文章
Miss Chen
2018年08月13日

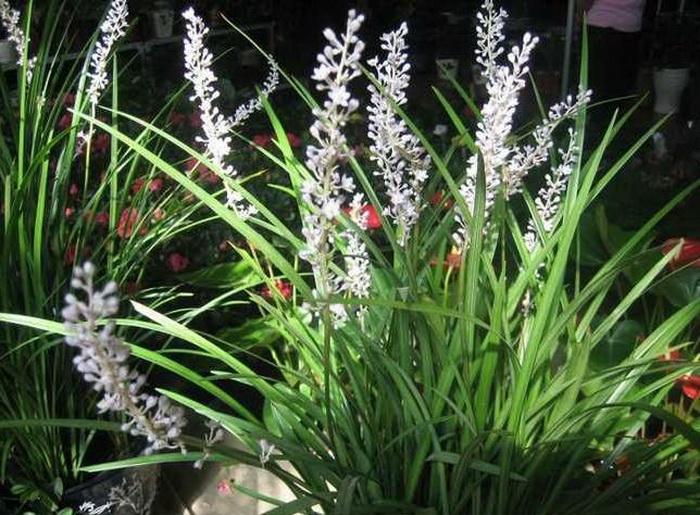
When the turfgrass lawns all around it lie exhausted and brown in the summer heat, the narrow, arching, green foliage of liriope (Liriope muscari) keeps its cool. Perennial liriope, also known as lilyturf, isn't grass. In mass plantings, however, it forms a lush ground cover, with the late-summer bonus of lavender flower spikes.

Although marketed as an evergreen that is perennial in U.S. Department of Agriculture plant hardiness zones 5 through 10, lilyturf may develop brown, withered foliage during winter in some areas. That is most likely to occur when temperatures drop below minus 10 degrees Fahrenheit.
Deep cold isn't lilyturf's only enemy. In all climates, the fungal disease anthracnose may leave the plant brown and tattered. Whether cold or disease is the problem, a well-timed trim is the solution.
Timing the Trim
The best time to trim lilyturf's damaged old foliage is anytime before its healthy new foliage emerges in spring. Otherwise, you'll shave the top of the fresh growth as well as the old growth. Fall trimming of anthracnose-blemished plants -- in warm-winter climates, at least -- keeps them looking good until spring.
Cutting back cold-damaged foliage can wait until anytime between January and April, depending on when the threat of subzero temperatures subsides in your area.
Choosing Your Method
Trim a large lilyturf planting with a lawn mower; for edgings or border-accent plants, hedge trimmers are easier to manage. Hedge trimmers are also better for cutting lilyturf with sprouting leaves because the tool can cut just above the new growth.
Making the Cuts
Before mowing lilyturf, adjust the mower blades to their highest setting.
Use the hedge trimmers like a giant pair of scissors. Kneeling, hold the trimmer grips firmly, and slide the blades into the foliage 3 to 4 inches above the crowns. As you cut, keep the blades horizontal and parallel to the ground. Otherwise, the trimmed plants will look uneven and spiky.

Although marketed as an evergreen that is perennial in U.S. Department of Agriculture plant hardiness zones 5 through 10, lilyturf may develop brown, withered foliage during winter in some areas. That is most likely to occur when temperatures drop below minus 10 degrees Fahrenheit.
Deep cold isn't lilyturf's only enemy. In all climates, the fungal disease anthracnose may leave the plant brown and tattered. Whether cold or disease is the problem, a well-timed trim is the solution.
Timing the Trim
The best time to trim lilyturf's damaged old foliage is anytime before its healthy new foliage emerges in spring. Otherwise, you'll shave the top of the fresh growth as well as the old growth. Fall trimming of anthracnose-blemished plants -- in warm-winter climates, at least -- keeps them looking good until spring.
Cutting back cold-damaged foliage can wait until anytime between January and April, depending on when the threat of subzero temperatures subsides in your area.
Choosing Your Method
Trim a large lilyturf planting with a lawn mower; for edgings or border-accent plants, hedge trimmers are easier to manage. Hedge trimmers are also better for cutting lilyturf with sprouting leaves because the tool can cut just above the new growth.

Making the Cuts
Before mowing lilyturf, adjust the mower blades to their highest setting.
Use the hedge trimmers like a giant pair of scissors. Kneeling, hold the trimmer grips firmly, and slide the blades into the foliage 3 to 4 inches above the crowns. As you cut, keep the blades horizontal and parallel to the ground. Otherwise, the trimmed plants will look uneven and spiky.
0
0
文章
Dummer. ゛☀
2017年09月24日

ACCORDING to the Gallup Gardening Survey, less than half of the country's home gardeners use any kind of fertilizer on their lawns or gardens. What's unfortunate about this statistic is that it means gardeners aren't getting as many flowers or as much produce as they should. And they're probably struggling with disease and insect problems that could be avoided.
Well-fed plants are healthier, more productive and more beautiful. This article covers the basics of why and how to fertilize your garden.

Plant Nutrients 101
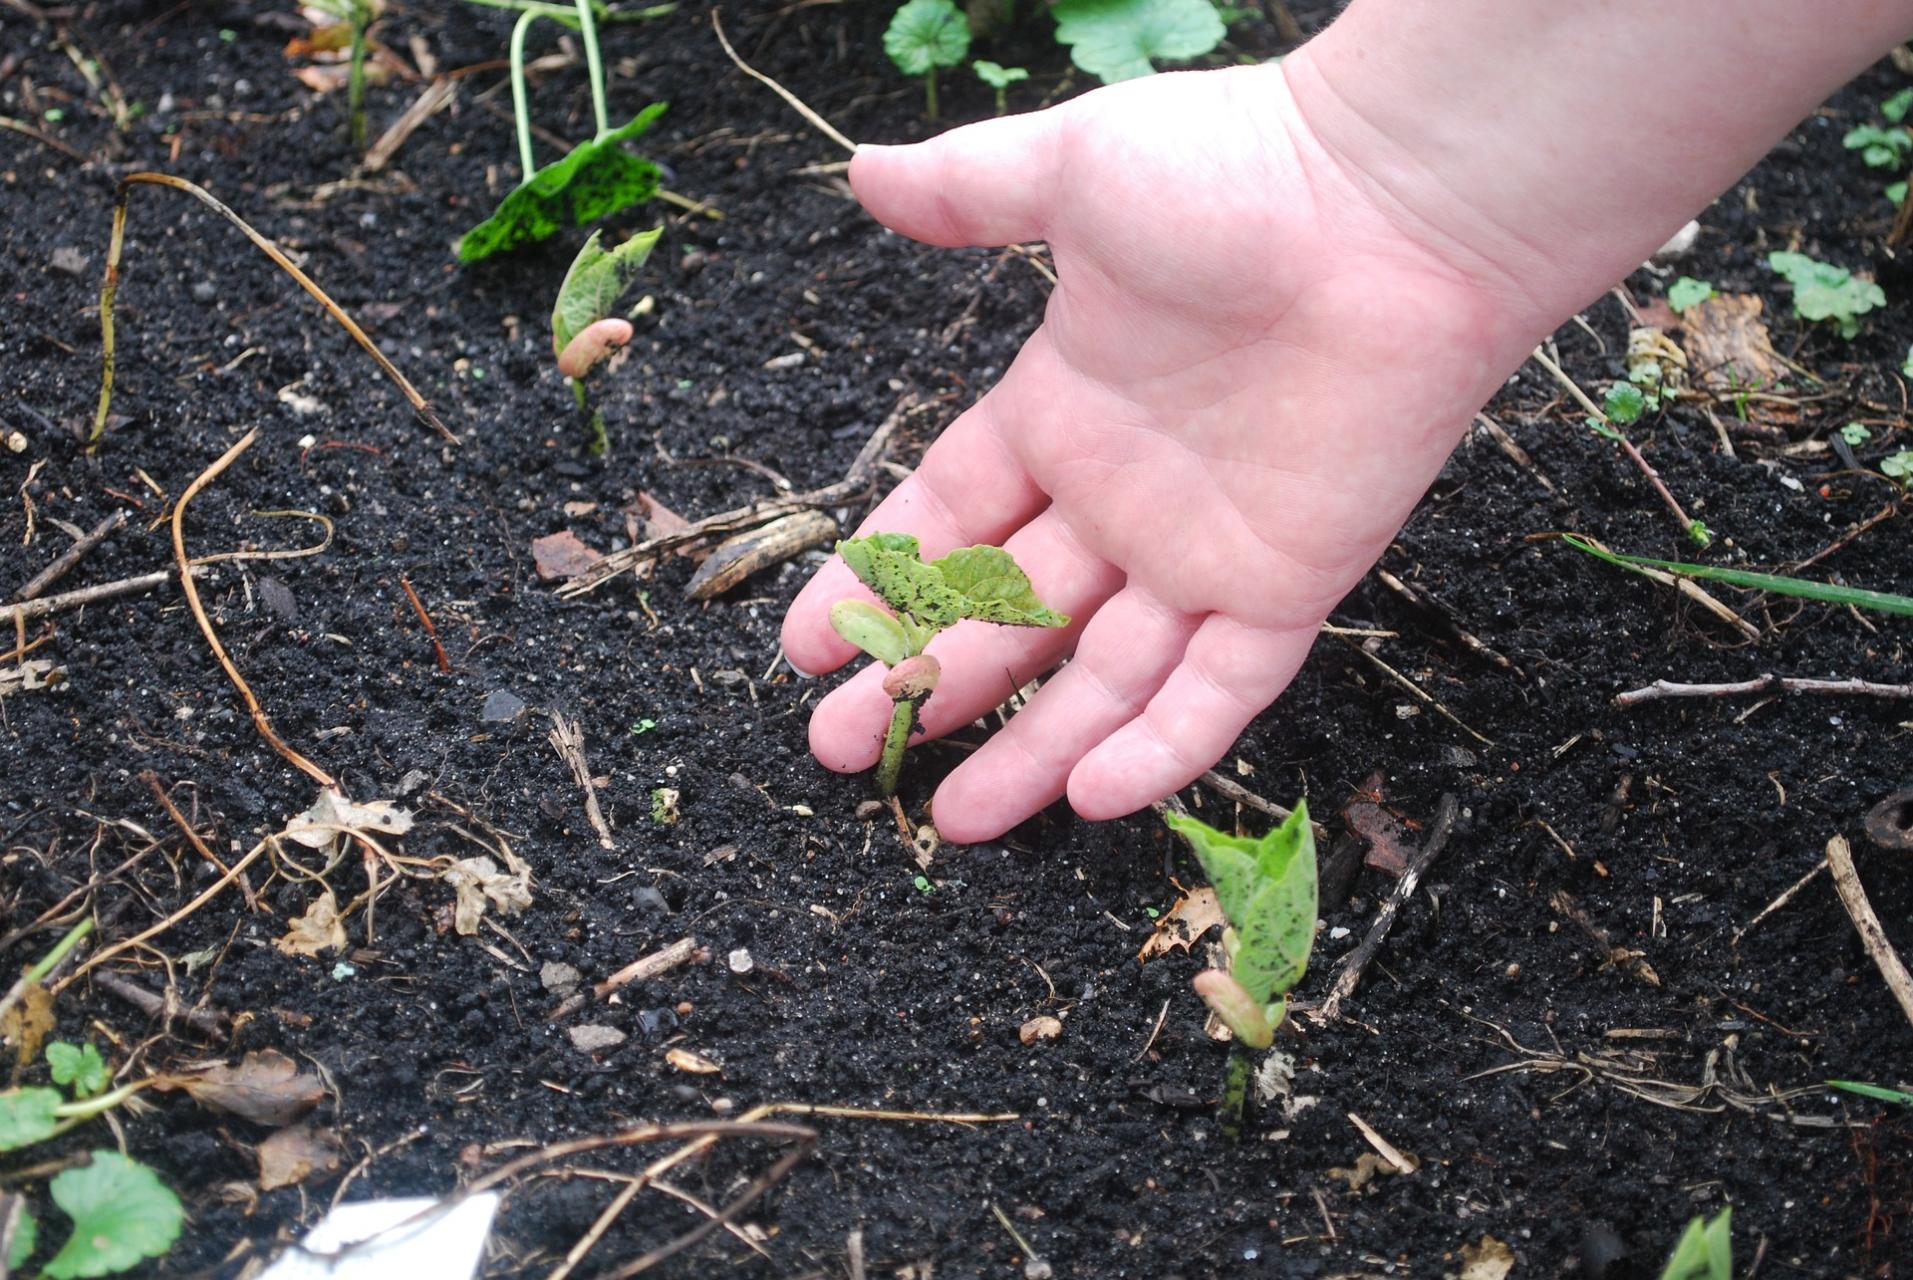
Plants need to be fertilized because most soil does not provide the essential nutrients required for optimum growth. Even if you are lucky enough to start with great garden soil, as your plants grow, they absorb nutrients and leave the soil less fertile. Remember those tasty tomatoes and beautiful roses you grew last year? It took nutrients from the soil to build those plant tissues. By fertilizing your garden, you replenish lost nutrients and ensure that this year's plants have the food they need to flourish.
There are six primary nutrients that plants require. Plants get the first three—carbon, hydrogen and oxygen—from air and water. The other three are nitrogen, phosphorus and potassium.
Nitrogen helps plants make the proteins they need to produce new tissues. In nature, nitrogen is often in short supply so plants have evolved to take up as much nitrogen as possible, even if it means not taking up other necessary elements. If too much nitrogen is available, the plant may grow abundant foliage but not produce fruit or flowers. Growth may actually be stunted because the plant isn't absorbing enough of the other elements it needs.
Phosphorus stimulates root growth, helps the plant set buds and flowers, improves vitality and increases seed size. It does this by helping transfer energy from one part of the plant to another. To absorb phosphorus, most plants require a soil pH of 6.5 to 6.8. Organic matter and the activity of soil organisms also increase the availability of phosphorus.
Potassium improves overall vigor of the plant. It helps the plants make carbohydrates and provides disease resistance. It also helps regulate metabolic activities.

There are three additional nutrients that plants need, but in much smaller amounts:
Calcium is used by plants in cell membranes, at their growing points and to neutralize toxic materials. In addition, calcium improves soil structure and helps bind organic and inorganic particles together.
Magnesium is the only metallic component of chlorophyll. Without it, plants can't process sunlight.
Sulfur is a component of many proteins.
Finally, there are eight elements that plants need in tiny amounts. These are called micronutrients and include boron, copper and iron. Healthy soil that is high in organic matter usually contains adequate amounts of each of these micronutrients.

Organic vs. Synthetic
Do plants really care where they get their nutrients? Yes, because organic and synthetic fertilizers provide nutrients in different ways. Organic fertilizers are made from naturally occurring mineral deposits and organic material, such as bone or plant meal or composted manure. Synthetic fertilizers are made by chemically processing raw materials.
In general, the nutrients in organic fertilizers are not water-soluble and are released to the plants slowly over a period of months or even years. For this reason, organic fertilizers are best applied in the fall so the nutrients will be available in the spring. These organic fertilizers stimulate beneficial soil microorganisms and improve the structure of the soil. Soil microbes play an important role in converting organic fertilizers into soluble nutrients that can be absorbed by your plants. In most cases, organic fertilizers and compost will provide all the secondary and micronutrients your plants need.
Synthetic fertilizers are water-soluble and can be taken up by the plant almost immediately. In fact applying too much synthetic fertilizer can "burn" foliage and damage your plants. Synthetic fertilizers give plants a quick boost but do little to improve soil texture, stimulate soil life, or improve your soil's long-term fertility. Because synthetic fertilizers are highly water-soluble, they can also leach out into streams and ponds. Synthetic fertilizers do have some advantages in early spring. Because they are water-soluble, they are available to plants even when the soil is still cold and soil microbes are inactive. For this reason, some organically-based fertilizers, such as PHC All-Purpose Fertilizer, also contain small amounts of synthetic fertilizers to ensure the availability of nutrients.
For the long-term health of your garden, feeding your plants by building the soil with organic fertilizers and compost is best. This will give you soil that is rich in organic matter and teeming with microbial life.
Foliar Feeding?
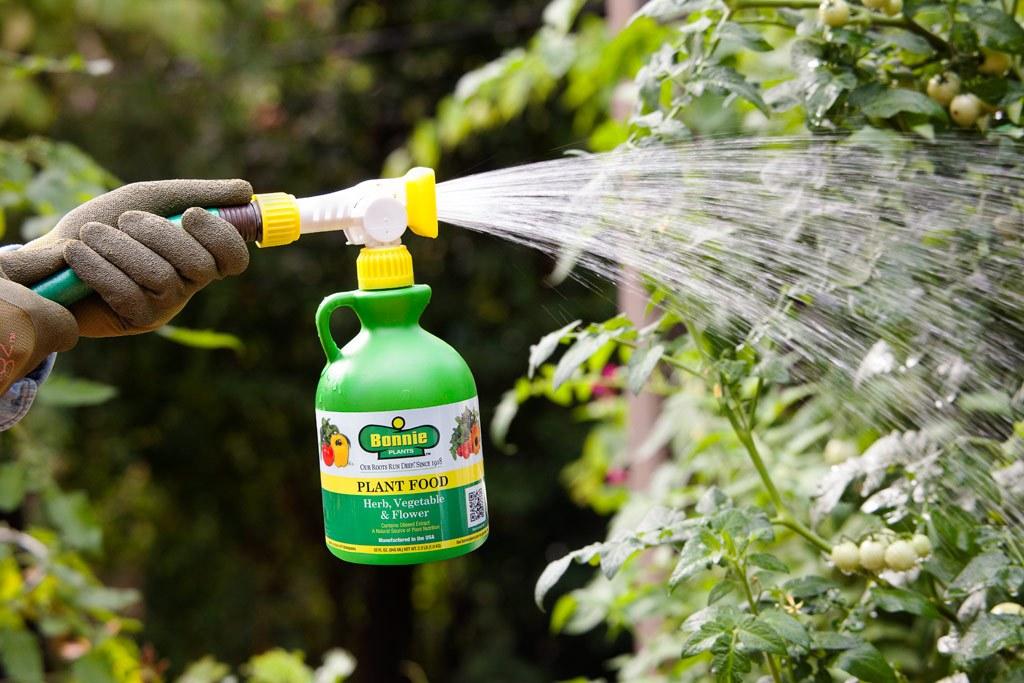
Plants can absorb nutrients eight to 20 times more efficiently through their leaf surfaces than through their roots. As a result, spraying foliage with liquid nutrients can produce remarkable yields. For best results, spray plants during their critical growth stages such as transplanting time, blooming time and just after fruit sets.
What About pH?
Even if proper nutrients are present in the soil, some nutrients cannot be absorbed by plants if the soil pH is too high or too low. For most plants, soil pH should be between 6.0 and 7.0. A soil test will measure the pH of your soil. You can send a sample to a lab (contact your local extension service for a low-cost kit) or buy a home kit and do it yourself. Lime or wood ash can be used to raise pH; sulfur or aluminum sulfate can lower pH. Keep in mind that it's best to raise or lower soil pH slowly over the course of a year or two. Dramatic adjustments can result in the opposite extreme, which may be worse than what you started with. Once again, a helpful solution is to apply compost. Compost moderates soil pH and is one of the best ways to maintain the 6.5 ideal.
How to Choose a Fertilizer
In most cases, an all-purpose, 5-5-5 fertilizer will provide the nutrients all plants need for healthy growth. If a soil test reveals certain nutrient deficiencies, or if you want to tailor your fertilizer to the needs of particular plants (tomatoes vs. flowers), you can select a special formulation. What you choose will depend on your soil and what you are growing.
The three numbers that you see on a fertilizer label, such as 5-5-5, tell you what proportion of each macronutrient the fertilizer contains. The first number is always nitrogen (N), the second is phosphorus (P) and the third is potassium (K). This "N-P-K" ratio reflects the available nutrients —by weight—contained in that fertilizer. For example, if a 100-pound bag of fertilizer has an N-P-K ratio of 5-7-4, it contains 5 pounds of nitrate, 7 pounds of phosphate (which contains phosphorus), 4 pounds of potash (which contains potassium) and 84 pounds of filler.
Note that the N-P-K ratio of organic fertilizers is typically lower than that of a synthetic fertilizer. This is because by law, the ratio can only express nutrients that are immediately available. Most organic fertilizers contain slow-release nutrients that will become available over time. They also contain many trace elements that might not be supplied by synthetic fertilizers.
Fertilizers offered by Gardener's Supply are either all-organic, or contain primarily organic materials. To build the long-term health and fertility of your soil, we recommend using granular organic fertilizers. Supplementing with a water-soluble fertilizer ensures that your plants have the nutrients they need when they're in active growth
Well-fed plants are healthier, more productive and more beautiful. This article covers the basics of why and how to fertilize your garden.

Plant Nutrients 101
Plants need to be fertilized because most soil does not provide the essential nutrients required for optimum growth. Even if you are lucky enough to start with great garden soil, as your plants grow, they absorb nutrients and leave the soil less fertile. Remember those tasty tomatoes and beautiful roses you grew last year? It took nutrients from the soil to build those plant tissues. By fertilizing your garden, you replenish lost nutrients and ensure that this year's plants have the food they need to flourish.
There are six primary nutrients that plants require. Plants get the first three—carbon, hydrogen and oxygen—from air and water. The other three are nitrogen, phosphorus and potassium.
Nitrogen helps plants make the proteins they need to produce new tissues. In nature, nitrogen is often in short supply so plants have evolved to take up as much nitrogen as possible, even if it means not taking up other necessary elements. If too much nitrogen is available, the plant may grow abundant foliage but not produce fruit or flowers. Growth may actually be stunted because the plant isn't absorbing enough of the other elements it needs.
Phosphorus stimulates root growth, helps the plant set buds and flowers, improves vitality and increases seed size. It does this by helping transfer energy from one part of the plant to another. To absorb phosphorus, most plants require a soil pH of 6.5 to 6.8. Organic matter and the activity of soil organisms also increase the availability of phosphorus.
Potassium improves overall vigor of the plant. It helps the plants make carbohydrates and provides disease resistance. It also helps regulate metabolic activities.

There are three additional nutrients that plants need, but in much smaller amounts:
Calcium is used by plants in cell membranes, at their growing points and to neutralize toxic materials. In addition, calcium improves soil structure and helps bind organic and inorganic particles together.
Magnesium is the only metallic component of chlorophyll. Without it, plants can't process sunlight.
Sulfur is a component of many proteins.
Finally, there are eight elements that plants need in tiny amounts. These are called micronutrients and include boron, copper and iron. Healthy soil that is high in organic matter usually contains adequate amounts of each of these micronutrients.

Organic vs. Synthetic
Do plants really care where they get their nutrients? Yes, because organic and synthetic fertilizers provide nutrients in different ways. Organic fertilizers are made from naturally occurring mineral deposits and organic material, such as bone or plant meal or composted manure. Synthetic fertilizers are made by chemically processing raw materials.
In general, the nutrients in organic fertilizers are not water-soluble and are released to the plants slowly over a period of months or even years. For this reason, organic fertilizers are best applied in the fall so the nutrients will be available in the spring. These organic fertilizers stimulate beneficial soil microorganisms and improve the structure of the soil. Soil microbes play an important role in converting organic fertilizers into soluble nutrients that can be absorbed by your plants. In most cases, organic fertilizers and compost will provide all the secondary and micronutrients your plants need.
Synthetic fertilizers are water-soluble and can be taken up by the plant almost immediately. In fact applying too much synthetic fertilizer can "burn" foliage and damage your plants. Synthetic fertilizers give plants a quick boost but do little to improve soil texture, stimulate soil life, or improve your soil's long-term fertility. Because synthetic fertilizers are highly water-soluble, they can also leach out into streams and ponds. Synthetic fertilizers do have some advantages in early spring. Because they are water-soluble, they are available to plants even when the soil is still cold and soil microbes are inactive. For this reason, some organically-based fertilizers, such as PHC All-Purpose Fertilizer, also contain small amounts of synthetic fertilizers to ensure the availability of nutrients.
For the long-term health of your garden, feeding your plants by building the soil with organic fertilizers and compost is best. This will give you soil that is rich in organic matter and teeming with microbial life.

Foliar Feeding?
Plants can absorb nutrients eight to 20 times more efficiently through their leaf surfaces than through their roots. As a result, spraying foliage with liquid nutrients can produce remarkable yields. For best results, spray plants during their critical growth stages such as transplanting time, blooming time and just after fruit sets.

What About pH?
Even if proper nutrients are present in the soil, some nutrients cannot be absorbed by plants if the soil pH is too high or too low. For most plants, soil pH should be between 6.0 and 7.0. A soil test will measure the pH of your soil. You can send a sample to a lab (contact your local extension service for a low-cost kit) or buy a home kit and do it yourself. Lime or wood ash can be used to raise pH; sulfur or aluminum sulfate can lower pH. Keep in mind that it's best to raise or lower soil pH slowly over the course of a year or two. Dramatic adjustments can result in the opposite extreme, which may be worse than what you started with. Once again, a helpful solution is to apply compost. Compost moderates soil pH and is one of the best ways to maintain the 6.5 ideal.

How to Choose a Fertilizer
In most cases, an all-purpose, 5-5-5 fertilizer will provide the nutrients all plants need for healthy growth. If a soil test reveals certain nutrient deficiencies, or if you want to tailor your fertilizer to the needs of particular plants (tomatoes vs. flowers), you can select a special formulation. What you choose will depend on your soil and what you are growing.
The three numbers that you see on a fertilizer label, such as 5-5-5, tell you what proportion of each macronutrient the fertilizer contains. The first number is always nitrogen (N), the second is phosphorus (P) and the third is potassium (K). This "N-P-K" ratio reflects the available nutrients —by weight—contained in that fertilizer. For example, if a 100-pound bag of fertilizer has an N-P-K ratio of 5-7-4, it contains 5 pounds of nitrate, 7 pounds of phosphate (which contains phosphorus), 4 pounds of potash (which contains potassium) and 84 pounds of filler.
Note that the N-P-K ratio of organic fertilizers is typically lower than that of a synthetic fertilizer. This is because by law, the ratio can only express nutrients that are immediately available. Most organic fertilizers contain slow-release nutrients that will become available over time. They also contain many trace elements that might not be supplied by synthetic fertilizers.
Fertilizers offered by Gardener's Supply are either all-organic, or contain primarily organic materials. To build the long-term health and fertility of your soil, we recommend using granular organic fertilizers. Supplementing with a water-soluble fertilizer ensures that your plants have the nutrients they need when they're in active growth
0
0
文章
Dummer. ゛☀
2017年09月17日

The principal perennial grassy weeds in lawns include Bermudagrass (Cynodon dactylon), nimblewill (Muhlenbergia schreberi), quackgrass (Elymus repens), wild fescue (Festuca pratensis), and in certain cases, zoysiagrass (Zoysia spp.). Each of these grasses, except wild fescue, is characterized by a vigorous, invasive growth habit under usual horticultural practices. They are especially troublesome in turf, because, unlike their common broadleaf counterparts, selective herbicides for their control are unknown.

Integrated Pest Management Strategies
1. Dig or pull plants. This method can be effective for controlling invading, perennial grassy weeds in beds and other non-lawn spaces. Constant vigilance is required because remaining root fragments and other plant parts will usually sprout, leading to renewed infestation. This technique cannot be recommended for use in turf except on a very limited basis. The usual practices of maintaining healthy, vigorous lawns comprised of cool-season grasses will not exclude invasion by nimblewill, Bermudagrass, or zoysiagrass from infested adjoining plots.

2. Use herbicides. Perennial grassy weeds can usually be controlled only by the application of non-selective, general purpose herbicides, e.g., glyphosate (Roundup, Kleenup) or glyfosinate. Small patches of these weeds in turf may be controlled by spot spraying. Of course, all vegetation will be killed, so the spotted turf must be repaired by proper soil preparation and overseeding with desirable species. Heavily infested, larger areas will probably require broadcast spraying of entire areas as a first step in lawn renovation. Whenever possible, this exercise should be carried out in late summer or early fall. Carefully directed sprays of non-selective herbicides have proven useful for controlling heavy infestation of perennial, grassy weeds in beds or other relatively open spaces. Desirable plants must be protected by adequate shielding to prevent contact with the herbicides during application. Although somewhat tedious, these materials may also be applied by carefully painting them on the weedy plants' surfaces.

3. Use all herbicides according to label instructions. Equipment must be cleaned and should not be used for applications other than herbicides.

Integrated Pest Management Strategies
1. Dig or pull plants. This method can be effective for controlling invading, perennial grassy weeds in beds and other non-lawn spaces. Constant vigilance is required because remaining root fragments and other plant parts will usually sprout, leading to renewed infestation. This technique cannot be recommended for use in turf except on a very limited basis. The usual practices of maintaining healthy, vigorous lawns comprised of cool-season grasses will not exclude invasion by nimblewill, Bermudagrass, or zoysiagrass from infested adjoining plots.

2. Use herbicides. Perennial grassy weeds can usually be controlled only by the application of non-selective, general purpose herbicides, e.g., glyphosate (Roundup, Kleenup) or glyfosinate. Small patches of these weeds in turf may be controlled by spot spraying. Of course, all vegetation will be killed, so the spotted turf must be repaired by proper soil preparation and overseeding with desirable species. Heavily infested, larger areas will probably require broadcast spraying of entire areas as a first step in lawn renovation. Whenever possible, this exercise should be carried out in late summer or early fall. Carefully directed sprays of non-selective herbicides have proven useful for controlling heavy infestation of perennial, grassy weeds in beds or other relatively open spaces. Desirable plants must be protected by adequate shielding to prevent contact with the herbicides during application. Although somewhat tedious, these materials may also be applied by carefully painting them on the weedy plants' surfaces.

3. Use all herbicides according to label instructions. Equipment must be cleaned and should not be used for applications other than herbicides.
0
0
文章
Dummer. ゛☀
2017年09月17日

Some of the most common perennial broadleaf weeds in Missouri lawns include bindweed, chicory, creeping bellflower, dandelion, ground ivy, mouseear chickweed, plantain, thistle, violets, and white clover. They differ from annual weeds in that they continue to grow year after year and once established, they are not affected by preemergent herbicides.

Integrated Pest Management Strategies
1. Hand dig or spot treat. If only a few weeds are present, hand dig the weeds with a forked tool to cut the root off well below ground level. You can also spot treat using glyphosate (Roundup, Kleenup) or the chemicals listed below. Since glyphosate (Roundup, Kleenup) is NOT selective, it will also kill any grass you get it on so apply very carefully. This method works best with weeds such as thistle or large plantain plants. The herbicide can also be brushed on individual weeds, avoiding the grass. NOTE: 2,4-D products listed below used according to label directions will not damage grass caught in the overspray.
2. Use chemical herbicides. When problem areas are too large for spot treating, hose-end products are the easiest for homeowners to use. Garden centers and hardware stores carry many different brands that contain various combinations of 2,4- D, MCPA, MCPP, and dicamba, weed killers that control broadleaf weeds. First establish the identity of the weeds, then check product labels to determine which herbicide best controls the weeds you have. Then, be sure and follow label directions. Some weeds may require more than one application. Perennial weeds are best killed when they are actively growing, which is usually in spring and fall. Herbicides applied in the summer are usually less effective.
3. Shade out the weeds. Areas of weeds can also be killed by covering the affected areas with black plastic, felt paper, boards, or cardboard until the weeds are dead. This will kill all plants that are shaded, including both desirable and undesirable perennial grasses. This may take several weeks. The killed areas will need to be tilled and reseeded or sodded at a later date.

0
0
文章
Dummer. ゛☀
2017年09月17日

Mushrooms growing in lawns are common occurrences especially during rainy weather. They live off decaying organic matter in the soil, often decaying tree roots, and are not harmful to the lawn. They will naturally disappear as they age or they may be collected and composted, knocked down with a rake or hoe, or mowed over with your lawnmower. Mushrooms should never be collected and eaten unless you are expert in their identification. To the novice gardener, many poisonous mushrooms can look very similar to edible ones. Don’t take a chance.
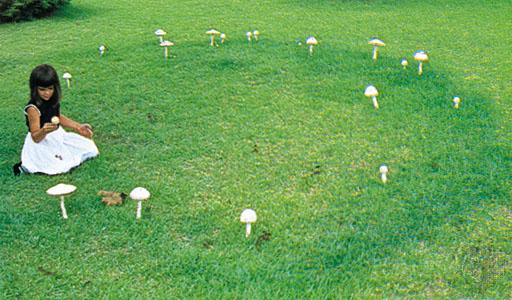
Mushrooms that develop in a ring in the lawn are called fairy rings. They will be the focus of the remainder of this sheet.
Fairy rings are caused by many different soilinhabiting fungi of the class Basidiomycetes. These fungi can cause the development of rings or arcs of deep green grass as well as unthrifty or dead grass.
Fairy ring fungi do not attack grass directly, but break down organic matter in the soil. As a result, nitrogen is released which the grass uses, causing it to grow and develop a contrasting green ring. In cases where the mycelia of the fungus get very dense and inhibit water movement into the soil, grass in the arc may turn brown. Mycelia may also deplete soil nutrients and produce toxic levels of hydrogen cyanide. The mushrooms that appear after rainfall are the fruiting bodies of the fungus.
The organic matter fairy rings break down is often old tree stumps, roots, logs, lumber, and other larger pieces of organic material in the soil below the lawn. Once this material is depleted, the fairy ring will disappear. This may take considerable time. Several fairy rings may appear relatively close together, especially on lawns that exist on sites that were previously wooded areas. When this occurs, it becomes noticeable that fairy rings do not cross each other, as fungal activity ceases when fungi from different rings contact each other.
Symptoms and Diagnosis
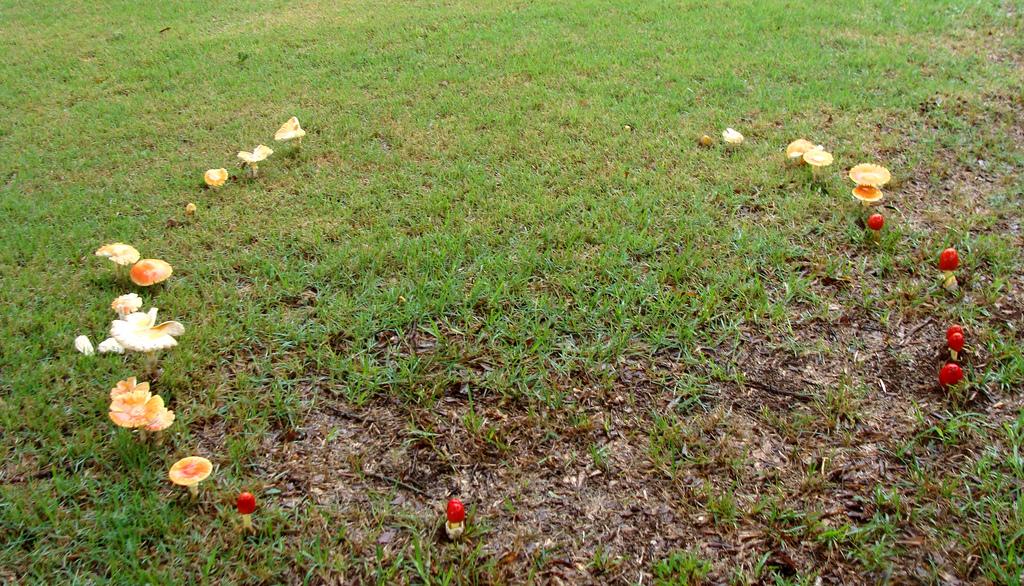
Dark green circles, arcs, or rings of thick, fastgrowing grass develop anytime from green-up in the spring (most common) until the first hard frost in the fall. These rings are most commonly between 2 and 15 feet in diameter, although they may be larger or smaller. Mushrooms or puffballs may appear under wet conditions in the same ring pattern. In some cases, a ring of brown or dead grass may appear.
Life Cycle
Approximately 50 species of fungi are known to form fairy rings in turf, with Marasmius oreades, Agaricus campestris, Lycoperdon spp., and Scleroderma spp. being the most common. These fungi decompose organic debris in the soil and thatch.
Fairy ring starts from a piece of mycelium or spore at a single point feeding in the thatch layer or on soil organic matter. The uniform outward growth of the fungus results in the development of rings.
Under certain conditions, and with certain fairy ring fungi, a ring of dead grass develops. Some of the responsible fungi have been shown to penetrate and kill root cells resulting in dead rings of grass. In addition, the mycelia of some fairy ring fungi are reported to be hydrophobic, creating a waterimpervious layer resulting in drought-stress problems for the grass. Once the soil under this mycelial layer becomes dry, it is very difficult to wet, and the roots of the grass plant die.

Integrated Pest Management Strategies
1. Fertilizer. Use of a nitrogen fertilizer can mask the symptoms of fairy ring by causing the rest of the lawn to green up. Using a soil needle (deep root feeder) to aerate and irrigate dead and dying rings is recommended.
2. Removal. Fairy ring development can be traced to buried organic debris. Undecomposed tree roots, wood scraps from construction projects, and other organic debris are commonly colonized by the fairy ring fungi and should be removed before establishing a new lawn. Use clean, ring-free sod for a new or renovated lawn.
Destroying existing turf may be required in persistent cases. Discard or kill a strip of sod 1 to 2 feet wide on each side of the zone of lush turf with a non-selective herbicide. Cultivate the area repeatedly to thoroughly mix the ring and nonring soil. Eliminate dry spots by soaking the cultivated area with water. Reseed or install clean, ring-free sod.
3. Thatch. Eliminate thatch buildup with a dethatching program.
4. Fungicides. Some fungicides are available for suppression of fairy ring, however, they may be only temporary as the decaying material may still be present.
Organic Strategies
Strategies 2 and 3 are strictly organic approaches. Using an appropriate organic fertilizer would be a viable organic approach to Strategy 1.
Mushrooms that develop in a ring in the lawn are called fairy rings. They will be the focus of the remainder of this sheet.
Fairy rings are caused by many different soilinhabiting fungi of the class Basidiomycetes. These fungi can cause the development of rings or arcs of deep green grass as well as unthrifty or dead grass.
Fairy ring fungi do not attack grass directly, but break down organic matter in the soil. As a result, nitrogen is released which the grass uses, causing it to grow and develop a contrasting green ring. In cases where the mycelia of the fungus get very dense and inhibit water movement into the soil, grass in the arc may turn brown. Mycelia may also deplete soil nutrients and produce toxic levels of hydrogen cyanide. The mushrooms that appear after rainfall are the fruiting bodies of the fungus.
The organic matter fairy rings break down is often old tree stumps, roots, logs, lumber, and other larger pieces of organic material in the soil below the lawn. Once this material is depleted, the fairy ring will disappear. This may take considerable time. Several fairy rings may appear relatively close together, especially on lawns that exist on sites that were previously wooded areas. When this occurs, it becomes noticeable that fairy rings do not cross each other, as fungal activity ceases when fungi from different rings contact each other.

Symptoms and Diagnosis
Dark green circles, arcs, or rings of thick, fastgrowing grass develop anytime from green-up in the spring (most common) until the first hard frost in the fall. These rings are most commonly between 2 and 15 feet in diameter, although they may be larger or smaller. Mushrooms or puffballs may appear under wet conditions in the same ring pattern. In some cases, a ring of brown or dead grass may appear.

Life Cycle
Approximately 50 species of fungi are known to form fairy rings in turf, with Marasmius oreades, Agaricus campestris, Lycoperdon spp., and Scleroderma spp. being the most common. These fungi decompose organic debris in the soil and thatch.
Fairy ring starts from a piece of mycelium or spore at a single point feeding in the thatch layer or on soil organic matter. The uniform outward growth of the fungus results in the development of rings.
Under certain conditions, and with certain fairy ring fungi, a ring of dead grass develops. Some of the responsible fungi have been shown to penetrate and kill root cells resulting in dead rings of grass. In addition, the mycelia of some fairy ring fungi are reported to be hydrophobic, creating a waterimpervious layer resulting in drought-stress problems for the grass. Once the soil under this mycelial layer becomes dry, it is very difficult to wet, and the roots of the grass plant die.

Integrated Pest Management Strategies
1. Fertilizer. Use of a nitrogen fertilizer can mask the symptoms of fairy ring by causing the rest of the lawn to green up. Using a soil needle (deep root feeder) to aerate and irrigate dead and dying rings is recommended.
2. Removal. Fairy ring development can be traced to buried organic debris. Undecomposed tree roots, wood scraps from construction projects, and other organic debris are commonly colonized by the fairy ring fungi and should be removed before establishing a new lawn. Use clean, ring-free sod for a new or renovated lawn.
Destroying existing turf may be required in persistent cases. Discard or kill a strip of sod 1 to 2 feet wide on each side of the zone of lush turf with a non-selective herbicide. Cultivate the area repeatedly to thoroughly mix the ring and nonring soil. Eliminate dry spots by soaking the cultivated area with water. Reseed or install clean, ring-free sod.
3. Thatch. Eliminate thatch buildup with a dethatching program.
4. Fungicides. Some fungicides are available for suppression of fairy ring, however, they may be only temporary as the decaying material may still be present.
Organic Strategies
Strategies 2 and 3 are strictly organic approaches. Using an appropriate organic fertilizer would be a viable organic approach to Strategy 1.
0
0
文章
Dummer. ゛☀
2017年09月15日

Wilting plants and yellow/brown patches on lawns.
Plants affected
Leatherjackets mainly attack grass roots. They will also feed on cereal crops and burrow into potato tubers.
About Leatherjackets
Leatherjackets are the larval stage of crane flies.
Crane flies, also known as daddy-long-legs, have long thin legs, one pair of wings and a small thin body around 2.5cm long.
Males and females can be identified by comparing the tip of their abdomens: males - are blunt whilst females - are pointed.
Adults are commonly seen flying from late August to October.
Since adults do not feed they cause no plant damage.
Mating and egg laying takes place within 24 hours of adults emerging.
Females lay their eggs by 'hopping' on the soil surface. Each time they land they insert their pointed abdomen into the soil and deposit an egg.
The larvae emerge as small brown grubs. They will begin feeding on root structures of grasses.
During the day the larvae remain under the soil, but on wet nights may appear above the surface and feed on plant stems.
Larvae overwinter in the soil until spring, when they begin feeding again.
There are four stages of larval development.
When they reach full size larvae they can be up to 4cm in length.
They pupate in August.
The pupae have rows of spines along their sides which enable them to move up and down within the soil during wet and dry periods.
Treatment
Organic
Regular and thorough observation of lawns and plants is essential when wishing to control leatherjackets organically.
Remove by covering small areas of lawn with black polythene overnight after heavy rain or irrigation. The grubs will come up onto the grass and can be removed in the morning.
Natural enemies can be released onto the affected plants.
The parasitic nematode Steinernema feltiae can be watered into the ground around affected areas. These parasites infect the grubs with bacteria to kill them.
Compacting the soil using a heavy roller will make it harder for the grubs to move through it.
Prevention
Regularly check lawns and plants for signs of leatherjacket infestation and deal with them as soon as they appear.
Encourage insect-eating birds by hanging feeders in the winter months and nest boxes in the spring.
Plants affected
Leatherjackets mainly attack grass roots. They will also feed on cereal crops and burrow into potato tubers.

About Leatherjackets
Leatherjackets are the larval stage of crane flies.
Crane flies, also known as daddy-long-legs, have long thin legs, one pair of wings and a small thin body around 2.5cm long.
Males and females can be identified by comparing the tip of their abdomens: males - are blunt whilst females - are pointed.
Adults are commonly seen flying from late August to October.
Since adults do not feed they cause no plant damage.
Mating and egg laying takes place within 24 hours of adults emerging.
Females lay their eggs by 'hopping' on the soil surface. Each time they land they insert their pointed abdomen into the soil and deposit an egg.
The larvae emerge as small brown grubs. They will begin feeding on root structures of grasses.

During the day the larvae remain under the soil, but on wet nights may appear above the surface and feed on plant stems.
Larvae overwinter in the soil until spring, when they begin feeding again.
There are four stages of larval development.
When they reach full size larvae they can be up to 4cm in length.
They pupate in August.
The pupae have rows of spines along their sides which enable them to move up and down within the soil during wet and dry periods.
Treatment
Organic
Regular and thorough observation of lawns and plants is essential when wishing to control leatherjackets organically.

Remove by covering small areas of lawn with black polythene overnight after heavy rain or irrigation. The grubs will come up onto the grass and can be removed in the morning.
Natural enemies can be released onto the affected plants.
The parasitic nematode Steinernema feltiae can be watered into the ground around affected areas. These parasites infect the grubs with bacteria to kill them.
Compacting the soil using a heavy roller will make it harder for the grubs to move through it.

Prevention
Regularly check lawns and plants for signs of leatherjacket infestation and deal with them as soon as they appear.
Encourage insect-eating birds by hanging feeders in the winter months and nest boxes in the spring.
0
0
文章
Dummer. ゛☀
2017年09月15日

Yellow/ brown patches on lawns. Wilting plants and damaged leaves on garden shrubs, vegetables and immature trees.
Plants affected
Chafer larvae attack the roots of lawns and some ornamental plants, fruit and vegetables, while adult chafers feed on the leaves of a range of different shrubs, plants and immature deciduous trees. However the adults rarely cause much damage.
About Chafer grubs
Adult chafers range in size, the biggest at 30mm in length being the Cockchafer, and the smallest the Welsh chafer at 11mm.
The adult chafers are mainly reddish brown in colour with distinctive large antennae.
Chafers have strong, hard cases that protect their delicate wings, when in flight these cases make a distinctive whirring sound.
The creamy, white larvae or grubs are often found curled up just below the soil surface, feeding especially on roots, mainly in August and September.
Larvae have distinctive grey ends to their abdomens, and brown heads.
Some species remain as larvae for up to three years.
Plant damage is mostly caused by the larvae although the adults can also seriously damage the upper parts of the plants.
Chafers overwinter below ground as pupae and the adults emerge in spring.
Adults often return to the same location to lay their eggs over a two week period during early summer.
Chafer predators such as foxes, badgers, rooks, crows, jays and magpies often damage lawns and community greens searching for grubs.
Treatment
Organic
Try natural pest controls, such as the parasitic nematode, Heterorhabditis megidis.
Where possible eradicate the larval stages by lifting sections of turf and disposing of the larvae.
Encourage birds that prey on the beetles and their larvae.
Use barrier methods such as fleece, to keep adults away from plants at risk.
Prevention
Check regularly for signs of chafer infestation and quickly deal with them.
Scarify and aerate lawns in autumn.
Where lawns have a history of infestation try to compress the turf by rolling it heavily during spring.

Plants affected
Chafer larvae attack the roots of lawns and some ornamental plants, fruit and vegetables, while adult chafers feed on the leaves of a range of different shrubs, plants and immature deciduous trees. However the adults rarely cause much damage.
About Chafer grubs
Adult chafers range in size, the biggest at 30mm in length being the Cockchafer, and the smallest the Welsh chafer at 11mm.
The adult chafers are mainly reddish brown in colour with distinctive large antennae.

Chafers have strong, hard cases that protect their delicate wings, when in flight these cases make a distinctive whirring sound.
The creamy, white larvae or grubs are often found curled up just below the soil surface, feeding especially on roots, mainly in August and September.
Larvae have distinctive grey ends to their abdomens, and brown heads.
Some species remain as larvae for up to three years.
Plant damage is mostly caused by the larvae although the adults can also seriously damage the upper parts of the plants.
Chafers overwinter below ground as pupae and the adults emerge in spring.
Adults often return to the same location to lay their eggs over a two week period during early summer.
Chafer predators such as foxes, badgers, rooks, crows, jays and magpies often damage lawns and community greens searching for grubs.

Treatment
Organic
Try natural pest controls, such as the parasitic nematode, Heterorhabditis megidis.
Where possible eradicate the larval stages by lifting sections of turf and disposing of the larvae.
Encourage birds that prey on the beetles and their larvae.
Use barrier methods such as fleece, to keep adults away from plants at risk.

Prevention
Check regularly for signs of chafer infestation and quickly deal with them.
Scarify and aerate lawns in autumn.
Where lawns have a history of infestation try to compress the turf by rolling it heavily during spring.
0
0
文章
Dummer. ゛☀
2017年09月15日

Look for
Small piles of earth around holes in soil, lawns, paths, and at the base of exterior walls. Adults may be in the house around fresh and stored food, and on sap-sucking pest-infested plants. Large swarms of flying ants appear in late summer.
Plants affected
Garden ants rarely cause damage to plants. However, they feed on sugary foods, oily seeds, honeydew from aphid-infected plants, and other small insects. Heaps of earth around the nest entrance can be a nuisance in the lawn where they interfere with mowing, and they can also partly bury low-growing plants.
About Garden ants
There are two main species of garden ants, the red ant Myrmica rubra and the black ant, Lasius niger.
Queen ants fly in from neighbouring gardens all the time but are killed by ants from existing nests. Killing a queen and her nest simply makes space for another. For this reason it is best to focus on controlling only those nests that are causing real problems.
Adult worker ants are all female, wingless, and around 5mm in length.
Queens are significantly longer and fatter.
Larvae are white legless grubs roughly 5mm long.
Each colony can vary in size from as small as 500 individuals to many thousands.
After over-wintering, females emerge in spring and lay eggs.
The first brood will be fed by the queen for three to four weeks before pupating in the soil.
Adult workers emerge after two weeks to maintain the nest and feed the queen and subsequent larvae.
When adults find a food source they leave a trail of chemicals known as pheromones back to the nest for others to follow.
Towards the end of summer winged males and females are produced.
Between August and September mating takes place during flight.
After mating, male adults die and females shed their wings and return to the soil to overwinter.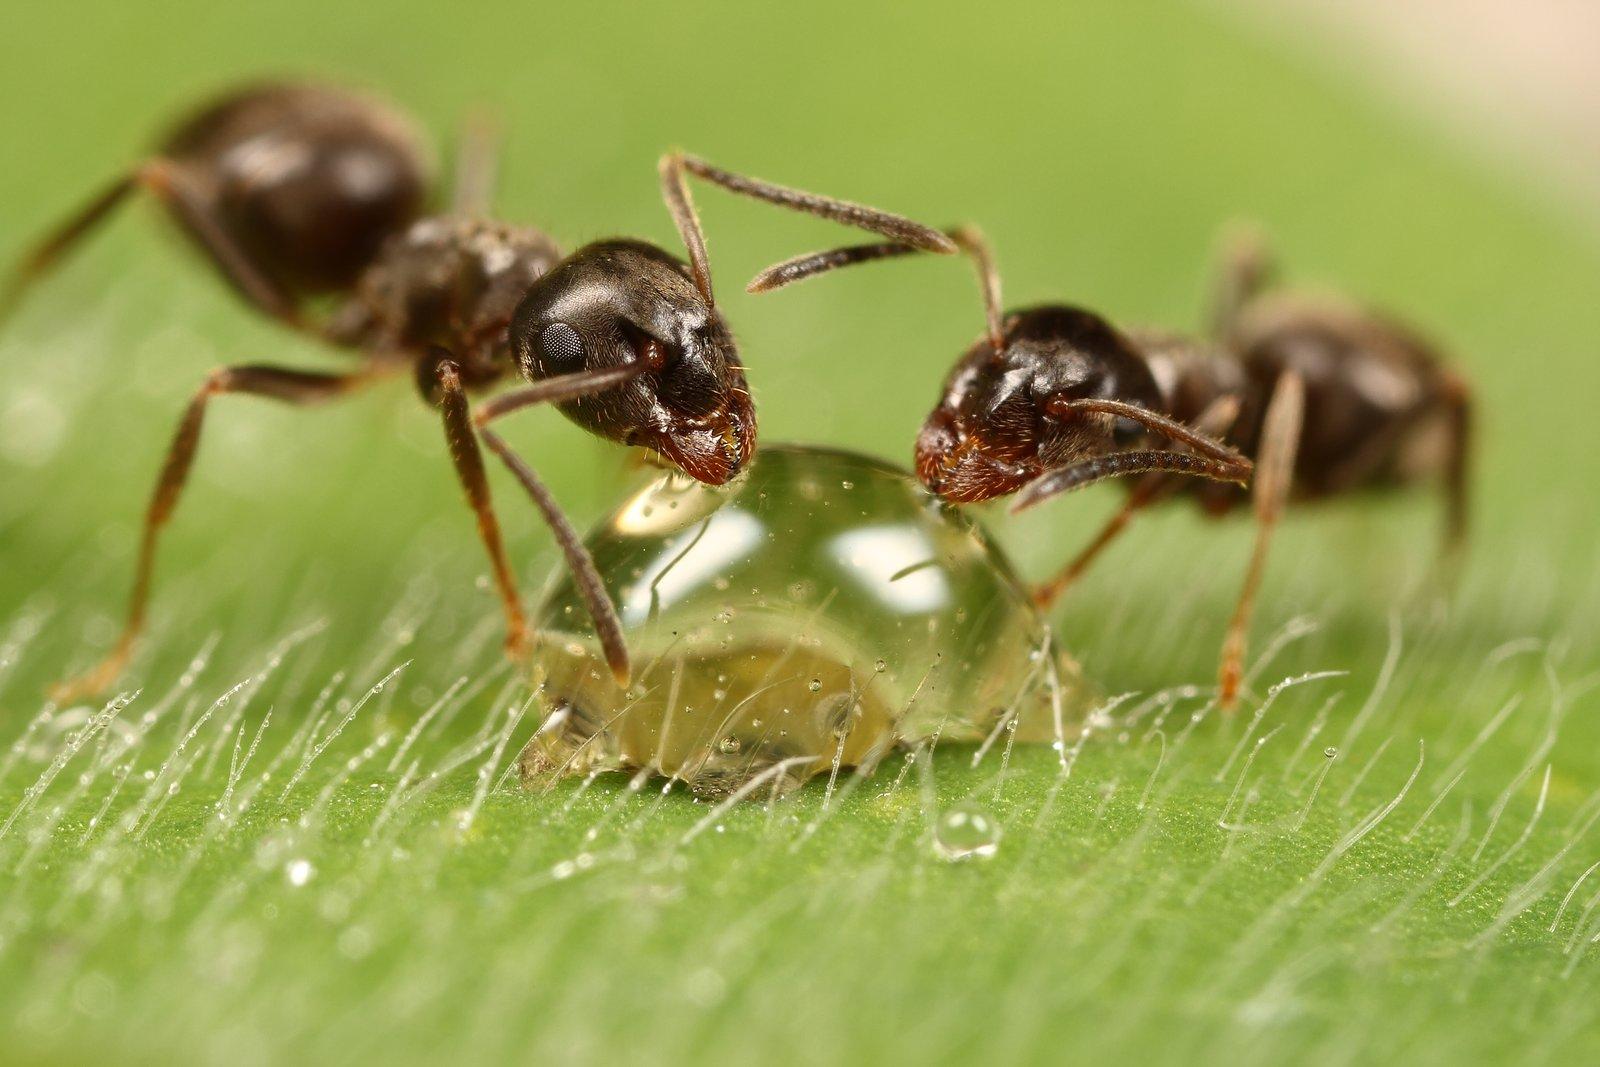
Treatment
Chemical
Products containing the following chemical ingredients are all effective on Garden ants
Pyrethrins
Pyrethroids
There are a large number of pesticides available for ant control although these are mainly for indoor use.
Organic
Observe foraging ants and follow them back to the nest.
Dig up nests where possible making sure to remove the queen.
Encourage insectivorous birds by hanging bird boxes and feeders.
Place tin cans over the ant hill in the morning. As it heats up, the ants take their eggs up into the can. In the afternoon slide a piece of cardboard under each can, and remove and dispose of the eggs. They make a tasty treat for birds, especially chickens.
Prevention
Clean previously infested surfaces to remove pheromone trails.
Use natural predators and parasites to control aphid populations.
Dig up soil in the winter months to disturb overwintering females.
Maintain pest-free plants.
Clean honeydew from any infested plants with water.
Small piles of earth around holes in soil, lawns, paths, and at the base of exterior walls. Adults may be in the house around fresh and stored food, and on sap-sucking pest-infested plants. Large swarms of flying ants appear in late summer.

Plants affected
Garden ants rarely cause damage to plants. However, they feed on sugary foods, oily seeds, honeydew from aphid-infected plants, and other small insects. Heaps of earth around the nest entrance can be a nuisance in the lawn where they interfere with mowing, and they can also partly bury low-growing plants.
About Garden ants
There are two main species of garden ants, the red ant Myrmica rubra and the black ant, Lasius niger.

Queen ants fly in from neighbouring gardens all the time but are killed by ants from existing nests. Killing a queen and her nest simply makes space for another. For this reason it is best to focus on controlling only those nests that are causing real problems.
Adult worker ants are all female, wingless, and around 5mm in length.
Queens are significantly longer and fatter.
Larvae are white legless grubs roughly 5mm long.
Each colony can vary in size from as small as 500 individuals to many thousands.
After over-wintering, females emerge in spring and lay eggs.
The first brood will be fed by the queen for three to four weeks before pupating in the soil.
Adult workers emerge after two weeks to maintain the nest and feed the queen and subsequent larvae.
When adults find a food source they leave a trail of chemicals known as pheromones back to the nest for others to follow.
Towards the end of summer winged males and females are produced.
Between August and September mating takes place during flight.
After mating, male adults die and females shed their wings and return to the soil to overwinter.

Treatment
Chemical
Products containing the following chemical ingredients are all effective on Garden ants
Pyrethrins
Pyrethroids
There are a large number of pesticides available for ant control although these are mainly for indoor use.
Organic
Observe foraging ants and follow them back to the nest.
Dig up nests where possible making sure to remove the queen.
Encourage insectivorous birds by hanging bird boxes and feeders.

Place tin cans over the ant hill in the morning. As it heats up, the ants take their eggs up into the can. In the afternoon slide a piece of cardboard under each can, and remove and dispose of the eggs. They make a tasty treat for birds, especially chickens.
Prevention
Clean previously infested surfaces to remove pheromone trails.
Use natural predators and parasites to control aphid populations.
Dig up soil in the winter months to disturb overwintering females.
Maintain pest-free plants.
Clean honeydew from any infested plants with water.
0
0
文章
Dummer. ゛☀
2017年09月15日

There are more than 5,000 known species of rust on plants. Common rust (Phragmidium spp.) is a fungal disease that attacks roses, hollyhocks, snapdragons, daylilies, beans, tomatoes and lawns. It is most often found on mature plants where symptoms appear primarily on the surfaces of lower leaves.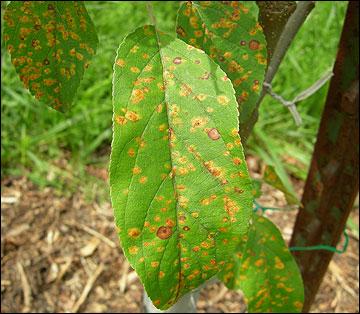
Early on, look for white, slightly raised spots on the undersides of leaves and on the stems. After a short period of time, these spots become covered with reddish-orange spore masses. Later, leaf postules may turn yellow-green and eventually black. Severe infestations will deform and yellow leaves and cause leaf drop.
Rust diseases are favored by 4 to 8 hours of low light intensity, warm temperatures and moisture — humidity, dew or rain — followed by 8 to 16 hours of high light intensity, high temperatures and slow drying of leaf surfaces.
Black spores are visible on leaves and stems in fall and overwinter inside infected stems which are distinguished by dark, corky blotches at points of infection. The spores are spread by wind or by water splashing back up onto the foliage.
Treatment
Select rust-resistant plant varieties when available.
Pick off and destroy infected leaves and frequently rake under plants to remove all fallen debris.
Water in the early morning hours — avoiding overhead sprinklers — to give plants time to dry out during the day. Drip irrigation and soaker hoses can be used to help keep leaves dry.
Use a slow-release, organic fertilizer on crops and avoid excess nitrogen. Soft, leafy, new growth is most susceptible.
Apply copper sprays or sulfur powders to prevent infection of susceptible plants. For best results, apply early or at first sign of disease. Spray all plant parts thoroughly and repeat every 7-10 days up to the day of harvest.
Effectively treat fungal diseases with SERENADE Garden. This broad spectrum bio-fungicide uses a patented strain of Bacillus subtilis and is approved for organic gardening. Best of all, it’s safe to use — you can treat and pick crops the same day!
Containing sulfur and pyrethrins, Bonide® Orchard Spray is a safe, one-hit concentrate for insect attacks and fungal problems. For best results, apply as a protective spray (2.5 oz/ gallon) early in the season. If disease, insects or wet weather are present, mix 5 oz in one gallon of water. Thoroughly spray all parts of the plant, especially new shoots.
Prune or stake plants and remove weeds to improve air circulation. Make sure to disinfect your pruning tools (one part bleach to 4 parts water) after each cut.
Use a thick layer of mulch or organic compost to cover the soil after you have raked and cleaned it well. Mulch will prevent the disease spores from splashing back up onto the leaves.
Burn or bag infected plants after the growing season (see Fall Garden Cleanup). Do NOT compost.

Early on, look for white, slightly raised spots on the undersides of leaves and on the stems. After a short period of time, these spots become covered with reddish-orange spore masses. Later, leaf postules may turn yellow-green and eventually black. Severe infestations will deform and yellow leaves and cause leaf drop.
Rust diseases are favored by 4 to 8 hours of low light intensity, warm temperatures and moisture — humidity, dew or rain — followed by 8 to 16 hours of high light intensity, high temperatures and slow drying of leaf surfaces.

Black spores are visible on leaves and stems in fall and overwinter inside infected stems which are distinguished by dark, corky blotches at points of infection. The spores are spread by wind or by water splashing back up onto the foliage.
Treatment
Select rust-resistant plant varieties when available.
Pick off and destroy infected leaves and frequently rake under plants to remove all fallen debris.
Water in the early morning hours — avoiding overhead sprinklers — to give plants time to dry out during the day. Drip irrigation and soaker hoses can be used to help keep leaves dry.

Use a slow-release, organic fertilizer on crops and avoid excess nitrogen. Soft, leafy, new growth is most susceptible.
Apply copper sprays or sulfur powders to prevent infection of susceptible plants. For best results, apply early or at first sign of disease. Spray all plant parts thoroughly and repeat every 7-10 days up to the day of harvest.
Effectively treat fungal diseases with SERENADE Garden. This broad spectrum bio-fungicide uses a patented strain of Bacillus subtilis and is approved for organic gardening. Best of all, it’s safe to use — you can treat and pick crops the same day!
Containing sulfur and pyrethrins, Bonide® Orchard Spray is a safe, one-hit concentrate for insect attacks and fungal problems. For best results, apply as a protective spray (2.5 oz/ gallon) early in the season. If disease, insects or wet weather are present, mix 5 oz in one gallon of water. Thoroughly spray all parts of the plant, especially new shoots.

Prune or stake plants and remove weeds to improve air circulation. Make sure to disinfect your pruning tools (one part bleach to 4 parts water) after each cut.
Use a thick layer of mulch or organic compost to cover the soil after you have raked and cleaned it well. Mulch will prevent the disease spores from splashing back up onto the leaves.
Burn or bag infected plants after the growing season (see Fall Garden Cleanup). Do NOT compost.
0
0
文章
Dummer. ゛☀
2017年08月29日

Brass buttons is the common name given to the plant Leptinella squalida. This very low growing, vigorously spreading plant is a good choice for rock gardens, the spaces between flagstones, and lawns where turf won’t grow. Keep reading to learn more Leptinella information, including the growing and care of brass button plants.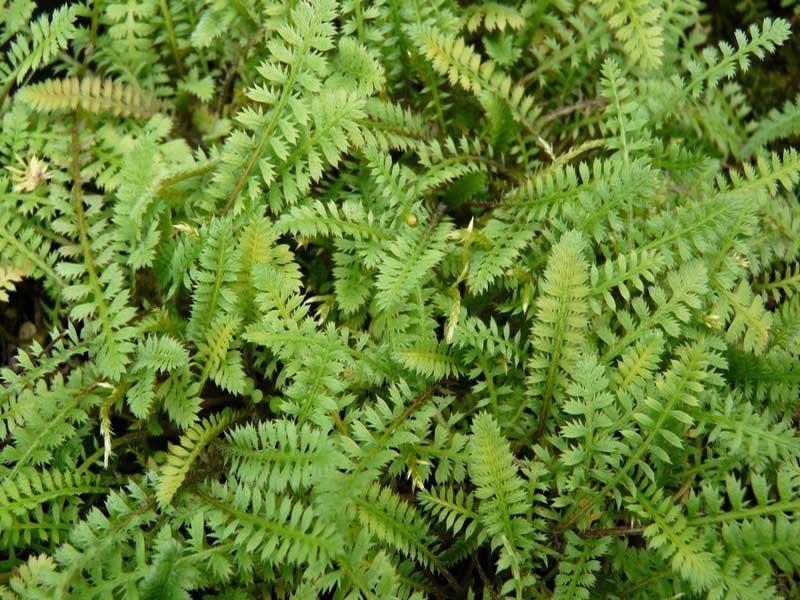
Leptinella Information
Brass buttons gets its name from the small yellow to green flowers it produces in the spring. The plant is in the daisy family, and its flowers look very much like the centers of daisy flowers, minus the long white petals. These small, hard looking flowers are said to resemble buttons.
Leptinella brass button plants are native to New Zealand but are widespread now. They are hardy from USDA zones 4 through 9, though just what that means depends on the zone. In 9 and 10, the plants are evergreen and will last all year. In colder climates, the leaves may die back. If protected by snow or mulch, the leaves will turn brown but stay in place. If exposed to the cold winter air, the leaves will die and new ones will grow in the spring. This is fine, though the new leaf growth will take a month or two to come back and the plant won’t be as attractive in the spring.
Growing Brass Buttons
Growing brass buttons in the garden is very easy. In cooler climates, the plants like full sun, but in hotter areas, they fare better with partial light shade. They will grow in a wide range of soils, though they prefer well drained, rich soil with frequent watering. They spread aggressively through runners just underground. You may need to dig them up and separate them every now and again in order to keep them in check.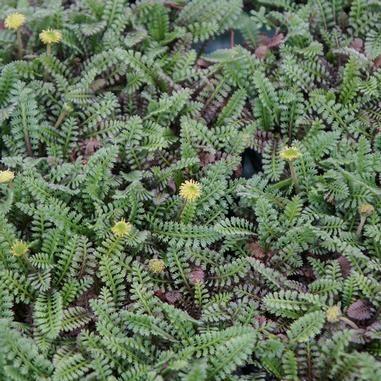
While some varieties boast green leaves, one particular variety that is very popular is called Platt’s Black, named for the garden of Jane Platt in which the plant was first documented. This variety has dark, almost black leaves with green tips and very dark flowers. Growing black brass buttons in the garden is a matter of personal taste – some gardeners think it looks on the verge of death, while others think it looks fascinating, especially interspersed with a bright green variety. Either way, the plant makes an exceptional specimen in the garden.

Leptinella Information
Brass buttons gets its name from the small yellow to green flowers it produces in the spring. The plant is in the daisy family, and its flowers look very much like the centers of daisy flowers, minus the long white petals. These small, hard looking flowers are said to resemble buttons.
Leptinella brass button plants are native to New Zealand but are widespread now. They are hardy from USDA zones 4 through 9, though just what that means depends on the zone. In 9 and 10, the plants are evergreen and will last all year. In colder climates, the leaves may die back. If protected by snow or mulch, the leaves will turn brown but stay in place. If exposed to the cold winter air, the leaves will die and new ones will grow in the spring. This is fine, though the new leaf growth will take a month or two to come back and the plant won’t be as attractive in the spring.

Growing Brass Buttons
Growing brass buttons in the garden is very easy. In cooler climates, the plants like full sun, but in hotter areas, they fare better with partial light shade. They will grow in a wide range of soils, though they prefer well drained, rich soil with frequent watering. They spread aggressively through runners just underground. You may need to dig them up and separate them every now and again in order to keep them in check.

While some varieties boast green leaves, one particular variety that is very popular is called Platt’s Black, named for the garden of Jane Platt in which the plant was first documented. This variety has dark, almost black leaves with green tips and very dark flowers. Growing black brass buttons in the garden is a matter of personal taste – some gardeners think it looks on the verge of death, while others think it looks fascinating, especially interspersed with a bright green variety. Either way, the plant makes an exceptional specimen in the garden.
0
0
文章
Dummer. ゛☀
2017年08月24日

Plantains are unsightly lawn weeds that thrive in compacted soil and neglected lawns. Plantain weed treatment consists of diligently digging out the plants as they appear and treating the plants with herbicides. Since weed plantain thrives in poorly established lawns, the best prevention is a healthy lawn. Keep reading to learn more about plantain control.
Broadleaf and Narrow Leaf Plantains
The two types of plantains that are commonly found in lawns are broadleaf plantain (Plantago major) and narrow-leaf, or buckhorn plant (P. lanceolata). These two perennial weeds are easily differentiated by their leaves. Broadleaf plantains have smooth, oval leaves while buckhorn plantain has ribbed, lance-shaped leaves. Both types are found throughout the U.S. where they thrive in compacted soil.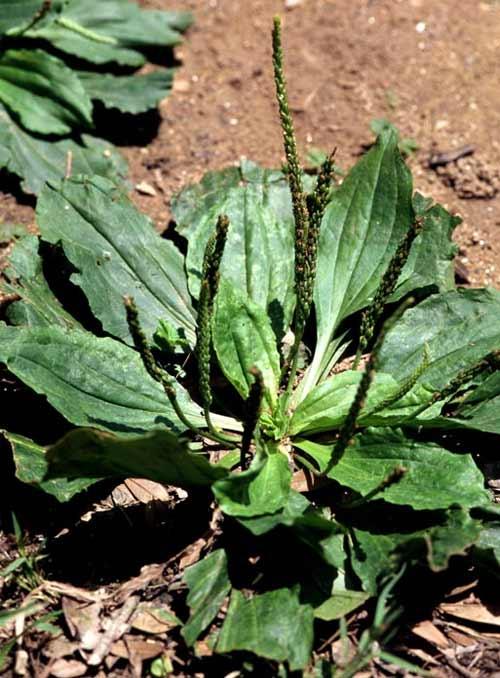
Preventing Plantain Lawn Weeds
The best way to prevent plantains in the lawn is to keep the soil aerated and healthy. Aerate compacted soil and follow a regular schedule of fertilization at least twice a year. Water the lawn deeply when there is less than an inch of rainfall in a week. A healthy lawn crowds out plantains, but the plantains crowd out the grass when the lawn is in poor condition. Plantain weeds also contaminate mowers and other equipment used on the lawn. Clean your equipment thoroughly before using it again to prevent the spread of planting lawn weeds.
Plantain Weed Treatment
Plantain control can be achieved by pulling or digging the plants as they emerge when the infested area is small. This is easiest in sandy soil or soil that has been softened by rain or irrigation. You may have to dig and pull the plants in the area several times before achieving complete control. The weeds must be removed before they have a chance to produce seeds. When large numbers of the weeds are present, plantain lawn weeds are best controlled with herbicides. Choose a post-emergent herbicide labeled for plantain control. Post-emergent herbicides are most effective against plantains in fall when the plants are moving carbohydrates to the roots for winter storage. You can also apply the herbicides in spring. Carefully follow the label instructions regarding mixing, timing and application procedures. Avoid spraying when temperatures are above 85 degrees F. (29 C.) and on windy days. Store any unused portions of the herbicide in the original container and out of the reach of children.

Broadleaf and Narrow Leaf Plantains
The two types of plantains that are commonly found in lawns are broadleaf plantain (Plantago major) and narrow-leaf, or buckhorn plant (P. lanceolata). These two perennial weeds are easily differentiated by their leaves. Broadleaf plantains have smooth, oval leaves while buckhorn plantain has ribbed, lance-shaped leaves. Both types are found throughout the U.S. where they thrive in compacted soil.

Preventing Plantain Lawn Weeds
The best way to prevent plantains in the lawn is to keep the soil aerated and healthy. Aerate compacted soil and follow a regular schedule of fertilization at least twice a year. Water the lawn deeply when there is less than an inch of rainfall in a week. A healthy lawn crowds out plantains, but the plantains crowd out the grass when the lawn is in poor condition. Plantain weeds also contaminate mowers and other equipment used on the lawn. Clean your equipment thoroughly before using it again to prevent the spread of planting lawn weeds.

Plantain Weed Treatment
Plantain control can be achieved by pulling or digging the plants as they emerge when the infested area is small. This is easiest in sandy soil or soil that has been softened by rain or irrigation. You may have to dig and pull the plants in the area several times before achieving complete control. The weeds must be removed before they have a chance to produce seeds. When large numbers of the weeds are present, plantain lawn weeds are best controlled with herbicides. Choose a post-emergent herbicide labeled for plantain control. Post-emergent herbicides are most effective against plantains in fall when the plants are moving carbohydrates to the roots for winter storage. You can also apply the herbicides in spring. Carefully follow the label instructions regarding mixing, timing and application procedures. Avoid spraying when temperatures are above 85 degrees F. (29 C.) and on windy days. Store any unused portions of the herbicide in the original container and out of the reach of children.
0
0
文章
Dummer. ゛☀
2017年07月15日

Family - Convolvulaceae
Flowering - April - October.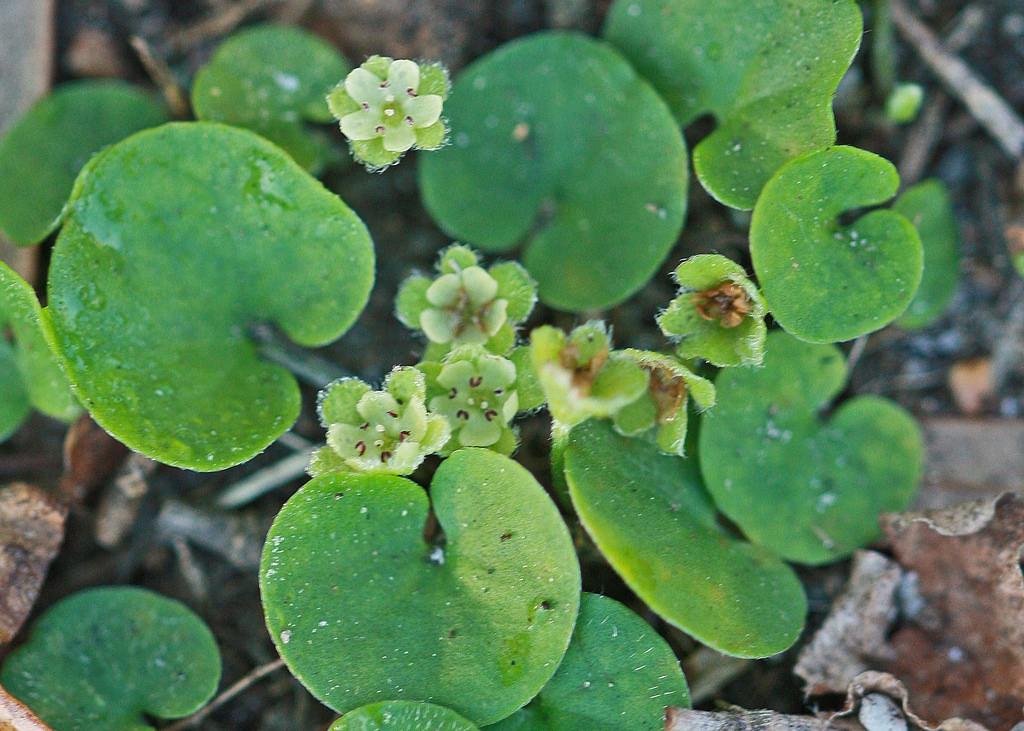
Habitat - Lawns, fields, roadsides.
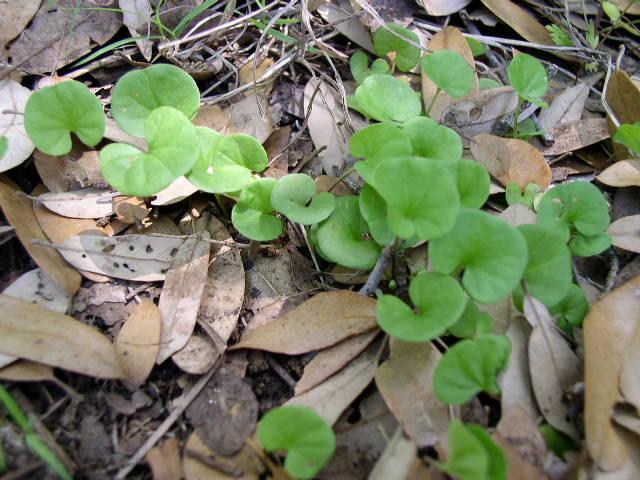
Origin - Native to U.S.
Other info. - This weedy little species is a fairly new addition to the Missouri flora and has only been reported from two southern Missouri counties. The plant is much more common in the southeastern U.S.
This species is easy to identify becasue of its creeping stems, reniform leaves, and small flowers.
Flowering - April - October.

Habitat - Lawns, fields, roadsides.

Origin - Native to U.S.
Other info. - This weedy little species is a fairly new addition to the Missouri flora and has only been reported from two southern Missouri counties. The plant is much more common in the southeastern U.S.
This species is easy to identify becasue of its creeping stems, reniform leaves, and small flowers.

0
0
文章
Dummer. ゛☀
2017年07月11日

Family - Caryophyllaceae
Stems - No info yet.
Leaves - No info yet.
Inflorescence - No info yet.
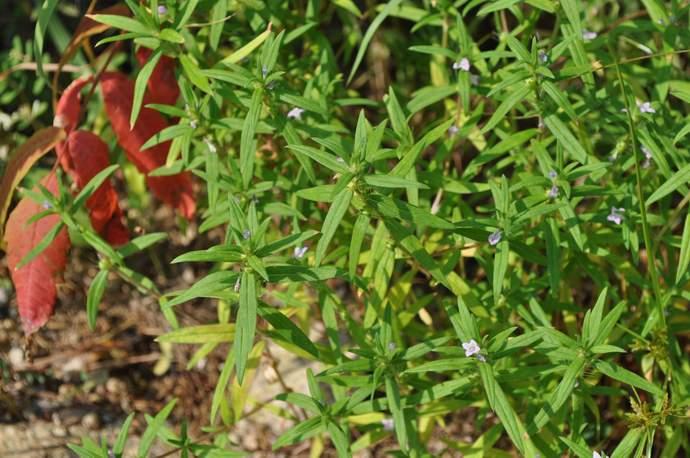
Flowering - March - June.
Habitat - Disturbed sites, lawns, roadsides, railroads.
Origin - Native to Europe.
Other info. - This little annual species can be found in scattered Missouri counties and is becoming more with time.
Many species of Cerastium look alike and can be hard to differentiate. Sometimes minute details such as cilia at the base of the tiny petals are needed to differentiate species. Typically plants need to be collected in both flower and fruit to get a proper identification.
C. brachypetalum can be identified by its annual habit, dense hairs, ciliate-based petals, and long fruiting pedicels. When growing in sunny areas, the plant typically has a distinct grayish appearance. In shady areas, the grayish appearance is mostly absent.
Stems - No info yet.

Leaves - No info yet.
Inflorescence - No info yet.

Flowering - March - June.
Habitat - Disturbed sites, lawns, roadsides, railroads.
Origin - Native to Europe.
Other info. - This little annual species can be found in scattered Missouri counties and is becoming more with time.
Many species of Cerastium look alike and can be hard to differentiate. Sometimes minute details such as cilia at the base of the tiny petals are needed to differentiate species. Typically plants need to be collected in both flower and fruit to get a proper identification.
C. brachypetalum can be identified by its annual habit, dense hairs, ciliate-based petals, and long fruiting pedicels. When growing in sunny areas, the plant typically has a distinct grayish appearance. In shady areas, the grayish appearance is mostly absent.
0
0


