文章
Miss Chen
2018年09月08日

Adenium obesum, commonly called desert rose, stands out among other desert plants with its trumpet-shaped flowers and gray, elephantine trunk. It adds a splash of color and visual interest to low-water gardens where few other flowering shrubs thrive. Desert rose requires minimal upkeep and care. The plant must be grown under the right conditions and provided with care early on so it thrives.
Climate and Temperature

Desert rose comes from the arid climates of eastern Africa and the Arabian peninsula. As a result, it tolerates extreme heat well and is intolerant of cold weather. Desert rose performs best in U.S. Department of Agriculture plant hardiness zones 10a through 12, where temperatures stay reliably above 33 degrees Fahrenheit. In warmer climates, desert rose blooms and retains its leathery, dark green foliage year-round, but it may enter dormancy if nighttime temperatures dip below 40 F or if daytime temperatures stay below 64 F. Cover outdoor plants if cold weather if forecast and move potted desert roses indoors, if possible.
Sunlight and Soil

Full sun and fast-draining soil are key to successfully growing a desert rose. An unshaded south-facing bed with at least 4 square feet of space is best for garden growing, although the soil must be porous with a moderate nutrient content. Grow desert rose in a container in marginal areas where winter cold snaps are common. Repot the plant every two years into a shallow, slightly larger pot to force vertical growth and show off the plant's unusual swollen trunk. Use a mixture of standard potting soil amended with one-third coarse sand to strike the right balance between nutrient content and drainage. Use a pot with drainage holes.
Seasonal Watering

The watering needs of a desert rose vary significantly throughout the year. Water weekly during the late spring and summer, providing roughly 1 inch of water each time. Increase water by one-half during especially hot or windy weather to prevent dehydration, but always allow the soil to dry out completely between waterings to prevent root rot. The plant needs little to no supplemental water during autumn and winter, especially in years with normal rainfall. Only provide water during the colder months if no rain falls for longer than two weeks. For a pot-grown desert rose, provide just enough water during the winter to keep it from shriveling.
Nutrient Needs

The desert rose is an efficient feeder and it doesn't generally need fertilizer. Its nutrient needs vary according to age and growing conditions. Most desert rose plants grow quickly during their first three to five years and will quickly exhaust the nutrient supply of their soil if it isn't supplemented. A pot-grown desert rose may have a similar issue, although it is ongoing throughout its life. Dissolve 1/4 teaspoon of 15-15-15 or 7-9-5 ratio fertilizer in 1 gallon of water. Water the plant with the mixture every two weeks. Apply the fertilizer solution only during the spring and summer, and always apply it to moist soil to prevent root burn.
Toxic Sap

Desert rose has a few drawbacks. The most significant consideration to make before growing it in your garden is the potential danger of the toxic sap. Desert rose exudes a watery, slightly sticky sap from its leaves, stems and flowers when it is pruned or damaged. The sap contains glycosides that can cause an irregular heartbeat or possibly kill someone who eats parts of the plant. People and pets are both affected by the toxic elements in desert rose sap, so don't grow the plant where curious children or pets play.
Climate and Temperature

Desert rose comes from the arid climates of eastern Africa and the Arabian peninsula. As a result, it tolerates extreme heat well and is intolerant of cold weather. Desert rose performs best in U.S. Department of Agriculture plant hardiness zones 10a through 12, where temperatures stay reliably above 33 degrees Fahrenheit. In warmer climates, desert rose blooms and retains its leathery, dark green foliage year-round, but it may enter dormancy if nighttime temperatures dip below 40 F or if daytime temperatures stay below 64 F. Cover outdoor plants if cold weather if forecast and move potted desert roses indoors, if possible.
Sunlight and Soil

Full sun and fast-draining soil are key to successfully growing a desert rose. An unshaded south-facing bed with at least 4 square feet of space is best for garden growing, although the soil must be porous with a moderate nutrient content. Grow desert rose in a container in marginal areas where winter cold snaps are common. Repot the plant every two years into a shallow, slightly larger pot to force vertical growth and show off the plant's unusual swollen trunk. Use a mixture of standard potting soil amended with one-third coarse sand to strike the right balance between nutrient content and drainage. Use a pot with drainage holes.
Seasonal Watering

The watering needs of a desert rose vary significantly throughout the year. Water weekly during the late spring and summer, providing roughly 1 inch of water each time. Increase water by one-half during especially hot or windy weather to prevent dehydration, but always allow the soil to dry out completely between waterings to prevent root rot. The plant needs little to no supplemental water during autumn and winter, especially in years with normal rainfall. Only provide water during the colder months if no rain falls for longer than two weeks. For a pot-grown desert rose, provide just enough water during the winter to keep it from shriveling.
Nutrient Needs

The desert rose is an efficient feeder and it doesn't generally need fertilizer. Its nutrient needs vary according to age and growing conditions. Most desert rose plants grow quickly during their first three to five years and will quickly exhaust the nutrient supply of their soil if it isn't supplemented. A pot-grown desert rose may have a similar issue, although it is ongoing throughout its life. Dissolve 1/4 teaspoon of 15-15-15 or 7-9-5 ratio fertilizer in 1 gallon of water. Water the plant with the mixture every two weeks. Apply the fertilizer solution only during the spring and summer, and always apply it to moist soil to prevent root burn.
Toxic Sap

Desert rose has a few drawbacks. The most significant consideration to make before growing it in your garden is the potential danger of the toxic sap. Desert rose exudes a watery, slightly sticky sap from its leaves, stems and flowers when it is pruned or damaged. The sap contains glycosides that can cause an irregular heartbeat or possibly kill someone who eats parts of the plant. People and pets are both affected by the toxic elements in desert rose sap, so don't grow the plant where curious children or pets play.
0
0
文章
Miss Chen
2018年08月21日

Hibiscus (Hibiscus spp.) plants produce large, often colorful, flowers during the summer. The hardy hibiscus varieties, such as rose of Sharon (Hibiscus syriacus), grow in U.S. Department of Agriculture plant hardiness zones 5 through 9. Tropical varieties, like Chinese hibiscus (Hibiscus rosa-sinensis), grow in USDA zones 9 through 11. Both hardy and tropical hibiscuses can suffer from yellow leaves and overall decline. The symptoms, causes and treatments are similar for both types of hibiscus.

Winter Leaf Drop
Tropical hibiscus varieties grown outdoors in summer but overwintered inside tend to suffer leaf yellowing, drop and dieback in the days following the move. It's difficult to supply a tropical hibiscus with enough light indoors, which causes further yellowing beyond the initial shock of relocation. Remove the leaves as they yellow if you want to try and keep the plant active during the winter. North Dakota State University Extension suggests placing the plant under bright artificial lighting for 13 hours each day, when brought inside during the winter months. You can also allow the plant to go dormant during winter. Place the plant in a dark area at around 40 to 50 degrees Fahrenheit and allow all the leaves to yellow and fall off before cutting the plant back to 6 inches tall. In spring, resume watering and place the plant in a sunny spot to encourage a fresh flush of healthy, green growth.
Cultural Concerns
Wet, poorly drained soil can cause root rots and general leaf yellowing. Grow potted hibiscus in containers with bottom drainage holes so the soil doesn't stay soggy. Plant garden hibiscus in well-draining soil and avoid overwatering and waterlogged soil. Nutrient deficiencies can also cause yellowing foliage, especially a lack of nitrogen in the soil. Water potted hibiscus with a soluble, all-purpose fertilizer every two weeks, such as a 1/2 teaspoon of 24-8-16 all-purpose blend mixed with 1 quart of water. For garden plants, sprinkling 1 tablespoon of a 12-4-8 or similar blend over every 1 square foot of garden at eight-week intervals provides enough nutrients. Fertilize hibiscus plants only when they are actively growing in spring and summer.

Blights
Both tropical and hardy hibiscus varieties can develop yellow leaves from a botrytis blight infection. This fungal disease may also cause spotting and discoloration on flowers or show as gray masses of mold on leaf, bud and stem surfaces. Overly wet soil and poor air circulation are the main causes. Remove affected leaves, stems and flowers with shears, wiping the shears with an isopropyl alcohol-soaked rag after each cut to destroy any fungal spores. Avoid overhead watering and keep the soil moist but not soggy.
Leaf Spot Diseases
Yellow spots on leaf surfaces may indicate a fungal leaf spot diseases. The shape and size of the spots varies, but most leaf spot diseases aren't fatal and they rarely cause long-term damage. Hibiscus plants don't require fungicide treatments for leaf spots. Instead, remove badly affected leaves and clean up fallen leaves and plant debris from around the base of the plant. Watering early in the day and keeping the foliage dry further prevents leaf spot problems.

Winter Leaf Drop
Tropical hibiscus varieties grown outdoors in summer but overwintered inside tend to suffer leaf yellowing, drop and dieback in the days following the move. It's difficult to supply a tropical hibiscus with enough light indoors, which causes further yellowing beyond the initial shock of relocation. Remove the leaves as they yellow if you want to try and keep the plant active during the winter. North Dakota State University Extension suggests placing the plant under bright artificial lighting for 13 hours each day, when brought inside during the winter months. You can also allow the plant to go dormant during winter. Place the plant in a dark area at around 40 to 50 degrees Fahrenheit and allow all the leaves to yellow and fall off before cutting the plant back to 6 inches tall. In spring, resume watering and place the plant in a sunny spot to encourage a fresh flush of healthy, green growth.
Cultural Concerns
Wet, poorly drained soil can cause root rots and general leaf yellowing. Grow potted hibiscus in containers with bottom drainage holes so the soil doesn't stay soggy. Plant garden hibiscus in well-draining soil and avoid overwatering and waterlogged soil. Nutrient deficiencies can also cause yellowing foliage, especially a lack of nitrogen in the soil. Water potted hibiscus with a soluble, all-purpose fertilizer every two weeks, such as a 1/2 teaspoon of 24-8-16 all-purpose blend mixed with 1 quart of water. For garden plants, sprinkling 1 tablespoon of a 12-4-8 or similar blend over every 1 square foot of garden at eight-week intervals provides enough nutrients. Fertilize hibiscus plants only when they are actively growing in spring and summer.

Blights
Both tropical and hardy hibiscus varieties can develop yellow leaves from a botrytis blight infection. This fungal disease may also cause spotting and discoloration on flowers or show as gray masses of mold on leaf, bud and stem surfaces. Overly wet soil and poor air circulation are the main causes. Remove affected leaves, stems and flowers with shears, wiping the shears with an isopropyl alcohol-soaked rag after each cut to destroy any fungal spores. Avoid overhead watering and keep the soil moist but not soggy.
Leaf Spot Diseases
Yellow spots on leaf surfaces may indicate a fungal leaf spot diseases. The shape and size of the spots varies, but most leaf spot diseases aren't fatal and they rarely cause long-term damage. Hibiscus plants don't require fungicide treatments for leaf spots. Instead, remove badly affected leaves and clean up fallen leaves and plant debris from around the base of the plant. Watering early in the day and keeping the foliage dry further prevents leaf spot problems.
0
0
文章
Miss Chen
2018年08月20日

Autumn fern (Dryopteris erythrosora) earns its common name from the color -- not the timing -- of its emerging fronds. As new fiddleheads unfurl in spring, the leaves display shades of copper and bronze with hints of salmon, rose and purple before maturing to glossy green in summer. Sporadic flushes of new growth through the growing season keep autumnal colors going. In cool climates, the leaves take on a slight russet-brown, but nothing that compares to spring. Low-maintenance and easy-care, autumn fern is a shade gardener's friend.

Site and Soil
Autumn fern is a woodland plant native to full and partial shade, protected from intense afternoon sun. Maturing at 18 inches tall and 24 inches wide, it will flourish beneath trees with high, open shade and well-drained, loamy, humus-rich soil.
All soil types, from sand to clay, suit adaptable autumn fern, but it will prefer a pH slightly below 7.0. Think of moisture-retentive woodland soil, rich with leaf mold and other organic matter, as a guide for your garden. If your garden lacks organic matter, work a 4-inch layer of compost or fine pine bark into the soil's upper 4 to 6 inches before planting autumn fern.
Water and Nutrients
Autumn fern prefers consistently moist soil, but doesn't tolerate waterlogged conditions. Once established, the slow-growing plant withstands periods of relative dryness better than many ferns, but it turns pale and wilts when water-stressed. Supplement natural rainfall, as needed, to keep the soil moist. The more sun the plant gets, the more water it needs.
Planted in rich, loamy soil, autumn fern doesn't require fertilizer. Like other woodland ferns, it's sensitive and easily burned by chemical fertilizers. Natural decomposition from leaves and a 1- to 2-inch layer of compost spread once a year are all it needs.

Pruning, Pests and Disease
In frost-free climates, autumn fern is evergreen. In cool-climate gardens, it dies back slowly with semi-evergreen growth at the crown. Leave the fronds intact over winter, then remove the dead or winter-worn foliage in spring. This is easily done by hand, which protects emerging fiddleheads and surface roots from accidental pruning injuries. When clipping, use shears that have been wiped with a cloth soaked in rubbing alcohol. This helps prevent the spread of disease.
Autumn fern has no significant problems with insect pests or disease. The fern is sensitive to pesticides, so good sanitation and proper care are key. Slugs and snails often gather in shade gardens. A inverted rind of melon (Cucumis melo) makes an effective, overnight slug trap. Dispose of the melon rind and its sluggish inhabitants in the morning.
Hardiness and Heaving
Autumn fern grows in U.S. Department of Agriculture plant hardiness zones 5 through 8. It's intolerant of hot, arid conditions in warmer Southwestern climates, but it tolerates heat and humidity in the Southeast. Named a Florida Garden Select plant by the Florida Nursery, Growers and Landscape Association, autumn fern thrives in Florida's USDA zones 8 through 11.
In all climates, a mature autumn fern tends to lift slightly out of the soil from year to year. When this happens, gently pull back the soil and reposition the crown back at soil level. The annual layer of 1 to 2 inches of compost also helps prevent autumn fern from heaving.

Site and Soil
Autumn fern is a woodland plant native to full and partial shade, protected from intense afternoon sun. Maturing at 18 inches tall and 24 inches wide, it will flourish beneath trees with high, open shade and well-drained, loamy, humus-rich soil.
All soil types, from sand to clay, suit adaptable autumn fern, but it will prefer a pH slightly below 7.0. Think of moisture-retentive woodland soil, rich with leaf mold and other organic matter, as a guide for your garden. If your garden lacks organic matter, work a 4-inch layer of compost or fine pine bark into the soil's upper 4 to 6 inches before planting autumn fern.
Water and Nutrients
Autumn fern prefers consistently moist soil, but doesn't tolerate waterlogged conditions. Once established, the slow-growing plant withstands periods of relative dryness better than many ferns, but it turns pale and wilts when water-stressed. Supplement natural rainfall, as needed, to keep the soil moist. The more sun the plant gets, the more water it needs.
Planted in rich, loamy soil, autumn fern doesn't require fertilizer. Like other woodland ferns, it's sensitive and easily burned by chemical fertilizers. Natural decomposition from leaves and a 1- to 2-inch layer of compost spread once a year are all it needs.

Pruning, Pests and Disease
In frost-free climates, autumn fern is evergreen. In cool-climate gardens, it dies back slowly with semi-evergreen growth at the crown. Leave the fronds intact over winter, then remove the dead or winter-worn foliage in spring. This is easily done by hand, which protects emerging fiddleheads and surface roots from accidental pruning injuries. When clipping, use shears that have been wiped with a cloth soaked in rubbing alcohol. This helps prevent the spread of disease.
Autumn fern has no significant problems with insect pests or disease. The fern is sensitive to pesticides, so good sanitation and proper care are key. Slugs and snails often gather in shade gardens. A inverted rind of melon (Cucumis melo) makes an effective, overnight slug trap. Dispose of the melon rind and its sluggish inhabitants in the morning.
Hardiness and Heaving
Autumn fern grows in U.S. Department of Agriculture plant hardiness zones 5 through 8. It's intolerant of hot, arid conditions in warmer Southwestern climates, but it tolerates heat and humidity in the Southeast. Named a Florida Garden Select plant by the Florida Nursery, Growers and Landscape Association, autumn fern thrives in Florida's USDA zones 8 through 11.
In all climates, a mature autumn fern tends to lift slightly out of the soil from year to year. When this happens, gently pull back the soil and reposition the crown back at soil level. The annual layer of 1 to 2 inches of compost also helps prevent autumn fern from heaving.
0
0
求助
Michub63
2018年08月09日

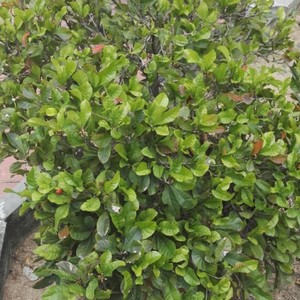
What ID for that tree,growing in Thailand and gives small red rose and sweet sour fruits

0
0


