文章
Miss Chen
2018年09月07日

Coneflowers (Echinacea spp.) are colorful perennials that attract birds and butterflies to your yard or garden. Coneflowers grow in shades of pink, purple, orange, yellow and white. These daisy-like flowers have a puffy central head that protrudes upward as the petals fold back. Coneflowers are native throughout eastern and central North America, growing in U.S. Department of Agriculture plant hardiness zones 3 through 9. Caring for hybrid coneflowers with regular deadheading, shearing once each season and dividing as needed will reward you with blooms for years to come.

When to Fertilize
Fertilize coneflowers in the spring as new growth appears with a fertilizer low in nitrogen like a 5-10-5 blend. Spread a small handful evenly around the plant, being sure that the product doesn't touch the plant. Apply two more applications at six week intervals and always water the fertilizer into the ground after applying. Coneflowers do not require heavy feeding; a spring mulch of rich compost helps smother weeds and provides a slow release of nutrients into the soil. While native varieties are not particular about soil type, coneflowers respond to loamy or sandy soil that drains well.
Watering
Water coneflowers regularly during the first growing season to help establish healthy root systems. Mature coneflowers are drought resistant, preferring an open area in full sun, but consistent watering can improve blooming throughout a hot, dry summer.
Few Pest Problems
Check the plants regularly for signs of insect damage. Although coneflowers are pest-resistant, leaf miners and Japanese beetles sometimes attack the leaves and flowers, and vine weevils may attack the roots. Dust the plants with diatomaceous earth or spray with a ready-to-use insecticidal soap to control insects. Powdery mildew, bacterial leaf spots and gray mold may be problems, especially in humid areas. Treat with a ready-to-use copper-based fungicide following the manufacturer's directions. Cover the entire foliage with the fungicide. Overhead watering can be a cause of disease spread; drip-irrigation or a soaker hose helps control soil-borne and airborne diseases by reducing splashing. Remove diseased parts of the plant when you deadhead and dispose of them by burning or in a trash collection container. Keep diseased plant material out of the compost pile and away from healthy plants.
Care in the Growing Season
Deadhead the coneflowers during the spring and early summer to encourage new growth in middle to late summer. Cut off spent blooms with garden shears as the petals begin to brown, wiping the blades with alcohol wipes between cuts to prevent the spread of disease. Cut out any dead or browning leaves to encourage fresh greenery later in the season. Leave the last spent coneflowers to dry on the plants in the fall -- the seed heads provide food for migrating and over-wintering birds and will reseed into the garden.

Shear coneflowers back to about one-third of their growth during the early summer to encourage bushy growth later in the season. Shearing a plant means to cut and remove most of the greenery and all of the spent blooms and stems.
If you're deadheading and pruning a large number of plants, mix nine parts water with one part household liquid bleach in a bucket, and dip the pruners in the solution between cuts to disinfect the blades.
Divide and Transplant
Divide mature coneflower clumps in the spring before growth begins, or in early fall after blooming is finished. Lift the plant from the ground completely with a shovel or spading fork, being careful not to damage the roots. Set the plant on the ground with the crown facing up. Place the tip of a sharp shovel at the top of the soil and between the center leaves of the coneflower plant. Push down with the shovel to cut the plant in half. Replant one half back into the hole where it was removed, and transplant the other half in a new location. Water both new coneflower plants after dividing and transplanting. Alternatively, you may cut a large clump into several sections with a sharp shovel or a knife and transplant the sections. Sterilize the blade after each cut.
Plant coneflowers as a border along a walkway or as part of a perennial cutting garden and watch the birds enjoy the seed heads.

When to Fertilize
Fertilize coneflowers in the spring as new growth appears with a fertilizer low in nitrogen like a 5-10-5 blend. Spread a small handful evenly around the plant, being sure that the product doesn't touch the plant. Apply two more applications at six week intervals and always water the fertilizer into the ground after applying. Coneflowers do not require heavy feeding; a spring mulch of rich compost helps smother weeds and provides a slow release of nutrients into the soil. While native varieties are not particular about soil type, coneflowers respond to loamy or sandy soil that drains well.
Watering
Water coneflowers regularly during the first growing season to help establish healthy root systems. Mature coneflowers are drought resistant, preferring an open area in full sun, but consistent watering can improve blooming throughout a hot, dry summer.
Few Pest Problems
Check the plants regularly for signs of insect damage. Although coneflowers are pest-resistant, leaf miners and Japanese beetles sometimes attack the leaves and flowers, and vine weevils may attack the roots. Dust the plants with diatomaceous earth or spray with a ready-to-use insecticidal soap to control insects. Powdery mildew, bacterial leaf spots and gray mold may be problems, especially in humid areas. Treat with a ready-to-use copper-based fungicide following the manufacturer's directions. Cover the entire foliage with the fungicide. Overhead watering can be a cause of disease spread; drip-irrigation or a soaker hose helps control soil-borne and airborne diseases by reducing splashing. Remove diseased parts of the plant when you deadhead and dispose of them by burning or in a trash collection container. Keep diseased plant material out of the compost pile and away from healthy plants.
Care in the Growing Season
Deadhead the coneflowers during the spring and early summer to encourage new growth in middle to late summer. Cut off spent blooms with garden shears as the petals begin to brown, wiping the blades with alcohol wipes between cuts to prevent the spread of disease. Cut out any dead or browning leaves to encourage fresh greenery later in the season. Leave the last spent coneflowers to dry on the plants in the fall -- the seed heads provide food for migrating and over-wintering birds and will reseed into the garden.

Shear coneflowers back to about one-third of their growth during the early summer to encourage bushy growth later in the season. Shearing a plant means to cut and remove most of the greenery and all of the spent blooms and stems.
If you're deadheading and pruning a large number of plants, mix nine parts water with one part household liquid bleach in a bucket, and dip the pruners in the solution between cuts to disinfect the blades.
Divide and Transplant
Divide mature coneflower clumps in the spring before growth begins, or in early fall after blooming is finished. Lift the plant from the ground completely with a shovel or spading fork, being careful not to damage the roots. Set the plant on the ground with the crown facing up. Place the tip of a sharp shovel at the top of the soil and between the center leaves of the coneflower plant. Push down with the shovel to cut the plant in half. Replant one half back into the hole where it was removed, and transplant the other half in a new location. Water both new coneflower plants after dividing and transplanting. Alternatively, you may cut a large clump into several sections with a sharp shovel or a knife and transplant the sections. Sterilize the blade after each cut.
Plant coneflowers as a border along a walkway or as part of a perennial cutting garden and watch the birds enjoy the seed heads.
0
0
文章
Miss Chen
2018年09月07日

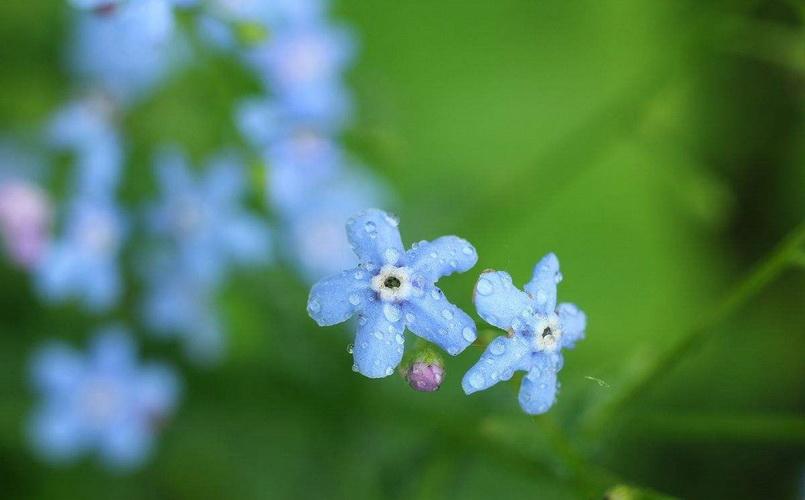
Delicate pale blue, or sometimes white and pink, forget-me-nots are a welcome sight after a long, snowy winter. Establishing forget-me-knots in your garden or yard is an easy task with great rewards. Forget-me-nots produce fantasy-like clouds of light blue that can provide quite a show-stopping display. They are a hardy perennial that will spread throughout your garden with very little effort on your part.

Step 1
Place potting soil in pots or six-pack inserts. Gently press the soil into the pot, but do not pack it too hard.
Step 2
Gently pour seeds from a packet into your hand. Forget-me-not seeds are very small; provided they are fresh, more than 90-percent of the seeds should germinate. Pinch a small amount of seeds and sprinkle them on top of the potting soil.
Step 3
Sprinkle more potting soil on top of the seeds so that there is about 1/8 inch of soil over the seeds. Press down to make sure the seeds have good contact with the soil, but do not pack the soil too hard.
Step 4
Water the soil. If your pots are in a cool location, cover them with plastic wrap to trap in heat, which aids in germination. The seeds should germinate within ten days. Let them grow for two weeks before transplanting them outdoors.
Step 5
Dig holes in the soil where you wish to transplant your forget-me-nots. Gently remove the plants from the six-pack plant pots and set them into the holes. Add soil around the stems and press lightly around the plants. Water only when your plants droop.
Step 6
Spread established forget-me-nots. Walk through the flowers as they begin to die off (in mid-June), and gently kick the plants to loosen and spread the seeds. You can also pull up a clump of flowers and shake them over areas where you would like to grow forget-me-nots the following year.

Step 1
Place potting soil in pots or six-pack inserts. Gently press the soil into the pot, but do not pack it too hard.
Step 2
Gently pour seeds from a packet into your hand. Forget-me-not seeds are very small; provided they are fresh, more than 90-percent of the seeds should germinate. Pinch a small amount of seeds and sprinkle them on top of the potting soil.
Step 3
Sprinkle more potting soil on top of the seeds so that there is about 1/8 inch of soil over the seeds. Press down to make sure the seeds have good contact with the soil, but do not pack the soil too hard.
Step 4
Water the soil. If your pots are in a cool location, cover them with plastic wrap to trap in heat, which aids in germination. The seeds should germinate within ten days. Let them grow for two weeks before transplanting them outdoors.
Step 5
Dig holes in the soil where you wish to transplant your forget-me-nots. Gently remove the plants from the six-pack plant pots and set them into the holes. Add soil around the stems and press lightly around the plants. Water only when your plants droop.

Step 6
Spread established forget-me-nots. Walk through the flowers as they begin to die off (in mid-June), and gently kick the plants to loosen and spread the seeds. You can also pull up a clump of flowers and shake them over areas where you would like to grow forget-me-nots the following year.
2
1


