文章
Miss Chen
2018年09月01日

A standby in the butterfly garden, milkweed (Asclepias syriaca), which grows in U.S. Department of Agriculture plant hardiness zones 3 through 9, provides the sole food source for monarch butterfly caterpillars. This 2 to 3-foot-tall perennial flowers through the summer and is one of several nectar sources for the adult monarch butterflies. With little required care, milkweed is a smart choice for meadows and wild areas of the yard.

Seed Control
Milkweed is best grown in naturalized areas and meadows as it tends to spread and take over more formal garden settings. You can keep it in check by plucking off all the flowers before they turn into seedpods. Use a pair of pruning shears. After clipping, rinse the blades in a solution of 1 part rubbing alcohol to 1 part water then let them dry before storing. Milkweed also spreads -- sometimes aggressively -- by its roots.
Milkweed and Larvae
Monarch butterfly caterpillars rely on the milkweed's leaves for food, but they leave holes behind when they feed. Because of this, milkweed works best in an informal garden setting where the feeding caterpillars can leave ragged-looking plants without ruining your manicured gardens. The caterpillars are easy to find with their striking yellow, white and black stripes.
Slug Problems
While resistant to disease, milkweed does attract slugs. These slow-moving, leaf-eating garden pests damage leaves and flowers when given a chance. If you notice large holes in the leaves, check for slugs -- the best time is after dark with a flashlight -- under the leaves every two to three days. Bring a bucket of water with 1 capful of dish soap added with you. As you pick off the slugs, drop them in the bucket. The soap kills the slugs, eliminating the unpleasant task of crushing them. Wear gardening gloves if you don't like touching the slugs.

Milkweed Aphids
Milkweed aphids suck sap from the plant's leaves. While natural predators usually keep aphids in check, you can use insecticidal soap for severe infestations. Spray the aphids directly with a ready-to-use product until they are saturated. Be careful not to get any on monarch butterfly caterpillars. Because milkweed is such an important plant for the monarch butterfly, avoid treatments when possible and don't use harsher chemical treatments. Sometimes simply spraying aphids with a strong jet of water is enough to get rid of them. Don't mistake the aphids for monarch eggs. Monarch butterflies commonly lay a single egg on each milkweed plant under a leaf. The milkweed aphids are yellow and generally live in colonies while the egg is and white and commonly on its own.
Winter Care and Toxicity
Milkweed plants survive the winter in cold regions by going dormant. In fall, adding a 3- to 4-inch-deep layer of mulch helps insulate the soil. While not required, this helps keep the ground from freezing and thawing and disrupting the roots. In spring, pull back the mulch to give space to the new growth. Plant milkweed away from areas where small children or pets spend time as the leaves are toxic if eaten.

Seed Control
Milkweed is best grown in naturalized areas and meadows as it tends to spread and take over more formal garden settings. You can keep it in check by plucking off all the flowers before they turn into seedpods. Use a pair of pruning shears. After clipping, rinse the blades in a solution of 1 part rubbing alcohol to 1 part water then let them dry before storing. Milkweed also spreads -- sometimes aggressively -- by its roots.
Milkweed and Larvae
Monarch butterfly caterpillars rely on the milkweed's leaves for food, but they leave holes behind when they feed. Because of this, milkweed works best in an informal garden setting where the feeding caterpillars can leave ragged-looking plants without ruining your manicured gardens. The caterpillars are easy to find with their striking yellow, white and black stripes.
Slug Problems
While resistant to disease, milkweed does attract slugs. These slow-moving, leaf-eating garden pests damage leaves and flowers when given a chance. If you notice large holes in the leaves, check for slugs -- the best time is after dark with a flashlight -- under the leaves every two to three days. Bring a bucket of water with 1 capful of dish soap added with you. As you pick off the slugs, drop them in the bucket. The soap kills the slugs, eliminating the unpleasant task of crushing them. Wear gardening gloves if you don't like touching the slugs.

Milkweed Aphids
Milkweed aphids suck sap from the plant's leaves. While natural predators usually keep aphids in check, you can use insecticidal soap for severe infestations. Spray the aphids directly with a ready-to-use product until they are saturated. Be careful not to get any on monarch butterfly caterpillars. Because milkweed is such an important plant for the monarch butterfly, avoid treatments when possible and don't use harsher chemical treatments. Sometimes simply spraying aphids with a strong jet of water is enough to get rid of them. Don't mistake the aphids for monarch eggs. Monarch butterflies commonly lay a single egg on each milkweed plant under a leaf. The milkweed aphids are yellow and generally live in colonies while the egg is and white and commonly on its own.
Winter Care and Toxicity
Milkweed plants survive the winter in cold regions by going dormant. In fall, adding a 3- to 4-inch-deep layer of mulch helps insulate the soil. While not required, this helps keep the ground from freezing and thawing and disrupting the roots. In spring, pull back the mulch to give space to the new growth. Plant milkweed away from areas where small children or pets spend time as the leaves are toxic if eaten.
0
0
成长记
jichi
2018年09月01日

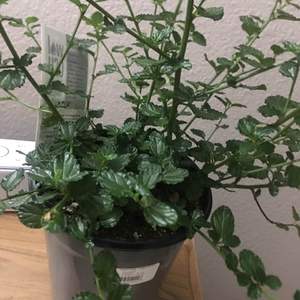
I now added "加州紫丁香 Ceanothus - Yankee Point - California Lilac" in my "garden"

0
0
文章
Miss Chen
2018年08月31日

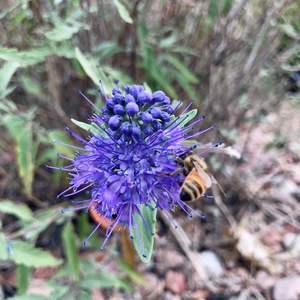
Blue flowers are hard to find in the garden -- most lean toward purple hues. However, Evolvulus glomeratus "Blue Daze" is aptly named: The low-growing, herbaceous perennial features true-blue flowers that stand out against the attractive, olive-green leaves. Perfect for borders or containers, "Blue Daze" blooms all summer long when cared for properly.

Climate and Temperatures
"Blue Daze" is a warmth-loving plant. It is hardy in U.S. Department of Agriculture plant hardiness zones 8 through 11. In cooler climates, it is often grown as an annual or in a container that is brought indoors for the winter. Situate this plant where it will stay nice and warm. In fact, if you have a hot spot in your garden where other plants wilt, replace those plants with this flower -- "Blue Daze" likes it hot. It can even tolerate salty conditions, so if you're near the coast, plant this flower in a hanging container and watch it withstand the salty air. Most outdoor plants die at the first hint of freezing temperatures, so bring container plants indoors well before cool fall temperatures arise. Some "Blue Daze" plants can tolerate a light frost if they are surrounded by a thick layer of mulch.
Light and Location
For "Blue Daze" to bloom properly, it needs full sunlight. Each flower opens for only one day, but it is replaced by a new flower the next day. If the day is cloudy or the plant is shaded, the flower won't open and its brief life is wasted. Locate these plants -- including those grown in containers -- where they will get as much hot, direct sunlight as possible. As far as soil goes, "Blue Daze" tolerates a range of soils, including poor or sandy soil, as long as it is well drained. If you bring a container indoors for the winter, locate it in bright but indirect sunlight and in a cool location.
Food and Water
Because "Blue Daze" is such a prolific bloomer, it benefits from monthly applications of fertilizer during the growing season. Use a bloom-boosting 15-30-15 formulation, water-soluble fertilizer once a month, following the instructions for application on the package. These instructions vary depending on the brand, but in general, dilute 1 tablespoon of the fertilizer in 1 gallon of water and use this solution to water your plants. Because "Blue Daze" thrives in full, hot sunlight, it needs frequent watering. Water when the surface of the soil feels dry to the touch and frequently enough so that the soil is almost continually but barely moist. In the winter, they need little watering.

Pests and Problems
"Blue Daze" is a hardy plant. It does not suffer from serious pest or disease problems. The one thing it cannot tolerate is soggy soil. Extended periods of rain cause fungal problems to develop in the soil, which quickly destroy the shallow roots of the plant. Overwatering leads to the same result, as does poorly drained soils. Plants grown in containers should have drainage holes in the base to prevent this problem, and home gardeners should avoid planting "Blue Daze" in depressions or other locations that tend to collect water.

Climate and Temperatures
"Blue Daze" is a warmth-loving plant. It is hardy in U.S. Department of Agriculture plant hardiness zones 8 through 11. In cooler climates, it is often grown as an annual or in a container that is brought indoors for the winter. Situate this plant where it will stay nice and warm. In fact, if you have a hot spot in your garden where other plants wilt, replace those plants with this flower -- "Blue Daze" likes it hot. It can even tolerate salty conditions, so if you're near the coast, plant this flower in a hanging container and watch it withstand the salty air. Most outdoor plants die at the first hint of freezing temperatures, so bring container plants indoors well before cool fall temperatures arise. Some "Blue Daze" plants can tolerate a light frost if they are surrounded by a thick layer of mulch.
Light and Location
For "Blue Daze" to bloom properly, it needs full sunlight. Each flower opens for only one day, but it is replaced by a new flower the next day. If the day is cloudy or the plant is shaded, the flower won't open and its brief life is wasted. Locate these plants -- including those grown in containers -- where they will get as much hot, direct sunlight as possible. As far as soil goes, "Blue Daze" tolerates a range of soils, including poor or sandy soil, as long as it is well drained. If you bring a container indoors for the winter, locate it in bright but indirect sunlight and in a cool location.
Food and Water
Because "Blue Daze" is such a prolific bloomer, it benefits from monthly applications of fertilizer during the growing season. Use a bloom-boosting 15-30-15 formulation, water-soluble fertilizer once a month, following the instructions for application on the package. These instructions vary depending on the brand, but in general, dilute 1 tablespoon of the fertilizer in 1 gallon of water and use this solution to water your plants. Because "Blue Daze" thrives in full, hot sunlight, it needs frequent watering. Water when the surface of the soil feels dry to the touch and frequently enough so that the soil is almost continually but barely moist. In the winter, they need little watering.

Pests and Problems
"Blue Daze" is a hardy plant. It does not suffer from serious pest or disease problems. The one thing it cannot tolerate is soggy soil. Extended periods of rain cause fungal problems to develop in the soil, which quickly destroy the shallow roots of the plant. Overwatering leads to the same result, as does poorly drained soils. Plants grown in containers should have drainage holes in the base to prevent this problem, and home gardeners should avoid planting "Blue Daze" in depressions or other locations that tend to collect water.
0
0
文章
Miss Chen
2018年08月31日

Winterize both garden-grown and container-grown hostas in the fall to prevent root damage. They will reward this extra winter care with lush new foliage in the spring and showy flowers in the summer. There's only one way to winterize hostas growing in the ground, but a few options exist for container hostas.

Hostas and Winter Damage
Hostas (Hosta spp.) are hardy in U.S. Department of Agriculture plant hardiness zones 3 to 9. They can survive winter temperatures as low as -40 degrees Fahrenheit when planted in the ground. Damage occurs to the root system when temperatures fluctuate. This is a bigger problem for hostas planted in the fall because they have not had a chance to grow their roots deep into the ground, but damage can occur in established hostas, too. As the ground goes through thaws and freezes, it pushes or heaves the hostas up, exposing their roots to the elements.
Hostas in the Ground
Cover hostas with 2 to 3 inches of shredded bark mulch in the fall after the ground freezes to a depth of 3 inches. The mulch will help insulate the soil, reducing the severity of temperature fluctuations, and protect the crowns of the plants. Remove the mulch in the spring when the ground thaws and there is no longer any danger that it will freeze again.
The tops of the hostas must be uncovered right away if new shoots begin to poke through the mulch. It can be left covering the crowns of the plants, though, if there is a chance temperatures may plummet again. Remove mulch from the crowns of the plants and pull it back a few inches away from stems after the danger of freezing temperatures has passed.
Hostas in Containers
Protect container-grown hostas from extreme cold, temperature fluctuations and moisture. Hostas in containers will be subjected to wind-chill temperatures far below what they would experience in the ground, and fluctuations will be more extreme. In addition, moisture will gather in the pots on top of the frozen roots when the sun warms the container, which will cause root rot.

Move hostas into an unheated garage or shed when temperatures begin to drop below freezing. Water them if temperatures warm to above freezing and the soil thaws only if it is completely dry. Set them back outdoors in the spring when temperatures warm to above freezing. If new shoots appear before freezing temperatures are over for the year, move the hostas outdoors to get some sunshine during the day while it is warm then back into the enclosure at night.
Dig holes in the ground large enough to hold the containers and sink the hostas, containers and all, into the ground in the fall before it freezes. Cover them with 2 to 3 inches of shredded bark mulch after the ground freezes. Pile the mulch over the top of the soil within the containers beneath the leaves and add more until plants are covered. This will prevent water pooling on the soil in the containers. Remove mulch in the spring and move the containers back to their usual positions when the danger of freezing weather has passed.
Bunch the potted hostas close together in an area protected from the wind such as right up against the north side of a building or next to the foundation of the house underneath a deck. Pile shredded bark mulch or shredded leaves over the soil in the containers and then over all of the plants to a depth of 2 to 3 inches. Pack it along the outer edge of the group of containers to a thickness of 3 to 4 inches. Uncover them and move them back to their usual locations in the spring when temperatures are likely to stay above freezing.

Hostas and Winter Damage
Hostas (Hosta spp.) are hardy in U.S. Department of Agriculture plant hardiness zones 3 to 9. They can survive winter temperatures as low as -40 degrees Fahrenheit when planted in the ground. Damage occurs to the root system when temperatures fluctuate. This is a bigger problem for hostas planted in the fall because they have not had a chance to grow their roots deep into the ground, but damage can occur in established hostas, too. As the ground goes through thaws and freezes, it pushes or heaves the hostas up, exposing their roots to the elements.
Hostas in the Ground
Cover hostas with 2 to 3 inches of shredded bark mulch in the fall after the ground freezes to a depth of 3 inches. The mulch will help insulate the soil, reducing the severity of temperature fluctuations, and protect the crowns of the plants. Remove the mulch in the spring when the ground thaws and there is no longer any danger that it will freeze again.
The tops of the hostas must be uncovered right away if new shoots begin to poke through the mulch. It can be left covering the crowns of the plants, though, if there is a chance temperatures may plummet again. Remove mulch from the crowns of the plants and pull it back a few inches away from stems after the danger of freezing temperatures has passed.
Hostas in Containers
Protect container-grown hostas from extreme cold, temperature fluctuations and moisture. Hostas in containers will be subjected to wind-chill temperatures far below what they would experience in the ground, and fluctuations will be more extreme. In addition, moisture will gather in the pots on top of the frozen roots when the sun warms the container, which will cause root rot.

Move hostas into an unheated garage or shed when temperatures begin to drop below freezing. Water them if temperatures warm to above freezing and the soil thaws only if it is completely dry. Set them back outdoors in the spring when temperatures warm to above freezing. If new shoots appear before freezing temperatures are over for the year, move the hostas outdoors to get some sunshine during the day while it is warm then back into the enclosure at night.
Dig holes in the ground large enough to hold the containers and sink the hostas, containers and all, into the ground in the fall before it freezes. Cover them with 2 to 3 inches of shredded bark mulch after the ground freezes. Pile the mulch over the top of the soil within the containers beneath the leaves and add more until plants are covered. This will prevent water pooling on the soil in the containers. Remove mulch in the spring and move the containers back to their usual positions when the danger of freezing weather has passed.
Bunch the potted hostas close together in an area protected from the wind such as right up against the north side of a building or next to the foundation of the house underneath a deck. Pile shredded bark mulch or shredded leaves over the soil in the containers and then over all of the plants to a depth of 2 to 3 inches. Pack it along the outer edge of the group of containers to a thickness of 3 to 4 inches. Uncover them and move them back to their usual locations in the spring when temperatures are likely to stay above freezing.
0
0


