文章
Miss Chen
2018年08月26日

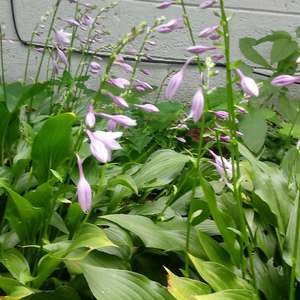
Hostas (Hosta spp.), also called plantain lily, funkia or August lily are cool customers in the shade garden. These herbaceous perennials die back in fall and live through winter in a dormant state, only to grow again the following spring. Hostas have some simple fall grooming needs. If they grow in containers or gardens in warmer climates, you'll also want to tuck them in to maintain a consistent soil temperature.
Hosta Notes

Hostas do best in dappled shade or with two to three hours of morning sun. A well-draining, organic soil that stays moist, never soggy keeps these woodland plants growing and healthy. Garden hostas grow in U.S. Department of Agriculture plant hardiness zones 4 through 8. A few extend past these limits. The old-fashioned August lily (Hosta plantanginea) grows in USDA zones 3 through 9 and Siebold's hostas (Hosta sieboldiana "Elegans") grow in USDA zones 4 through 9.
Basic Trimming

Trim dead leaves down to the ground in late fall to prevent crown rot and to discourage rodents and slugs from adopting the pile for winter shelter. Whenever you groom hostas, clean shears and wipe cutting surfaces, which can become pitted, with a half-and-half mixture of rubbing alcohol and water to guard against transmission of fungal infections or rots.
End of Season Care

When air temperatures begin to drop below 50 degrees Fahrenheit at night, the outer leaves begin to droop and leaf production in the center of each crown stops. Eventually, all of the leaves will become desiccated and drop over. It's important for your hostas to continue to receive 1 inch of water throughout the fall, but if soil deficiencies necessitate fertilizing hostas, stop feeding them in July or early August or you'll force them to continue to produce leaves. This growth will be pale and tender, making the whole plant -- including its crown and roots -- susceptible to frost damage. Wait until leaves fall over to groom hostas because they are needed after flowering to produce food for next year's growth.
Preparing Container Hostas for Winter

If you have the space, sink potted hosta plants into the soil to keep the soil temperature from fluctuating. If the pots cannot be buried, move the plant containers into a sheltered area once you've trimmed the plants. Put them against a wall under an overhang or in an unheated building so the pots can't collect water over winter.
Mulch to Regulate Temperature

In USDA zones 6 through 9 or if your hostas are in containers, mulch hostas with a 3- to 4-inch layer of pine straw to even out soil temperatures. All hostas grow and flower best when subjected to a period of freezing or near-freezing temperatures during their dormant periods. An Auburn University study found that, although the number of days or weeks varies by variety and cultivar, chilling encourages earlier emergence and better growth. Mulching keeps soil from heating and cooling each day and night, interrupting chilling periods. Mulch is not necessary in USDA zones below 6 where winter temperatures stay well below freezing for months.
Hosta Notes

Hostas do best in dappled shade or with two to three hours of morning sun. A well-draining, organic soil that stays moist, never soggy keeps these woodland plants growing and healthy. Garden hostas grow in U.S. Department of Agriculture plant hardiness zones 4 through 8. A few extend past these limits. The old-fashioned August lily (Hosta plantanginea) grows in USDA zones 3 through 9 and Siebold's hostas (Hosta sieboldiana "Elegans") grow in USDA zones 4 through 9.
Basic Trimming

Trim dead leaves down to the ground in late fall to prevent crown rot and to discourage rodents and slugs from adopting the pile for winter shelter. Whenever you groom hostas, clean shears and wipe cutting surfaces, which can become pitted, with a half-and-half mixture of rubbing alcohol and water to guard against transmission of fungal infections or rots.
End of Season Care

When air temperatures begin to drop below 50 degrees Fahrenheit at night, the outer leaves begin to droop and leaf production in the center of each crown stops. Eventually, all of the leaves will become desiccated and drop over. It's important for your hostas to continue to receive 1 inch of water throughout the fall, but if soil deficiencies necessitate fertilizing hostas, stop feeding them in July or early August or you'll force them to continue to produce leaves. This growth will be pale and tender, making the whole plant -- including its crown and roots -- susceptible to frost damage. Wait until leaves fall over to groom hostas because they are needed after flowering to produce food for next year's growth.
Preparing Container Hostas for Winter

If you have the space, sink potted hosta plants into the soil to keep the soil temperature from fluctuating. If the pots cannot be buried, move the plant containers into a sheltered area once you've trimmed the plants. Put them against a wall under an overhang or in an unheated building so the pots can't collect water over winter.
Mulch to Regulate Temperature

In USDA zones 6 through 9 or if your hostas are in containers, mulch hostas with a 3- to 4-inch layer of pine straw to even out soil temperatures. All hostas grow and flower best when subjected to a period of freezing or near-freezing temperatures during their dormant periods. An Auburn University study found that, although the number of days or weeks varies by variety and cultivar, chilling encourages earlier emergence and better growth. Mulching keeps soil from heating and cooling each day and night, interrupting chilling periods. Mulch is not necessary in USDA zones below 6 where winter temperatures stay well below freezing for months.
0
0
文章
Miss Chen
2018年08月26日

When shopping for new plants, many gardeners keep an eye out for something pretty to grow in that shady area of the garden. Found in nature growing on the forest floor, horny goat weed (Epimedium spp) is worth considering, for its bronze and red-tipped foliage as well as its winter hardiness. Also known as bishop's hat and barrenwort, horny goat weed is a perennial flowering plant, hardy to U.S. Department of Agriculture zones 4 through 8.
Step 1
Add 2 inches of peat moss and 3 inches of compost to the planting soil and mix it into the top 10 inches. This will start your horny goat weed off right by giving it a rich soil in which to grow.
Step 2
Dig planting holes, 8 to 10 inches apart, that are the same depth and three times the width of the nursery pot in which the horny goat weed is growing. Gently remove the plants from the pots and place the roots in the hole. Backfill the hole with soil, pressing lightly around the base of the plants.
Step 3
Water the horny goat weed immediately after planting and keep the soil moist at all times. During hot, dry or windy weather, check the soil more frequently and water if needed.
Step 4
Apply 2 to 3 inches of compost to the top of the soil, completely surrounding the horny goat weed, in early spring.
Step 5
Cut off any winter-damaged foliage and stems in the spring. Don't be afraid to trim the entire plant back to the ground if needed, as it will grow right back.
0
0


