


成长记
imightbeagiant
2017年09月28日

I new added a "First attenpt at propagation. Bottom right is Jade, not sure of others." in my "garden"

1
0
成长记
imightbeagiant
2017年09月28日
I new added a "Kalanchoe, free from Kensington Florist (not flowering)" in my "garden"

2
0
成长记
imightbeagiant
2017年09月28日
I new added a "Pachyphytum? Etoliated, but producing babies. From Safeway." in my "garden"

0
0
文章
Dummer. ゛☀
2017年09月28日

Sunflowers (Helianthus annuus) are perhaps one of the easiest flowers that you can grow in the garden. They are so easy to grow that they are frequently used to introduce very young gardeners to the joys of gardening. Many gardeners fondly remember planting the black and white seeds of giant Sunflowers and watching in wonder as they grew to tower into the sky.
But just because Sunflowers are easy to grow does not mean that they should be dismissed from the grown-up garden. The variety of Sunflowers available to the home gardener is absolutely amazing and, as an added bonus, Sunflowers can help attract some local birds to your garden.
Sunflowers come in sizes that range from dwarf varieties, which can be as small as a foot and a half tall, to giant varieties, which grow to be over twelve feet tall. You can find Sunflowers in colors from very pale yellows to dark, burgundy reds and all shades of yellow, red and orange in-between.
Sunflowers also come in a variety of petal counts. While the single layer of petals is still the most common, you can find quite a few Sunflower varieties with double and teddy bear petal layers. All of these sunflower options ensure that when you add these flowers to your garden, it will be anything but blah.
Growing Conditions and General Care
If you decide to add Sunflowers to your garden, there are a few things you will want to keep in mind.
First of all, they are called sunflowers for a reason. They need sun. Make sure that the location you choose for your Sunflowers gets full sun.
Second, you do not need to worry about soil too much. They are not picky about the conditions of the soil, but they are plants. They will do better in better soil.
Third, Sunflower seed shells do contain a substance that is toxic to grass. So, you will need to either harvest the Sunflower heads before the seeds begin to fall out or you will need to plant your Sunflowers in a location where you do not mind any nearby grass being killed.
Fourth, keep in mind the height of the Sunflower variety you have chosen. A giant, twelve foot variety will end up acting very much like a small tree and may shade the surrounding flowers.
As mentioned above, Sunflowers can also help you to attract local birds to your garden. When the growing season is coming to a close, you can harvest your sunflower heads and use some of the seeds to feed the birds over the winter. You have two options when using sunflower seeds to feed the birds. The first is that you can simply leave the Sunflower heads outside for the birds. This option is the easiest but be warned that the birds will make a mess when pulling the seeds out of the Sunflower head. Your other option is to remove the seeds from the head and to put them in your bird feeder. This method is a little more work but will be neater in the long run. Also, putting the seeds in a birdfeeder will also help to keep your feathered friends safe as the birdfeeder will be up off the ground and out of reach of many of the animals that eat birds.
So, while you may have fond memories of tall yellow Sunflowers that you planted as a child, give this old garden favorite a new try and rediscover the world of sunflowers.
1
1
文章
Dummer. ゛☀
2017年09月28日
Many people swear by homegrown Chamomile tea to calm their nerves. This cheery herb can add beauty to a garden and may have sedative qualities. Chamomile growing in the garden is both useful and visually pleasing.
There are two kinds of Chamomile. The first is Roman Chamomile (Chamaemelum nobile) and the other is German Chamomile (Matricaria chamomilla). The Roman variety is the True Chamomile but German variety is used herbally for nearly the same things. The steps for growing Roman Chamomile and growing German Chamomile are also nearly identical.
Roman Chamomile is also known as Russian Chamomile and English Chamomile. It is a creeping ground cover that grows like a mat. It has small daisy like flowers with yellow centers and white petals. The leaves are feathery. It is a perennial.
German Chamomile looks similar to Roman Chamomile with the differences being that German Chamomile grows upright to the height of about 1 to 2 feet (30 to 60 cm) and is a reseeding annual.
Growing Conditions and General Care
As stated, both kinds of Chamomile grow in similar conditions, so from here on down, we will refer to them as just Chamomile.
You can grow Chamomile herb in USDA plant hardiness zones 3 to 9. Chamomile grows best in cool conditions and should be planted in part shade, but will also grow full sun. The soil should be dry.
Once your Chamomile is established, it needs very little care. Like most herbs, it grows best when it is not fussed over. Too much fertilizer will result in lots of weakly flavored foliage and few flowers.
Chamomile is drought tolerant and only needs to be watered in times of prolonged drought.
Propagation
Plant Chamomile in the spring from either seeds or plants. It’s easier to establish Chamomile herb in your garden from plants or divisions than from seeds, but growing Chamomile from seed is also relatively easy.
Pests and Diseases
For the most part, Chamomile is not affected by many pests. It is often recommended as a companion plant to plant in the vegetable garden as its strong scent often keeps pests away. That being said, a Chamomile plant weakened by lack of water or other issues may be attacked by aphids, mealybugs or thrips.
0
0
文章
Dummer. ゛☀
2017年09月28日
Purple Coneflowers (Echinacea) are quintessential prairie plants. They are hardy, drought tolerant, long-blooming, and are being cultivated in a ever widening range of colors. It’s hard to find a garden without at least one variety. Echinacea is a native North American genus with about 10 species. Not all make great garden plants. Echinacea purpurea is by far the most popular. It has a more fibrous root system, rather than the long tap root and woody crown found in other wilder species, and is more adaptable to garden conditions and more forgiving of dividing and transplanting.
The daisy-like flower is actually made up of several small flowers. The petals are sterile and are there to lure insects toward the many fertile flowers in the central disk or cone. These flowers are rich in nectar and very popular with both bees and butterflies. Flowers were generally some shade of purple or lavender, with a dark center cone. Much hybridization has been taking place and you can now find petal colors ranging from white to green through yellow, orange and deep reds. The common name “coneflower” refers to the way the petals angle backwards, away from the center, forming a cone.
Growth starts with a clump of basal leaves, which eventually send up flower stems in mid-summer. The leaf shape depends on the variety. Many have oval leaves with a wide base, but some from dry, western areas often have narrow leaves.
Growing Conditions
Light: To get the most blooms and the sturdiest plants, plant them in a spot that gets at least 5 hours of full sun a day. They will tolerate partial shade, but plants may flop or strain to reach the sun.
Water: In seasons with normal rainfall, additional watering is not necessary
Hardiness Zones: Coneflowers will grow well just about anywhere and are labeled USDA Hardiness Zones 3-9. You may want to give them a little winter protection their first year, but once established, they are rugged and hardy.
Soil: Most Coneflowers grown in gardens prefer a neutral soil pH of about 6.5 to 7.0.
Fertilizer: Although they thrive best in a soil high in organic matter, too much supplemental fertilizer can cause them to become leggy. The new hybrids need more TLC than the species.
Planting
If you don’t want to start your own seeds, there are plenty of varieties available for purchase as plants, especially through mail order. Plants can also be divided or grown from stem cuttings. Coneflower can be planted in either spring or fall. Be sure to allow for good air circulation to prevent fungal diseases.
Coneflower hybrids tend to be sterile, but the species are relatively easy to grow from seed. If you’d like to save seed, wait until the cone has fully dried. It will be darker in color and stiff to the touch. The seeds are attached to the sharp spines. You don’t need to separate them, before storing or planting. You could plant the whole cone, if you like, although you’ll want to divide the many seedlings you’ll wind up with. (If you grow multiple varieties and collect the seed yourself, you may well wind up with some interesting crosses.)
The seeds germinate best with some cold stratification. The easiest route would be to sow them outdoors in the fall, either in the ground or winter sow in pots. If you are going to start seed indoors, simulate the chilling period by soaking the seeds in water and then placing the slightly damp seed in a sealed container in the refrigerator for 8 – 10 weeks. Then take them out and plant as you normally would. They should germinate within 10 – 14 days.
Pests and Diseases
For the most part, Coneflower have very few problems. I already mentioned giving them good air circulation, so they aren’t bothered by fungal diseases. If you should see mildew or spots on the leaves, simply cut them back and let them fill back in.
Aster yellows, a systemic plant disease that causes growth deformities in the flowers. It can affect hundreds of different flowers, not just those in the Aster Family. There is not known cure and it is spread by a leafhopper, so affected plants should be removed and destroyed as soon as possible, to protect nearby plants.
Grower’s Tips
Coneflowers are often listed as drought tolerant, but they will do much better with regular water. I leave the plants standing through winter, to feed the birds. Shearing them back in the spring will result in bushier plants that bloom longer into the season. Deadheading is the primary maintenance required with Coneflowers. They are prolific bloomers and keeping them deadheaded will keep them in bloom all summer. Luckily each flower remains in bloom for several weeks. Flowers start blooming from the top of the stem. As the initial flower fades, more side shoots and buds will form along the stem. Keep the plants deadheaded and you’ll keep getting more flowers.
0
0
文章
Dummer. ゛☀
2017年09月28日
If you want your neighbors to think you’re an award-winning gardener, try planting dahlias in your garden this year. Just when everything else starts to show the strain of midsummer, Dahlias begin a showstopping performance that lasts through fall. Dahlias need just a little bit of special care in some climates, but the rewards far outweigh the work.
About Dahlias
Buying: Dahlias are sold as tubers, but they may also be available planted in pots at garden centers in the spring. For the most interesting selection, visit your nearest Dahlia society.
Cold Hardiness: Dahlias are considered true perennials only in zones 6-7 and warmer. In cooler climates, they can be treated like annuals, or you can dig up and store the tubers over the winter. Cold hardiness for Dahlias depends on the variety, so check the label when buying.
Size: Dahlias range from foot tall dwarf varieties to towering 8 feet (2.4 m) giants.
Quality: Look for plump, firm tubers with no spoiled spots and at least one eye. Unlike potatoes, Dahlia tubers have eyes only on the top, where the stem meets the root.
Growing Conditions
Light: Full sun 6-8 hours a day is ideal, although if you live in a hot climate you may want to give them a little cooling afternoon shade.
Soil: Loose, fertile, well-draining, slightly acidic soil. Dahlias put out tiny feeder roots that require light soil that holds moisture without being soggy. Clay soil should be amended with compost, sand, and/or humus.
Water: Dahlias need regular water but will rot in heavy wet soil.
Fertilizer: Dahlias need lots of nutrients, especially when blooming. Rich soil and balanced organic fertilizer will help.
Cautions: Dahlias are very susceptible to rot and freeze, so keep this in mind when choosing your planting site.
How to Plant
When to Plant: Plant Dahlias in spring, after all danger of frost has passed. If the weather has been soggy, wait until the soil dries out a little.
Soil Preparation: Till the soil about a foot deep. Work in plenty of well-rotted compost, sand, or humus. Avoid manure or fresh compost – it’s too high in nitrogen. If you’re buying soil, make sure it hasn’t been treated with weed preventers since Dahlias are very susceptible to herbicides.
Planting: Plant Dahlia tubers about 2 feet (60 cm) apart and 6 inches (15 cm) deep, with the eyes facing up.
Watering: Ideally, you shouldn’t water new Dahlias, but let the spring rains work their magic. If it’s already hot and dry, you can give them a light watering.
Support: Taller varieties need stakes for support. Install a bamboo stake or tomato cage when planting, so that you don’t cause damage later.
Identify: Tag plants with the name of the variety to prevent confusion if you dig them up to keep over the winter.
Mulch: Add a couple of inches of mulch to hold in moisture.
Growing Tips
Fertilizing: Feed Dahlias about once a month with an organic fertilizer lower in nitrogen and higher in phosphorus and potassium, such as a 1-2-2 ratio. With enough compost, your Dahlias will do fine without fertilizer.
Watering: Make sure your Dahlias get an inch of water per week. Keep track of rainfall so that the water is consistent.
Deadheading: Clip off spent blossoms to encourage more blooming.
Disbudding: While optional, some gardeners remove many of the flower buds to focus the plant’s energy on fewer, larger and showier blooms with long stems. The flower buds come in clusters of three. If desired, remove the two side buds and allow the middle one to grow, and keep pinching off any more side buds that form along the end of the stem.
Pinching: For a more natural look, pinch back Dahlia plants when small to encourage branching.
Dividing: Dahlias can be divided in fall or spring. Dig up the tubers and use a sharp knife to cut into sections, making sure each section has at least one eye. Allow tubers to dry overnight before replanting.
Overwintering Outdoors: If Dahlias are hardy in your zone, simply cut them back after the first heavy frost and apply an extra layer of mulch to protect them from the cold. Remove the extra mulch in spring.
Overwintering Indoors: In colder climates, dig up and store the tubers in a basement or garage, then divide and replant them in the spring.
Weeding: Hand pull weeds around Dahlias, or smother with mulch. Don’t use any sprays.
Cut Flowers: Dahlias make stunning bouquets! Cut the blooms in early morning for best results.
1
1
文章
Dummer. ゛☀
2017年09月28日
What southern garden is complete without the majestic, fragrant Magnolia tree? If you’ve long admired the beauty of Magnolias, you’ll be happy to learn that they’re quite easy to grow. And with over 80 species native to North America and Asia, there’s sure to be one that’s right for your yard.
With their glorious flowers and dramatic foliage, magnolias are a garden favorite. Magnolias:
– Require very little care.
– Are resistant to many diseases and pests.
– Tolerate harsh Southern summers.
– Provide year-round beauty.
– Seeds and foliage are favorites of migrating birds.
As you dream about Magnolias in your yard, keep in mind that there are many different species and varieties to choose from. They range in size from 20 to 80 feet (6 to 24 m) tall, with both evergreen and deciduous species.
Growing Conditions
Although different species of Magnolia can tolerate slightly different conditions, in general they will do best with:
Soil: Slightly acidic, moist, loose, well-draining soil. To mimic Magnolia’s natural conditions, amend heavy soil with peat moss and compost.
Hardiness: Grow best in Zones 7-10, depending on variety, with a few cultivars hardy to zone 5.
Light: Full sun to partial shade. Moist, peaty soil can help Magnolias tolerate full sun. If you’re pushing the limits of cold tolerance, avoid planting Magnolias in southern exposure since the leaves can be damaged by winter sun and flowers may open prematurely.
Water: Magnolias benefit from irrigation the first few years, then they are tolerant of moderate drought.
Space: They need room to grow to their full mature size and width. While looking small when first planted, over time they’ll grow to fill up the space.
Flowers: Some varieties of Magnolia don’t bloom until 15 years old, so be sure to choose one that’s fits your needs and expectations. Grafted plants (rather than seed-grown) bloom sooner.
Planting Tips
Timing: Plant container-grown and balled-and-burlapped Magnolias in fall or spring. Plant field-grown or transplanted Magnolias in early spring. Avoid fall planting if you’re pushing the limits of cold tolerance.
Spread Roots: When planting, be sure to cut any roots that are circling the root ball. Magnolias have a tendency to girdle (or become rootbound) if the roots aren’t spread out.
Water: Give your new Magnolia one inch of water per week.
Fertilizer: Don’t fertilize your newly planted Magnolia until next growing season. Then for the next three years or so, feed your Magnolia with a balanced organic fertilizer every other month between March and September, cutting back to once or twice per season after that.
Support: Use stakes and lines to stabilize your new magnolia since it will be top-heavy.
Growing Tips
Problems: Magnolias are generally trouble-free, and in most cases, minor problems – such as scale or leaf spots – can be left untreated.
Pruning: If you want to prune or shape your Magnolia, do it while the tree is very young since large branches don’t heal very well from pruning.
Bark Damage: Magnolias are susceptible to bark damage and breakage, so avoid hitting them with the string trimmer or lawn mower.
Propagating: You can propagate Magnolias by collecting the seeds, or take semi-hardwood cuttings in late summer. Cuttings can take up to a year to root.
Transplanting: Magnolias have an enormous, rope-like root system. They don’t usually tolerate transplanting once the trunk is 4 inches (10 cm) or larger in diameter.
0
0
文章
Dummer. ゛☀
2017年09月28日
Polygonatum also known as King Solomon’s Seal or Solomon’s Seal is a close relative of the Lily of the Valley, with several similar species that are native to North America, northern Europe and Siberia, and cultivated as popular garden ornamentals. The hardy perennial has stems of 3 feet (90 cm) in height that finally curve gracefully and bear pale green, oval leaves and drooping clusters of creamy white flowers, followed by blue-black berries.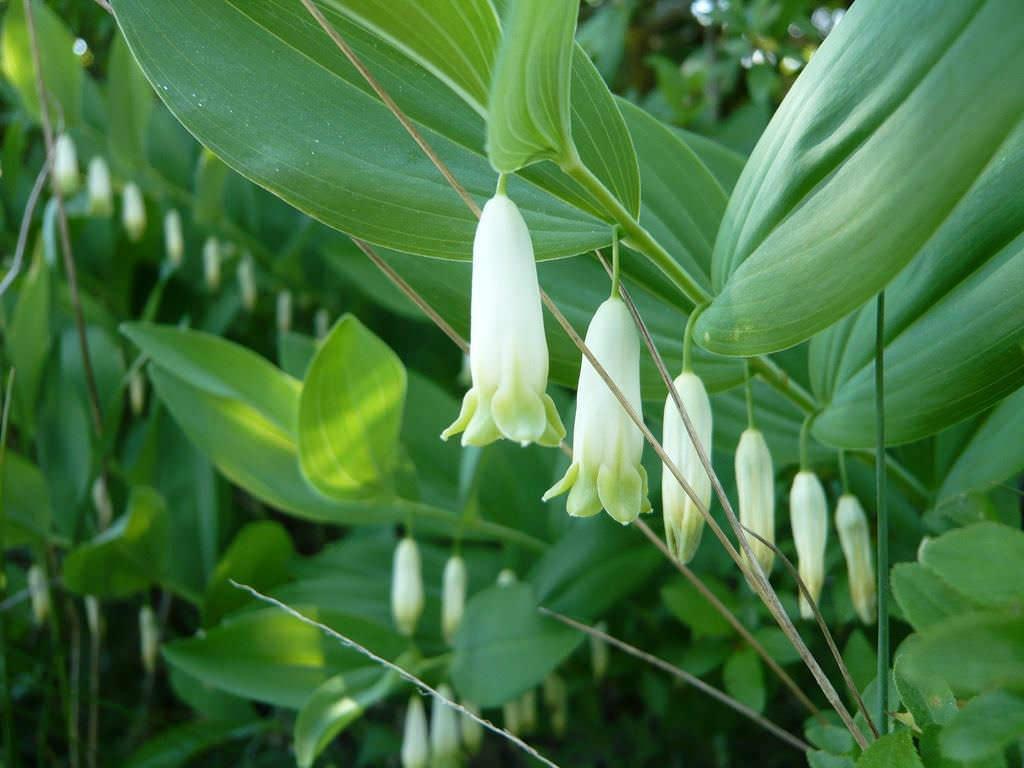
Solomon’s Seal plants are an excellent choice for woodland or shade gardens and for using as background plantings with hardy ferns. They look great when planted in large containers. Solomon’s Seal plants are usually grown from rhizomes which should be planted 2 inches (5 cm) deep in the spring or fall.
Solomon’s Seal has a rich history that goes back many thousands of years. Herbalists and healers, both in Europe and North America and the Far East, have written about its diverse effects on numerous conditions. It can be used as a herbal tincture, salve, tea or supplement. As an alternative remedy, it may offer relief, healing or mending to sports injuries and other conditions related to tendons, joints, ligaments, bones, bruises, connecting tissues, cartilage, etc. It also soothes and repairs gastrointestinal inflammation and injuries. It is effective for feminine issues, such as menstrual cramps, PMS, bleeding, and the like. Additionally, it is known to lower blood pressure and relieve dry coughs.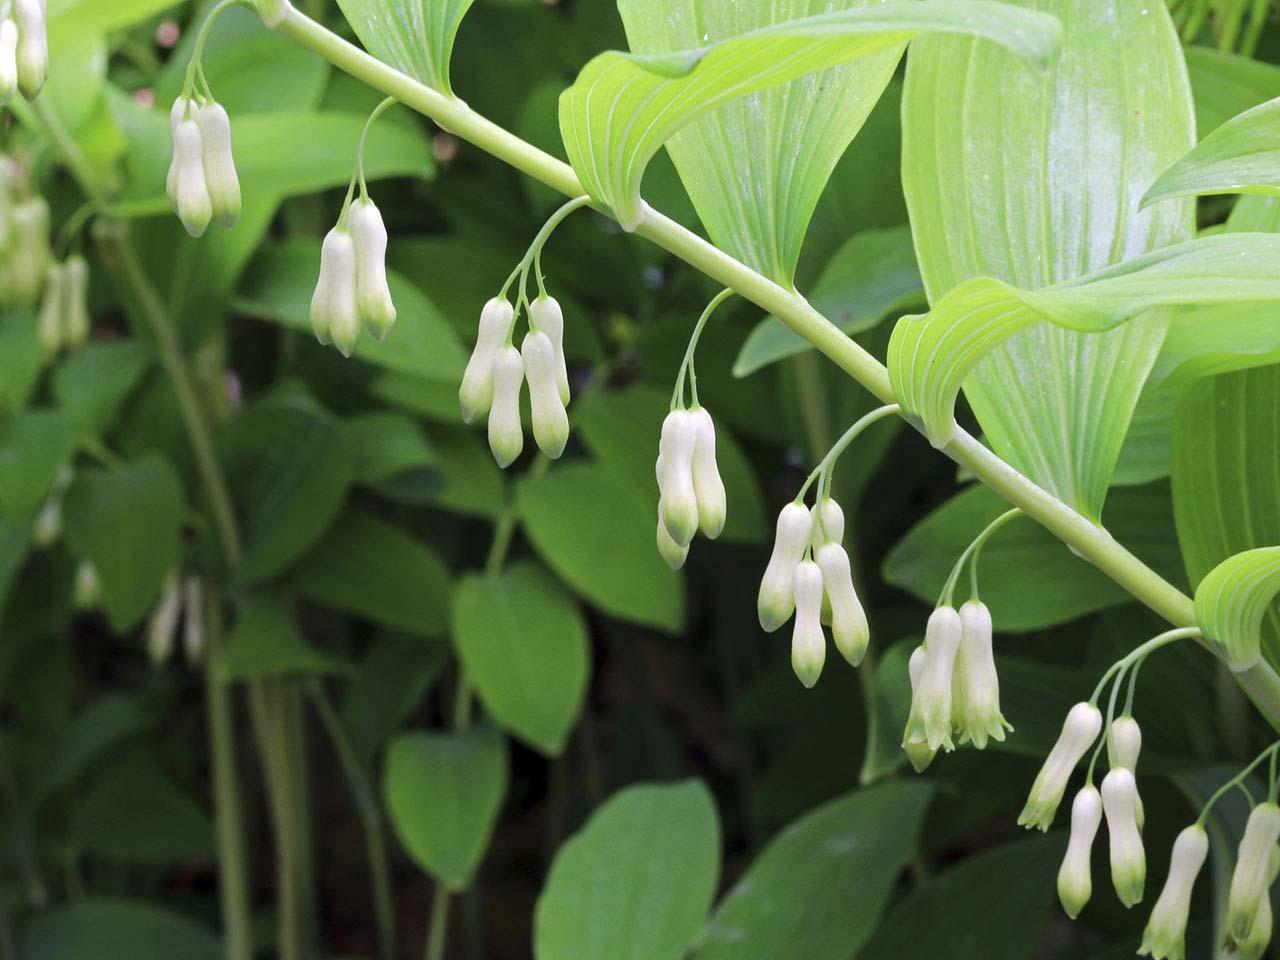
Growing Conditions
Plants are usually started by transplants or rhizomes. Seeds of Polygonatum can take up to 2 years to sprout, so you will get some seeding in established plantings.
Solomon’s Seal like a rich organic soil with a pH in the acidic to neutral zone. They need some shade to truly thrive. Damp shade is even better, although once established, they are quite drought tolerant. Plants can be started in the spring or fall. Plant only 1 to 2 inches (2.5 to 5 cm) deep and about 2 to 3 inches (5 to 7.5 cm) apart.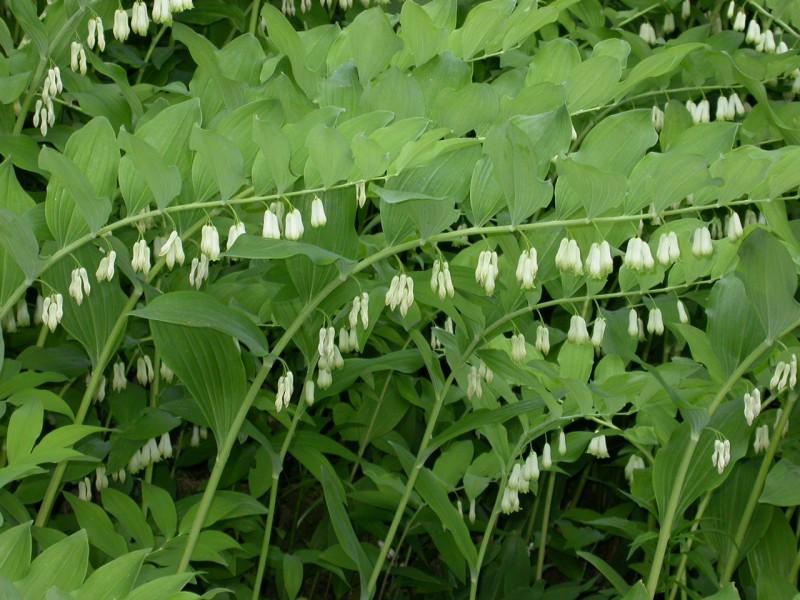
General Care
Solomon’s Seal seldom needs division. It takes several years before a clump is large enough to divide for propagation purposes. When ready, divide in early spring or fall and leave several buds on each division, for the best success. The rhizomes can be divided even further, but it will take longer for them to become established. Another option is to remove and plant just the offsets at the out edges of a clump.
Solomon’s Seal does not require deadheading. The flowers are small and will drop off naturally. The foliage remains attractive all season, so the plant is virtually maintenance free. The stems even disconnect from the rhizomes on their own, after frost. But before that, the foliage turns a nice golden yellow.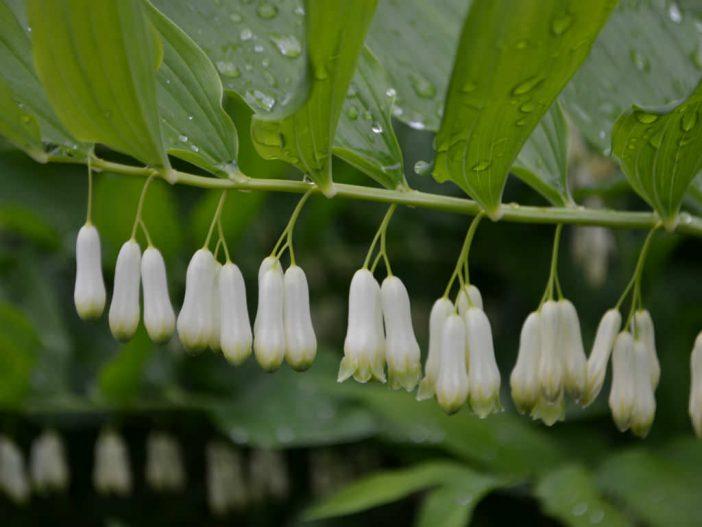
Pests and Diseases
Healthy Solomon’s Seal growing in good conditions seem to have few problems. If the weather is extremely damp, you may see signs of powdery mildew or another fugal disease. These should ameliorate as things dry out. Better air circulation will also help. Slugs and snails can also become a problem in damper areas.
0
0
文章
Dummer. ゛☀
2017年09月28日
While often sold as a flowering perennial, Yarrow (Achillea millefolium) is actually an herb. Whether you decide to grow Yarrow in your flower beds or in your herb garden, it’s still a lovely addition to your yard.
Yarrow has many uses as an herb. It is commonly used as a medicinal herb that can treat the bleeding of minor wounds, swollen or cramping muscles, reducing fever or to help with relaxing. As with any medicinal herb, it should not be taken without first consulting a physician. On the non-medicinal side, Yarrow is an astringent and makes a good facial wash or shampoo. Whether you grow Yarrow as a decorative plant or an herb, you can be sure that it will add beauty to your garden. Since Yarrow care is so easy, you have nothing to lose by giving this ancient herb a small place in one of your flower beds.
Growing Conditions and General Care
It is most often propagated by division, so chances are you’ll buy your Yarrow as a plant. Space your plants 12 to 24 inches (30 to 60 cm) apart if you’re planting more than one plant.
You can also start your Yarrow from seed. Start seeds indoors about six to eight weeks before your last frost date. Sow the seeds in moist, normal potting soil. The seeds should just barely be covered by the potting soil. Place the pot with the seeds in a sunny and warm location.
The seeds should germinate in 14 to 21 days, depending on the conditions. You can speed up the germination by covering the top of the pot with plastic wrap to keep in moisture and heat. Remove the plastic wrap once the seeds have sprouted.
Regardless of whether your plants are grown from seed or bought as full plants, you will want to plant them in full sun. They thrive in a wide variety of soils but do best in well drained soil. Yarrows will even grow in very poor dry soils with low fertility soil.
Some caution should be taken when growing Yarrow, as in the right conditions, it can become invasive and will then be in need of control.
Once you have planted your Yarrow, it needs little care. It doesn’t need to be fertilized and only needs to be watered during times of severe drought.
While Yarrow needs little care, it is susceptible to a few diseases and pests. Most commonly, plants will be affected by either botrytis mold or powdery mildew. These will both appear as a white powdery covering on the leaves. Both can be treated with a fungicide. Yarrows are also occasionally affected by spittlebugs.
0
0
文章
Dummer. ゛☀
2017年09月28日
Growing Blanket Flowers (Gaillardia) are an interesting and colorful addition to the flower bed or garden, offering long lasting blooms if deadheaded, a necessary part of the care of Blanket Flowers. A member of the Daisy family, flowers are similar to those of the familiar Wildflower.
Blanket Flowers are annual or perennial herbs or subshrubs, sometimes with rhizomes. The stem is usually branching and erect to a maximum height around 32 inches (80 cm). The leaves are alternately arranged. Some Gaillardias have only basal leaves. They vary in shape. They are glandular in most species. The inflorescence is a solitary flower head. The head can have 15 or more ray florets, while some Blanket Flowers lack any ray florets. They can be most any shade of yellow, orange, red, purplish, brown, white, or bicolored. They are sometimes rolled into a funnel shape. There are many tubular disc florets at the center of the head in a similar range of colors, and usually tipped with hairs. The fruit usually has a pappus of scales.
Learning how to grow Blanket Flower is a fairly simple process. They are easily started from seeds or may be purchased as seedlings for a garden display of blooms in red and yellow colors of the traditional Indian blanket.
Growing Conditions and General Care
Sow seeds into a well-draining soil and cover slightly. Although drought tolerant once established, care of Blanket Flowers includes keeping the seeds moist until germination occurs. Once established, occasional watering should become a part of Blanket Flowers’ care. This assists in a longer display of the colorful blooms.
Care of Gaillardias includes planting in a full sun location to keep this fast growing specimen happy. As a native plant to the central United States and Mexico, Blanket Flower is a heat loving flower that attracts butterflies. Growing Blanket Flowers are drought tolerant and do not like wet feet from soggy soil.
Now that you are familiar with growing Blanket Flowers, you can add then to a bed or border for eye catching color. Growing Blanket Flowers can naturalize in a meadow or field adding hues of color. Easy care of Blanket Flowers makes them an ideal specimen for many landscape uses.
0
0
文章
Dummer. ゛☀
2017年09月28日
Planting Speedwell (Veronica officinalis) in the garden is a great way to enjoy long-lasting blooms throughout the summer season. These easy-care plants don’t require much upkeep once established, making them ideal for the busy gardener.
An easy to care for perennial with flowers in an array of vibrant blues, pinks and white, the Speedwell is drought resistant but should be watered in the summer when there is less than an inch of rainfall per week. The plant has a long blooming season, from June to August, and is fairly pest and disease resistant as well, with the exception of some issues like powdery mildew, spider mites, and thrips.
Speedwell perennials are reportedly deer and rabbit resistant, but butterflies and hummingbirds are attracted to their dizzying hues. Flowers will bloom for six to eight weeks throughout the summer months and, as a result, make beautiful cut flower additions to vase arrangements or for container gardening in mixed flower groupings.
Growing Conditions
Speedwell thrives in conditions as wide ranging as full sun to partial shade and in loamy, sandy or clay dense soils. However, it does prefer a sunny location with well draining soil. The soil pH can be as liberal as neutral, alkaline or acidic, with moisture content from average to quite moist.
The hardy medium sized plant, with striking 1 to 3 foot (30 to 90 cm) flower spikes, flourishes in USDA hardiness zones 3-8. The Speedwell is tolerant of a variety of conditions but prefers full sun and well drained soil.
Speedwell can be sown from seed; however, it is more commonly purchased from a nursery so planting it in the garden can take place right away in spring.
General Care
Speedwell plant care is relatively low maintenance. In order to facilitate maximum blooming, it is advisable to remove the faded spikes from Speedwell and periodically divide the plant every few years in the early spring or fall.
The tallest Speedwell specimens generally require staking, and in late autumn after the first frost, cut stems back to an inch or so above ground level.
1
1
文章
Dummer. ゛☀
2017年09月28日
Most gardeners consider Dandelions a weed and are looking for information on how to remove it from their garden. But, once you get to know a little more about this nutritious plant, you may find yourself also wondering how to grow and harvest Dandelion plants for yourself.
While Dandelions can be a nuisance in the lawn, they are also a surprising source of nutrients. Dandelion greens contain vitamin C, potassium, calcium, iron, magnesium, phosphorus, thiamine, riboflavin, beta carotene and fiber. They are actually more nutritious than most of the fruits and vegetables you can buy in the grocery store.
It is also touted as being beneficial to your liver, kidneys, blood and digestion. Not to mention that it supposedly helps with acne, weight-loss, blood pressure and cholesterol levels. It is nearly a perfect food.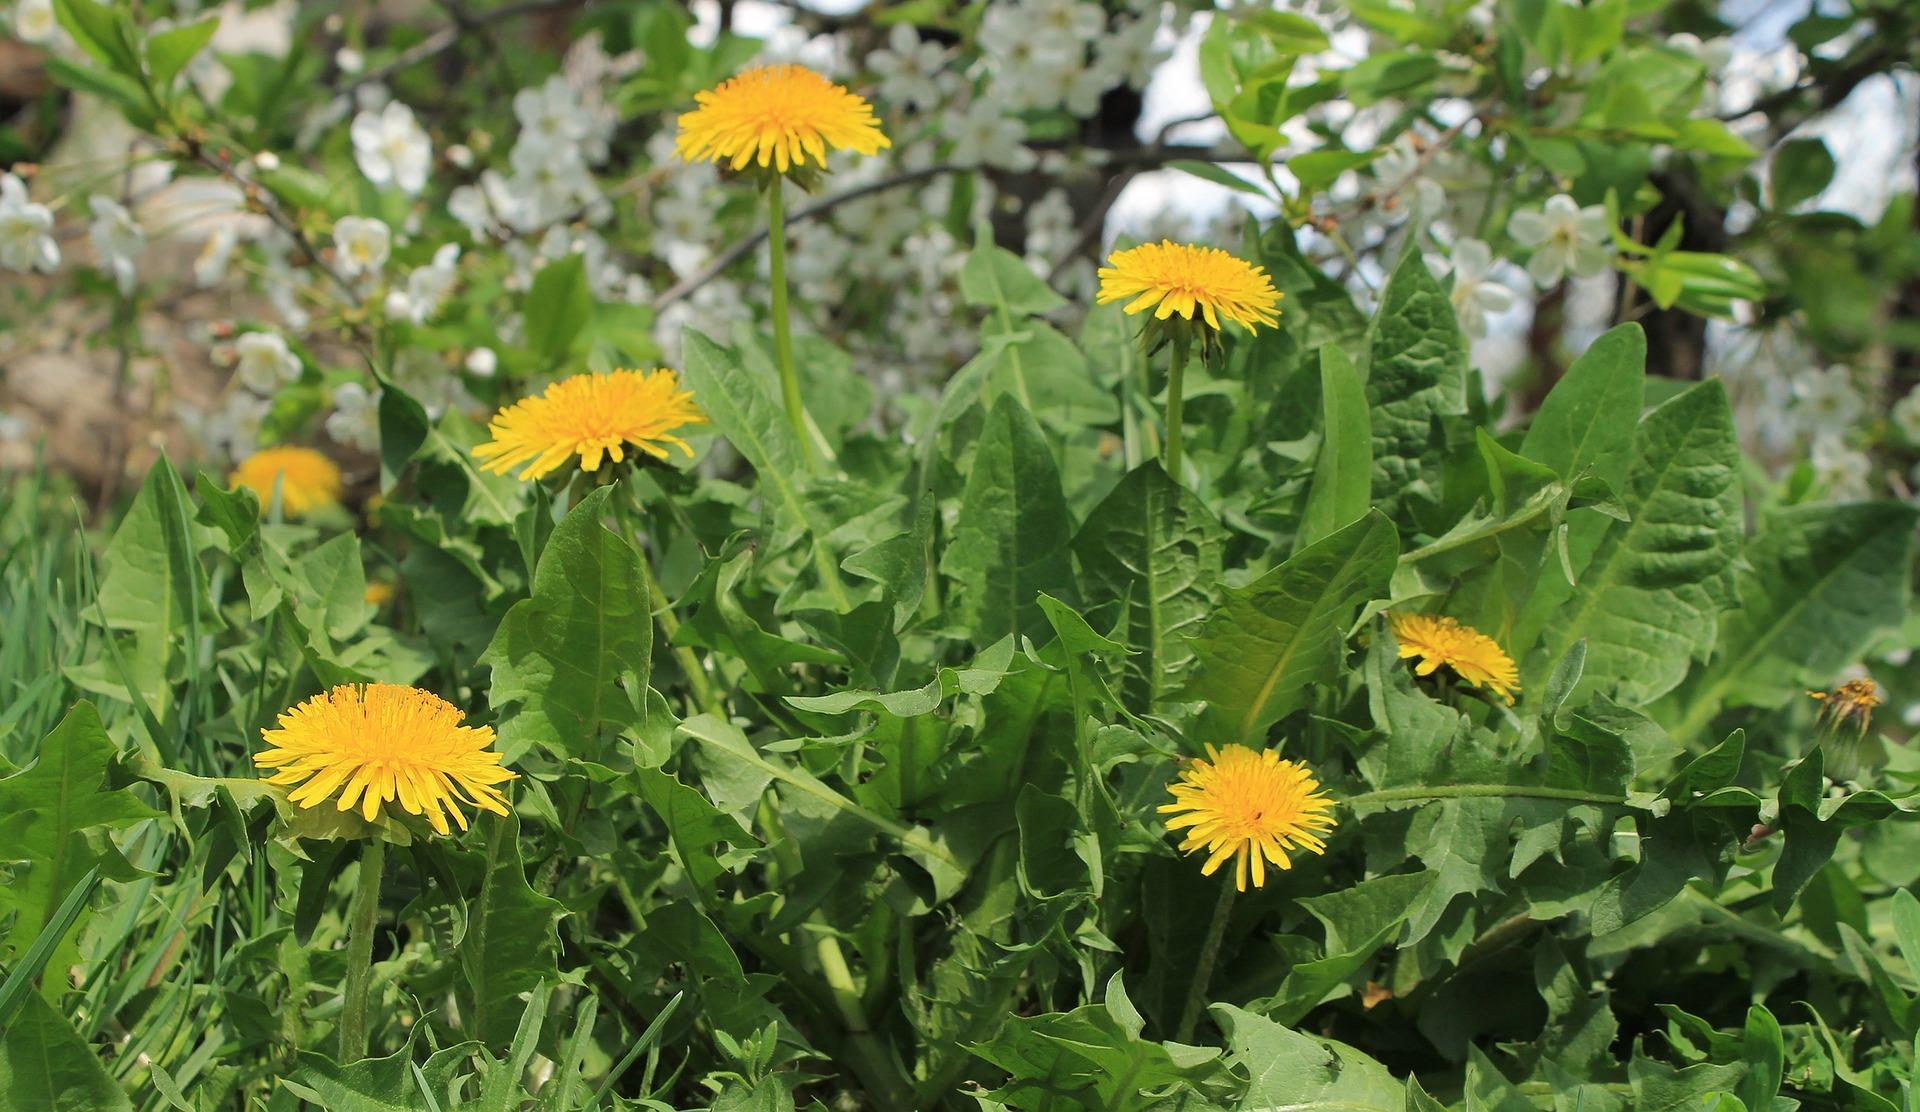
Growing Conditions and General Care
At a very basic level, you don’t need to do much to grow Dandelions. Chances are there is a whole yard full of them near where you live, perhaps even right outside your door, but it’s likely that the Dandelion plants growing in your lawn are Common Dandelion (Taraxacum officinale subsp. vulgare). This is the most common variety of Dandelion, but there are thousands of varieties and cultivars to be found around the world. Common Dandelion has all the health benefits mentioned above, but they tend to be a bit more bitter than some of the other varieties of Dandelion you can buy.
Dandelions are by nature a very bitter green, but there are steps you can take to reduce how bitter it is. First, grow a less bitter variety. The right variety can make Dandelion greens taste much better than the wild variety growing in your yard.
Second, try growing Dandelions in the shade. This will blanch the leaves some and will result in a less bitter leaf. Alternately, you can manually blanch the Dandelion leaves by covering the plants a few days before you are ready to harvest.
The third thing you can do to reduce bitterness is to harvest Dandelion leaves early. Young leaves will be less bitter than more mature leaves.
You can keep your Dandelions from becoming invasive in your yard by either choosing a less invasive variety (yes, they exist) or by making sure that the plant never goes to seed and therefore cannot spread its seeds throughout the neighborhood.
Harvesting
Much like other greens, Dandelions can be harvested either as a “head” by removing the entire plant when mature (starting to flower) at harvest or as a leaf, which means that you would remove only some of the young leaves or the whole head when the plant is still young. Both ways are acceptable and which you choose will be based on your preference.
Another benefit of growing Dandelions is the fact that it is a perennial. After you harvest the plant it will grow back the same season, year after year.
Never harvest Dandelions from a location that is near a road or has been treated with pesticides or other chemicals.
0
0

