求助
Ed Fong
2017年11月29日

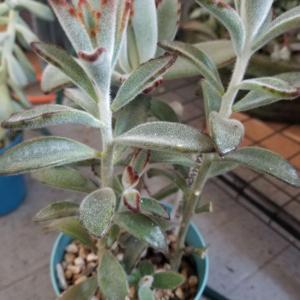
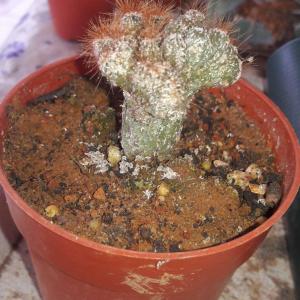
what does my plant happens? It starts to rot.

0
0
Ed Fong:Thanks
sunnyzou:@Ed Fong Wash with 75% alcohol to kill scale insects
Ed Fong:How do I overcome this problem?
Ueca:This is called "scale infestation". Basically, a type of bug that drinks from the cactus.
文章
Miss Chen
2017年11月29日

Bitterweed is an annual wildflower from the aster family that frequently infests pastures, sandy ground, prairies and disturbed sites. The weedy plant has a mature height of ½ to 2 ½ feet and blooms with small, five to 10 petaled yellow flowers. Bitterweed gets its name from its bitter, toxic foliage that gives cow milk a bitter taste if grazed. Greater quantities of foliage ingestion can kill domesticated farm animals and horses. You can kill bitterweed in pastures with the use of 2, 4-D herbicide, as recommended by the Mississippi State University Extension.

Step 1
Apply the herbicide to young, active growing weeds for best control. Younger plants are more effectively controlled than the more mature ones.
Step 2
Check that the weeds have at least two true leaves before you start treatment. If the weeds do not have true leaves, the effect of the herbicide is reduced.
Step 3
Mix herbicide at the rate of 1 to 2 pints for every 10 to 20 gallons of water. Fill the sprayer with herbicide solution.
Step 4
Spray all weed plants evenly at the recommended rate of 20 gallons per acre. Do not use a low spray volume, as this usually does not provide coverage adequate to kill the weed.

Step 5
Do not treat pastures that are severely drought stressed. Also, do not use the herbicide on pastures of annual legumes until after the production of seed.

Step 1
Apply the herbicide to young, active growing weeds for best control. Younger plants are more effectively controlled than the more mature ones.
Step 2
Check that the weeds have at least two true leaves before you start treatment. If the weeds do not have true leaves, the effect of the herbicide is reduced.
Step 3
Mix herbicide at the rate of 1 to 2 pints for every 10 to 20 gallons of water. Fill the sprayer with herbicide solution.
Step 4
Spray all weed plants evenly at the recommended rate of 20 gallons per acre. Do not use a low spray volume, as this usually does not provide coverage adequate to kill the weed.

Step 5
Do not treat pastures that are severely drought stressed. Also, do not use the herbicide on pastures of annual legumes until after the production of seed.
0
0
求助
Kel C
2017年11月28日

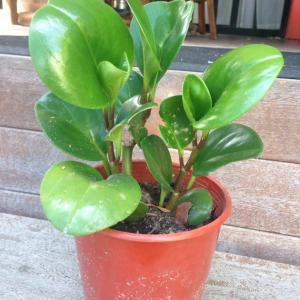
Can anyon help me please and tell me what this plant is?

1
0
Citibear23:Lantana
Kel C:Thank you
frankgrant:PEPPEROMIA
frankgrant:Oops. Pepperoni a
frankgrant:Pepperonis
成长记
pzsoofi
2017年11月28日

Turning pink and growing new little “bubbles” and roots (finally, ROOTS!!!). This little plant is so thankful. I hope the new leaves will stay more tightly packed due to all these sunrays coming through the window :)


2
0
Danial Ahmed
2017年11月27日

Does anyone recognize this plant?
Uniquely Its roots originate from the top and make their way down to the soil.

Uniquely Its roots originate from the top and make their way down to the soil.

0
0
文章
Miss Chen
2017年11月26日

Mushrooms are a wild plant that can be delicious when added to salads or tomato sauce, but not all mushrooms are safe to eat. If you live in the Maryland area, it may be tempting to pick mushrooms you find growing in your yard or in a wooded area nearby, but this may not be safe, depending on the species you find. Identifying species of mushroom found in Maryland can help prevent accidental poisoning.

Black-footed Polypore
Black-footed polypores are usually found on decaying deciduous wood between August and December. They grow individually or in groups. These mushrooms are easily identifiable. The caps are usually between 1 1/2 and almost 8 inches wide and are dark reddish-brown. The color gets paler toward the edges. Black-footed polypores are inedible. Their scientific name is Polyporus badius.
Autumn Skullcap
Autumn skullcaps have small caps, which are usually only 1 1/2 to 2 1/2 inches across. They can be found in forests or natural areas, usually on rotted wood. They grow individually or in small clusters. The autumn skullcap, which is also called the deadly Galernia, is poisonous if ingested. In fact, they are so toxic that they can be fatal if eaten. The scientific name of the autumn skullcap is Galernia autumnalis.
Honey Mushroom
The honey mushroom is usually found at the base of deciduous trees or pines or on old stumps. In some cases, the mushrooms behave as parasites by living on live shrubs or trees. The individual caps can grow up to 4 inches across and the stalks are about 3/4 inches wide, and can grow up to 6 inches high. True honey mushrooms are edible, but some people's stomachs can be upset by them. There are also poisonous mushrooms that are very similar in appearance. The scientific name for the honey mushroom is Armillariella mellea.
Crown-tipped Coral Fungus
These mushrooms look like coral found on the ocean floor, and grow on logs that are well decayed. They are common, and edible, either raw or cooked. The scientific name of these mushrooms is Clavicorona pyxidata. This particular mushroom is only one type of Clavicorona mushrooms.

Netted Rhodotus
The netted Rhodotus are usually found between June and September on dead deciduous wood, either scattered or in groups. The caps of these mushrooms are 1 to 2 inches across. They are red or pink with white ridges that look like netting over the caps. The stalks are around 1 to 2 inches thick and measure 1 to 2 inches long. Netted Rhodotus are not a common type of mushroom, and it's unknown if they're edible. The scientific name of the netted Rhodotus is Rhodotus palmatus.

Black-footed Polypore
Black-footed polypores are usually found on decaying deciduous wood between August and December. They grow individually or in groups. These mushrooms are easily identifiable. The caps are usually between 1 1/2 and almost 8 inches wide and are dark reddish-brown. The color gets paler toward the edges. Black-footed polypores are inedible. Their scientific name is Polyporus badius.
Autumn Skullcap
Autumn skullcaps have small caps, which are usually only 1 1/2 to 2 1/2 inches across. They can be found in forests or natural areas, usually on rotted wood. They grow individually or in small clusters. The autumn skullcap, which is also called the deadly Galernia, is poisonous if ingested. In fact, they are so toxic that they can be fatal if eaten. The scientific name of the autumn skullcap is Galernia autumnalis.
Honey Mushroom
The honey mushroom is usually found at the base of deciduous trees or pines or on old stumps. In some cases, the mushrooms behave as parasites by living on live shrubs or trees. The individual caps can grow up to 4 inches across and the stalks are about 3/4 inches wide, and can grow up to 6 inches high. True honey mushrooms are edible, but some people's stomachs can be upset by them. There are also poisonous mushrooms that are very similar in appearance. The scientific name for the honey mushroom is Armillariella mellea.
Crown-tipped Coral Fungus
These mushrooms look like coral found on the ocean floor, and grow on logs that are well decayed. They are common, and edible, either raw or cooked. The scientific name of these mushrooms is Clavicorona pyxidata. This particular mushroom is only one type of Clavicorona mushrooms.

Netted Rhodotus
The netted Rhodotus are usually found between June and September on dead deciduous wood, either scattered or in groups. The caps of these mushrooms are 1 to 2 inches across. They are red or pink with white ridges that look like netting over the caps. The stalks are around 1 to 2 inches thick and measure 1 to 2 inches long. Netted Rhodotus are not a common type of mushroom, and it's unknown if they're edible. The scientific name of the netted Rhodotus is Rhodotus palmatus.
0
0
文章
Miss Chen
2017年11月24日

How much water a tomato plant needs depends on where it is in its life cycle. Tomato plants that are actively growing, flowering and setting fruit need more water than tomato plants that are still in the seedling stage (not having flowered yet). Water effects how the fruit looks: too much and the tomato will suffer from blossom-end rot; too little and the tomato will crack (also called cat facing).

Germinating Tomato Seeds

After sowing tomato seeds, it is important to keep the seed-sowing flat evenly moist. Don't water from above, as this might cause damping off. Place the flat in a larger shallow container that's filled with water. The flat will wick water from the container into the soil. Remove the flat when the soil is moist. When the surface of the soil starts to dry out, replace the flat in the container of water. Continue to do this until the seeds start to germinate.
Seedling Tomatoes

Seedling tomatoes should also be watered from the bottom up to avoid damping off and other bacterial disease. Once the seedling tomatoes have been potted into individual containers, allow the top 1/4 inch of soil to dry out before watering. Continue to allow the top 1/4 inch of soil to dry out while hardening off your seedlings. After transplanting your seedlings into the garden, gradually increase the time between watering until the top 2 to 3 inches of soil dries out before you water again. Do not allow your seedlings to wilt. The trick to watering tomatoes is to always water under the plant, as splashing water can cause disease, and water deeply and infrequently for deeper root growth. The longer the roots, the healthier the tomato plant and the less time you will have to water as the roots will pull water (and nutrients) up from deeper layers of soil. To water deeply, apply water to the soil until it starts pooling on the soil's surface. Stop watering when it takes one to two minutes for the pooled water to be absorbed by the soil.
Flowering

Flowering tomatoes need a steady supply of moisture to prevent decreased flowering and flower drop. Allow the top 2 to 3 inches of soil to dry out before watering again. You should only have to water every second or third day. Aim to give your tomato plants 1 to 2 inches of water a week. Remember that rain counts as a watering.
Fruiting

It is critical that your tomato plants receive adequate amounts of water while they are setting fruit. Inadequate water will cause your plant to stop flowering and to drop immature fruit. Too much water will cause your tomatoes to taste watery, and the skin to crack. Your tomato plants can withstand both insects and fungal or bacterial disease better if they're watered regularly. Continue to give your plants 1 to 2 inches of water a week; however, only allow the top 1 to 2 inches of soil to dry out before watering again. Applying mulch, whether plastic or organic, will help conserve moisture and reduce the risks of soil-borne diseases. Your tomatoes may need more water if it is particularly hot and humid. Let the soil dryness indicate when your tomatoes need to be watered.
Late Summer/Early Fall

As the season winds down and late summer turns to fall, allow the top 2 to 3 inches of soil to dry out before watering. Two to three weeks before your first frost date, stop watering your tomatoes. Remove unripened tomatoes as the plants start to die back.

Germinating Tomato Seeds

After sowing tomato seeds, it is important to keep the seed-sowing flat evenly moist. Don't water from above, as this might cause damping off. Place the flat in a larger shallow container that's filled with water. The flat will wick water from the container into the soil. Remove the flat when the soil is moist. When the surface of the soil starts to dry out, replace the flat in the container of water. Continue to do this until the seeds start to germinate.
Seedling Tomatoes

Seedling tomatoes should also be watered from the bottom up to avoid damping off and other bacterial disease. Once the seedling tomatoes have been potted into individual containers, allow the top 1/4 inch of soil to dry out before watering. Continue to allow the top 1/4 inch of soil to dry out while hardening off your seedlings. After transplanting your seedlings into the garden, gradually increase the time between watering until the top 2 to 3 inches of soil dries out before you water again. Do not allow your seedlings to wilt. The trick to watering tomatoes is to always water under the plant, as splashing water can cause disease, and water deeply and infrequently for deeper root growth. The longer the roots, the healthier the tomato plant and the less time you will have to water as the roots will pull water (and nutrients) up from deeper layers of soil. To water deeply, apply water to the soil until it starts pooling on the soil's surface. Stop watering when it takes one to two minutes for the pooled water to be absorbed by the soil.
Flowering

Flowering tomatoes need a steady supply of moisture to prevent decreased flowering and flower drop. Allow the top 2 to 3 inches of soil to dry out before watering again. You should only have to water every second or third day. Aim to give your tomato plants 1 to 2 inches of water a week. Remember that rain counts as a watering.
Fruiting

It is critical that your tomato plants receive adequate amounts of water while they are setting fruit. Inadequate water will cause your plant to stop flowering and to drop immature fruit. Too much water will cause your tomatoes to taste watery, and the skin to crack. Your tomato plants can withstand both insects and fungal or bacterial disease better if they're watered regularly. Continue to give your plants 1 to 2 inches of water a week; however, only allow the top 1 to 2 inches of soil to dry out before watering again. Applying mulch, whether plastic or organic, will help conserve moisture and reduce the risks of soil-borne diseases. Your tomatoes may need more water if it is particularly hot and humid. Let the soil dryness indicate when your tomatoes need to be watered.
Late Summer/Early Fall

As the season winds down and late summer turns to fall, allow the top 2 to 3 inches of soil to dry out before watering. Two to three weeks before your first frost date, stop watering your tomatoes. Remove unripened tomatoes as the plants start to die back.
0
0
文章
Miss Chen
2017年11月24日

If you are thinking about buying or have already purchased a "Topsy Turvy" planting system you will need to figure out where to hang it and choose which tomato variety to plant into it. In the following steps you will find a few extra tips that are not included in the product instructions that will guide you through the process.

Step 1
Decide where you will hang it. Tomatoes need full sun but with a hanging planter some shade at least on the root bag is better, especially on hot summer days. A location with morning sun and afternoon shade is probably the best. Optimum is if the bag is always out of direct sunlight but the plant receives full sun at least 6 hours per day. How high you hang it depends on the type of tomato plant you buy. Determinate patio type tomatoes are stocky and won't grow very tall (long). Cherry type and indeterminate types can grow quite tall (long). Most plant tags will give this information about variety characteristics.
Step 2
Buy a tomato plant to grow in it. Using the above guidelines, pick the variety of tomato plant you will be growing. The hole at the bottom of the planter that you will insert the plant root ball through is only 2.5" in diameter. Pick a plant that is growing in a small enough pot that you can fit the root ball through the opening without damaging the roots.
Step 3
Harden off the young tomato plant. Plants do not naturally grow in an upside down position so giving your young tomato seedling a few days to acclimate to the new conditions will help it adjust more quickly. Plants purchased from garden centers have been grown in optimum conditions by greenhouse growers and are usually in protected lower light conditions at the store. If the planter will be hanging in direct sunlight most of the day it will cause damage to the plant when it suddenly receives full sunshine on the undersides of the leaves. One way to adjust the plant to its new conditions, before transplanting, is to lay it on its side for a few days. Do this in the sun near where it will be growing. The plant will begin to turn itself toward the sun and will be in a better position when is planted and hung up.

Step 4
Choose a potting mix to fill it. Any good draining general planting mix should be ok. Some mixes are also available that are specifically prepared for tomatoes and vegetables. Check the information on the bag of mix to see if it is recommended to be used for potted plants. Also, check to see if it has slow release or other fertilizers added to it. You will need to set up a liquid fertilizer regime or add slow release fertilizers if the mix doesn't already have any added.
Step 5
Drill a hole to insert the hook provided. Pick a beam or support that is strong enough to hold the weight of a full sized plant, media and water. Leave enough space between the hook and surrounding plants or structures to allow for the size of a mature tomato plant and the "Topsy Turvy" plant bag.
Step 6
Place the tomato seedling in the planter. Lay the "Topsy Turvy" on its side and put the root ball of the tomato plant through the bottom hole per instructions. Then place the foam insert around the stem, from the inside, to hold it in place. If the plant is a little leggy it can be planted deeper than it was growing in the pot and more roots will form along the stem.
Step 7
Fill with potting media. This is the tricky part. The planter holds approximately 1/2 cubic foot of potting media. You will either need to have someone hold it for you while you are filling or you can lay it on its side and roll and fill as much as you can before you hang it. The bag, plus the cables and plant will be about 2.5 feet tall and can not be set down or it will damage the young plant.
Step 8
Hang the planter. It will be heavy now because of the weight of the potting mix and you will most likely need a ladder to reach the hook. It is best to have someone assist you by holding the ladder and handing you the plant. They can also help support the bottom of the planter while you are hanging it on the hook.
Step 9
Add water. Do this after you hang it so you will not be lifting the extra weight of the water too. The easiest way to water the hanging planter is to use a water wand extension for your hose. Water until the water starts to drain out the holes in the bottom.

Step 1
Decide where you will hang it. Tomatoes need full sun but with a hanging planter some shade at least on the root bag is better, especially on hot summer days. A location with morning sun and afternoon shade is probably the best. Optimum is if the bag is always out of direct sunlight but the plant receives full sun at least 6 hours per day. How high you hang it depends on the type of tomato plant you buy. Determinate patio type tomatoes are stocky and won't grow very tall (long). Cherry type and indeterminate types can grow quite tall (long). Most plant tags will give this information about variety characteristics.
Step 2
Buy a tomato plant to grow in it. Using the above guidelines, pick the variety of tomato plant you will be growing. The hole at the bottom of the planter that you will insert the plant root ball through is only 2.5" in diameter. Pick a plant that is growing in a small enough pot that you can fit the root ball through the opening without damaging the roots.
Step 3
Harden off the young tomato plant. Plants do not naturally grow in an upside down position so giving your young tomato seedling a few days to acclimate to the new conditions will help it adjust more quickly. Plants purchased from garden centers have been grown in optimum conditions by greenhouse growers and are usually in protected lower light conditions at the store. If the planter will be hanging in direct sunlight most of the day it will cause damage to the plant when it suddenly receives full sunshine on the undersides of the leaves. One way to adjust the plant to its new conditions, before transplanting, is to lay it on its side for a few days. Do this in the sun near where it will be growing. The plant will begin to turn itself toward the sun and will be in a better position when is planted and hung up.

Step 4
Choose a potting mix to fill it. Any good draining general planting mix should be ok. Some mixes are also available that are specifically prepared for tomatoes and vegetables. Check the information on the bag of mix to see if it is recommended to be used for potted plants. Also, check to see if it has slow release or other fertilizers added to it. You will need to set up a liquid fertilizer regime or add slow release fertilizers if the mix doesn't already have any added.
Step 5
Drill a hole to insert the hook provided. Pick a beam or support that is strong enough to hold the weight of a full sized plant, media and water. Leave enough space between the hook and surrounding plants or structures to allow for the size of a mature tomato plant and the "Topsy Turvy" plant bag.
Step 6
Place the tomato seedling in the planter. Lay the "Topsy Turvy" on its side and put the root ball of the tomato plant through the bottom hole per instructions. Then place the foam insert around the stem, from the inside, to hold it in place. If the plant is a little leggy it can be planted deeper than it was growing in the pot and more roots will form along the stem.
Step 7
Fill with potting media. This is the tricky part. The planter holds approximately 1/2 cubic foot of potting media. You will either need to have someone hold it for you while you are filling or you can lay it on its side and roll and fill as much as you can before you hang it. The bag, plus the cables and plant will be about 2.5 feet tall and can not be set down or it will damage the young plant.
Step 8
Hang the planter. It will be heavy now because of the weight of the potting mix and you will most likely need a ladder to reach the hook. It is best to have someone assist you by holding the ladder and handing you the plant. They can also help support the bottom of the planter while you are hanging it on the hook.
Step 9
Add water. Do this after you hang it so you will not be lifting the extra weight of the water too. The easiest way to water the hanging planter is to use a water wand extension for your hose. Water until the water starts to drain out the holes in the bottom.
0
0
文章
Miss Chen
2017年11月24日

A vegetable garden isn't complete without a tomato plant (Lycopersicon esculentum) or two, if only for the pleasure of fresh tomatoes in midsummer. Even if you don't have the space for a large garden, tomato plants are suited to container gardening. Which means that if you have a 5-gallon bucket or two hanging around, you have the makings for a tomato garden.

Preparing the Buckets
Wash and sterilize buckets, even if they're new, with a solution of 2 tablespoons household bleach in 1 gallon of water, and allow them to air-dry. Drill 1/4- to 1/2-inch holes on the lower edge of the bucket for drainage, spacing them about 2 inches apart all the way around. Place a 2-inch layer of coarse gravel or small stones in the bottom to prevent water from pooling, should the holes get plugged with soil.
Soil Choices
Growing mixes specifically designed for tomatoes go a long way toward minimizing the risk of soil-borne diseases, and provide the right conditions for proper root development. Not all potting soils are alike: Some are dense and wet, while others are fluffy but low in nutrients. Your best bet is to make your own, using equal parts potting soil, sphagnum or peat moss, and well-aged compost or manure. Fill the buckets to halfway and set aside the extra soil to fill in around the plants.
Planting Properly
Dig a hole in the center of the growing mix to equal the size of the seedling's roots. Set it gently into the hole and bring the soil around the base of the stem. Add more soil until it comes up to just below the seedling's lowest leaves and pat gently. Fertilize with a starter solution of 3 to 4 tablespoons of an 8-8-8 blend in 1 gallon of water, adding no more than 1 cup of the mixture to each plant. Fertilize again when the fruit appears, and every four to six weeks through the growing season.
Support Systems
Tomato plants can get top-heavy once the fruit starts to set. Install support in the form of a stake or a tomato cage into the bucket right after planting. Poke the stake into the soil about 2 inches from the plant so you don't injure the roots. As the plant grows, attach it loosely to the stake with gardening twine or tomato clips. Insert a tomato cage into the soil up to the bottom rungs, and tuck the branches in as the plant grows.

General Care
Buy seedlings from a garden center, or start your own indoors in early spring. Transfer them outside when they are about 4 to 6 inches tall and when it is at least 50 degrees Fahrenheit with no chance of frost. Place the buckets in a sunny spot, and inspect your tomato plants routinely for signs of fungal disease. Symptoms include dark, dead plant tissue, spots on the leaves and fruit, and fuzzy mildews on leaves and stems. Treat the plants with a solution of 1/2 to 2 ounces of liquid copper and 1 gallon of water, or according to label instructions. Spray all parts of the tomoatoes, including both sides of the leaves, when the disease appears, and every seven to 10 days until symptoms disappear.

Preparing the Buckets
Wash and sterilize buckets, even if they're new, with a solution of 2 tablespoons household bleach in 1 gallon of water, and allow them to air-dry. Drill 1/4- to 1/2-inch holes on the lower edge of the bucket for drainage, spacing them about 2 inches apart all the way around. Place a 2-inch layer of coarse gravel or small stones in the bottom to prevent water from pooling, should the holes get plugged with soil.
Soil Choices
Growing mixes specifically designed for tomatoes go a long way toward minimizing the risk of soil-borne diseases, and provide the right conditions for proper root development. Not all potting soils are alike: Some are dense and wet, while others are fluffy but low in nutrients. Your best bet is to make your own, using equal parts potting soil, sphagnum or peat moss, and well-aged compost or manure. Fill the buckets to halfway and set aside the extra soil to fill in around the plants.
Planting Properly
Dig a hole in the center of the growing mix to equal the size of the seedling's roots. Set it gently into the hole and bring the soil around the base of the stem. Add more soil until it comes up to just below the seedling's lowest leaves and pat gently. Fertilize with a starter solution of 3 to 4 tablespoons of an 8-8-8 blend in 1 gallon of water, adding no more than 1 cup of the mixture to each plant. Fertilize again when the fruit appears, and every four to six weeks through the growing season.
Support Systems
Tomato plants can get top-heavy once the fruit starts to set. Install support in the form of a stake or a tomato cage into the bucket right after planting. Poke the stake into the soil about 2 inches from the plant so you don't injure the roots. As the plant grows, attach it loosely to the stake with gardening twine or tomato clips. Insert a tomato cage into the soil up to the bottom rungs, and tuck the branches in as the plant grows.

General Care
Buy seedlings from a garden center, or start your own indoors in early spring. Transfer them outside when they are about 4 to 6 inches tall and when it is at least 50 degrees Fahrenheit with no chance of frost. Place the buckets in a sunny spot, and inspect your tomato plants routinely for signs of fungal disease. Symptoms include dark, dead plant tissue, spots on the leaves and fruit, and fuzzy mildews on leaves and stems. Treat the plants with a solution of 1/2 to 2 ounces of liquid copper and 1 gallon of water, or according to label instructions. Spray all parts of the tomoatoes, including both sides of the leaves, when the disease appears, and every seven to 10 days until symptoms disappear.
1
2


