成长记
greenwhalepinkshark
2017年09月25日
I new added a "Haworthia springbokvlakensi "crystal ball"" in my "garden"


4
0
文章
Dummer. ゛☀
2017年09月23日

Commonly called Zebra Plant, Haworthia attenuata is a cold-sensitive succulent species grown for its eye-catching, green and white textured leaves. It is hardy within U.S. Department of Agriculture hardiness zones 10 and above and will produce an abundance of offshoots, or pups, once established in a sunny bed. The offshoots provide a simple and highly effective means of propagating new Zebra Plants if they are carefully removed and potted in a suitable growing mix. However, they should only be removed in spring or autumn when the plant is not actively growing, to reduce stress to both the offshoots and the parent plant.
Locate the rooted offsets around the base of the zebra plant. Carefully scrape away the soil from around the base of the offshoots and look for small, pale pink or white roots.
Insert the blade of a gardening knife into the soil midway between the parent plant and the rooted offshoot. Slide the blade through the soil to sever the connecting root.
Etch out a 2-inch radius in the soil around the base of the rooted offshoot using the tip of your gardening knife. Dig down along the radial line to a 5-inch depth using a small handheld spade.
Insert the blade of the handheld spade at an angle underneath the rooted offshoot. Carefully pry it loose from the soil and remove it. Fill in the hole left by the offshoot to protect the parent plant’s roots.
Crumble off half the soil from around the offshoot’s rootball. Pot it in a small, 3- to 4-inch nursery container. Use a potting mix made up of 2 parts perlite, 2 parts coarse sand and 1 part sterile compost.
Place the potted zebra plant offshoot where it will receive bright, diffuse light and temperatures above 68 degrees Fahrenheit, such as in a glasshouse, cold frame or indoors near a south-facing window.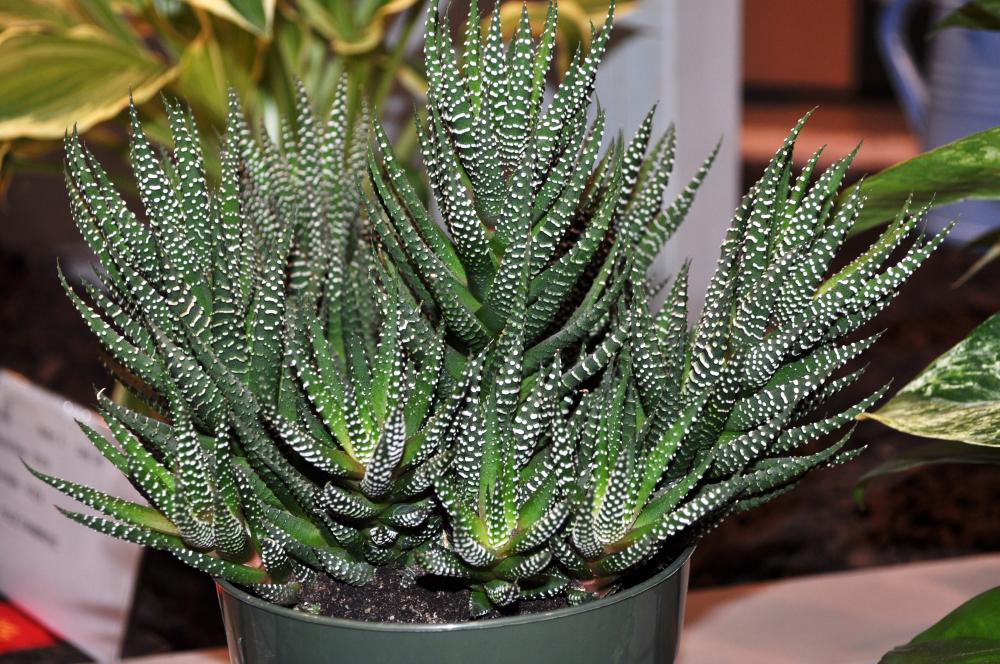
Withhold watering for the first three days. Water only until the soil feels barely moist in the top inch. Maintain light, even moisture in the soil mixture, but allow it to dry out for a day or so once a week.
Remove Offsets From a Zebra Plant
Things You Will Need
Garden knife
Handheld spade
3- or 4-inch nursery container
Perlite
Coarse sand
Sterile compost
Tip
Unrooted Zebra Plant offsets can be rooted in pure perlite or coarse sand before planting, but they are subject to a high rate of die-off.

Locate the rooted offsets around the base of the zebra plant. Carefully scrape away the soil from around the base of the offshoots and look for small, pale pink or white roots.
Insert the blade of a gardening knife into the soil midway between the parent plant and the rooted offshoot. Slide the blade through the soil to sever the connecting root.

Etch out a 2-inch radius in the soil around the base of the rooted offshoot using the tip of your gardening knife. Dig down along the radial line to a 5-inch depth using a small handheld spade.
Insert the blade of the handheld spade at an angle underneath the rooted offshoot. Carefully pry it loose from the soil and remove it. Fill in the hole left by the offshoot to protect the parent plant’s roots.

Crumble off half the soil from around the offshoot’s rootball. Pot it in a small, 3- to 4-inch nursery container. Use a potting mix made up of 2 parts perlite, 2 parts coarse sand and 1 part sterile compost.
Place the potted zebra plant offshoot where it will receive bright, diffuse light and temperatures above 68 degrees Fahrenheit, such as in a glasshouse, cold frame or indoors near a south-facing window.

Withhold watering for the first three days. Water only until the soil feels barely moist in the top inch. Maintain light, even moisture in the soil mixture, but allow it to dry out for a day or so once a week.
Remove Offsets From a Zebra Plant
Things You Will Need
Garden knife
Handheld spade
3- or 4-inch nursery container
Perlite
Coarse sand
Sterile compost

Tip
Unrooted Zebra Plant offsets can be rooted in pure perlite or coarse sand before planting, but they are subject to a high rate of die-off.
0
0
文章
Dummer. ゛☀
2017年09月23日

Leaf cuttings are easier than they look, and it is very satisfying to see the young plants growing from the old leaf.
There are a number of succulents that can be propagated easily this way: Gasteria, Haworthia, Sansevieria and plants of the Crassulaceae family (Crassula, Kalanchoe, Sedum, Graptopetalum).
The easy way is just to get a leaf. Let the cut dry out in the shade for a day to a week, and just place them on top of the soil. Do not bury or semi-bury into the soil. The roots will find their way into the soil on their own. The soil should be well drained. If you need to improvise good growing soil, mix half well-rotted compost with half fine pumice or grit. You can expect to see a change in the leaf after 3-4 weeks and the young plants will take a season to develop into new plants.
The leaves need water at some point but only a light sprinkling. While “grown-up” succulents only need to be watered every week, or even once a month (depending on the season/heat), the leaves need to be watered constantly without being watered too much. Only water the soil after it is dry.
The temperature is an important factor. Succulents of the Crassulaceae family will root better in the fall, and in late winter/early spring. They will generally not root in the summer, but rather slowly dry out, or rot. The rule of thumb is that the leaf cuttings has chances to grow only if the parent plant is actively growing.

There are a number of succulents that can be propagated easily this way: Gasteria, Haworthia, Sansevieria and plants of the Crassulaceae family (Crassula, Kalanchoe, Sedum, Graptopetalum).

The easy way is just to get a leaf. Let the cut dry out in the shade for a day to a week, and just place them on top of the soil. Do not bury or semi-bury into the soil. The roots will find their way into the soil on their own. The soil should be well drained. If you need to improvise good growing soil, mix half well-rotted compost with half fine pumice or grit. You can expect to see a change in the leaf after 3-4 weeks and the young plants will take a season to develop into new plants.

The leaves need water at some point but only a light sprinkling. While “grown-up” succulents only need to be watered every week, or even once a month (depending on the season/heat), the leaves need to be watered constantly without being watered too much. Only water the soil after it is dry.

The temperature is an important factor. Succulents of the Crassulaceae family will root better in the fall, and in late winter/early spring. They will generally not root in the summer, but rather slowly dry out, or rot. The rule of thumb is that the leaf cuttings has chances to grow only if the parent plant is actively growing.
1
2
文章
Dummer. ゛☀
2017年09月22日

Haworthia are delightful little succulents that form very attractive and singular small houseplants. Generally easy to grow, the same best practices that yield healthy Aloe and Echeveria plants will also produce beautiful Haworthia. In terms of appeal, these small, low growing plants form rosettes of fleshy green leaves that are generously covered with white, pearly warts or bands, giving them a distinctive appearance.
Growing Conditions
Light: Bright light, but not direct sunlight. These grow in similar conditions to other succulents. White or yellow leaves usually signify too much sun.
Water: Water evenly and generously in the summer, letting the soil media dry out between watering. In the winter, reduce watering to every other month. Never allow water to collect in the rosette.
Temperature: Warmer summers but cool in the winter (down to 50˚F/10˚C).
Soil: Use a cactus mix or very fast-draining potting soil mixed with sand.
Fertilizer: Fertilize during the summer growing season with a cactus fertilizer. Don’t feed during the winter.
Propagation
Haworthia can be propagated at repotting time using offsets from the mother plant. When taking offsets, use a sharp knife or snippers and cut as close to the mother stem as possible to including as many roots as possible, then allow the offset to dry briefly before repotting it (similar to cuttings from other succulents).
Pot the offsets in a small pot, using the same soil as the mother plant, put it a warm, bright spot, and make sure to adequately water.
Repotting
Haworthia are small (usually remaining between 3 inches (7.5 cm) and 5 (12.5 cm) inches in height) and relatively slow-growing. They are often grown in small clusters in wide, shallow dishes. Over time, clusters will naturally enlarge as the mother plant sends off small plantlets. When the cluster has outgrown its dish, repot in the spring or early summer into a new wide and shallow dish with fresh potting soil. This is also the time to take offsets for propagation.
Grower’s Tips
Haworthia are not considered difficult houseplants to grow—if you can keep a pot of aloe alive on a windowsill, chances are you can do the same with a dish of Haworthia. As with all succulents, the most dangerous situation is too much water—they should never be allowed to sit in water under any circumstances. At the same time, these decorative little plants can be grown in interesting containers such as tea cups and even miniature baby shoes. If you’re given a Haworthia in such a container, make sure the container had adequate drainage. If it doesn’t, it might be a good idea to pop the plant out of its container and add a layer of gravel to the bottom to reduce the wicking action of the soil above. Finally, look out for sunburned spots on your plants.

Growing Conditions
Light: Bright light, but not direct sunlight. These grow in similar conditions to other succulents. White or yellow leaves usually signify too much sun.
Water: Water evenly and generously in the summer, letting the soil media dry out between watering. In the winter, reduce watering to every other month. Never allow water to collect in the rosette.

Temperature: Warmer summers but cool in the winter (down to 50˚F/10˚C).
Soil: Use a cactus mix or very fast-draining potting soil mixed with sand.
Fertilizer: Fertilize during the summer growing season with a cactus fertilizer. Don’t feed during the winter.

Propagation
Haworthia can be propagated at repotting time using offsets from the mother plant. When taking offsets, use a sharp knife or snippers and cut as close to the mother stem as possible to including as many roots as possible, then allow the offset to dry briefly before repotting it (similar to cuttings from other succulents).

Pot the offsets in a small pot, using the same soil as the mother plant, put it a warm, bright spot, and make sure to adequately water.
Repotting
Haworthia are small (usually remaining between 3 inches (7.5 cm) and 5 (12.5 cm) inches in height) and relatively slow-growing. They are often grown in small clusters in wide, shallow dishes. Over time, clusters will naturally enlarge as the mother plant sends off small plantlets. When the cluster has outgrown its dish, repot in the spring or early summer into a new wide and shallow dish with fresh potting soil. This is also the time to take offsets for propagation.

Grower’s Tips
Haworthia are not considered difficult houseplants to grow—if you can keep a pot of aloe alive on a windowsill, chances are you can do the same with a dish of Haworthia. As with all succulents, the most dangerous situation is too much water—they should never be allowed to sit in water under any circumstances. At the same time, these decorative little plants can be grown in interesting containers such as tea cups and even miniature baby shoes. If you’re given a Haworthia in such a container, make sure the container had adequate drainage. If it doesn’t, it might be a good idea to pop the plant out of its container and add a layer of gravel to the bottom to reduce the wicking action of the soil above. Finally, look out for sunburned spots on your plants.
1
1
文章
Miss Chen
2017年09月21日

La Haworthia turgida es una suculenta de la familia de las xantoroeáceas como los aloes. Es de origen africano, en concreto de Sudáfrica. Es una planta muy decorativa por sus abigarradas rosetas y el color y diseño de sus hojas. Es fácil de cultivar en interior siempre que reciba suficiente luz.

La principal precaución que hay que tener con haworthia es evitar que se acumule el agua de riego en la maceta o en el plato inferior. Sus hojas son pequeñas y se suelen unir entre 20 y 40 para formar esas llamativas rosetas que a su vez pueden tener unos 10 cm de diámetro. La planta no suele superar los 13 cm de altura. Todas estas medidas hacen que sea fácil cultivar esta planta en contenedores decorativos como tazas de té o cualquier otro recipiente similar. En estos casos habrá que practicar un orificio de drenaje o en su defecto colocar una capa de gravilla en el fondo del recipiente.
La haworthia es una planta de crecimiento lento. Usaremos un sustrato para cactus o similar, vale una mezcla propia que asegure un buen drenaje, y colocaremos la planta en un lugar luminoso pero donde no reciba luz solar directa. Ésta puede quemar las hojas volviéndolas quebradizas y de color marrón.

La planta suele producir hijuelos que podemos aprovechar para reproducir la planta en otros recipientes. Cuando la haworthia se ve un poco encajada en la maceta hay que trasplantarla a otra mayor aunque no es necesario que sea muy profunda ya que sus raíces son bastante superficiales. El riego debe ser regular pero dejando que el sustrato seque bien entre riegos. En invierno reduciremos más si cabe el aporte hídrico regando la planta cada dos meses. Lo que hay que evitar a toda costa es que se acumule agua sobre la roseta.

La principal precaución que hay que tener con haworthia es evitar que se acumule el agua de riego en la maceta o en el plato inferior. Sus hojas son pequeñas y se suelen unir entre 20 y 40 para formar esas llamativas rosetas que a su vez pueden tener unos 10 cm de diámetro. La planta no suele superar los 13 cm de altura. Todas estas medidas hacen que sea fácil cultivar esta planta en contenedores decorativos como tazas de té o cualquier otro recipiente similar. En estos casos habrá que practicar un orificio de drenaje o en su defecto colocar una capa de gravilla en el fondo del recipiente.
La haworthia es una planta de crecimiento lento. Usaremos un sustrato para cactus o similar, vale una mezcla propia que asegure un buen drenaje, y colocaremos la planta en un lugar luminoso pero donde no reciba luz solar directa. Ésta puede quemar las hojas volviéndolas quebradizas y de color marrón.

La planta suele producir hijuelos que podemos aprovechar para reproducir la planta en otros recipientes. Cuando la haworthia se ve un poco encajada en la maceta hay que trasplantarla a otra mayor aunque no es necesario que sea muy profunda ya que sus raíces son bastante superficiales. El riego debe ser regular pero dejando que el sustrato seque bien entre riegos. En invierno reduciremos más si cabe el aporte hídrico regando la planta cada dos meses. Lo que hay que evitar a toda costa es que se acumule agua sobre la roseta.
1
0
求助
ninque
2017年09月18日

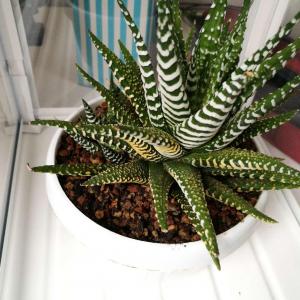
Does anyone know why the leaves of my Haworthia Attenuata are turning brownish??? Too much water/too little?

1
0
rebeccamee:I've noticed the color change on my own one as well. It maybe caused by the sunlight.
meriunkat:try watering only when the soil is dry Wich could be every three days
meriunkat:if they are brown and crunchy like dry it might not have enough water but if they are soggy or squishy then too much water
sarajordan2993:i noticed this on mine when i bought it . i thought it was just the plant itself throwing off different colors . my plant was inside the garden store at my walmart when i purchased it . so i dont think it could be caused from sun
cclecombe:Having done a little more research, it could be too much sun too! Apparently it can make the ends go red? I'd say it's probably either of those, so should be relatively easy to figure out.
显示更多


