文章
Miss Chen
2017年11月30日


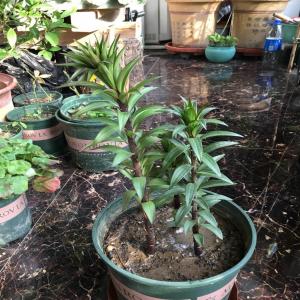
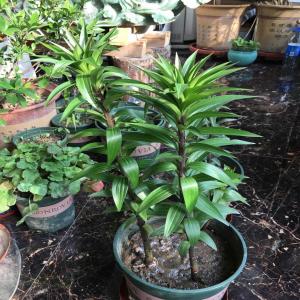
白檀又名灰木、碎籽树、乌于、子木、栅柴等,为山矾科山矾属落叶灌木或小乔木,高达5米,嫩枝被毛。叶互生,椭圆形,长4-9.5 厘米,宽2-5.5厘米,边缘细锐锯齿。圆锥花序生枝顶,花白色。核果卵形,黑色。可作器具,亦可入药。
广泛分布于中国东北部及黄河以南地区,尤以长江流域以南诸省区更为普遍。多生于海拨200-1000m丘陵山地疏林、灌木中和第四纪红土光坡。以向阳坡地及沟谷区生长较好,具有耐干早瘠薄,根系发达、萌发力强,易繁殖等优点,是优良的水土保持树种之一。

白檀的药用价值
白檀可以供药用,清热解毒、调气散结、祛风止痒,还可以用来治疗乳腺炎、疝气、荨麻疹、淋巴腺炎等疾病。
白檀的食用价值
白檀的种子含油量为30%,经过提炼之后可以制成上等的食用油。白檀油有人体必需的不饱和脂肪酸,是比较理想、有益于健康的食用植物油。
白檀的饲用价值
白檀的叶片中含有丰富的矿物质,可以作家禽的饲料。
白檀的观赏价值
白檀的外形很优美,枝叶繁茂,春天白花盛开,秋季结下蓝色的果实,具有很高的观赏价值。
白檀的工业价值
白檀油可以用作工业用油,比如作机械行业的润滑油等;白檀的木材很细致,可以作为家具用材。
白檀的生态价值
白檀的耐旱性很好,根系也很发达,固土的能力很强,可以作为防治水土流失的先锋树种。白檀的繁殖力强,耐刈割的同时热值高,可以作为薪炭林种植。
0
0
文章
Miss Chen
2017年11月26日


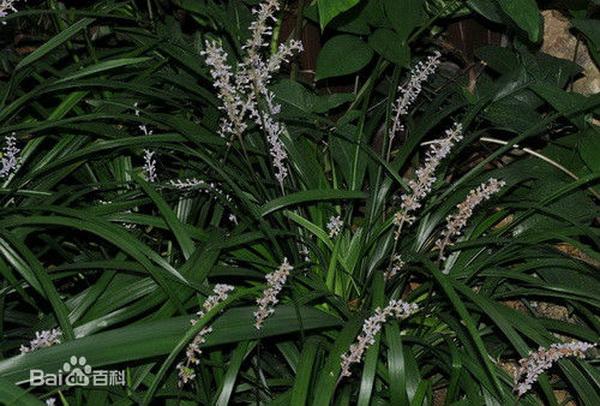
麦冬百合科沿阶草属多年生常绿草本植物,根较粗,中间或近末端常膨大成椭圆形或纺锤形的小块根,茎很短,叶基生成丛,禾叶状,苞片披针形,先端渐尖,种子球形,花期5-8月,果期8-9月。
麦冬原产中国,日本、越南、印度也有分布。中国南方等地均有栽培。生于海拔2000米以下的山坡阴湿处、林下或溪旁。
麦冬的小块根是中药,有生津解渴、润肺止咳之效。
麦冬草的药用价值
在中药中,麦冬草的性味是甘、微苦、性微寒。麦冬草入药有着养肺的作用,麦冬草可以润肺清心,化痰止咳,还能抑制呕吐。《本草纲目》中认为麦冬是极好的养阴润肺的药品。麦冬还可以养胃,如果有厌食的情况,还可以用麦冬来开胃进食。
麦冬一般用来治疗肺燥干咳、心烦失眠、肠燥便秘等等症状。麦冬对心脑血管疾病也有很好的预防和治疗的作用,麦冬可以降低血糖、抗心律失常,对老年人非常好。但是麦冬不能长期服用,容易有副作用,要在医生的指导下服用。
麦冬草的园林作用
麦冬草虽然没有娇艳的花朵,麦冬草的花朵是非常朴素的淡紫色的,但是麦冬草十分容易种植,并且麦冬草一年四季都是常绿的,非常耐寒也非常耐旱,另一方面,麦冬草不容易发生病虫害,所以十分适合作为城市绿植。此外,虽然普通品种的麦冬草其貌不扬,但是近年来逐渐培养出了新品种的观赏价值较高的麦冬草,更加适合作为园林观赏。
麦冬草的经济价值
麦冬草的块茎有很多功效,是一种较为名贵的中草药,所以这是一种价值比较高的经济作物,在中医药中有广泛的作用。是具有一定的经济价值的。
0
0
文章
Miss Chen
2017年11月26日

You can grow your own edible mushrooms in a portable 5-gallon bucket. Oyster mushrooms (Pleurotus spp.) are the best choice for bucket growing, because they are less sensitive to growing conditions and less picky about growing media than other varieties of mushrooms. You can grow the mushrooms indoors or outdoors, as long as the mushrooms have the necessary humidity levels and growing temperature.

Step 1
Drill about 10 holes, spaced approximately 6 inches apart, staggered around the center section -- the space that reaches from about 3 inches above the bottom of the bucket to about 3 inches below the top of the bucket -- of a 5-gallon plastic bucket. The mushrooms will grow out of these holes. Use a 1/2-inch drill bit. Dump the plastic shavings out of the bucket after all the holes are drilled.
Step 2
Fill the bucket about half full with moistened growing media. You can use coffee grounds, sawdust, straw or a mixture of the items to form the media.
Step 3
Open the bag of mushroom spawn. The bag is usually about the size of a loaf of bread with the spawn packed in straw or sawdust. Break off some of the spawn and mix it in with the media in the bucket. Continue adding media and mixing in spawn until you have used all the spawn and the mixture is about 1-inch from the top of the bucket.
Step 4
Cover the entire bucket loosely with a clear plastic bag. Cut 12 X-shaped holes around the top and sides of the bag to allow some air to get in. When you see fuzz start to appear, indicating the spawn is colonizing the media, remove the bag and cover the bucket with a lid or just leave the plastic bag cover over the bucket.

Step 5
Place the bucket in a humid environment at a temperature around 70 degrees Fahrenheit. Create humidity by misting the bucket daily or by setting the bucket in a tub that contains about 1 inch of water. If the bucket is covered with a bag, mist under the bag. Do not remove the lid from the bucket if you are using a lid. You are not trying to wet the growing media, you are just trying to raise the humidity around the bucket.
Step 6
Increase misting to three times a day when you see mushrooms start to appear in the bucket holes. This takes approximately three to four weeks. As the mushrooms appear, cut an "X" in the plastic bag over each hole that contains mushrooms if you covered the bucket with a bag rather than using a lid. This gives the mushrooms room to grow. Mist the mushrooms that emerge from the holes so they do not dry out. Wet the mushrooms enough that they are shiny, but not dripping or slimy.
Step 7
Break off the mushrooms when they get to the size you want. Mushrooms will continue to grow until the spawn is exhausted. If you do not see any new mushrooms for three weeks, the bucket is done producing.
Step 8
Empty the spent mushroom spawn and media and clean out the bucket to reuse it with a new batch of spawn.

Step 1
Drill about 10 holes, spaced approximately 6 inches apart, staggered around the center section -- the space that reaches from about 3 inches above the bottom of the bucket to about 3 inches below the top of the bucket -- of a 5-gallon plastic bucket. The mushrooms will grow out of these holes. Use a 1/2-inch drill bit. Dump the plastic shavings out of the bucket after all the holes are drilled.
Step 2
Fill the bucket about half full with moistened growing media. You can use coffee grounds, sawdust, straw or a mixture of the items to form the media.
Step 3
Open the bag of mushroom spawn. The bag is usually about the size of a loaf of bread with the spawn packed in straw or sawdust. Break off some of the spawn and mix it in with the media in the bucket. Continue adding media and mixing in spawn until you have used all the spawn and the mixture is about 1-inch from the top of the bucket.
Step 4
Cover the entire bucket loosely with a clear plastic bag. Cut 12 X-shaped holes around the top and sides of the bag to allow some air to get in. When you see fuzz start to appear, indicating the spawn is colonizing the media, remove the bag and cover the bucket with a lid or just leave the plastic bag cover over the bucket.

Step 5
Place the bucket in a humid environment at a temperature around 70 degrees Fahrenheit. Create humidity by misting the bucket daily or by setting the bucket in a tub that contains about 1 inch of water. If the bucket is covered with a bag, mist under the bag. Do not remove the lid from the bucket if you are using a lid. You are not trying to wet the growing media, you are just trying to raise the humidity around the bucket.
Step 6
Increase misting to three times a day when you see mushrooms start to appear in the bucket holes. This takes approximately three to four weeks. As the mushrooms appear, cut an "X" in the plastic bag over each hole that contains mushrooms if you covered the bucket with a bag rather than using a lid. This gives the mushrooms room to grow. Mist the mushrooms that emerge from the holes so they do not dry out. Wet the mushrooms enough that they are shiny, but not dripping or slimy.
Step 7
Break off the mushrooms when they get to the size you want. Mushrooms will continue to grow until the spawn is exhausted. If you do not see any new mushrooms for three weeks, the bucket is done producing.
Step 8
Empty the spent mushroom spawn and media and clean out the bucket to reuse it with a new batch of spawn.
0
0
文章
Miss Chen
2017年11月16日

Growing strawberries (Fragaria × ananassa) requires some care, but the freshly picked, sweet, juicy fruits are worth the effort. Strawberries grow as perennials in U.S. Department of Agriculture plant hardiness zones 5 through 8, and in USDA zones 9 and 10 they're usually grown as cool-season, annual plants. Three kinds of are available: June-bearing, everlasting and day neutral. June-bearing strawberries fruit in early summer, everlasting varieties fruit in spring, summer and fall, and day neutral varieties bear fruit throughout the growing season. All three types grow best in full-sun sites and well-drained soils.

Soil, Light and Spacing
For the largest crop of fruits, grow strawberry plants in soil rich in organic matter and in a site that receives at least six hours of direct light per day. Space June-bearing strawberries 18 to 24 inches apart in rows 4 feet apart, and space everlasting and day neutral varieties 1 foot apart in a bed of two or three rows spaced 1 foot apart. June-bearing strawberries produce shoots called runners that root and grow into new plants on either side of their rows, creating strawberry beds 2 feet wide. Everlasting and day neutral strawberry plants produce few runners and these are removed, so they grow as single plants.
Water and Fertilizer
Moist growing sites and fertilizer encourage strawberries to grow healthily. Strawberries need about 1 inch of water each week when the weather is dry during the growing season. Apply the water to the base of the plants, avoiding the leaves. Over-fertilizing strawberries causes excessive leafy growth at the expense of fruit, but plants benefit from an annual fertilizer application after harvest. Dilute 2 tablespoons of a 10-10-10 liquid fertilizer in 1 gallon of water, and pour 1 to 2 cups of the solution at the base of each strawberry plant.
Mulch for Strawberries
Strawberries benefit from mulching, which suppresses weeds, conserves soil moisture and protects plants from frost. Remove weeds from around strawberry plants, and spread a 2-inch layer of an organic mulch such as garden compost or leaf mold, avoiding the plant stems. In areas where fall below 20 degrees Fahrenheit, spread a 3- to 4-inch layer of straw over plants in late fall. In spring, when young, yellow foliage appears, pull mulch away from the plants but replace it when frosts are predicted. Straw mulches can also be spread beneath developing fruit to keep it off the ground.

Strawberry Pruning
General care for strawberries includes pruning blossoms and runners. Pinch the blossoms off June-bearing strawberries in their first season to encourage the plants to develop strong root systems and bear a large crop the following year. Pinch the blossoms off everlasting and day neutral types until early July, which helps the plants establish before putting energy into growing fruit. Prune the runners from everlasting and day neutral plants whenever they appear. Sterilize pruning shears by wiping a cloth soaked in rubbing alcohol over the blades, and cut the runners where they join the rest of the plant. Sterilize the shears again when you've finished.
Strawberry Renovation
June-bearing strawberries growing as perennials provide crops for three or four years with annual renovation. After harvest, mow the strawberry beds to remove the old foliage. Set the mower blades to 1 to 1 1/2 inches above the ground. Rake off the leaves, and narrow the beds to 6 to 12 inches wide by digging out plants on both sides, and remove all weeds. Fertilize the strawberry plants with a granular or powder 10-10-10 fertilizer spread at a rate of 1 pound per 100 square feet, and mix the fertilizer lightly into the soil surface. Water the renovated patch for the rest of the growing season, applying 1 inch of water per week during dry weather.

Soil, Light and Spacing
For the largest crop of fruits, grow strawberry plants in soil rich in organic matter and in a site that receives at least six hours of direct light per day. Space June-bearing strawberries 18 to 24 inches apart in rows 4 feet apart, and space everlasting and day neutral varieties 1 foot apart in a bed of two or three rows spaced 1 foot apart. June-bearing strawberries produce shoots called runners that root and grow into new plants on either side of their rows, creating strawberry beds 2 feet wide. Everlasting and day neutral strawberry plants produce few runners and these are removed, so they grow as single plants.
Water and Fertilizer
Moist growing sites and fertilizer encourage strawberries to grow healthily. Strawberries need about 1 inch of water each week when the weather is dry during the growing season. Apply the water to the base of the plants, avoiding the leaves. Over-fertilizing strawberries causes excessive leafy growth at the expense of fruit, but plants benefit from an annual fertilizer application after harvest. Dilute 2 tablespoons of a 10-10-10 liquid fertilizer in 1 gallon of water, and pour 1 to 2 cups of the solution at the base of each strawberry plant.
Mulch for Strawberries
Strawberries benefit from mulching, which suppresses weeds, conserves soil moisture and protects plants from frost. Remove weeds from around strawberry plants, and spread a 2-inch layer of an organic mulch such as garden compost or leaf mold, avoiding the plant stems. In areas where fall below 20 degrees Fahrenheit, spread a 3- to 4-inch layer of straw over plants in late fall. In spring, when young, yellow foliage appears, pull mulch away from the plants but replace it when frosts are predicted. Straw mulches can also be spread beneath developing fruit to keep it off the ground.

Strawberry Pruning
General care for strawberries includes pruning blossoms and runners. Pinch the blossoms off June-bearing strawberries in their first season to encourage the plants to develop strong root systems and bear a large crop the following year. Pinch the blossoms off everlasting and day neutral types until early July, which helps the plants establish before putting energy into growing fruit. Prune the runners from everlasting and day neutral plants whenever they appear. Sterilize pruning shears by wiping a cloth soaked in rubbing alcohol over the blades, and cut the runners where they join the rest of the plant. Sterilize the shears again when you've finished.
Strawberry Renovation
June-bearing strawberries growing as perennials provide crops for three or four years with annual renovation. After harvest, mow the strawberry beds to remove the old foliage. Set the mower blades to 1 to 1 1/2 inches above the ground. Rake off the leaves, and narrow the beds to 6 to 12 inches wide by digging out plants on both sides, and remove all weeds. Fertilize the strawberry plants with a granular or powder 10-10-10 fertilizer spread at a rate of 1 pound per 100 square feet, and mix the fertilizer lightly into the soil surface. Water the renovated patch for the rest of the growing season, applying 1 inch of water per week during dry weather.
1
0


