文章
Miss Chen
2017年11月22日

Tomatoes (Lycopersicon esculentum) are tender plants that can't withstand a heavy frost, but slightly frosted plants may recover. Usually grown as annual plants, tomatoes can grow year round in U.S. Department of Agriculture plant hardiness zones 10 through 11. At 40 degrees Fahrenheit and lower temperatures, tomato plants' leaves, stems and fruits suffer damage, but you can help save the plants by protecting them from further frosts.

Saving Young Plants

Young tomato plants are especially vulnerable to cold weather. Signs of frost damage include soft and discolored stems and leaves, and sunken leaf spots that are tan to brown. The spots usually appear between leaf veins. If the damage isn't extensive -- affecting only leaves' outer edges for example, then the plants probably will recover. Move the plants to a frost-free area if they're in containers, and cover plants in the ground with sheets of fabric if more frosts threaten. If the stems below the lowest leaves are discolored and soft, then little hope exists for the plants. Discard them and immediately sow or buy new tomato plants for a crop that year.
Rescuing Mature Plants

You may be able to save mature tomato plants that suffered a late frost. The average annual last frost date is only a rough guide to when to expect the late frost, and sometimes late spring or early summer frosts catch gardeners by surprise. If your mature tomato plants have frost damage, inspect them carefully. Those that collapsed completely can't be saved, and you may have to rely on kind neighbors for homegrown tomato fruits that year. If, however, your mature plants are still standing, tidy them by removing their frost-damaged leaves. Pinch or prune them at the nearest point where healthy tissue begins. Wipe the blades of the pruning shears in rubbing alcohol before and after pruning to help prevent the spread of pests and diseases.
Protecting Them from Frosts

If your tomato plants survived a light frost, then keeping an eye on the weather forecast and protecting them the next time frost is expected should be worth the effort. Water the tomato plants' soil the evening before a frost, and cover the plants with newspapers, old bedsheets, fabric tarps, floating rows covers or a similar material before the sun sets. Spread the material over the tomato plants' stakes, and don't allow the material to touch the plants because touching reduces the level of frost protection. An option to protect young tomato plants is to wash and cut the tops off plastic milk containers and place the containers over the plants before the night's frost. Remove the containers the following morning when the frost has thawed; doing so will prevent the young plants from heating in the sun's rays.
Harvesting Tomatoes After a Frost

The growing season for tomato plants is a few short months in some areas of the United States, but you can harvest tomato fruits up to and just after the first fall frost. Tomato plants produce best when daytime temperatures are 70 to 75 F during the day and 65 to 68 F at night. At temperatures below 60 F, production slows or stops, and the plants don't grow or produce when temperatures are cold enough to develop frosts. After the first fall frost, harvest all the fruits. Cut off all the fruits' frost-damaged parts and eat the undamaged portions fresh, or save undamaged fruits to eat as green tomatoes or to allow to ripen. Green tomatoes will ripen when spread in a single layer in a dark, airy location where the temperature doesn't fall below 55 F. Fruits from a frosted tomato plant shouldn't be canned because they may be unsafe.

Saving Young Plants

Young tomato plants are especially vulnerable to cold weather. Signs of frost damage include soft and discolored stems and leaves, and sunken leaf spots that are tan to brown. The spots usually appear between leaf veins. If the damage isn't extensive -- affecting only leaves' outer edges for example, then the plants probably will recover. Move the plants to a frost-free area if they're in containers, and cover plants in the ground with sheets of fabric if more frosts threaten. If the stems below the lowest leaves are discolored and soft, then little hope exists for the plants. Discard them and immediately sow or buy new tomato plants for a crop that year.
Rescuing Mature Plants

You may be able to save mature tomato plants that suffered a late frost. The average annual last frost date is only a rough guide to when to expect the late frost, and sometimes late spring or early summer frosts catch gardeners by surprise. If your mature tomato plants have frost damage, inspect them carefully. Those that collapsed completely can't be saved, and you may have to rely on kind neighbors for homegrown tomato fruits that year. If, however, your mature plants are still standing, tidy them by removing their frost-damaged leaves. Pinch or prune them at the nearest point where healthy tissue begins. Wipe the blades of the pruning shears in rubbing alcohol before and after pruning to help prevent the spread of pests and diseases.
Protecting Them from Frosts

If your tomato plants survived a light frost, then keeping an eye on the weather forecast and protecting them the next time frost is expected should be worth the effort. Water the tomato plants' soil the evening before a frost, and cover the plants with newspapers, old bedsheets, fabric tarps, floating rows covers or a similar material before the sun sets. Spread the material over the tomato plants' stakes, and don't allow the material to touch the plants because touching reduces the level of frost protection. An option to protect young tomato plants is to wash and cut the tops off plastic milk containers and place the containers over the plants before the night's frost. Remove the containers the following morning when the frost has thawed; doing so will prevent the young plants from heating in the sun's rays.
Harvesting Tomatoes After a Frost

The growing season for tomato plants is a few short months in some areas of the United States, but you can harvest tomato fruits up to and just after the first fall frost. Tomato plants produce best when daytime temperatures are 70 to 75 F during the day and 65 to 68 F at night. At temperatures below 60 F, production slows or stops, and the plants don't grow or produce when temperatures are cold enough to develop frosts. After the first fall frost, harvest all the fruits. Cut off all the fruits' frost-damaged parts and eat the undamaged portions fresh, or save undamaged fruits to eat as green tomatoes or to allow to ripen. Green tomatoes will ripen when spread in a single layer in a dark, airy location where the temperature doesn't fall below 55 F. Fruits from a frosted tomato plant shouldn't be canned because they may be unsafe.
0
0
文章
Miss Chen
2017年11月20日

Rosemary (Rosmarinus officinalis) can resist many pest and disease problems, but plants weakened or stressed may fall prey to problems. The shrub grows in U.S. Department of Agriculture plant hardiness zones 8 through 10, but it also thrives as a potted plant in any climate. Soil or site conditions are common problems, although pests and fungus can also kill rosemary. It can be difficult or even impossible to save rosemary once it begins to die, but quick diagnosis and treatment sometimes prove successful.

Winter Kill
Winter freezes can kill a rosemary shrub, but it may not become obvious until after the temperature begins to warm in spring. The evergreen sprigs begin losing their color, become dry and brittle, and eventually turn completely brown or yellow. (ref 3) Minor freeze damage only kills a few branches, allowing you to save the plant, while major damage kills the roots and plant entirely. Cut back the damaged branches to the nearest healthy wood using pruning shears disinfected with isopropyl alcohol. The healthy roots and remaining living branches will usually survive and put on new growth through spring and summer. Prevent future stress by growing the rosemary in a pot and overwintering it indoors, or by covering it with a frost blanket when short hard freezes are expected.
Water Stress
Locations that easily become wet or waterlogged slowly kill rosemary plants. Rosemary can tolerate more moisture in summer, but wet winter soil quickly kills the plant either by suffocating the roots or by freezing solid. Rosemary prefers well-drained soil and moderate moisture conditions. Dig up and transplant the shrub to a well-drained, full sun garden bed, or transplant it into a pot with bottom drainage holes. Water rosemary about once a week when there is no rainfall and when the top 1 to 2 inches of soil feels dry, providing no more than 1 inch of water at each irrigation.

Fungal Disease
Fungal issues typically go hand-in-hand with wet soil. Root and crown rot, caused by the Phytophthora spp. fungus, cause stunted growth or branch death. The rosemary sprigs yellow and dry out, while the base of the stem and roots become soft, mushy and produce a foul odor. Moving the rosemary to a site with better drainage and refraining from watering until after recovery may allow it to live if the roots aren't badly damaged, but most shrubs won't recover from root rot. Powdery mildew fungus, which forms as a white powder on the rosemary needles, favors dry conditions and warm temperatures between 60 and 80 degree Fahrenheit. Providing the rosemary with full, all-day sunlight and spraying the foliage with water early in the day to rinse away spores can minimize mildew issues. For extreme infections, cut out the mildewed branches with disinfected shears so the remaining healthy branches can recover.
Leaf and Stem Pests
Various pests feed on rosemary plants, including spittle bugs, aphids and whiteflies. Rosemary usually recovers from pest damage unless the infestation is severe or if the plant is already weakened by cold or water stress. Pear-shaped aphids feed on the underside of the stems. Spittle bugs leave behind a white, foamy residue that resembles spittle. Treat both by rinsing them off the rosemary with a sharp spray of water, or drench the plant with a ready-to-use insecticidal soap at five-day intervals until the pests are gone. Water sprays and soap products can also help control whiteflies. Spray the plants several times a day with water to discourage the flies and their larvae. Yellow sticky traps or reflective mulch spread around the rosemary may also minimize whitefly problems.
Chemical Damage
Premature needle death, yellowing of the needle tips or a general burned appearance may indicate chemical damage from herbicides, pesticides or improper fertilization. Herbicide drift, which occurs when the wind carries the spray beyond its intended target, causes leaf dieback or kills the entire plant. Pruning out the affected branches may allow the plant to recover if the chemicals haven't reached the roots. Excessive use of fertilizers can lead to the buildup of fertilizer salts in the soil, especially in container-grown plants. Watering the rosemary deeply so the excess moisture drains freely from the bottom of the pot at least once monthly during the summer helps flush out any excess salt.
Nutritional Deficiencies
Fertilizer is seldom necessary for a rosemary shrub, especially those grown in garden beds where the trace nutrients in the soil provide sufficient fertilization. Potted plants or those grown in exceptionally poor soil may be suffering from a nutrient deficiency if the plant grows slowly or develops stunted, pale yellow needles. An application of a general purpose fertilizer in early spring should provide enough nutrients to help the plant recover. Follow package instructions or mix 1/2 teaspoon of a soluble 24-8-16 blend with 1 gallon of water, and water the rosemary with the solution. Avoid applying fertilizer directly to the foliage because it can damage the needles.

Winter Kill
Winter freezes can kill a rosemary shrub, but it may not become obvious until after the temperature begins to warm in spring. The evergreen sprigs begin losing their color, become dry and brittle, and eventually turn completely brown or yellow. (ref 3) Minor freeze damage only kills a few branches, allowing you to save the plant, while major damage kills the roots and plant entirely. Cut back the damaged branches to the nearest healthy wood using pruning shears disinfected with isopropyl alcohol. The healthy roots and remaining living branches will usually survive and put on new growth through spring and summer. Prevent future stress by growing the rosemary in a pot and overwintering it indoors, or by covering it with a frost blanket when short hard freezes are expected.
Water Stress
Locations that easily become wet or waterlogged slowly kill rosemary plants. Rosemary can tolerate more moisture in summer, but wet winter soil quickly kills the plant either by suffocating the roots or by freezing solid. Rosemary prefers well-drained soil and moderate moisture conditions. Dig up and transplant the shrub to a well-drained, full sun garden bed, or transplant it into a pot with bottom drainage holes. Water rosemary about once a week when there is no rainfall and when the top 1 to 2 inches of soil feels dry, providing no more than 1 inch of water at each irrigation.

Fungal Disease
Fungal issues typically go hand-in-hand with wet soil. Root and crown rot, caused by the Phytophthora spp. fungus, cause stunted growth or branch death. The rosemary sprigs yellow and dry out, while the base of the stem and roots become soft, mushy and produce a foul odor. Moving the rosemary to a site with better drainage and refraining from watering until after recovery may allow it to live if the roots aren't badly damaged, but most shrubs won't recover from root rot. Powdery mildew fungus, which forms as a white powder on the rosemary needles, favors dry conditions and warm temperatures between 60 and 80 degree Fahrenheit. Providing the rosemary with full, all-day sunlight and spraying the foliage with water early in the day to rinse away spores can minimize mildew issues. For extreme infections, cut out the mildewed branches with disinfected shears so the remaining healthy branches can recover.
Leaf and Stem Pests
Various pests feed on rosemary plants, including spittle bugs, aphids and whiteflies. Rosemary usually recovers from pest damage unless the infestation is severe or if the plant is already weakened by cold or water stress. Pear-shaped aphids feed on the underside of the stems. Spittle bugs leave behind a white, foamy residue that resembles spittle. Treat both by rinsing them off the rosemary with a sharp spray of water, or drench the plant with a ready-to-use insecticidal soap at five-day intervals until the pests are gone. Water sprays and soap products can also help control whiteflies. Spray the plants several times a day with water to discourage the flies and their larvae. Yellow sticky traps or reflective mulch spread around the rosemary may also minimize whitefly problems.
Chemical Damage
Premature needle death, yellowing of the needle tips or a general burned appearance may indicate chemical damage from herbicides, pesticides or improper fertilization. Herbicide drift, which occurs when the wind carries the spray beyond its intended target, causes leaf dieback or kills the entire plant. Pruning out the affected branches may allow the plant to recover if the chemicals haven't reached the roots. Excessive use of fertilizers can lead to the buildup of fertilizer salts in the soil, especially in container-grown plants. Watering the rosemary deeply so the excess moisture drains freely from the bottom of the pot at least once monthly during the summer helps flush out any excess salt.
Nutritional Deficiencies
Fertilizer is seldom necessary for a rosemary shrub, especially those grown in garden beds where the trace nutrients in the soil provide sufficient fertilization. Potted plants or those grown in exceptionally poor soil may be suffering from a nutrient deficiency if the plant grows slowly or develops stunted, pale yellow needles. An application of a general purpose fertilizer in early spring should provide enough nutrients to help the plant recover. Follow package instructions or mix 1/2 teaspoon of a soluble 24-8-16 blend with 1 gallon of water, and water the rosemary with the solution. Avoid applying fertilizer directly to the foliage because it can damage the needles.
1
0
成长记
Koala小熊
2017年11月19日

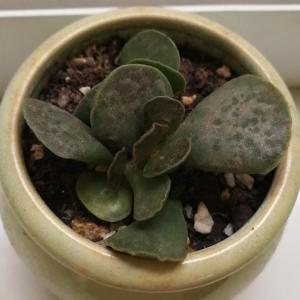
當初買來綠龜之卵的時候不小心碰掉的一片葉子,索性拿來葉孵
一開始才過10天就看到它發根了
沒想到發根發了好久,到最近兩個月過去了才開始冒出圓圓的葉子來
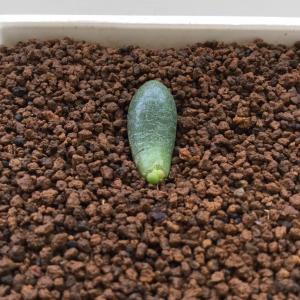
一開始才過10天就看到它發根了
沒想到發根發了好久,到最近兩個月過去了才開始冒出圓圓的葉子來

0
0
文章
Miss Chen
2017年11月15日

You can save and sow seeds from your favorite garden strawberries (Fragaria x ananassa), perennial in U.S. Department of Agriculture plant hardiness zones 3 through 10, but most are hybrid cultivars that won't come true from seed. On the other hand, purchased or saved seeds for wild strawberries (Fragaria spp., USDA zones 4 through 10), or open-pollinated garden types such as "Fresca" (USDA zones 3 through 8) will come true. Sellers also offer seeds of hybrid decorative garden varieties, including "Tarpan" (USDA zones 5 through 8), which are grown for their unusual pink flowers as well as their berries.

Harvest Seeds
To harvest strawberry seeds from their fruits, place four or five berries and 1 quart of water in the pitcher of a blender. After covering the blender, run it on its lowest setting for 10 seconds. Discard any seeds that float to the surface, as they won't be viable, and pour the mixture of water and strawberry pulp through a strainer that has mesh that's fine enough to retain the seeds. Hold the strainer over a sink or place a container beneath it to catch the watery pulp. When the seeds are completely drained, spread them on paper towels and allow them to dry thoroughly.
Stratify Seeds
Store saved or purchased strawberry seeds in a paper envelope inside a covered glass jar or zip-lock plastic bag in the refrigerator until one month before you intend to plant them. If you want to harvest strawberries the same year that you plant their seeds, you must sow the seeds indoors no later than the beginning of February. One month earlier than the planting date you choose, place the jar or bag containing the seeds in the freezer. After the month has passed, retrieve the container from the freezer, and leave it at room temperature overnight before you open it to plant the seeds.
Plant Seeds
Make sure the flowerpot or other container you use for sowing the seeds has drainage holes. After filling it to within 1/2 inch of its rim with damp, sterile seed-starting mix, sow the seeds about 1 inch apart over the surface of the mix. Press them into the surface and leave them uncovered, as they require light for germination. After topping the container with plastic wrap, place it under a grow light set to run for 12 to 14 hours per day or on a sunny -- preferably south-facing -- windowsill. If you keep the container at temperatures between 60 and 75 degrees Fahrenheit, the seeds should germinate within one to six weeks.

Grow Seedlings
For the first month, feed the plants once every two weeks with a fertilizer recommended for seedlings, such as liquid kelp (0-0-1). Use only half the amount specified, which for the kelp would be 1 tablespoon of the concentrate per gallon of water. After one month, you can raise that to the full amount of 2 tablespoons per gallon every two weeks. About six weeks after the seedlings germinate, transplant them into individual 4-inch pots of potting soil. They should be ready to go outdoors after another six weeks. Place the pots in the shade at first, accustoming the plants gradually to more and more sun before you transplant them into the garden, setting them 2 feet apart in well-drained, slightly acidic soil in full sun. Work 1/4 cup of an all-purpose organic fertilizer such as 5-5-5 into the planting hole for each seedling, water them well and mulch them with straw. To stay healthy, the strawberry plants will need at least 1 inch of water per week from rainfall or irrigation.

Harvest Seeds
To harvest strawberry seeds from their fruits, place four or five berries and 1 quart of water in the pitcher of a blender. After covering the blender, run it on its lowest setting for 10 seconds. Discard any seeds that float to the surface, as they won't be viable, and pour the mixture of water and strawberry pulp through a strainer that has mesh that's fine enough to retain the seeds. Hold the strainer over a sink or place a container beneath it to catch the watery pulp. When the seeds are completely drained, spread them on paper towels and allow them to dry thoroughly.
Stratify Seeds
Store saved or purchased strawberry seeds in a paper envelope inside a covered glass jar or zip-lock plastic bag in the refrigerator until one month before you intend to plant them. If you want to harvest strawberries the same year that you plant their seeds, you must sow the seeds indoors no later than the beginning of February. One month earlier than the planting date you choose, place the jar or bag containing the seeds in the freezer. After the month has passed, retrieve the container from the freezer, and leave it at room temperature overnight before you open it to plant the seeds.
Plant Seeds
Make sure the flowerpot or other container you use for sowing the seeds has drainage holes. After filling it to within 1/2 inch of its rim with damp, sterile seed-starting mix, sow the seeds about 1 inch apart over the surface of the mix. Press them into the surface and leave them uncovered, as they require light for germination. After topping the container with plastic wrap, place it under a grow light set to run for 12 to 14 hours per day or on a sunny -- preferably south-facing -- windowsill. If you keep the container at temperatures between 60 and 75 degrees Fahrenheit, the seeds should germinate within one to six weeks.

Grow Seedlings
For the first month, feed the plants once every two weeks with a fertilizer recommended for seedlings, such as liquid kelp (0-0-1). Use only half the amount specified, which for the kelp would be 1 tablespoon of the concentrate per gallon of water. After one month, you can raise that to the full amount of 2 tablespoons per gallon every two weeks. About six weeks after the seedlings germinate, transplant them into individual 4-inch pots of potting soil. They should be ready to go outdoors after another six weeks. Place the pots in the shade at first, accustoming the plants gradually to more and more sun before you transplant them into the garden, setting them 2 feet apart in well-drained, slightly acidic soil in full sun. Work 1/4 cup of an all-purpose organic fertilizer such as 5-5-5 into the planting hole for each seedling, water them well and mulch them with straw. To stay healthy, the strawberry plants will need at least 1 inch of water per week from rainfall or irrigation.
0
0


