文章
Miss Chen
2022年05月28日

Cordyline, or ti, is a common decorative plant that thrives outdoors in USDA hardiness zones 9 through 12, but it also makes an excellent houseplant with its long, spikey leaves. Cordyline typically has leathery leaves in a variety of colors, including green, red, yellow, white, purple, and purplish-red.
Some species in this group have fragrant flowers followed by berries. The moderate-growing plant will produce white, pink, or pale lavender flowers that are cup-shaped and sweet-smelling. They bloom in early summer and then small berries will appear after the flowers. It's more typical for flowering to occur in outdoor varieties, but flowers can appear on houseplants. If you plant cordyline outside, do so in the spring. This plant is toxic to dogs and cats.1
Common Name Cordyline, Hawaiian ti plant, good luck plant
Botanical Name Cordyline terminalis
Family Asparagaceae
Plant Type Evergreen shrub
Mature Size 2-4 ft. tall and wide
Sun Exposure Full-sun, partial sun
Soil Type Well-draining
Soil pH Neutral to acidic, 6-6.5
Bloom Time Summer
Flower Color White, pink, lavender
Hardiness Zones 9-12 (USDA)
Native Area Pacific Islands, Southeast Asia
Toxicity Highly toxic to dogs and cats
Cordyline Care
Tropical cordyline is a hardy plant if you grow it in the right climate. Its many varieties are colorful and cheery, and it's an attractive low-maintenance evergreen shrub. Ti will bring color to both your indoor or outdoor garden, and it's very easy to maintain.
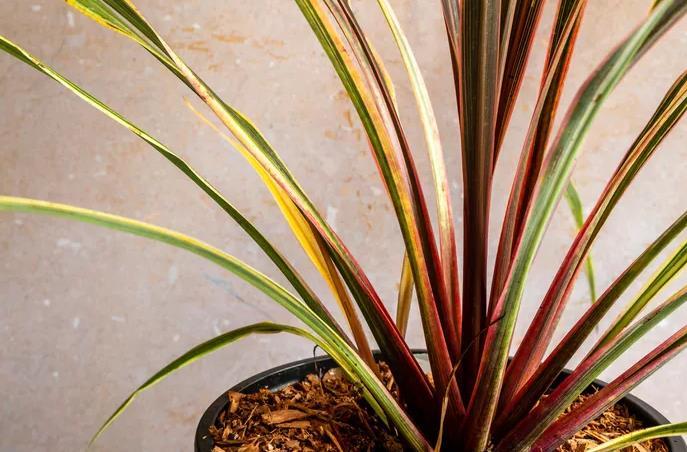
The name Cordyline originates from Greek; the word kordyle, meaning "club," is a reference to the plant's vigorous root system. If you've planted cordyline outdoors in a raised garden bed, the root system can sometimes grow so large it may disrupt surrounding plants.
Light
Ti needs bright light, but avoid direct sunlight in unhabituated plants. Also, green-leaved cordyline tends to do best with direct light, while those with other colored leaves may prefer bright indirect or filtered sunlight.
Soil
Cordyline needs a rich, well-drained high-quality potting mix with a pH of 6-6.5.
Water
Ti plants prefer to be watered when the surface of its soil feels dry. Water until it starts to run out of the drainage holes. Do not put the drained water back into the plant.
Fertilizer
These plants can be fed in the spring with slow-release pellets. You can feed the plant weekly during the growing season with a liquid 20-20-20 fertilizer at half-strength. Do not fertilize during the winter.
Temperature and Humidity
Ti thrives in temperatures above 62 degrees Fahrenheit and prefers a high humidity environment. Avoid putting the plant near a cold draft like a window. These are tropical plants, so if you're experiencing leaf drop, try raising both the temperature and humidity.
Types of Cordyline
'C. australis': resembles the yucca plant with narrow, long, and grayish to dark leaves
'Calypso Queen': boasts ruby-maroon leaves
'Oahu Rainbow': shows off dark-green leaves streaked with cream and white
'Firebrand': offers beautiful pink leaves that darken to maroon
'Hilo Rainbow': displays deep-green foliage with pops of burgundy
Pruning
A mature, well-trimmed plant should have stems of various heights, up to 3 feet to 4 feet (some stems can go much higher), and be clothed in leaves to the soil level. Over time, cordylines tend to become leggy, so you may want to trim back individual stems in a staggered pattern to keep the plant full.
Propagating Cordyline
Propagating ti is typically done with stem cuttings. The easy process is as follows:
Cut 3- to 5-inch pieces from mature stems and remove all of the leaves.
Lay the pieces in a damp mixture of sand and perlite, and keep in a room that's at least 62 degrees Fahrenheit.
Shoots will grow from the eyes of the stems and can be planted in potting soil when they have about four to six leaves each. You can repot in spring or every other spring, as needed.
How to Grow Cordyline From Seed
Ti can be grown with purchased seeds or harvested seeds from the ripened berries that you may occasionally find even on an indoor plant.
Harvested seeds need to be squeezed out of the berry and cleaned. If you found indoor berries, just clean the seeds and let them air-dry for a few days before planting. If you found your berries outdoors, they'll need to be stratified for several months before planting.
When seeds are ready, sow them in well-draining, sandy compost. Germination should happen in four to six weeks, but possibly longer.
Potting and Repotting Cordyline
Cordyline does well in pots, especially if you don't live in a tropical climate: You can just bring them indoors for the winter. When it's time to move the plant outdoors during warmer months, make sure the outdoor soil drains well and any threat of frost has passed.
The plant doesn't need to be repotted unless it's growing too large for its pot, which might be every few years. When repotting, Choose a tall pot of any material with adequate drainage holes for cordyline to accommodate two to three years of root growth.
Overwintering
If you're at the cooler end of cordyline's hardiness zones (9 through 12), you can tie up your plant's leaves with natural twine to keep them safe in cooler months; Just be sure they're dry before you do so to avoid rot. Outdoor cordyline plants also need to be well secured in harsh, windy conditions; The long, thin leaves can thrash in the wind and cause the plant to topple over.
Common Pests & Plant Diseases
Cordyline is prone to common pests and problems, such as scale insects, spider mites, and mealybugs. All of these can be fixed with either neem oil or insecticidal soap.
Ti also attracts bacterial leaf spot and root rot. You can try to beat both of these problems with fungicide and by making sure the plants aren't sitting in soil that's too wet.
Common Problems With Cordyline
This otherwise easy-going tropical plant will let you know if it's in trouble by the condition of its leaves. Here's how to fix a leaf issue.
Browning Tips
This is a common problem with many houseplants, including indoor-grown cordyline. The plant may be experiencing underwatering, overwatering, too much fertilizer, root rot, or even overly dry air.
However, another issue could be the salts and fluoride in the tap water used to moisten the plant. Cordyline is sensitive to fluoride, which is found in many residential water supplies. Flush the plant, or before watering, leave the water in an open container overnight to reduce chlorine and salts. You can also switch to distilled or bottled water or harvest rainwater for plants.
Leaves Turning Yellow
A second common problem with houseplants like cordyline is the yellowing of leaves. Most plants naturally shed older yellow leaves. But, if your cordyline's leaves are turning yellow, it may also mean it has a watering issue or it's getting too much sunlight. It needs indirect bright light rather than harsh rays directly on the leaves.
Yellow leaves could also mean your plant is in a spot where there are frequent temperature fluctuations. Check for drafts. Allow the leaves to drop and see how the plant fares in another spot.

If you see that the lower leaves are turning yellow, that usually means there's root rot. Check for waterlogged or blackened roots. Unfortunately, you may not be able to save a cordyline plant with root rot.
FAQ
Is cordyline easy to grow?
Caring for these plants indoors (and outdoors) is easy, simple, and straightforward. But, they must be kept warm and they need a lot of light.
Why is cordyline considered a lucky plant?
In many areas of the world, the ti plant is considered to have mystical powers that bring good luck, long life, and lasting love to its owner. For example, in Hawaii, cordyline is planted around homes to bring good luck to the homeowners.
What is the difference between cordyline and dracaena?
Cordyline and dracaena plants are often confused because they look alike with nearly identical spikey leaves. You can tell the difference by the color roots. Cordyline plants have white roots and dracaena have orange roots.
Some species in this group have fragrant flowers followed by berries. The moderate-growing plant will produce white, pink, or pale lavender flowers that are cup-shaped and sweet-smelling. They bloom in early summer and then small berries will appear after the flowers. It's more typical for flowering to occur in outdoor varieties, but flowers can appear on houseplants. If you plant cordyline outside, do so in the spring. This plant is toxic to dogs and cats.1
Common Name Cordyline, Hawaiian ti plant, good luck plant
Botanical Name Cordyline terminalis
Family Asparagaceae
Plant Type Evergreen shrub
Mature Size 2-4 ft. tall and wide
Sun Exposure Full-sun, partial sun
Soil Type Well-draining
Soil pH Neutral to acidic, 6-6.5
Bloom Time Summer
Flower Color White, pink, lavender
Hardiness Zones 9-12 (USDA)
Native Area Pacific Islands, Southeast Asia
Toxicity Highly toxic to dogs and cats
Cordyline Care
Tropical cordyline is a hardy plant if you grow it in the right climate. Its many varieties are colorful and cheery, and it's an attractive low-maintenance evergreen shrub. Ti will bring color to both your indoor or outdoor garden, and it's very easy to maintain.

The name Cordyline originates from Greek; the word kordyle, meaning "club," is a reference to the plant's vigorous root system. If you've planted cordyline outdoors in a raised garden bed, the root system can sometimes grow so large it may disrupt surrounding plants.
Light
Ti needs bright light, but avoid direct sunlight in unhabituated plants. Also, green-leaved cordyline tends to do best with direct light, while those with other colored leaves may prefer bright indirect or filtered sunlight.
Soil
Cordyline needs a rich, well-drained high-quality potting mix with a pH of 6-6.5.
Water
Ti plants prefer to be watered when the surface of its soil feels dry. Water until it starts to run out of the drainage holes. Do not put the drained water back into the plant.
Fertilizer
These plants can be fed in the spring with slow-release pellets. You can feed the plant weekly during the growing season with a liquid 20-20-20 fertilizer at half-strength. Do not fertilize during the winter.
Temperature and Humidity
Ti thrives in temperatures above 62 degrees Fahrenheit and prefers a high humidity environment. Avoid putting the plant near a cold draft like a window. These are tropical plants, so if you're experiencing leaf drop, try raising both the temperature and humidity.
Types of Cordyline
'C. australis': resembles the yucca plant with narrow, long, and grayish to dark leaves
'Calypso Queen': boasts ruby-maroon leaves
'Oahu Rainbow': shows off dark-green leaves streaked with cream and white
'Firebrand': offers beautiful pink leaves that darken to maroon
'Hilo Rainbow': displays deep-green foliage with pops of burgundy
Pruning
A mature, well-trimmed plant should have stems of various heights, up to 3 feet to 4 feet (some stems can go much higher), and be clothed in leaves to the soil level. Over time, cordylines tend to become leggy, so you may want to trim back individual stems in a staggered pattern to keep the plant full.
Propagating Cordyline
Propagating ti is typically done with stem cuttings. The easy process is as follows:
Cut 3- to 5-inch pieces from mature stems and remove all of the leaves.
Lay the pieces in a damp mixture of sand and perlite, and keep in a room that's at least 62 degrees Fahrenheit.
Shoots will grow from the eyes of the stems and can be planted in potting soil when they have about four to six leaves each. You can repot in spring or every other spring, as needed.
How to Grow Cordyline From Seed
Ti can be grown with purchased seeds or harvested seeds from the ripened berries that you may occasionally find even on an indoor plant.
Harvested seeds need to be squeezed out of the berry and cleaned. If you found indoor berries, just clean the seeds and let them air-dry for a few days before planting. If you found your berries outdoors, they'll need to be stratified for several months before planting.
When seeds are ready, sow them in well-draining, sandy compost. Germination should happen in four to six weeks, but possibly longer.
Potting and Repotting Cordyline
Cordyline does well in pots, especially if you don't live in a tropical climate: You can just bring them indoors for the winter. When it's time to move the plant outdoors during warmer months, make sure the outdoor soil drains well and any threat of frost has passed.
The plant doesn't need to be repotted unless it's growing too large for its pot, which might be every few years. When repotting, Choose a tall pot of any material with adequate drainage holes for cordyline to accommodate two to three years of root growth.
Overwintering
If you're at the cooler end of cordyline's hardiness zones (9 through 12), you can tie up your plant's leaves with natural twine to keep them safe in cooler months; Just be sure they're dry before you do so to avoid rot. Outdoor cordyline plants also need to be well secured in harsh, windy conditions; The long, thin leaves can thrash in the wind and cause the plant to topple over.
Common Pests & Plant Diseases
Cordyline is prone to common pests and problems, such as scale insects, spider mites, and mealybugs. All of these can be fixed with either neem oil or insecticidal soap.
Ti also attracts bacterial leaf spot and root rot. You can try to beat both of these problems with fungicide and by making sure the plants aren't sitting in soil that's too wet.
Common Problems With Cordyline
This otherwise easy-going tropical plant will let you know if it's in trouble by the condition of its leaves. Here's how to fix a leaf issue.
Browning Tips
This is a common problem with many houseplants, including indoor-grown cordyline. The plant may be experiencing underwatering, overwatering, too much fertilizer, root rot, or even overly dry air.
However, another issue could be the salts and fluoride in the tap water used to moisten the plant. Cordyline is sensitive to fluoride, which is found in many residential water supplies. Flush the plant, or before watering, leave the water in an open container overnight to reduce chlorine and salts. You can also switch to distilled or bottled water or harvest rainwater for plants.
Leaves Turning Yellow
A second common problem with houseplants like cordyline is the yellowing of leaves. Most plants naturally shed older yellow leaves. But, if your cordyline's leaves are turning yellow, it may also mean it has a watering issue or it's getting too much sunlight. It needs indirect bright light rather than harsh rays directly on the leaves.
Yellow leaves could also mean your plant is in a spot where there are frequent temperature fluctuations. Check for drafts. Allow the leaves to drop and see how the plant fares in another spot.

If you see that the lower leaves are turning yellow, that usually means there's root rot. Check for waterlogged or blackened roots. Unfortunately, you may not be able to save a cordyline plant with root rot.
FAQ
Is cordyline easy to grow?
Caring for these plants indoors (and outdoors) is easy, simple, and straightforward. But, they must be kept warm and they need a lot of light.
Why is cordyline considered a lucky plant?
In many areas of the world, the ti plant is considered to have mystical powers that bring good luck, long life, and lasting love to its owner. For example, in Hawaii, cordyline is planted around homes to bring good luck to the homeowners.
What is the difference between cordyline and dracaena?
Cordyline and dracaena plants are often confused because they look alike with nearly identical spikey leaves. You can tell the difference by the color roots. Cordyline plants have white roots and dracaena have orange roots.
0
0
文章
Miss Chen
2022年04月07日

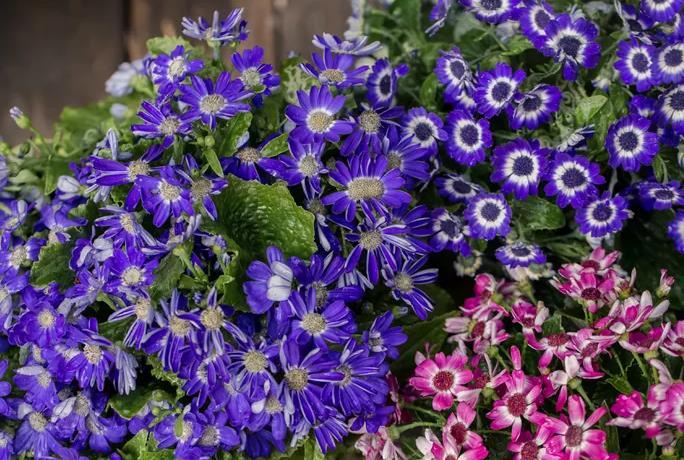
Cineraria is a hybrid plant, a cross between Pericallis cruenta and P. lanata, species that are native to the Azores and Canary Island. Cineraria is a tender perennial, hardy in zones 9 to 11, but it is usually grown as an annual or short-lived seasonal houseplant. Known for a wide range of colors and long-lasting blooms, Cineraria comes in vibrant shades of pink, red, purple, blue, and many bi-colors. Cineraria is a mound-forming plant with large leaves that becomes covered with blossoms during its blooming season. It prefers cool weather, so as a garden plant it is usually grown for spring blossoms, then removed from the garden in favor of summer-blooming annuals after the bloom period is over. Many gardeners prefer to use them for container culture rather than as in-ground bedding plants.
As outdoor plants, cineraria plants are usually planted from nursery starts in the spring, which have been commercially grown to provide cool-season spring blooming. But these plants bloom about four months after seed germination, so it's possible to dictate the bloom period by carefully selecting the time when you sow seeds. Sowing in late summer, for example, can give indoor flowering plants for Christmas.
Common Name Cineraria, Florist's cineraria
Botanical Name Pericallis × hybrida
Family Asteraceae
Plant Type Tender perennial, usually grown as annual
Mature Size 6–12 in. tall, 9–12 in. wide
Sun Exposure Partial to full shade
Soil Type Moist but well-draining
Soil pH Acidic (5.5–6.0)
Bloom Time Seasonal bloomer; blossoms 16 to 18 weeks after seed germination
Flower Color Various (no yellow)
Hardiness Zones 9–11 (USDA)
Native Areas Nursery hybrid; parent species are from the Azores and Canary Islands
Cineraria Care
The flamboyant colors of cineraria, as well their versatile daisy shape, have made them increasingly popular in the United States in recent years as a decorative annual. But if you happen to live in a very warm zone (USDA 9 to 11) you can try growing them as perennials. As an annual, they hold their color for a decent period of time, so make sure they stay evenly moist and deadhead them continually to encourage new buds, and you'll have weeks of glorious colorful blooms from spring through summer.
Light
Cineraria will do best in filtered sunlight or partial shade conditions and it resents full sunlight. If grown as a short-lived indoor plant, however, it likes more light.
Soil
Cineraria like a rich, moist, slightly acidic soil that has good drainage. Amendments such as peat moss and coffee grounds can help create good coil conditions for this somewhat fussy plant. When grown indoors, a standard potting mix works well, as it contains a high percentage of peat which ensures an acidic pH.
Water
Cineraria needs constant moisture but it still needs to breathe. Water well and frequently at the base of the plant, checking the soil to make sure it feels moist but not soggy. Steady watering in hot weather is a must. But at the same time, cineraria doesn't like constantly soggy soil, which can encourage root and crown rot diseases. Thus, it's critical that frequent watering is paired with well-draining soil.
Temperature and Humidity
Cineraria is temperamental about temperature. The preferred temp is between 50 and 65 degrees Fahrenheit. If temps dip below 35 degrees at night, the plants will die, and if they go above 80 degrees, they'll stop blooming. In the heat of summer, make sure cineraria plants stay in shade; it may be necessary to bring potted plants indoors during very hot days.
When grown indoors, cineraria plants like a cool environment; they will bloom longer with
daytime temperatures of about 65 degrees Fahrenheit and nighttime temps of 50 to 55 degrees.
These flowers thrive in an environment that is humid yet not quite tropical. Even if your location is not consistently humid, you can approximate the climate needs of this plant by keeping the soil around it consistently moist. However, avoid making the ground too soggy as this can cause root rot. The best way to provide this humidity for both indoor and outdoor plantings is to create a pebble tray. Spread a layer of pebbles or pea gravel on a low dish or tray and place it beneath the container. Keep filled with water to up to a 1/2 inch in depth (that may mean refreshing it daily if your house has dry air). As that water evaporates it will create an evenly humid atmosphere around the plant. Misting is not recommended as it may overwhelm the flower petals.
Fertilizer
Feed cineraria plants with a half-strength balanced fertilizer every two weeks, beginning at the point where flower buds appear. These plants have a steady appetite, but don't want to be gorged with fertilizer.
Types of Cineraria
Cineraria is usually offered in various named color mixes. Some popular ones include the 'Senetti' mix, which includes blue, light blue, magenta, pink, and bicolors; 'Cruenta Amigo' mix, including blue, red, purple, magenta, and white flowers, often with white eyes; 'Satellite Mix', featuring ground-hugging 8-inch plants; and the 'Early Perfection' series, with compact 8- to 10-inch plants ideal for small pots.
Pruning
Deadheading spent flowers will both keep the plants looking tidy and extend the bloom season by prompting the plant to produce additional flower buds. After flowering is complete, these plants are usually pulled out and replaced with summer-flowering annuals.
Propagating Cineraria
Cineraria is usually propagated from seed, but you can also propagate new plants for indoor winter growing by taking stem cuttings in fall:
Cut a 4- to 6-inch stem tip, preferably one without flowers. Remove all but the top leaves.
Dip the cut end in rooting hormone, then plant it in a small pot filled with ordinary potting soil.
Moisten the soil and place the planted cutting in a large plastic bag, taking care that the plastic does not touch the leaves.
Place the cutting in a cool location with good indirect light. Periodically check the cutting to see if roots have formed (tug on the stem; with a rooted cutting you'll be able to feel resistance).
When roots have formed, remove the plastic bag and continue to grow the cutting in a relatively cool location with bright light but out of the direct sun. Propagated in this manner, the new plant should flower within about three months.
How to Grow Cineraria From Seed
Popular in the commercial trade as a cut flower, cineraria is most commonly propagated by seed. Plant the seeds in small pots or flat trays containing commercial seed-starter mix, lightly pressing the seeds into the soil. Do not cover them, as they need light to germinate. Keep the seeds moist; germination generally takes 14 to 21 days. As seedings develop their true leaves, they can be transplanted into individual pots to continue growing. The plants will bloom 16 to 18 weeks after seed germination.
If grown as garden perennials, these plants will readily reseed themselves and colonize. If you wish to prevent this, deadhead the flowers before the seeds mature.
Potting and Repotting Cineraria
When grown in containers, cineraria does well in an ordinary commercial potting mix with a high peat content. For best bloom, they prefer to be somewhat root-bound, so smallish containers with good drainage are usually sufficient.
These are not easy plants to grow indoors as houseplants, as they require careful control of temperatures (cool) and humidity (high). Give indoor potted plants more light than is required for outdoor plants.
Overwintering
Once they flower, cineraria is reluctant to bloom again, so the plants are often removed from the garden once the flowering is complete.
If you live in a climate where cineraria can be grown as garden perennials, you may want to leave the plants in place so that they will self-seed and create new volunteer plants.
Common Pests & Plant Diseases
Cineraria is subject to quite a number of plant pests and diseases. Indoor plants are often more susceptible than outdoor garden plants.
Aphids, thrips, spider mites, white fly and leaf miners can all feast on cineraria. The best treatment is a spray with a horticultural oil such as neem oil, or a chemical pesticide.
Disease issues include powdery mildew, gray mold, fungal rot of the crown or roots, and various plant viruses. Keeping soil moisture levels and humidity levels correct will prevent many disease problems, but badly affected plants may need to be removed.
How to Get Cineraria to Bloom
Failure to bloom can usually be traced to a lack of water or nutrients. Cineraria is a relatively demanding plant that needs a half-strength feeding every two weeks. Frequent light feeding is the key to good flowering. These plants also require soil that is consistently moist but not soggy.
Common Problems With Cineraria
The trickiest part of growing cineraria is getting the moisture levels right. Too much water induces root or crown rot, while too little water will prevent the profuse blooming that these plants are famous for. They are also quite sensitive to temperature, preferring coolish conditions and often succumbing when conditions are too warm. It's best not to grow cineraria at all if you live in very hot climate, and excessively dry or rainy conditions are also problematic.

FAQ
How was cineraria developed?
These, cheery, colorful daisy-like flowers are in the Asteraceae (aster) family, which also includes sunflowers, daisies, strawflowers and ageratum. The parent species (Pericallis cruenta and P. lanata) were first discovered by horticulturists from the British Royal Gardens in 1777, growing in the Azores and Canary Islands on cool ocean cliffs overlooking the Atlantic. The varieties now popular in the trade are derived from the hybrid cross of these two species.
How can I use this plant in the landscape?
Cineraria is most often used as an annual, either for garden beds or more often as a container plant for patios, decks, or window boxes, or as a short-lived indoor flowering plant. There is nothing subtle about cineraria, so they are popular whenever you want to make a bold color statement. The cobalt blue shades are especially popular in summer to create red, white, and blue arrangements for Independence Day.
How long does Cineraria live?
Even when it can be grown as perennial in warm climates, cineraria does not readily rebloom after flowering, so in most areas, this short-lived perennial is simply discarded after the flowering is complete.
How do I force cineraria into winter blooming as a houseplant?
Cineraria is a seasonal bloomer that generally flowers 16 to 18 weeks after seeds germinate and sprout. Thus, it's easy enough to dictate the bloom period by choosing the proper time to plant the seeds. For Christmas bloom, for example, you should plant seeds in late August to early September. Remember, though, that it's tricky to provide the proper cool and humid conditions when growing this plant indoors. This is why many people seeking winter-blooming plants simply buy them in season from a houseplant supplier.
As outdoor plants, cineraria plants are usually planted from nursery starts in the spring, which have been commercially grown to provide cool-season spring blooming. But these plants bloom about four months after seed germination, so it's possible to dictate the bloom period by carefully selecting the time when you sow seeds. Sowing in late summer, for example, can give indoor flowering plants for Christmas.
Common Name Cineraria, Florist's cineraria
Botanical Name Pericallis × hybrida
Family Asteraceae
Plant Type Tender perennial, usually grown as annual
Mature Size 6–12 in. tall, 9–12 in. wide
Sun Exposure Partial to full shade
Soil Type Moist but well-draining
Soil pH Acidic (5.5–6.0)
Bloom Time Seasonal bloomer; blossoms 16 to 18 weeks after seed germination
Flower Color Various (no yellow)
Hardiness Zones 9–11 (USDA)
Native Areas Nursery hybrid; parent species are from the Azores and Canary Islands

Cineraria Care
The flamboyant colors of cineraria, as well their versatile daisy shape, have made them increasingly popular in the United States in recent years as a decorative annual. But if you happen to live in a very warm zone (USDA 9 to 11) you can try growing them as perennials. As an annual, they hold their color for a decent period of time, so make sure they stay evenly moist and deadhead them continually to encourage new buds, and you'll have weeks of glorious colorful blooms from spring through summer.
Light
Cineraria will do best in filtered sunlight or partial shade conditions and it resents full sunlight. If grown as a short-lived indoor plant, however, it likes more light.
Soil
Cineraria like a rich, moist, slightly acidic soil that has good drainage. Amendments such as peat moss and coffee grounds can help create good coil conditions for this somewhat fussy plant. When grown indoors, a standard potting mix works well, as it contains a high percentage of peat which ensures an acidic pH.
Water
Cineraria needs constant moisture but it still needs to breathe. Water well and frequently at the base of the plant, checking the soil to make sure it feels moist but not soggy. Steady watering in hot weather is a must. But at the same time, cineraria doesn't like constantly soggy soil, which can encourage root and crown rot diseases. Thus, it's critical that frequent watering is paired with well-draining soil.
Temperature and Humidity
Cineraria is temperamental about temperature. The preferred temp is between 50 and 65 degrees Fahrenheit. If temps dip below 35 degrees at night, the plants will die, and if they go above 80 degrees, they'll stop blooming. In the heat of summer, make sure cineraria plants stay in shade; it may be necessary to bring potted plants indoors during very hot days.
When grown indoors, cineraria plants like a cool environment; they will bloom longer with
daytime temperatures of about 65 degrees Fahrenheit and nighttime temps of 50 to 55 degrees.
These flowers thrive in an environment that is humid yet not quite tropical. Even if your location is not consistently humid, you can approximate the climate needs of this plant by keeping the soil around it consistently moist. However, avoid making the ground too soggy as this can cause root rot. The best way to provide this humidity for both indoor and outdoor plantings is to create a pebble tray. Spread a layer of pebbles or pea gravel on a low dish or tray and place it beneath the container. Keep filled with water to up to a 1/2 inch in depth (that may mean refreshing it daily if your house has dry air). As that water evaporates it will create an evenly humid atmosphere around the plant. Misting is not recommended as it may overwhelm the flower petals.
Fertilizer
Feed cineraria plants with a half-strength balanced fertilizer every two weeks, beginning at the point where flower buds appear. These plants have a steady appetite, but don't want to be gorged with fertilizer.
Types of Cineraria
Cineraria is usually offered in various named color mixes. Some popular ones include the 'Senetti' mix, which includes blue, light blue, magenta, pink, and bicolors; 'Cruenta Amigo' mix, including blue, red, purple, magenta, and white flowers, often with white eyes; 'Satellite Mix', featuring ground-hugging 8-inch plants; and the 'Early Perfection' series, with compact 8- to 10-inch plants ideal for small pots.
Pruning
Deadheading spent flowers will both keep the plants looking tidy and extend the bloom season by prompting the plant to produce additional flower buds. After flowering is complete, these plants are usually pulled out and replaced with summer-flowering annuals.
Propagating Cineraria
Cineraria is usually propagated from seed, but you can also propagate new plants for indoor winter growing by taking stem cuttings in fall:
Cut a 4- to 6-inch stem tip, preferably one without flowers. Remove all but the top leaves.
Dip the cut end in rooting hormone, then plant it in a small pot filled with ordinary potting soil.
Moisten the soil and place the planted cutting in a large plastic bag, taking care that the plastic does not touch the leaves.
Place the cutting in a cool location with good indirect light. Periodically check the cutting to see if roots have formed (tug on the stem; with a rooted cutting you'll be able to feel resistance).
When roots have formed, remove the plastic bag and continue to grow the cutting in a relatively cool location with bright light but out of the direct sun. Propagated in this manner, the new plant should flower within about three months.
How to Grow Cineraria From Seed
Popular in the commercial trade as a cut flower, cineraria is most commonly propagated by seed. Plant the seeds in small pots or flat trays containing commercial seed-starter mix, lightly pressing the seeds into the soil. Do not cover them, as they need light to germinate. Keep the seeds moist; germination generally takes 14 to 21 days. As seedings develop their true leaves, they can be transplanted into individual pots to continue growing. The plants will bloom 16 to 18 weeks after seed germination.
If grown as garden perennials, these plants will readily reseed themselves and colonize. If you wish to prevent this, deadhead the flowers before the seeds mature.
Potting and Repotting Cineraria
When grown in containers, cineraria does well in an ordinary commercial potting mix with a high peat content. For best bloom, they prefer to be somewhat root-bound, so smallish containers with good drainage are usually sufficient.
These are not easy plants to grow indoors as houseplants, as they require careful control of temperatures (cool) and humidity (high). Give indoor potted plants more light than is required for outdoor plants.
Overwintering
Once they flower, cineraria is reluctant to bloom again, so the plants are often removed from the garden once the flowering is complete.
If you live in a climate where cineraria can be grown as garden perennials, you may want to leave the plants in place so that they will self-seed and create new volunteer plants.
Common Pests & Plant Diseases
Cineraria is subject to quite a number of plant pests and diseases. Indoor plants are often more susceptible than outdoor garden plants.
Aphids, thrips, spider mites, white fly and leaf miners can all feast on cineraria. The best treatment is a spray with a horticultural oil such as neem oil, or a chemical pesticide.
Disease issues include powdery mildew, gray mold, fungal rot of the crown or roots, and various plant viruses. Keeping soil moisture levels and humidity levels correct will prevent many disease problems, but badly affected plants may need to be removed.
How to Get Cineraria to Bloom
Failure to bloom can usually be traced to a lack of water or nutrients. Cineraria is a relatively demanding plant that needs a half-strength feeding every two weeks. Frequent light feeding is the key to good flowering. These plants also require soil that is consistently moist but not soggy.
Common Problems With Cineraria
The trickiest part of growing cineraria is getting the moisture levels right. Too much water induces root or crown rot, while too little water will prevent the profuse blooming that these plants are famous for. They are also quite sensitive to temperature, preferring coolish conditions and often succumbing when conditions are too warm. It's best not to grow cineraria at all if you live in very hot climate, and excessively dry or rainy conditions are also problematic.

FAQ
How was cineraria developed?
These, cheery, colorful daisy-like flowers are in the Asteraceae (aster) family, which also includes sunflowers, daisies, strawflowers and ageratum. The parent species (Pericallis cruenta and P. lanata) were first discovered by horticulturists from the British Royal Gardens in 1777, growing in the Azores and Canary Islands on cool ocean cliffs overlooking the Atlantic. The varieties now popular in the trade are derived from the hybrid cross of these two species.
How can I use this plant in the landscape?
Cineraria is most often used as an annual, either for garden beds or more often as a container plant for patios, decks, or window boxes, or as a short-lived indoor flowering plant. There is nothing subtle about cineraria, so they are popular whenever you want to make a bold color statement. The cobalt blue shades are especially popular in summer to create red, white, and blue arrangements for Independence Day.
How long does Cineraria live?
Even when it can be grown as perennial in warm climates, cineraria does not readily rebloom after flowering, so in most areas, this short-lived perennial is simply discarded after the flowering is complete.
How do I force cineraria into winter blooming as a houseplant?
Cineraria is a seasonal bloomer that generally flowers 16 to 18 weeks after seeds germinate and sprout. Thus, it's easy enough to dictate the bloom period by choosing the proper time to plant the seeds. For Christmas bloom, for example, you should plant seeds in late August to early September. Remember, though, that it's tricky to provide the proper cool and humid conditions when growing this plant indoors. This is why many people seeking winter-blooming plants simply buy them in season from a houseplant supplier.
0
0
文章
Miss Chen
2021年11月26日

The bridal wreath spirea (Spirae aprunifolia) is a medium-sized deciduous shrub with an upright arching habit, featuring thick sprays of white double flowers that create a focal point in the landscape. Fully hardy in USDA hardiness zones 5-9, this is an easy-to-grow shrub that, once established, requires little care.
The Spiraea genus is found within the Rosaceae family of plants, and it bears some similarity to rose bushes, especially the shape of the leaves and the spiny stems. The species name, prunifolia, indicates that the leaves are similar to those of Prunus, the group that contains many of the familiar stone fruits such as cherries, plums, and peaches.
In spring blooming season, bridal wreath spireas create a cascading waterfall of white, with clusters of small white flowers that bloom all the way down the arching branches. Each leaf is 1- to 3-inches long with an ovate or elliptical shape. The spring flower display is followed by another show in the fall when the leaves turn to hues of red, orange, and yellow.
Spirea is a fast-growing shrub, and within a single growing season, it usually achieves full size. Like most shrubs, bridal wreath spirea is best planted early in the growing season, which will allow the shrub's root system plenty of time to become established before winter. If you must plant in the fall (this sometimes is when nurseries are discounting available stock), try to do it with enough time so the shrub's roots can settle in and begin growing before winter weather sets in.

Botanical Name Spiraea prunifolia
Common Name Spirea, bridal wreath, bridal veil spirea
Plant Type Deciduous shrub
Mature Size 4-8 ft. tall and wide
Sun Exposure Full sun
Soil Type Any well-draining soil
Soil pH 6.0-7.0 (slightly acidic to neutral)
Bloom Time Early spring
Flower Color White
Hardiness Zones 5-9, (USDA)
Native Area China, Korea, and Taiwan
Bridal Wreath Spirea Care
This shrub is very easy to grow in any average soil in a full sun location. It will tolerate some shade, and once established, it has a decent tolerance for occasional drought. Like most shrubs, it should be planted in a carefully prepared hole, at the same depth it was growing in its nursery pot. If planting in a row or mass, space the plant at least 3-feet apart, or 4- to 6-feet apart for a looser mass.
Bridal wreath spirea makes a great specimen plant, or it can be planted as a hedge or in masses as a screening plant. It also works well in foundation plantings. It is excellent when planted in the sunny margins abutting woodland areas, similar to the way azaleas are often used.
The bridal wreath spirea attracts butterflies, but its prickly stems repel grazing by deer. Make sure to plant this shrub where it will not scratch human passers-by—unless you are planting it to discourage intruders.
There are no serious pest or disease problems for the bridal wreath spirea, but they can be susceptible to many of the diseases and insects that attack other members of the rose family. This includes leaf spot, fire blight, powdery mildew, root rot, aphids, leaf roller, and scale.
Some varieties of spirea can escape gardens and become invasive in parts of the U.S., so before planting, check with your local extension office agent.1
Learn About Gold Mound Spirea
Light
This shrub will do best in a spot in your garden that receives full sun; it will tolerate part shade, though with slightly reduced flowering. When planting young bridal wreath spirea shrubs, make sure to provide plenty of room between them: They will grow and can block each other's light if planted too close together.
Soil
This plant is not picky about the soil it's planted in, and can thrive in clay, loam, and even acidic soils. Its biggest need is soil that's well-draining, so the roots never sit in water.
Water
Bridal wreath spirea prefers to grow in well-drained moist soil, though it is able to withstand some periods of drought. Water the plants once a week during the summer whenever rainfall is less than 1 inch. Keep the plants well-watered as they are becoming established.
Temperature and Humidity
This plant is quite hardy, surviving both cold winter and hot summer temperatures in its defined range. It thrives in any climate conditions within its hardiness zones (5-9).
Fertilizer
Every spring, add a 2-inch layer of compost over the soil under the shrub. This is usually sufficient to feed the plant, and it will also help to retain moisture and prevent weeds.

Bridal Wreath Spirea Varieties
‘Fire Light’ has pink flowers that show in summer, and fiery red fall color.
‘Anthony Waterer’ boasts carmine-red flowers and purple fall foliage.
‘Tor’ features tiny white flowers and dark green oval leaves that turn orange, red, and purple in fall.
‘Snowmound’ offers white flowers, attractive arching stems, and dark, blue-green foliage.
Pruning
This plant tends to spread through suckering, so ground suckers will need to be trimmed off if you want to keep the shrubs confined.
If desired, the shrubs can be pruned for shape or size immediately after the spring flowering period. Always use a clean, sharp gardening shear. A good pruning routine is to remove all dead wood, as well as some of the oldest stems all the way to ground level. This will open up the center of the shrub to sunlight, which will reinvigorate it. Tips of branches can also be trimmed to control the size of the shrub.
Propagating Bridal Wreath Spirea
The best way to propagate bridal wreath spirea shrubs is by rooting softwood cuttings. To do so, cut segments of flexible stem tips 6- to 8-inches long. Remove the bottom leaves from these trimmed segments. Dip the cut end into powdered rooting hormone.
Fill a 6-inch pot with moist potting mix, then plant four or five prepared stems around the inner edge of the pot, embedding the exposed nodes into the potting mix. Cover the pot with a large plastic bag and seal it. Place the pot in a dappled shade location and allow the cuttings to root over the next few weeks. Check periodically to make sure the potting mix remains moist.
After about four weeks, you should see new, green growth on the stems, indicating that roots are forming. At this point, repot the cuttings into their own individual containers, then tuck the pots into a sheltered location and allow them to continue growing until they go dormant in winter. The next spring, transplant the rooted cuttings into the garden.
The Spiraea genus is found within the Rosaceae family of plants, and it bears some similarity to rose bushes, especially the shape of the leaves and the spiny stems. The species name, prunifolia, indicates that the leaves are similar to those of Prunus, the group that contains many of the familiar stone fruits such as cherries, plums, and peaches.
In spring blooming season, bridal wreath spireas create a cascading waterfall of white, with clusters of small white flowers that bloom all the way down the arching branches. Each leaf is 1- to 3-inches long with an ovate or elliptical shape. The spring flower display is followed by another show in the fall when the leaves turn to hues of red, orange, and yellow.
Spirea is a fast-growing shrub, and within a single growing season, it usually achieves full size. Like most shrubs, bridal wreath spirea is best planted early in the growing season, which will allow the shrub's root system plenty of time to become established before winter. If you must plant in the fall (this sometimes is when nurseries are discounting available stock), try to do it with enough time so the shrub's roots can settle in and begin growing before winter weather sets in.

Botanical Name Spiraea prunifolia
Common Name Spirea, bridal wreath, bridal veil spirea
Plant Type Deciduous shrub
Mature Size 4-8 ft. tall and wide
Sun Exposure Full sun
Soil Type Any well-draining soil
Soil pH 6.0-7.0 (slightly acidic to neutral)
Bloom Time Early spring
Flower Color White
Hardiness Zones 5-9, (USDA)
Native Area China, Korea, and Taiwan
Bridal Wreath Spirea Care
This shrub is very easy to grow in any average soil in a full sun location. It will tolerate some shade, and once established, it has a decent tolerance for occasional drought. Like most shrubs, it should be planted in a carefully prepared hole, at the same depth it was growing in its nursery pot. If planting in a row or mass, space the plant at least 3-feet apart, or 4- to 6-feet apart for a looser mass.
Bridal wreath spirea makes a great specimen plant, or it can be planted as a hedge or in masses as a screening plant. It also works well in foundation plantings. It is excellent when planted in the sunny margins abutting woodland areas, similar to the way azaleas are often used.
The bridal wreath spirea attracts butterflies, but its prickly stems repel grazing by deer. Make sure to plant this shrub where it will not scratch human passers-by—unless you are planting it to discourage intruders.
There are no serious pest or disease problems for the bridal wreath spirea, but they can be susceptible to many of the diseases and insects that attack other members of the rose family. This includes leaf spot, fire blight, powdery mildew, root rot, aphids, leaf roller, and scale.
Some varieties of spirea can escape gardens and become invasive in parts of the U.S., so before planting, check with your local extension office agent.1
Learn About Gold Mound Spirea
Light
This shrub will do best in a spot in your garden that receives full sun; it will tolerate part shade, though with slightly reduced flowering. When planting young bridal wreath spirea shrubs, make sure to provide plenty of room between them: They will grow and can block each other's light if planted too close together.
Soil
This plant is not picky about the soil it's planted in, and can thrive in clay, loam, and even acidic soils. Its biggest need is soil that's well-draining, so the roots never sit in water.
Water
Bridal wreath spirea prefers to grow in well-drained moist soil, though it is able to withstand some periods of drought. Water the plants once a week during the summer whenever rainfall is less than 1 inch. Keep the plants well-watered as they are becoming established.
Temperature and Humidity
This plant is quite hardy, surviving both cold winter and hot summer temperatures in its defined range. It thrives in any climate conditions within its hardiness zones (5-9).
Fertilizer
Every spring, add a 2-inch layer of compost over the soil under the shrub. This is usually sufficient to feed the plant, and it will also help to retain moisture and prevent weeds.

Bridal Wreath Spirea Varieties
‘Fire Light’ has pink flowers that show in summer, and fiery red fall color.
‘Anthony Waterer’ boasts carmine-red flowers and purple fall foliage.
‘Tor’ features tiny white flowers and dark green oval leaves that turn orange, red, and purple in fall.
‘Snowmound’ offers white flowers, attractive arching stems, and dark, blue-green foliage.
Pruning
This plant tends to spread through suckering, so ground suckers will need to be trimmed off if you want to keep the shrubs confined.
If desired, the shrubs can be pruned for shape or size immediately after the spring flowering period. Always use a clean, sharp gardening shear. A good pruning routine is to remove all dead wood, as well as some of the oldest stems all the way to ground level. This will open up the center of the shrub to sunlight, which will reinvigorate it. Tips of branches can also be trimmed to control the size of the shrub.
Propagating Bridal Wreath Spirea
The best way to propagate bridal wreath spirea shrubs is by rooting softwood cuttings. To do so, cut segments of flexible stem tips 6- to 8-inches long. Remove the bottom leaves from these trimmed segments. Dip the cut end into powdered rooting hormone.
Fill a 6-inch pot with moist potting mix, then plant four or five prepared stems around the inner edge of the pot, embedding the exposed nodes into the potting mix. Cover the pot with a large plastic bag and seal it. Place the pot in a dappled shade location and allow the cuttings to root over the next few weeks. Check periodically to make sure the potting mix remains moist.
After about four weeks, you should see new, green growth on the stems, indicating that roots are forming. At this point, repot the cuttings into their own individual containers, then tuck the pots into a sheltered location and allow them to continue growing until they go dormant in winter. The next spring, transplant the rooted cuttings into the garden.
0
0


