文章
Miss Chen
2017年11月20日

Although some plants take well to division, or splitting, woody herbs such as rosemary (Rosmarinus officinalis cvs.) are propagated best with the layering technique. When layering, simply allow new plants to spring up alongside the "mother" plant until they are sturdy enough for you to "cut their cords" and move them to new locations.

Step 1
Choose one or two outer stems from the main rosemary plant, ensuring the stems look healthy and are tall. Spring is the best time to start this process, when the stems are most flexible and have plenty of time to root. If you want to layer more than one stem, then choose stems on each side of the main plant, and ensure each stem has room to grow.
Step 2
Mix one handful of compost and one handful of bonemeal with the top 4 to 6 inches of soil on each side of the rosemary plant. Each amended area should be a rectangular patch about 6 inches wide and 12 inches long, extending outward from the base of your selected stems.
Step 3
Dig a narrow trench about 2 inches deep in the center of the 12-inch-long section of amended soil. You can also judge the length for the trench by the general height of the stem that will lay in it, minus about 2 inches of the stem's leafy end.

Step 4
Strip a selected rosemary stem of most of its needlelike leaves, keeping the leaves on about 2 inches of the stem's tip. Use a small, sharp knife to slice the underside of the stem gently in several places, and dust the underside with hormone rooting powder. Disinfect the knife before and after its use by either spraying it with a household disinfectant or soaking its blade for five minutes in a solution that is one part bleach to three parts water. Air-dry the disinfected knife or rinse it with clean water and dry it with a clean cloth.
Step 5
Bend the stem gently down so that it lays flat against the bottom of the shallow trench. Do not press the last 2 inches of the stem's tip into the soil. That leafy part will remain above-ground. Use a landscape peg or U-shaped flexible wire at the midpoint of the stem to ensure the underside of the stem remains in contact with the ground.
Step 6
Fill the rest of the trench with the amended soil so that most of the stem is buried but its leafy end sticks above the soil.
Step 7
Repeat the process with each stem you want to layer to create a new plant. If you have several mature rosemary plants that you want to propagate, then repeat the process for the layering technique with them.
Step 8
Water the soil of the buried stems on a regular basis until the stems form rootlets. Although rosemary plants usually don't do well in moist soil, the baby plants will.
Step 9
Check for rootlets after several weeks by gently digging around the buried stems. It can take several months for the rosemary layering technique literally to take root. So be patient.
Step 10
Separate the young, well-established plants from their mother rosemary plant by slicing off the young plants near the base of the mature plant.
Step 11
Replant each young rosemary plant in its own container that has bottom drainage holes and is filled with potting soil. Alternatively, plant the young rosemary plants in a sunny place in your garden. When setting the young plants into containers or a garden bed, plant them at the same soil depth at which they previously grew. That depth usually is marked by a definite soil line on a plant's stem.

Step 1
Choose one or two outer stems from the main rosemary plant, ensuring the stems look healthy and are tall. Spring is the best time to start this process, when the stems are most flexible and have plenty of time to root. If you want to layer more than one stem, then choose stems on each side of the main plant, and ensure each stem has room to grow.
Step 2
Mix one handful of compost and one handful of bonemeal with the top 4 to 6 inches of soil on each side of the rosemary plant. Each amended area should be a rectangular patch about 6 inches wide and 12 inches long, extending outward from the base of your selected stems.
Step 3
Dig a narrow trench about 2 inches deep in the center of the 12-inch-long section of amended soil. You can also judge the length for the trench by the general height of the stem that will lay in it, minus about 2 inches of the stem's leafy end.

Step 4
Strip a selected rosemary stem of most of its needlelike leaves, keeping the leaves on about 2 inches of the stem's tip. Use a small, sharp knife to slice the underside of the stem gently in several places, and dust the underside with hormone rooting powder. Disinfect the knife before and after its use by either spraying it with a household disinfectant or soaking its blade for five minutes in a solution that is one part bleach to three parts water. Air-dry the disinfected knife or rinse it with clean water and dry it with a clean cloth.
Step 5
Bend the stem gently down so that it lays flat against the bottom of the shallow trench. Do not press the last 2 inches of the stem's tip into the soil. That leafy part will remain above-ground. Use a landscape peg or U-shaped flexible wire at the midpoint of the stem to ensure the underside of the stem remains in contact with the ground.
Step 6
Fill the rest of the trench with the amended soil so that most of the stem is buried but its leafy end sticks above the soil.
Step 7
Repeat the process with each stem you want to layer to create a new plant. If you have several mature rosemary plants that you want to propagate, then repeat the process for the layering technique with them.
Step 8
Water the soil of the buried stems on a regular basis until the stems form rootlets. Although rosemary plants usually don't do well in moist soil, the baby plants will.
Step 9
Check for rootlets after several weeks by gently digging around the buried stems. It can take several months for the rosemary layering technique literally to take root. So be patient.
Step 10
Separate the young, well-established plants from their mother rosemary plant by slicing off the young plants near the base of the mature plant.
Step 11
Replant each young rosemary plant in its own container that has bottom drainage holes and is filled with potting soil. Alternatively, plant the young rosemary plants in a sunny place in your garden. When setting the young plants into containers or a garden bed, plant them at the same soil depth at which they previously grew. That depth usually is marked by a definite soil line on a plant's stem.
0
0
求助
pokemondude13
2017年10月03日

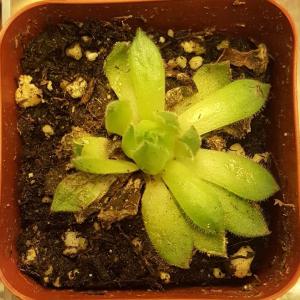
please help me ID my succulent and help him grow back to full health. Any tips on the species he turns out to be is more than welcome, this is my first succulent.#help #Layering #suncculents

0
0
Ueca:This is a Sempervivum. Plant it into any spot of soil in your yard, or anywhere that gets fresh air. If in a yard, check at night to make sure slugs aren't trying to eat it.
Usually just leaving it alone in the front yard is a pretty good plan.
成长记
Plants Encyclopdias
2016年08月17日

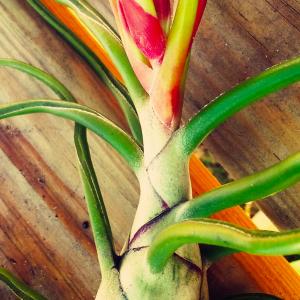
Name: Bulbous Air Plant
Latin: Tillandsia bulbosa
Origin: South America
Plant height: 5 - 15 cm
Reproduction: #Layering
Difficulty level: #Easy
Tags: #SouthAmerica #Tillandsiabulbosa
Latin: Tillandsia bulbosa
Origin: South America
Plant height: 5 - 15 cm
Reproduction: #Layering
Difficulty level: #Easy
Tags: #SouthAmerica #Tillandsiabulbosa

49
14
成长记
Plants Encyclopdias
2016年08月17日

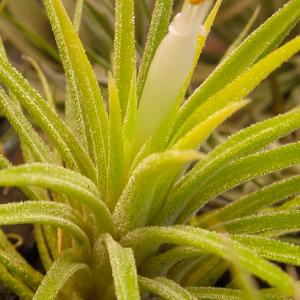
Name: Air Plant
Latin: Tillandsia ionantha
Origin: South America
Plant height: 15 - 30 cm
Reproduction: #Layering
Difficulty level: #Easy
Tags: #SouthAmerica #Tillandsiaionantha
Latin: Tillandsia ionantha
Origin: South America
Plant height: 15 - 30 cm
Reproduction: #Layering
Difficulty level: #Easy
Tags: #SouthAmerica #Tillandsiaionantha

35
5
成长记
Plants Encyclopdias
2016年08月17日

Name: Pink Quill
Latin: Tillandsia cyanea
Origin: Africa
Plant height: 5 - 25 cm
Reproduction: #Layering
Difficulty level: #Easy
Tags: #Africa #Tillandsiacyanea

Latin: Tillandsia cyanea
Origin: Africa
Plant height: 5 - 25 cm
Reproduction: #Layering
Difficulty level: #Easy
Tags: #Africa #Tillandsiacyanea

39
5
Melanie74:what an absolute stunn8ng flower
成长记
Plants Encyclopdias
2016年08月17日

Name: Tillandsia Spanish Moss
Latin: Tillandsia usneoudes
Origin: South America
Plant height: 50 - 150 cm
Reproduction: #Layering
Difficulty level: #Easy
Tags: #SouthAmerica #Tillandsiausneoudes
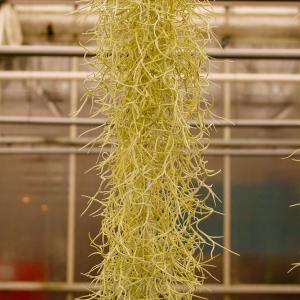
Latin: Tillandsia usneoudes
Origin: South America
Plant height: 50 - 150 cm
Reproduction: #Layering
Difficulty level: #Easy
Tags: #SouthAmerica #Tillandsiausneoudes

18
3
成长记
Plants Encyclopdias
2016年08月17日

Name: Mistletoe fig
Latin: Ficus deltoidea
Origin: Asia
Plant height: 50 - 90 cm
Reproduction: #Layering
Difficulty level: #Medium
Tags: #Asia #Ficusdeltoidea
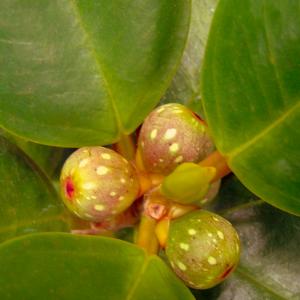
Latin: Ficus deltoidea
Origin: Asia
Plant height: 50 - 90 cm
Reproduction: #Layering
Difficulty level: #Medium
Tags: #Asia #Ficusdeltoidea

3
1
成长记
Plants Encyclopdias
2016年08月17日

Name: Chinese Banyan
Latin: Ficus microcarpa
Origin: Asia
Plant height: 60 - 150 cm
Reproduction: #Layering
Difficulty level: #Medium
Tags: #Asia #Ficusmicrocarpa
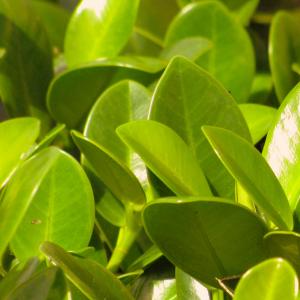
Latin: Ficus microcarpa
Origin: Asia
Plant height: 60 - 150 cm
Reproduction: #Layering
Difficulty level: #Medium
Tags: #Asia #Ficusmicrocarpa

2
1
成长记
Plants Encyclopdias
2016年08月17日

Name: Guzmania zahnii
Latin: Guzmania zahnii
Origin: South America
Plant height: 40 - 70 cm
Reproduction: #Layering
Difficulty level: #Easy
Tags: #SouthAmerica #Guzmaniazahnii
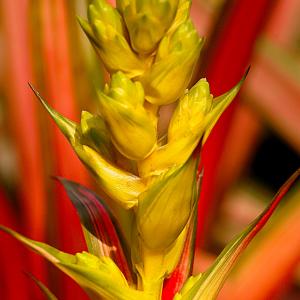
Latin: Guzmania zahnii
Origin: South America
Plant height: 40 - 70 cm
Reproduction: #Layering
Difficulty level: #Easy
Tags: #SouthAmerica #Guzmaniazahnii

3
0
成长记
Plants Encyclopdias
2016年08月17日

Name: Mosaic guzmania
Latin: Guzmania musaica
Origin: South America
Plant height: 35 - 50 cm
Reproduction: #Layering
Difficulty level: #Easy
Tags: #SouthAmerica #Guzmaniamusaica

Latin: Guzmania musaica
Origin: South America
Plant height: 35 - 50 cm
Reproduction: #Layering
Difficulty level: #Easy
Tags: #SouthAmerica #Guzmaniamusaica

3
0


