文章
Gina
2017年03月16日


Most of us gardeners are thinking about what we want to plant this year, but the choices can be daunting! Whether you are a new gardener or are an expert, with all the new plant choices each year, how do you choose what to plant? I have three guidelines to choosing what to plant, and also our recommendations for the Best New Plants.
1. You can’t have it all, so pick one or two new plants to try. I, too, have been guilty of excitedly filling my cart at the nursery with every new plant I find. Restraint is key for two reason…first, you could very well go broke. Second, incorporating too many new plants each year will make your garden appear disconnected and haphazard.
2. Make sure you choose for the sites you have. I LOVE all the new Hosta varieties out today, but the plain truth is, 99% of my gardens in full sun. Yes, I did try to cheat and make a shady “enough” garden on the side of a fenced area… it was NOT shady “enough”.
3. Do your research. New plant choices can sometimes cost a little more, or have to be ordered online. Make sure the variety you love isn’t a high maintenance plant, when you are a low maintenance gardener. Trust me, love dies quickly when the hope you had for that gorgeous rare poppy has you out in the garden for two hours a day in the hot sun staking and watering and fussing, or picking slugs off those Hosta plants every day of the year!
We have made our choices based on awards, ease of care and beauty. Let us know in the comments which are your favorites!
Our featured plant, above – “Plum Pudding” Poppy – This is one of the most gorgeous poppies I’ve seen. Easy to grow, this poppy blooms in June, lasts longer than most other poppies, and many times will re-bloom in the fall! You have to grow it for this color alone! Hardy to zone 3, highly recommended.
“Bloomerang” Lilac – This selection is the winner of the Green Thumb award, and it’s a fragrant lilac hardy down to zone 3. What is different about this lilac is that it blooms in the spring, then it re-blooms midsummer to fall! Growing 4-6 feet and dark purple in flower, it is a strong grower that is deer and compact. Frankly I personally have my reservations about traditionally spring blooming plants being bred to re-bloom, but I’m including it because I know many of you readers will love this plant.

Coneflower “Supreme Cantaloupe” – Coneflowers have had new plant elections every year for awhile now, but we love this new one! Like all coneflowers, they are drought resistant and love the sun, and flower all summer. About 2 1/2 feet high, this one opens looking like a gerber daisy, then expands to a full coneflower’s look with orange petals and a brown eye that turns orange as it matures. Hummingbirds and butterflies love this plant, hardy to zone 4.
The Perennial Plant Association just named an ornamental grass as plant of the year 2014… Panicum “Northwind”. We are big fans of grasses, and this Switchgrass has a wonderful blue green color which turns yellow in the fall. A strong upright grower, it withstands windy areas and blooms in September. Tolerates wet soil, but is also drought tolerant once established. Very low care, just cut back in early spring. Hardy to zone 2!

Russian Sage “Peek a Blue”- We grow a lot of Russian Sage in the high desert, but this new variety is a compact form growing just 2 feet tall, with bright blue spires all summer. Drought and heat resistant, this is a great choice for a full sun garden to zone 4.

We have bought into the sedum craze, and although our fav is still “Angelina”, a new variety called “Lime Zinger” has caught the attention of garden writers. Hardy to zone 4, these tough plants spread quickly to 18 inches, then bloom in summer with rosy pink clusters. Ideal for hot, dry spots and poor soil. Great in containers.

Our final choice for plants we want to try, “Sugarberry Ruffles” Lavender. This is not a hardy plant, best suited to containers in most parts of the country. It’s hardy to zone 8, but might be worth a try in a protected zone 7 garden. More resistant to heat and humidity than most lavender, its unique color of pink and lavender blooms and it’s tendency to re-bloom in the fall make it a great choice for your patio… Oh, and did I mention it’s heavenly fragrance? Already selling out, look quickly for this wonderful plant before it’s gone!
Try our choices for the best new plants for 2014, and remember it’s about the gardening journey!
1
1
文章
Gina
2017年03月15日


With every new growing season comes the need for outdoor planters… and we’ve rounded up some unique planter tutorials for every gardener, whether you want a traditional window box, or an up-cycled art piece. Most of these outdoor planter projects have complete instructions, so check them out, pick one or two, and plan some garden projects for the weekend! Our featured project, above, comes to us from Popular Mechanics. Learn how to make this simple DIY wood planter with this great tutorial and lots of step by step photos.
Lowes has a nice contemporary indoor outdoor planter project with step by step photos and a video.

This wooden planter box by Family Handyman can be built in less than an hour with their tutorial. I love this because you can easily change out plants, and even combine plants with different watering needs because they are in separate pots.

Tracie over at Cleverly Inspired wanted some large planters that were similar to some that are available at Restoration Hardware. She came up with these wonderful planters. See how she did it.

Want to make a large DIY planter on wheels? Then head over to Four Generations, One Roof, and find out how Jessica and her dad made this one! They have excellent step by step photos in their tutorial. This is great for small garden spaces… You can create an entire garden in this one planter! Love this!

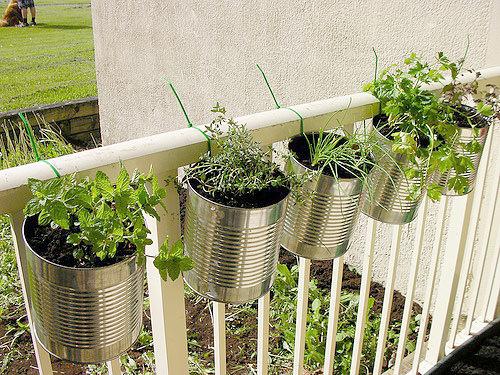
This is a clever idea we got from Christie on Flickr… Using recycled cans as planters, and drill holes to attach with zip ties! (Also for drainage). Obviously you can cut off the excess zip tie after they are hung, they are left to illustrate the project. Love this! What other kinds of containers could you up cycle?
These low cost drum planters have downloadable instructions, and are made with recycled drums and recycled wood. What a really cool idea for little cash! You could use this idea for a lot of recycled containers!

This Coppice Vertical Planter is sold on a UK website but we think it would be very easily DIY’able! Even better would be to use old wine crates as the boxes.

Gotta love these more modern patio paver planters by Stephanie Lynn we found on Apartment Therapy. She has a step by step for you, (its easy!) and even some suggested plants!

I like these simple pallet planters, they would look amazing growing small vegetables! From Creative Homemaking.

These Criss Cross Outdoor Planters from Centsational Girl look fantastic. Love them painted white but could look really nice in a natural stained finish as well. See how she made these.

From Kate Was Here, Check out this cool DIY vertical planter.
Learn how to make a garden trough that looks old, but isn’t! From This Old House.

From Ruffles and Truffles, this DIY vertical planter is really easy! Great for awkward corners of your garden. Good tutorial!

3
3
文章
Gina
2017年03月15日

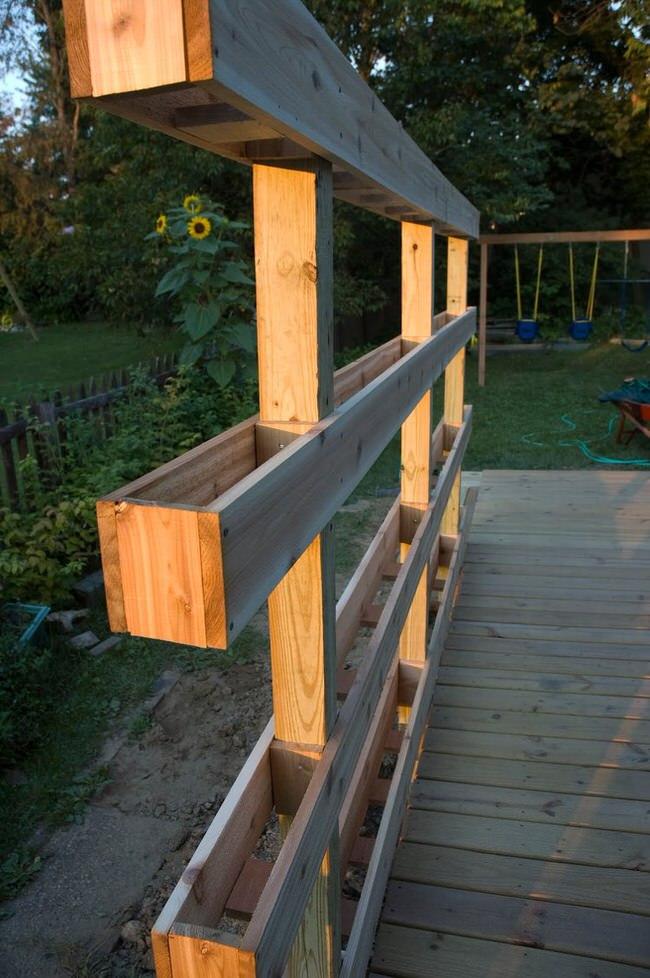
If you need more gardening space, or you just want to try something a little more unique and interesting, consider a vertical garden. There is nothing new about the idea of going up in garden design… hanging planters, trees and arbors and porticos are all examples of taking things skyward. But these DIY vertical gardens are clever and smart, and give your garden a creative edge. So the next time you’re trying to figure out how to find enough space to grow those herbs, or what you can do to liven up a ho-hum garden space, go vertical! Our feature photo below, is a modern, space saving DIY vertical garden from Chris at ‘Man Made DIY’. He grew veggies in it, but anything is fair game!

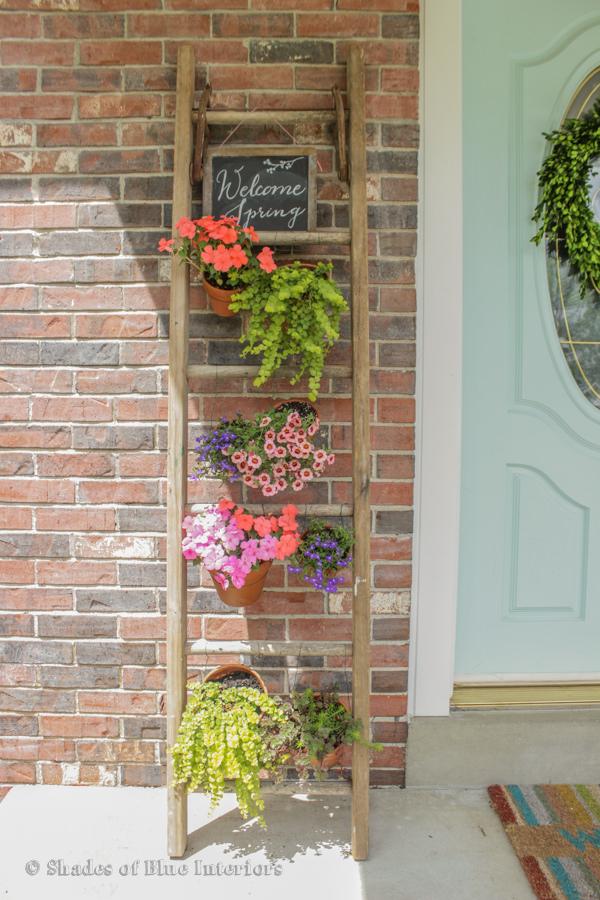
Rachel at ‘Shades of Blue Interiors’ wanted a pop of color for her small front porch. Her DIY ladder vertical garden brought that color to eye level and added charm to her porch as well! This is an easy project with inexpensive materials. The key would be an attractive wooden ladder! If you don’t have an authentically old one, consider picking up a cheap wood ladder at a home improvement store and staining it.
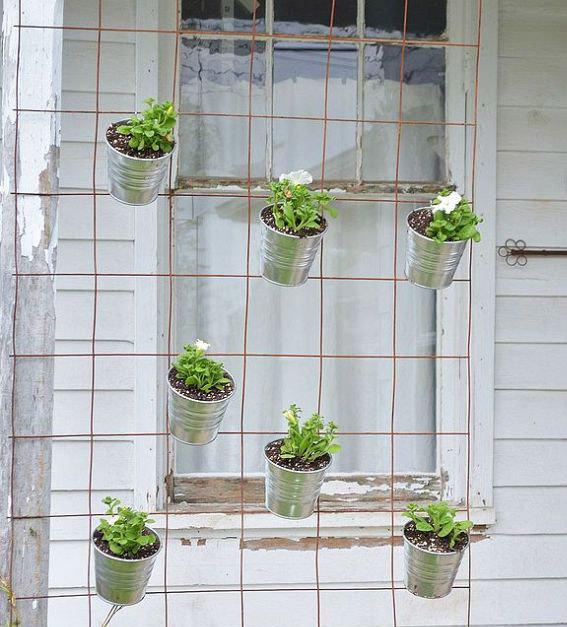
Got a roll of rusty metal fence? Or already have a fence that could use a spruce up? Punch holes in simple metal or plastic containers, and hang onto the fence with an s-hook. Plant with your fav flowers or herbs! Remember, keep the containers small enough so that the fence will hold the weight when they are full of soil. This project is from Jill at ‘Sew a Fine Seam‘.
Make succulent frames with this tutorial from ‘Sunset‘. This is a fun project that can turn a patio or balcony space into a really special garden area, even if you have only concrete flooring! Photo from ‘Sky Parlour‘.

‘AKA Design’ built an arbor support for their DIY vertical garden. I love these kinds of container gardens because they are so versatile. This could be all moss, ferns, succulents, herbs, or flowers. Use a color theme or all the colors you can. Trailing plants or mounding ones. Having the same pot throughout ties it all together. Great tutorial!

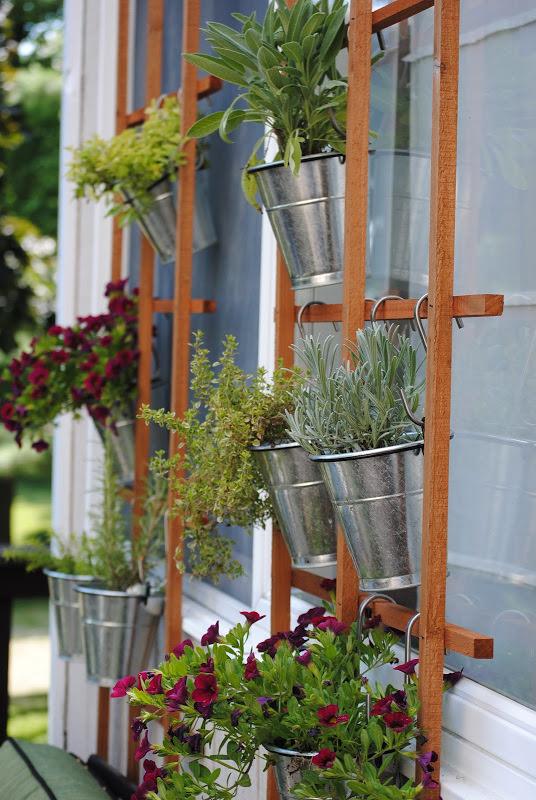
This vertical herb garden trellis wall from Carrie at ‘Making Lemonade’ is perfect for adding some shade to a window with none, or just making fresh herbs easily accessible from the kitchen door! Simple project anyone can do with ordinary trellis from the home improvement store and some Ikea pots. Plus, I love her theory on how important it is to take care of yourself! (Go read it, the whole deck makeover is so cute!)
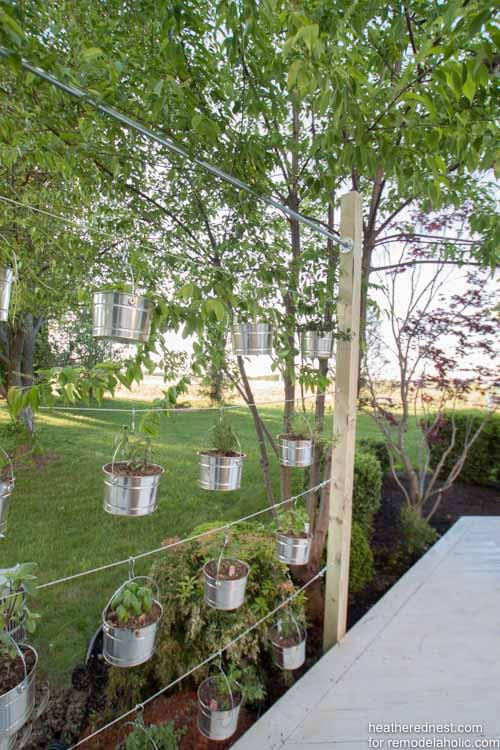
Love this DIY suspended vertical garden from ‘The Heathered Nest’ via ‘Remodelaholic’. This project is made with some simple pots and galvanized wire, and they walk you through it step by step. They even make suggestions on how you can customize it!
This DIY outdoor succulent wall garden from ‘Sugar & Cloth’ was made using an unfinished hand rail and used paint tins! Love how clever this is.

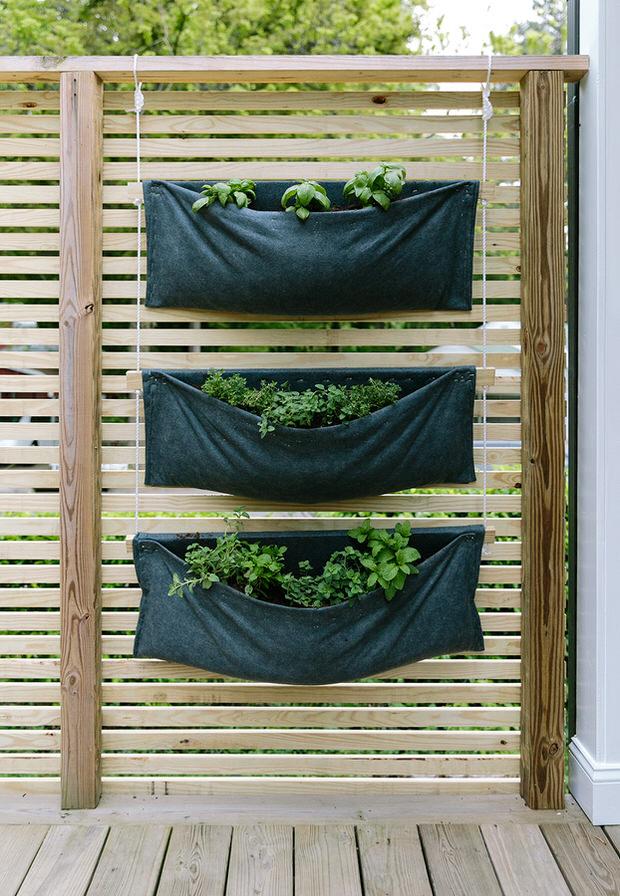
Lovin’ on this DIY simple modern vertical wall garden from ‘The Fresh Exchange’. Would love to grow container veggies in this! This is made with felt from the fabric store, believe it or not!
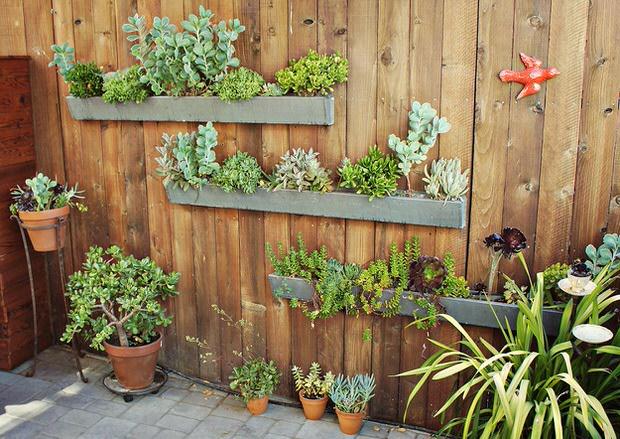
This vertical garden DIY is from ‘Numi Tea Blog’, and is made from ordinary rain gutters. I wonder if we could figure out a way to mount these to a stone block wall? :)
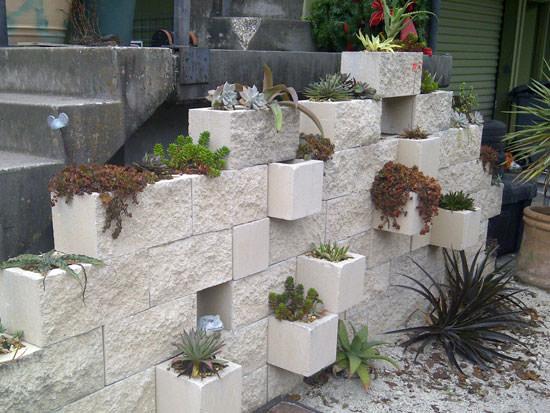
Make a cinderblock garden! You can visit our tutorial for our DIY cinder clock vertical planter to get all the instructions. This photo from ‘The Rainforest Garden‘.
Last, learn how to plant a vertical garden from ‘Front & Main’, the blog of ‘West Elm’. This project would look amazing indoors or out on a covered patio. Simple and awesome!
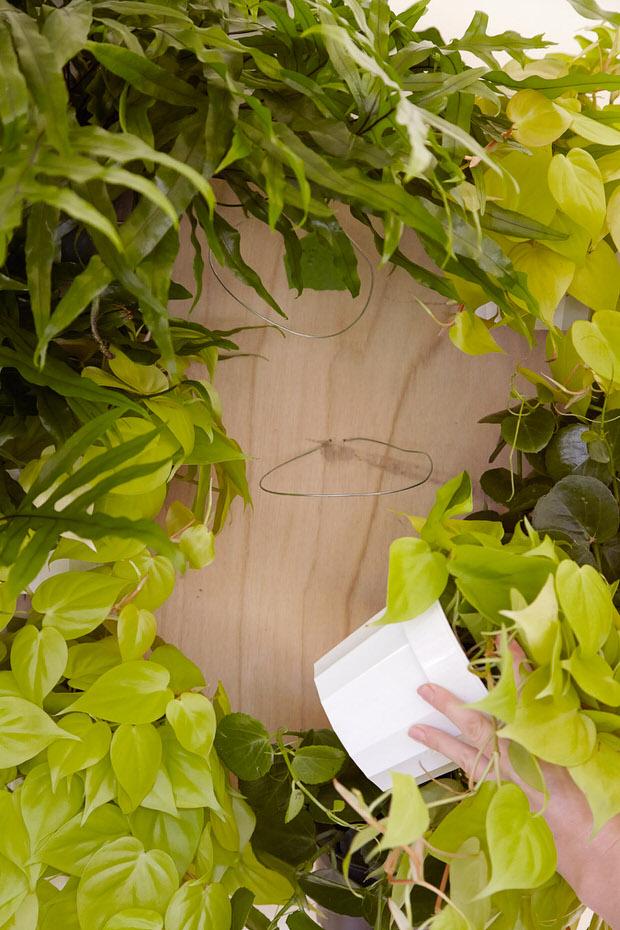

Get creative! No matter how small or boring your garden space, there is always a way to create your own amazing little bit of green earth!

Rachel at ‘Shades of Blue Interiors’ wanted a pop of color for her small front porch. Her DIY ladder vertical garden brought that color to eye level and added charm to her porch as well! This is an easy project with inexpensive materials. The key would be an attractive wooden ladder! If you don’t have an authentically old one, consider picking up a cheap wood ladder at a home improvement store and staining it.

Got a roll of rusty metal fence? Or already have a fence that could use a spruce up? Punch holes in simple metal or plastic containers, and hang onto the fence with an s-hook. Plant with your fav flowers or herbs! Remember, keep the containers small enough so that the fence will hold the weight when they are full of soil. This project is from Jill at ‘Sew a Fine Seam‘.

Make succulent frames with this tutorial from ‘Sunset‘. This is a fun project that can turn a patio or balcony space into a really special garden area, even if you have only concrete flooring! Photo from ‘Sky Parlour‘.

‘AKA Design’ built an arbor support for their DIY vertical garden. I love these kinds of container gardens because they are so versatile. This could be all moss, ferns, succulents, herbs, or flowers. Use a color theme or all the colors you can. Trailing plants or mounding ones. Having the same pot throughout ties it all together. Great tutorial!

This vertical herb garden trellis wall from Carrie at ‘Making Lemonade’ is perfect for adding some shade to a window with none, or just making fresh herbs easily accessible from the kitchen door! Simple project anyone can do with ordinary trellis from the home improvement store and some Ikea pots. Plus, I love her theory on how important it is to take care of yourself! (Go read it, the whole deck makeover is so cute!)

Love this DIY suspended vertical garden from ‘The Heathered Nest’ via ‘Remodelaholic’. This project is made with some simple pots and galvanized wire, and they walk you through it step by step. They even make suggestions on how you can customize it!

This DIY outdoor succulent wall garden from ‘Sugar & Cloth’ was made using an unfinished hand rail and used paint tins! Love how clever this is.

Lovin’ on this DIY simple modern vertical wall garden from ‘The Fresh Exchange’. Would love to grow container veggies in this! This is made with felt from the fabric store, believe it or not!

This vertical garden DIY is from ‘Numi Tea Blog’, and is made from ordinary rain gutters. I wonder if we could figure out a way to mount these to a stone block wall? :)

Make a cinderblock garden! You can visit our tutorial for our DIY cinder clock vertical planter to get all the instructions. This photo from ‘The Rainforest Garden‘.

Last, learn how to plant a vertical garden from ‘Front & Main’, the blog of ‘West Elm’. This project would look amazing indoors or out on a covered patio. Simple and awesome!


Get creative! No matter how small or boring your garden space, there is always a way to create your own amazing little bit of green earth!
1
1
文章
Hande Salcan
2017年03月15日

If you need to lay a new lawn, or repair or replace an old one, there is no faster way to get it established then laying sod. It’s not a difficult job if you follow some easy hints. Steve and I have both laid sod before, and we have a step by step guide for you and one big “got to know”. You will be sore. Accept it now…but it will be from a job well done, and nothing…I mean nothing transforms a yard faster then the velvet green of a sod lawn.
Why lay sod instead of seed? First of all, a seeded lawn can take months before it can be used for any kind of regular traffic, be that from pets, kids, or guests. Second, it requires the same prep time, yet weeks and weeks more extra maintenance chores while you baby that seed into germination and to become a full and lush lawn. Third, seed lawns tend to need patching later on, and use a lot more water to establish. (I guess thats fourth, too!) Need anymore? It’s pretty darn satisfying spending a good afternoon laying down sod, to step back and look at your instant happy garden. Also, sod can be laid pretty much anytime during the growing season, though spring and fall are best. (Summer installation requires more attention to watering!) Seed is best planted in spring, fall planting can be tough.The only con to laying sod (besides the “sore” part is that it initially costs more than seed. But if you factor in the extra water required to get a seed lawn started, the extra expense patching the lawn later on, and the time spent waiting to use your yard, sod is a pretty good investment.
Sod can be ordered straight from sod companies, or from your local nursery. It is delivered in 3-4 foot rolls on wood pallets, and is sold by the foot. You will need to figure our how many square feet you want to lay before you call to order.

Ok, so on to our step by step tutorial on how to lay sod!
1. Prep is everything. Just like any gardening, prepping the soil will make the difference between a lawn that is healthy and lush, and one that is thin, dries out easily and eventually fails. The weekend before you have the sod delivered, rent or borrow a rototiller and till the soil six inches deep. Add an inch or two layer of compost to the top of the soil and till it in. Then the fun part. Using a metal rake, smooth out the area to be sodded, and break up any large chunks. Water.

2. Have the sod delivered the morning of installation if possible. If not, no more than the day before. Water the sod on the pallets lightly to keep it from drying out. Hint: Don’t soak the sod, it will make it much heavier to pick up and carry.
3. Lay your first row of sod, usually along the longest side of the yard. Lay the sod strips with the ends butting up together, but not overlapping. This is key to not having weeds growing up between your sod strips while the lawn is establishing.

4. Lay the next row. This row, you want to stagger the seams, as This Old House says, “like you are laying brick.” Lay the rest of your rows in this staggering manner.
5. Use a sharp garden knife to cut strips to fit. My “garden” knife was an old serrated knife from the kitchen drawer. It lasted just long enough to get the whole lawn done. Be warned.
6. When the sod is all laid, walk along the seams to gently help them make contact with the soil. Some rent a roller, but we have never had an issue from just walking the seams. Water well with sprinklers.

7. Water the new lawn every day for a week, then every other day for the next week. By week three, you should be seeing significant growth and you should be able to water like a normal (new) lawn for your climate. When the lawn is 3 inches high, it’s time for the first mowing. It’s also ready for light foot traffic. Sod lawns are pretty tough, you can walk across them to set up a sprinkler, for instance, from day one. Just hold off on the football and slip and slide for a bit, ok?
That’s it, you have learned how to lay sod, and transformed your yard! Anyone laid sod before and want to share their tips? Share with us in comments!
Why lay sod instead of seed? First of all, a seeded lawn can take months before it can be used for any kind of regular traffic, be that from pets, kids, or guests. Second, it requires the same prep time, yet weeks and weeks more extra maintenance chores while you baby that seed into germination and to become a full and lush lawn. Third, seed lawns tend to need patching later on, and use a lot more water to establish. (I guess thats fourth, too!) Need anymore? It’s pretty darn satisfying spending a good afternoon laying down sod, to step back and look at your instant happy garden. Also, sod can be laid pretty much anytime during the growing season, though spring and fall are best. (Summer installation requires more attention to watering!) Seed is best planted in spring, fall planting can be tough.The only con to laying sod (besides the “sore” part is that it initially costs more than seed. But if you factor in the extra water required to get a seed lawn started, the extra expense patching the lawn later on, and the time spent waiting to use your yard, sod is a pretty good investment.
Sod can be ordered straight from sod companies, or from your local nursery. It is delivered in 3-4 foot rolls on wood pallets, and is sold by the foot. You will need to figure our how many square feet you want to lay before you call to order.

Ok, so on to our step by step tutorial on how to lay sod!
1. Prep is everything. Just like any gardening, prepping the soil will make the difference between a lawn that is healthy and lush, and one that is thin, dries out easily and eventually fails. The weekend before you have the sod delivered, rent or borrow a rototiller and till the soil six inches deep. Add an inch or two layer of compost to the top of the soil and till it in. Then the fun part. Using a metal rake, smooth out the area to be sodded, and break up any large chunks. Water.

2. Have the sod delivered the morning of installation if possible. If not, no more than the day before. Water the sod on the pallets lightly to keep it from drying out. Hint: Don’t soak the sod, it will make it much heavier to pick up and carry.
3. Lay your first row of sod, usually along the longest side of the yard. Lay the sod strips with the ends butting up together, but not overlapping. This is key to not having weeds growing up between your sod strips while the lawn is establishing.

4. Lay the next row. This row, you want to stagger the seams, as This Old House says, “like you are laying brick.” Lay the rest of your rows in this staggering manner.
5. Use a sharp garden knife to cut strips to fit. My “garden” knife was an old serrated knife from the kitchen drawer. It lasted just long enough to get the whole lawn done. Be warned.
6. When the sod is all laid, walk along the seams to gently help them make contact with the soil. Some rent a roller, but we have never had an issue from just walking the seams. Water well with sprinklers.

7. Water the new lawn every day for a week, then every other day for the next week. By week three, you should be seeing significant growth and you should be able to water like a normal (new) lawn for your climate. When the lawn is 3 inches high, it’s time for the first mowing. It’s also ready for light foot traffic. Sod lawns are pretty tough, you can walk across them to set up a sprinkler, for instance, from day one. Just hold off on the football and slip and slide for a bit, ok?
That’s it, you have learned how to lay sod, and transformed your yard! Anyone laid sod before and want to share their tips? Share with us in comments!
0
0


