文章
Dummer. ゛☀
2017年09月25日

Scientific Name
Alstroemeria pulchella L.f.

Common Names
Parrot Lily, Parrot Flower, Peruvian Lily, Lily of the Incas, Princess Lily, New Zealand Christmas Bell
Synonyms
Alstroemeria atrorubra, Alstroemeria banksiana, Alstroemeria hassleriana, Alstroemeria psittacina, Alstroemeria psittacina var. longipedunculata, Lilavia psittacina
Scientific Classification
Family: Alstroemeriaceae
Тribe: Alstroemerieae
Genus: Alstroemeria

Flower
Color: Crimson and light green
Bloom Time: Late spring through autumn
Description
Alstroemeria psittacina is a tuberous perennial with lush, green foliage up to 2 feet (60 cm) tall. From late spring through autumn, it sends up to 3 foot (90 cm) tall flower stalks, each topped with about 5 to 9 speckled flowers in a radial pattern. The trumpet-shaped flowers demand attention, with their unusual combination of crimson and light green. The blooms make excellent cut flowers, often lasting 2 weeks in a vase.

How to Grow and Care
The best place to plant Peruvian Lily is where they will either receive full sun or a slightly shaded area. At least allow them to have good morning sun. Drainage is important for the survival of Peruvian Lily, so be sure it drains well. Observe how the proposed area you want to plant responds after a good rain. If it still has standing water after about 5 hours, look for another location. If you’re limited to a certain location which holds water too long, build up the soil to a higher level to improve its drainage capabilities. The plant will rot if it sits in standing water or soggy soil.
You can plant Alstroemeria after the last frost is over. If you have your bare root plants but the ground is still hard or too wet, place the roots in a pot until the ground is ready for them. Keep them in a cool area while you’re waiting. Don’t water them much before placing them in the soil and are still in the pots.
Origin
Native to Brazil, Argentina, and Paraguay.
Alstroemeria pulchella L.f.

Common Names
Parrot Lily, Parrot Flower, Peruvian Lily, Lily of the Incas, Princess Lily, New Zealand Christmas Bell
Synonyms
Alstroemeria atrorubra, Alstroemeria banksiana, Alstroemeria hassleriana, Alstroemeria psittacina, Alstroemeria psittacina var. longipedunculata, Lilavia psittacina
Scientific Classification
Family: Alstroemeriaceae
Тribe: Alstroemerieae
Genus: Alstroemeria

Flower
Color: Crimson and light green
Bloom Time: Late spring through autumn
Description
Alstroemeria psittacina is a tuberous perennial with lush, green foliage up to 2 feet (60 cm) tall. From late spring through autumn, it sends up to 3 foot (90 cm) tall flower stalks, each topped with about 5 to 9 speckled flowers in a radial pattern. The trumpet-shaped flowers demand attention, with their unusual combination of crimson and light green. The blooms make excellent cut flowers, often lasting 2 weeks in a vase.

How to Grow and Care
The best place to plant Peruvian Lily is where they will either receive full sun or a slightly shaded area. At least allow them to have good morning sun. Drainage is important for the survival of Peruvian Lily, so be sure it drains well. Observe how the proposed area you want to plant responds after a good rain. If it still has standing water after about 5 hours, look for another location. If you’re limited to a certain location which holds water too long, build up the soil to a higher level to improve its drainage capabilities. The plant will rot if it sits in standing water or soggy soil.
You can plant Alstroemeria after the last frost is over. If you have your bare root plants but the ground is still hard or too wet, place the roots in a pot until the ground is ready for them. Keep them in a cool area while you’re waiting. Don’t water them much before placing them in the soil and are still in the pots.
Origin
Native to Brazil, Argentina, and Paraguay.
0
0
cclecombe
2017年09月25日

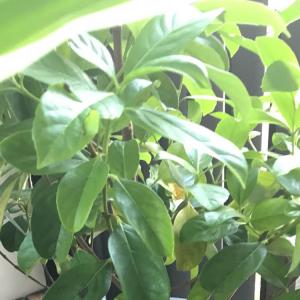
The Peace Lily I'm ressurecting for my friend is looking much better than it was! New shoots on their way too!


1
0
成长记
Succulentlover72
2017年09月24日

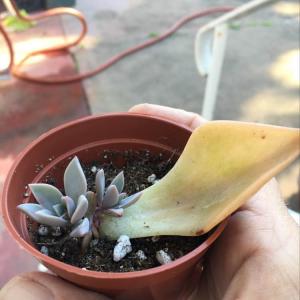
I new added a "Propagate from leaves" in my "garden"

3
0
meriunkat:💜💚
文章
Dummer. ゛☀
2017年09月24日

EVERY flower gardener should know the pleasure of growing clematis. If you already have one in your garden, you're probably scheming about how to squeeze in another! New to clematis? Read on and discover how easy it is to be successful with the "queen of climbers."

Selecting a Plant
Until fairly recently, only a handful of clematis cultivars were readily available in the U.S. Some of these traditional favorites include Jackmanii, General Sikorski, Henryi and Comtesse de Bouchard. But clematis have become a hugely popular perennial, and today, the average local garden center offers dozens of different choices.
When selecting a clematis for your garden, you'll want to think about a couple things, which include its mature height, flower form and color.
If you have room for a vigorous 10- or 20-foot clematis vine, there are many wonderful cultivars that will fit the bill. There are also more compact varieties that are perfectly happy growing in a small garden or even in a pot on the patio.
The standard clematis flower form is a large blossom with six or seven petals, measuring 5-6" across. There are also cultivars with smaller blossoms, double blossoms, and lovely bell-like flowers. Colors range from white to wine red, lavender to deep purple, and there are even a few yellow ones.
It can take several years for a clematis vine to mature and begin flowering vigorously. To shorten the wait and help ensure your success, it's best to purchase a plant that's at least two years old. Look for a container-grown plant in a quart or gallon-size pot. If you're shopping for your clematis at a garden center or nursery, select a robust plant that's showing vigorous growth, rather than a weak plant with a beautiful picture.

Where to Plant It
Hopefully you have a planting location in mind before you bring home your new clematis. Ideally it's a sunny spot. Though some clematis cultivars will bloom in partial shade (such as Nellie Moser and Henryii), to reach their full potential they need at least six hours of sun each day.
Clematis prefer moist, well-drained soil that's neutral to slightly alkaline in pH. If your soil tends to be acidic, you should sweeten it periodically with limestone or a little wood ash. Dig a good hole for your new clematis, working in lots of compost and some granular organic fertilizer.
Be very gentle when settling the plant into its new home; the roots, crown and emerging vines of clematis can be easily broken. Position the plant slightly deeper than it was growing in the pot, so the first set of true leaves is just under the soil surface. Water weekly for the first season, to help the plant get established. If you can get your clematis through its first year, chances are good that it will continue to thrive. Mulching around the base of the plant will help conserve moisture, but keep the mulch several inches away from the crown, where the vines emerge from the soil.
Clematis are happiest with cool shade at their roots and warm sun on their foliage. Mulching around the roots will help keep the soil cool, as will the foliage of a low-growing perennial.

How to Support It
Though there are some types of clematis that have a bushy habit, most of them are born to climb. Like other climbing plants, the growing end of a clematis vine is searching for something to grab onto, and if it can't find anything, it will stop growing. Make sure you provide it with something to climb on from day one.
A clematis vine does not climb by twining around something, as a pole bean or a morning glory does. It climbs by wrapping its leaf stems around something. Because these leaf stems are not very long, anything that's more than about 1/2 inch in diameter is too wide for the leaf stem to twist around. The easiest things for a clematis to grab onto, are twine, fishing line, wire, thin branches, wooden dowels or steel rods. The more grabbing opportunities you offer, the better, so even if you have a nice trellis, consider adding some twine "helper" lines, or covering your trellis with a grid of trellis netting.
Depending on the vigor of the plant and the type of trellis you have, you'll probably need to do some "trussing" during the season to help support the vines and keep them attached to the trellis. Both fishing line and twine work well for this job.

Pruning and Care
Clematis vary in their need for pruning. Some types flower on last year's vines, so you want to avoid cutting them to the ground in the spring. Others flower on current-year vines, so they don't mind being cut to the ground each year. Rather than driving yourself crazy trying to keep track of the ideal pruning technique for each cultivar, try this common-sense approach: leave the prior year's growth in place until mid-spring. Begin pruning only when you can see which vines are dead and which ones are starting to leaf out.
A happy clematis plant puts out an amazing amount of flowers and foliage. Feed your plants well to keep them healthy and vigorous. In early spring, surround the plant with a shovelful of compost and a handful of granular organic fertilizer. Feed again, once or twice during the growing season, with a water-soluble organic fertilizer.

Selecting a Plant
Until fairly recently, only a handful of clematis cultivars were readily available in the U.S. Some of these traditional favorites include Jackmanii, General Sikorski, Henryi and Comtesse de Bouchard. But clematis have become a hugely popular perennial, and today, the average local garden center offers dozens of different choices.
When selecting a clematis for your garden, you'll want to think about a couple things, which include its mature height, flower form and color.
If you have room for a vigorous 10- or 20-foot clematis vine, there are many wonderful cultivars that will fit the bill. There are also more compact varieties that are perfectly happy growing in a small garden or even in a pot on the patio.
The standard clematis flower form is a large blossom with six or seven petals, measuring 5-6" across. There are also cultivars with smaller blossoms, double blossoms, and lovely bell-like flowers. Colors range from white to wine red, lavender to deep purple, and there are even a few yellow ones.
It can take several years for a clematis vine to mature and begin flowering vigorously. To shorten the wait and help ensure your success, it's best to purchase a plant that's at least two years old. Look for a container-grown plant in a quart or gallon-size pot. If you're shopping for your clematis at a garden center or nursery, select a robust plant that's showing vigorous growth, rather than a weak plant with a beautiful picture.

Where to Plant It
Hopefully you have a planting location in mind before you bring home your new clematis. Ideally it's a sunny spot. Though some clematis cultivars will bloom in partial shade (such as Nellie Moser and Henryii), to reach their full potential they need at least six hours of sun each day.
Clematis prefer moist, well-drained soil that's neutral to slightly alkaline in pH. If your soil tends to be acidic, you should sweeten it periodically with limestone or a little wood ash. Dig a good hole for your new clematis, working in lots of compost and some granular organic fertilizer.
Be very gentle when settling the plant into its new home; the roots, crown and emerging vines of clematis can be easily broken. Position the plant slightly deeper than it was growing in the pot, so the first set of true leaves is just under the soil surface. Water weekly for the first season, to help the plant get established. If you can get your clematis through its first year, chances are good that it will continue to thrive. Mulching around the base of the plant will help conserve moisture, but keep the mulch several inches away from the crown, where the vines emerge from the soil.
Clematis are happiest with cool shade at their roots and warm sun on their foliage. Mulching around the roots will help keep the soil cool, as will the foliage of a low-growing perennial.

How to Support It
Though there are some types of clematis that have a bushy habit, most of them are born to climb. Like other climbing plants, the growing end of a clematis vine is searching for something to grab onto, and if it can't find anything, it will stop growing. Make sure you provide it with something to climb on from day one.
A clematis vine does not climb by twining around something, as a pole bean or a morning glory does. It climbs by wrapping its leaf stems around something. Because these leaf stems are not very long, anything that's more than about 1/2 inch in diameter is too wide for the leaf stem to twist around. The easiest things for a clematis to grab onto, are twine, fishing line, wire, thin branches, wooden dowels or steel rods. The more grabbing opportunities you offer, the better, so even if you have a nice trellis, consider adding some twine "helper" lines, or covering your trellis with a grid of trellis netting.
Depending on the vigor of the plant and the type of trellis you have, you'll probably need to do some "trussing" during the season to help support the vines and keep them attached to the trellis. Both fishing line and twine work well for this job.

Pruning and Care
Clematis vary in their need for pruning. Some types flower on last year's vines, so you want to avoid cutting them to the ground in the spring. Others flower on current-year vines, so they don't mind being cut to the ground each year. Rather than driving yourself crazy trying to keep track of the ideal pruning technique for each cultivar, try this common-sense approach: leave the prior year's growth in place until mid-spring. Begin pruning only when you can see which vines are dead and which ones are starting to leaf out.
A happy clematis plant puts out an amazing amount of flowers and foliage. Feed your plants well to keep them healthy and vigorous. In early spring, surround the plant with a shovelful of compost and a handful of granular organic fertilizer. Feed again, once or twice during the growing season, with a water-soluble organic fertilizer.
0
0
文章
Dummer. ゛☀
2017年09月24日

Quarantine
When new succulent plants are aquired, it is a good idea to keep them separate from the rest of the collection for a few weeks so that obvious pests can be spotted. This allows time for eggs of pests to hatch and the progeny dealt with. A good way to do this is to maintain a "quarantine" window ledge separate from other plants. Many growers repot newly aquired plants into their favourite growing medium, and this is a good occasion to examine the general condition of the roots and check for pests such as root mealy bugs.
It may seem over-cautious, but many people like to treat their new plant with systemic insecticide while re-potting. This doubtless helps to avoid introduction of new pests into the collection. Repotting with "sterilised" compost which has been heated sufficiently to kill insects, larvae and eggs is a good idea.

Inspection
A regular check on the condition of your succulent plants, perhaps while you are watering them, will help you to spot the early signs of pests and diseases which are best treated early before serious damage is done to the plants, or before they can spread through the collection. However, never assume that just one plant in a collection is affected. Pests may well have spread to other specimens nearby, even if you can not see them. Ants "farm" mealy bugs for their honeydew secretions and may help to spread them through the collection.

Also watch how well individual plants are growing. Poor growth, a sudden change in condition or a limp plant which fails to take up water can be a warning sign of damaged roots caused by e.g. root mealy bugs, vine weevil, or roots rotting as a result of over-watering.
HygieneCleanliness in the greenhouse is an important measure in preventing outbreaks of pests and diseases. Always remove dead leaves and flowers as soon as possible. Some growers like to remove flower stalks of e.g. Adromischus before they flower and drip nectar on the plants, potentiating moulds. Leaf litter provides an ideal hiding place for pests. If wet by watering, dead plant material is a breeding ground for fungi and production of their spores. Tidy up debris in the green house left from re-potting and propagation. Treatment of the ground under the staging, walkways and areas of paving with a disinfectant solution e.g. Jeyes Fluid is a smelly but effective traditional way of discouraging pests and diseases.
When new succulent plants are aquired, it is a good idea to keep them separate from the rest of the collection for a few weeks so that obvious pests can be spotted. This allows time for eggs of pests to hatch and the progeny dealt with. A good way to do this is to maintain a "quarantine" window ledge separate from other plants. Many growers repot newly aquired plants into their favourite growing medium, and this is a good occasion to examine the general condition of the roots and check for pests such as root mealy bugs.
It may seem over-cautious, but many people like to treat their new plant with systemic insecticide while re-potting. This doubtless helps to avoid introduction of new pests into the collection. Repotting with "sterilised" compost which has been heated sufficiently to kill insects, larvae and eggs is a good idea.

Inspection
A regular check on the condition of your succulent plants, perhaps while you are watering them, will help you to spot the early signs of pests and diseases which are best treated early before serious damage is done to the plants, or before they can spread through the collection. However, never assume that just one plant in a collection is affected. Pests may well have spread to other specimens nearby, even if you can not see them. Ants "farm" mealy bugs for their honeydew secretions and may help to spread them through the collection.

Also watch how well individual plants are growing. Poor growth, a sudden change in condition or a limp plant which fails to take up water can be a warning sign of damaged roots caused by e.g. root mealy bugs, vine weevil, or roots rotting as a result of over-watering.
HygieneCleanliness in the greenhouse is an important measure in preventing outbreaks of pests and diseases. Always remove dead leaves and flowers as soon as possible. Some growers like to remove flower stalks of e.g. Adromischus before they flower and drip nectar on the plants, potentiating moulds. Leaf litter provides an ideal hiding place for pests. If wet by watering, dead plant material is a breeding ground for fungi and production of their spores. Tidy up debris in the green house left from re-potting and propagation. Treatment of the ground under the staging, walkways and areas of paving with a disinfectant solution e.g. Jeyes Fluid is a smelly but effective traditional way of discouraging pests and diseases.
1
1


