文章
Dummer. ゛☀
2017年10月01日

1. You can only use Aloe vera on the skin as it helps with skin problems.
Fact: You can drink Aloe vera. You can also put it on the inside of your mouth to get rid of sores and mouth ulcers. Drinking it is very beneficial to your health. It is very good for controlling blood sugar as well.
2. Aloe is only good for sunburn.
Fact: Aloe vera is good for all sorts of illnesses. Yes it is good for sunburn, but it has a lot of other uses as well.
3. You have to have an illness to drink Aloe vera.
Fact: Anyone can drink aloe. Even if you are completely healthy. In fact aloe helps to boost your immune system so you are less likely to catch colds and flu.
4. The best way to use Aloe vera is fresh from the plant.
Fact: Aloe fresh from the plant goes off very quickly. You would have to use it immediately in order to get the benefits. Aloe products that have been processed are designed to last longer.
5. The whole leaf is better than just the inside.
Fact: The rind of the plant does not make any difference to the effectiveness of the Aloe.
6. Powdered and Aloe capsules are just as good as the drink.
Fact: Powdered and aloe capsules have been over processed. Some of the goodness is in the liquid part of the plant.
7. You should see results quickly when drinking Aloe.
Fact: Like all natural products it takes a while to feel the benefits. You will have to take it for at least 2 months to notice any difference.
8. All Aloe plants are the same.
Fact: There are several different species of Aloe. Some of them have no healing properties at all. The Aloe vera plant is the one that needs to be used.
9. Aloe vera tastes disgusting.
Fact: It is an acquired taste. There are several different flavours of Aloe vera on the market and there should be one that will suit your taste-buds. Also once you drink it you will find that it starts to taste better.
10. All brands of Aloe vera juice work in the same way.
Fact: You will need to check the ingredients list on the bottle to see how much Aloe vera it actually contains. If Aloe vera (Aloe barbadensis) is the first ingredient on the list you can be sure that you will get the benefits. If Aloe vera is too far down the list, you might as well just drink water as you will hardly get any benefits at all.
Fact: You can drink Aloe vera. You can also put it on the inside of your mouth to get rid of sores and mouth ulcers. Drinking it is very beneficial to your health. It is very good for controlling blood sugar as well.

2. Aloe is only good for sunburn.
Fact: Aloe vera is good for all sorts of illnesses. Yes it is good for sunburn, but it has a lot of other uses as well.
3. You have to have an illness to drink Aloe vera.
Fact: Anyone can drink aloe. Even if you are completely healthy. In fact aloe helps to boost your immune system so you are less likely to catch colds and flu.
4. The best way to use Aloe vera is fresh from the plant.

Fact: Aloe fresh from the plant goes off very quickly. You would have to use it immediately in order to get the benefits. Aloe products that have been processed are designed to last longer.
5. The whole leaf is better than just the inside.
Fact: The rind of the plant does not make any difference to the effectiveness of the Aloe.
6. Powdered and Aloe capsules are just as good as the drink.
Fact: Powdered and aloe capsules have been over processed. Some of the goodness is in the liquid part of the plant.
7. You should see results quickly when drinking Aloe.

Fact: Like all natural products it takes a while to feel the benefits. You will have to take it for at least 2 months to notice any difference.
8. All Aloe plants are the same.
Fact: There are several different species of Aloe. Some of them have no healing properties at all. The Aloe vera plant is the one that needs to be used.
9. Aloe vera tastes disgusting.
Fact: It is an acquired taste. There are several different flavours of Aloe vera on the market and there should be one that will suit your taste-buds. Also once you drink it you will find that it starts to taste better.

10. All brands of Aloe vera juice work in the same way.
Fact: You will need to check the ingredients list on the bottle to see how much Aloe vera it actually contains. If Aloe vera (Aloe barbadensis) is the first ingredient on the list you can be sure that you will get the benefits. If Aloe vera is too far down the list, you might as well just drink water as you will hardly get any benefits at all.
1
0
文章
Dummer. ゛☀
2017年09月30日

Gazania is a genus of low-growing, trailing ground covers with daisy-like blooms that open on summer and fall days, closing at night. It only grows 0.5 to 1 foot (15 to 30 cm) tall and 1 to 2 feet (30 to 60 cm) wide, but its vivid flowers more than make up for its lack of height. Although grown as an annual in much of the country, this plant overwinters in U.S. Department of Agriculture plant hardiness zones 8b through 11. Plant this colorful, low-growing specimen outside in containers or directly into the ground to incorporate it into your landscape.
Growing Conditions and General Care
Plant Gazanias in early spring, in full sun and well-draining soil, spacing multiple plants 12 to 18 inches (30 to 45 cm) apart to form a ground cover mat. These flowers can tolerate almost any type of soil — alkaline, acidic, loam, clay and sand — as long as they have good drainage, though they prefer good, fertile loam.
Water the Gazania, keeping it moist after planting until you see new growth. Once growing on its own, this plant is quite drought tolerant, and only requires supplemental water during droughts of three weeks or more. Water in the morning, as Gazanias can succumb to stem and root rots, powdery mildew and leaf spot that can result from staying wet for too long.
Pinch off fading flowers with your fingers to encourage a longer bloom period.
Prune annually in late winter or early spring, beginning in the second season, cutting the foliage back to 2 or 3 inches above the ground with pruning shears. This will refresh the plant and encourage new growth.
Fertilize annually soon after pruning, beginning in the second season, with a teaspoon or two of 10-10-10 granular fertilizer, scattering it evenly around the edges of the plant and watering it into the ground. Gazanias can tolerate soils with low fertility, and actually do not do well with excess fertilizer. In even moderately fertile soil they do not require this application, but it can encourage healthy early season growth.
Plant different varieties of Gazanias in a bunch for a colorful mix.
Propagation
Gazanias are particularly suited for creating a fast-spreading garden spread. They self-seed and grow very quickly. However, you can fasten the propagation process. For this, systematic division of young Gazanias is needed. Choose Gazanias that are about 10 inches (25 cm) tall. Using gardening scissors, cut through the basal stem, dividing it into two halves. Each half will now grow as an individual plant.

Growing Conditions and General Care
Plant Gazanias in early spring, in full sun and well-draining soil, spacing multiple plants 12 to 18 inches (30 to 45 cm) apart to form a ground cover mat. These flowers can tolerate almost any type of soil — alkaline, acidic, loam, clay and sand — as long as they have good drainage, though they prefer good, fertile loam.

Water the Gazania, keeping it moist after planting until you see new growth. Once growing on its own, this plant is quite drought tolerant, and only requires supplemental water during droughts of three weeks or more. Water in the morning, as Gazanias can succumb to stem and root rots, powdery mildew and leaf spot that can result from staying wet for too long.
Pinch off fading flowers with your fingers to encourage a longer bloom period.

Prune annually in late winter or early spring, beginning in the second season, cutting the foliage back to 2 or 3 inches above the ground with pruning shears. This will refresh the plant and encourage new growth.
Fertilize annually soon after pruning, beginning in the second season, with a teaspoon or two of 10-10-10 granular fertilizer, scattering it evenly around the edges of the plant and watering it into the ground. Gazanias can tolerate soils with low fertility, and actually do not do well with excess fertilizer. In even moderately fertile soil they do not require this application, but it can encourage healthy early season growth.
Plant different varieties of Gazanias in a bunch for a colorful mix.

Propagation
Gazanias are particularly suited for creating a fast-spreading garden spread. They self-seed and grow very quickly. However, you can fasten the propagation process. For this, systematic division of young Gazanias is needed. Choose Gazanias that are about 10 inches (25 cm) tall. Using gardening scissors, cut through the basal stem, dividing it into two halves. Each half will now grow as an individual plant.
0
1
文章
Miss Chen
2017年09月29日

Tulips (Tulipa spp.) poking their heads out of the soil is one of the first signs that spring has arrived, and the brightly colored blooms don't disappoint in the weeks that follow. Hardy in U.S. Department of Agriculture plant hardiness zones 4 through 10, most tulips are perennial, and they'll bloom again next spring if you take proper care of them once they're done blooming this year.

As Blooms Fade
Once the tulip blooms have started to wilt and droop, gently pluck the remaining petals from the stem. If you prefer, cut off the dead flowers, as well as 1 to 2 inches of the stem. Don't, however, pull or snip off the plants' leaves. Allow the leaves to die back on their own, because even though the flower is gone for the year, the roots of the plant still rely on photosynthesis from the leaves to feed the plant. Deadheading the blooms prevents the plant from developing seeds and directs the plant's energy back into the bulb. To prevent disease, always use disinfected pruning tools when cutting any portion of the tulip.
After the Stems Turn Yellow
If you don't like the way the dying leaves and stems look, plant other flowers or foliage around the tulips to disguise the unsightliness. After the leaves have turned yellow and died back on their own, gently remove them from the stem. If the stems have wilted or turned yellow or brown, snip them off at ground level. Don't be tempted to do this too soon, however, or it could inhibit the tulips from returning next year. In cooler areas that experience frost and snow, cover the tulip bed with 2 to 4 inches of organic mulch like straw to protect the bulbs over winter. Use the same amount of mulch in warmer zones to preserve moisture in the soil.
Water Properly
As long as the stems of the tulips are green, you need to water them regularly. Until the stem dies, the bulb is storing up energy for the winter and water is necessary for this process. While there isn't a specific guideline regarding how much to water the tulips once they've bloomed, it's a good idea to give them a thorough watering every few days, especially if your area is experiencing a dry spell and make sure to continue watering during dry weather conditions throughout fall. Apply enough water to saturate the soil to a depth of approximately 6 inches to reach the tulip roots.

Divide and Fertilize
Older plants might need to be divided after they bloom to encourage them to return the next spring and to alleviate overcrowding that creates smaller bloom size. In warm areas of USDA zones 8 through 10, tulip bulbs require lifting and storing for six to eight weeks in the refrigerator inside a paper bag. Don't store the bulbs next to ripening fruit where the ethylene gas destroys the flower bud developing inside the bulb. When lifting and replanting, dig up the older bulbs and remove the largest "daughter" bulb. Replant each daughter 6 to 8 inches deep and spacing each bulb 5 inches apart, keeping in mind that tulips thrive in full sun. Fertilizing is usually recommended while the tulips are blooming, but you should also plan to fertilize if you divide the bulbs after they bloom. When blooming starts to occur, incorporate 2 pounds of 5-10-5 or 5-10-10 fertilizer per 100 square feet into the soil. Incorporate the fertilizer into the top inch of soil and wash it off any portion of the tulip it touches. The same type of balanced fertilizer can be applied right after you divide and replant the bulbs. When adding fertilizer to the planting hole, be sure to cover the fertilizer with approximately 1 inch of soil and do not allow the bulb to have direct contact with the fertilizer so the bulb isn't damaged or burned.

As Blooms Fade
Once the tulip blooms have started to wilt and droop, gently pluck the remaining petals from the stem. If you prefer, cut off the dead flowers, as well as 1 to 2 inches of the stem. Don't, however, pull or snip off the plants' leaves. Allow the leaves to die back on their own, because even though the flower is gone for the year, the roots of the plant still rely on photosynthesis from the leaves to feed the plant. Deadheading the blooms prevents the plant from developing seeds and directs the plant's energy back into the bulb. To prevent disease, always use disinfected pruning tools when cutting any portion of the tulip.
After the Stems Turn Yellow
If you don't like the way the dying leaves and stems look, plant other flowers or foliage around the tulips to disguise the unsightliness. After the leaves have turned yellow and died back on their own, gently remove them from the stem. If the stems have wilted or turned yellow or brown, snip them off at ground level. Don't be tempted to do this too soon, however, or it could inhibit the tulips from returning next year. In cooler areas that experience frost and snow, cover the tulip bed with 2 to 4 inches of organic mulch like straw to protect the bulbs over winter. Use the same amount of mulch in warmer zones to preserve moisture in the soil.
Water Properly
As long as the stems of the tulips are green, you need to water them regularly. Until the stem dies, the bulb is storing up energy for the winter and water is necessary for this process. While there isn't a specific guideline regarding how much to water the tulips once they've bloomed, it's a good idea to give them a thorough watering every few days, especially if your area is experiencing a dry spell and make sure to continue watering during dry weather conditions throughout fall. Apply enough water to saturate the soil to a depth of approximately 6 inches to reach the tulip roots.

Divide and Fertilize
Older plants might need to be divided after they bloom to encourage them to return the next spring and to alleviate overcrowding that creates smaller bloom size. In warm areas of USDA zones 8 through 10, tulip bulbs require lifting and storing for six to eight weeks in the refrigerator inside a paper bag. Don't store the bulbs next to ripening fruit where the ethylene gas destroys the flower bud developing inside the bulb. When lifting and replanting, dig up the older bulbs and remove the largest "daughter" bulb. Replant each daughter 6 to 8 inches deep and spacing each bulb 5 inches apart, keeping in mind that tulips thrive in full sun. Fertilizing is usually recommended while the tulips are blooming, but you should also plan to fertilize if you divide the bulbs after they bloom. When blooming starts to occur, incorporate 2 pounds of 5-10-5 or 5-10-10 fertilizer per 100 square feet into the soil. Incorporate the fertilizer into the top inch of soil and wash it off any portion of the tulip it touches. The same type of balanced fertilizer can be applied right after you divide and replant the bulbs. When adding fertilizer to the planting hole, be sure to cover the fertilizer with approximately 1 inch of soil and do not allow the bulb to have direct contact with the fertilizer so the bulb isn't damaged or burned.
0
0
文章
权问薇
2017年09月28日

#松叶牡丹
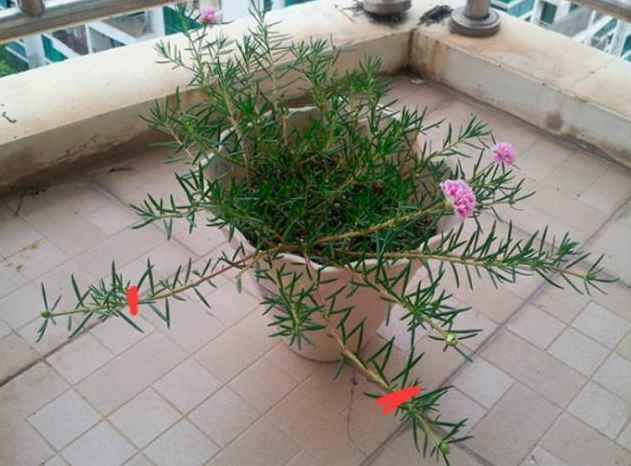
1、剪取10cm左右枝条,要选择比较健壮的那种。
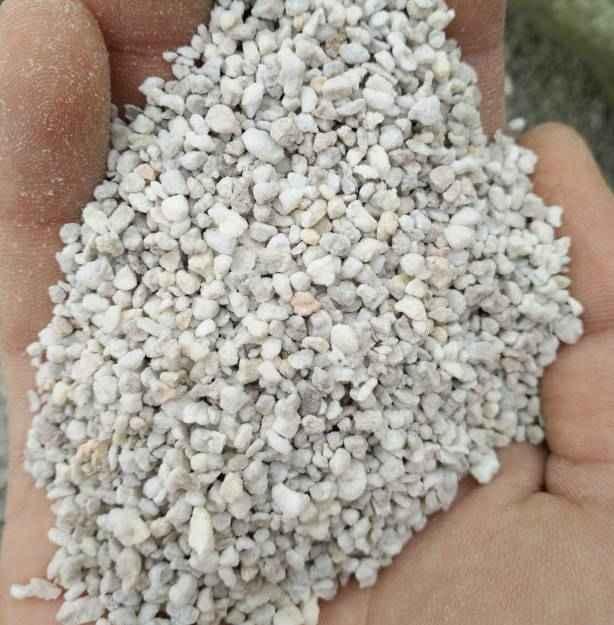
2、准备好干净的珍珠岩,没有的话,也可以用蛭石、河沙等颗粒土进行代替。用水打湿。
3、把插条先放在阴凉的地方1~2天的时间,进行阴干。
4、把插进珍珠岩中,浇透水,这几天保持湿润。
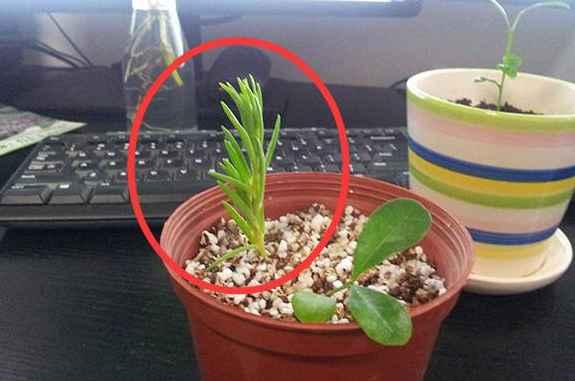
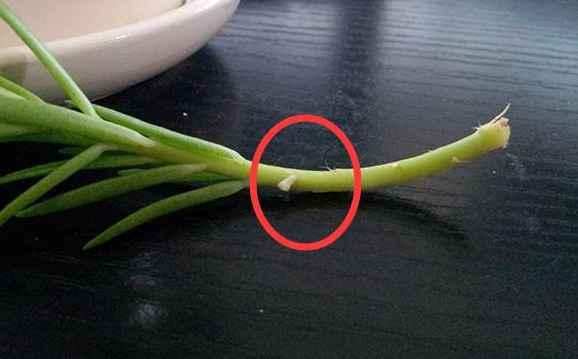
5、大约2~3天,就能看见茎上冒出来白白的小东西,这就是正式生根了~等根系长地更加健壮一些之后,就可以移栽了~
6、移栽之后,先放在阴凉通风的地方缓上2~3天的时间,之后再拿出去露养就好~

长春花
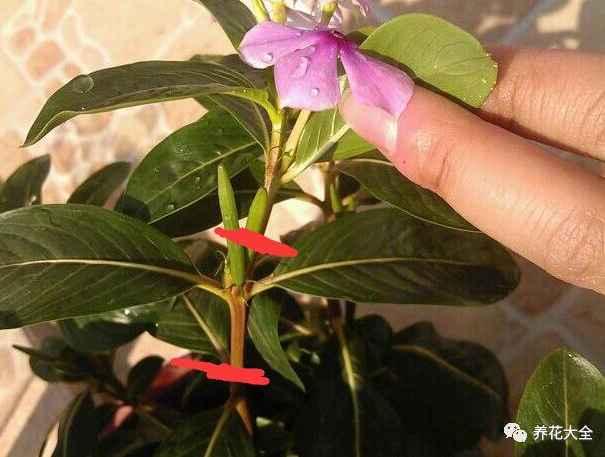
1、选取长春花顶部嫩芽,去掉花朵以及最底部的叶子,将枝条放在多菌灵溶液中进行消毒,然后阴干即可。
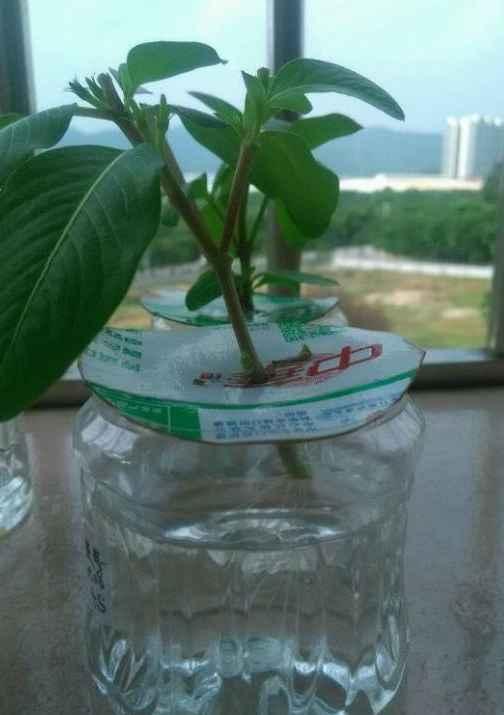
2、准备好几个瓶子,然后按照比瓶口大一圈的大小,用纸壳剪出来几个圆板,在圆板的中间戳个洞,能把长春花的枝条插进去即可。

3、把长春花的枝条顺着洞插进去,瓶子里加一半的水,把纸板盖上去即可。然后放到阴凉通风的地方进行养护,一般7~10天左右就能生根哦~
生根图
▼
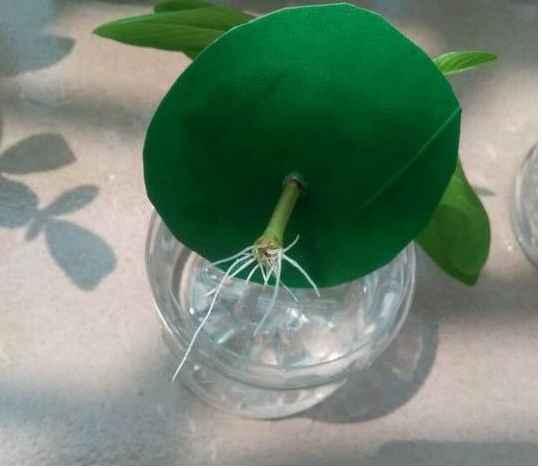
4、等移栽之后,先缓苗2~3天,之后保持土壤湿润,多晒太阳就好了~
多肉
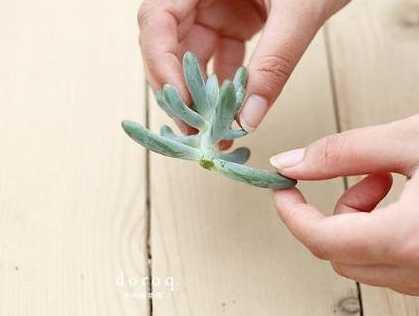
1、将多肉拦腰剪断!
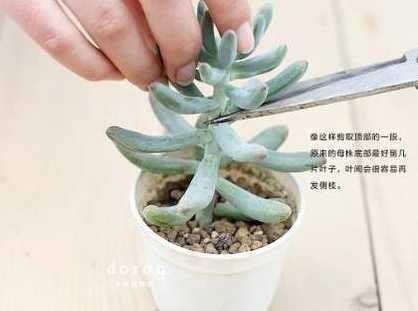
2、把多肉下面的叶子都去掉,只留最顶部的几片。然后放在阴凉的地方晾干。
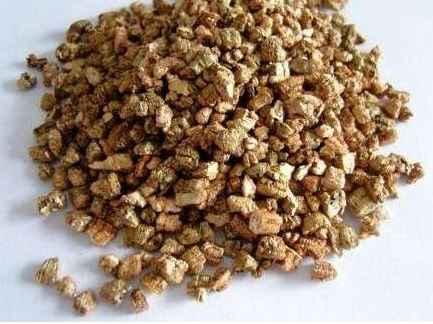
3、准备好干净的蛭石或者是珍珠岩,都没有的话,也可以用其他的颗粒土进行替代。
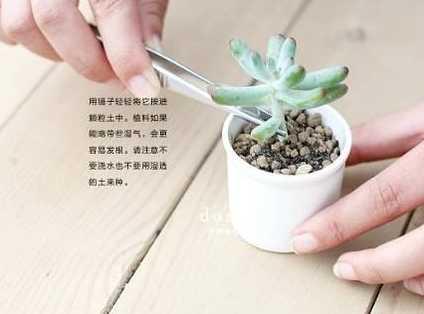
4、将多肉植物插进去即可,大约5天就能生根,注意,多肉植物在生根之前先不要浇水,干旱能够让多肉生根更快。
生根图
▼
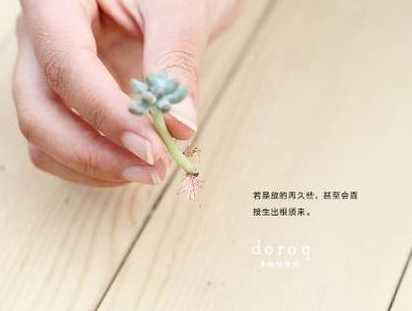
5、等生根之后,就一次性浇透水,在阴处放1~2天,然后多晒太阳,浇水见干见湿即可~
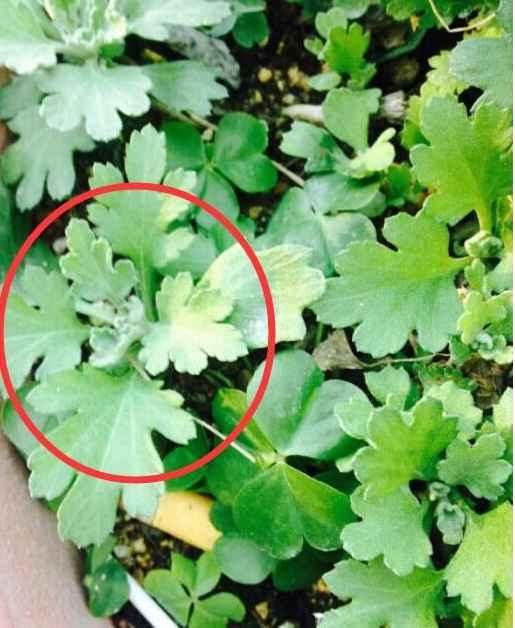
菊花
1、选取菊花顶端的嫩芽10cm左右,掐下来。
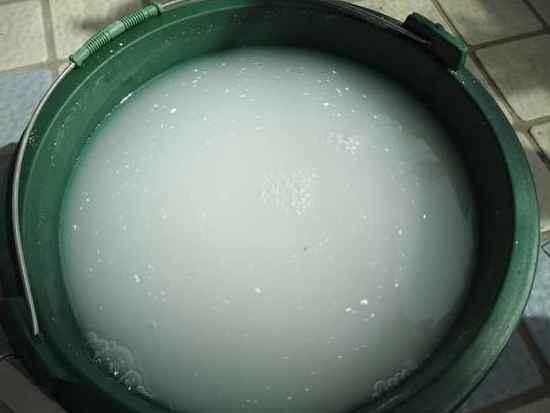
2、放在多菌灵溶液中进行消毒,然后阴干。
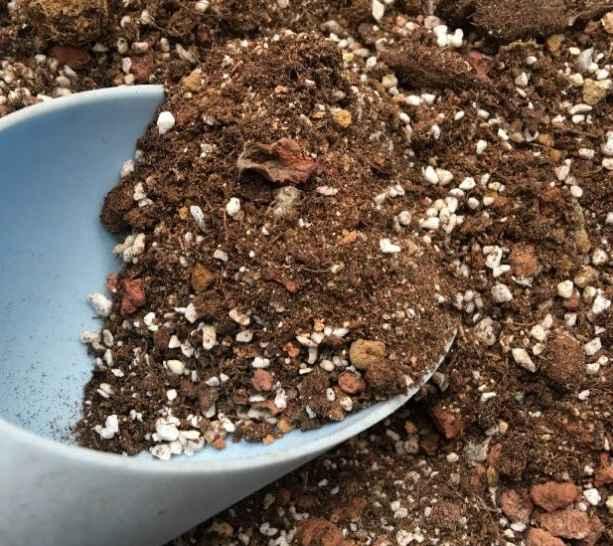
3、准备好干净的营养土,放进容器里,浇透水。
4、将枝条插进去即可,之后的一周时间都要保持土壤湿润,它才能快快长根哦~
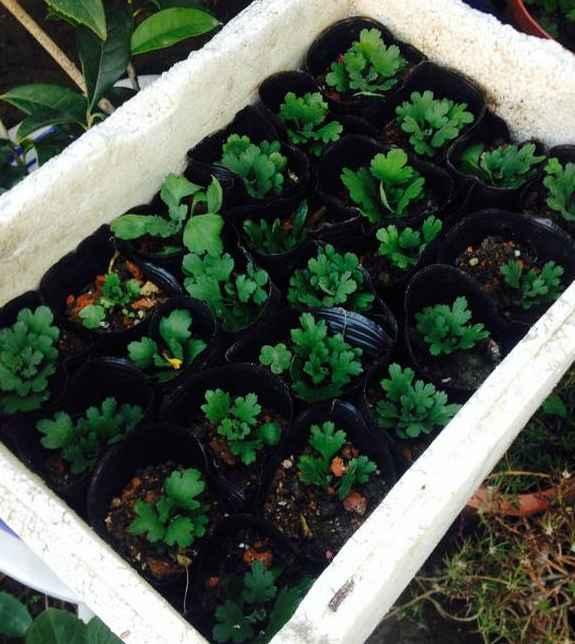
生根图
▼

5、生根之后就可以移栽啦~等缓盆之后,一定要多晒太阳,保持土壤湿润哦~这样才能开花多!

薄荷
1、选取健壮的枝条,在薄荷末端嫩枝和木质化之间选取,枝条上至少要有三个芽眼点哦~
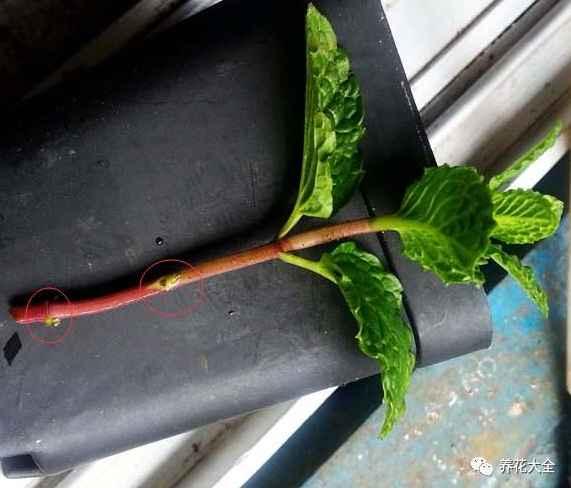
2、把薄荷底部的叶片摘除,为了减少水分的蒸发。

3、准备好干净的土壤,园土或者是营养土都是可以的哦~

4、把薄荷茎节上的芽点埋进土壤里即可。
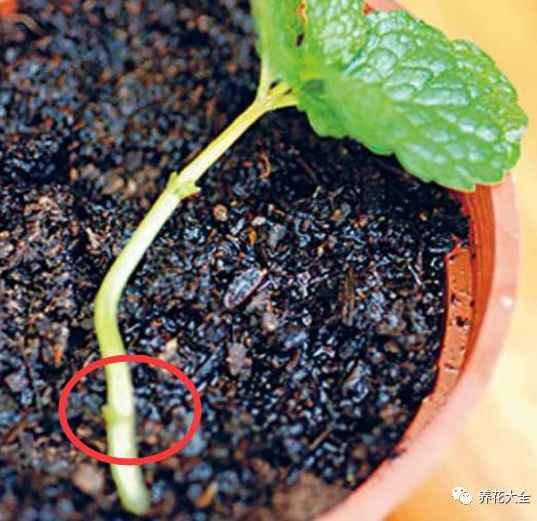
5、在种好之后,就用喷雾器把表面的土壤打湿。

6、放到阴凉通风,有散射光的地方,大约4~5天的时间,白嫩的根系就会长出来了~
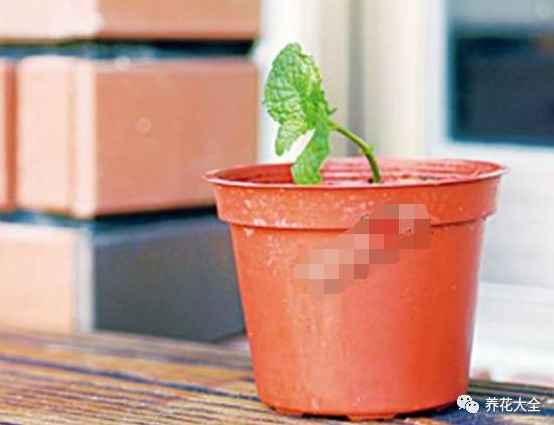
生根图
▼

7、等根系长好了以后,就要放到南阳台上进行养护,多晒太阳多通风,保持土壤湿润~

铜钱草
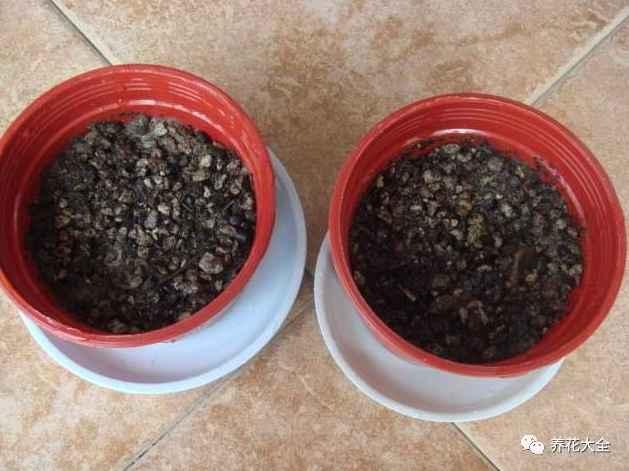
1、铜钱草真的很好活的,先找一个不透水的容器,放进去一些泥浆。
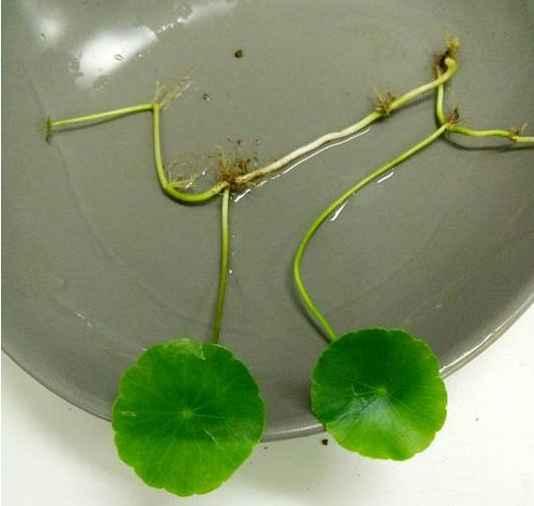
2、把选好的铜钱草从根部分开,把它的匍匐茎插进去。
3、加水,九分满的程度就可以了。

4、放在光照超级好的地方,记得及时加水就行了!3~5天的时间,铜钱草就能长出根系哦~
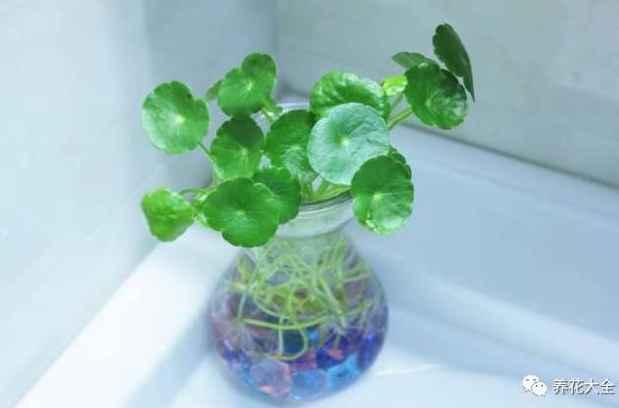
5、之后养护按照大肥大水大太阳来,很快铜钱草就能爆盆了~

百万小玲(矮牵牛)
1、选择干净的营养土,放进育苗盒里,轻轻用手压实,然后用小棍子在中间戳出来一个孔。

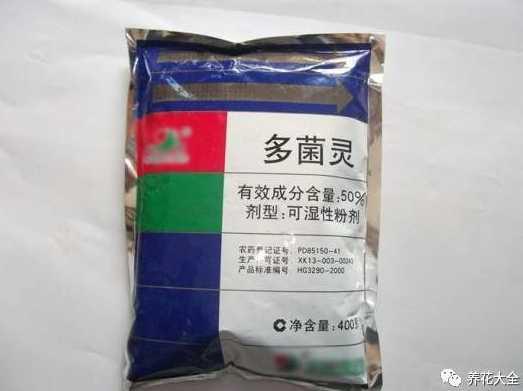
2、用兑了多菌灵的水浇透。
3、用百万小玲摘心打顶下来的芽扦插即可扦插,插条的长度控制在4~5cm之间即可。
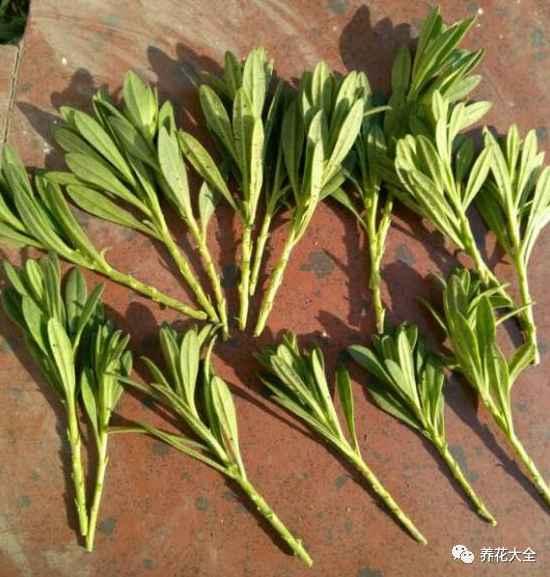
4、将插条的伤口处放在多菌灵溶液中浸泡20分钟左右,然后抹上点儿生根粉,放在阴凉通风的地方阴干。
5、把插条插进土壤里,喷水后放在阴凉通风的地方养护。
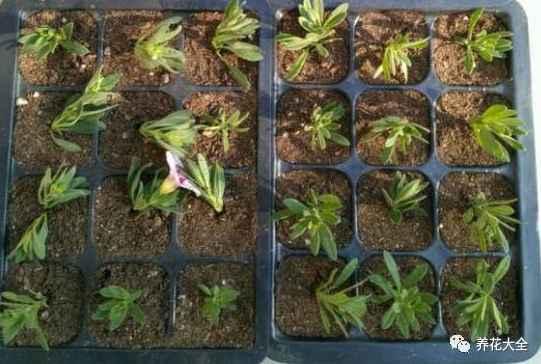
6、大概5~7天就能生根,生根之后先不要急着移栽,再等上1周左右的时间,等根系长的健壮一些之后,再移栽到花盆里去。
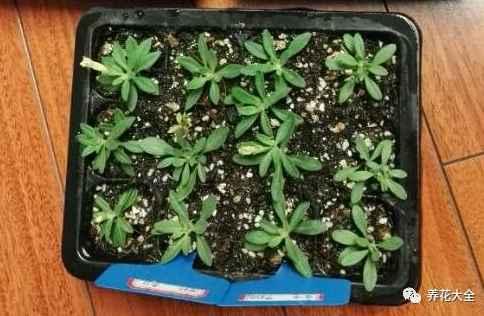
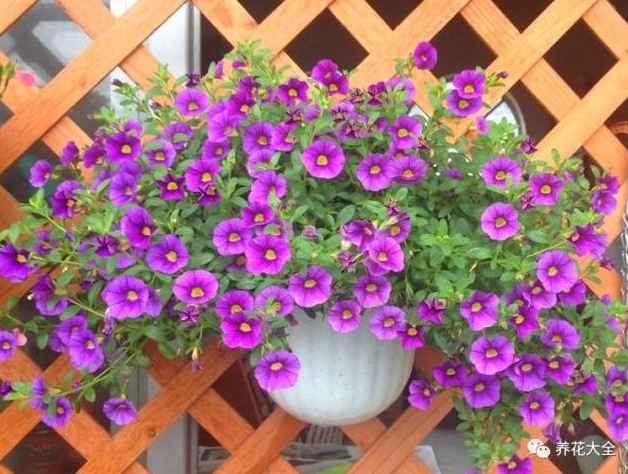
7、移栽之后,先放在阴凉通风的地方缓根2~3天,之后再放到光照良好的地方养护即可~等1个月过去,就能爆盆了~
天竺葵
1、从顶稍开始,截取长7~10厘米一段茎干即可~

2、茎干下面的叶子和小芽之类的要全都去掉。
3、将天竺葵的伤口处放在多菌灵溶液中浸泡15分钟左右进行消毒,然后放在阴凉处阴干即可。
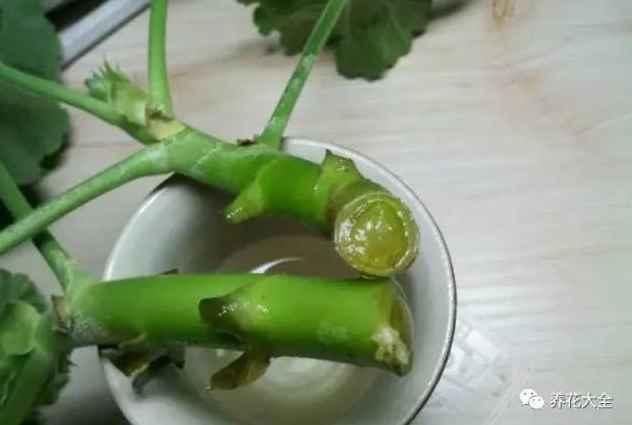
4、准备好育苗块,用水泡开,把天竺葵插入育苗块中即可。没有的话也可以使用海绵,包裹住插条伤口处的部分。

5、大约5~7天的时间,天竺葵就能生根,再等1周左右的时间,就可以上盆了。
6、上盆之后,先放到阴凉通风的地方缓根2~3天,然后再放到光照良好的地方养护即可~

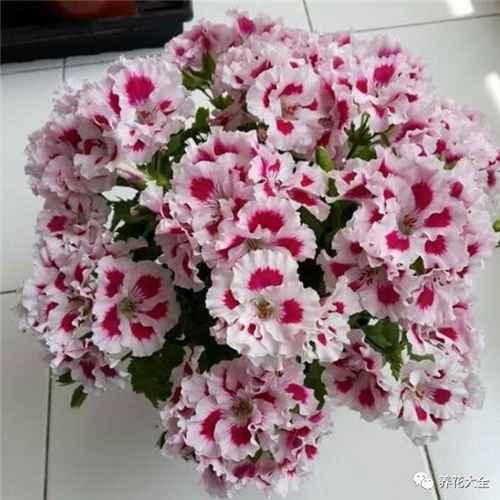
7、天竺葵日常养护要记住大肥大水大太阳这七个字哦,只有这样才能开花多!
绿萝
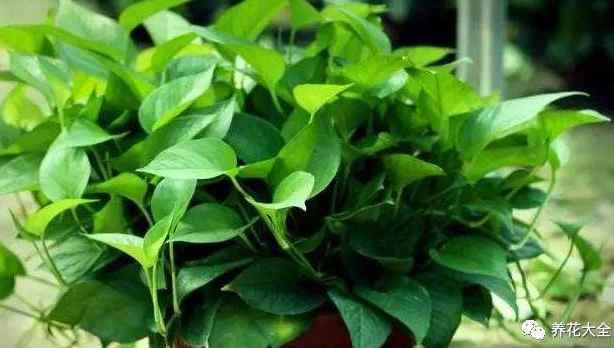
1、剪取绿萝健壮的枝条,选的时候要注意,仔细看一下是否有节点。

2、准备一个干净的容器,装上水,自来水就行~
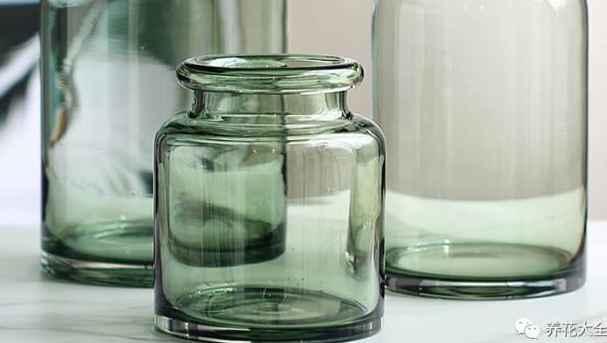
3、将绿萝枝条先放在阴凉通风的地方阴干,然后插进水里即可~

4、夏天大概1~2天的时间换一次水间。大约7天左右,绿萝就会生根了,可以接着水培哦~
必活的上盆步骤(以天竺葵为例)
很多花友扦插的花倒是生根了,但是却失败在了上盆这个步骤上,接下来,花花就介绍一个百分百成活的上盆方法。
1、准备2个杯子,一个大,一个小。
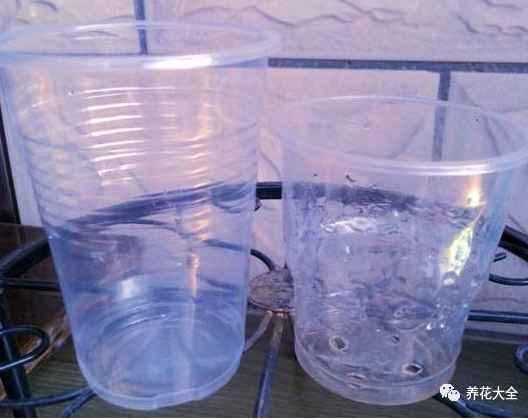
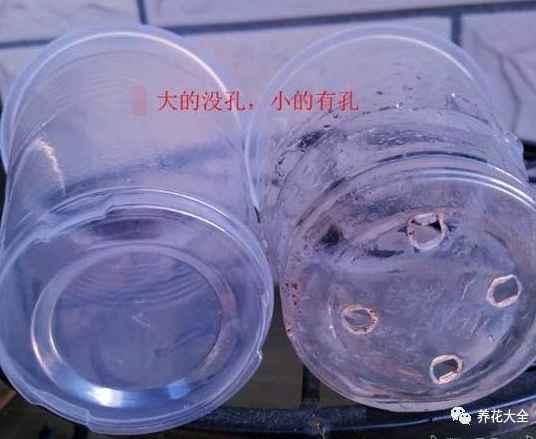
2、在比较小的那个一次性杯子的底部弄几个孔,可以用烟头烫,也可以用剪刀戳。
3、往有孔的杯子里放进去一些土壤

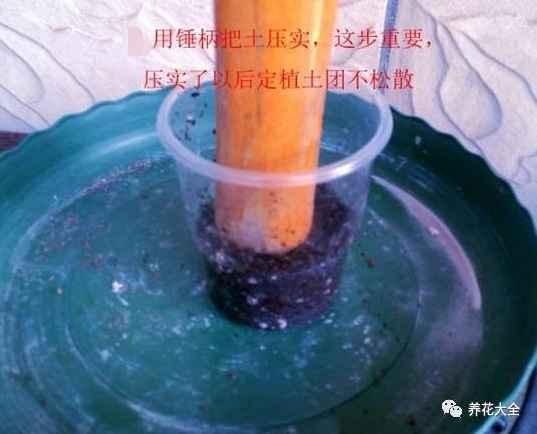
4、用锤柄或者是其他的东西,把杯子里的土壤压实。
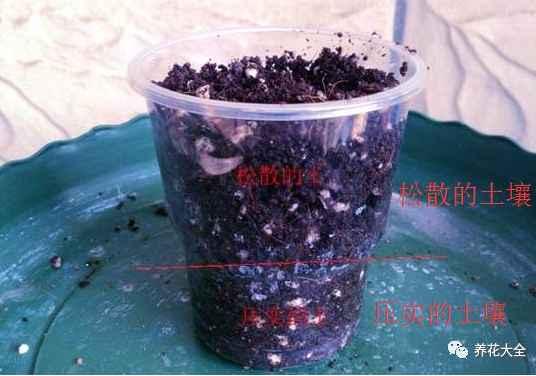
5、然后再次往小杯子里加土,这次要松散的土壤才行。
6、找个盆,装满水,把装满土的杯子放进去浸水。
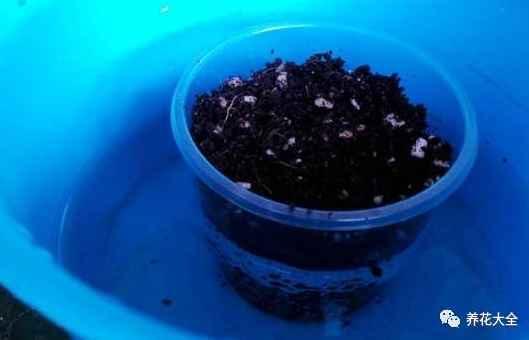
7、用高锰酸钾溶液浇透土壤,进行消毒。

8、取出来已经生根的天竺葵小苗。
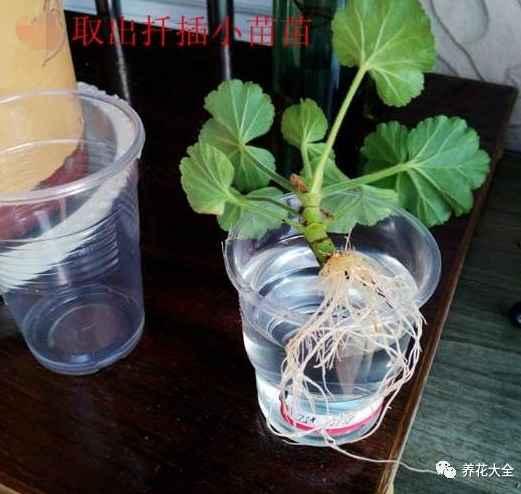
9、放进杯子里,用塑料小棍的之类的,轻轻地把天竺葵的根系都埋进土壤里。
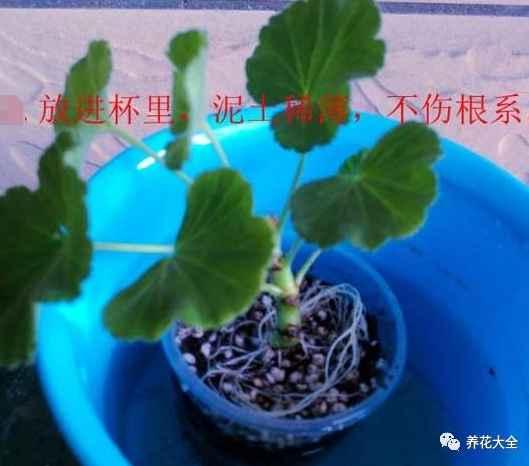
10、根系埋好之后,就把杯子拿出来,然后套进大的杯子里,悬空透水。

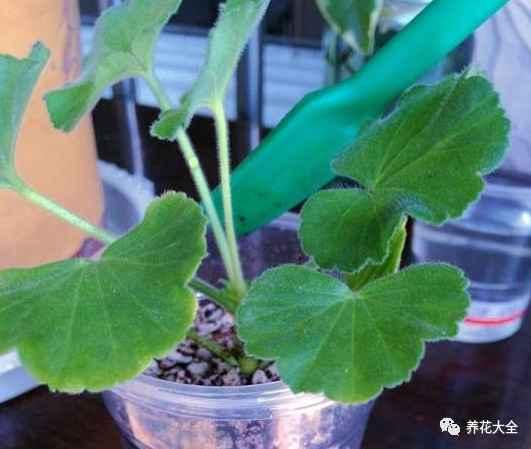
11、最后,将小杯子里的土壤稍微压实一下即可。
1、剪取10cm左右枝条,要选择比较健壮的那种。

2、准备好干净的珍珠岩,没有的话,也可以用蛭石、河沙等颗粒土进行代替。用水打湿。

3、把插条先放在阴凉的地方1~2天的时间,进行阴干。
4、把插进珍珠岩中,浇透水,这几天保持湿润。

5、大约2~3天,就能看见茎上冒出来白白的小东西,这就是正式生根了~等根系长地更加健壮一些之后,就可以移栽了~

6、移栽之后,先放在阴凉通风的地方缓上2~3天的时间,之后再拿出去露养就好~

长春花
1、选取长春花顶部嫩芽,去掉花朵以及最底部的叶子,将枝条放在多菌灵溶液中进行消毒,然后阴干即可。

2、准备好几个瓶子,然后按照比瓶口大一圈的大小,用纸壳剪出来几个圆板,在圆板的中间戳个洞,能把长春花的枝条插进去即可。

3、把长春花的枝条顺着洞插进去,瓶子里加一半的水,把纸板盖上去即可。然后放到阴凉通风的地方进行养护,一般7~10天左右就能生根哦~

生根图
▼

4、等移栽之后,先缓苗2~3天,之后保持土壤湿润,多晒太阳就好了~
多肉
1、将多肉拦腰剪断!

2、把多肉下面的叶子都去掉,只留最顶部的几片。然后放在阴凉的地方晾干。

3、准备好干净的蛭石或者是珍珠岩,都没有的话,也可以用其他的颗粒土进行替代。

4、将多肉植物插进去即可,大约5天就能生根,注意,多肉植物在生根之前先不要浇水,干旱能够让多肉生根更快。

生根图
▼

5、等生根之后,就一次性浇透水,在阴处放1~2天,然后多晒太阳,浇水见干见湿即可~

菊花
1、选取菊花顶端的嫩芽10cm左右,掐下来。

2、放在多菌灵溶液中进行消毒,然后阴干。

3、准备好干净的营养土,放进容器里,浇透水。

4、将枝条插进去即可,之后的一周时间都要保持土壤湿润,它才能快快长根哦~

生根图
▼

5、生根之后就可以移栽啦~等缓盆之后,一定要多晒太阳,保持土壤湿润哦~这样才能开花多!

薄荷
1、选取健壮的枝条,在薄荷末端嫩枝和木质化之间选取,枝条上至少要有三个芽眼点哦~

2、把薄荷底部的叶片摘除,为了减少水分的蒸发。

3、准备好干净的土壤,园土或者是营养土都是可以的哦~

4、把薄荷茎节上的芽点埋进土壤里即可。

5、在种好之后,就用喷雾器把表面的土壤打湿。

6、放到阴凉通风,有散射光的地方,大约4~5天的时间,白嫩的根系就会长出来了~

生根图
▼

7、等根系长好了以后,就要放到南阳台上进行养护,多晒太阳多通风,保持土壤湿润~

铜钱草
1、铜钱草真的很好活的,先找一个不透水的容器,放进去一些泥浆。

2、把选好的铜钱草从根部分开,把它的匍匐茎插进去。

3、加水,九分满的程度就可以了。

4、放在光照超级好的地方,记得及时加水就行了!3~5天的时间,铜钱草就能长出根系哦~

5、之后养护按照大肥大水大太阳来,很快铜钱草就能爆盆了~

百万小玲(矮牵牛)
1、选择干净的营养土,放进育苗盒里,轻轻用手压实,然后用小棍子在中间戳出来一个孔。

2、用兑了多菌灵的水浇透。

3、用百万小玲摘心打顶下来的芽扦插即可扦插,插条的长度控制在4~5cm之间即可。

4、将插条的伤口处放在多菌灵溶液中浸泡20分钟左右,然后抹上点儿生根粉,放在阴凉通风的地方阴干。
5、把插条插进土壤里,喷水后放在阴凉通风的地方养护。

6、大概5~7天就能生根,生根之后先不要急着移栽,再等上1周左右的时间,等根系长的健壮一些之后,再移栽到花盆里去。

7、移栽之后,先放在阴凉通风的地方缓根2~3天,之后再放到光照良好的地方养护即可~等1个月过去,就能爆盆了~

天竺葵
1、从顶稍开始,截取长7~10厘米一段茎干即可~

2、茎干下面的叶子和小芽之类的要全都去掉。
3、将天竺葵的伤口处放在多菌灵溶液中浸泡15分钟左右进行消毒,然后放在阴凉处阴干即可。

4、准备好育苗块,用水泡开,把天竺葵插入育苗块中即可。没有的话也可以使用海绵,包裹住插条伤口处的部分。

5、大约5~7天的时间,天竺葵就能生根,再等1周左右的时间,就可以上盆了。
6、上盆之后,先放到阴凉通风的地方缓根2~3天,然后再放到光照良好的地方养护即可~

7、天竺葵日常养护要记住大肥大水大太阳这七个字哦,只有这样才能开花多!

绿萝
1、剪取绿萝健壮的枝条,选的时候要注意,仔细看一下是否有节点。

2、准备一个干净的容器,装上水,自来水就行~

3、将绿萝枝条先放在阴凉通风的地方阴干,然后插进水里即可~

4、夏天大概1~2天的时间换一次水间。大约7天左右,绿萝就会生根了,可以接着水培哦~

必活的上盆步骤(以天竺葵为例)
很多花友扦插的花倒是生根了,但是却失败在了上盆这个步骤上,接下来,花花就介绍一个百分百成活的上盆方法。
1、准备2个杯子,一个大,一个小。

2、在比较小的那个一次性杯子的底部弄几个孔,可以用烟头烫,也可以用剪刀戳。

3、往有孔的杯子里放进去一些土壤

4、用锤柄或者是其他的东西,把杯子里的土壤压实。

5、然后再次往小杯子里加土,这次要松散的土壤才行。

6、找个盆,装满水,把装满土的杯子放进去浸水。

7、用高锰酸钾溶液浇透土壤,进行消毒。

8、取出来已经生根的天竺葵小苗。

9、放进杯子里,用塑料小棍的之类的,轻轻地把天竺葵的根系都埋进土壤里。

10、根系埋好之后,就把杯子拿出来,然后套进大的杯子里,悬空透水。

11、最后,将小杯子里的土壤稍微压实一下即可。

2
4
文章
权问薇
2017年09月28日


施肥的方法
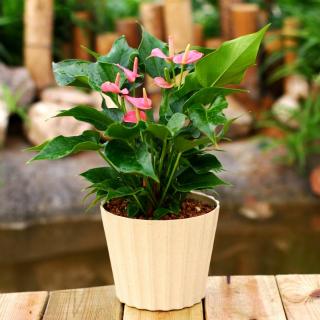
合理的施肥可以有效的促进粉掌的生长。至于肥料的选择,复合肥和液体肥料均可,值得一提的是复合肥中氮磷钾的比例要严格控制为1:1:1。最佳的施肥时机是清晨或者傍晚,频率可以控制在一周多一次,比如7至12天。如果选择液体肥料,每三天施肥一次即可。需要特别注意的是,两种施肥的方式只能用一种,不能两种同时使用。
土壤与施肥
粉掌相对喜肥,盆栽粉掌的土壤应选择土质肥沃、疏松、有良好的透气性和透水性为宜。如果土壤里再能含有粉掌生长所必须的部分养分就更好了。树下含有腐叶的土就是很好的选择。另外在往盆里下土前,在盆地铺一层破碎的砖瓦块可以有效的提高排水性。

温度与施肥
想必大家都知道,当温度降到一定程度后,植株会停止部分生理活动,此时是万万不可施肥的,粉掌的最佳生长温度区间为19摄氏度到25摄氏度之间。所以像在我国北方应该夏季防止周围温度过高,冬季则要预防不必要的冻伤,并在必要时停止施肥。
水肥管理
粉掌特别怕干,所以最好能每两天浇一次水。但是浇水时也不能一次浇过多,盆内的积水可能导致粉掌根部腐烂。正所谓肥水不分家,浇水时,加入适量的一到两滴液肥,能够更好的促使植株生长哦!
施肥的注意事项
小编想在这里着重的提醒大家,不是施肥的量越大越好,合理的控制肥料的浓度,可以使粉掌更好的生长和吸取养分哦!
0
0
文章
我说肉肉你说萌!
2017年09月28日
一般来说选用的盆,要比多肉的冠幅(直径),大个1-2cm,或1/3-1/4,更利于多肉长大,或群生。盆的高度可比盆宽度略高,或略矮(瓦苇系的盆可高点),通常不建议细筒高盆,不利于空气流通,也不利于把握浇水的分量。
#多肉 种下后,盆留有一定间隙,方便多肉生长,也方便自己浇水。


如果植株本身是生长较快的品种,如仙女之舞、玉蝶,选择的盆可以再大点,如植株的2-3倍宽,盆太大,浇水的时机会较难把握。不清楚长得快不快,则参考上一点,可以等长大了,再换盆。
盆过大的情况下,浇水要多用点心。


如果,不想多肉长太大,保持多肉娇小的体型,则可以用跟多肉大小差不多,或比多肉还小的盆,以达到控型的目的。
已经半木质化的老桩也没必要换更大的盆,已经长不动了。


#多肉 种下后,盆留有一定间隙,方便多肉生长,也方便自己浇水。


如果植株本身是生长较快的品种,如仙女之舞、玉蝶,选择的盆可以再大点,如植株的2-3倍宽,盆太大,浇水的时机会较难把握。不清楚长得快不快,则参考上一点,可以等长大了,再换盆。
盆过大的情况下,浇水要多用点心。


如果,不想多肉长太大,保持多肉娇小的体型,则可以用跟多肉大小差不多,或比多肉还小的盆,以达到控型的目的。
已经半木质化的老桩也没必要换更大的盆,已经长不动了。


5
3
文章
Miss Chen
2017年09月28日

Para ello, te damos un pequeño instructivo que te será de mucha utilidad
PASO 1
Primero, debemos seleccionar las plantas de exigencias de cultivo similares. Después, humedeceremos la tierra de los tiestos. Montaremos el grupo decorativo colocándo los tiestos en el contenedor, situando las plantas más elevadas en la zona posterior.
PASO 2
Una vez que tengamos bien planificado cómo vamos a desarrollar el conjunto, prepararemos el contenedor colocando una capa de 5 cm de drenaje (gravilla o trozos de tiesto) en la base y, a continuación, la cubriremos con una capa de tierra: mezcla de 1 parte de arena y 3 de emzcla para tiestos de tierra negra.
PASO 3
Seguidamente, retiraremos las plantas de los tiestos, con cuidado de no pincharnos (dado a que la amyoría de los cactus tienen espinas agudas, al movelos, es aconsejable usar guantes), y las colocaremos en el contenedor, rellenándolo despues con tierra. Debemos tener precaución de dejar el suficiente espacio entre una y otra planta para que puedan desarrollarse.
PASO 4
Finalmente, revestiremos el contenedor ya plantado con una capa de 5 cm de gravilla. Para crear un aspecto aún más natural, podemos añadir piedras decorativas.
2
0
文章
素雅
2017年09月28日


育苗
选取#香瓜 种子以后,先把它晒两天。然后再用55度的温水一遍倒水一遍搅拌后泡上5到8个小时即可。将种子取出洗净以后再用湿的棉毛巾包好套一个塑料袋,放到30到32度的环境中,一般18到20个小时后芽就能出来了。等到长出了四片叶子的时候就能定植了 。

管理
在植物的苗期,除了花打顶以外等枝杈长到3到5cm时再将杈打掉,最好是在天气比较好的上午,不能用剪刀或是手掐。浇水的话要在长出2片叶子再浇,第一次的时候不需要施肥。等到第一茬瓜鸡蛋大时再用膨瓜肥。一般10到15天浇一次水就可以了。
施肥
幼苗期的时候,一般施氮磷含量都比较多的。茎叶生长较快的时期主要用氮肥。结瓜的时候主要施用钾氮肥。
授粉
如果需要手动授粉就要在上午进行,建议在9到10点之间,应该在雌花开后的两小时授粉。
采收
等到香瓜成熟了之后就可以采收了,具体方法是用手指按靠近果脐的那一面,发软就是熟了,或者是闻一下有么有香瓜所独有的浓香,如果熟了的话就用剪刀剪下来。

0
2
文章
Miss Chen
2017年09月28日

Ya vimos con anterioridad que la siembra de asiento es utilizada para las plantas que son difíciles o de transplante delicado. Aprende detallamente los pasos a seguir para hacerla.
Paso nº 1:
Debe prepararse la tierra o sustrato desinfectado. La mezcla puede ser de turba, perlita y vermiculita en diferentes proporciones. Para facilitar el crecimiento de las semillas, debe estar la tierra bien preparada para almácigos que se venden en los comercios de la rama.
Paso nº 2:
Listo el sustrato, debe mojarlo con una regadera de chorro fino para lograr una cierta cantidad de humedad. Cuando use bandejas, debe regar por lo menos dos horas antes de sembrar para que el sustrato drene bien y quede con humedad.
Paso nº 3:
Posteriormente, deben colocarse las semillas en forma pareja. La profundidad dependerá del tamaño de la semilla: entre 2 y 4 veces su diámetro.
Paso nº 4:
Cubrir con tierra tamizada las semillas.
Paso nº 5:
Regar con pulverizador para evitar la formación de costra en la superficie de la tierra, y la movilización de la semilla. Proteger el almácigo según el recipiente elegido (tapa de vidrio, plástico, bolsa de polietileno). Debe procurar que los plantines dispongan de la mayor cantidad de luz posible pero no los exponga al sol directo.
Paso nº 6:
Tras lograr las plántulas, llega el momento del trasplante. Se realiza cuando la planta tiene dos pares de hojas y una altura de 5cm. El trasplante es una forma de endurecer los plantines. Se los traslada a recipientes individuales y de ahí al lugar definitivo.
0
0
文章
Dummer. ゛☀
2017年09月28日

The Meconopsis genus contains short lived hardy perennials that reach a height of 1 to 5 feet (30 cm to 1.5 m). They carry poppy like flowers that can bloom in spring, summer or the start of autumn (species dependent). Many Meconopsis species are known for their blue poppy like flowers but they can also carry flowers of many other colors including white, orange, pink and yellow. Some of the common names for Meconopsis include Welsh Poppy, Asiatic Poppy, Blue Poppy and Harebell Poppy.
The Blue Poppy is the national flower of Bhutan. Welsh poppies can be invasive.
Growing Conditions and General Care
Full sunlight (cool areas only); full or partial shade. Acidic soil. Add grit to heavy soils. Nutrient-rich soil, add manure, leaf matter or compost if necessary. Moist soil. Supply mulch of manure of bark chippings when planting to help maintain moisture; do not cover the crowns. Regular watering during dry periods in summer to keep the soil moist. No need to water in the winter as the plant prefers a dry soil whilst resting. Cut back to the ground in autumn. Replace regularly as Meconopsis do not live for long time.
How to Grow from Seeds
The seeds of the Meconopsis should be sown on the surface; this can wither be done just before the last frost of spring or towards the end of autumn. Blue Poppies prefer to grow in a shady or partially shady part of the gardens but can tolerate sunny areas in milder climates. They like a rich acidic soil, ideally the soil should be kept moist in the summer, but allowed to dry in the winter.
When starting Blue Poppy off indoors do so about two months in advance. The Meconopsis seeds should be sown in vermiculite. It should take about two to four weeks for blue poppy to germinate at 54 to 64 degrees Fahrenheit (12 to 18 degrees Celsius). Once growing the seedlings should be watered from beneath. Once ready transplant the young Meconopsis plants at a spacing of 12 inches/30 cm (small) to 2.5-3 feet/75-90 cm (large) apart. This should be done following the last frost of spring.
Grower’s Tips
When growing Meconopsis plants in the garden it is very important to keep the soil moist in the summer. Once the growing period has finished, cut back Meconopsis plant to ground level (autumn). If you require more plants then they can be propagated by division at the start of spring.

The Blue Poppy is the national flower of Bhutan. Welsh poppies can be invasive.
Growing Conditions and General Care
Full sunlight (cool areas only); full or partial shade. Acidic soil. Add grit to heavy soils. Nutrient-rich soil, add manure, leaf matter or compost if necessary. Moist soil. Supply mulch of manure of bark chippings when planting to help maintain moisture; do not cover the crowns. Regular watering during dry periods in summer to keep the soil moist. No need to water in the winter as the plant prefers a dry soil whilst resting. Cut back to the ground in autumn. Replace regularly as Meconopsis do not live for long time.

How to Grow from Seeds
The seeds of the Meconopsis should be sown on the surface; this can wither be done just before the last frost of spring or towards the end of autumn. Blue Poppies prefer to grow in a shady or partially shady part of the gardens but can tolerate sunny areas in milder climates. They like a rich acidic soil, ideally the soil should be kept moist in the summer, but allowed to dry in the winter.
When starting Blue Poppy off indoors do so about two months in advance. The Meconopsis seeds should be sown in vermiculite. It should take about two to four weeks for blue poppy to germinate at 54 to 64 degrees Fahrenheit (12 to 18 degrees Celsius). Once growing the seedlings should be watered from beneath. Once ready transplant the young Meconopsis plants at a spacing of 12 inches/30 cm (small) to 2.5-3 feet/75-90 cm (large) apart. This should be done following the last frost of spring.

Grower’s Tips
When growing Meconopsis plants in the garden it is very important to keep the soil moist in the summer. Once the growing period has finished, cut back Meconopsis plant to ground level (autumn). If you require more plants then they can be propagated by division at the start of spring.
0
1


