文章
Miss Chen
2017年09月18日

Las zanahorias se pueden sembrar todo el año, preferentemente en primavera, de febrero a mayo. Lo que tenemos que hacer es plantar las semillas a 1-2 cm. de profundidad. Tendremos en cuenta que cada cada planta necesita unos 10 cm. de espacio. Además, las zanahorias, al ser raíces, no se pueden trasplantar, así que no es conveniente moverlas a otra maceta o container. Cuando empiecen crecer las plantitas, hay que dejar sólo las más fuertes, retirando el resto (aclarado). La zanahoria se recolecta a los 3-4 meses.

Temporada de siembra: Primavera / Verano / Otoño / Invierno. Se puede cultivar todo el año, con preferencia en primavera, de febrero a mayo. (Sumar 6 meses para países que se encuentren en el hemisferio sur)
Cuando recolectar: 90-120 días. Cosechar las zanahorias antes de que estén demasiado maduras, así saldrán más tiernas y sabrosas.
Tipo de clima: Atlántico / Montaña / Mediterráneo / Continental / Subtropical. Todo tipo de clima. Soporta bien las heladas suaves. En climas muy cálidos las zanahorias se vuelven de color más claro, y salen más finas y largas, mientras que en climas más fríos se vuelven de color amarillento y salen más cortas.
Temperatura mínima: -5 – 9°C
Temperatura máxima: 28°C
Tipo de tierra y abono: Tierra arenosa y ligera, con capacidad para retener agua. Es muy exigente en cuanto a la tierra.
Espacio necesario: unos 10 centímetros por planta.
Luz: Semisombra en verano para evitar pérdidas de humedad.
Riego: Mantener una humedad constante, sin cambios bruscos. En verano es bastante exigente en riegos, hay que evitar que se seque demasiado la tierra.
Plagas e infecciones: podredumbre negra (raíz), mildiu, alternaria, cercospora, septoria y rhizoctonia (hojas).

Cómo almacenar la cosecha: La zanahoria tiene muy buena conservación. Se pueden almacenar en el frigorífico varias semanas, o en un lugar oscuro y fresco, mejor con las hojas verdes ya cortadas pues estas le quitan humedad y nutrientes a la raíz. En condiciones adecuadas de temperatura (3-5°C) y humedad alta estable, se pueden conservar durante 3-5 meses.
Grado de dificultad: Fácil.

Temporada de siembra: Primavera / Verano / Otoño / Invierno. Se puede cultivar todo el año, con preferencia en primavera, de febrero a mayo. (Sumar 6 meses para países que se encuentren en el hemisferio sur)
Cuando recolectar: 90-120 días. Cosechar las zanahorias antes de que estén demasiado maduras, así saldrán más tiernas y sabrosas.
Tipo de clima: Atlántico / Montaña / Mediterráneo / Continental / Subtropical. Todo tipo de clima. Soporta bien las heladas suaves. En climas muy cálidos las zanahorias se vuelven de color más claro, y salen más finas y largas, mientras que en climas más fríos se vuelven de color amarillento y salen más cortas.
Temperatura mínima: -5 – 9°C
Temperatura máxima: 28°C
Tipo de tierra y abono: Tierra arenosa y ligera, con capacidad para retener agua. Es muy exigente en cuanto a la tierra.
Espacio necesario: unos 10 centímetros por planta.
Luz: Semisombra en verano para evitar pérdidas de humedad.
Riego: Mantener una humedad constante, sin cambios bruscos. En verano es bastante exigente en riegos, hay que evitar que se seque demasiado la tierra.
Plagas e infecciones: podredumbre negra (raíz), mildiu, alternaria, cercospora, septoria y rhizoctonia (hojas).

Cómo almacenar la cosecha: La zanahoria tiene muy buena conservación. Se pueden almacenar en el frigorífico varias semanas, o en un lugar oscuro y fresco, mejor con las hojas verdes ya cortadas pues estas le quitan humedad y nutrientes a la raíz. En condiciones adecuadas de temperatura (3-5°C) y humedad alta estable, se pueden conservar durante 3-5 meses.
Grado de dificultad: Fácil.
0
0
文章
Dummer. ゛☀
2017年09月18日

Two leafminers are most prevalent. The native holly leafminer, Phytomyza ilicicola, is a common pest of American holly. The holly leafminer, P. ilicis, feeds only on English hollies. The adult of both is a small black fly only about 1/8 inch long; the larva, a maggot, tunnels in the leaves causing yellowish or brown winding trails or blotches. Leaves may also become distorted and flecked with tiny brown dots. Leaves eventually yellow and drop. This should not be confused with the natural yellowing and shedding of older leaves which occurs annually in late spring or when the plant is under stress.
Symptoms and Diagnosis
Early signs are small raised bumps on the leaf where the egg has been inserted in the leaf by the female. The females also make small pinpoint holes in the leaves, called feeding punctures, through which they and adult males feed on the tender juice inside the leaf. This damage may be confused with damage caused by leaf spines, which can also cause punctures in leaves. When the young maggots hatch from the eggs, their feeding results in light green serpentine tunnels that become progressively wider as the maggot grows. In later stages, the maggot may have mined an area that looks like a spot or blotch. When scraped with a knife or pin, the upper leaf tissue will peel off revealing a mined area below. The maggot or frass (insect droppings) may be evident. In later stages, the leaves yellow and drop. Examining the leaves for tunnels will confirm the presence of leaf miner.
Life Cycle
Only one generation occurs each year. The larvae overwinter in the leaves on the tree or leaves which have fallen. Adults emerge in mid-May to late June and begin laying eggs in about 10 days. The females make a slit in the leaf and deposit an egg inside the leaf. The larva hatches and the young begin feeding on the leaf tissue.
Integrated Pest Management Strategies
1. Pick up and destroy infested leaves. If damage is noticed after mid-May, most insecticidal sprays will not control the pest. To limit future infestations or control a minor problem, collect and dispose of the infested leaves on the ground and on the tree in fall or winter. Do not compost the leaves. For minor problems, limit the use of insecticidal sprays used on the plants or in the area, which could kill beneficial insects, such as the small beneficial wasps that parasitize leafminer maggots.
2. Keep plants healthy. A healthy plant is better able to withstand occasional defoliation caused by leaf miners. Water during dry periods and mulch to help retain moisture.
3. Crush the small eggs or tunneling miners. Inspect small plants for early signs of damage and squeeze the eggs or young maggots.
4. If necessary, use insecticidal sprays. For severe cases, spray the new young foliage with an insecticide beginning in mid-May when the adults begin to emerge and lay eggs. Usually two follow-up sprays 7-10 days apart are needed. Check pesticide labels for directions and be sure to spray both the upper and lower sides of the leaf well. Insecticides include acephate (Orthene), spinosad and imidacloprid (Merit). Imidacloprid may also be applied to the soil in early spring.

Symptoms and Diagnosis
Early signs are small raised bumps on the leaf where the egg has been inserted in the leaf by the female. The females also make small pinpoint holes in the leaves, called feeding punctures, through which they and adult males feed on the tender juice inside the leaf. This damage may be confused with damage caused by leaf spines, which can also cause punctures in leaves. When the young maggots hatch from the eggs, their feeding results in light green serpentine tunnels that become progressively wider as the maggot grows. In later stages, the maggot may have mined an area that looks like a spot or blotch. When scraped with a knife or pin, the upper leaf tissue will peel off revealing a mined area below. The maggot or frass (insect droppings) may be evident. In later stages, the leaves yellow and drop. Examining the leaves for tunnels will confirm the presence of leaf miner.

Life Cycle
Only one generation occurs each year. The larvae overwinter in the leaves on the tree or leaves which have fallen. Adults emerge in mid-May to late June and begin laying eggs in about 10 days. The females make a slit in the leaf and deposit an egg inside the leaf. The larva hatches and the young begin feeding on the leaf tissue.
Integrated Pest Management Strategies
1. Pick up and destroy infested leaves. If damage is noticed after mid-May, most insecticidal sprays will not control the pest. To limit future infestations or control a minor problem, collect and dispose of the infested leaves on the ground and on the tree in fall or winter. Do not compost the leaves. For minor problems, limit the use of insecticidal sprays used on the plants or in the area, which could kill beneficial insects, such as the small beneficial wasps that parasitize leafminer maggots.

2. Keep plants healthy. A healthy plant is better able to withstand occasional defoliation caused by leaf miners. Water during dry periods and mulch to help retain moisture.
3. Crush the small eggs or tunneling miners. Inspect small plants for early signs of damage and squeeze the eggs or young maggots.
4. If necessary, use insecticidal sprays. For severe cases, spray the new young foliage with an insecticide beginning in mid-May when the adults begin to emerge and lay eggs. Usually two follow-up sprays 7-10 days apart are needed. Check pesticide labels for directions and be sure to spray both the upper and lower sides of the leaf well. Insecticides include acephate (Orthene), spinosad and imidacloprid (Merit). Imidacloprid may also be applied to the soil in early spring.

0
0
文章
权问薇
2017年09月17日

#君子兰
君子兰养了2-3年以上,就会在君子兰母株上爆出很多小芽。这些小芽切下来种在土里,就能变成新的君子兰了。

操作步骤:
1、发现家里的君子兰爆小芽了之后,不用管,等到小芽长出2-3片叶子的时候,再对君子兰进行脱盆处理。在脱盆前的1周内,最好不要浇水,以便盆土分离。

2、将花盆倒扣过来,一只手握住君子兰的根茎,另外一只手慢慢敲击花盆,从而让君子兰脱盆。脱盆后,将君子兰根系上的土壤清理干净。

3、将君子兰的根系浸泡在多菌灵溶液或高锰酸钾溶液中,大概20分钟即可,之后放在阴凉通风的地方将根系晾干。

4、根系晾干了后,用消毒后的小刀将带着君子兰小芽的根系切下来。为了让切下来的君子兰小芽成活率更高,在切的时候最好多带点根系,这样才更能生根快、生根多。

5、切下来的君子兰小芽和母株伤口上,都要撒点多菌灵粉末,以达到杀菌消毒的作用,之后放在阴凉通风处将伤口晾干。

6、伤口晾干后,即可进行上盆操作。土壤一定要选择疏松、透气的营养土,可以用园土、珍珠岩按照3:1的比例配置,还可以再掺点松针。

7、重新上盆后,放在阴凉通风的地方缓2-3周,让君子兰小芽能够适应新土壤重新生长。经过这样操作后,1株君子兰就能变成好几盆了!

吊兰
有些花友家里的吊兰养的特别好,不仅养成了瀑布,还长出了好多小吊兰。这些小吊兰剪下来就又成了新的吊兰了。各位花友是不是觉得特别方便?

操作方法:
1、用消过毒的剪刀,将吊兰母株上的小吊兰剪下来。

2、剪下来的小吊兰上最好要带点气生根,这样才更容易生根成活。

3、准备需要的土壤,土壤一定要疏松透气、排水性良好,可以用腐叶土和河沙按照3:1的比例混合而成,之后浇1次透水即可。

4、将小吊兰插入土壤中大概2-3cm的地方,之后放在阴凉通风的地方缓和一段时间,再正常养护即可。

兰花
花花身边养兰花的朋友不少,但是能够把兰花养得特别好的朋友却不多。毕竟兰花算是不太好养的花了,只是如果你能将一株兰花养好了,分分钟就能变成好几盆呢!

操作步骤:
1、在分株之前,要将兰花停水10-15天,这样脱盆后根系的水分比较少,操作起来也就不容易断根。脱盆的时候,先将花盆四周拍打一下,之后将花盆侧翻慢慢倒出来,记住千万别把新芽和根尖给碰坏了。

2、脱盆后,将兰花根系上的土壤清理干净,然后用清水清洗,将根系梳理整齐,露出白花花的根系。

3、用消过毒的剪刀,对兰花进行分株操作,保证每个兰花植株上都至少有1条健壮的根系。

4、将兰花分株后,浸泡在多菌灵溶液中大概半个小时以上,以达到杀菌消毒的目的,之后拿出来放在阴凉处晾干伤口。

5、将根系晾干后,重新上盆即可。养兰花的植料一定要疏松透气,陶粒、树皮、煤渣、木屑等全都可以。兰花上盆后,要浇1次透水,之后放在阴凉通风的地方缓1-2周即可。

文竹
现在不少人家里都养了文竹,想要让文竹1株变多株,也是可以采用分株的方法来繁殖的。

操作步骤:
1、想要给文竹分株,必须要保证文竹在2-3年以上的年限,同时它的根部新枝条萌发非常多,这样分株后的成活率才更高。

2、首先对文竹进行脱盆处理,然后用手轻轻拍打文竹的根部,让根系上的土脱落,记得动作一定要轻,否则会损伤根系。

3、用清水稍微冲洗一下根部,这个时候我们会发现,在文竹根系上有很多分生的节点,找到这些节点,轻轻一掰,就能分开了,千万别用蛮力强行分开,不然损伤了根系,不容易成活。

4、确定将植株分成多少。为了保证文竹的成活率,最好让每一株的根系都旺盛一些。花花用的这一株文竹,就可以分成3-4盆了。

5、在盆底垫点土,之后将分株好的文竹放进去,一只手扶着文竹,另外一只手填土,注意在分株的时候,根系一定要均匀地分布在花盆中,这样才有利于根系的成活。这样文竹的分株就完成啦!

白掌
很多人还是愿意把白掌叫做一帆风顺,毕竟这代表了不少人的美好祝愿。花花觉得,如果家里的白掌能一盆变多盆,是不是代表着下一年会更顺利?

操作步骤:
1、首先对白掌进行脱盆处理,将根系上的土壤清理干净。处理根系的时候,一定要小心一些,千万别损伤到根系。

2、将根系梳理一下,然后直接进行分株即可。分株的时候,要确保每个分开的植株上都有健壮的根系,这样才能保证分株后的成活率。

3、分株后,在阴凉通风的地方晾干伤口,随后上盆即可。盆土必须要保证疏松透气,可以用泥炭土、珍珠岩按照2:1的比例配置。

4、上盆后的白掌,要放在阴凉通风的地方缓1-2周,再转移到散射光下养护即可。

君子兰养了2-3年以上,就会在君子兰母株上爆出很多小芽。这些小芽切下来种在土里,就能变成新的君子兰了。

操作步骤:
1、发现家里的君子兰爆小芽了之后,不用管,等到小芽长出2-3片叶子的时候,再对君子兰进行脱盆处理。在脱盆前的1周内,最好不要浇水,以便盆土分离。

2、将花盆倒扣过来,一只手握住君子兰的根茎,另外一只手慢慢敲击花盆,从而让君子兰脱盆。脱盆后,将君子兰根系上的土壤清理干净。

3、将君子兰的根系浸泡在多菌灵溶液或高锰酸钾溶液中,大概20分钟即可,之后放在阴凉通风的地方将根系晾干。

4、根系晾干了后,用消毒后的小刀将带着君子兰小芽的根系切下来。为了让切下来的君子兰小芽成活率更高,在切的时候最好多带点根系,这样才更能生根快、生根多。

5、切下来的君子兰小芽和母株伤口上,都要撒点多菌灵粉末,以达到杀菌消毒的作用,之后放在阴凉通风处将伤口晾干。

6、伤口晾干后,即可进行上盆操作。土壤一定要选择疏松、透气的营养土,可以用园土、珍珠岩按照3:1的比例配置,还可以再掺点松针。

7、重新上盆后,放在阴凉通风的地方缓2-3周,让君子兰小芽能够适应新土壤重新生长。经过这样操作后,1株君子兰就能变成好几盆了!

吊兰
有些花友家里的吊兰养的特别好,不仅养成了瀑布,还长出了好多小吊兰。这些小吊兰剪下来就又成了新的吊兰了。各位花友是不是觉得特别方便?

操作方法:
1、用消过毒的剪刀,将吊兰母株上的小吊兰剪下来。

2、剪下来的小吊兰上最好要带点气生根,这样才更容易生根成活。

3、准备需要的土壤,土壤一定要疏松透气、排水性良好,可以用腐叶土和河沙按照3:1的比例混合而成,之后浇1次透水即可。

4、将小吊兰插入土壤中大概2-3cm的地方,之后放在阴凉通风的地方缓和一段时间,再正常养护即可。

兰花
花花身边养兰花的朋友不少,但是能够把兰花养得特别好的朋友却不多。毕竟兰花算是不太好养的花了,只是如果你能将一株兰花养好了,分分钟就能变成好几盆呢!

操作步骤:
1、在分株之前,要将兰花停水10-15天,这样脱盆后根系的水分比较少,操作起来也就不容易断根。脱盆的时候,先将花盆四周拍打一下,之后将花盆侧翻慢慢倒出来,记住千万别把新芽和根尖给碰坏了。

2、脱盆后,将兰花根系上的土壤清理干净,然后用清水清洗,将根系梳理整齐,露出白花花的根系。

3、用消过毒的剪刀,对兰花进行分株操作,保证每个兰花植株上都至少有1条健壮的根系。

4、将兰花分株后,浸泡在多菌灵溶液中大概半个小时以上,以达到杀菌消毒的目的,之后拿出来放在阴凉处晾干伤口。

5、将根系晾干后,重新上盆即可。养兰花的植料一定要疏松透气,陶粒、树皮、煤渣、木屑等全都可以。兰花上盆后,要浇1次透水,之后放在阴凉通风的地方缓1-2周即可。

文竹
现在不少人家里都养了文竹,想要让文竹1株变多株,也是可以采用分株的方法来繁殖的。

操作步骤:
1、想要给文竹分株,必须要保证文竹在2-3年以上的年限,同时它的根部新枝条萌发非常多,这样分株后的成活率才更高。

2、首先对文竹进行脱盆处理,然后用手轻轻拍打文竹的根部,让根系上的土脱落,记得动作一定要轻,否则会损伤根系。

3、用清水稍微冲洗一下根部,这个时候我们会发现,在文竹根系上有很多分生的节点,找到这些节点,轻轻一掰,就能分开了,千万别用蛮力强行分开,不然损伤了根系,不容易成活。

4、确定将植株分成多少。为了保证文竹的成活率,最好让每一株的根系都旺盛一些。花花用的这一株文竹,就可以分成3-4盆了。

5、在盆底垫点土,之后将分株好的文竹放进去,一只手扶着文竹,另外一只手填土,注意在分株的时候,根系一定要均匀地分布在花盆中,这样才有利于根系的成活。这样文竹的分株就完成啦!

白掌
很多人还是愿意把白掌叫做一帆风顺,毕竟这代表了不少人的美好祝愿。花花觉得,如果家里的白掌能一盆变多盆,是不是代表着下一年会更顺利?

操作步骤:
1、首先对白掌进行脱盆处理,将根系上的土壤清理干净。处理根系的时候,一定要小心一些,千万别损伤到根系。

2、将根系梳理一下,然后直接进行分株即可。分株的时候,要确保每个分开的植株上都有健壮的根系,这样才能保证分株后的成活率。

3、分株后,在阴凉通风的地方晾干伤口,随后上盆即可。盆土必须要保证疏松透气,可以用泥炭土、珍珠岩按照2:1的比例配置。

4、上盆后的白掌,要放在阴凉通风的地方缓1-2周,再转移到散射光下养护即可。

2
3
文章
权问薇
2017年09月17日

吸甲醛
1.#龟背竹
龟背竹可以说是吸甲醛能力最强的室内花卉,2小时内,在固定空间内能够吸收90%的甲醛,还能吸收苯和其他的挥发性有害气体。

养护要点:
喜欢湿润,平常1周浇水1-2次,保持盆土湿润就行,早晚往叶片及周围喷水保湿。
2.鸭掌木
鸭掌木又称鹅掌柴,它平均每个小时能把甲醛的浓度降低9毫克,对尼古丁和其他有害气体也有一定的净化作用。

养护要点:
耐旱,浇水宁干勿湿,盆土表面发白变干再浇水,放在通风散光的地方。
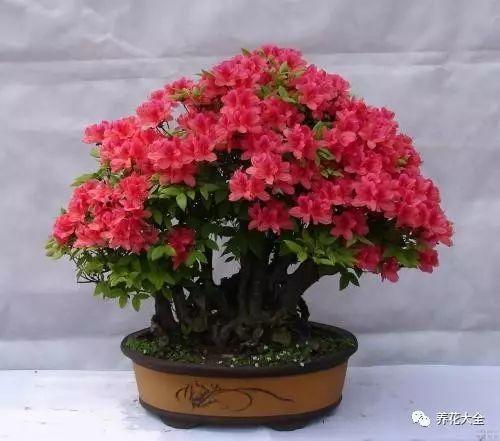
3.杜鹃
杜鹃对甲醛的吸收能力,仅次于龟背竹和鸭掌木,还能吸收空气中的氨,具有一定的滞尘功能。
养护要点:
喜欢酸性土壤,可以用松针土养护,室内放南阳台养护,喜湿,及时浇水但别积水。
吸二手烟
1.常春藤
常春藤叶片上的气孔,能够吸收尼古丁、甲醛、苯,将其转化为无害物质,还能吸收香烟燃烧产生的烟雾。

养护要点:
散光,放在东西阳台、客厅即可,浇水见干见湿,半月施1次豆饼肥,多喷水。
2.吸毒草
吸毒草,可以吸收香烟产生的尼古丁,并将其转化为无害物质,还能净化空气中的苯等其他有害物质。

养护要点:
喜欢湿润,3-5天浇水一次,或者看到叶子蔫了就浇清水或淘米水,长得特别快,枝条扦插容易活。
3.铁线蕨
铁线蕨能够吸收尼古丁、一氧化碳及吸烟过程中产生的其他有害物质,堪称生物净化器。

养护要点:
喜欢湿润,土面保持微润,每天往叶面喷水。耐阴,放在东西阳台或北阳台养护,每月施1次复合肥会长势更旺。
吸雾霾
1.龙血树
龙血树叶片茂密,具有很强滞尘和净化空气能力,特别是红边龙血和香龙血树,除此之外,它们还能吸收甲醛、二甲苯和三氯乙烯。

养护要点:
耐旱能力强,保持盆土略干,1个月浇水2-3次即可,耐阴,放在室内南阳台就行,不要室外暴晒。
2.孔雀竹芋
孔雀竹芋,不仅叶片大,而且表面有细小的绒毛,具有非常好的滞尘功能,有效吸附空气中的雾霾、甲苯、甲醛等有害气体。

养护要点:
耐阴能力强,室内阳台、客厅、卧室都能摆放,不要暴晒。喜欢湿润,保持盆土微润状态但别积水,冬天控制浇水,保持盆土微干。
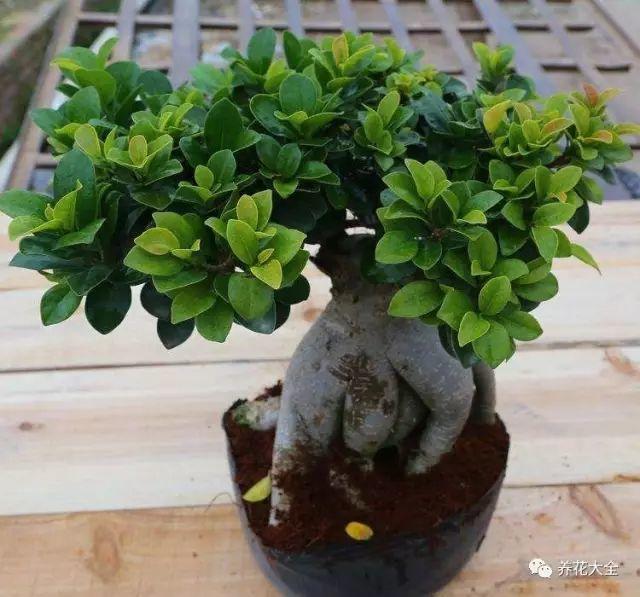
3.盆栽榕树
榕树盆栽,尤其是高山榕和人参榕,也具有非常棒的空气净化功能,茂密的叶片可以通过蒸腾作用,向空气中补充水分,滞留灰尘,还能有效吸收空气中的二氧化硫和氯气。
养护要点:
喜光,放南阳台养护,看到盆土发白了再浇水,浇就浇透,盆土里多掺点沙子防积水。放在离窗户近一点的地方,保持通风。
汽车尾气
1.苔藓
苔藓是对付汽车尾气的天热清道夫,波恩大学研究人员,经过长时间观察和实验发现,1平方米的苔藓能够吸收20克汽车尾气颗粒,而且它还能吸收汽车尾气中的有毒成分氨,将其转化为生物质。

养护要点:
苔藓在墙角路边非常常见,挖点回家养就行。苔藓喜欢湿润,每天要往上面喷水保湿。放在散光阴凉的地方养护,不要暴晒。
2.米兰
可以吸收汽车尾气中的二氧化硫、氯气、二氧化碳,而且它开花后还会散发出具有杀菌作用的挥发油,对人体健康有益。

养护要点:
喜欢光照,放在阳光充足的地方。喜欢湿润,盆土要长期处于微微湿润状态,但别积水,春夏秋每月施一次花生饼肥或者复合肥,不要施氮肥太多。
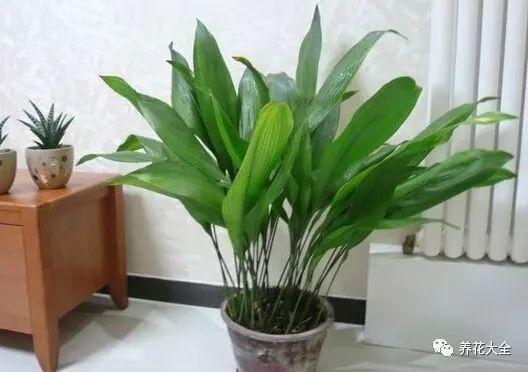
3.一叶兰
一叶兰叶片宽大,具有很好的吸附灰尘作用,而且还能吸收空气中的二氧化碳、氟化氢。
养护要点:
喜欢湿润的环境,也耐旱,保持不干不浇,不要积水。耐阴,室内养护即可,不要暴晒。
吸油烟
1.绿萝
绿萝能够吸收厨房烟雾中的有害物质,以及空气中的三氯乙烯、甲醛、苯等,而且厨房湿气大正适合绿萝生长哦!

养护要点:
喜欢湿润,1周浇水1-2次,用淘米水浇长得更快。平常多向叶面喷水,保持叶片翠绿。散光养护,避免过于荫蔽。
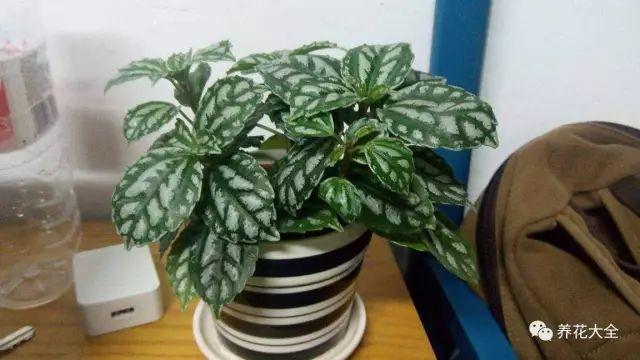
2.冷水花
冷水花能够吸收空气中的污染物和有毒物质,而且生性强健,摆放在通风光照不佳的厨房也能活。
养护要点:
冷水花耐旱,平常看到盆土干裂了再浇水。放在厨房光照相对较好的地方,会长得更快、更好。
3.琴叶榕
琴叶榕,叶片硕大,不仅能够吸收空气中的尘埃和油烟,还对粉尘和二手烟也有一定的吸收作用。

养护要点:
琴叶榕枝高叶大,能吸收空气中的尘埃和油烟,对二手烟和粉尘也有一定的吸收作用。还能吸收烟气等有害气体,增加空气中负离子含量,提高空气温度。
降低电磁辐射伤害
1.仙人球
仙人球不仅能减少电磁辐射对人体的伤害,还具有吸附灰尘、净化空气的作用。可以在电脑桌前排1棵。

养护要点:
怕涝,一个月浇水1-2次即可。条件允许的话,就放在光照好的地方晒晒太阳,会长得更快。
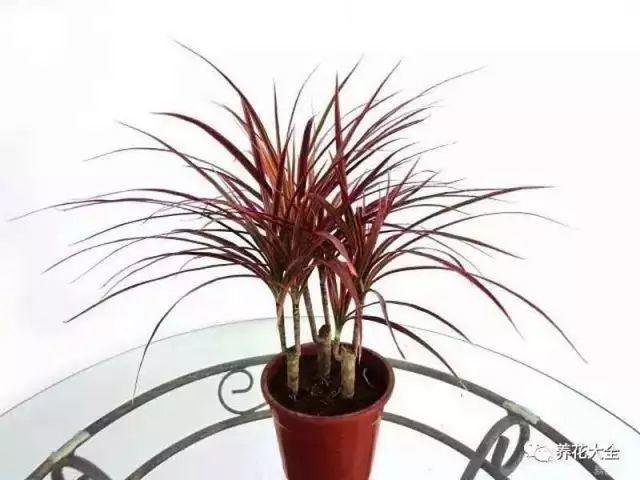
2.千年木
千年木的叶片和根部能够有效吸收三氯乙烯、苯、甲醛,而且也会降低电磁辐射对人体的伤害。
养护要点:
喜欢湿润,保持土壤微润。喜欢散光环境,不要暴晒。多往叶面喷水可以防止干尖。
3.量天尺
量天尺,对于甲醛、、氡、TVOC(总挥发性有机物)具有吸附作用,也能降低电磁辐射对人体的伤害。

养护要点:
喜欢光照,多晒太阳。耐旱怕涝,土壤多掺沙防烂根。每半月施1次腐熟液肥。
吸附灰尘
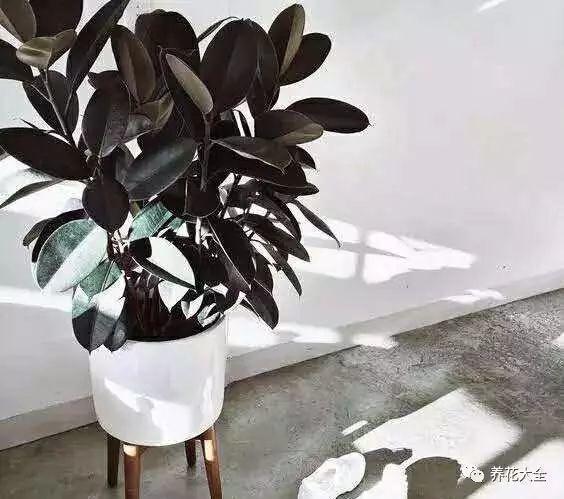
1.橡皮树
橡皮树叶面宽大,而且带有非常细小的绒毛,能够有效吸附空气中的灰尘、粉尘,还能有效吸收一氧化碳、氟化氢等有害气体。
养护要点:
耐旱能力强,盆土表面发白很干的时候再浇透水。放在光照充足的地方,以免徒长,徒长后可以通过短截促进侧枝萌发。
2.巴西木
巴西木不仅叶片宽大,具有非常强大的滞尘功能,而且还能吸收空气中的苯、三氯乙烯、二氧化硫等有害气体。

养护要点:
耐旱能力强,一般一个月浇水2-3次即可。多往叶片上喷水保湿,每月往盆里扔几粒复合肥颗粒。
3.君子兰
君子兰叶片厚实、宽大,含有很多的绒毛和气孔,并且能分泌大量黏液,吸收掉空气中的烟尘和粉尘,净化空气。

养护要点:
室内散光环境养花最佳,浇水不干不浇,摸到表面土壤干了再浇。春秋换盆的时候施底肥,底肥可以用炒熟的瓜子也可以用麻籽。
空气净化全能选手
1.芦荟
芦荟是天然的空气净化器,1盆接受4小时光照的芦荟,可以消除1平方空气中90%的甲醛。而且它不仅能够杀灭空气中的部分有害微生物,吸附灰尘、粉尘,还能吸收二氧化硫、一氧化碳、甲醛等有害物质。

养护要点:
耐旱,平时看到盆土表面干了再浇水。非常耐阴,但是多晒太阳会让它长得更快!
2.吊兰
在8-10平米的房间内,吊兰相当于一个空气净化器,能够吸收空气中的一氧化碳、甲醛、过氧化氮等有害气体。

养护要点:
吊兰耐阴,适合放室内养,平常1-2周浇1次水。每月撒几粒尿素或缓释肥,或者自己沤的豆饼肥。
3.虎皮兰
1盆虎皮兰,就可以吸收普通房间里80%的有害气体。2盆虎皮兰就可以把房间里的空气完全净化,堪称“治污能手”。
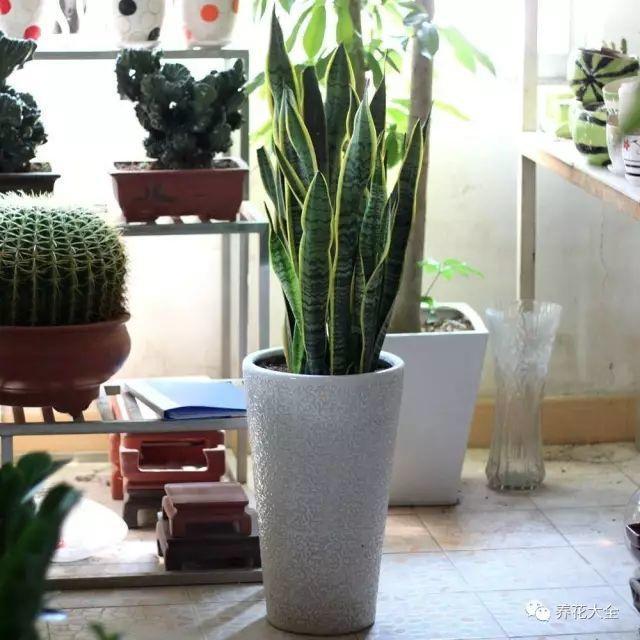
养护要点:
虎皮兰耐旱,容易烂根,大概1个月2-3次即可。土壤里多掺沙子,不积水。
1.#龟背竹
龟背竹可以说是吸甲醛能力最强的室内花卉,2小时内,在固定空间内能够吸收90%的甲醛,还能吸收苯和其他的挥发性有害气体。

养护要点:
喜欢湿润,平常1周浇水1-2次,保持盆土湿润就行,早晚往叶片及周围喷水保湿。
2.鸭掌木
鸭掌木又称鹅掌柴,它平均每个小时能把甲醛的浓度降低9毫克,对尼古丁和其他有害气体也有一定的净化作用。

养护要点:
耐旱,浇水宁干勿湿,盆土表面发白变干再浇水,放在通风散光的地方。
3.杜鹃
杜鹃对甲醛的吸收能力,仅次于龟背竹和鸭掌木,还能吸收空气中的氨,具有一定的滞尘功能。

养护要点:
喜欢酸性土壤,可以用松针土养护,室内放南阳台养护,喜湿,及时浇水但别积水。
吸二手烟
1.常春藤
常春藤叶片上的气孔,能够吸收尼古丁、甲醛、苯,将其转化为无害物质,还能吸收香烟燃烧产生的烟雾。

养护要点:
散光,放在东西阳台、客厅即可,浇水见干见湿,半月施1次豆饼肥,多喷水。
2.吸毒草
吸毒草,可以吸收香烟产生的尼古丁,并将其转化为无害物质,还能净化空气中的苯等其他有害物质。

养护要点:
喜欢湿润,3-5天浇水一次,或者看到叶子蔫了就浇清水或淘米水,长得特别快,枝条扦插容易活。
3.铁线蕨
铁线蕨能够吸收尼古丁、一氧化碳及吸烟过程中产生的其他有害物质,堪称生物净化器。

养护要点:
喜欢湿润,土面保持微润,每天往叶面喷水。耐阴,放在东西阳台或北阳台养护,每月施1次复合肥会长势更旺。
吸雾霾
1.龙血树
龙血树叶片茂密,具有很强滞尘和净化空气能力,特别是红边龙血和香龙血树,除此之外,它们还能吸收甲醛、二甲苯和三氯乙烯。

养护要点:
耐旱能力强,保持盆土略干,1个月浇水2-3次即可,耐阴,放在室内南阳台就行,不要室外暴晒。
2.孔雀竹芋
孔雀竹芋,不仅叶片大,而且表面有细小的绒毛,具有非常好的滞尘功能,有效吸附空气中的雾霾、甲苯、甲醛等有害气体。

养护要点:
耐阴能力强,室内阳台、客厅、卧室都能摆放,不要暴晒。喜欢湿润,保持盆土微润状态但别积水,冬天控制浇水,保持盆土微干。
3.盆栽榕树
榕树盆栽,尤其是高山榕和人参榕,也具有非常棒的空气净化功能,茂密的叶片可以通过蒸腾作用,向空气中补充水分,滞留灰尘,还能有效吸收空气中的二氧化硫和氯气。

养护要点:
喜光,放南阳台养护,看到盆土发白了再浇水,浇就浇透,盆土里多掺点沙子防积水。放在离窗户近一点的地方,保持通风。
汽车尾气
1.苔藓
苔藓是对付汽车尾气的天热清道夫,波恩大学研究人员,经过长时间观察和实验发现,1平方米的苔藓能够吸收20克汽车尾气颗粒,而且它还能吸收汽车尾气中的有毒成分氨,将其转化为生物质。

养护要点:
苔藓在墙角路边非常常见,挖点回家养就行。苔藓喜欢湿润,每天要往上面喷水保湿。放在散光阴凉的地方养护,不要暴晒。
2.米兰
可以吸收汽车尾气中的二氧化硫、氯气、二氧化碳,而且它开花后还会散发出具有杀菌作用的挥发油,对人体健康有益。

养护要点:
喜欢光照,放在阳光充足的地方。喜欢湿润,盆土要长期处于微微湿润状态,但别积水,春夏秋每月施一次花生饼肥或者复合肥,不要施氮肥太多。
3.一叶兰
一叶兰叶片宽大,具有很好的吸附灰尘作用,而且还能吸收空气中的二氧化碳、氟化氢。

养护要点:
喜欢湿润的环境,也耐旱,保持不干不浇,不要积水。耐阴,室内养护即可,不要暴晒。
吸油烟
1.绿萝
绿萝能够吸收厨房烟雾中的有害物质,以及空气中的三氯乙烯、甲醛、苯等,而且厨房湿气大正适合绿萝生长哦!

养护要点:
喜欢湿润,1周浇水1-2次,用淘米水浇长得更快。平常多向叶面喷水,保持叶片翠绿。散光养护,避免过于荫蔽。
2.冷水花
冷水花能够吸收空气中的污染物和有毒物质,而且生性强健,摆放在通风光照不佳的厨房也能活。

养护要点:
冷水花耐旱,平常看到盆土干裂了再浇水。放在厨房光照相对较好的地方,会长得更快、更好。
3.琴叶榕
琴叶榕,叶片硕大,不仅能够吸收空气中的尘埃和油烟,还对粉尘和二手烟也有一定的吸收作用。

养护要点:
琴叶榕枝高叶大,能吸收空气中的尘埃和油烟,对二手烟和粉尘也有一定的吸收作用。还能吸收烟气等有害气体,增加空气中负离子含量,提高空气温度。
降低电磁辐射伤害
1.仙人球
仙人球不仅能减少电磁辐射对人体的伤害,还具有吸附灰尘、净化空气的作用。可以在电脑桌前排1棵。

养护要点:
怕涝,一个月浇水1-2次即可。条件允许的话,就放在光照好的地方晒晒太阳,会长得更快。
2.千年木
千年木的叶片和根部能够有效吸收三氯乙烯、苯、甲醛,而且也会降低电磁辐射对人体的伤害。

养护要点:
喜欢湿润,保持土壤微润。喜欢散光环境,不要暴晒。多往叶面喷水可以防止干尖。
3.量天尺
量天尺,对于甲醛、、氡、TVOC(总挥发性有机物)具有吸附作用,也能降低电磁辐射对人体的伤害。

养护要点:
喜欢光照,多晒太阳。耐旱怕涝,土壤多掺沙防烂根。每半月施1次腐熟液肥。
吸附灰尘
1.橡皮树
橡皮树叶面宽大,而且带有非常细小的绒毛,能够有效吸附空气中的灰尘、粉尘,还能有效吸收一氧化碳、氟化氢等有害气体。

养护要点:
耐旱能力强,盆土表面发白很干的时候再浇透水。放在光照充足的地方,以免徒长,徒长后可以通过短截促进侧枝萌发。
2.巴西木
巴西木不仅叶片宽大,具有非常强大的滞尘功能,而且还能吸收空气中的苯、三氯乙烯、二氧化硫等有害气体。

养护要点:
耐旱能力强,一般一个月浇水2-3次即可。多往叶片上喷水保湿,每月往盆里扔几粒复合肥颗粒。
3.君子兰
君子兰叶片厚实、宽大,含有很多的绒毛和气孔,并且能分泌大量黏液,吸收掉空气中的烟尘和粉尘,净化空气。

养护要点:
室内散光环境养花最佳,浇水不干不浇,摸到表面土壤干了再浇。春秋换盆的时候施底肥,底肥可以用炒熟的瓜子也可以用麻籽。
空气净化全能选手
1.芦荟
芦荟是天然的空气净化器,1盆接受4小时光照的芦荟,可以消除1平方空气中90%的甲醛。而且它不仅能够杀灭空气中的部分有害微生物,吸附灰尘、粉尘,还能吸收二氧化硫、一氧化碳、甲醛等有害物质。

养护要点:
耐旱,平时看到盆土表面干了再浇水。非常耐阴,但是多晒太阳会让它长得更快!
2.吊兰
在8-10平米的房间内,吊兰相当于一个空气净化器,能够吸收空气中的一氧化碳、甲醛、过氧化氮等有害气体。

养护要点:
吊兰耐阴,适合放室内养,平常1-2周浇1次水。每月撒几粒尿素或缓释肥,或者自己沤的豆饼肥。
3.虎皮兰
1盆虎皮兰,就可以吸收普通房间里80%的有害气体。2盆虎皮兰就可以把房间里的空气完全净化,堪称“治污能手”。

养护要点:
虎皮兰耐旱,容易烂根,大概1个月2-3次即可。土壤里多掺沙子,不积水。
0
2
文章
权问薇
2017年09月17日

换盆
1、在换盆之前,记得先停水1周,这样可以让泥土和花盆脱离。
2、将#君子兰 脱盆的时候要注意,可以一手握住君子兰的鳞茎,一手翻转花盆,把君子兰拿出来。
3、轻拍土团,先把一些比较送的土拍掉,之后用水将君子兰的根部冲洗干净。

4、观察根系,把老根、枯根、发黑的根系切除掉。

5、把根部泡在多菌灵溶液中,半个小时之后,拿出来阴干。

6、配置土壤,别忽视了这一步哦,要知道土壤配好了,养君子兰也就事半功倍了!比较合适的配比为田园土5份,腐叶土3份,河沙2份。
同时在花盆底部埋进去一些瓜子、缓释肥当做底肥。在上面盖一层3~5cm的土壤,避免根系直接接触土壤。

7、上盆之前,先用土把君子兰根系中间的部分填满,然后再上盆,注意要一边填土一边拍打花盆,避免中间出现空隙。

8、浇透水,放在阴凉通风的地方1~2天,之后拿出去晒太阳即可。

施肥
1液体肥
1、追肥要在缓根之后进行哦,记得换盆之后不要立刻进行施肥。
可以用豆饼、麻籽饼、花生饼、葵花籽、大、小麻籽等,粉粹之后浸泡在水里进行发酵,时间最好是1年以上,越长越好。
使用的时候取出来上层液体,按照1:50的比例进行配置,灌根即可,大约7~10天1次。

2、将淡水鱼,像是鲤鱼啊,鲫鱼啊之类的鳞、鳍、骨、头等,兑水浸泡使用,不过也是要发酵完全之后才能使用,这种自制花肥里含有丰富的磷钾肥,能让君子兰多开花。

3、也可以用动物的血、骨头之类的浸水发酵。
注意:液肥必须是充分发酵之后的,没有充分发酵的液体肥通常会很臭,而且还会有烧根的风险,建议最少使用发酵了1年以上的哦!

2固体肥
1、大麻籽(蓖麻籽)、小麻籽、葵花籽、芝麻等,要炒熟之后使用。建议在换盆的时候埋进盆底即可。

2、鸡粪肥等动物粪便发酵完全之后形成的肥料。追肥的时候可以在君子兰盆壁的附近挖个小孔埋进去。

3、动物血粉、动物骨粉,注意,是进行了干燥粉碎或者是焙烧粉碎之后的才能用。可以放进盆底,也可以挖个小孔当做追肥。

光照
君子兰一个夏天都在阴凉处养护,但是随着温度的降低,君子兰已经开始从休眠期中醒过来,所以,这个时候的光照就变得很重要了。
将君子兰放在隔着玻璃的南阳台上,不仅光照充足,而且玻璃能够隔绝紫外线,让君子兰能够不至于被灼伤。
同时,每隔1周的时间就要将君子兰旋转180度,为的是避免君子兰的叶片变得散乱。
浇水
君子兰的浇水也要逐渐增加,夏天大约是1周浇水1次,那么现在可以渐渐减少浇水的间隔,可以慢慢增加到5天左右浇水1次。
家里用自来水的,每次浇水之前,先把自来水放到不碍事儿的地方静置2~3的时间,去除水里的氯气。

分株
成熟的君子兰几乎每年都会在根茎处萌发幼芽,花友们可以在春天给君子兰换盆时将这些小芽分出来,养几天就又是一盆新花了!

1、把君子兰从盆中脱出,注意力度不要太大,避免损伤根系。

2、清理干净根系的泥土,观察根系。

3、把小芽小心地掰下来,最好能带着一部分根系,能提高成活率。

4、清理根系,剪掉老根、枯根、腐烂的根系。

5、把君子兰根部浸泡在在多菌灵溶液(多菌灵:水=1:2000)中20-30分钟,消毒。

6、然后拿出来君子兰,放在阴凉通风处晾干,为了安全起见,伤口处可以再涂抹一些多菌灵。

7、根部晾干后,就可以重新上盆了!
按照腐叶土:松针土:河沙=3:2:1的比例配置盆土,对于无根的小芽,要提高一下沙子的比重。

8、上盆后浇水,直到水从花盆底部的透水孔中渗出为止。
之后将君子兰放在阴凉通风处,等新叶长出后就可以正常养护了!

秋老虎
一些地区的秋老虎还没有发威,但是也不放松警惕哦!
应对秋老虎最关键的一点儿就是通风,所以一定要把君子兰放在通风好的地方啊!

1、在换盆之前,记得先停水1周,这样可以让泥土和花盆脱离。
2、将#君子兰 脱盆的时候要注意,可以一手握住君子兰的鳞茎,一手翻转花盆,把君子兰拿出来。
3、轻拍土团,先把一些比较送的土拍掉,之后用水将君子兰的根部冲洗干净。

4、观察根系,把老根、枯根、发黑的根系切除掉。

5、把根部泡在多菌灵溶液中,半个小时之后,拿出来阴干。

6、配置土壤,别忽视了这一步哦,要知道土壤配好了,养君子兰也就事半功倍了!比较合适的配比为田园土5份,腐叶土3份,河沙2份。
同时在花盆底部埋进去一些瓜子、缓释肥当做底肥。在上面盖一层3~5cm的土壤,避免根系直接接触土壤。

7、上盆之前,先用土把君子兰根系中间的部分填满,然后再上盆,注意要一边填土一边拍打花盆,避免中间出现空隙。

8、浇透水,放在阴凉通风的地方1~2天,之后拿出去晒太阳即可。

施肥
1液体肥
1、追肥要在缓根之后进行哦,记得换盆之后不要立刻进行施肥。
可以用豆饼、麻籽饼、花生饼、葵花籽、大、小麻籽等,粉粹之后浸泡在水里进行发酵,时间最好是1年以上,越长越好。
使用的时候取出来上层液体,按照1:50的比例进行配置,灌根即可,大约7~10天1次。

2、将淡水鱼,像是鲤鱼啊,鲫鱼啊之类的鳞、鳍、骨、头等,兑水浸泡使用,不过也是要发酵完全之后才能使用,这种自制花肥里含有丰富的磷钾肥,能让君子兰多开花。

3、也可以用动物的血、骨头之类的浸水发酵。
注意:液肥必须是充分发酵之后的,没有充分发酵的液体肥通常会很臭,而且还会有烧根的风险,建议最少使用发酵了1年以上的哦!

2固体肥
1、大麻籽(蓖麻籽)、小麻籽、葵花籽、芝麻等,要炒熟之后使用。建议在换盆的时候埋进盆底即可。

2、鸡粪肥等动物粪便发酵完全之后形成的肥料。追肥的时候可以在君子兰盆壁的附近挖个小孔埋进去。

3、动物血粉、动物骨粉,注意,是进行了干燥粉碎或者是焙烧粉碎之后的才能用。可以放进盆底,也可以挖个小孔当做追肥。

光照
君子兰一个夏天都在阴凉处养护,但是随着温度的降低,君子兰已经开始从休眠期中醒过来,所以,这个时候的光照就变得很重要了。
将君子兰放在隔着玻璃的南阳台上,不仅光照充足,而且玻璃能够隔绝紫外线,让君子兰能够不至于被灼伤。
同时,每隔1周的时间就要将君子兰旋转180度,为的是避免君子兰的叶片变得散乱。
浇水
君子兰的浇水也要逐渐增加,夏天大约是1周浇水1次,那么现在可以渐渐减少浇水的间隔,可以慢慢增加到5天左右浇水1次。
家里用自来水的,每次浇水之前,先把自来水放到不碍事儿的地方静置2~3的时间,去除水里的氯气。

分株
成熟的君子兰几乎每年都会在根茎处萌发幼芽,花友们可以在春天给君子兰换盆时将这些小芽分出来,养几天就又是一盆新花了!

1、把君子兰从盆中脱出,注意力度不要太大,避免损伤根系。

2、清理干净根系的泥土,观察根系。

3、把小芽小心地掰下来,最好能带着一部分根系,能提高成活率。

4、清理根系,剪掉老根、枯根、腐烂的根系。

5、把君子兰根部浸泡在在多菌灵溶液(多菌灵:水=1:2000)中20-30分钟,消毒。

6、然后拿出来君子兰,放在阴凉通风处晾干,为了安全起见,伤口处可以再涂抹一些多菌灵。

7、根部晾干后,就可以重新上盆了!
按照腐叶土:松针土:河沙=3:2:1的比例配置盆土,对于无根的小芽,要提高一下沙子的比重。

8、上盆后浇水,直到水从花盆底部的透水孔中渗出为止。
之后将君子兰放在阴凉通风处,等新叶长出后就可以正常养护了!

秋老虎
一些地区的秋老虎还没有发威,但是也不放松警惕哦!
应对秋老虎最关键的一点儿就是通风,所以一定要把君子兰放在通风好的地方啊!

1
1
文章
权问薇
2017年09月17日


一、#盆栽竹子 的施肥技巧
1、刚刚栽种竹子时应该使用酸性或中性土壤,土壤里最好含有一些砂质,农田土也可。刚种植入盆时就可以适当的放入点有机肥了。
1、盆栽竹子是喜欢水的,但是大家往往没注意到。为什么呢?竹子生命力很旺盛,所以施肥浇水的时候都可以量稍微大一点,这样它们才能更好的生长。
2、盆栽竹子的施肥时间可以定为一个月一次,这个速度相对来说是对竹子最好的。
二、盆栽竹子施什么肥
1、盆栽竹子尽量使用有机肥,此种肥料中有大量的钾钙元素,竹子生长全靠它。除了对竹子本身比较好以外,还能减少污染,何乐而不为。
2、生长过程中缺肥或施肥过量都会引起疾病,所以要注意施基础肥料。因为盆栽的营养有限,春夏时节肥要薄,次数可以稍勤一点,不断补充盆土养分。
3、盆栽竹子一定要用有机肥。

温馨提示
给盆栽竹子施肥的问题解决了总会问到浇水怎么办。竹子是非常喜欢水的植物,所以盆土要处于水润状态,不能缺水。环境如果干燥,可以选择稍微多浇水,还有,在生长黄金时期应该多浇水。

1
1
文章
Dummer. ゛☀
2017年09月17日

Thrips are small (1/5th inch), fringe-winged, pale-colored insects. Normally, they are responsible for negligible problems on houseplants, but plants in the Gesneriaceae family (African violet) and Commelinaceae family (Wandering Jew) are prone to attack.
Symptoms and Diagnosis
Thrips are rarely seen because of their small size. The insects feed by puncturing the surface of the plant parts with their single large mandible and slurping the plant juices that seep from the wound. Flowers or leaves may develop silvery streaks. Heavily infested leaves appear brownish or silvery, and growing points may become contorted. Some species of thrips leave sooty spots of black fecal matter on the leaves. Thrips also vector plant diseases. Light blue cards coated with a thin film of oil suspended within two feet above indoor plants can be used as indicator traps. Winged adults caught on the card indicate the presence of thrips.
Life Cycle
Female thrips lay their eggs in tiny slits cut into the surface of leaves, flowers, and stems. The eggs can be laid any time of year and hatch within a few days in warm, indoor conditions. The young, called nymphs, are cream to pale green and only visible with magnification. They feed for 7–14 days. Fullgrown nymphs, in most species, drop off the plant to the soil where they burrow down and pupate. Winged adults emerge to complete the cycle.
Integrated Pest Management Strategies
1. Keep plants moist. Plants that are kept too dry are more likely to be damaged by thrips. To limit damage or reduce future damage after other initial control measures are used, keep plants moist and increase humidity.
2. Insecticidal soap. Insecticidal soaps, which are considered nontoxic to humans and pets, give good control. Be sure that flowers and growing tips are well covered with the spray. Frequent sprays may be needed until the problem is under control.
3. Use superior horticultural oil sprays. Highly refined oils sold as superior or horticultural oils will also control thrips. The oil suffocates the insects. These oils are highly refined and under proper conditions, can be applied to plants in foliage without damage. Follow label directions to avoid damage to some plants that may be sensitive. Superior oils are also considered nontoxic and are less likely to harm beneficial insects. When spraying indoors, protect surfaces that may be damaged by an oil residue.
4. Use chemical insecticides. Many insecticides registered for use indoors are available. Sprays containing pyrethrins, a plant-derived insecticide, are effective and more benign than other chemical pesticides. Follow label directions and, if possible, spray out-of-doors or in a garage, weather permitting.
5. To limit future problems, inspect plants regularly. With regular inspection, pest problems can be caught when just beginning and control is easier. It is also recommended to isolate newly acquired plants for 2–3 weeks to limit introducing pests indoors. Bringing plants indoors in the fall is another way of introducing insects indoors.

Symptoms and Diagnosis
Thrips are rarely seen because of their small size. The insects feed by puncturing the surface of the plant parts with their single large mandible and slurping the plant juices that seep from the wound. Flowers or leaves may develop silvery streaks. Heavily infested leaves appear brownish or silvery, and growing points may become contorted. Some species of thrips leave sooty spots of black fecal matter on the leaves. Thrips also vector plant diseases. Light blue cards coated with a thin film of oil suspended within two feet above indoor plants can be used as indicator traps. Winged adults caught on the card indicate the presence of thrips.

Life Cycle
Female thrips lay their eggs in tiny slits cut into the surface of leaves, flowers, and stems. The eggs can be laid any time of year and hatch within a few days in warm, indoor conditions. The young, called nymphs, are cream to pale green and only visible with magnification. They feed for 7–14 days. Fullgrown nymphs, in most species, drop off the plant to the soil where they burrow down and pupate. Winged adults emerge to complete the cycle.
Integrated Pest Management Strategies
1. Keep plants moist. Plants that are kept too dry are more likely to be damaged by thrips. To limit damage or reduce future damage after other initial control measures are used, keep plants moist and increase humidity.

2. Insecticidal soap. Insecticidal soaps, which are considered nontoxic to humans and pets, give good control. Be sure that flowers and growing tips are well covered with the spray. Frequent sprays may be needed until the problem is under control.
3. Use superior horticultural oil sprays. Highly refined oils sold as superior or horticultural oils will also control thrips. The oil suffocates the insects. These oils are highly refined and under proper conditions, can be applied to plants in foliage without damage. Follow label directions to avoid damage to some plants that may be sensitive. Superior oils are also considered nontoxic and are less likely to harm beneficial insects. When spraying indoors, protect surfaces that may be damaged by an oil residue.

4. Use chemical insecticides. Many insecticides registered for use indoors are available. Sprays containing pyrethrins, a plant-derived insecticide, are effective and more benign than other chemical pesticides. Follow label directions and, if possible, spray out-of-doors or in a garage, weather permitting.
5. To limit future problems, inspect plants regularly. With regular inspection, pest problems can be caught when just beginning and control is easier. It is also recommended to isolate newly acquired plants for 2–3 weeks to limit introducing pests indoors. Bringing plants indoors in the fall is another way of introducing insects indoors.
0
0
文章
Dummer. ゛☀
2017年09月17日

Spider mites are spiders, not insects. They have 8 legs; insects have only 6. Regardless, they are a serious pest both indoors and out. Spider mites are very small, only about 1/50 of an inch long, and so are difficult to see. They have piercing-sucking mouth parts for feeding on plant sap. They can multiply rapidly and in large numbers, cause leaves to take on a dusty, dull appearance. Leaves then yellow and drop or turn brown or tan.
Symptoms and Diagnosis
Since the mites are so small, the first sign is generally a plant that looks dull or in poor health. Leaves may appear stippled and curled. Fine webbing may also be evident under the leaves or between the leaf and the stem. When a leaf or branch is tapped over a white sheet of paper, small specks that appear as dust or pepper may be seen to move.
Life Cycle
Spider mites can go from egg to mature adult in less than two weeks. Indoors as well as outdoors, several generations occur each year.
Integrated Pest Management Strategies
1. Remove mites. Dislodge as many mites as possible using a strong stream of water. Done on a regular basis, this can reduce populations dramatically. Wash the plants either outdoors or in the shower. Protect the soil so it is not washed out of the pot by the spray.
2. Use insecticidal soap. Many insecticidal soaps are also effective in controlling mites so check the label. Other soap products may actually be labeled as miticidal sprays. These soaps are specially formulated to kill mites and not damage plants. They can be very effective if used frequently until the problem is under control.
3. Use superior horticultural oil sprays. Highly refined oils sold as superior or horticultural oils are also very effective in controlling mites. The oil suffocates the mites. Unlike dormant oils, these oils are highly refined and under proper conditions, can be applied to plants in foliage without damage. Follow label directions to avoid damage to some plants that may be sensitive. Superior oils are also considered nontoxic and are less harmful to beneficial insects. When spraying indoors, protect surfaces that may be damaged by an oil residue.
4. Use chemical miticides. Many miticides registered for use indoors are available. Follow directions and if possible, spray out-of-doors or in a garage, weather permitting. Check label for control of spider mites.
5. To limit future problems, inspect plants regularly. With regular inspection, pest problems can be caught when just beginning and control is easier. It is also recommended to isolate newly acquired plants for 2–3 weeks to limit introducing pests indoors. Bringing plants indoors in the fall is another way of introducing mites indoors.

Symptoms and Diagnosis
Since the mites are so small, the first sign is generally a plant that looks dull or in poor health. Leaves may appear stippled and curled. Fine webbing may also be evident under the leaves or between the leaf and the stem. When a leaf or branch is tapped over a white sheet of paper, small specks that appear as dust or pepper may be seen to move.
Life Cycle
Spider mites can go from egg to mature adult in less than two weeks. Indoors as well as outdoors, several generations occur each year.

Integrated Pest Management Strategies
1. Remove mites. Dislodge as many mites as possible using a strong stream of water. Done on a regular basis, this can reduce populations dramatically. Wash the plants either outdoors or in the shower. Protect the soil so it is not washed out of the pot by the spray.
2. Use insecticidal soap. Many insecticidal soaps are also effective in controlling mites so check the label. Other soap products may actually be labeled as miticidal sprays. These soaps are specially formulated to kill mites and not damage plants. They can be very effective if used frequently until the problem is under control.

3. Use superior horticultural oil sprays. Highly refined oils sold as superior or horticultural oils are also very effective in controlling mites. The oil suffocates the mites. Unlike dormant oils, these oils are highly refined and under proper conditions, can be applied to plants in foliage without damage. Follow label directions to avoid damage to some plants that may be sensitive. Superior oils are also considered nontoxic and are less harmful to beneficial insects. When spraying indoors, protect surfaces that may be damaged by an oil residue.
4. Use chemical miticides. Many miticides registered for use indoors are available. Follow directions and if possible, spray out-of-doors or in a garage, weather permitting. Check label for control of spider mites.

5. To limit future problems, inspect plants regularly. With regular inspection, pest problems can be caught when just beginning and control is easier. It is also recommended to isolate newly acquired plants for 2–3 weeks to limit introducing pests indoors. Bringing plants indoors in the fall is another way of introducing mites indoors.
0
0
文章
Dummer. ゛☀
2017年09月17日

Mealybugs are common pests of indoor plants. They can also be serious pests of outdoor plants in warmer climates, such as Florida and California.
Symptoms and Diagnosis
Adult females are oval, 1/5 to 1/3 inch long, and have a waxy, white, cottony appearance. They are slow moving and usually are in clusters along leaf veins, on the underside of leaves, and in hidden areas at joints. They are piercing-sucking insects, which feed on plant sap. The insects exude a honeydew, which can cause leaves to become sticky. Ants may be attracted to the sweet liquid. In time, a black mold, called sooty mold, can grow on the honeydew giving the leaves a dirty, sooty appearance. Plants infested with mealybugs become weak, may wilt and turn yellow, and eventually die.
Life Cycle
Indoors, eggs can be laid any time of year. Eggs hatch in about 2 weeks. The young mature in 6–8 weeks. Several generations can occur in the same year.
Integrated Pest Management Strategies
1. Remove insects. Dislodge as many insects as possible using a strong stream of water. A cotton swab soaked in rubbing alcohol will also effectively remove a few insects.
2. Use insecticidal soap. Insecticidal soaps specially formulated to kill insects and not damage plants are effective if used frequently until the problem is under control.
3. Use superior oil sprays. Highly refined oils sold as superior or horticultural oils are also very effective in controlling mealybugs. The oil suffocates the insects. Unlike dormant oils, these oils are highly refined and under proper conditions, can be applied to plants in foliage without damage. Follow label directions to avoid damage to some plants that may be sensitive. Superior oils are also considered nontoxic and are less likely to harm beneficial insects. When spraying indoors, protect surfaces that may be damaged by an oil residue.
4. Use chemical insecticides. Many insecticides registered for use indoors are available. Follow directions and, if possible, spray out-of-doors or in a garage, weather permitting.
5. To limit future problems, inspect plants regularly. With regular inspection, pest problems can be caught when just beginning and control is easier. It is also recommended to isolate newly acquired plants for 2–3 weeks to limit introducing pests indoors. Bringing plants indoors in the fall is another way of introducing insects indoors.

Symptoms and Diagnosis
Adult females are oval, 1/5 to 1/3 inch long, and have a waxy, white, cottony appearance. They are slow moving and usually are in clusters along leaf veins, on the underside of leaves, and in hidden areas at joints. They are piercing-sucking insects, which feed on plant sap. The insects exude a honeydew, which can cause leaves to become sticky. Ants may be attracted to the sweet liquid. In time, a black mold, called sooty mold, can grow on the honeydew giving the leaves a dirty, sooty appearance. Plants infested with mealybugs become weak, may wilt and turn yellow, and eventually die.

Life Cycle
Indoors, eggs can be laid any time of year. Eggs hatch in about 2 weeks. The young mature in 6–8 weeks. Several generations can occur in the same year.
Integrated Pest Management Strategies
1. Remove insects. Dislodge as many insects as possible using a strong stream of water. A cotton swab soaked in rubbing alcohol will also effectively remove a few insects.
2. Use insecticidal soap. Insecticidal soaps specially formulated to kill insects and not damage plants are effective if used frequently until the problem is under control.

3. Use superior oil sprays. Highly refined oils sold as superior or horticultural oils are also very effective in controlling mealybugs. The oil suffocates the insects. Unlike dormant oils, these oils are highly refined and under proper conditions, can be applied to plants in foliage without damage. Follow label directions to avoid damage to some plants that may be sensitive. Superior oils are also considered nontoxic and are less likely to harm beneficial insects. When spraying indoors, protect surfaces that may be damaged by an oil residue.
4. Use chemical insecticides. Many insecticides registered for use indoors are available. Follow directions and, if possible, spray out-of-doors or in a garage, weather permitting.

5. To limit future problems, inspect plants regularly. With regular inspection, pest problems can be caught when just beginning and control is easier. It is also recommended to isolate newly acquired plants for 2–3 weeks to limit introducing pests indoors. Bringing plants indoors in the fall is another way of introducing insects indoors.
0
0
文章
Dummer. ゛☀
2017年09月17日

Thrips are minute, slender-bodied insects less than 1/16 inch to about 3/16 inch in length. With magnification, you can identify the adults that range in color from yellow to black and have four long, narrow, fringed wings. The young nymphs are smaller, wingless, and range in color from yellow to white. Many thrips are plant feeders attacking flowers, leaves, fruit, twigs, or buds.
Symptoms and Diagnosis
Thrips congregate by the hundreds and leave black, varnish-like fecal deposits on the underside of leaves. To feed, they puncture the epidermal layer of the host plant with their single large mandible, then slurp the cell sap as it flows into the wound. As a result of their feeding, the foliage appears dusty or silver and dull. Some species may burrow between the upper and lower leaf surfaces to feed. Blossoms can become streaked with brown and can wither prematurely. Injured leaves are twisted or discolored and scarred. The fruit of host plants is often pitted. A few species are beneficial predators of mites and small insects including other thrips, and some feed on fungal spores. Several species may bite people. Some species act as vectors of plant disease. Thrips are poor fliers, so that damage may first appear in one location and then slowly spread over the plant. Thrips will be most apparent on flowers, especially white, yellow, and other light-colored blooms.
Life Cycle
Eggs are inserted into leaves, fruit, stems, or the bark of trees and shrubs. One to two weeks later, pale, wingless nymphs emerge and feed actively until they pupate. Some species enclose the pupa in a cocoon on the ground or on the host plant. The winged adult thrips emerge from the cocoon or pupal stage. Generations may occur every two to three weeks, but the largest populations are present from late spring to midsummer. Thrips overwinter in the egg stage.
Integrated Pest Management Strategies
1. Knock off thrips with a forceful spray of cold water in small gardens, preferably early in the morning. Use a nozzle that produces a fine spray of water, and thoroughly wash off the undersides of affected leaves. The control is most effective when repeated at least 3 times, either daily or every other day.
2. Keep plants well irrigated and adequately misted since thrips prefer a dry environment.
3. Prune and destroy injured and infested plants. Do not compost them.
4. Predacious spiders, mites, and pirate bugs help control thrips. Conserving naturally occurring populations of beneficial insects by avoiding persistent pesticides is important to biologically controlling thrips.
5. Aluminum foil and other disorienting mulches have been used with some success to reduce thrips infestations.
6. Two applications of pyrethrum applied 3 to 4 days apart will treat serious infestations.
7. Insecticidal soaps are effective for temporary reduction of thrips populations. Spray every 3 days for 2 weeks. To control iris thrips, spray insecticidal soap at the base of each plant every 5 to 7 days until the infestation has been controlled. To prevent thrips problems, soak iris divisions and gladiolus corms for 30 minutes in a hot water bath (110–125 degrees F). Dig up gladiolus bulbs early in the fall and let them cure in open trays in a shady location with good air flow such as a garage for a few weeks before soaking them. Then allow the bulbs to dry thoroughly before storing.
8. Spray infested plants with a systemic insecticide such as imidacloprid (Merit) since thrips frequently burrow inside the plant tissue.
9. If necessary, use chemical insecticides such as acephate (Orthene), bifenthrin, imidacloprid, or spinosad. Spray 2 or more times at intervals of 7-10 days to control thrips as they hatch.

Symptoms and Diagnosis
Thrips congregate by the hundreds and leave black, varnish-like fecal deposits on the underside of leaves. To feed, they puncture the epidermal layer of the host plant with their single large mandible, then slurp the cell sap as it flows into the wound. As a result of their feeding, the foliage appears dusty or silver and dull. Some species may burrow between the upper and lower leaf surfaces to feed. Blossoms can become streaked with brown and can wither prematurely. Injured leaves are twisted or discolored and scarred. The fruit of host plants is often pitted. A few species are beneficial predators of mites and small insects including other thrips, and some feed on fungal spores. Several species may bite people. Some species act as vectors of plant disease. Thrips are poor fliers, so that damage may first appear in one location and then slowly spread over the plant. Thrips will be most apparent on flowers, especially white, yellow, and other light-colored blooms.

Life Cycle
Eggs are inserted into leaves, fruit, stems, or the bark of trees and shrubs. One to two weeks later, pale, wingless nymphs emerge and feed actively until they pupate. Some species enclose the pupa in a cocoon on the ground or on the host plant. The winged adult thrips emerge from the cocoon or pupal stage. Generations may occur every two to three weeks, but the largest populations are present from late spring to midsummer. Thrips overwinter in the egg stage.

Integrated Pest Management Strategies
1. Knock off thrips with a forceful spray of cold water in small gardens, preferably early in the morning. Use a nozzle that produces a fine spray of water, and thoroughly wash off the undersides of affected leaves. The control is most effective when repeated at least 3 times, either daily or every other day.
2. Keep plants well irrigated and adequately misted since thrips prefer a dry environment.
3. Prune and destroy injured and infested plants. Do not compost them.
4. Predacious spiders, mites, and pirate bugs help control thrips. Conserving naturally occurring populations of beneficial insects by avoiding persistent pesticides is important to biologically controlling thrips.

5. Aluminum foil and other disorienting mulches have been used with some success to reduce thrips infestations.
6. Two applications of pyrethrum applied 3 to 4 days apart will treat serious infestations.
7. Insecticidal soaps are effective for temporary reduction of thrips populations. Spray every 3 days for 2 weeks. To control iris thrips, spray insecticidal soap at the base of each plant every 5 to 7 days until the infestation has been controlled. To prevent thrips problems, soak iris divisions and gladiolus corms for 30 minutes in a hot water bath (110–125 degrees F). Dig up gladiolus bulbs early in the fall and let them cure in open trays in a shady location with good air flow such as a garage for a few weeks before soaking them. Then allow the bulbs to dry thoroughly before storing.

8. Spray infested plants with a systemic insecticide such as imidacloprid (Merit) since thrips frequently burrow inside the plant tissue.
9. If necessary, use chemical insecticides such as acephate (Orthene), bifenthrin, imidacloprid, or spinosad. Spray 2 or more times at intervals of 7-10 days to control thrips as they hatch.
0
0
文章
Dummer. ゛☀
2017年09月17日

Stink bugs are attractive and distinctive insects that are generally easy to identify. Ranging in size from 1/4 to 1 inch long and about half as broad, they are shield-shaped with a triangle-like horny scale on their back. Also, as the name indicates, many stink bugs do produce an offensive odor when disturbed. The most common pest species are green, brown, gray, or yellow and some have red or yellow markings. Their host plants include blackberry, cabbage and other members of the mustard family, corn, tomato, eggplant, bean, soybean, and trees such as apple, peach, pecan, and cherry. Stink bugs may also be found on ornamental plants including columbine, snapdragon, and sunflower. The harlequin bug, Murgantia histrionica, a red and black-spotted species of stink bug, is an important pest of crops in the mustard family in the southern United States. The green stink bug, Acrosternum hilare, and brown stink bugs, Euschistus spp., can be of economic importance in soybean fields primarily by reducing seed quality and quantity. A few species of stink bugs are predatory on other insects.
Symptoms and Diagnosis
In the "true bug" group, stink bugs feed by inserting their mouth parts into the leaves, flowers, buds, fruit, and seeds of host plants and sucking plant sap. Large infestations of stink bugs may cause plants, especially small plants and young tender growth, to wilt, become stunted and misshapen, or die. Other damage includes yellow or white blotches on leaves; misshapen or aborted fruits, seeds, and buds; calluses, blemishes or depressions; and black pits on nuts. Tomatoes exhibit pale yellow spots and a white pithy area just under the skin at the puncture site. Peaches and other fruits may develop scarring and dimpling resulting in cat-facing or a pitted appearance. The seeds in soybean pods may be deformed, small, discolored, or shriveled.
Life Cycle
The stink bug overwinters as an adult in protected areas such as under dead weeds, leaf litter, or the bark of trees. In early summer, the female lays clusters of eggs on the underside of leaves. These eggs are barrel or keg-shaped with a circular lid. In one to three weeks, the young hatch into wingless nymphs that resemble small adult stink bugs, although the coloration may differ from that of the adult. The nymphs will molt several times before developing wings and becoming an adult. The number of generations per year depends on the species.
Integrated Pest Management Strategies
1. Sanitation. Control weeds in susceptible crops and in areas adjacent to gardens to decrease breeding and overwintering habitat. It is important to remove weeds early in the growing season before stink bug populations increase or the loss of habitat may force pests to move into the garden.
2. Collect insects. Hand pick and destroy eggs and bugs.
3. Use natural controls. Encourage other natural predators such as parasitic wasps and flies by growing small-flowered plants. The unpleasant odor produced by stink bugs deters many predators but several bird species do consume these pests.
4. Use trap crops. Plant trap crops of mustard and treat that area with an appropriate pesticide.
5. Use insecticides. If damage is severe, use insecticidal soap, sabadilla, pyrethrin or permethrin (Eight).

Symptoms and Diagnosis
In the "true bug" group, stink bugs feed by inserting their mouth parts into the leaves, flowers, buds, fruit, and seeds of host plants and sucking plant sap. Large infestations of stink bugs may cause plants, especially small plants and young tender growth, to wilt, become stunted and misshapen, or die. Other damage includes yellow or white blotches on leaves; misshapen or aborted fruits, seeds, and buds; calluses, blemishes or depressions; and black pits on nuts. Tomatoes exhibit pale yellow spots and a white pithy area just under the skin at the puncture site. Peaches and other fruits may develop scarring and dimpling resulting in cat-facing or a pitted appearance. The seeds in soybean pods may be deformed, small, discolored, or shriveled.

Life Cycle
The stink bug overwinters as an adult in protected areas such as under dead weeds, leaf litter, or the bark of trees. In early summer, the female lays clusters of eggs on the underside of leaves. These eggs are barrel or keg-shaped with a circular lid. In one to three weeks, the young hatch into wingless nymphs that resemble small adult stink bugs, although the coloration may differ from that of the adult. The nymphs will molt several times before developing wings and becoming an adult. The number of generations per year depends on the species.

Integrated Pest Management Strategies
1. Sanitation. Control weeds in susceptible crops and in areas adjacent to gardens to decrease breeding and overwintering habitat. It is important to remove weeds early in the growing season before stink bug populations increase or the loss of habitat may force pests to move into the garden.
2. Collect insects. Hand pick and destroy eggs and bugs.
3. Use natural controls. Encourage other natural predators such as parasitic wasps and flies by growing small-flowered plants. The unpleasant odor produced by stink bugs deters many predators but several bird species do consume these pests.

4. Use trap crops. Plant trap crops of mustard and treat that area with an appropriate pesticide.
5. Use insecticides. If damage is severe, use insecticidal soap, sabadilla, pyrethrin or permethrin (Eight).
0
0


