文章
Miss Chen
2018年05月14日

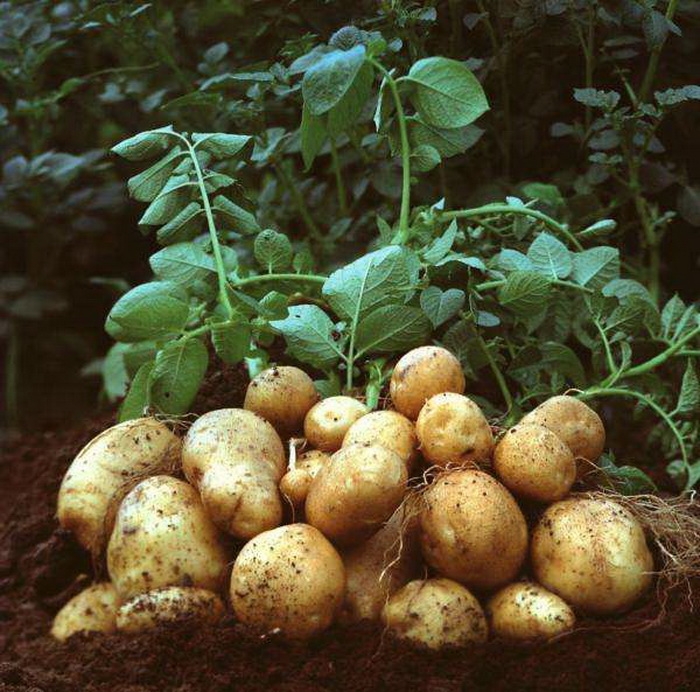
Potatoes are easy to grow, and the plants can be highly productive if grown under the best conditions. Oklahoma gardeners are fortunate to have a climate well-suited to growing potatoes, and starting your plants at the right time will help make sure your crop is a bountiful one.
Time Frame
Potatoes are considered cool-season vegetables. They are not particularly sensitive to frost, and can be planted earlier than more tender garden plants. You can plant potatoes from mid-February to mid-March. If you live in southern Oklahoma, you should plant during the earlier portion of this range.
Considerations
Potatoes grow best in soil that is well aerated, moist and well drained; avoid compacting the soil. A pH between 5.0 and 5.5 is ideal. Potatoes grow well in sunny conditions, but excessive heat and lack of moisture reduce yield.

Sweet Potatoes
Sweet potatoes are less hardy than regular potatoes, and should be planted between May 1 and June 20.
Time Frame
Potatoes are considered cool-season vegetables. They are not particularly sensitive to frost, and can be planted earlier than more tender garden plants. You can plant potatoes from mid-February to mid-March. If you live in southern Oklahoma, you should plant during the earlier portion of this range.
Considerations
Potatoes grow best in soil that is well aerated, moist and well drained; avoid compacting the soil. A pH between 5.0 and 5.5 is ideal. Potatoes grow well in sunny conditions, but excessive heat and lack of moisture reduce yield.
Sweet Potatoes
Sweet potatoes are less hardy than regular potatoes, and should be planted between May 1 and June 20.
0
0
文章
Miss Chen
2018年05月14日
Potatoes (Solanum tuberosum) are native to the Andean mountains, and well-suited to Colorado's rugged geography and varied climate. Colorado is the fifth to sixth largest producer of potatoes in the United States, with the San Luis Valley in southeastern Colorado producing 90 percent of Colorado's commercial potato crop. While not all of the more than 5,000 varieties preserved in Peru are available in Colorado, hundreds of varieties, from early to mid- to late season types, grow well in Colorado.

When to Plant
Potatoes are tubers and herbaceous perennials, hardy in U.S. Department of Agriculture plant hardiness zones 2 to 11. Plant potatoes four to six weeks before the last frost, when the ground temperature has warmed to 40 to 50 degrees Fahrenheit. In the San Luis Valley, parts of the Western Slope and other areas of Colorado with an elevation below 7,000 feet, plant potatoes in late April to early May. In more mountainous regions, wait until mid-May. Potatoes can withstand light frost, though it will kill emerging leaves. The leaves will grow back and the plant will continue to grow, though repeated freezing depletes reserves in the seed tubers.
Site and Soil
Choose a location where the potato plants will receive at least six hours of sunlight each day. Sandy, loamy soil with a pH of 4.8 to 5.5 is ideal, though some varieties will push through clay soils and most will tolerate a more alkaline pH level. Do not plant potatoes in the same location each year, and do not plant them where other nightshade family plants were grown the previous season. Nightshade family plants include tomatoes, eggplant and peppers.
Choosing Potatoes
Seed potatoes look just like the potatoes you eat, though potatoes from the grocery store may have been treated to prevent sprouting. You can replant potatoes you grew the previous year, but after one or two growing seasons, the potatoes will no longer produce well. Seed potato producers grow seed potato from the sprouts that emerge from potatoes. These sprouts are rooted and cultivated to produce the seed tuber. Any seed potato imported into Colorado must be certified as free of disease.

How to Plant
Seed potatoes that are 1 to 3 ounces, or about the size of an egg, can be planted whole. Cut larger seed potatoes into pieces of about the same size, as long as each piece has at least one or two "eyes" or sprouts. Handle seed potatoes carefully, taking care to not break off the emerging sprouts. Dig a trench 6 to 8 inches deep, and plant the seed potatoes or pieces 18 inches apart, in rows 2 feet apart. Cover them with 4 inches of soil. Water well and check the moisture level where the potatoes are growing to avoid overwatering. Potatoes can withstand less water, while too much may cause the tubers to rot or develop diseases.
Sprouts should emerge in about two weeks; when they are 8 inches high, hill the plants by raking up soil from the sides of the bed to add another 4 inches of soil around each sprout. Repeat this hilling process every two to three weeks as the plants grow, taking care to not disturb the soil where the tubers are growing. Be sure to cover any tubers that push to the surface with soil.
When to Plant
Potatoes are tubers and herbaceous perennials, hardy in U.S. Department of Agriculture plant hardiness zones 2 to 11. Plant potatoes four to six weeks before the last frost, when the ground temperature has warmed to 40 to 50 degrees Fahrenheit. In the San Luis Valley, parts of the Western Slope and other areas of Colorado with an elevation below 7,000 feet, plant potatoes in late April to early May. In more mountainous regions, wait until mid-May. Potatoes can withstand light frost, though it will kill emerging leaves. The leaves will grow back and the plant will continue to grow, though repeated freezing depletes reserves in the seed tubers.
Site and Soil
Choose a location where the potato plants will receive at least six hours of sunlight each day. Sandy, loamy soil with a pH of 4.8 to 5.5 is ideal, though some varieties will push through clay soils and most will tolerate a more alkaline pH level. Do not plant potatoes in the same location each year, and do not plant them where other nightshade family plants were grown the previous season. Nightshade family plants include tomatoes, eggplant and peppers.
Choosing Potatoes
Seed potatoes look just like the potatoes you eat, though potatoes from the grocery store may have been treated to prevent sprouting. You can replant potatoes you grew the previous year, but after one or two growing seasons, the potatoes will no longer produce well. Seed potato producers grow seed potato from the sprouts that emerge from potatoes. These sprouts are rooted and cultivated to produce the seed tuber. Any seed potato imported into Colorado must be certified as free of disease.
How to Plant
Seed potatoes that are 1 to 3 ounces, or about the size of an egg, can be planted whole. Cut larger seed potatoes into pieces of about the same size, as long as each piece has at least one or two "eyes" or sprouts. Handle seed potatoes carefully, taking care to not break off the emerging sprouts. Dig a trench 6 to 8 inches deep, and plant the seed potatoes or pieces 18 inches apart, in rows 2 feet apart. Cover them with 4 inches of soil. Water well and check the moisture level where the potatoes are growing to avoid overwatering. Potatoes can withstand less water, while too much may cause the tubers to rot or develop diseases.
Sprouts should emerge in about two weeks; when they are 8 inches high, hill the plants by raking up soil from the sides of the bed to add another 4 inches of soil around each sprout. Repeat this hilling process every two to three weeks as the plants grow, taking care to not disturb the soil where the tubers are growing. Be sure to cover any tubers that push to the surface with soil.
0
0
文章
Miss Chen
2018年04月20日
Sweet potatoes are one of the most versatile and nutritious vegetables on the market today. They are a very common vegetable in many Asian cultures, though they have yet to catch on as much in the Western diet, as they are mostly thought of as a holiday food. A warm weather vegetable, sweet potatoes are grown all across the United States, but nowhere more so than these five states.

North Carolina
With the sweet potato as its state vegetable, it's no surprise that North Carolina is the No. 1 sweet potato producing state in the country. According to statistics compiled by the United States Department of Agriculture, North Carolina produced, on average, 5,260,277 cwt a year from 1990 to 2007. (A cwt is a unit of measurement used in agriculture, meaning one hundred weight).
Louisiana
Louisiana is known for many things: the birthplace of Elvis, Mardi Gras in New Orleans and Cajun food. It is not necessarily well-know for sweet potatoes, but it's the second-highest sweet potato producing state in the country, with an average of 2,795,055 cwt between 1990 to 2007. Since the sweet potato is a warm weather vegetable, Louisiana is able to grow sweet potatoes year-round. Louisiana agriculture is also composed of sugarcane, cotton and soybeans.
California
With its warm climate, California is an ideal state for growing many different fruits and vegetables, the sweet potato being one of them. California weighs in as the third highest sweet potato producing state in the country, with an average of 2,487,500 cwt between 1990 to 2007. California is also known for its raisins, dairy products, figs and olives. The state produces more than half the countries fruits, nuts and vegetables.

Mississippi
Coming in fourth in sweet potato production is Mississippi, with an average of 1,607,444 cwt from 1990 to 2007. Though most people don't associate Mississippi with sweet potatoes, the state is known for its agriculture, as its warm climate makes it ideal for growing cotton, soybeans, rice and other plants.
Texas
Last, but not least, Texas rounds out the top five list of sweet potato producing states, with an average of 492,888 cwt per year between 1990 to 2007. As the second largest industry in the state, Texas is known for its agriculture, especially its cattle ranches, wool and cotton production. The state also grows much of the country's corn, wheat and hay.
North Carolina
With the sweet potato as its state vegetable, it's no surprise that North Carolina is the No. 1 sweet potato producing state in the country. According to statistics compiled by the United States Department of Agriculture, North Carolina produced, on average, 5,260,277 cwt a year from 1990 to 2007. (A cwt is a unit of measurement used in agriculture, meaning one hundred weight).
Louisiana
Louisiana is known for many things: the birthplace of Elvis, Mardi Gras in New Orleans and Cajun food. It is not necessarily well-know for sweet potatoes, but it's the second-highest sweet potato producing state in the country, with an average of 2,795,055 cwt between 1990 to 2007. Since the sweet potato is a warm weather vegetable, Louisiana is able to grow sweet potatoes year-round. Louisiana agriculture is also composed of sugarcane, cotton and soybeans.
California
With its warm climate, California is an ideal state for growing many different fruits and vegetables, the sweet potato being one of them. California weighs in as the third highest sweet potato producing state in the country, with an average of 2,487,500 cwt between 1990 to 2007. California is also known for its raisins, dairy products, figs and olives. The state produces more than half the countries fruits, nuts and vegetables.
Mississippi
Coming in fourth in sweet potato production is Mississippi, with an average of 1,607,444 cwt from 1990 to 2007. Though most people don't associate Mississippi with sweet potatoes, the state is known for its agriculture, as its warm climate makes it ideal for growing cotton, soybeans, rice and other plants.
Texas
Last, but not least, Texas rounds out the top five list of sweet potato producing states, with an average of 492,888 cwt per year between 1990 to 2007. As the second largest industry in the state, Texas is known for its agriculture, especially its cattle ranches, wool and cotton production. The state also grows much of the country's corn, wheat and hay.
0
0
文章
Miss Chen
2018年04月16日
The humble potato, Solanum tuberosum, is native to North America but grown the world over as a nutritious staple food and delicious dinner vegetable fried, baked, mashed or roasted. Potatoes are easy to grow in the home garden and available in hundreds of different varieties. Once planted, potatoes emerge from the soil quickly, depending on temperature, planting conditions and the variety you are growing.

Soil Temperature
Seed potatoes planted in garden soil at the recommended depth of about 4 inches should emerge from the soil in two to four weeks, according to Cornell University. However, if soil temperature is too cold or the ground is too wet or too dry, seed potato pieces are likely to rot in the ground and not sprout, or take considerably longer to emerge from the soil. As long as the ground has warmed, sprouting potatoes that may be killed back by late-spring frosts will emerge again and grow successfully through the summer season. Hill up soil around emerging potato plants; this practice will compel them to grow longer root systems that will produce more potatoes.
Curing Seed Potatoes
Small seed potatoes can be planted whole, while ones larger than a small egg should be cut into pieces, with each piece containing one or more eyes from which the growth will sprout. Curing the cut seed potato pieces before planting them will help to ensure better germination rates and faster emergence, according to Cornell University, although this is a point of disagreement among experts, with the Ohio State University Extension recommending planting immediately after seed potatoes are cut. To follow Cornell's recommended curing process, put cut seed potato pieces in a brown paper bag and store at room temperature for four to six days, shaking occasionally to prevent pieces from sticking together, then plant in a prepared trench in garden soil.

Sprouted Potatoes
You can speed up the potato emergence process by pre-sprouting your potatoes, advises the University of Georgia College of Agricultural and Environmental Science. Start with small, whole seed potatoes, and lay them out in a single layer in a room that receives sun and keeps a temperature consistently over 60 degrees. The potatoes will develop small green sprouts that, in large quantities, may be toxic, so don't eat your greened potatoes. Plant the sprouted potatoes about 4 inches deep, with the sprouts pointed upwards, and the potato plants will emerge from the soil faster than unsprouted plantings. Don't plant sprouted potatoes too deeply or you will delay their emergence.
Straw Potatoes
Market gardeners looking for perfectly-shaped potato tubers, and gardeners looking to submit prize-winning large potatoes at county fair competitions, often use a method called straw potato growing. Plant by placing seed potatoes at the surface of loosened, cultivated soil, then covering with 6 inches of loose straw. The potato plants will emerge through the straw, usually in just 2 to 3 weeks, because they do not have several inches of soil to grow through. Add more straw around the plants as they grow and as the earlier straw layers compact. Harvest at the end of the season by pulling back the straw, which eliminates the risk of slicing tubers when digging them out with a shovel.
Soil Temperature
Seed potatoes planted in garden soil at the recommended depth of about 4 inches should emerge from the soil in two to four weeks, according to Cornell University. However, if soil temperature is too cold or the ground is too wet or too dry, seed potato pieces are likely to rot in the ground and not sprout, or take considerably longer to emerge from the soil. As long as the ground has warmed, sprouting potatoes that may be killed back by late-spring frosts will emerge again and grow successfully through the summer season. Hill up soil around emerging potato plants; this practice will compel them to grow longer root systems that will produce more potatoes.
Curing Seed Potatoes
Small seed potatoes can be planted whole, while ones larger than a small egg should be cut into pieces, with each piece containing one or more eyes from which the growth will sprout. Curing the cut seed potato pieces before planting them will help to ensure better germination rates and faster emergence, according to Cornell University, although this is a point of disagreement among experts, with the Ohio State University Extension recommending planting immediately after seed potatoes are cut. To follow Cornell's recommended curing process, put cut seed potato pieces in a brown paper bag and store at room temperature for four to six days, shaking occasionally to prevent pieces from sticking together, then plant in a prepared trench in garden soil.
Sprouted Potatoes
You can speed up the potato emergence process by pre-sprouting your potatoes, advises the University of Georgia College of Agricultural and Environmental Science. Start with small, whole seed potatoes, and lay them out in a single layer in a room that receives sun and keeps a temperature consistently over 60 degrees. The potatoes will develop small green sprouts that, in large quantities, may be toxic, so don't eat your greened potatoes. Plant the sprouted potatoes about 4 inches deep, with the sprouts pointed upwards, and the potato plants will emerge from the soil faster than unsprouted plantings. Don't plant sprouted potatoes too deeply or you will delay their emergence.
Straw Potatoes
Market gardeners looking for perfectly-shaped potato tubers, and gardeners looking to submit prize-winning large potatoes at county fair competitions, often use a method called straw potato growing. Plant by placing seed potatoes at the surface of loosened, cultivated soil, then covering with 6 inches of loose straw. The potato plants will emerge through the straw, usually in just 2 to 3 weeks, because they do not have several inches of soil to grow through. Add more straw around the plants as they grow and as the earlier straw layers compact. Harvest at the end of the season by pulling back the straw, which eliminates the risk of slicing tubers when digging them out with a shovel.
0
0
文章
Miss Chen
2018年04月14日
A normal planting depth of 1 to 3 inches protects seed potato pieces from frost damage even during a hard freeze. Potato leaves survive light frosts with little injury, but leaves and stems die back to the ground in colder temperatures. Seed potatoes send up new shoots to replace frost-killed tops. Protecting plants during the last frosts of spring preserves the advantage gardeners gain from early planting.

Planting Times
Gardeners could plant potatoes as soon as the ground thaws in spring and dries enough to work without compacting. Planting in March, several weeks before the last frost date in most areas, gives potatoes a chance for a longer growing season. The extra days increase yields, since potato tubers stop growing when soil heats to 80 degrees Fahrenheit. Late frosts might kill early potato plants back to the ground, but potatoes nearly always recover. Early plantings exposed to long periods of cold rainy weather could fail for other reasons. Cold and wet conditions delay sprouting and cause seed pieces to rot.
Critical Temperatures
Light frosts cause little harm to potato plants, but the difference between a harmless light frost and a heavy frost measures only a few degrees. Temperatures between 29 and 32 degrees Fahrenheit cause light frost, but temperatures from 25 to 28 degrees inflict serious damage to potatoes. In the fall, a hard freeze of 24 degrees or below ends the season, but a brief hard freeze in spring only kills potato plants to ground level. Elevation and ground slope influence the severity of frosts. Potatoes planted on depressed ground sit in frost pockets that collect cold air. Potatoes growing on slopes at higher levels experience warmer temperatures and less frost damage.

Protection
Planting potatoes in mounded rows warms soil faster than flat row systems and it encourages early sprouting. A light mulch of straw over newly emerged potato plants traps ground warmth and protects the tender plants from freezing temperatures. Row covers offer better protection, increasing night temperatures in the potato row by 5 degrees Fahrenheit, according to master gardener Patti O'Neal on the Jeffco Gardener website. Fabric row covers work better than either plastic or paper. Any cover that contacts leaves conducts enough heat to burn leaf tips but will protect other parts of the plant.
Chitting
Forcing potatoes to sprout before planting, or chitting, adds to the growing season without adding risk of frost damage. Potatoes sprout after a month in storage at temperatures of 55 degrees Fahrenheit, if exposed to indirect lighting. Allowing seed potatoes to develop 1/2-inch sprouts before planting guarantees early growth in safely controlled conditions. Cut the sprouting potatoes into pieces at least 1/2 inch thick, with one or more sprouts per piece. Give the cut surfaces a day to harden off and plant just before the last frost date. Plant the pieces flat side down and be careful not to break the sprouts as you cover the row with soil.
Planting Times
Gardeners could plant potatoes as soon as the ground thaws in spring and dries enough to work without compacting. Planting in March, several weeks before the last frost date in most areas, gives potatoes a chance for a longer growing season. The extra days increase yields, since potato tubers stop growing when soil heats to 80 degrees Fahrenheit. Late frosts might kill early potato plants back to the ground, but potatoes nearly always recover. Early plantings exposed to long periods of cold rainy weather could fail for other reasons. Cold and wet conditions delay sprouting and cause seed pieces to rot.
Critical Temperatures
Light frosts cause little harm to potato plants, but the difference between a harmless light frost and a heavy frost measures only a few degrees. Temperatures between 29 and 32 degrees Fahrenheit cause light frost, but temperatures from 25 to 28 degrees inflict serious damage to potatoes. In the fall, a hard freeze of 24 degrees or below ends the season, but a brief hard freeze in spring only kills potato plants to ground level. Elevation and ground slope influence the severity of frosts. Potatoes planted on depressed ground sit in frost pockets that collect cold air. Potatoes growing on slopes at higher levels experience warmer temperatures and less frost damage.
Protection
Planting potatoes in mounded rows warms soil faster than flat row systems and it encourages early sprouting. A light mulch of straw over newly emerged potato plants traps ground warmth and protects the tender plants from freezing temperatures. Row covers offer better protection, increasing night temperatures in the potato row by 5 degrees Fahrenheit, according to master gardener Patti O'Neal on the Jeffco Gardener website. Fabric row covers work better than either plastic or paper. Any cover that contacts leaves conducts enough heat to burn leaf tips but will protect other parts of the plant.
Chitting
Forcing potatoes to sprout before planting, or chitting, adds to the growing season without adding risk of frost damage. Potatoes sprout after a month in storage at temperatures of 55 degrees Fahrenheit, if exposed to indirect lighting. Allowing seed potatoes to develop 1/2-inch sprouts before planting guarantees early growth in safely controlled conditions. Cut the sprouting potatoes into pieces at least 1/2 inch thick, with one or more sprouts per piece. Give the cut surfaces a day to harden off and plant just before the last frost date. Plant the pieces flat side down and be careful not to break the sprouts as you cover the row with soil.
0
0
文章
Miss Chen
2018年04月10日
The ideal temperature to store potatoes is 42 to 50 degrees. Most refrigerators are set at 37 degrees, which is a few degrees colder than this. Room temperature is usually much higher, at 65 to 70 degrees. If you do not have a cool location, you can store potatoes in the fridge. Put them in a perforated plastic bag to retain humidity and provide ventilation. Do not store potatoes with apples.

Temperature
You can store potatoes at room temperature for up to a few weeks. They will become soft and may begin to sprout if you store them at 65 to 70 degrees for more than a few weeks. Warm temperatures also make them more susceptible to disease. Storing potatoes in the fridge causes the starch in them to convert to sugar, which makes them turn darker if you fry them. They are safe to eat but will not look like golden fries. Boiling or baking does not affect the color. Do not freeze potatoes.
Humidity and Darkness
Potatoes need darkness, humidity and ventilation. Ideal conditions are 90 to 95 percent humidity. If you store potatoes in the fridge for more than a few weeks, check the bag to be sure they are not molding due to lack of ventilation. Light causes potatoes to accumulate chlorophyll and turn green. You can cut off small portions of green, but discard potatoes with large amounts of green because they can contain toxic compounds. Store them in dark-colored bags or a cardboard box.
Storing Harvested Potatoes
Do not wash harvested potatoes before you store them. A root cellar or storage cabinet that can be maintained at the ideal temperature and humidity is best for long-term storage of large quantities of potatoes. You can improvise with an extra refrigerator set to the ideal temperature of 42 degrees. Potatoes will keep for several months at this temperature before they begin to sprout. Take them out of the fridge four to six weeks before planting time to encourage sprouting.

Other Considerations
If you are buying potatoes and do not have a place to store them under ideal conditions, purchase only the quantity you will consume in a few weeks. If you are growing potatoes, consider how you will store your harvest and prepare the location in advance. If you use a root cellar or other method of storing loose potatoes, be sure to store potatoes and apples in separate compartments. Apples give off ethylene gas, which causes potatoes to sprout. Potatoes also cause apples to lose their flavor.
Temperature
You can store potatoes at room temperature for up to a few weeks. They will become soft and may begin to sprout if you store them at 65 to 70 degrees for more than a few weeks. Warm temperatures also make them more susceptible to disease. Storing potatoes in the fridge causes the starch in them to convert to sugar, which makes them turn darker if you fry them. They are safe to eat but will not look like golden fries. Boiling or baking does not affect the color. Do not freeze potatoes.
Humidity and Darkness
Potatoes need darkness, humidity and ventilation. Ideal conditions are 90 to 95 percent humidity. If you store potatoes in the fridge for more than a few weeks, check the bag to be sure they are not molding due to lack of ventilation. Light causes potatoes to accumulate chlorophyll and turn green. You can cut off small portions of green, but discard potatoes with large amounts of green because they can contain toxic compounds. Store them in dark-colored bags or a cardboard box.
Storing Harvested Potatoes
Do not wash harvested potatoes before you store them. A root cellar or storage cabinet that can be maintained at the ideal temperature and humidity is best for long-term storage of large quantities of potatoes. You can improvise with an extra refrigerator set to the ideal temperature of 42 degrees. Potatoes will keep for several months at this temperature before they begin to sprout. Take them out of the fridge four to six weeks before planting time to encourage sprouting.
Other Considerations
If you are buying potatoes and do not have a place to store them under ideal conditions, purchase only the quantity you will consume in a few weeks. If you are growing potatoes, consider how you will store your harvest and prepare the location in advance. If you use a root cellar or other method of storing loose potatoes, be sure to store potatoes and apples in separate compartments. Apples give off ethylene gas, which causes potatoes to sprout. Potatoes also cause apples to lose their flavor.
0
0
文章
Miss Chen
2018年03月16日
Jicama has a crisp, sweet flavor reminiscent of apples. The white flesh of the root is edible, both raw and cooked, and is often used in salads or cooked in the same manner as potatoes. This Mexican vegetable is sometimes grown in home gardens and is also available from most well-stocked grocery stores. Selecting ripe jicamas, whether you grow them yourself or purchase them, ensures the best flavor and texture.

Step 1
Examine the exterior of the jicama. Select those with an approximate 6-inch diameter and a smooth, cream or light brown exterior. Avoid wrinkled jicama roots as these are overly-mature.
Step 2
Check all sides of the jicama for cracks. Avoid those with cracks or visible bruises.
Step 3
Cut into the jicama. Under-ripe jicamas are hard and difficult to cut while a knife easily slices through a ripe jicama.

Step 4
Harvest garden-grown jicama after the foliage begins to die back but before the first fall frost. Dying foliage indicates root maturity.
Step 1
Examine the exterior of the jicama. Select those with an approximate 6-inch diameter and a smooth, cream or light brown exterior. Avoid wrinkled jicama roots as these are overly-mature.
Step 2
Check all sides of the jicama for cracks. Avoid those with cracks or visible bruises.
Step 3
Cut into the jicama. Under-ripe jicamas are hard and difficult to cut while a knife easily slices through a ripe jicama.
Step 4
Harvest garden-grown jicama after the foliage begins to die back but before the first fall frost. Dying foliage indicates root maturity.
0
0
文章
Dummer. ゛☀
2017年09月23日

Many gardeners have had trouble with nematodes attacking their plants. Maybe you’ve tried to grow carrots, but they came out knobby and twisted. Or maybe your potatoes were covered in warts and galls. If so, your garden may have a nematode problem. Read on to learn more about controlling nematodes with plants.
Using Plants for Nematode Control
Nematodes are tiny round worms that commonly live in soil, and many of them attack garden plants. These pests can damage the roots of numerous edible and ornamental plants, so many gardeners have looked for ways to control them. If you are one of those gardeners, you may have wondered: are there any plants that repel nematodes?
Some nematodes can be controlled using nematode-killing pesticides (nematicides), but these can be toxic and most are unavailable to home gardeners. Crop rotation can also reduce nematode infestations, but it is time consuming. Fortunately, scientists have identified a list of nematode repellent plants that can help combat these earth-dwelling pests. These include: Painted Daisy – kills nematodes when used as a green manure French Marigold – kills nematodes when used as a green manure Dahlia – repels nematodes Castor Bean – kills nematodes when used as a green manure Partridge Pea – reduces populations of peanut root knot nematode Rapeseed – certain varieties kill nematodes when used as a green manure Showy Crotalaria – kills nematodes when used as a green manure Velvet Bean – may repel several types of nematodes Controlling nematodes with plants is an effective, natural method and is definitely worth a try.
How to Use Nematode Repellent Plants
Of the list above, two of the best plants for nematode control are the painted daisy and French marigold. Both of these are not just nematode repellent plants, but they actually kill nematodes more efficiently. Painted daisy (Chrysanthemum coccineum) is useful for warding off nematode problems because it produces a botanical toxin that kills root nematodes. French marigold (Tagetes patula) produces a natural chemical that kills several types of nematodes, including the root-knot nematodes that attack carrots and many other vegetable plants. Scientists have found that Tangerine, a dwarf French marigold variety, is especially effective at combating nematodes in garden soil. The following varieties of French marigold are also effective: Bolero Bonita Mixed Goldie Gypsy Sunshine Petite Petite Harmony Petite Gold Scarlet Sophie Single Gold
If you have a nematode infestation, remove as many plant roots as possible when you clean up your garden in the fall. In winter and early spring, till and solarize the soil to reduce nematode populations.
In spring, plant one of one of the recommended varieties of French marigold (or another of the plants that repel nematodes) in solid patches or strips in the garden. Space the plants at seven inches apart. Let them grow for at least two months, then till the plants into the soil. Be sure to till the plants in or remove the flower heads of marigolds before they go to seed. Otherwise, they could become a weed in next year’s garden. To prevent nematodes from returning to the garden, keep the soil free of weeds until the next spring.
0
0
文章
Dummer. ゛☀
2017年09月15日
A common tuber disease that occurs wherever potatoes are grown. Potato scab symptoms include dark brown, pithy patches that may be raised and “warty.” These lesions can affect just a small portion of the tuber surface, or may completely cover it. Sometimes the ridged portions are in broken concentric rings.
Potato scab is caused by a bacterium-like organism, Streptomyces scabies, that overwinters in soil and fallen leaves. The organism can survive indefinitely in slightly alkaline soils, but is relatively scarce in highly acid soils. It is transmitted to plants by infected seed tubers, wind and water. The organism is also spread in fresh manure, since it can survive passage through the digestive tract of animals. (Learn how to grow organic potatoes here.)
S. scabies enters through pores (lenticels) in stems, through wounds and directly through the skin of young tubers. In addition to potatoes, other crops infected include beets, radish, turnip, carrot, rutabaga and parsnips. This should be kept in mind when considering a crop rotation schedule.
Note: S. scabies can survive in the soil for many years in the absence of potato.
Treatment
The following control measures have all been proven effective against scab in potatoes. However, in most cases a combination of these techniques will be required.
Plant certified, disease-free seed potatoes and resistant varieties whenever possible. We suggest using the russet-skinned varieties since they have more resistance to the disease.
Rotate root crops by planting in alternate locations to limit the disease.
Potato scab is most prevalent in dry, alkaline soils. Decrease soil pH by adding elemental sulfur. The disease is controlled or greatly suppressed at soil pH levels of 5.2 or lower. Simple and affordable soil test kits are available to check pH often.
Tilling in a cover crop — mustard, canola, alfalfa — prior to planting potatoes will help reduce infection.
Some growers report success spreading agricultural gypsum prior to planting at a rate of 25 lbs per 2,000 sq ft. This will raise the calcium content of your soil and help build strong cell walls in plants. (Note: S. scabies disrupts the development of cell walls resulting in lesions.)
Adequate irrigation during early tuber development may have a dramatic effect on common scab infection, but you will need to keep the soil damp for 2-6 weeks. This technique is effective because high soil moisture promotes growth of a bacteria that can crowd out S. scabies on the potato surface.
Do NOT overwater.
0
0
文章
Dummer. ゛☀
2017年09月15日
Affecting a wide variety of horticultural and vegetable crops — roses, beans, tobacco, tomatoes, potatoes, cucumbers and peppers — mosaic is a viral diseases found throughout the United States.
Plant viruses can be difficult to detect as symptoms look similar to many nutrient deficiencies and vary depending on the age of the plant when infection occurs. Look for:
Yellow, white or green stripes/ streaks/ spots on foliage
Wrinkled, curled or small leaves
Pronounced yellowing only of veins
Stunted growth and reduced yields
Infected fruit appears mottled and develops raised “warty” areas
Mosaic virus overwinters on perennial weeds and is spread by insects that feed on them. Aphids, leafhoppers, whiteflies and cucumber beetles are common garden pests that can transmit this disease. Soil, seed, starter pots and containers can be infected and pass the virus to the plant. Cuttings or divisions from infected plants will also carry the virus.
Treatment
There are no cures for viral diseases such as mosaic once a plant is infected. As a result, every effort should be made to prevent the disease from entering your garden.
Fungicides will NOT treat this viral disease.
Plant resistant varieties when available or purchase transplants from a reputable source.
Do NOT save seed from infected crops.
Spot treat with least-toxic, natural pest control products, such as Safer Soap, Bon-Neem and diatomaceous earth, to reduce the number of disease carrying insects.
Harvest-Guard® row cover will help keep insect pests off vulnerable crops/ transplants and should be installed until bloom.
Remove all perennial weeds, using least-toxic herbicides, within 100 yards of your garden plot.
The virus can be spread through human activity, tools and equipment. Frequently wash your hands and disinfect garden tools, stakes, ties, pots, greenhouse benches, etc. (one part bleach to 4 parts water) to reduce the risk of contamination.
Avoid working in the garden during damp conditions (viruses are easily spread when plants are wet).
Avoid using tobacco around susceptible plants. Cigarettes and other tobacco products may be infected and can spread the virus.
Remove and destroy all infected plants (see Fall Garden Cleanup). Do NOT compost.
0
0
文章
Dummer. ゛☀
2017年09月14日
A major pest of corn, the European corn borer (Ostrinia nubilalis) will also feed on over 300 different garden plants including peppers, snap beans, potatoes, tomatoes, apples and gladiolus. Damage to corn is caused by the young larvae which chew leaves and tassels. Later they tunnel all parts of the stalks and ears, resulting in reduced plant vigor, broken stalks, poor ear development and dropped ears. Other crops are damaged primarily by the tunneling of the stalks, pods or stems by the larvae.
Fully grown corn borer larvae (3/4 – 1 inch long) are extremely destructive flesh-colored caterpillars with a reddish or dark brown head and several distinct spots on the top of each abdominal ring or segment. The adult borer is a night-flying yellowish-brown colored moth (1 inch wingspan) with dark wavy bands across its wings.
Note : The European corn borer most likely arrived in the United States during the early 1900’s in imported corn which was used to make brooms.
Life Cycle
Fully grown larvae pass the winter concealed in corn stubble or other plant parts on which they have been feeding. Pupation takes place in late spring with the adult moths appearing in May and June. When mature, the females begin laying clumps of white eggs on the undersides of the lower leaves of host plants. (Adult females may lay up to 500 eggs over their short lifetime.) Under ideal conditions, these first generation eggs hatch within 3-7 days. Tiny caterpillars begin feeding on host plants and complete their development in 3-4 weeks. Pupation occurs deep inside the corn stalks and second generation moths emerge and begin laying eggs in early summer. Produces 1-3 generations per year depending upon the climate.
Note: Second generation borers are considered to be the most damaging to corn.
Corn Borer Control
Shred and plow under cornstalks in or near fields where borers overwinter. This should be done in fall or early spring before the adults emerge.
Use pheromone traps to determine main flight period for moths, then release trichogramma wasps to destroy eggs.
Beneficial insects, such as ladybugs and lacewing larvae, will consume a large number of borer eggs.
Treat silk frequently with Garden Dust (Bt-kurstaki) or Monterey Garden Insect Spray (spinosad) to kill young larvae. Repeat applications every 4-5 days until tassels turn brown.
Use organic insecticides only as a last resort.
Note: Ladybugs will consume almost 60 borer eggs a day. Stink bugs, damsel bugs, spiders and hover fly larvae feed on young caterpillars.
0
0
文章
Dummer. ゛☀
2017年09月13日
Water-soaked spots on blossoms or leaves are an early symptom of this fungal disease. A cottony white growth may develop on the spots. White mold attacks many types of edible plants, including beans, peas, potatoes, soybeans, carrots and cabbage. White mold gradually spreads to all above-ground plant parts. Infected tissues wilt, yellow and die. Cool, wet weather favors the development of the disease. The fungus overwinters in the soil.

Prevention and Control
Choose disease-resistant varieties when possible.
Space plants and rows widely so that plants remain dry as much as possible.
Avoid handling plants when wet.
Water early in the day so plants dry before nightfall. Use drip irrigation or soaker hoses rather than overhead watering.
Minimize the use of nitrogen fertilizers.
Uproot and destroy diseased plants as soon as you notice them.
0
0
文章
Dummer. ゛☀
2017年09月13日
Early symptoms of late blight infection include irregular olive or gray water-soaked lesions on the leaves and stems of tomatoes and potatoes. Both crops are vulnerable to this fungal disease at every stage of their growth cycle. A mildew-like white mold may also develop on or near these lesions. The disease spreads rapidly and can kill crops within a week of infection. (Late blight fungus, Phytophthora infestans, was the cause of the potato famine in Ireland in the 1850s.)

Unlike early blight, late blight does not cause the plant’s leaves to drop off; leaves usually remain attached even after they’ve turned brown and dried up. On tomato plants, infected fruits develop large sunken areas. These may not appear until after harvest. On potato plants, infection of leaves doesn't necessarily mean that tubers will be diseased. Tubers become infected by late blight when fungal spores wash down through the soil or tubers come in contact with foliage at harvest.

To prevent this from happening, remove and destroy all potato foliage and wait a week before harvesting to allow the tuber skins to cure. Monitor potatoes in storage for dry brownish rotted areas; disease symptoms may not appear until after harvest.

Wet weather with cool nights and warm days favors the spread of late blight. In warm parts of the United States, the pathogen can overwinter in soil and plant debris. In cold-winter areas, it survives only in potato tubers left in the soil, though the fungal spores move easily and quickly on the wind, spreading northward each growing season.

Prevention and Control
As a preventive measure, use Actinovate®, an organic fungicide. Add a copper-based product, such as our ready-to-spray Copper Fungicide, when late blight is present.
Buy certified disease-free seed and transplants. Seek out late blight-resistant varieties of tomatoes and potatoes.
Keep plant foliage as dry as possible; use drip irrigation or soaker hoses rather than overhead watering. Space plants generously to ensure good air circulation.
Uproot and destroy any volunteer tomato or potato plants that sprout in your garden.
Plants that become infected with late blight can rarely be saved. As the disease advances, the number of fungal spores produced multiplies rapidly. Remove infected plants from your garden as soon as possible. Bury deeply in the soil or put them in a plastic bag for disposal.
Be thorough when harvesting potatoes. Destroy any infected tubers that you find.
Unlike early blight, late blight does not cause the plant’s leaves to drop off; leaves usually remain attached even after they’ve turned brown and dried up. On tomato plants, infected fruits develop large sunken areas. These may not appear until after harvest. On potato plants, infection of leaves doesn't necessarily mean that tubers will be diseased. Tubers become infected by late blight when fungal spores wash down through the soil or tubers come in contact with foliage at harvest.
To prevent this from happening, remove and destroy all potato foliage and wait a week before harvesting to allow the tuber skins to cure. Monitor potatoes in storage for dry brownish rotted areas; disease symptoms may not appear until after harvest.
Wet weather with cool nights and warm days favors the spread of late blight. In warm parts of the United States, the pathogen can overwinter in soil and plant debris. In cold-winter areas, it survives only in potato tubers left in the soil, though the fungal spores move easily and quickly on the wind, spreading northward each growing season.
Prevention and Control
As a preventive measure, use Actinovate®, an organic fungicide. Add a copper-based product, such as our ready-to-spray Copper Fungicide, when late blight is present.
Buy certified disease-free seed and transplants. Seek out late blight-resistant varieties of tomatoes and potatoes.
Keep plant foliage as dry as possible; use drip irrigation or soaker hoses rather than overhead watering. Space plants generously to ensure good air circulation.
Uproot and destroy any volunteer tomato or potato plants that sprout in your garden.
Plants that become infected with late blight can rarely be saved. As the disease advances, the number of fungal spores produced multiplies rapidly. Remove infected plants from your garden as soon as possible. Bury deeply in the soil or put them in a plastic bag for disposal.
Be thorough when harvesting potatoes. Destroy any infected tubers that you find.
0
0
文章
Dummer. ゛☀
2017年09月13日
This common fungal disease of tomatoes and potatoes first appears as dark brown spots on leaves. On close examination, the spots show a pattern of concentric brown rings. Spots may enlarge and merge, and the leaves will turn yellow and die. Infected plants slowly lose leaves from the bottom up as the disease progresses. Tomato plant stems may also be infected, and eventually tomato fruit will display leathery black lesions. If the disease progresses relatively slowly, gardeners can usually expect to harvest usable fruit, but the quality and yield will be reduced. When potatoes suffer from early blight, their leaves display similar black spots and the tubers become covered with brown, corky spots.

The early blight fungus overwinters in plant residues in the soil; the disease spreads rapidly in warm, humid conditions.

Prevention and Control
Grow blight-tolerant tomato varieties and purchase disease-free seeds and plants.
If space allows, rotate susceptible crops.
Destroy any volunteer potato or tomato plants that sprout in your garden, as they may already be infected.
Keep foliage as dry as possible. Use drip irrigation or soaker hoses rather than overhead watering.
Keep tomato plants staked to encourage good air circulation and minimize contact between plants and soil.
Mulch tomato plants early in the season to slow the disease spread.
Pick off and destroy infected leaves. If the disease continues to spread, uproot and destroy or deeply bury the diseased plants.
After harvest, remove all potentially infected plant debris from the garden and destroy it. Compost the material only if you maintain a “hot” compost pile that will reach 150 degrees F for several days.
The early blight fungus overwinters in plant residues in the soil; the disease spreads rapidly in warm, humid conditions.
Prevention and Control
Grow blight-tolerant tomato varieties and purchase disease-free seeds and plants.
If space allows, rotate susceptible crops.
Destroy any volunteer potato or tomato plants that sprout in your garden, as they may already be infected.
Keep foliage as dry as possible. Use drip irrigation or soaker hoses rather than overhead watering.
Keep tomato plants staked to encourage good air circulation and minimize contact between plants and soil.
Mulch tomato plants early in the season to slow the disease spread.
Pick off and destroy infected leaves. If the disease continues to spread, uproot and destroy or deeply bury the diseased plants.
After harvest, remove all potentially infected plant debris from the garden and destroy it. Compost the material only if you maintain a “hot” compost pile that will reach 150 degrees F for several days.
0
0
文章
Dummer. ゛☀
2017年08月25日
Dill weed is an essential flavoring for pickling. The feathery, fresh young leaves add a delicate flavor to fish, potatoes and sauces and yield thick stems at maturity. The plant bolts in high heat and produces umbrella-shaped flower appendages topped with hard little seeds. The herb literally grows “like a weed,” which is the genesis of the name dill weed. Learn how to harvest dill and how to store dill weed to keep the delicate flavor around all year.
How to Harvest Dill
Dill weed is preserved by drying the leaves, seeds or entire stem of the herb. Use pruners or sharp scissors when harvesting dill weed for drying. Cut just the leafy foliage or remove entire stems to dry for canning and seeds. Remove the stems when the seeds are brown and ripe. Dill flavor is best when it just begins to flower. Wash the herbs after harvesting dill weed to remove dirt and insects.
How to Dry Dill
Dill weed refers to the greenish blue leaves of the herb, while dill seeds are just the seeds of the dill plant. The overall name of dill is used to describe the entire plant. Dill weed is delicate even when fresh and should be added to dishes at the end of the cooking process to preserve the light, grassy flavor. Dry dill weed leaves lose some of their pungency and require more of the seasoning to produce the same flavor profile as fresh. Dill seeds are more flavorful and are often used where a stronger dill flavor is desired, such as in pickling.
Drying Dill Seeds
Drying dill seeds actually accentuates their flavor and ensures a supply of seasoning for the next pickle-canning. You can bunch dry dill seeds by tying the stems together and hanging the herbs upside down. Keep the bunches lightly bundled so air can circulate. Cover the bunches with paper bags that have been liberally punched with holes on the side. The bags will catch the seeds as they dry, along with any pieces of leaf.
Drying Dill Weed
Dill leaves or dill weed are used dried as a crushed aromatic. The flavor is very light but the aroma is strong and adds complexity to foods. Dry dill by clipping off the individual leaflets and laying them in one layer on a dehydrator sheet or bakers rack. The leaves will dry in less than a day in a food dehydrator but will take several days on a baker’s rack in a warm, dry location. Turn the leaves every day so they are evenly exposed to the warm air.
How to Store Dill Weed
Crumble or crush the leaflets after they are completely dry. Herbs must be stored in a cool, dark area to avoid diminishing the color and flavor. Dry dill weed will keep for four to six months and can be used just like fresh dill leaves.
0
0

