


求助
Lucky Coyote
2017年05月23日

how do I take a rosette or two off of my tiger jaws for propagation without hurting it, and is the leaf in the second picture rotting? it's rather soft compared to the rest of the plant


1
0
Ueca:I haven't done it myself, but research tells me that the stem is a crucial part to have on the cutting if you want to propagate it.
文章
Gina
2017年05月23日

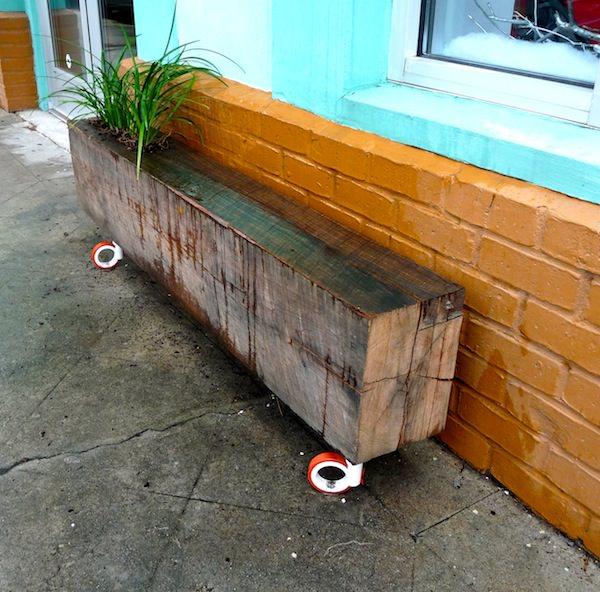
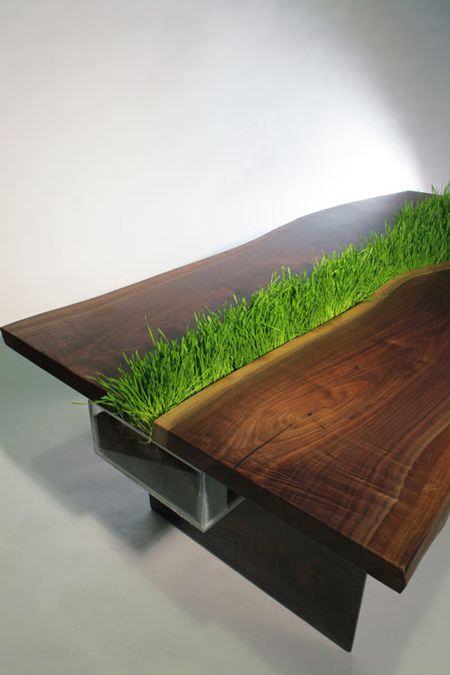
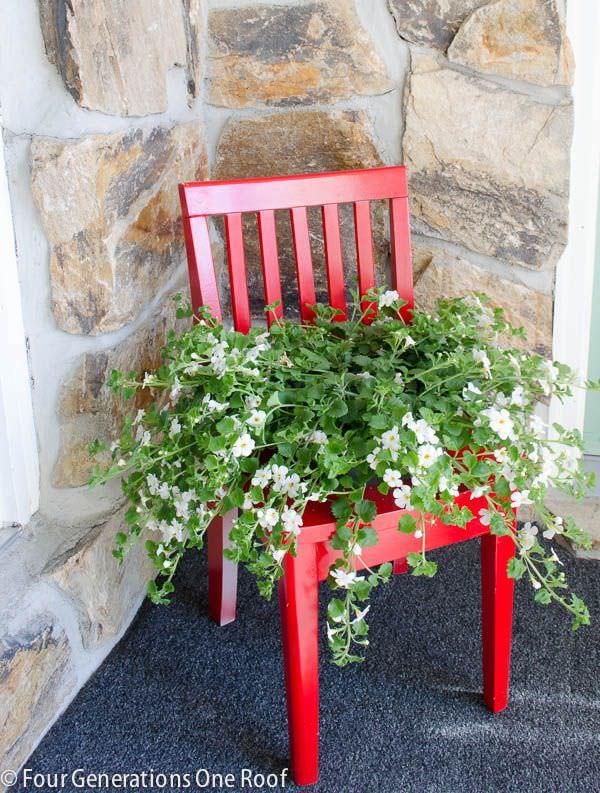
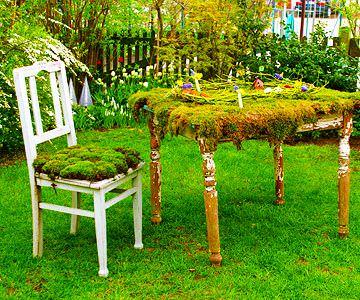
Plant your furniture…literally! We have run across these really neat ways to integrate plantings into your garden rooms, by planting your furniture itself! Really unique containers, and I love the idea of having plants as part of the outdoor room, not just next to it. Some of these have some easy DIY instructions, and others are just inspirational to get your creative ideas flowing… but they are all great ideas for any garden seating area. Remember, you can always alter a tutorial to fit your style and needs… love the chair planter, but it’s too cottage for you? Plant a simpler chair with succulents, or all foliage plants for a more minimalistic look. Use moss, or succulents, or try using all one type of flower in a project instead of a mix. I actually love the simple green of the modern table with the grass… the deep green color also brings out the amazing wood the table is made of… Remember, if you decide to go it alone, and dive into creating a planter out of furniture, you must either accept that the weathering of the water and plants will eventually rot away the piece, or you must provide a moisture barrier to protect the furniture. This can be as simple as attaching some plastic sheeting with a staple gun. Remember, the thrift store and yard sales are your friend here. So here are our picks for planting your furniture, send us pics and share your projects readers!
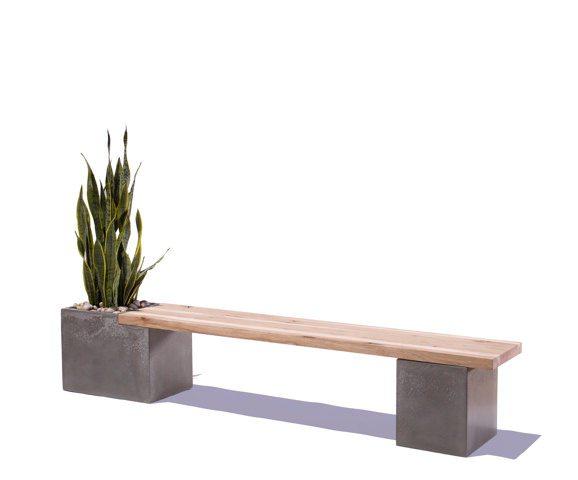
Our featured project, above, from HomeJelly is one of my favorites, and simple enough for anyone… Its a ceiling beam planter bench, and has a complete tutorial. All you need for this is a drill, a chisel, and wheels if you want it to be movable…You could also do this with railroad ties, but I would worry about seeping creosote myself… Don’t forget to read their safety advice! Want a similar, upscale look? Tao Concrete on Etsy sells this version. We could see this being DIY’able as well.
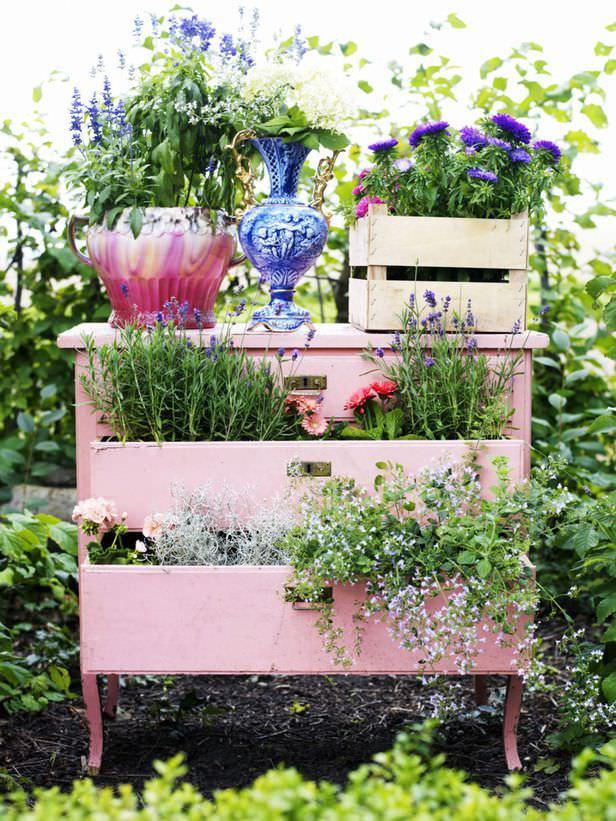
From HGTV, this dresser planter is an easy one…just remember to line the drawers before you fill with soil if you want to preserve the wood. You could use the top as a serving buffet!
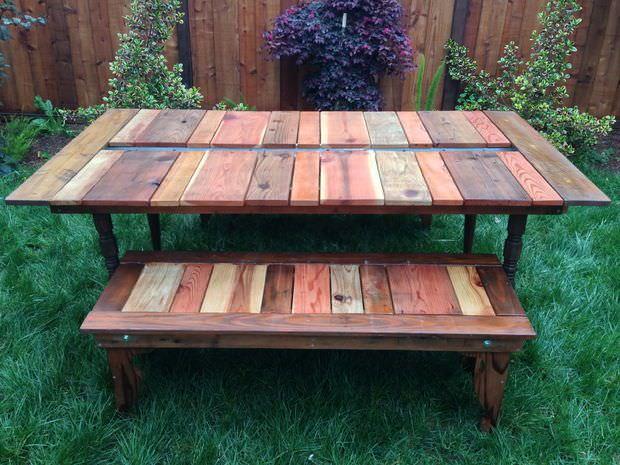
FromKatie Jackson Woodworks on Instructables, this Reclaimed Wood Flat Pack Picnic Table With Planter is pretty cool… you can use the center trough for ice and drinks, or plant herbs, pretty lettuce or edible flowers. This design is an award winner as well!
From This Old House, this hypertufa planter table is clearly amazing… and the hypertufa is so much lighter and stronger than concrete. Great instructions for this project, and even a video.
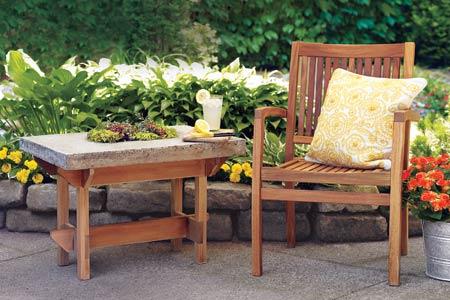
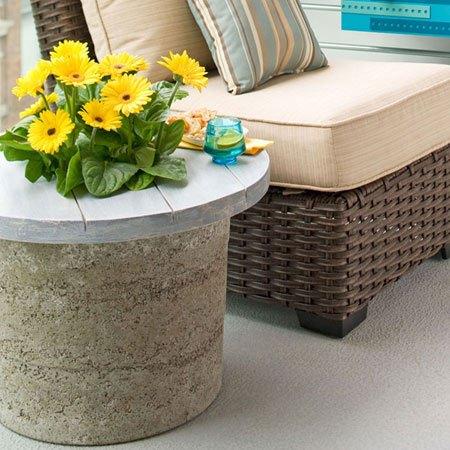
Since we are on hypertufa, Lowes has this step by step for this hypertufa planter table as well, and this might be a better beginner project. So cute!
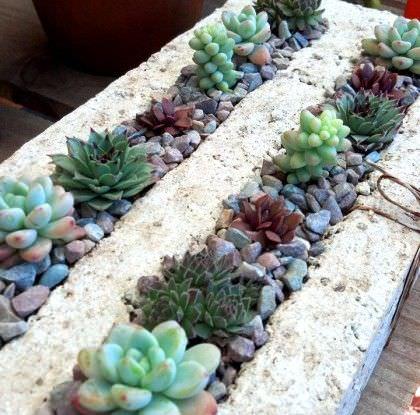
Cactus Jungle took the hypertufa table idea, created two troughs and used succulents. Cool!
From Libby James, and totally inspirational, this is the modern table I talked about in my intro… This. Is. Cool.
From Four Generations, One Roof, we love this DIY chair planter. Color, not too cute but fun and fresh! Don’t forget to check out her complete tutorial.
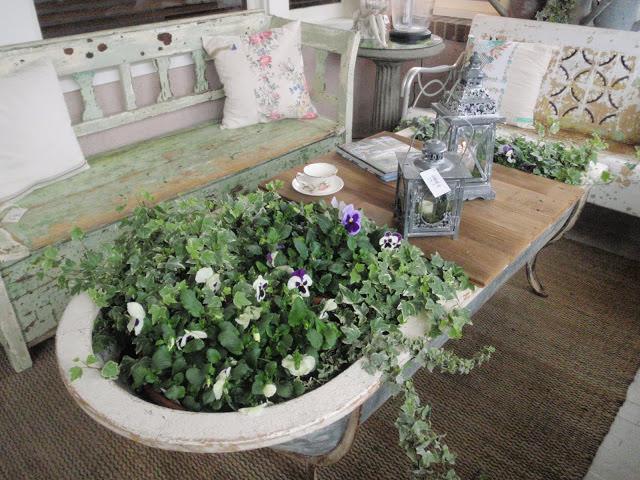
This tin bathtub planter table is great inspiration… This photo is by Hammers and High Heels from Bachmans in Minneapolis… This would be an easy DIY folks!
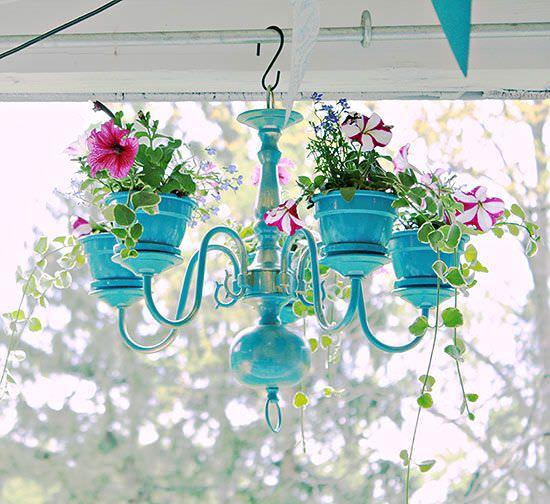
Who needs lighting? This DIY chandelier planter by DIY Show Off will make your outdoor room glow all by itself! Follow her step by step instructions to find our how to take your thrift store (or basement) find and turn it into garden treasure. (BTW, this project was featured by BHG!)
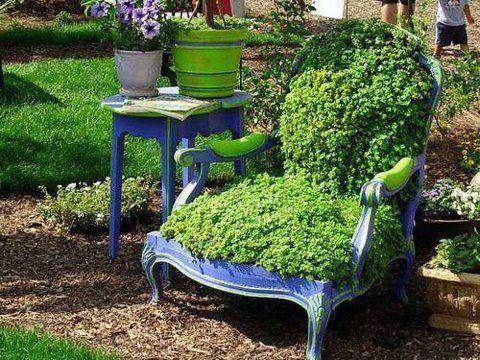
Purely inspirational, we found this photo on Pinterest, and I would love to have this whimsical piece in a corner of my garden! I would think you could DIY this with some chicken wire, a staple gun and some patience. If anyone knows who created this marvelous piece, please let us know, we’d like to pick their brain!
The blog that originally posted this idea no longer exists, but I had to include it… Again, staple gun, some soil, and some moss is all it would take. Remember if you use moss that it requires shade and water… There are some sedums now that have find texture that would give you the same look for sunnier and drier gardens. Sedum “Acre” would be great choice, and has tiny yellow flowers in summer.
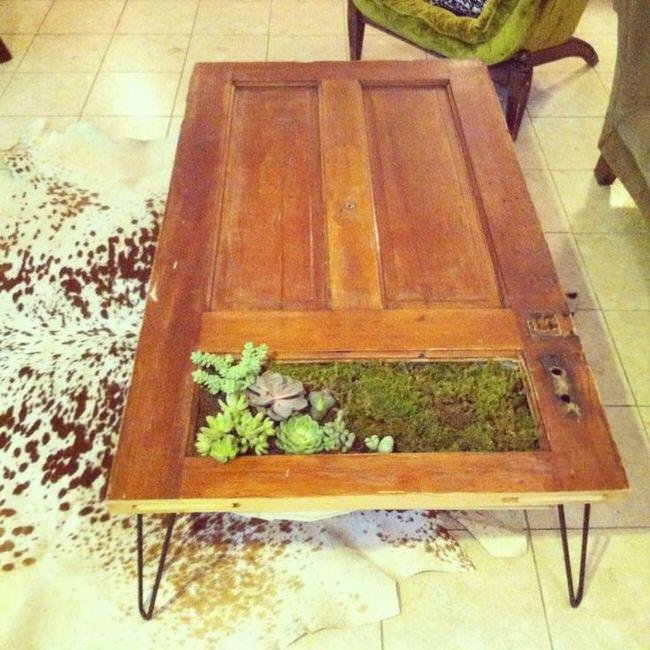
An engineering gardener created this planter table form an old door, and some hairpin table legs. Amazing ingenuity!
A lot of mid-century furniture was designed with planters, it was part of the theory behind the modern movement to integrate nature in design. Keep your eye out for pieces like this at yard and estate sales, and don’t be afraid to press them into use outdoors in a covered or protected area.
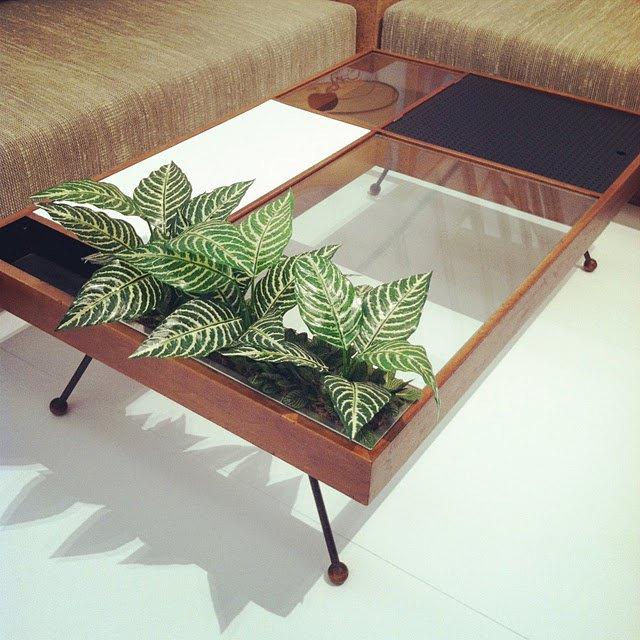
And this one from ModAttic…

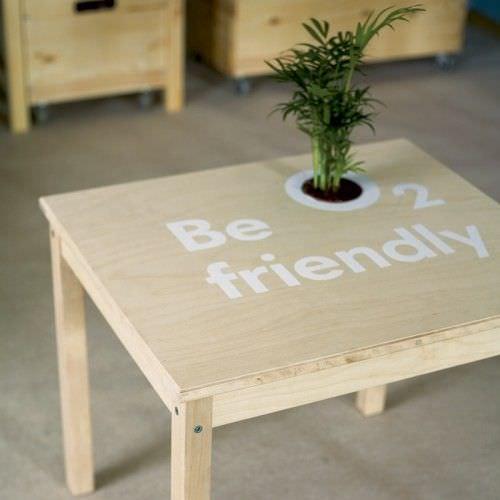
Lastly, this DIY coffee table with built in planter from Shelterness… Good instructions, easy project…
2
0
文章
安静的美女子
2017年05月23日

Learn how to care for lipstick plant. Lipstick plant care is simple, all it requires is constantly warm temperature and humid surrounding to grow and thrive.
Lipstick plant (Aeschynanthus radicans) is native to Indonesia and Malaysia. It is an epiphyte— a delicate, tropical vine that can also be grown as houseplant and excellent for use in hanging baskets on a shady balcony or patio.

USDA Zones– 10 – 12
Difficulty– Easy to Moderate
Lipstick Plant Characteristics
Its leaves are green, ovate, opposite, waxy and somewhat succulent like. Arranged in long, tanned and thin branches. The inflorescence appear are terminal, with flowers of tubular corolla like a cylindrical cup, with colors ranging from bright red to purplish-brown. The flower resembles a lipstick and that’s why it is called “Lipstick Plant”. The flowers have pungent aroma and are attractive to sunbirds and hummingbirds.
Lipstick Plant Propagation
Lipstick plant propagation can be done from cuttings or from seeds. Best propagation time is when temperature is around 70 F (21 C).
Requirements for Growing Lipstick PlantLocation
Must be grown in dappled shade, always protected from direct sun but under full indirect light. Location must not be windy or cool. Keep the plant above 60 F (15 C). It can be grown tropical climate in USDA Zones 10b – 12 but below these zones, you need to be careful as the lipstick plant is not frost tolerant and likes to grow in constantly warm temperature between 65 to 85 F (18 – 30 C)
Once established do not change the location of plant again and again.
Soil
Grow it in fertile, well draining and airy substrate that is rich in humus, peat moss or cocopeat.
Watering
Water whenever the surface begins to dry. Soak the entire pot every time. Water regularly in summer to keep the root ball moist. In winter, reduce the watering. Be careful with watering in cooler climates, in winter watering should be almost suspended as it can cause root rot.
It prefers non-calcareous lukewarm water, best to water it with distilled or rain water if possible.
Lipstick Plant Care
Lipstick plant care is simple, all it requires is constantly warm temperature and humid surrounding to grow and thrive.
Fertilizer
Feed the plant once a month using 3-1-2 ratio liquid fertilizer, such as 9-3-6 diluted at half strength recommended. Make sure to water plant before fertilizing to avoid root burn. Stop fertilizing in late fall and resume again in early spring.
Pruning
Prune it after it finishes flowering. Cut each branch to a length of about 6 inches using a sharp pair of scissors.
Pinching
The tip of the branches should be pinched regularly to encourage dense growth.
Pests, Diseases and Problems during Lipstick Plant Care
Generally, it is not susceptible to diseases. Root rot is possible if plant is overwatered in winter. In pests it might be attacked by aphids, red spider mite, mealybugs and whiteflies.
If you’re growing lipstick plant indoors keep it moist but avoid excess watering. Place it on a ventilated place with good air circulation and bright indirect light.
Lipstick Plant Losing Leaves
Lipstick plant (Aeschynanthus radicans) is native to Indonesia and Malaysia. It is an epiphyte— a delicate, tropical vine that can also be grown as houseplant and excellent for use in hanging baskets on a shady balcony or patio.
USDA Zones– 10 – 12
Difficulty– Easy to Moderate
Lipstick Plant Characteristics
Its leaves are green, ovate, opposite, waxy and somewhat succulent like. Arranged in long, tanned and thin branches. The inflorescence appear are terminal, with flowers of tubular corolla like a cylindrical cup, with colors ranging from bright red to purplish-brown. The flower resembles a lipstick and that’s why it is called “Lipstick Plant”. The flowers have pungent aroma and are attractive to sunbirds and hummingbirds.
Lipstick Plant Propagation
Lipstick plant propagation can be done from cuttings or from seeds. Best propagation time is when temperature is around 70 F (21 C).
Requirements for Growing Lipstick PlantLocation
Must be grown in dappled shade, always protected from direct sun but under full indirect light. Location must not be windy or cool. Keep the plant above 60 F (15 C). It can be grown tropical climate in USDA Zones 10b – 12 but below these zones, you need to be careful as the lipstick plant is not frost tolerant and likes to grow in constantly warm temperature between 65 to 85 F (18 – 30 C)
Once established do not change the location of plant again and again.
Soil
Grow it in fertile, well draining and airy substrate that is rich in humus, peat moss or cocopeat.
Watering
Water whenever the surface begins to dry. Soak the entire pot every time. Water regularly in summer to keep the root ball moist. In winter, reduce the watering. Be careful with watering in cooler climates, in winter watering should be almost suspended as it can cause root rot.
It prefers non-calcareous lukewarm water, best to water it with distilled or rain water if possible.
Lipstick Plant Care
Lipstick plant care is simple, all it requires is constantly warm temperature and humid surrounding to grow and thrive.
Fertilizer
Feed the plant once a month using 3-1-2 ratio liquid fertilizer, such as 9-3-6 diluted at half strength recommended. Make sure to water plant before fertilizing to avoid root burn. Stop fertilizing in late fall and resume again in early spring.
Pruning
Prune it after it finishes flowering. Cut each branch to a length of about 6 inches using a sharp pair of scissors.
Pinching
The tip of the branches should be pinched regularly to encourage dense growth.
Pests, Diseases and Problems during Lipstick Plant Care
Generally, it is not susceptible to diseases. Root rot is possible if plant is overwatered in winter. In pests it might be attacked by aphids, red spider mite, mealybugs and whiteflies.
If you’re growing lipstick plant indoors keep it moist but avoid excess watering. Place it on a ventilated place with good air circulation and bright indirect light.
Lipstick Plant Losing Leaves
2
0
Maria Manuel:mine's
Maria Manuel:mind's loosing buds & flowers...what should I do? (...bought it 2 days ago...)
文章
安静的美女子
2017年05月23日
Rubber tree plant care as a houseplant is easy. If you keep it in a well-lit position in your home. Besides the ornamental aspect, rubber tree is considered an air purifying plant.

Family: Moraceae
Soil pH: Neutral, slightly acidic
Plant type: Tree, Indoor plant
Vegetation type: Perennial
Foliage type: Evergreen
Toxicity: Its sap is toxic and causes mild skin irritation or burning sensation in eyes if comes contacted
Propagation: Rubber tree is commonly propagated from cuttings or air layering.
Popular Varieties– Ficus elastica ‘Tineke’ with variegated green and white leaves having overtones of burgundy and red veins.– Ficus elastica ‘Doescheri’: Also called “Indian Rubber Tree”, it has dark green foliage with yellow patches. Plant of this variety needs more natural light than most of the other variety.– Ficus elastica ‘Black Prince’: This variety has thick dark green leathery foliage with bronze undertones and large rounded leaves.-Ficus elastica ‘Decora’: This variety has thick dark green foliage.Rubber Tree Plant Information
Native to South-East Asia, the rubber tree grows on the edge of tropical rain forests. It can grow up to 30 m high in its native conditions. However, when you grow rubber tree indoors as a houseplant it only reaches 2-3 m high. *You can grow rubber tree outdoors in USDA Zones 9 – 11.
Rubber tree plant care is easy, which makes it a very popular houseplant. It survives even in poorly lit areas, though with slow growth.
Also Read: How to Grow Fiddle Leaf Fig
Rubber Tree Plant Care and Growing RequirementsLocation
Avoid direct sunlight, especially afternoon sun. Otherwise, the leaves will eventually fall off. Place the plant on a bright and well-lit spot that receives indirect or morning sunlight.
Soil
Use well-drained quality potting mix suitable for houseplants and a container with proper drainage. Rubber tree plant care will be easy if you fulfill only these two requirements.
Temperature
Ideally, the temperature that suits it best lies in a range of 59 – 68 F (15 to 20 C). It can withstand winter temperature down to 40 F (4 C), but the leaves may suffer.
Humidity
Rubber tree prefers moderately cool, moist and humid air. For humidity, you can mist water on its foliage.
Watering
Provide sufficient drainage to plant and avoid excess watering as it may cause root rot. Limit watering to keep the soil slightly moist and leave the surface soil to dry out between watering spells.
Fertilizer
Fertilize the plant with all-purpose fertilizer during the growing period in spring and summer.
Pests and Diseases
Rubber plant is resistant to pest and diseases. However, if grown in poor conditions and low light pests like spider mites and mealybugs cause a problem.
Pruning Rubber Tree
Pruning rubber tree is important if you want to keep it in a desired shape or size. You can prune the plant lightly at any time of the year but for proper pruning and trimming wait for spring. Prune your plant in the beginning of the growing season.
Rubber Tree Plant Care TipsRepot the plant when it becomes root bound. It grows quickly and within a year you’ll need to repot it.Once the desired size is achieved you can stop repotting and keep it root bound.If you’re unable to repot the plant, scrap a few inches of potting soil and replace it.When fertilizing indoor plants, ensure you don’t feed them heavily. Light dose is enough.Wipe and clean the leaves with a damp sponge once in a while.Avoid overwatering or misting of leaves with too cold water as rubber plant loses its leaves due to overwatering or when sprayed with too cold water.
0
0
文章
扭扭
2017年05月23日

Learn how to grow cucumbers vertically to get the most productive plant. Growing cucumbers vertically also save lot of space, which is suitable for small gardens.
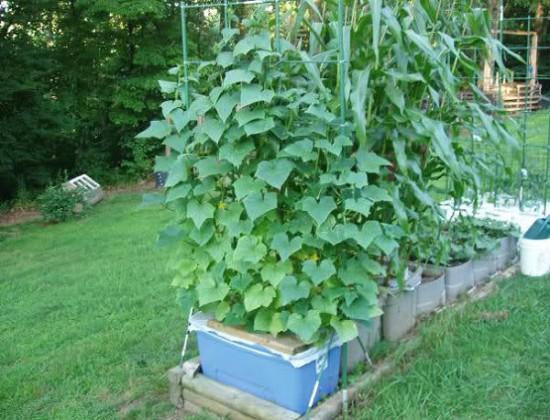
Cucumber is a refreshing vegetable, especially if picked up fresh. It is eaten in variety of ways: raw in salad, cooked or pickled. It is easy to grow and only requires a warm, sunny exposure and deep and regular watering.
What if you want to grow cucumbers but you have a small garden. Definitely, it will take a lot of space. In that case growing cucumbers vertically is an space savvy option.
Benefits of Growing Cucumbers Vertically
One advantage of Growing Cucumbers Vertically is that by this you can avoid a common problem of fruit rot associated with cucumber cultivation, which happens when fruit sitting in moist soil for long period of time. When you allow cucumber vines to grow up vertically, it improves the air circulation around the plant that prevents fungal diseases. Cucumber plants have sprawling habit and growing cucumbers vertically allow their leaves to absorb more sun, which result in healthy plant and large cucumbers. One more key benefit is that you can harvest the fruits more easily and in time.
Why you should grow cucumbers vertically
When cucumbers grown horizontally they usually cover 10 – 20 sq ft of space, plant sprawls over the surface around it. However, smaller and bushier varieties take only 1/3 of this space but they produce less fruits. Climbing, vine type varieties are more productive and when you grow them vertically they barely take 1 sq ft of space, climbing up on the support of trellis.
How to Grow Cucumbers VerticallyChoosing Container and Trellis
If you’re growing cucumbers vertically in containers, prefer large containers that are about at least 12 inches deep and wide. How many cucumber plants you can grow in such a container depends on the variety you are planting. A vining variety grows tall and send long roots, whereas bushier varieties are short.
Trellis Size
Choose a 5 to 6 feet tall trellis that is sturdy and doesn’t topple. If growing climbing varieties use “A frame trellis” so that the plant crawl up and down from it easily.
Propagation and Planting Cucumbers
Sow seeds directly onto the desired spot or in small pots. Cover them with about 2 cm of soil. Once the seedlings germinate and have a few leaves, transplant the healthiest ones into a bigger pot or on the frost free ground in spring or summer when soil temperature is around 70 F (20 C). If you live in tropical or subtropical climate, you can grow cucumber year round.
Cucumber plant is a heavy feeder like tomatoes, prepare your soil well before planting by incorporating decomposed manure and compost.
Requirements for Growing Cucumbers VerticallyPosition
Cucumber loves a warm and sunny exposure that is less windy. It does not tolerate temperature below 50 F (10 C). Optimum temperature to grow cucumbers fall in the range of 60 – 95 F (15 – 35 C).
Soil
It prefers well drained, loose and deep soil, rich in organic matter and neutral in pH.
Watering
Regular and deep watering is the key of productive harvest, when growing cucumber. It is due to the high water content of its fruits. While watering, avoid wetting the foliage as it may encourage fungal diseases.
Mulching
Mulch around the base of plant to improve moisture retaining ability of soil.
Fertilizer
At the time of planting add all purpose slow release fertilizer in soil. Once the plant starts to flower, side dress the plant with aged manure. Also apply balanced liquid fertilizer at that time according to manufacturer’s instructions.
Diseases and Pests
Cucumber plants particularly suffer from anthracnose, powdery mildew and in pests look out for aphids.
HarvestWhen and how to harvest cucumbers?
Cucumbers are ready for harvest in 60 to 90 days after seed sowing, depending on the variety. Pick cucumbers when they are developed enough, do not
let the fruit to overripe.
1
0
文章
粉团
2017年05月23日

Don’t wait till spring for gardening, begin with 6 things in February so that you’ll have a good start when the weather gets warm again.
USDA Plant Hardiness Zones break down the country into regions based on what their average extreme low temperature can reach for the year. They range from zones 1a to 13b. The majority of the United States falls in between zone 3a, which has a low temperature of between -40 and -35 degrees (F), and zone 8a, with a low of 10 to 15 degrees. That means that most of us have some sort of off season during the winter months when most of our outdoor gardening is put on hold. By December, most annual plants have finished their cycles and been taken up, and many perennials are dormant.
February, right in the middle of the winter, is the perfect time to start strategizing your garden for the upcoming spring. Depending on where you live, February falls somewhere between 6-12 weeks out from when you can start planting outside. The following ideas are some things you can be working on now to have better results from your garden when the weather gets warm.
1. Map Your Garden
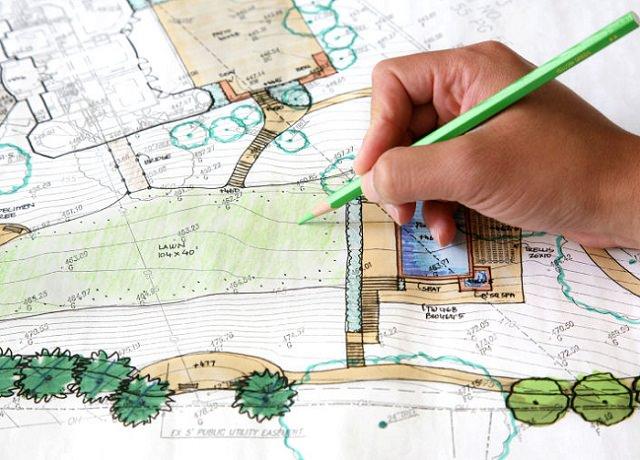
Gardening is fun and rewarding whether you have a plan or not. There have been times where I planted seeds very late in the season because I forgot to earlier and still got results. I’ve planted things next to each other that you aren’t supposed to and still gotten results. To have the best turnout, however, a little planning goes a long way.
An easy way to plan your garden is to map it out and divide it into square feet. Depending on the vegetable, you can plant a certain amount of seeds per square foot. The following can be used as a guide:
Seedlings Per Square FootWhat to Plant1 per 2 square feetwatermelon, vining squash1tomato, basil, broccoli, cauliflower, hot peppers2cucumbers4lettuce, other leafy greens8bush beans, snap peas16beets, radishes, turnips, carrots, onions
See an example map of a square foot garden plan.
When mapping out your garden you should also consider companion planting. Companion planting is the practice of planting vegetables or flowers that complement each other and produce higher yields and quality when planted in closer proximity. For almost any garden vegetable, marigolds are a good companion plant because they deter pests like beetles. Plan on including marigolds in your garden layout!
2. Order Seeds
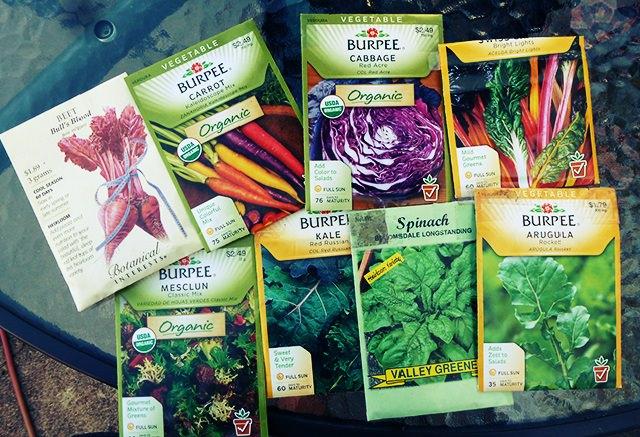
Now that you have your plan, you should have an idea of what seeds you are going to need. If you have been gardening for a while, you’ve probably signed up to receive seed catalogs from a few companies. The catalogs usually start arriving
sometime around January 1st. If you’ve had a chance to look through them and have decided what you would like to plant, now is the time to place your order. You want to may sure they get to you in time if you are going to be starting seeds indoors. If you will be purchasing your seeds from a garden store, you can do that now, too.
If you’ve saved seeds from last year’s crops or from organic veggies you’ve purchased at the store, that’s great! You’re one step ahead.
3. Start Seedlings Indoors
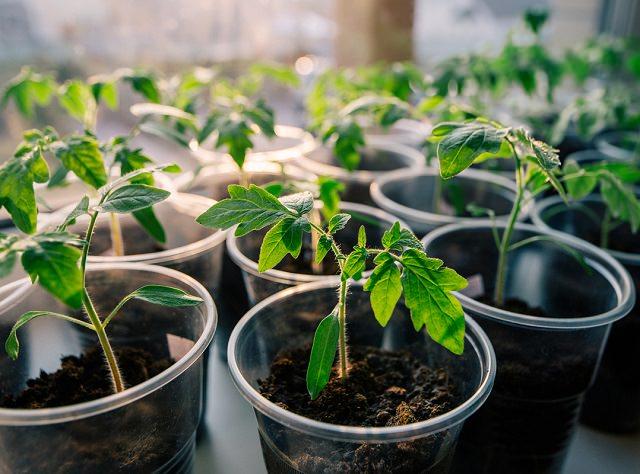
Depending on your hardiness zone, your lasts frost date (and when you can start planting outside) falls somewhere between April 1-May 15. If you live in a more northern zone with an early first frost date like September or October 1st, that window doesn’t give your plants a whole lot of time to flourish if you are starting from seed. Many seedlings will fare better and will have more time to produce a full crop if started indoors first. February is the perfect time to start seedlings indoors so they will be strong enough to harden off and plant outside once its warm enough.
To start seedlings inside, you’ll just need a seedling tray or small containers with drainage holes, sterile seed starter mix, some plastic wrap, and a sunny window. Plant your seeds 1-2 per cell or container in the moistened mix. Cover with plastic wrap. Check each day that the medium is moist. Once seedlings emerge, you can remove the plastic wrap. Provided they get enough water and strong sunlight, your seedlings should be strong enough within the next 2-3 months to go outside. (Make sure to harden them off first).
4. Start Composting

Composting is a garden project you can start in winter or any time of year. Having your own compost bin will save you money in the long run—its cheaper than expensive fertilizer from garden stores, and it uses waste you’d otherwise be filling your garbage bags with. There are a lot of options for compost systems to try, depending on if you’re doing it inside or outside, if you want to use worms or not, etc. For a worm bin compost or a no-turn (i.e. low maintenance) outdoor compost, the turnaround process is 3 months or more, so if you start now it will be ready during the early part of the growing season to start using in your garden. The decomposition process is slower in winter with the cooler temperatures, but there are a few things you can do to speed up the process if you start late and are going to want to start using your compost sooner.
5. Build a Hoop House
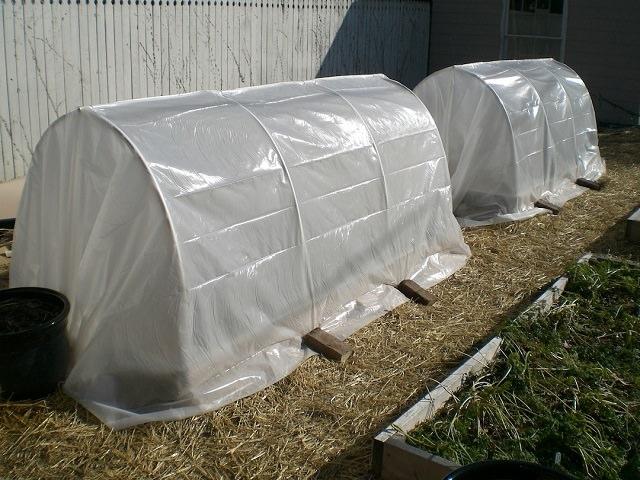
If you are especially anxious to get some plants in the ground outside, you can consider building a hoop house. A hoop house is a series of parallel hoops arching over your garden, covered in a heat retaining greenhouse material. This dome acts as a mini greenhouse to protect your plants from frost. It can extend your growing season by as many as 8 weeks in spring and fall. By the middle of February, you should be able to plant cold hardy plants (think arugula, onions, broccoli) in your hoop house. You can try plants less forgiving of frost if you add an extra layer of material inside the dome.
You can try making a hoop house yourself, or they can also be purchased at your local garden store.
6. Plant Fall Bulbs, If You Forgot Earlier
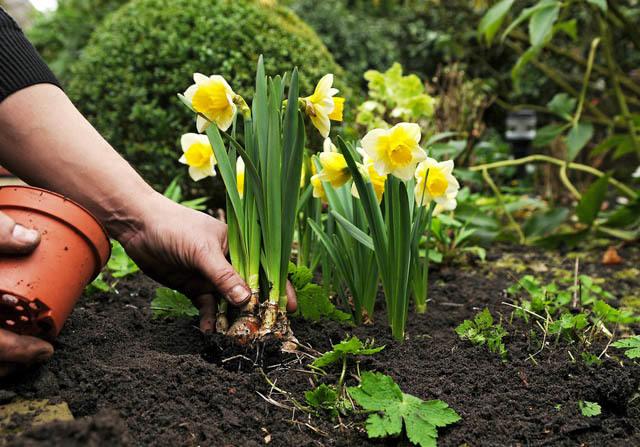
Oh no, you forgot to plant your tulip and daffodil bulbs before Thanksgiving! Plant them now anyway. Fall bulbs need a period of cold to bloom once the weather gets warm. Ideally, they should be planted between September and December, but many will still bloom just fine if planted later, as long as they have some time on the ground in the cold. Bulbs are different from seeds—they won’t make it until next year, so you might as well try to plant them now while they still have a chance at success.
If you have spring bulbs like gladiolus, don’t plant those now! They will need to wait until the soil is warmer and there is no chance of frost, as they do not work the same way as for fall bulbs and won’t survive winter temperatures.
For devoted gardeners, winter can be a dull time. Its natural to be antsy when there’s not much you can do for your garden. Even though I know you’ll be happier once last frost hits and you can get outside digging in the dirt, at least you can chase off the winter blues for now with some of these things on your garden to-do list. After getting started planning and planting your seedlings, the last frost will be here before you know it. Happy gardening!
USDA Plant Hardiness Zones break down the country into regions based on what their average extreme low temperature can reach for the year. They range from zones 1a to 13b. The majority of the United States falls in between zone 3a, which has a low temperature of between -40 and -35 degrees (F), and zone 8a, with a low of 10 to 15 degrees. That means that most of us have some sort of off season during the winter months when most of our outdoor gardening is put on hold. By December, most annual plants have finished their cycles and been taken up, and many perennials are dormant.
February, right in the middle of the winter, is the perfect time to start strategizing your garden for the upcoming spring. Depending on where you live, February falls somewhere between 6-12 weeks out from when you can start planting outside. The following ideas are some things you can be working on now to have better results from your garden when the weather gets warm.
1. Map Your Garden
Gardening is fun and rewarding whether you have a plan or not. There have been times where I planted seeds very late in the season because I forgot to earlier and still got results. I’ve planted things next to each other that you aren’t supposed to and still gotten results. To have the best turnout, however, a little planning goes a long way.
An easy way to plan your garden is to map it out and divide it into square feet. Depending on the vegetable, you can plant a certain amount of seeds per square foot. The following can be used as a guide:
Seedlings Per Square FootWhat to Plant1 per 2 square feetwatermelon, vining squash1tomato, basil, broccoli, cauliflower, hot peppers2cucumbers4lettuce, other leafy greens8bush beans, snap peas16beets, radishes, turnips, carrots, onions
See an example map of a square foot garden plan.
When mapping out your garden you should also consider companion planting. Companion planting is the practice of planting vegetables or flowers that complement each other and produce higher yields and quality when planted in closer proximity. For almost any garden vegetable, marigolds are a good companion plant because they deter pests like beetles. Plan on including marigolds in your garden layout!
2. Order Seeds
Now that you have your plan, you should have an idea of what seeds you are going to need. If you have been gardening for a while, you’ve probably signed up to receive seed catalogs from a few companies. The catalogs usually start arriving
sometime around January 1st. If you’ve had a chance to look through them and have decided what you would like to plant, now is the time to place your order. You want to may sure they get to you in time if you are going to be starting seeds indoors. If you will be purchasing your seeds from a garden store, you can do that now, too.
If you’ve saved seeds from last year’s crops or from organic veggies you’ve purchased at the store, that’s great! You’re one step ahead.
3. Start Seedlings Indoors
Depending on your hardiness zone, your lasts frost date (and when you can start planting outside) falls somewhere between April 1-May 15. If you live in a more northern zone with an early first frost date like September or October 1st, that window doesn’t give your plants a whole lot of time to flourish if you are starting from seed. Many seedlings will fare better and will have more time to produce a full crop if started indoors first. February is the perfect time to start seedlings indoors so they will be strong enough to harden off and plant outside once its warm enough.
To start seedlings inside, you’ll just need a seedling tray or small containers with drainage holes, sterile seed starter mix, some plastic wrap, and a sunny window. Plant your seeds 1-2 per cell or container in the moistened mix. Cover with plastic wrap. Check each day that the medium is moist. Once seedlings emerge, you can remove the plastic wrap. Provided they get enough water and strong sunlight, your seedlings should be strong enough within the next 2-3 months to go outside. (Make sure to harden them off first).
4. Start Composting
Composting is a garden project you can start in winter or any time of year. Having your own compost bin will save you money in the long run—its cheaper than expensive fertilizer from garden stores, and it uses waste you’d otherwise be filling your garbage bags with. There are a lot of options for compost systems to try, depending on if you’re doing it inside or outside, if you want to use worms or not, etc. For a worm bin compost or a no-turn (i.e. low maintenance) outdoor compost, the turnaround process is 3 months or more, so if you start now it will be ready during the early part of the growing season to start using in your garden. The decomposition process is slower in winter with the cooler temperatures, but there are a few things you can do to speed up the process if you start late and are going to want to start using your compost sooner.
5. Build a Hoop House
If you are especially anxious to get some plants in the ground outside, you can consider building a hoop house. A hoop house is a series of parallel hoops arching over your garden, covered in a heat retaining greenhouse material. This dome acts as a mini greenhouse to protect your plants from frost. It can extend your growing season by as many as 8 weeks in spring and fall. By the middle of February, you should be able to plant cold hardy plants (think arugula, onions, broccoli) in your hoop house. You can try plants less forgiving of frost if you add an extra layer of material inside the dome.
You can try making a hoop house yourself, or they can also be purchased at your local garden store.
6. Plant Fall Bulbs, If You Forgot Earlier
Oh no, you forgot to plant your tulip and daffodil bulbs before Thanksgiving! Plant them now anyway. Fall bulbs need a period of cold to bloom once the weather gets warm. Ideally, they should be planted between September and December, but many will still bloom just fine if planted later, as long as they have some time on the ground in the cold. Bulbs are different from seeds—they won’t make it until next year, so you might as well try to plant them now while they still have a chance at success.
If you have spring bulbs like gladiolus, don’t plant those now! They will need to wait until the soil is warmer and there is no chance of frost, as they do not work the same way as for fall bulbs and won’t survive winter temperatures.
For devoted gardeners, winter can be a dull time. Its natural to be antsy when there’s not much you can do for your garden. Even though I know you’ll be happier once last frost hits and you can get outside digging in the dirt, at least you can chase off the winter blues for now with some of these things on your garden to-do list. After getting started planning and planting your seedlings, the last frost will be here before you know it. Happy gardening!
3
2
文章
Hande Salcan
2017年05月23日


Your garden doesn’t have to be a flamboyant display of bright blooms to be a “garden”. In fact, some of the most interesting gardens in the world rely on foliage to supply color and interest. Green is not the only color of leaves, either. The plant world is full of varied choices full of color, texture and form that can carry off a fun, whimsical space, or the most formal and elegant of gardens. How, and why would we garden with just foliage, not flowers? Glad you asked…

Why?
Foliage gardens require less upkeep, since they don’t require the deadheading that flowering plants do.
Green is one of the most visually calming colors, so planting a garden with foliage tends to make a space worth relaxing in.
Without flowers, a visitor to the garden tends to look closer, appreciating the texture of a leaf, and the variations of color and form. In short, a foliage garden can be a plant lovers dream.
An ‘all foliage’ garden tends to look pretty for a longer season…flowering plants use so much energy – they tend to go quiet a good part of the year when they aren’t in flower.

How to Use Foliage, not Flowers
First of all, the same old rules of design apply to foliage plants.
Plant in groups of 3 or more, and contrast textures, form and colors. This is easier to do in a foliage garden because you don’t have the changing colors of flowers at different times of the year to think about when planting the original design. What yous see, is generally what you will get all season long, with minor exceptions.
Plant sun plants in sun, shade plants in shade.
Plant water loving plants together so they can get extra attention from the hose, and drought tolerant plants farther out where they might not get watered as frequently.
Learn what colored foliage looks best with what. There are all kinds of guidelines out there, but I say this is the place to experiment and learn about basic design by trying different combinations. Some places to start? Yellow/green varieties tend to contrast nicely with gray or purple leaved plants. Variegated or pattered leaves look best next to a solid green for contrast, without looking too busy. Brightly colored foliage, such as reds look best as a focal plantings, with simple leaves nearby to set them off.
Don’t forget about form and texture, which can be very important when you are using just leaves for your garden interest. Large, bold leaved hostas look amazing next to the fern like leaves of a bleeding-heart. A tall vertical ornamental grass may be a great “exclamation point” to break up a bed of low growing sedums. You get the idea. Contrast.

Now that you have the gist of it, try foliage plants for gardens. Or try a small foliage garden in one corner with just three. It’s a great way for any plant lover to really get to know what gardening is all about, and a great design lesson too. I want to thoroughly recommend a book called Fine Foliage by Karen Chapman and Christina Salwitz. This book was a best gardening book Amazon 2013, and with good reason. Great photos, and great advice for foliage combinations. (And no, I don’t get anything for saying that! They also have a great gardening blog as well, with amazing ideas.
So give foliage gardening a go, it’s rewarding and lower maintenance as well.
1
1
文章
Carol
2017年05月23日
You love to garden but don’t find time to maintain it. Don’t bother, imply these easy landscaping tips to make a low maintenance garden.

Easy Landscaping Tips for a Low Maintenance Garden
Unfortunately, there is no plant that is maintenance-free and every garden requires regular care and seasonal cleanup work. However, by making some changes you can reduce your efforts.
Grow plants that are low maintenance
1. So what are the plants that do not require special care? The answer is simple, native plants and the plants that are most suitable for your climate and growing conditions you have for them in your garden.
2. For a low maintenance garden, you’ll have to do a sacrifice. Instead of exotic plants, choose indigenous species, preferably those that occur naturally around your area. Such plants are easy to adapt, tough and resilient and will grow well even without special attention.
Group plants according to their requirements
3. Group plants according to their requirements at the right location, plants that require full sun or shade must be planted carefully together. Plants that require moist soil must not be planted with the ones that have low watering needs.
4. Give preference to drought tolerant plants as they require less watering. Also, the plants that grow slowly are a good option as they need less pruning. Those plants that spread widely must be planted too as they cover space, which means fewer plants. Also, don’t forget about the plants that resist pests and diseases.
Plant conifers
5. There are a variety of conifers that do not shed their needles in the winter, so in this period when everything seems dull they will look good in your garden. Conifers do not require regular care from pests too.
Opt for perennials
6. Instead of sowing seeds of annual plants routinely, opt for perennials. You will only need to do deadheading and pruning sometimes. Once grown, most of the perennials do well with infrequent watering. These plants are also quite resistant to pests than annuals. If you would like to grow annuals, grow the ones that are self-seeding and require less care.
No lawn please!

7. If you want a low care garden, avoid having a lawn. Instead, design a rock garden there or plan something unique. Plant a flower bed or grow lawn alternatives. Growing ground covers, small shrubs, and bushes is also a good idea. You can also create a wildflower meadow there, this will give a chance to wildlife to thrive.
Don’t overcrowd your garden
8. Plant moderately, don’t overcrowd your garden. The more plants you have, the more your garden will require treatment and attention.
Do something about watering
9. An indispensable solution may be the automatic irrigation system, which practically does not require maintenance, it allows to save time so that you would have to spend on watering the garden. Garden is irrigated by sprinklers or drip irrigation lines. The system is activated at a time you set and dispense the correct amount of water to particular groups of plants.
10. Automated watering system may be expensive, however, there are a few more hacks that can save your time like growing drought tolerant plants or those that prefer dry soil.
11. Large shrubs, long living trees, fruit plants once become established get water from nature and require watering sparingly. Also, you can replace your ordinary containers with self-watering ones.
Use slow release fertilizers
12. Slow release fertilizers limit the use of frequent fertilization. In addition, in the long run, they provide the plants the amount of nutrients they need, gradually.
Do mulching

13. Mulching is the part of easy landscaping. Do mulching everywhere, this will help in keeping the soil moist, water will evaporate less and roots will get ample moisture. Also, thick mulching (2-3 inches at least) helps in eliminating weeds. Around your garden beds, you can also cover the soil with pebbles and gravels. This will make your garden more attractive and it works as a mulch too.
14. You can also cover the empty space of your garden with sun blocking plastic sheeting, it may not look good but doesn’t allow weed seeds to germinate and spread.
Easy Landscaping Tips for a Low Maintenance Garden
Unfortunately, there is no plant that is maintenance-free and every garden requires regular care and seasonal cleanup work. However, by making some changes you can reduce your efforts.
Grow plants that are low maintenance
1. So what are the plants that do not require special care? The answer is simple, native plants and the plants that are most suitable for your climate and growing conditions you have for them in your garden.
2. For a low maintenance garden, you’ll have to do a sacrifice. Instead of exotic plants, choose indigenous species, preferably those that occur naturally around your area. Such plants are easy to adapt, tough and resilient and will grow well even without special attention.
Group plants according to their requirements
3. Group plants according to their requirements at the right location, plants that require full sun or shade must be planted carefully together. Plants that require moist soil must not be planted with the ones that have low watering needs.
4. Give preference to drought tolerant plants as they require less watering. Also, the plants that grow slowly are a good option as they need less pruning. Those plants that spread widely must be planted too as they cover space, which means fewer plants. Also, don’t forget about the plants that resist pests and diseases.
Plant conifers
5. There are a variety of conifers that do not shed their needles in the winter, so in this period when everything seems dull they will look good in your garden. Conifers do not require regular care from pests too.
Opt for perennials
6. Instead of sowing seeds of annual plants routinely, opt for perennials. You will only need to do deadheading and pruning sometimes. Once grown, most of the perennials do well with infrequent watering. These plants are also quite resistant to pests than annuals. If you would like to grow annuals, grow the ones that are self-seeding and require less care.
No lawn please!
7. If you want a low care garden, avoid having a lawn. Instead, design a rock garden there or plan something unique. Plant a flower bed or grow lawn alternatives. Growing ground covers, small shrubs, and bushes is also a good idea. You can also create a wildflower meadow there, this will give a chance to wildlife to thrive.
Don’t overcrowd your garden
8. Plant moderately, don’t overcrowd your garden. The more plants you have, the more your garden will require treatment and attention.
Do something about watering
9. An indispensable solution may be the automatic irrigation system, which practically does not require maintenance, it allows to save time so that you would have to spend on watering the garden. Garden is irrigated by sprinklers or drip irrigation lines. The system is activated at a time you set and dispense the correct amount of water to particular groups of plants.
10. Automated watering system may be expensive, however, there are a few more hacks that can save your time like growing drought tolerant plants or those that prefer dry soil.
11. Large shrubs, long living trees, fruit plants once become established get water from nature and require watering sparingly. Also, you can replace your ordinary containers with self-watering ones.
Use slow release fertilizers
12. Slow release fertilizers limit the use of frequent fertilization. In addition, in the long run, they provide the plants the amount of nutrients they need, gradually.
Do mulching
13. Mulching is the part of easy landscaping. Do mulching everywhere, this will help in keeping the soil moist, water will evaporate less and roots will get ample moisture. Also, thick mulching (2-3 inches at least) helps in eliminating weeds. Around your garden beds, you can also cover the soil with pebbles and gravels. This will make your garden more attractive and it works as a mulch too.
14. You can also cover the empty space of your garden with sun blocking plastic sheeting, it may not look good but doesn’t allow weed seeds to germinate and spread.
0
0
文章
Eyin Thor
2017年05月23日

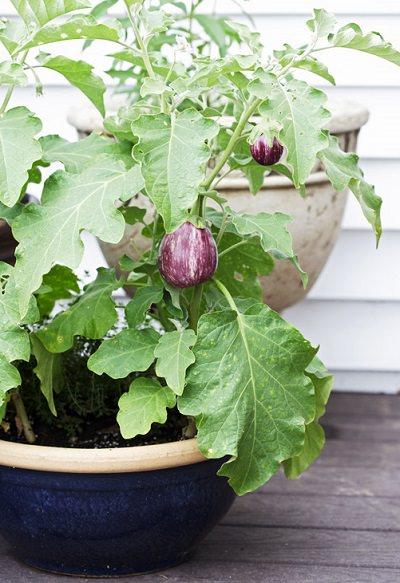
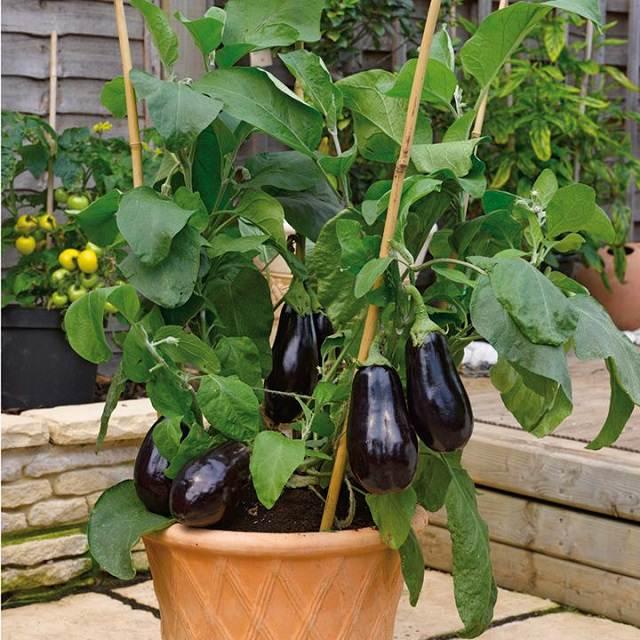
Growing eggplants in containers is not complicated, and if you’re a fan of grilling and oven broiling, you should grow this delicious and PRODUCTIVE vegetable.
Eggplant is a perennial tropical vegetable plant native to South and East Asia (namely, China and India) and a member of the tomato family. The plant loves heat and full sun and requires evenly moist soil in its native environment to thrive and fruit heavily.
These are the medium sized bushes, and nowadays a much more dwarf and compact cultivars are available for limited space gardeners. Similar to the other cousins of nightshade family e.g. tomatoes and peppers, it is possible to grow this vegetable in a container.
How to Grow Eggplants in Pots
Growing eggplants in pots is possible in two ways– Either start them using seeds or buy the seedlings from a nearby nursery or garden center. If you’re new to growing plants and have not grown them much– buy a few seedlings of your favorite eggplant variety. This will make things hassle free! If you’ve decided to germinate them from seeds, then that is also relatively easy.
Planting Time
Usually, in the spring, it’s the season when eggplant seedlings are transplanted on the ground when all the dangers of frost are passed. BUT container grown eggplants can be planted in summer and even in early fall, if you’re ready to move the pots here and there to control the temperature, especially during the nighttime when the temperature dips down. If you’re growing eggplants in a hot and warm frost-free climate, planting in winter is also possible.
Note that; this vegetable plant is more sensitive to low temperatures than tomatoes and peppers.Starting Eggplants from Seeds
Ensure you plant up to two seeds in each cell of a seedling tray or directly sow two seeds in each container. Remember, the eggplants require a lot of warmth for germination, more than tomatoes and peppers. Therefore, if you think the outdoors is not warm enough (temperature above 68 F (20 C) is good enough for eggplant seeds to germinate), you can place them indoors to kick start their growth, that’s the best of container gardening. Once they have sprouted and had up to four leaves, they can be transplanted into the desired containers.
Choosing a Pot
You’ll need a large container, depending on the cultivar, the larger the variety you’re growing, the larger the pot! Usually, the eggplant is relatively large, similar to a pepper plant or tomato so it requires a large pot which should be big enough for the capacity of five gallons, at least. In other words, use a pot that is at least 12 inches deep in size for each plant. If growing in a cooler region, choose a pot that retains heat. Here’s an informative article on choosing the best pot type for your container garden!
Requirements for Growing Eggplants in Containers
Position
Place the pots in a spot which has good air circulation and gets direct sunlight and some wind. This is because the eggplant requires a lot of warmth and sun exposure when growing. West or south facing direction is appropriate.
Soil
The eggplants require a lot of nutrients for growth and a neutral or slightly acidic soil in pH. Use soil that is rich in nutrients, most preferably loamy soilless potting mix. Eggplants thrive in the soil which has adequate and sufficient moisture so think about the moisture retaining capability of soil too. Therefore, you should also add a lot of compost or aged manure to the soil to enhance its capacity to retain water.
Watering
Eggplants love to grow in evenly moist soil, ensure you provide adequate moisture for them. Make sure the drainage is good to avoid root rot. Also, take care not to saturate the soil with too much water making it soggy.
Fertilizer
To provide ample nutrients for more productivity, you should apply fertilizer following the recommendations on the fertilizer bag. As eggplants are heavy feeders and need the fertilizer high in phosphorous, use the 5-10-5 fertilizer or other in a similar ratio, you can apply the balanced fertilizer, too. If required, spray on the leaves of your plants with liquid plant food, typically known as the foliar feeding.
Temperature
Once the plants are germinated and transplanted into the pots, provide them heat and try to keep them in the temperature above 50-54 F (10-12 C). If you’re growing eggplants in a warm climate, you don’t need to worry about temperature requirements much.
Eggplant Care
Pruning and Removing Suckers
Growing eggplant in a pot is not different than tomatoes, however, pruning it and picking the suckers is not necessary unlike TOMATOES but to improve productivity you can do this. When the plants are mature, you’ll need to look out for suckers to remove them. Yellowing or diseased leaves or branches growing tall and lanky and hindering the growth and productivity should be removed too.
Staking
As eggplant bush grows tall and its fruits are plump and heavy, you’ll need to tie your plants to the stake to support them. The most simple thing you can do is to thrust a stick in the pot and tie your plant to it, you can also use a cage to help the plant from falling.
Pests and Diseases
The most common pests for the eggplant is the black flea beetle, which feeds on the leaves of the plant, these insects are the common sight but if the plant is healthy, they won’t do any harm and also the aphids. One more common pest is the cutworm. This worm, as its name suggests, usually cuts the plant at its base. This can be prevented by using a cutworm collar or you can easily eliminate them by yourself. These pests can also be controlled using CHEMICAL pesticides, which we don’t recommend.
Eggplants grown in pots don’t get affected by diseases often. However, if you want, check out the list of eggplant diseases here!
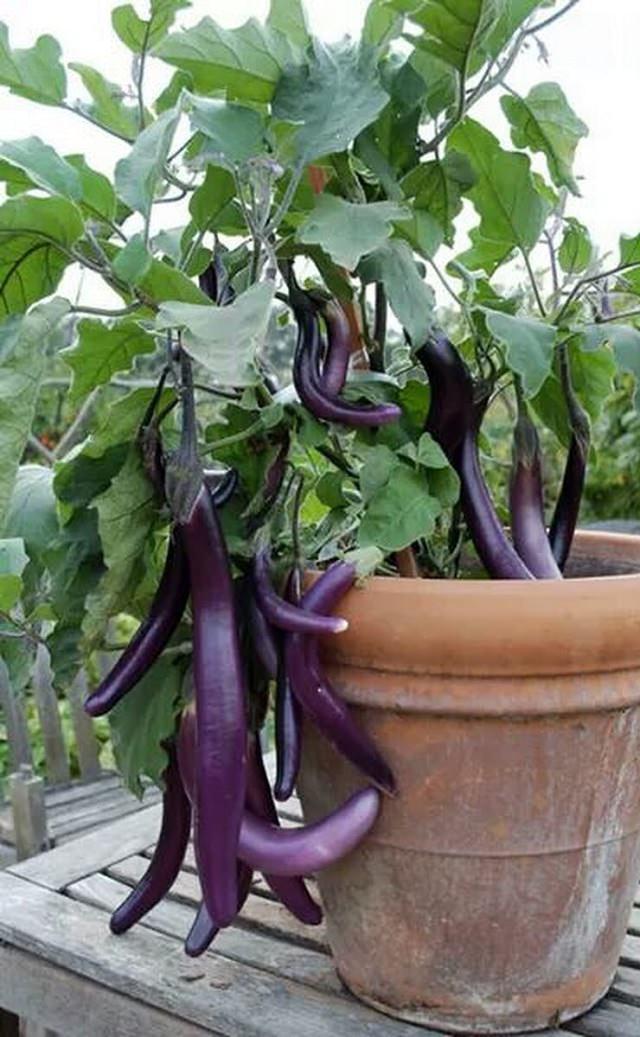
Harvesting
The eggplant usually reaches maturity after two to three months after planting, to say more clearly, in 60-80 days, depending more the type of variety you’re growing and the climate. At around this time, the plant starts to produce fruits which grow to become glossy when fully mature.
Eggplant is a perennial tropical vegetable plant native to South and East Asia (namely, China and India) and a member of the tomato family. The plant loves heat and full sun and requires evenly moist soil in its native environment to thrive and fruit heavily.
These are the medium sized bushes, and nowadays a much more dwarf and compact cultivars are available for limited space gardeners. Similar to the other cousins of nightshade family e.g. tomatoes and peppers, it is possible to grow this vegetable in a container.
How to Grow Eggplants in Pots
Growing eggplants in pots is possible in two ways– Either start them using seeds or buy the seedlings from a nearby nursery or garden center. If you’re new to growing plants and have not grown them much– buy a few seedlings of your favorite eggplant variety. This will make things hassle free! If you’ve decided to germinate them from seeds, then that is also relatively easy.
Planting Time
Usually, in the spring, it’s the season when eggplant seedlings are transplanted on the ground when all the dangers of frost are passed. BUT container grown eggplants can be planted in summer and even in early fall, if you’re ready to move the pots here and there to control the temperature, especially during the nighttime when the temperature dips down. If you’re growing eggplants in a hot and warm frost-free climate, planting in winter is also possible.
Note that; this vegetable plant is more sensitive to low temperatures than tomatoes and peppers.Starting Eggplants from Seeds
Ensure you plant up to two seeds in each cell of a seedling tray or directly sow two seeds in each container. Remember, the eggplants require a lot of warmth for germination, more than tomatoes and peppers. Therefore, if you think the outdoors is not warm enough (temperature above 68 F (20 C) is good enough for eggplant seeds to germinate), you can place them indoors to kick start their growth, that’s the best of container gardening. Once they have sprouted and had up to four leaves, they can be transplanted into the desired containers.
Choosing a Pot
You’ll need a large container, depending on the cultivar, the larger the variety you’re growing, the larger the pot! Usually, the eggplant is relatively large, similar to a pepper plant or tomato so it requires a large pot which should be big enough for the capacity of five gallons, at least. In other words, use a pot that is at least 12 inches deep in size for each plant. If growing in a cooler region, choose a pot that retains heat. Here’s an informative article on choosing the best pot type for your container garden!
Requirements for Growing Eggplants in Containers
Position
Place the pots in a spot which has good air circulation and gets direct sunlight and some wind. This is because the eggplant requires a lot of warmth and sun exposure when growing. West or south facing direction is appropriate.
Soil
The eggplants require a lot of nutrients for growth and a neutral or slightly acidic soil in pH. Use soil that is rich in nutrients, most preferably loamy soilless potting mix. Eggplants thrive in the soil which has adequate and sufficient moisture so think about the moisture retaining capability of soil too. Therefore, you should also add a lot of compost or aged manure to the soil to enhance its capacity to retain water.
Watering
Eggplants love to grow in evenly moist soil, ensure you provide adequate moisture for them. Make sure the drainage is good to avoid root rot. Also, take care not to saturate the soil with too much water making it soggy.
Fertilizer
To provide ample nutrients for more productivity, you should apply fertilizer following the recommendations on the fertilizer bag. As eggplants are heavy feeders and need the fertilizer high in phosphorous, use the 5-10-5 fertilizer or other in a similar ratio, you can apply the balanced fertilizer, too. If required, spray on the leaves of your plants with liquid plant food, typically known as the foliar feeding.
Temperature
Once the plants are germinated and transplanted into the pots, provide them heat and try to keep them in the temperature above 50-54 F (10-12 C). If you’re growing eggplants in a warm climate, you don’t need to worry about temperature requirements much.
Eggplant Care
Pruning and Removing Suckers
Growing eggplant in a pot is not different than tomatoes, however, pruning it and picking the suckers is not necessary unlike TOMATOES but to improve productivity you can do this. When the plants are mature, you’ll need to look out for suckers to remove them. Yellowing or diseased leaves or branches growing tall and lanky and hindering the growth and productivity should be removed too.
Staking
As eggplant bush grows tall and its fruits are plump and heavy, you’ll need to tie your plants to the stake to support them. The most simple thing you can do is to thrust a stick in the pot and tie your plant to it, you can also use a cage to help the plant from falling.
Pests and Diseases
The most common pests for the eggplant is the black flea beetle, which feeds on the leaves of the plant, these insects are the common sight but if the plant is healthy, they won’t do any harm and also the aphids. One more common pest is the cutworm. This worm, as its name suggests, usually cuts the plant at its base. This can be prevented by using a cutworm collar or you can easily eliminate them by yourself. These pests can also be controlled using CHEMICAL pesticides, which we don’t recommend.
Eggplants grown in pots don’t get affected by diseases often. However, if you want, check out the list of eggplant diseases here!
Harvesting
The eggplant usually reaches maturity after two to three months after planting, to say more clearly, in 60-80 days, depending more the type of variety you’re growing and the climate. At around this time, the plant starts to produce fruits which grow to become glossy when fully mature.
0
0
文章
安小宝
2017年05月23日

Anyone who has a small garden realizes their small garden space can be both a blessing and a curse. Cursed because you just will not have all the room to plant every garden bloom and blossom you have ever admired. Blessed because, from a design perspective, a small space is easier to design, maintain and even harvest! But if you are looking at your small garden space and are confused as to where to start, here are some great design tips to help you create a special space just for you.
Focus Your Attention
When your space is small, don’t feel that you have to shove a plant into every last square inch of ground. Focus your attention in the space on a focal point, and create a design that simply points the way. Fill the empty space with hardscaping. Now you have a space to impress, with less work, money and time, but much more wow!

Don’t Ignore Space
We often tend to ignore certain spaces in a garden, and when you have a small yard to begin with, thats a waste. Utilize forgotten areas such as a side yard to create green space. Keep it simple so it doesn’t get overgrown. Pick 3-5 plants that will grow well in the space, then repeat them.

Use Ornaments to Add Oomph.
When our garden design must be limited due to space, one of the tricks of the trade is to use garden ornaments to add a little pizzazz and keep a simple space from looking boring. It also serves to slow the eye down so that it doesn’t take in the small garden too quickly. Try placing them at natural stopping points in the flow of the garden.

Go Crazy.
If you are a plant lover like me, restraint probably isn’t your strong suit. So pack it in! Create a lush oasis by planting closer than you normally would, especially in borders. Add containers to up the effect. Remember, if you plant closely like this, you need to compensate with extra water and fertilizer throughout the season.

Go Up!
Vertical gardens are trendy, and right on point for a small garden design. Check out our post on DIY vertical gardens for more info.

Lastly, remember when your space is small, to make it an extension of your indoor living space. Use hardscaping to create entertaining areas, and open those doors wide and let the spaces work together. Use furnishings outdoors, plant grass for “carpet,” add planter “accents” and remember to just enjoy the space you have to it’s fullest, no matter what its size!


0
0
文章
Eyin Thor
2017年05月23日
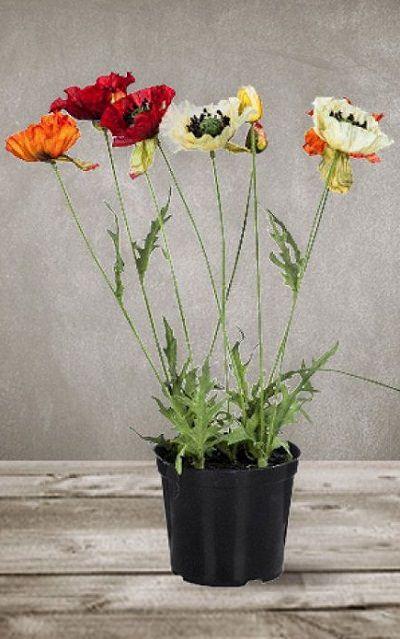
Learn how to grow poppies in this article. Even if you don’t have a space for large flower beds, by growing poppies in pots you can still enjoy the colorful blooms of this stately flowering plant.

Beautiful and seemingly delicate, the poppies are the plants not particularly very easy to grow but the beauty of the flowering plant makes it a popular classic. Those who want to enjoy the intense blooms in their container gardens must grow poppies in pots.
Best Poppy Varieties
There are some of the varieties of poppies that are popular and can grow well in a pot:
Oriental poppy
Most of the oriental poppy cultivars have large strikingly beautiful flowers that usually appears in late spring to early summer in bright colors like orange and red. There are also softer colors of this perennial flowering plant: pink, white and purple, with or without a central spot.
Height: 0.40 to 1.20 m.
USDA Hardiness Zones: 2-9
Iceland poppy
Usually grown as an annual or biennial.This short living perennial is self-seeding and come year after year, does not like the hot summers. Lightly perfumed flowers appear from mid spring to mid summer in colors like yellow, orange, red, pink and white. Flowers of this cultivar fade slowly than other poppies.
Height: 0.30 to 0.6 m.
USDA Hardiness zones: 3-9
California poppy
The showy state flower of California is a short-lived perennial in warm temperate and subtropical climates (USDA Zone 8-10). If you want to grow poppy in a tropical climate, try California poppy, keeping the plant in partial shade in summer.
Height: 0.15 to 0.45 m.
USDA Zones: 6-10b
Shirley poppy
One of the most beautiful and delicate poppies. Shirley Poppy is the name given to an ornamental cultivar group derived from the European wild field poppy (Papaver rhoeas).
Height: up to 0.6 m
USDA Zones: 3-9, can be grown in zones 10 & 11 as annual but doesn’t tolerate tropical heat well.
Choosing a Pot
Growing poppies in pots is easy, the plant is best grown in a medium sized pot. As poppies don’t tolerate waterlogged soil, ensure the pot has sufficient drainage holes in the bottom so that the water will drain freely.
How to Grow PoppiesSowing Seeds and Planting
1. Poppy grows well from seeds. Make sure that you place the pot in a bright position after planting seeds as poppy seeds require light to germinate. Also, most of the poppies do not like being transplanted, so either choose a pot that biodegradable or plant seeds in the exact pot in which you wish to grow poppy plants later.
2. Disperse seeds by hand in the pot. As the poppy seeds are very small, gardeners often mix them with sand to achieve a more equitable distribution. This also helps to see where the seeds were sown.
3. Tamp the seeds lightly down on the soil so that they are covered by a very thin layer of soil or sand. This keeps the seeds in place and they’ll also get plenty of light for germination. Once the seeds are planted moisten the soil making sure you don’t move the seeds.
4. Keep the soil constantly moist until germination. Germination depends on the climate and species but usually occurs within 25 days.
5. Poppies have a very delicate root system in the beginning so once the seedlings sprout water them gently. Thin out the seedlings 4-6 inches apart, when they reach a height of 5 inches. If you are planting in a medium to the large sized pot you can easily keep more than one plant per pot.
Requirements for Growing Poppies in Pots

Location
Poppies love the sun, so place your pots in a spot that receives ample sunlight, at least 6-7 hours daily. However, if you live in a warm climate where the sun is intense, grow poppies in partial sun.
Soil
Poppies can thrive on a variety of soils unless it is clay rich and blocks the drainage, the best is to use humus rich, loamy potting mix. The substrate should be neither too loose, nor prone to compaction and must be well draining. Slightly acidic to neutral soil pH is recommended.
Watering
When the poppies are in bloom or about to bloom in warm season, watering must be moderate and regular. On the contrary, once you get past the period of flowering, best to leave the soil dry as much as possible and watering must be done only when the top one inch surface of soil seems dry.
Poppy Plant Care
Fertilizer
Poppies are not heavy feeders; on the ground, they tolerate poor soil and thrive on their own but when growing poppies in pots you’ll need to fertilize the plant. At the time of planting or at the beginning of growing season, usually, spring (fall in warm frost-free climates), add a slow-release fertilizer to provide a steady supply of nutrition to plant during the whole season.
If you haven’t added a slow release fertilizer start to feed the plant with balanced liquid fertilizer on a bi-weekly basis once the plant has exceeded the height of 5 inches or when new growth emerges in spring. You can also feed the plant with flower fertilizer during the flowering period. Cease the application of fertilizer once the growing period ends.
Also, poppies are prone to magnesium and iron deficiency, application of Epsom salt is recommended.
Deadheading
Cut off the faded flowers to encourage more blooms.
Pests and Diseases
If the pot is not well draining or if you overwater the plant, it may die due to root rot. It also suffers from powdery mildew. In pests, keep an eye on aphids and spider mites.
Beautiful and seemingly delicate, the poppies are the plants not particularly very easy to grow but the beauty of the flowering plant makes it a popular classic. Those who want to enjoy the intense blooms in their container gardens must grow poppies in pots.
Best Poppy Varieties
There are some of the varieties of poppies that are popular and can grow well in a pot:
Oriental poppy
Most of the oriental poppy cultivars have large strikingly beautiful flowers that usually appears in late spring to early summer in bright colors like orange and red. There are also softer colors of this perennial flowering plant: pink, white and purple, with or without a central spot.
Height: 0.40 to 1.20 m.
USDA Hardiness Zones: 2-9
Iceland poppy
Usually grown as an annual or biennial.This short living perennial is self-seeding and come year after year, does not like the hot summers. Lightly perfumed flowers appear from mid spring to mid summer in colors like yellow, orange, red, pink and white. Flowers of this cultivar fade slowly than other poppies.
Height: 0.30 to 0.6 m.
USDA Hardiness zones: 3-9
California poppy
The showy state flower of California is a short-lived perennial in warm temperate and subtropical climates (USDA Zone 8-10). If you want to grow poppy in a tropical climate, try California poppy, keeping the plant in partial shade in summer.
Height: 0.15 to 0.45 m.
USDA Zones: 6-10b
Shirley poppy
One of the most beautiful and delicate poppies. Shirley Poppy is the name given to an ornamental cultivar group derived from the European wild field poppy (Papaver rhoeas).
Height: up to 0.6 m
USDA Zones: 3-9, can be grown in zones 10 & 11 as annual but doesn’t tolerate tropical heat well.
Choosing a Pot
Growing poppies in pots is easy, the plant is best grown in a medium sized pot. As poppies don’t tolerate waterlogged soil, ensure the pot has sufficient drainage holes in the bottom so that the water will drain freely.
How to Grow PoppiesSowing Seeds and Planting
1. Poppy grows well from seeds. Make sure that you place the pot in a bright position after planting seeds as poppy seeds require light to germinate. Also, most of the poppies do not like being transplanted, so either choose a pot that biodegradable or plant seeds in the exact pot in which you wish to grow poppy plants later.
2. Disperse seeds by hand in the pot. As the poppy seeds are very small, gardeners often mix them with sand to achieve a more equitable distribution. This also helps to see where the seeds were sown.
3. Tamp the seeds lightly down on the soil so that they are covered by a very thin layer of soil or sand. This keeps the seeds in place and they’ll also get plenty of light for germination. Once the seeds are planted moisten the soil making sure you don’t move the seeds.
4. Keep the soil constantly moist until germination. Germination depends on the climate and species but usually occurs within 25 days.
5. Poppies have a very delicate root system in the beginning so once the seedlings sprout water them gently. Thin out the seedlings 4-6 inches apart, when they reach a height of 5 inches. If you are planting in a medium to the large sized pot you can easily keep more than one plant per pot.
Requirements for Growing Poppies in Pots
Location
Poppies love the sun, so place your pots in a spot that receives ample sunlight, at least 6-7 hours daily. However, if you live in a warm climate where the sun is intense, grow poppies in partial sun.
Soil
Poppies can thrive on a variety of soils unless it is clay rich and blocks the drainage, the best is to use humus rich, loamy potting mix. The substrate should be neither too loose, nor prone to compaction and must be well draining. Slightly acidic to neutral soil pH is recommended.
Watering
When the poppies are in bloom or about to bloom in warm season, watering must be moderate and regular. On the contrary, once you get past the period of flowering, best to leave the soil dry as much as possible and watering must be done only when the top one inch surface of soil seems dry.
Poppy Plant Care
Fertilizer
Poppies are not heavy feeders; on the ground, they tolerate poor soil and thrive on their own but when growing poppies in pots you’ll need to fertilize the plant. At the time of planting or at the beginning of growing season, usually, spring (fall in warm frost-free climates), add a slow-release fertilizer to provide a steady supply of nutrition to plant during the whole season.
If you haven’t added a slow release fertilizer start to feed the plant with balanced liquid fertilizer on a bi-weekly basis once the plant has exceeded the height of 5 inches or when new growth emerges in spring. You can also feed the plant with flower fertilizer during the flowering period. Cease the application of fertilizer once the growing period ends.
Also, poppies are prone to magnesium and iron deficiency, application of Epsom salt is recommended.
Deadheading
Cut off the faded flowers to encourage more blooms.
Pests and Diseases
If the pot is not well draining or if you overwater the plant, it may die due to root rot. It also suffers from powdery mildew. In pests, keep an eye on aphids and spider mites.
4
1


