求助
Tabitha Farmer
2017年05月22日

Can someone help me identify this plant? It had accidently taken root in a combo pot my mother bought at our local greenhouse. I put it in a glass of water and its growing quickly. It reminds me of a succulent in appearance but the fact that it is thriving in water has me questioning if it is a succulent or not and, if so, what kind.

0
0
Tabitha Farmer:Thank you!!
sunnyzou:Portulaca oleracea L. var. granatus
文章
粉团
2017年05月22日

Do you want to grow the best tomatoes in taste and size? And want to have a bumper harvest? Then put these things in the hole before planting your tomato plant!
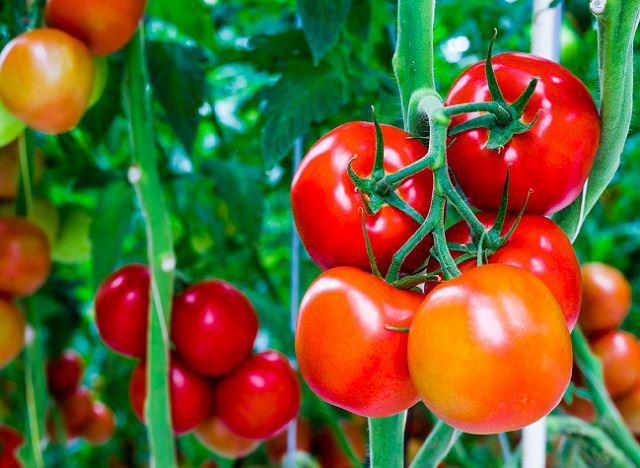
The homegrown TOMATOES are so delicious, and when you pick them fresh and eat, the delightful taste you get is just unmatchable. Better than store bought fruits. The thick, juicy, plump, sweet, a bit acrid and so satiating– the tomatoes are one of the first fruits (vegetable, if you say) everyone wants to grow from the beginning of the gardening season.1. Baking Soda
It works and really a good trick (especially when you’re growing tomatoes in containers) if you want sweeter tomatoes. Simply sprinkle a small amount of baking soda around the base of your tomato plants. The baking soda will be absorbed into the soil and lower the acidity levels, thus, giving you tomatoes that are more sweet than tart.
2. Fish heads
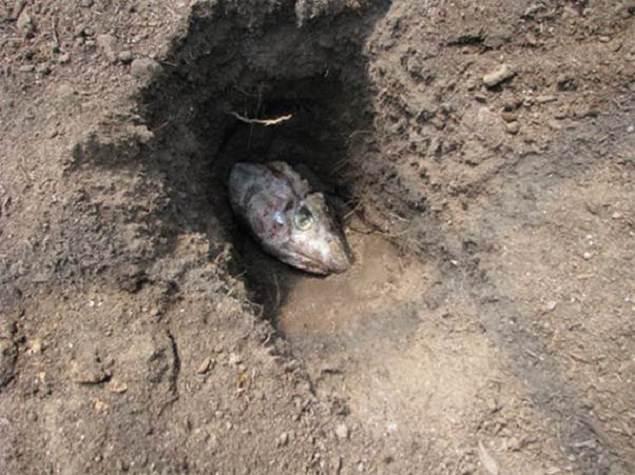
Fish heads have been used as a natural fertilizer in the garden for a long time. Their popularity with tomato planting is not a myth that needs to be busted. It works! Their decay releases nitrogen, potassium, many essential trace elements, calcium and phosphorous. The only problem with burying fish heads is that critters may dig them up. To avoid this, bury deeply, at least a foot. You can drop them into the hole whole or use groundfish scraps which you can mix with water(2 cups) and milk(1 cup) for a supercharge solution. If you want to read more on this, here’s an article in detail!
3. Aspirin
Drop 2-3 aspirin tablets in the hole either whole or ground; this is to boost plant immunity, it also helps to ward off diseases like blight and increases the yield. The salicylic acid, a compound in aspirin is the reason why it works. You can also spray plants with the solution contain this drug. If you want to read more about ASPIRIN uses on tomato plants in detail, visit DailyMail UK.
4. Eggshells
Eggshells boost the calcium content in the soil. And just like us, Calcium is one of the most important components that plant needs for growth. Here’s a very educative article if you like to read, it also helps to prevent blossom end rot. Whether you’re planting tomatoes in the garden bed or containers, you can always put eggshells before planting.
Also Read: Eggshell Uses in the Garden
5. Epsom Salt

Tomatoes suffer from magnesium deficiency that is why it’s a good idea to add 1 or 2 tablespoons of Epsom salt while transplanting the seedling in the bottom of the planting hole (both in containers or garden bed). Cover this with a thin layer of soil; this is to make sure that roots are not directly touching Epsom salt.
Epsom salt must be used when growing tomatoes; it can do miracles. Read why you should use it here!
Also Read: 13 Great Epsom Salt Uses in the Garden
6. Kelp Meal
Kelp meal is rich in micro-nutrients and trace elements. It provides complete nutrient for plants, the addition of kelp gives tomatoes a turbo boosted start. Slow-release kelp fertilizer contains the tomato with sufficient nutrient over a period which prevents the plant from experiencing shock as is with the use of excess fertilizers. One cup-full of kelp meal is adequate for the plant at the time of planting. If you want to read more about kelp fertilizer, click here!
7. Bone Meal
Similar to kelp meal, bone meal is also an addition to the tomato hole during planting. A handful or cup-full of bone meal is essential for a blossoming and quality fruits of the tomato plant since it provides the much-needed phosphorus nutrient which is one of the most vital components for healthy tomato growth.
8. Used coffee grounds

Add well-composted coffee grounds to the planting hole when transplanting tomato seedlings to improve soil composition and provide a source of slow-release nutrients to your plants. It is an excellent source of fertilizer and can be used even as a mulch. We have written a comprehensive guide on coffee grounds uses, take a look!
The homegrown TOMATOES are so delicious, and when you pick them fresh and eat, the delightful taste you get is just unmatchable. Better than store bought fruits. The thick, juicy, plump, sweet, a bit acrid and so satiating– the tomatoes are one of the first fruits (vegetable, if you say) everyone wants to grow from the beginning of the gardening season.1. Baking Soda
It works and really a good trick (especially when you’re growing tomatoes in containers) if you want sweeter tomatoes. Simply sprinkle a small amount of baking soda around the base of your tomato plants. The baking soda will be absorbed into the soil and lower the acidity levels, thus, giving you tomatoes that are more sweet than tart.
2. Fish heads
Fish heads have been used as a natural fertilizer in the garden for a long time. Their popularity with tomato planting is not a myth that needs to be busted. It works! Their decay releases nitrogen, potassium, many essential trace elements, calcium and phosphorous. The only problem with burying fish heads is that critters may dig them up. To avoid this, bury deeply, at least a foot. You can drop them into the hole whole or use groundfish scraps which you can mix with water(2 cups) and milk(1 cup) for a supercharge solution. If you want to read more on this, here’s an article in detail!
3. Aspirin
Drop 2-3 aspirin tablets in the hole either whole or ground; this is to boost plant immunity, it also helps to ward off diseases like blight and increases the yield. The salicylic acid, a compound in aspirin is the reason why it works. You can also spray plants with the solution contain this drug. If you want to read more about ASPIRIN uses on tomato plants in detail, visit DailyMail UK.
4. Eggshells
Eggshells boost the calcium content in the soil. And just like us, Calcium is one of the most important components that plant needs for growth. Here’s a very educative article if you like to read, it also helps to prevent blossom end rot. Whether you’re planting tomatoes in the garden bed or containers, you can always put eggshells before planting.
Also Read: Eggshell Uses in the Garden
5. Epsom Salt
Tomatoes suffer from magnesium deficiency that is why it’s a good idea to add 1 or 2 tablespoons of Epsom salt while transplanting the seedling in the bottom of the planting hole (both in containers or garden bed). Cover this with a thin layer of soil; this is to make sure that roots are not directly touching Epsom salt.
Epsom salt must be used when growing tomatoes; it can do miracles. Read why you should use it here!
Also Read: 13 Great Epsom Salt Uses in the Garden
6. Kelp Meal
Kelp meal is rich in micro-nutrients and trace elements. It provides complete nutrient for plants, the addition of kelp gives tomatoes a turbo boosted start. Slow-release kelp fertilizer contains the tomato with sufficient nutrient over a period which prevents the plant from experiencing shock as is with the use of excess fertilizers. One cup-full of kelp meal is adequate for the plant at the time of planting. If you want to read more about kelp fertilizer, click here!
7. Bone Meal
Similar to kelp meal, bone meal is also an addition to the tomato hole during planting. A handful or cup-full of bone meal is essential for a blossoming and quality fruits of the tomato plant since it provides the much-needed phosphorus nutrient which is one of the most vital components for healthy tomato growth.
8. Used coffee grounds
Add well-composted coffee grounds to the planting hole when transplanting tomato seedlings to improve soil composition and provide a source of slow-release nutrients to your plants. It is an excellent source of fertilizer and can be used even as a mulch. We have written a comprehensive guide on coffee grounds uses, take a look!
0
0
文章
Alicia
2017年05月22日

Learn about the companion plants for tomatoes. Tomato companion plants are those that help it in growing more productively.
The key of getting most productive tomato plants is to plant right companions with it. Read this article to find out which are the best companion plants for tomatoes.

Companion planting is a sustainable way to grow healthy tomatoes without the use of toxic pesticides. Many good companion plant for tomatoes are herbs and flowers like marigold.
Also Read: How to Grow Tomatoes in Hanging Baskets
Tomato Companion Plants: Herbs
Basil and tomatoes in the garden go as well together as they do in the kitchen. Plant two or three basil plants near tomatoes. They not only enhances the flavor of each other and improves growth but also keep the pests away.
Plant garlic between each tomato plant to discourage red spider mites and plant parsley to improve the taste of tomatoes. Chives and mint are pungent herbs that also deter away the pests and are compatible with tomatoes.
Plant borage near tomatoes as it protects tomato plants from tomato hornworm.
Tomato Companion Plants: Vegetables
Tomatoes also do well with beans, peas, peppers, onions and lettuce. Carrots and tomatoes also go well together, although carrots grow little stunned if planted too close to the tomato plants but their flavor will be higher.
Also Read: Carrot Companion Plants
Tomato Companion Plants: Flowers
Flowers planted with tomatoes add variety in the garden. Plant marigolds along with tomatoes – they keep the soil healthy, prevent nematodes and discourage many common garden pests. This bright annual flower also adds color to the garden and attract beneficial insects to your tomato patch.
Calendula also keeps the pests away. As an added bonus, its flowers are edible and added in salads and desserts. Nasturtiums too are good companion plants for tomatoes.
Unsuitable Plants for Tomatoes
While some companion plants improve or do not affect the tomatoes, some plants are best avoided to be planted near them. Generally tomatoes are heavy feeders, they require lots of sun, water and nutrients so you should avoid plants that have higher growing requirements or have pests and diseases like tomatoes. Don’t pare tomatoes with cabbage, broccoli, kohlrabi and other members of brassica genus, as they slow up the growth and development of tomatoes.
Tomatoes and potatoes are also not a good match – both suffer from the same pests and diseases and once it hits one plant, quickly affect the other. Corn is another plant that needs to be avoided as both are vulnerable to a worm that can be transferred between the two plants.
Plants that Do well with Tomatoes
Tomatoes when planted with some plants also help them. A bed of asparagus with a few tomato plants will be more resistant to asparagus beetle. When planted with roses, tomatoes prevent black spot in roses, a fungal disease that attacks the roses.
The key of getting most productive tomato plants is to plant right companions with it. Read this article to find out which are the best companion plants for tomatoes.
Companion planting is a sustainable way to grow healthy tomatoes without the use of toxic pesticides. Many good companion plant for tomatoes are herbs and flowers like marigold.
Also Read: How to Grow Tomatoes in Hanging Baskets
Tomato Companion Plants: Herbs
Basil and tomatoes in the garden go as well together as they do in the kitchen. Plant two or three basil plants near tomatoes. They not only enhances the flavor of each other and improves growth but also keep the pests away.
Plant garlic between each tomato plant to discourage red spider mites and plant parsley to improve the taste of tomatoes. Chives and mint are pungent herbs that also deter away the pests and are compatible with tomatoes.
Plant borage near tomatoes as it protects tomato plants from tomato hornworm.
Tomato Companion Plants: Vegetables
Tomatoes also do well with beans, peas, peppers, onions and lettuce. Carrots and tomatoes also go well together, although carrots grow little stunned if planted too close to the tomato plants but their flavor will be higher.
Also Read: Carrot Companion Plants
Tomato Companion Plants: Flowers
Flowers planted with tomatoes add variety in the garden. Plant marigolds along with tomatoes – they keep the soil healthy, prevent nematodes and discourage many common garden pests. This bright annual flower also adds color to the garden and attract beneficial insects to your tomato patch.
Calendula also keeps the pests away. As an added bonus, its flowers are edible and added in salads and desserts. Nasturtiums too are good companion plants for tomatoes.
Unsuitable Plants for Tomatoes
While some companion plants improve or do not affect the tomatoes, some plants are best avoided to be planted near them. Generally tomatoes are heavy feeders, they require lots of sun, water and nutrients so you should avoid plants that have higher growing requirements or have pests and diseases like tomatoes. Don’t pare tomatoes with cabbage, broccoli, kohlrabi and other members of brassica genus, as they slow up the growth and development of tomatoes.
Tomatoes and potatoes are also not a good match – both suffer from the same pests and diseases and once it hits one plant, quickly affect the other. Corn is another plant that needs to be avoided as both are vulnerable to a worm that can be transferred between the two plants.
Plants that Do well with Tomatoes
Tomatoes when planted with some plants also help them. A bed of asparagus with a few tomato plants will be more resistant to asparagus beetle. When planted with roses, tomatoes prevent black spot in roses, a fungal disease that attacks the roses.
3
3
求助
Amanda Lynn
2017年05月22日

My boyfriend bought me a beautiful succulant arrangement. I have identified all but this one. It resembles an elephant bush l, however the stem is a light green and the leaves have a very delicate fuzz on them. Is this typical of a young EB plant? Or, is this something else??

0
0
Amanda Lynn:Thank you so much! Im just starting to really get into gardening and I want to provide the best care to my little greenies that I can, but I need to know the species! lol
我是小花:The plant may be a Crassula rogersii, a polymeth, native to South Africa
文章
Andrea
2017年05月22日

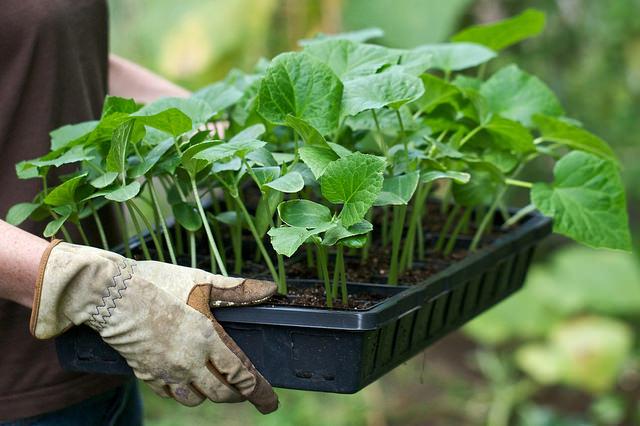
When thinking about planting seeds, sometimes it can be confusing. What should I plant when? Well, the answer is… there are a lot of different answers! What to plant when depends on your location and zone, your weather, and your planting method. Some seeds must be started indoors early, and others can be planted right out in the garden. Here are our picks for seed starting calendars so you know just what to plant when! Our feature photo above comes from Anne at ‘The Micro Gardener’. She has compiled a list of garden planting calendars and resources you shouldn’t miss.
First thing you need to know is your growing “zone”. In the US, you can find your zone for your state and area by visiting the ‘USDA” website. If you need to find out your frost dates, you can use this chart from ‘Food Skills and Self Sufficiency‘.

Next, you want a way to keep track of what you plant, and a place to hold onto any printable calendars and resources. I recommend a garden journal. You can buy one at any bookstore, or you download the free printable garden journal from ‘About.com’ and simply slip it into a binder cover.

Margaret Roach from ‘A Way to Garden’ has a program you can use to help you no matter what zone you garden in. All you have to know is your approximate last frost date. You plug that date into her planting calculator, and it tells you the best dates to plant from seed indoors, or to transplant or plant from seed outdoors. She has both veggies and annual flowers on her calculator for you. Margaret has been a garden writer for both Newsday and Martha Stewart Living.

From ‘Anglican Home’, this vegetable planting cheat sheet gives you info on what to plant when, also ideas on container planting and companion planting as well!

Many vegetables can be planted for winter harvest… it’s not just spring that these decisions have to be made! ‘Territorial Seeds‘ has a winter gardening planting calendar for a general idea on when, and what to plant for winter harvest. If you live in a severe winter climate, check with your local nursery to verify these dates.

So no matter where you live or what you plant, here are the garden planting calendars and resources to get the right plant, into the right spot, at the right time!
1
0
文章
Micky
2017年05月22日
Care and growing castor beans is simple and easy. Learn how to grow castor oil plant in this article.
Castor, botanically known as Ricinus communis, is a herbaceous perennial plant. It can be grown as an annual or perennial, depending on the weather.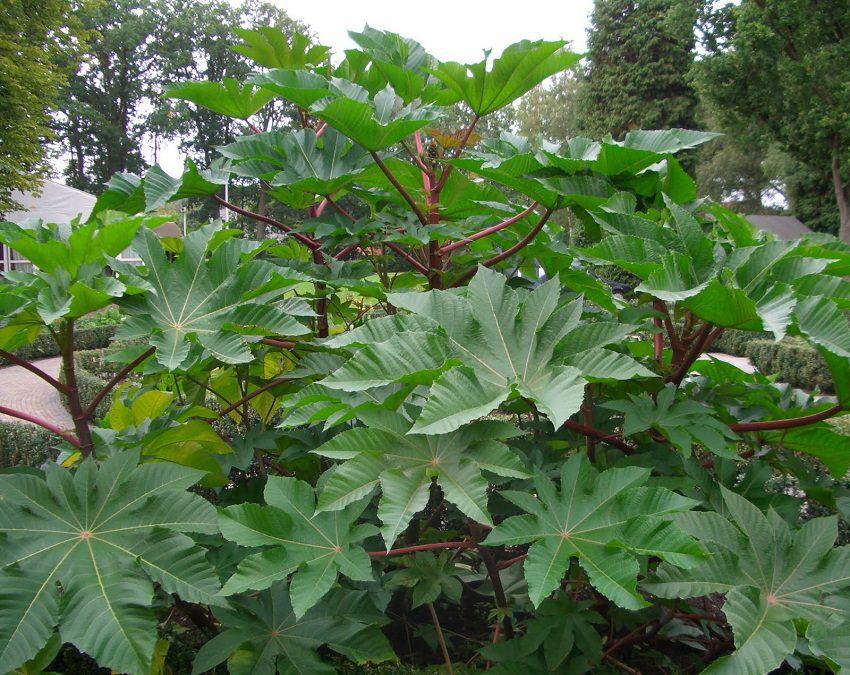
USDA Zones — 9 – 11
Propagation Method — Seeds, cuttings
Difficulty — Easy
Soil Type — Neutral
Other names — Castor oil plant, wonder tree, arandi, kege, amanakku, chittamankku, ricin, castorbean, erand, eranda, gandharva hasta, graine de ricin, tangantangan Oil Plant
Native to Eastern Africa and India, the castor plant is world’s most poisonous plant. Still it is grown for various medicinal purposes and as an ornamental plant. It has large attractive foliage, star-shaped thorns and red seed capsules. Planting a castor plant is a great way to add some low-cost tropical touch to your home landscape but you should be aware if you’ve children or pets.
You can grow this plant as an annual in the Department of Agriculture (USDA) hardiness zones plant 2 – 9 and as perennial in USDA Zone 9b and above.
The plant grows rapidly, achieving height of six feet or more in just three months and reaches a maximum height of up to 12 m and is a very invasive plant in places where it is native of
Conditions for Growing Castor Beans
Castor plant grows quickly and as it is native to tropics, it needs heat and warm temperature to grow, the optimal cultivation temperature is 77 – 86 F (25 – 30 ° C) with a good amount of light.
It is also possible to grow castor oil plant in coastal areas.
Propagation
Growing castor beans plant is possible by seeds. Soak castor seeds in a glass of water for 24 hours before planting. Use filtered or purified water instead of tap water.
Planting Castor Beans
Sow castor seeds 1 inches deep and space the seeds at least 3 feet away. Keep the soil moist and transplant them to bigger pot or in the garden when the two real leaves emerge.
In the garden, space castor plants 3 feet apart. Add some well-rotted compost in the planting hole.
For growing castor beans in a pot, choose a large container and use potting mix or make it yourself by mixing equal parts of soil, perlite, peat and compost.
Requirements for Growing Castor BeansSoil
The soil has to be rich in organic substance and must be well drained much as it does not tolerate water logging. Castor plant is quite adaptable to many types of soil.
Sun
Castor loves the sun but needs to be sheltered from the prevailing winds because of its height.
Watering
Castor plant prefers the soil to be always slightly moist. In winter, reduce watering and let the soil to dry out between watering spells.
Castor Oil Plant CareFertilizer
Fertilize the castor plant once a month with an all-purpose fertilizer. Spread a layer of an inch of aged manure or compost around the base of plant when the buds begin to emerge.
Pruning
Pruning is not necessary for castor plant.
Harvesting
Select the bean pods as they begin to dry on the plant. Either remove the castor plants from the garden with pods or leave them if growing as perennial. Wear garden gloves, long-sleeved shirt and long pants during harvesting castor beans and disposal of plants.
Pests and Diseases
1
0
文章
Abigal
2017年05月22日

Learn how to grow gaura in your garden. Gaura plant care and growing is easy. This drought tolerant shrub thrives in well-drained soil and loves to bath in the day long sun.
The gaura is a beautiful perennial plant that is easy to grow and with minimal care, it offers a long blooming period and colorful flowers that attract butterflies.
Gaura Plant Care

USDA Zones— 5 – 10
Difficulty— Easy
Other Names— Wandflower, Butterfly gaura, Whirling butterfly, Siskiyou pink
The genus “Gaura” consists of about 20 species of plants. It is native to North America. Its fine erected foliage and irregularly shaped flowers make it attractive. You can vary the uses according to the species, low growing varieties (not more than 24 inches) are placed in borders or in rock gardens while the large shrub-like varieties are perfect for growing in the cluster behind low growing plants in flower beds.
Two Popular VarietiesGaura Biennis (Biennial Gaura): A tall variety that can grow 3-6 feet high. The foliage is red when matured, it has hairy flowering stems and light pink or white colored flowers that turn into coral red in late summer and fall.Gaura Lindheimeri (White Gaura): A Texas native, tolerant to drought. It grows up to 5 feet tall, flowers appears from summer to fall.How to Grow GauraPropagation
Gaura can be propagated from seeds.The seeds are available in local garden shops or can be bought online. Propagation by cuttings should be done in spring and late summer or by division in the fall.
Planting Gaura
Prepare the planting site by performing a deep plowing. Remove stones, debris, and weeds. This plant doesn’t transplant well, that’s why it is better to sow the seeds directly at the planting site, once all the dangers of frost are eliminated and the weather warms up.
If you are planting a potted gaura plant, make sure to make a planting hole in soil– twice wide and of the same depth as it was planted in the previous pot. Place the plant in the hole and fill that with well-drained soil. If the soil is very heavy or poor prepare it by adding compost or well-rotted manure and coarse sand in smaller proportion.
How to Grow Gaura in Pots
Growing gaura in pots is possible. Choose the pot that is 12 inches deep and 10 inches wide to provide a sufficient space to the plant. Keep the pot in sunny spot and water it only when the top surface of soil dries out.
Requirements for Growing Gaura

Position
Planting position must be sunny, for prolific blooms exposure to at least 6 hours of sunlight is ideal. If the location is windy provide support to plants.
Soil
Gaura grows well in light and sandy soil. Due to its taproot, the soil must be deep and also little fertile. Water logging soil that is clay rich and cloaks the drainage hinders the development and must be avoided.
Watering
Growing gaura is easy. As it adapts well to the drought-like conditions due to the long taproot it has, infrequent and economical watering is recommended. Water it deeply but only when the top two inch of soil seems dry.
Spacing
The planting distance for low growing varieties is around 12 inches. For more shrub like large varieties, space the plants 15 inches apart from each other.
Gaura Plant CareFertilizer
Gaura doesn’t require additional fertilizer to bloom. It thrives in poor soil. Application of manure or compost during planting is sufficient. Even adding too much natural fertilizer can cause the plant to grow limply.
Deadheading and Pruning
Remove spent flower spikes as soon as they fade, cut the entire stalk to promote more blooms. Once the blooming period ends in late summer, trim the shrub slightly (3″) to refresh it. The plant will start to flower again in fall with more vigor.
Overwintering
Gaura plant care is if you live in the warmer region. During the winter, let the faded stems on site, they provide protection against the cold. It is also recommended to mulch around the roots to insulate them, especially if you live below USDA Zone 8.
Diseases and Pests
The gaura is a beautiful perennial plant that is easy to grow and with minimal care, it offers a long blooming period and colorful flowers that attract butterflies.
Gaura Plant Care
USDA Zones— 5 – 10
Difficulty— Easy
Other Names— Wandflower, Butterfly gaura, Whirling butterfly, Siskiyou pink
The genus “Gaura” consists of about 20 species of plants. It is native to North America. Its fine erected foliage and irregularly shaped flowers make it attractive. You can vary the uses according to the species, low growing varieties (not more than 24 inches) are placed in borders or in rock gardens while the large shrub-like varieties are perfect for growing in the cluster behind low growing plants in flower beds.
Two Popular VarietiesGaura Biennis (Biennial Gaura): A tall variety that can grow 3-6 feet high. The foliage is red when matured, it has hairy flowering stems and light pink or white colored flowers that turn into coral red in late summer and fall.Gaura Lindheimeri (White Gaura): A Texas native, tolerant to drought. It grows up to 5 feet tall, flowers appears from summer to fall.How to Grow GauraPropagation
Gaura can be propagated from seeds.The seeds are available in local garden shops or can be bought online. Propagation by cuttings should be done in spring and late summer or by division in the fall.
Planting Gaura
Prepare the planting site by performing a deep plowing. Remove stones, debris, and weeds. This plant doesn’t transplant well, that’s why it is better to sow the seeds directly at the planting site, once all the dangers of frost are eliminated and the weather warms up.
If you are planting a potted gaura plant, make sure to make a planting hole in soil– twice wide and of the same depth as it was planted in the previous pot. Place the plant in the hole and fill that with well-drained soil. If the soil is very heavy or poor prepare it by adding compost or well-rotted manure and coarse sand in smaller proportion.
How to Grow Gaura in Pots
Growing gaura in pots is possible. Choose the pot that is 12 inches deep and 10 inches wide to provide a sufficient space to the plant. Keep the pot in sunny spot and water it only when the top surface of soil dries out.
Requirements for Growing Gaura
Position
Planting position must be sunny, for prolific blooms exposure to at least 6 hours of sunlight is ideal. If the location is windy provide support to plants.
Soil
Gaura grows well in light and sandy soil. Due to its taproot, the soil must be deep and also little fertile. Water logging soil that is clay rich and cloaks the drainage hinders the development and must be avoided.
Watering
Growing gaura is easy. As it adapts well to the drought-like conditions due to the long taproot it has, infrequent and economical watering is recommended. Water it deeply but only when the top two inch of soil seems dry.
Spacing
The planting distance for low growing varieties is around 12 inches. For more shrub like large varieties, space the plants 15 inches apart from each other.
Gaura Plant CareFertilizer
Gaura doesn’t require additional fertilizer to bloom. It thrives in poor soil. Application of manure or compost during planting is sufficient. Even adding too much natural fertilizer can cause the plant to grow limply.
Deadheading and Pruning
Remove spent flower spikes as soon as they fade, cut the entire stalk to promote more blooms. Once the blooming period ends in late summer, trim the shrub slightly (3″) to refresh it. The plant will start to flower again in fall with more vigor.
Overwintering
Gaura plant care is if you live in the warmer region. During the winter, let the faded stems on site, they provide protection against the cold. It is also recommended to mulch around the roots to insulate them, especially if you live below USDA Zone 8.
Diseases and Pests
1
0
文章
Micky
2017年05月22日
Learn how to plant thuja, it’s one of the fast growing privacy trees you’d like to plant in your garden.
Thuja is a small genus belonging to the group of conifers and to the family of Cupressaceae. It is native to North America and Asia. It has a columnar habit and flattened branches. Some of its varieties can reach up to 200 feet tall in favorable climate.
USDA Zones — 3 – 11
Propagation Method — Seeds, vegetative propagation
Difficulty — Easy
Soil pH — 6 – 8
Varieties and How to Plant Thuja
There are three species most widespread: Thuja green giant, which is a hybrid of thuja plicata and Thuja standishii– the most popular cultivar that reaches height of 18 to 25 m and has very rapid growth and ornamental use. The tops of its branches are solid to the touch and its foliage are mildly fragrant.
Thuja occidentalis, also called as white cedar is famous for its amazing ornamental foliage. It’s a beautiful small tree that gives rustic appearance. It grows between to 10 to 20 meters high.
Thuja plicata is also referred as giant or western arborvitae. It grows up to amazing height of 55 to 60 m (180 to 200 ft).
Propagation
It can be propagated from seeds, cuttings and air layering. Propagate in summer using fresh cuttings.
Position for Growing Arborvitae
Thuja grows easily in both full sun and partial shade. However, exposure to cold harsh winds can be damaging to young plants.
RequirementsSoil
Thuja grows in most soil types. But the best soil for it is fertile soil that has ability to retain moisture. It also tolerates very chalky soils.
Watering
Water thuja deeply. Soil around it should be kept moist and covered, constantly, from a mulch of organic material.
Fertilizer
It needs regular fertilization to grow fast. Feed it with balanced liquid fertilizer in the beginning of growing season to kick start the growth.
Thuja CarePruning
It doesn’t require pruning as it naturally grows in columnar shape. Although if you are growing this for hedge prune regularly to maintain shape. It can tolerate excessive pruning without any problem.
Pests and Diseases
1
0
文章
Micky
2017年05月22日
Learn how to grow carob tree. Growing carob tree is easy, it’s also grown as ornamental plant in the gardens.
Growing Carob is durable evergreen tree native to the Mediterranean. It has bright, green beautiful foliage, cluster of small flowers and edible pods that are used as cocoa powder substitute.
Carob pods contain about 8% protein, vitamins A and B and about one-third of calories than chocolate.
USDA Zones — 9-11
Propagation Method — Seeds
Difficulty — Easy
Soil pH — 6 – 8
Carob Tree Growing Conditions
Carob tree grows about 10 meter tall (exceptionally 15 m). It is a dioecious tree, which means each tree bears male or female flowers. Carob tree can bear up to 20 F temperature.
Carob tree has a thick and twisted trunk with a rough and brown bark. Its leaves are oval, dark green and shiny that are 12 to 30 centimeters long. Its foliage provides a welcome shade in hot countries. They form a very effective curtain against noise too.
Growing Carob from Seeds
The fresh carob tree seeds germinates quickly and easily. If you don’t find fresh seeds you can grow it from dry seeds which is scarified and soaked in water until they double in size. They can be planted in spring or fall.
Requirements for Growing Carob TreeSoil
The carob tree is a tree that grows in many soil types including hillsides with deep sandy soil or loam, even arid. It does not tolerate acidic or wet soils but requires good drainage.
Sun
Carob tree needs full sun and a position sheltered from wind.
Watering
It is resistant to drought. However, watering must be provided during dry seasons, especially if the tree is grown for its fruit.
Carob Tree Care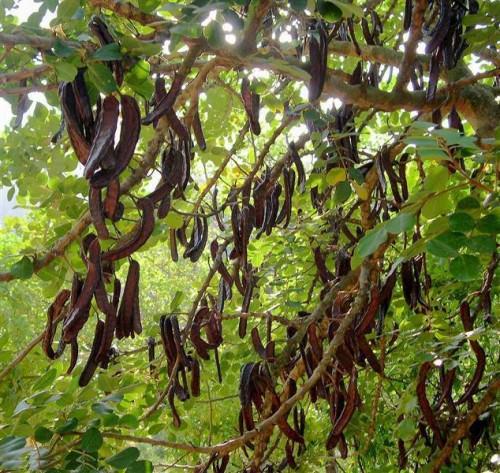
Once fully developed carob tree can withstand temperatures up to -7 ° C, but frost during flowering period can reduce or sometimes prevent fruiting. The tree is ideally grown in regions with a Mediterranean climate.
Fertilizer
Fertilizer is often unnecessary for carob trees. However, a 8-3-9 fertilizer can be applied occasionally to give plant a boost.
Pruning
0
0
文章
Andy
2017年05月22日

Learn how to grow tulsi plant, its care and growing requirements are simple and easy.
Tulsi or holy basil is an incredible herb revered in Indian mythology in Hinduism for its medicinal and spiritual characteristics.
Tulsi, a medicinal herb is native to India, its spicy and refreshing fragrance and tiny colorful flowers makes this a useful houseplant. Tulsi grows as a perennial plant in areas with mild winter and as an annual in cold and temperate climates.
USDA Zones — 10-11, can be grown in the cooler zones as annual
0
0
求助
Ueca
2017年05月22日

What is the species of this plant?

1
0
Ueca:It now looks like this after I gave it to a friend.
Kyla Hunter:a type of haworthia
Amanda Lynn:Aloe kilifiensis ! 🌿🌱
桃子 奋斗ing💯:芦荟


求助
Ueca
2017年05月20日
What is the species of this plant in the middle?

0
0
meriunkat:looks like Crassula Tetragona "Miniture tree pinetree"


