求助
kimberly
2018年04月22日

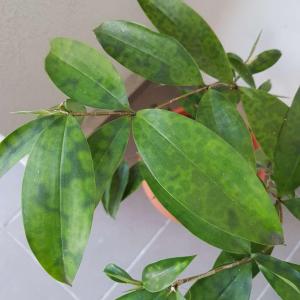
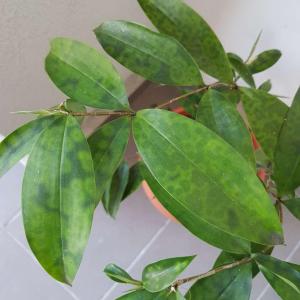
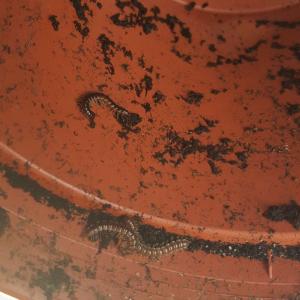
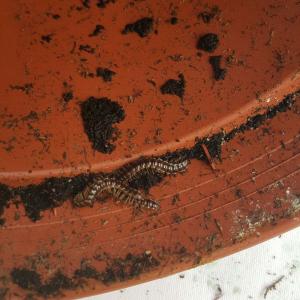
I found these in my monstera plant, does anyone know if they are harmful to my plant?


0
0
Ueca:If you see ones that look similar but run really freaking fast that means it's a centipede. They're scary, but harmless to plants.
Ueca:Flat-back millipedes (Polydesmus angustus) are herbivores and prefer to eat dead plant matter, fruits, and juicy vulnerable plants. Probably not a big problem but make sure they don't become too numerous.
文章
Miss Chen
2018年04月20日

Acorn squash (Cucurbita pepo) is an annual vining winter squash plant that produces ribbed fruit with green or gold rinds. When harvested ripe, the fruits store for about three months. To determine if an acorn squash is ripe, consider the appearance and texture of its skin, the condition of the vine and the number of days since sowing.

Skin Appearance
An orange patch appears on the area of the acorn squash that rests on the ground when the fruit is ripe, and skin is matte. An immature acorn squash is shiny. As the fruit ripens, it loses its shine and looks dry and dull.
Skin Texture
A ripe acorn squash has a very tough skin. To test whether an acorn squash is ripe, try to pierce the skin with your thumbnail. Your nail won't easily leave a mark on a ripe acorn squash.
Vine Condition
As an acorn squash matures, the vine deteriorates. When an acorn squash plant turns yellow and dies back, the fruit are usually ripe.
Harvest Time
Acorn squash are usually ready to harvest about 80 to 100 days after sowing. The seeds are sown in spring after the final local average frost date, and the fruits mature as fall approaches.

Unripe Fruit
An unripe acorn squash doesn't ripen after harvest. Acorn squash fruit texture and flavor develops as the fruit ripens. Unripe fruit are watery and taste bland, and store badly.
'Jersey Golden Acorn'
'Jersey Golden Acorn' is an acorn squash variety that produces fruit that can be picked unripe without losing flavor. The flesh of this variety is sweet when the fruit is golfball-sized, and the skin is soft. You can eat unripe 'Jersey Golden Acorn' fruit raw or cooked.
Fruit Harvest
Harvest acorn squash by cutting the stem 1 inch from the fruit, and store the fruit in a dry place at 50 degrees Fahrenheit. An acorn squash fruit stores best at 50 to 75 percent humidity.

Skin Appearance
An orange patch appears on the area of the acorn squash that rests on the ground when the fruit is ripe, and skin is matte. An immature acorn squash is shiny. As the fruit ripens, it loses its shine and looks dry and dull.
Skin Texture
A ripe acorn squash has a very tough skin. To test whether an acorn squash is ripe, try to pierce the skin with your thumbnail. Your nail won't easily leave a mark on a ripe acorn squash.
Vine Condition
As an acorn squash matures, the vine deteriorates. When an acorn squash plant turns yellow and dies back, the fruit are usually ripe.
Harvest Time
Acorn squash are usually ready to harvest about 80 to 100 days after sowing. The seeds are sown in spring after the final local average frost date, and the fruits mature as fall approaches.

Unripe Fruit
An unripe acorn squash doesn't ripen after harvest. Acorn squash fruit texture and flavor develops as the fruit ripens. Unripe fruit are watery and taste bland, and store badly.
'Jersey Golden Acorn'
'Jersey Golden Acorn' is an acorn squash variety that produces fruit that can be picked unripe without losing flavor. The flesh of this variety is sweet when the fruit is golfball-sized, and the skin is soft. You can eat unripe 'Jersey Golden Acorn' fruit raw or cooked.
Fruit Harvest
Harvest acorn squash by cutting the stem 1 inch from the fruit, and store the fruit in a dry place at 50 degrees Fahrenheit. An acorn squash fruit stores best at 50 to 75 percent humidity.
0
0
文章
Miss Chen
2018年04月18日

The definition of a vegetable is any edible portion of a plant that does not include a sweet fruit or seed. Vegetables typically consist of leafy, root and stem sections of plants; however, some plants labeled as vegetables are fruits by botanical definition. These mislabeled fruits are plants that contain seeds, but for culinary purposes, are vegetables because the plants lack sweetness.
Tomatoes

Tomatoes are one of the most popular vegetables grown in home gardens, according to the University of Illinois. This warm season perennial has hundreds of cultivars in numerous shapes, sizes and colors. Tomatoes originate from South America and belong to the Solanaceae plant family. Tomatoes plants fall into two categories: determinate and indeterminate. Determinate tomato plants develop flower clusters that stop the growth of the plant vertically. Indeterminate tomato plants form lateral flower clusters that prevent horizontal growth but allow vertical. Some tomato plants need caging or staking because of the weight of the plant.
Peppers

Peppers are tender vegetables planted as warm season crops and are native to Mexico, Central and South America. These multi-purpose seed-containing vegetables belong to the Solanaceae plant family. Peppers come in multiple sizes and shapes including species like bell, sweet and hot peppers. Bell peppers include bell boy and lady bell cultivars. Sweet peppers used in salads are banana peppers and gypsy. Hot peppers entail varieties like jalapeno, red chili and cayenne. Peppers enjoy well-draining fertile soil with ample moisture.
Eggplants

Eggplants are part of the Solanaceae plant family. These purple and white colored cold-seasoned vegetables are native to India, Pakistan, Sri Lanka, Nepal and Bangladeshis. Eggplants come in many varieties including large oval-shaped, elongated and small oval-shaped. Smaller species have the ability to grow in containers. Eggplants require a nitrogen-based fertilizer with plenty of moisture. These seed-bearing vegetables enjoy the hot conditions of summer and need a long growing season. Two typical problems with eggplant crops are the verticillium wilt, a plant disease, and flea beetles.
Cucumbers

Cucumbers are warm-seasoned vegetables that originate from India. This dark green cylindrical vegetable from the Cucurbitaceae family develops from creeping vines. Cucumbers come in many varieties including long green slicing, compact long green slicing and pickling. Burpless is a long green slicing hybrid cucumber that takes 62 days to harvest, fanfare is a compact long green slicing hybrid that is disease resistant, and Carolina is a medium-sized pickling cucumber. Cucumbers also come in an assortment of dwarf cultivars. Cucumbers have shallow roots; therefore, they need plenty of moisture.
Tomatoes

Tomatoes are one of the most popular vegetables grown in home gardens, according to the University of Illinois. This warm season perennial has hundreds of cultivars in numerous shapes, sizes and colors. Tomatoes originate from South America and belong to the Solanaceae plant family. Tomatoes plants fall into two categories: determinate and indeterminate. Determinate tomato plants develop flower clusters that stop the growth of the plant vertically. Indeterminate tomato plants form lateral flower clusters that prevent horizontal growth but allow vertical. Some tomato plants need caging or staking because of the weight of the plant.
Peppers

Peppers are tender vegetables planted as warm season crops and are native to Mexico, Central and South America. These multi-purpose seed-containing vegetables belong to the Solanaceae plant family. Peppers come in multiple sizes and shapes including species like bell, sweet and hot peppers. Bell peppers include bell boy and lady bell cultivars. Sweet peppers used in salads are banana peppers and gypsy. Hot peppers entail varieties like jalapeno, red chili and cayenne. Peppers enjoy well-draining fertile soil with ample moisture.
Eggplants

Eggplants are part of the Solanaceae plant family. These purple and white colored cold-seasoned vegetables are native to India, Pakistan, Sri Lanka, Nepal and Bangladeshis. Eggplants come in many varieties including large oval-shaped, elongated and small oval-shaped. Smaller species have the ability to grow in containers. Eggplants require a nitrogen-based fertilizer with plenty of moisture. These seed-bearing vegetables enjoy the hot conditions of summer and need a long growing season. Two typical problems with eggplant crops are the verticillium wilt, a plant disease, and flea beetles.
Cucumbers

Cucumbers are warm-seasoned vegetables that originate from India. This dark green cylindrical vegetable from the Cucurbitaceae family develops from creeping vines. Cucumbers come in many varieties including long green slicing, compact long green slicing and pickling. Burpless is a long green slicing hybrid cucumber that takes 62 days to harvest, fanfare is a compact long green slicing hybrid that is disease resistant, and Carolina is a medium-sized pickling cucumber. Cucumbers also come in an assortment of dwarf cultivars. Cucumbers have shallow roots; therefore, they need plenty of moisture.
0
0
文章
Miss Chen
2018年04月18日

Pepperoncini peppers belong to the mild hot pepper group of of pepper plants. The peppers are served fresh, cooked or pickled. Pepperoncinis are typically used in the yellow-green stage. You can leave them on the plant until they develop an orange-red color, but pepperoncini aren't typically ripened to the full stage. Picking the peppers during the yellow-green period results in a crisp pepper that withstands pickling well and retains the characteristic flavor and texture of the pepperoncini.

Step 1
Inspect the color and skin condition of the pepper. Harvest the peppers when they are evenly yellow-green in color and when the skin has become glossy. Dull-skinned pepperoncini haven't ripened sufficiently.
Step 2
Press lightly on the pepperoncini. Harvest those that have developed firm flesh and avoid those that are thin or flimsy.
Step 3
Cut the ripe pepperoncini from the plant with shears, leaving 1/2 inch of the stem attached. Don't pull the pepper off the plant, as this damages the plant and the pepper.

Step 4
Place the pepperoncinis in a plastic storage bag or container. Store the peppers in the vegetable crisper drawer of the refrigerator for one to three weeks before using or preparing them for long term storage.

Step 1
Inspect the color and skin condition of the pepper. Harvest the peppers when they are evenly yellow-green in color and when the skin has become glossy. Dull-skinned pepperoncini haven't ripened sufficiently.
Step 2
Press lightly on the pepperoncini. Harvest those that have developed firm flesh and avoid those that are thin or flimsy.
Step 3
Cut the ripe pepperoncini from the plant with shears, leaving 1/2 inch of the stem attached. Don't pull the pepper off the plant, as this damages the plant and the pepper.

Step 4
Place the pepperoncinis in a plastic storage bag or container. Store the peppers in the vegetable crisper drawer of the refrigerator for one to three weeks before using or preparing them for long term storage.
0
0
文章
Miss Chen
2018年04月17日

If you want an abundant crop of orange pumpkins for use at Halloween or for making pies for Thanksgiving, Ohioans must prepare a garden plot and plant after danger of frost passes in spring. Depending on pumpkin cultivar, a warm growing period of 100 to 120 days allows the pumpkin vine to flower and develop harvestable fruits. If possible, time the spring planting so that the pumpkins ripen on the vine in early October.

Planting Time
Pumpkins do not tolerate frost. Across the vast majority of Ohio, the last frost in spring occurs anytime from April 21 to May 10, depending on latitude and elevation. Contact your local cooperative extension office to learn of the last spring frost date in your county, or speak to staff at your local garden center. Wait an additional two to four weeks after your area's last frost date to allow the garden soil to sufficiently warm to at least 65 degrees Fahrenheit. An appropriate pumpkin planting time frame is from mid-May to early June in most parts of Ohio.
Timing Considerations
Because pumpkins take 100 to 120 days from germination to harvest, you don't want to plant pumpkin seeds or transplants too early in spring. Although you must avoid frost, cool soil temperatures inhibit growth and may lead to root rot. Pumpkins tend to soften and rot on the vine if they ripen too early, such as in late August or September. Aim for pumpkins to pick around October 1. Look at the pumpkin seed packet for the "days to harvest" data. Count backward that number of days from the target October harvest date. This provides you the ideal sowing date in your Ohio locale.
Planting Pumpkin Seeds
Sow pumpkin seeds in hills. A hill is a shallow planting basin about 1 inch deep and 6 to 10 inches wide. Place four or five pumpkin seeds in the hill and cover with 1 inch of soil. Additional hills need to be spaced 6 to 10 feet apart. Hills oriented in long rows need about 15 feet between rows. This allows room for the sprawling vines to grow and still receive ample sunlight.

Growing Giant Pumpkins
Everyone admires a gigantic pumpkin to use as a jack-o' lantern around Halloween. The pumpkin varieties that produce the largest fruits need at least 120 days to germinate, grow and produce ripe pumpkins. According to David A. Mangione of the Ohio State University Extension, it's behooving to start seeds of these long-maturation pumpkins indoors about two weeks before planting them outdoors. He suggests sowing seeds indoors in late April and transplanted them outdoors in May or June when soil is warm and frosts no longer occur.

Planting Time
Pumpkins do not tolerate frost. Across the vast majority of Ohio, the last frost in spring occurs anytime from April 21 to May 10, depending on latitude and elevation. Contact your local cooperative extension office to learn of the last spring frost date in your county, or speak to staff at your local garden center. Wait an additional two to four weeks after your area's last frost date to allow the garden soil to sufficiently warm to at least 65 degrees Fahrenheit. An appropriate pumpkin planting time frame is from mid-May to early June in most parts of Ohio.
Timing Considerations
Because pumpkins take 100 to 120 days from germination to harvest, you don't want to plant pumpkin seeds or transplants too early in spring. Although you must avoid frost, cool soil temperatures inhibit growth and may lead to root rot. Pumpkins tend to soften and rot on the vine if they ripen too early, such as in late August or September. Aim for pumpkins to pick around October 1. Look at the pumpkin seed packet for the "days to harvest" data. Count backward that number of days from the target October harvest date. This provides you the ideal sowing date in your Ohio locale.
Planting Pumpkin Seeds
Sow pumpkin seeds in hills. A hill is a shallow planting basin about 1 inch deep and 6 to 10 inches wide. Place four or five pumpkin seeds in the hill and cover with 1 inch of soil. Additional hills need to be spaced 6 to 10 feet apart. Hills oriented in long rows need about 15 feet between rows. This allows room for the sprawling vines to grow and still receive ample sunlight.

Growing Giant Pumpkins
Everyone admires a gigantic pumpkin to use as a jack-o' lantern around Halloween. The pumpkin varieties that produce the largest fruits need at least 120 days to germinate, grow and produce ripe pumpkins. According to David A. Mangione of the Ohio State University Extension, it's behooving to start seeds of these long-maturation pumpkins indoors about two weeks before planting them outdoors. He suggests sowing seeds indoors in late April and transplanted them outdoors in May or June when soil is warm and frosts no longer occur.
0
0
文章
Miss Chen
2018年04月16日

A salad vegetable grown in almost every garden, leaf lettuce is also called loose-leaf lettuce. Some types of lettuce you may plant include romaine or cos with their upright, long heads, small, soft butterhead varieties, crisphead or iceberg lettuce, and asparagus or stem lettuce. Knowing how to trim your lettuces while still growing them in your garden or after harvesting will help your lettuce last longer and increase the quality, flavor and presentation of your produce.

Step 1
Use sharp garden scissors or shears to trim 2 to 4 inches from your lettuce leaves in the garden when they have grown 6 to 10 inches tall or cut your lettuce carefully to the crown, or the point where the lettuce root joins the stem at ground level.
Step 2
Fertilize and water your lettuce greens after trimming; your lettuce greens will regrow and be ready for trimming again after two to three weeks. "Cut-and-come-again" represents this process of growing continuous harvests of lettuce, meaning that you do not have to wait until harvest time to enjoy your produce.
Step 3
Cut off all brown leaf tissue, called "tipburn," from your lettuce. Tipburn is a disease where the tips and edges of the leaves decay from uneven watering during the high temperatures of summer. The rest of the lettuce will not be harmed when you remove the leaves with tipburn. Prevent tipburn by watering your lettuce lightly but frequently to keep the soil evenly moist.

Step 4
Trim soft lettuces after harvesting by removing damaged, discolored leaves. Soft lettuces include butter lettuce, Bibb and leaf lettuce.
Step 5
Tear lettuce leaves into bite-size pieces when preparing them for a meal ahead of time rather than cutting them with a metal knife; otherwise, the lettuce leaf edges will rapidly become brown. Ascorbic acid oxidase also releases when you cut or chop lettuce with a knife, destroying its vitamin C content.
Step 6
Trim the butt of crisphead lettuce, like iceberg lettuce, to within 1/8 to 1/4 inch of the bottom leaf when preparing lettuce for public exhibits, such as vegetable shows. Trim the heads of Bibb lettuce varieties and romaine lettuces by removing damaged, old leaves. Briefly soak the lettuces in water, spray them carefully with water, and then store the lettuces in a dry, cool area until ready for the vegetable show.

Step 1
Use sharp garden scissors or shears to trim 2 to 4 inches from your lettuce leaves in the garden when they have grown 6 to 10 inches tall or cut your lettuce carefully to the crown, or the point where the lettuce root joins the stem at ground level.
Step 2
Fertilize and water your lettuce greens after trimming; your lettuce greens will regrow and be ready for trimming again after two to three weeks. "Cut-and-come-again" represents this process of growing continuous harvests of lettuce, meaning that you do not have to wait until harvest time to enjoy your produce.
Step 3
Cut off all brown leaf tissue, called "tipburn," from your lettuce. Tipburn is a disease where the tips and edges of the leaves decay from uneven watering during the high temperatures of summer. The rest of the lettuce will not be harmed when you remove the leaves with tipburn. Prevent tipburn by watering your lettuce lightly but frequently to keep the soil evenly moist.

Step 4
Trim soft lettuces after harvesting by removing damaged, discolored leaves. Soft lettuces include butter lettuce, Bibb and leaf lettuce.
Step 5
Tear lettuce leaves into bite-size pieces when preparing them for a meal ahead of time rather than cutting them with a metal knife; otherwise, the lettuce leaf edges will rapidly become brown. Ascorbic acid oxidase also releases when you cut or chop lettuce with a knife, destroying its vitamin C content.
Step 6
Trim the butt of crisphead lettuce, like iceberg lettuce, to within 1/8 to 1/4 inch of the bottom leaf when preparing lettuce for public exhibits, such as vegetable shows. Trim the heads of Bibb lettuce varieties and romaine lettuces by removing damaged, old leaves. Briefly soak the lettuces in water, spray them carefully with water, and then store the lettuces in a dry, cool area until ready for the vegetable show.
0
0
文章
Miss Chen
2018年04月14日

The vegetable called broccoli found at markets is the immature flower heads of the plant Brassica oleracea var. italica. Broccoli is related to cabbage and other members of the cole family. High in vitamin A and D, broccoli makes a healthy addition to the vegetable garden. Broccoli grows during the cool weather in spring and fall. In cool climates, broccoli grows well in summer.

Seed Germination
Broccoli is an annual vegetable plant. The first step in the growing season is seed germination. Start broccoli seeds indoors in individual 3-inch pots six weeks before the last spring frost date. Broccoli seeds take one to two weeks to germinate. Keep broccoli seeds at 80 degrees F during germination. Use a heating pad under the seed flat, or keep the seeds in a greenhouse where the temperature is consistently 80 degrees F.
Plant Development
Seedling development takes three to four weeks after the seeds germinate. During seedling development, broccoli plants develop roots and their first leaves. Once the seedlings emerge from the soil, remove them from the heating pad and place them in an area where the air temperature is between 60 and 65 degrees F. Keep broccoli seedlings indoors until they are four weeks old. Water the seedlings by soaking each pot when the top of the soil begins to feel dry. Always use pots with drainage holes in the bottom. Standing water around the young, developing broccoli roots causes rot and seedling death.
Early and Mature Harvest Flowering Tops
Broccoli develops a stalk and mature leaves before producing the flowering top. Broccoli plants mature for harvest in 50 to 65 days after planting. Transplant broccoli as early as possible in spring after the last frost date and when the soil temperature warms to 60 or 65 degrees F. Use a soil thermometer to determine the soil temperature before planting out the seedlings. Keep the soil damp around the developing broccoli plants and remove weeds by hand.

Harvest and Seed Collection
The last stage of growth before harvest is the development of flower heads. Harvest broccoli when the flower heads are 6 to 8 inches across and compact, with tightly closed green buds. Developing broccoli heads can be harvested at any point. The final stage of broccoli development is the flower and seed development. Any broccoli that is allowed to go to seed will not be harvestable. Allow a few plants to go to seed for next year's crop. Harvest the seed pods when they dry and turn brown on the plant. Till the old plant material into the soil in the fall after the last harvest.

Seed Germination
Broccoli is an annual vegetable plant. The first step in the growing season is seed germination. Start broccoli seeds indoors in individual 3-inch pots six weeks before the last spring frost date. Broccoli seeds take one to two weeks to germinate. Keep broccoli seeds at 80 degrees F during germination. Use a heating pad under the seed flat, or keep the seeds in a greenhouse where the temperature is consistently 80 degrees F.
Plant Development
Seedling development takes three to four weeks after the seeds germinate. During seedling development, broccoli plants develop roots and their first leaves. Once the seedlings emerge from the soil, remove them from the heating pad and place them in an area where the air temperature is between 60 and 65 degrees F. Keep broccoli seedlings indoors until they are four weeks old. Water the seedlings by soaking each pot when the top of the soil begins to feel dry. Always use pots with drainage holes in the bottom. Standing water around the young, developing broccoli roots causes rot and seedling death.
Early and Mature Harvest Flowering Tops
Broccoli develops a stalk and mature leaves before producing the flowering top. Broccoli plants mature for harvest in 50 to 65 days after planting. Transplant broccoli as early as possible in spring after the last frost date and when the soil temperature warms to 60 or 65 degrees F. Use a soil thermometer to determine the soil temperature before planting out the seedlings. Keep the soil damp around the developing broccoli plants and remove weeds by hand.

Harvest and Seed Collection
The last stage of growth before harvest is the development of flower heads. Harvest broccoli when the flower heads are 6 to 8 inches across and compact, with tightly closed green buds. Developing broccoli heads can be harvested at any point. The final stage of broccoli development is the flower and seed development. Any broccoli that is allowed to go to seed will not be harvestable. Allow a few plants to go to seed for next year's crop. Harvest the seed pods when they dry and turn brown on the plant. Till the old plant material into the soil in the fall after the last harvest.
0
0


