求助
kenzeeeeee
2017年11月05日

my plant here is dying and I do not know how to care for it. I feel if I know it's correct name, I'll be able to help it live.


0
0
Jabandit:Less water, more sunlight
AloeYouVeraMuch:Need more pictures, then I can give you an ID but I'd guess some sort of jade plant
小馒头331:Kalanchoe marnieriana?Is it?
成长记
oh-0kay
2017年11月04日

— 3 week update —
the end of the plant looks
as if if it might grow some
roots in the following weeks !
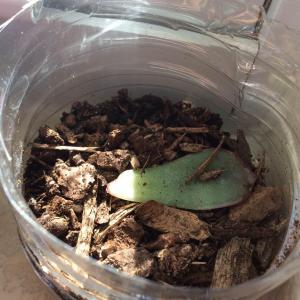
the end of the plant looks
as if if it might grow some
roots in the following weeks !

0
0
成长记
oh-0kay
2017年11月04日

— 3 week update —
i moved the plant to my other window so it can get more light before the sun sets
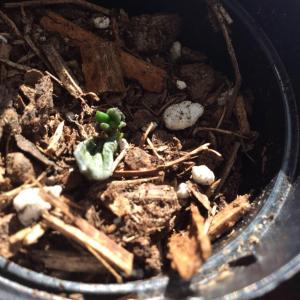
i moved the plant to my other window so it can get more light before the sun sets

0
0
文章
Miss Chen
2017年11月03日

When it comes to growing your own garlic (Allium sativum), proper timing means the difference between a harvest of healthy, densely flavored bulbs and anemic, tasteless ones. Although garlic is suitable for U.S. Department of Agriculture plant hardiness zones 4 through 9, it produces the most flavorful bulbs when grown in cool soil. In a Mediterranean climate, planting between late October and early November gives the cloves adequate time to form bulbs. If fall frosts are possible in your area, wait until after the first one to plant. The earlier you get cloves the ground, the larger your harvested bulbs will be.

Sun and Soil
Even in winter, garlic needs at least six hours of daily sun. It grows best in loose, organically rich well-drained loam. If necessary, improve the planting bed's lack of drainage or fertility with plant-based compost or well-aged manure before planting. Loosen its top 6 to 8 inches with a spade or tiller and work in 2 to 3 inches of compost or 1 inch of manure. The Cornell University Department of Horticulture estimates that 30 pounds of compost covers 10 square feet of soil to a 1-inch depth. Space the rows of garlic 1 foot apart, with 3 to 5 inches between the individual cloves.
Mulch and Water
Mulching newly planted garlic with a 2-inch layer of straw lures soil-aerating earthworms to the garden bed and discourages weeds. Don't water until the garlic's new, green shoots appear. After that, a weekly total of 1 inch of rain or supplemental water is enough until the foliage begins yellowing in early summer. That equates to 6 gallons of water per 10 square feet of soil. The goal is to keep the soil consistently moist. After the leaves yellow and until you harvest the bulbs, let the soil dry out between watering sessions.
Fertilizer Application
When garlic's shoots are 6 to 8 inches high, side dress the bed with granulated, high-nitrogen 21-0-0 fertilizer. Rake the mulch aside and dig 1- to 2-inch-deep furrows between the rows with the edge of a hoe. Keep them 6 inches from the plant. Sprinkle 2 1/2 tablespoons, or the label's specified amount, of fertilizer evenly over each 10 square feet of furrow and cover it with soil. Water the furrows immediately and reapply the mulch.

Potential Problems
Pests rarely affect garlic, and planting certified disease-free cloves from a reputable nursery dramatically reduces the likelihood of disease. Weeds may become troublesome because garlic foliage doesn't provide enough shade to keep them from germinating. Pulling or digging the weeds up as soon as they sprout stops them from stealing the garlic's moisture and nutrients without exposing it to chemical herbicides. Replacing the straw mulch as it decomposes also helps.
About Those Curling Stalks
In late spring, hardneck garlic varieties (Allium sativum var. ophioscorodon) send up thick flower stalks that eventually curl around themselves. Cut them for use in salads because leaving them on the plants channels energy away from bulb development.

Sun and Soil
Even in winter, garlic needs at least six hours of daily sun. It grows best in loose, organically rich well-drained loam. If necessary, improve the planting bed's lack of drainage or fertility with plant-based compost or well-aged manure before planting. Loosen its top 6 to 8 inches with a spade or tiller and work in 2 to 3 inches of compost or 1 inch of manure. The Cornell University Department of Horticulture estimates that 30 pounds of compost covers 10 square feet of soil to a 1-inch depth. Space the rows of garlic 1 foot apart, with 3 to 5 inches between the individual cloves.
Mulch and Water
Mulching newly planted garlic with a 2-inch layer of straw lures soil-aerating earthworms to the garden bed and discourages weeds. Don't water until the garlic's new, green shoots appear. After that, a weekly total of 1 inch of rain or supplemental water is enough until the foliage begins yellowing in early summer. That equates to 6 gallons of water per 10 square feet of soil. The goal is to keep the soil consistently moist. After the leaves yellow and until you harvest the bulbs, let the soil dry out between watering sessions.
Fertilizer Application
When garlic's shoots are 6 to 8 inches high, side dress the bed with granulated, high-nitrogen 21-0-0 fertilizer. Rake the mulch aside and dig 1- to 2-inch-deep furrows between the rows with the edge of a hoe. Keep them 6 inches from the plant. Sprinkle 2 1/2 tablespoons, or the label's specified amount, of fertilizer evenly over each 10 square feet of furrow and cover it with soil. Water the furrows immediately and reapply the mulch.

Potential Problems
Pests rarely affect garlic, and planting certified disease-free cloves from a reputable nursery dramatically reduces the likelihood of disease. Weeds may become troublesome because garlic foliage doesn't provide enough shade to keep them from germinating. Pulling or digging the weeds up as soon as they sprout stops them from stealing the garlic's moisture and nutrients without exposing it to chemical herbicides. Replacing the straw mulch as it decomposes also helps.
About Those Curling Stalks
In late spring, hardneck garlic varieties (Allium sativum var. ophioscorodon) send up thick flower stalks that eventually curl around themselves. Cut them for use in salads because leaving them on the plants channels energy away from bulb development.
3
1
文章
Miss Chen
2017年11月03日

How long it takes for garlic (Allium sativum) to grow and mature depends on when you plant the cloves. Garlic grows best when it experiences a period of chilling. The best time for planting garlic is fall, and fall-planted garlic matures in about eight months. Garlic can also be planted in spring, and spring-planted garlic takes less than eight months to mature, but it may not form bulbs. Garlic grows in U.S. Department of Agriculture plant hardiness zones 4 through 9.

Growing Garlic
A spot in full sun and well-drained, fertile soil provide the best growing conditions for garlic. Choose a part of the garden that gets at least eight hours of sun each day. Garlic tolerates alkaline soil, but it prefers acidic soil that's slightly dry and rich in organic matter. Don't grow garlic in heavy, wet soil because this leads to rot.
Space garlic cloves 4 to 6 inches apart in rows 15 to 24 inches apart. Don't grow garlic on a site where it grew during the past three years, to help prevent disease problems.
Watering Garlic
Keeping garlic well-watered and mulched through the growing season provides the best bulbs. Mulches suppress weeds that compete with garlic for water, and also help conserve soil moisture.

Water garlic every eight to 10 days in dry weather, moistening the soil to a depth of 2 feet. Spread a 2-inch layer of garden compost, well-rotted manure, leaf mold or other organic matter around the garlic plants, but don't allow the mulch to touch the garlic plants' leaves.
Applying Fertilizer
Fall-planted garlic needs a high-nitrogen fertilizer in spring, and garlic planted in fall or spring needs fertilizer in early summer. Ready-to-use 12-0-0 blood meal supplies garlic nutrient needs.
Put on gloves, and evenly sprinkle ready-to-use 12-0-0 blood meal at a rate of 1 tablespoon per 1 square foot over a fall-planted garlic bed when the garlic begins actively growing in spring. Water the granules into the soil. Apply the fertilizer at the same rate to fall-planted and spring-planted garlic two to three months later, in early summer. Manufacturers' instructions vary among products, so read the fertilizer label and follow the instructions.
Harvesting and Curing Garlic
Curing garlic after harvest helps prevent it from spoiling in storage. Garlic is ready for harvesting when the bulbs contain well-developed cloves and the bulb skin is thick, dry and papery. Other signs of maturity include brown leaves and only six to eight green leaves remaining on each plant. Don't wait longer than two weeks after all the leaves have withered to harvest garlic, because the bulbs deteriorate in the soil. Push a garden fork into the soil 2 inches from the base of the plant, and lever the bulb out of the soil.
Spread garlic bulbs, with the leaves attached, in a single layer in a warm, shady, dry, airy place. Don't allow the bulbs to touch. After three or four days the bulbs and leaves will be dried out and ready for storage. Store garlic in a dry, shady place at temperatures between 40 and 60 degrees Fahrenheit.

Growing Garlic
A spot in full sun and well-drained, fertile soil provide the best growing conditions for garlic. Choose a part of the garden that gets at least eight hours of sun each day. Garlic tolerates alkaline soil, but it prefers acidic soil that's slightly dry and rich in organic matter. Don't grow garlic in heavy, wet soil because this leads to rot.
Space garlic cloves 4 to 6 inches apart in rows 15 to 24 inches apart. Don't grow garlic on a site where it grew during the past three years, to help prevent disease problems.
Watering Garlic
Keeping garlic well-watered and mulched through the growing season provides the best bulbs. Mulches suppress weeds that compete with garlic for water, and also help conserve soil moisture.

Water garlic every eight to 10 days in dry weather, moistening the soil to a depth of 2 feet. Spread a 2-inch layer of garden compost, well-rotted manure, leaf mold or other organic matter around the garlic plants, but don't allow the mulch to touch the garlic plants' leaves.
Applying Fertilizer
Fall-planted garlic needs a high-nitrogen fertilizer in spring, and garlic planted in fall or spring needs fertilizer in early summer. Ready-to-use 12-0-0 blood meal supplies garlic nutrient needs.
Put on gloves, and evenly sprinkle ready-to-use 12-0-0 blood meal at a rate of 1 tablespoon per 1 square foot over a fall-planted garlic bed when the garlic begins actively growing in spring. Water the granules into the soil. Apply the fertilizer at the same rate to fall-planted and spring-planted garlic two to three months later, in early summer. Manufacturers' instructions vary among products, so read the fertilizer label and follow the instructions.
Harvesting and Curing Garlic
Curing garlic after harvest helps prevent it from spoiling in storage. Garlic is ready for harvesting when the bulbs contain well-developed cloves and the bulb skin is thick, dry and papery. Other signs of maturity include brown leaves and only six to eight green leaves remaining on each plant. Don't wait longer than two weeks after all the leaves have withered to harvest garlic, because the bulbs deteriorate in the soil. Push a garden fork into the soil 2 inches from the base of the plant, and lever the bulb out of the soil.
Spread garlic bulbs, with the leaves attached, in a single layer in a warm, shady, dry, airy place. Don't allow the bulbs to touch. After three or four days the bulbs and leaves will be dried out and ready for storage. Store garlic in a dry, shady place at temperatures between 40 and 60 degrees Fahrenheit.
1
0
求助
jahboots
2017年11月03日

What is this plant?

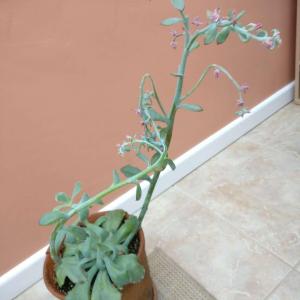
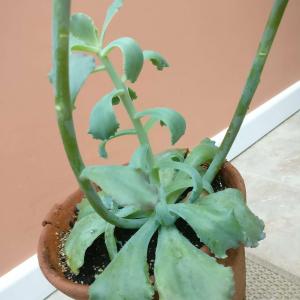


1
0
stunning.succulents:kalanchoe perhaps? looks like it needs more light regardless
文章
Miss Chen
2017年11月02日

Perennial strawberries (Fragaria × ananassa) are perennials that grow in U.S. Department of Agriculture plant hardiness zones 3 through 10. They grow best and accept plant nutrients in soil that has a pH from 5.5 to 6.

Strawberry types are divided among June-bearing varieties that yield one large crop in June, day-neutral varieties that yield strawberries throughout the growing season, and everbearing varieties that yield a June crop and one in early autumn. All three types are fertilized the same way at the start of the growing season. Day-neutral and everbearing have added needs during the summer.
Soil Amendments
More than three-fourths of strawberry roots are found in the top six inches of soil. If you have your soil tested and find minerals that are below the optimal level, work soil amendments into the top 6 to 8 inches of soil six months to one year before you plant your strawberries.
If your soil needs potassium, apply 1 1/2 cups of potassium chloride, 0-0-60, or potassium sulfate, 0-0-43, per 100 square feet of strawberry growing soil. Potassium sulfate is acceptable for organic gardeners. Mixing 14 cups of greensand to each 100 square feet is also acceptable for organic potassium. Greensand, mined from mineral deposits originally on the ocean floor, contains 3 percent potassium along with iron, magnesium, silica and other trace minerals.
If your soil lacks phosphorus, combine 2 1/2 cups of superphosphate, 0-20-0, or 1 cup of triple superphosphate, 0-46-0 to 100 square feet of soil. For organic phosphorus add 6 cups of bonemeal, 1-11-0, to 100 square feet.

Strawberries commonly suffer from a lack of boron in the soil. If no boron was added in the previous three to four years, mix 3/4 ounce of borax into a gallon of water and shake thoroughly. Spread this over 100 square feet of strawberry planting area, taking care not to apply too much. If you regularly amend your soil with compost, it should contain sufficient organic boron.
Growing Season Fertilizer
Two weeks before you plant strawberries, mix 2 pounds of water-soluble, granular 5-10-10 fertilizer into the top 6 to 8 inches of 100 square feet of soil.
Add fertilizer to newly planted strawberries in 6-inch bands on both sides of the rows. Use water-soluble, granular fertilizer and water well after application.
Six to eight weeks after planting, apply 1 pound of water-soluble, granular 5-10-10 fertilizer per 100 square feet of soil. If granules land on the strawberry leaves, knock them off with your hand or wash them off.
Adding nitrogen fertilizer in the spring before harvest may increase plant and berry diseases and cause excessive growth of stems and leaves. But if your plants are growing slowly and the leaves are light green, add 1/2 pound of 5-10-5 per 100 square feet of soil.
After harvesting June-bearing strawberries, remove weeds, cut back leaves and thin plants. Then add 1 to 2 pounds of 10-10-10 fertilizer per 100 square feet of soil in 6-inch bands beside the plants. Give the plants at least 1 inch of water per week to avoid salt injury from the fertilizer and to give the strawberries strong, new growth. One inch of water is roughly 6 gallons per square yard.
If your strawberries are growing in soil that has not been allowed to dry out, fertilize them again in late august with 1/2 pound of 10-10-10 fertilizer for each 100 square feet of soil.
Apply 1 pound of 10-10-10 fertilizer to 100 square feet of everbearing and day neutral strawberries in the middle of June and July and at the end of August.
Organic Fertilizers
Organic nutrients for strawberries are best added before they are planted, rather than later.
If you have time, plant oats in the area where you then plow them under a few weeks before you plant strawberries. The decaying oats will add nutrients to the soil.
Early spring is also when you should add 35 pounds of rabbit or poultry manure or 65 pounds of cow manure into the top 6 to 8 inches of 100 square feet of soil.

Strawberry types are divided among June-bearing varieties that yield one large crop in June, day-neutral varieties that yield strawberries throughout the growing season, and everbearing varieties that yield a June crop and one in early autumn. All three types are fertilized the same way at the start of the growing season. Day-neutral and everbearing have added needs during the summer.
Soil Amendments
More than three-fourths of strawberry roots are found in the top six inches of soil. If you have your soil tested and find minerals that are below the optimal level, work soil amendments into the top 6 to 8 inches of soil six months to one year before you plant your strawberries.
If your soil needs potassium, apply 1 1/2 cups of potassium chloride, 0-0-60, or potassium sulfate, 0-0-43, per 100 square feet of strawberry growing soil. Potassium sulfate is acceptable for organic gardeners. Mixing 14 cups of greensand to each 100 square feet is also acceptable for organic potassium. Greensand, mined from mineral deposits originally on the ocean floor, contains 3 percent potassium along with iron, magnesium, silica and other trace minerals.
If your soil lacks phosphorus, combine 2 1/2 cups of superphosphate, 0-20-0, or 1 cup of triple superphosphate, 0-46-0 to 100 square feet of soil. For organic phosphorus add 6 cups of bonemeal, 1-11-0, to 100 square feet.

Strawberries commonly suffer from a lack of boron in the soil. If no boron was added in the previous three to four years, mix 3/4 ounce of borax into a gallon of water and shake thoroughly. Spread this over 100 square feet of strawberry planting area, taking care not to apply too much. If you regularly amend your soil with compost, it should contain sufficient organic boron.
Growing Season Fertilizer
Two weeks before you plant strawberries, mix 2 pounds of water-soluble, granular 5-10-10 fertilizer into the top 6 to 8 inches of 100 square feet of soil.
Add fertilizer to newly planted strawberries in 6-inch bands on both sides of the rows. Use water-soluble, granular fertilizer and water well after application.
Six to eight weeks after planting, apply 1 pound of water-soluble, granular 5-10-10 fertilizer per 100 square feet of soil. If granules land on the strawberry leaves, knock them off with your hand or wash them off.
Adding nitrogen fertilizer in the spring before harvest may increase plant and berry diseases and cause excessive growth of stems and leaves. But if your plants are growing slowly and the leaves are light green, add 1/2 pound of 5-10-5 per 100 square feet of soil.
After harvesting June-bearing strawberries, remove weeds, cut back leaves and thin plants. Then add 1 to 2 pounds of 10-10-10 fertilizer per 100 square feet of soil in 6-inch bands beside the plants. Give the plants at least 1 inch of water per week to avoid salt injury from the fertilizer and to give the strawberries strong, new growth. One inch of water is roughly 6 gallons per square yard.
If your strawberries are growing in soil that has not been allowed to dry out, fertilize them again in late august with 1/2 pound of 10-10-10 fertilizer for each 100 square feet of soil.
Apply 1 pound of 10-10-10 fertilizer to 100 square feet of everbearing and day neutral strawberries in the middle of June and July and at the end of August.
Organic Fertilizers
Organic nutrients for strawberries are best added before they are planted, rather than later.
If you have time, plant oats in the area where you then plow them under a few weeks before you plant strawberries. The decaying oats will add nutrients to the soil.
Early spring is also when you should add 35 pounds of rabbit or poultry manure or 65 pounds of cow manure into the top 6 to 8 inches of 100 square feet of soil.
0
0
文章
Miss Chen
2017年11月02日

Pruning strawberries (Fragaria x ananassa) encourages them to grow strongly and produce plenty of fruit. Strawberries are hardy in U.S. Department of Agriculture plant hardiness zones 2 through 11. June-bearing or short-day strawberries fruit in spring and early summer; ever-bearing varieties produce strawberries through the growing season; day-neutral plants usually fruit three months after planting. Before and after pruning strawberries, wipe your pruning shear blades with rubbing alcohol to help prevent the spread of pests and diseases.

First-Year Plants
Pruning flowers on strawberries in their first year increases fruit production later. June-bearing, ever-bearing and day-neutral strawberries that have their first flowers pruned also grow more vigorously than unpruned plants.
Prune all the flowering stalks on June-bearing strawberries in the first growing season. Prune the stalks at their bases where they join the rest of the plant. Prune the first flush of flowers that appear on ever-bearing strawberries after planting. If your ever-bearing plants are growing strongly, you can allow the second flush of flowers to develop into fruits. Prune flowers on day-neutral varieties for six weeks after planting.
Matted Rows
Selective pruning of strawberry runners helps produce matted rows of plants. Runners are shoots that grow out from plants and develop roots, which grow into new plants. Matted rows of strawberries are wide rows that cover bare soil and suppress weeds.

To create matted rows of June-bearing or ever-bearing strawberries, plant new plants 12 to 18 inches apart in rows 3 to 4 feet apart. When runners appear, encourage six from each plant to form roots. Weigh them down, evenly spaced around the plants, with small stones or U-shaped pieces of wire at their nodes, which are bumps on the stems. Prune all other runners that appear at their bases where they join the rest of the plant.
Grow day-neutral strawberries 9 inches apart in rows 3 to 4 feet apart. Prune all runners on day-neutral plants in the first year, and allow them to form matted rows in the second and third year.
Ribbon Rows
Ribbon rows are rows of single strawberries. Growing strawberries in ribbon rows allows air to circulate and reduces the risk of pests and diseases.
To grow June-bearing, ever-bearing and day-neutral strawberries in ribbon rows, space the plants 4 to 9 inches apart in rows 2 to 3 feet apart. Prune all the runners that appear through the life of the plants. To help prevent problems with weeds, spread a 2-inch layer of sawdust or a 4-inch layer of clean straw between the strawberry plants.
Gray Mold
Strawberries suffer from a fungal disease called gray mold, but pruning helps reduce the disease's spread. Gray mold often affects strawberries in damp weather and in sites with poor air circulation. Blossoms and fruit slowly turn moldy, and finally a dusty, gray mold covers whole fruits.
Prune infected blossoms and fruit, and dead leaves, on June-bearing, ever-bearing and day-neutral strawberries. Pick healthy fruit at least every other day, and immediately refrigerate it. Water in the morning at the plant bases to help prevent gray mold.

First-Year Plants
Pruning flowers on strawberries in their first year increases fruit production later. June-bearing, ever-bearing and day-neutral strawberries that have their first flowers pruned also grow more vigorously than unpruned plants.
Prune all the flowering stalks on June-bearing strawberries in the first growing season. Prune the stalks at their bases where they join the rest of the plant. Prune the first flush of flowers that appear on ever-bearing strawberries after planting. If your ever-bearing plants are growing strongly, you can allow the second flush of flowers to develop into fruits. Prune flowers on day-neutral varieties for six weeks after planting.
Matted Rows
Selective pruning of strawberry runners helps produce matted rows of plants. Runners are shoots that grow out from plants and develop roots, which grow into new plants. Matted rows of strawberries are wide rows that cover bare soil and suppress weeds.

To create matted rows of June-bearing or ever-bearing strawberries, plant new plants 12 to 18 inches apart in rows 3 to 4 feet apart. When runners appear, encourage six from each plant to form roots. Weigh them down, evenly spaced around the plants, with small stones or U-shaped pieces of wire at their nodes, which are bumps on the stems. Prune all other runners that appear at their bases where they join the rest of the plant.
Grow day-neutral strawberries 9 inches apart in rows 3 to 4 feet apart. Prune all runners on day-neutral plants in the first year, and allow them to form matted rows in the second and third year.
Ribbon Rows
Ribbon rows are rows of single strawberries. Growing strawberries in ribbon rows allows air to circulate and reduces the risk of pests and diseases.
To grow June-bearing, ever-bearing and day-neutral strawberries in ribbon rows, space the plants 4 to 9 inches apart in rows 2 to 3 feet apart. Prune all the runners that appear through the life of the plants. To help prevent problems with weeds, spread a 2-inch layer of sawdust or a 4-inch layer of clean straw between the strawberry plants.
Gray Mold
Strawberries suffer from a fungal disease called gray mold, but pruning helps reduce the disease's spread. Gray mold often affects strawberries in damp weather and in sites with poor air circulation. Blossoms and fruit slowly turn moldy, and finally a dusty, gray mold covers whole fruits.
Prune infected blossoms and fruit, and dead leaves, on June-bearing, ever-bearing and day-neutral strawberries. Pick healthy fruit at least every other day, and immediately refrigerate it. Water in the morning at the plant bases to help prevent gray mold.
1
0
文章
Miss Chen
2017年11月02日

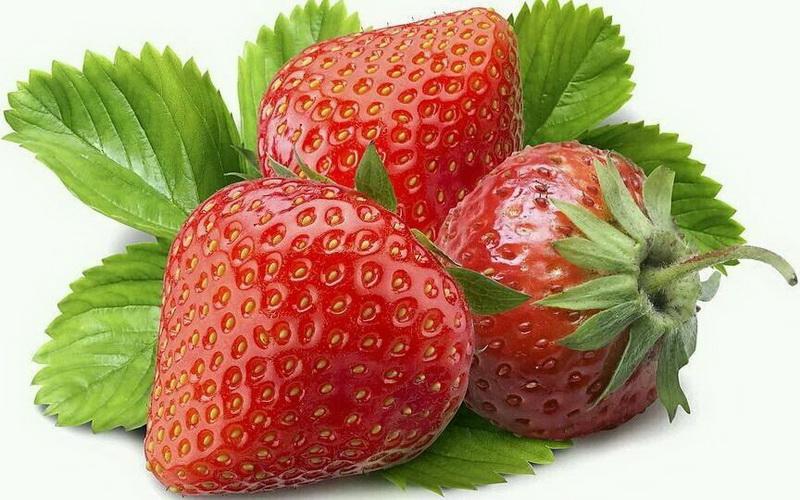
When you look at a strawberry, those little yellow dots that you see evenly coating the outer flesh are actually seeds. Each one of these seeds is capable of germinating into a whole new plant that can provide at least 1 qt. berries. Because strawberry plants are perennials, they will continue to produce bountiful harvests year after year. With a little preparation, you can grow your own strawberry plants indoors from the seeds of the fresh berry.

Step 1
Place one or two fresh strawberries on a paper plate. Set the paper plate in an undisturbed area such as a high shelf or windowsill to dry out.
Step 2
Rub the skin of the strawberry with your hands. As you rub, the strawberry seeds will fall onto the paper plate.
Step 3
Collect the seeds and store them in an envelope inside the refrigerator for 30 days. Cold storage or "stratification" is essential prior to germination.
Step 4
Fill a seed starter tray with organic potting soil. Remove the strawberry seeds from the envelope and press two seeds, ¼ inch into the soil of each cell.
Step 5
Spray the soil with warm water from a spray bottle. Place the clear plastic cover on the seed starter tray and set the tray in an area with bright, indirect sunlight.
Step 6
Remove the plastic cover when the strawberry seedlings poke their way through the soil. Germination is usually between four and seven days. Continue to provide the young strawberry plants with bright, indirect sunlight and moist soil as they grow.

Step 1
Place one or two fresh strawberries on a paper plate. Set the paper plate in an undisturbed area such as a high shelf or windowsill to dry out.
Step 2
Rub the skin of the strawberry with your hands. As you rub, the strawberry seeds will fall onto the paper plate.
Step 3
Collect the seeds and store them in an envelope inside the refrigerator for 30 days. Cold storage or "stratification" is essential prior to germination.

Step 4
Fill a seed starter tray with organic potting soil. Remove the strawberry seeds from the envelope and press two seeds, ¼ inch into the soil of each cell.
Step 5
Spray the soil with warm water from a spray bottle. Place the clear plastic cover on the seed starter tray and set the tray in an area with bright, indirect sunlight.
Step 6
Remove the plastic cover when the strawberry seedlings poke their way through the soil. Germination is usually between four and seven days. Continue to provide the young strawberry plants with bright, indirect sunlight and moist soil as they grow.
0
0
求助
CMO111101
2017年11月02日

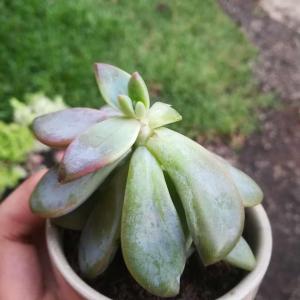
Hi! I have my new plant. I just found this outside, abandoned. It's a little weak and some leaves are missing. I have many questions.
a. What succulent is this?
b. Leaves are a little weak and might fall off. Will these leaves stick back if I take care of the plant?
c. A leaf has been cut off. Will it grow back?
I want this plant to have the perfect shape again. Please help me out. Thank you!
a. What succulent is this?
b. Leaves are a little weak and might fall off. Will these leaves stick back if I take care of the plant?
c. A leaf has been cut off. Will it grow back?
I want this plant to have the perfect shape again. Please help me out. Thank you!

1
0
Edgar Enrique Solis de la Rosa:these plants love the sun, the substrate must be very drained and water once a week
meriunkat:Also when they received to much sunlight without training it to withstand the leaves will slouch
meriunkat:Usually if leaves are dry the plant is not getting enough water, if the leaves are mushy it is being overwatered which as a result could rot and die
meriunkat:However first decide whether the leaves are dry or mushy above all, this will help you decide weather it needs more water or less
meriunkat:New leaves grow from the top of the stem, a fallen leaf can be used to propagate, sometimes new leaves will grow from the bottom part of stem as a new plant
显示更多


