文章
Gina
2017年05月22日


If you want to get crafty in the garden, for the garden, or just as a way to keep your thumb green during the winter months, we have the project for you! Hypertufa is a mix of concrete and other elements that is lightweight, easy to work with, can be molded or even carved, and is a perfect project for both beginner and experienced crafters and gardeners. You can create pots, containers, art… ok, we will just let these cool tutorials speak for themselves, ok? BTW… you can even do this on a covered kitchen table with the kids! All you need is a place to let them cure, and you get amazing results for just a little creative effort. Oh, yeah. It’s fun! Our feature photo above is from ‘Martha’. She shows us how to make these bowl hypertufas using a kitchen mixing bowl as a mold! (Can you say dollar store?) These would look great inside or out, and she has a bunch of other variations as well, including a basketweave patterned hypertufa. Check it out!
The basic recipe (Although there are TONS of variations!) From ‘Lowes‘.
1 Part Portland Cement
1 Part Perlite
1 Part Peat Moss
1 Part Water (Can be adjusted to consistency needed for each project)
Mix dry ingredients with gloved hands before adding water. Mix well. Thick oatmeal is a good place to start, thickness wise.
Spray inside of mold with non stick cooking spray.
Pack mixture into mold in whatever way you wish to create sides of containers, art… whatever!
Put inside closed plastic bag for 24-36 hours. This keeps it from drying too quickly, which can cause cracking. Now set in some out of the way place for 2-3 weeks to totally cure. Pop off mold, use a brush or sponge to rub off any imperfections. Done!
Ok, you can see I was pretty casual with the basic directions here. That’s ’cause it’s a very forgiving medium, so have some fun with it! Most of these tutorials have their own take on the directions as well.
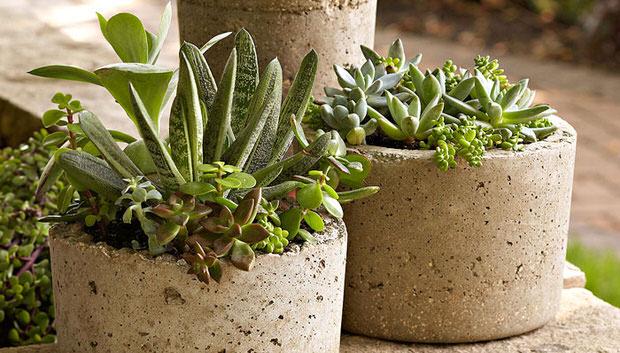
From Pam at ‘House of Hawthornes’, everything about making hypertufa containers. Make sure you take note at what she used for molds… Ok, just trust me, it works!

‘This Old House’ shows us it isn’t just for making containers! Make this hypertufa table! Use their plans for the whole table, or just make the top and use it with an existing base.
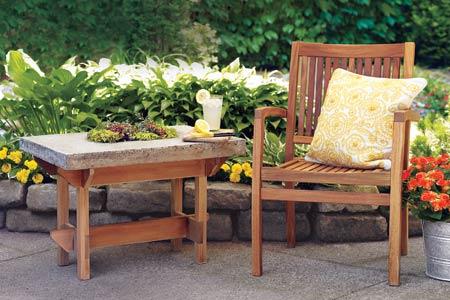
Learn to make a hypertufa planter from ‘Gardeners Supply’. As you can see, they used theirs for a container water garden!
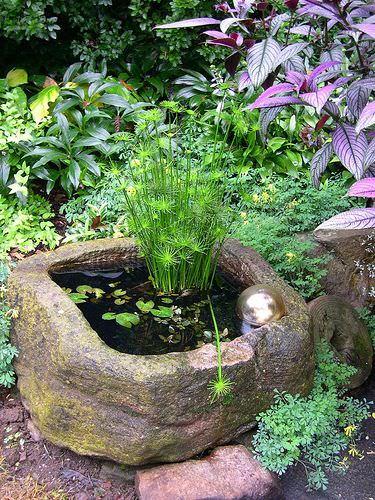
We LOVE this hypertufa tough from ‘Dirty Horticulture’… it has such an organic feel, like it’s been there 100 years! Lots of great tips on making molds as well.
Hypertufa garden seat by ‘Flat Earth Designs’ via ‘My Notting Hill‘ in Texas. Are we starting to see the versatility in this medium?

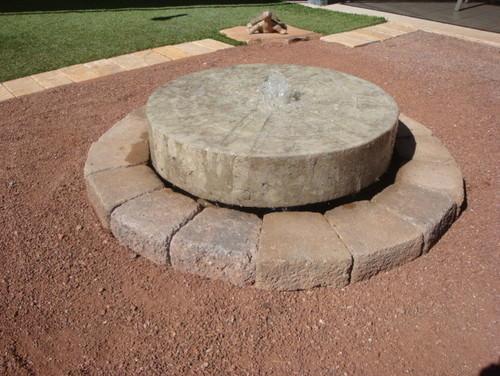
Make a hypertufa millstone for over a fountain, with help from ‘Houzz GardenWeb’!
This wicker basket hypertufa is also from ‘Martha’ An easy variation, I love these for a country or traditional porch!
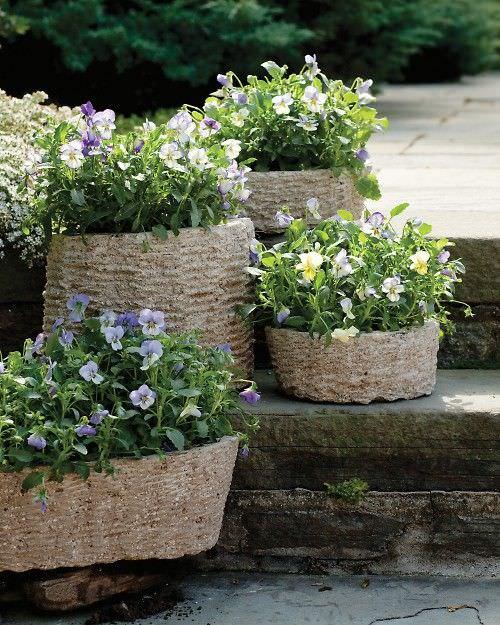
Lastly, these hypertufa containers use recycled items as molds… I really like the texture the veggie oil container made! From ‘Home Life Science’.

1
1
文章
Gina
2017年05月22日


Looking for a quick and easy garden container to add some flair to a boring deck, yard or patio? Here is a before and after project that will take less than 30 minutes, can be inexpensive and is a creative take on ordinary container gardening!
Supplies:
Any container that has sections.
(We used an old wood soda crate)
Potting soil
Alpine or compact plants
Polished stones

Step One: Choose plants that are of an alpine or compact nature. You don’t want to the plants overgrowing the container so much that you can no longer see the structure that gives it a good design. Line the container with plastic to protect it if you choose, but be sure it has some drainage. If drainage is an issue, place a layer of gravel at the bottom of the container first. Fill the container with potting soil, gently pack down, and place the plants. Fill with more soil, gently press down with your fingers, and water. Tip: Don’t plant all the sections of your container. Leaving some empty space highlights the plants and gives the eye a place to rest.
Step Two: Fill some of the empty sections with polished stones or glass. You can find these at craft shops or dollar stores, or perhaps you already have a collection. The stones are a nice contrast to the container and the plants.
Step Three: Place your container, keep it watered and prune the plants as needed to keep them controlled. Remember, in this particular project, you are highlighting the creative container as much as the plants!
Done! Some ideas?
Use recycled materials from a building renovation store and succulents for a more modern or contemporary look.
Repeat the same plant over and over, or vary your plants for more contrast. Try small grasses, succulents, compact annuals, or even experiment with a trailing houseplant over one side. Think about all containers that have sections…kitchen containers, building supplies, plastic organizing trays, or create your own by placing a series of smaller containers inside a larger one!
Easy, quick garden container project to make your small space or patio garden something special. You can make it as budget friendly as you wish, and this is a great project to reuse and recycle, making it green gardening as well!
0
0
文章
Micky
2017年05月22日


If you are looking for a pumpkin carving project that’s easy, a little different, and can double for great fall decor as well, pumpkin drilling is for you. You can place these all around the garden and light them with candles (careful!) glow sticks, or even those dollar store led stick up lights. While I think this is safer than using knives to carve, still be very careful using power tools, and know how your drill works and how to keep yourself safe. And if your arm gets tired, give it a rest or take turns… We drilled the pumpkins first, then scooped them afterwards. It seemed to give more stability to the pumpkin while you drill. Yes, your drill bits will get goopy… Just un-goop, and move on. :) However, if you prefer to scoop first, more power to ya! Here’s your tutorial on how to drill pumpkins!
Step One: Create a pattern and use painters tape to help you mark it onto your pumpkin. We used dry erase marker to make the initial marks, then punched with a skewer to make it easier to get the drill going in the right place.

Step Two: Using various sized bits, we drilled straight into the pumpkin at the pre-marked spots. It helps to have someone hold the pumpkin while another person handles the drill.

Step Three: Clean up the mess. Scoop if you haven’t already. We used a small knife as well to clean up any holes that didn’t have clean cuts.

We haven’t tried it ourselves, but we hear if you dip the drilled pumpkin in a bucket with a bleach water solution, it will last much longer. We hear a tablespoon of bleach to a gallon of water is the best bet, then let dry. Let us know if it works for you, or if you have any other ideas for helping your pumpkins to last! Happy Halloween!
0
0
文章
Abigal
2017年05月22日
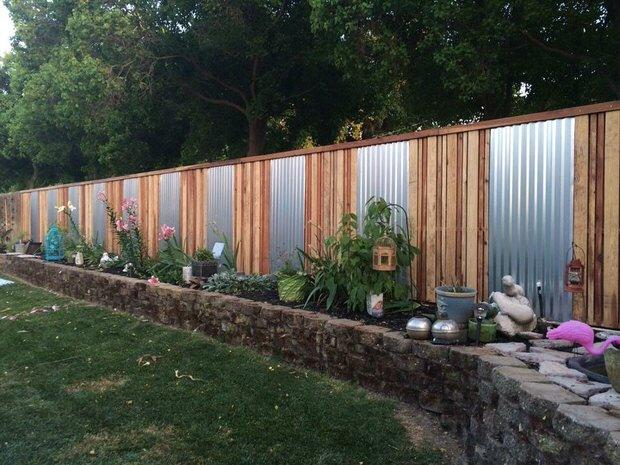
Putting up a backyard fence isn’t a small project, but it’s one that can improve your time in your yard, make it safe for kids and pets, and increase your home’s value. So don’t just put up a plain old fence! Take it up a notch and make your home look more custom with our DIY backyard fancy fence ideas! Some of these are DIY projects to get you right on your way, some are just ideas you can adapt to your own yard. Details count in your garden as well as inside your home, so take the time to plan out a fence you will be proud to show off. You’re gonna build it anyway, right? Why not do it fancy! Our feature photo below, is from a homeowner from California on ‘Hometalk‘. They included a short tutorial on adding corrugated metal to their ordinary fence to “fancy” it up! Love this fence!
From ‘Dunn DIY’, this DIY modern mid century horizontal fence isn’t any more difficult to build than an ordinary fence, but has loads more style. You see these type of fences at upscale restaurants and boutique hotels, as well as high end homes. Full tutorial with lots of photos for building this fence.

Want to fancy up your fence without swinging a hammer? Hang a painting on it! This idea comes to us from ‘Apartment Therapy‘. I would suggest a coat of exterior sealer to your canvas though! Make sure you also attach it well to stand up to weather and wind.

From “Design Intervention Dairy’, this tutorial for Nicole Curtis’s (HGTV’s “Rehab Addict”) chain link fence cover up idea is one amazing way to fancy up the least fancy kind of fence there is! Scroll down a little on the page to find the tutorial.
Before

After

Another idea from ‘Design Intervention‘, this horizontal fence is similar to the one above, but uses some piping or chain link posts in place of some of the slats. The tutorial above could be modified to make something similar to this.
This contemporary fence from ‘Houzz‘ is a great example of how artistic you can get with a simple material… wood. This is just a well thought out version of these other horizontal fencing tutorials. You can also hire a contractor to do a project like this, using this photo as reference for them. Love this look!

‘Apartment Therapy‘ has a great variant of those same modern horizontal fencing tutorials. This fence uses narrower slat near the top, but at the same spacing as the lower slats so you actually can see through the fence near the top. It makes it a lot more interesting as well.

Our last idea is simply a reminder that what can really make a difference in a fancy fence is using high quality wood, such as IPE. This fence is a great example of what a difference it makes! Photo from ‘Eco Inventos‘.


From ‘Dunn DIY’, this DIY modern mid century horizontal fence isn’t any more difficult to build than an ordinary fence, but has loads more style. You see these type of fences at upscale restaurants and boutique hotels, as well as high end homes. Full tutorial with lots of photos for building this fence.

Want to fancy up your fence without swinging a hammer? Hang a painting on it! This idea comes to us from ‘Apartment Therapy‘. I would suggest a coat of exterior sealer to your canvas though! Make sure you also attach it well to stand up to weather and wind.

From “Design Intervention Dairy’, this tutorial for Nicole Curtis’s (HGTV’s “Rehab Addict”) chain link fence cover up idea is one amazing way to fancy up the least fancy kind of fence there is! Scroll down a little on the page to find the tutorial.
Before

After

Another idea from ‘Design Intervention‘, this horizontal fence is similar to the one above, but uses some piping or chain link posts in place of some of the slats. The tutorial above could be modified to make something similar to this.
This contemporary fence from ‘Houzz‘ is a great example of how artistic you can get with a simple material… wood. This is just a well thought out version of these other horizontal fencing tutorials. You can also hire a contractor to do a project like this, using this photo as reference for them. Love this look!

‘Apartment Therapy‘ has a great variant of those same modern horizontal fencing tutorials. This fence uses narrower slat near the top, but at the same spacing as the lower slats so you actually can see through the fence near the top. It makes it a lot more interesting as well.

Our last idea is simply a reminder that what can really make a difference in a fancy fence is using high quality wood, such as IPE. This fence is a great example of what a difference it makes! Photo from ‘Eco Inventos‘.

0
0
文章
Abigal
2017年05月21日

I love projects with rocks. I don’t know if it’s because they are such a natural element, or because they are all so different, or just because it’s like playing with adult legos… But I love them! So when I run across a great DIY project with rocks, all I want to do is start digging around in the garden for some great basalt and quartz! We ran across all these creative garden projects with rocks that any of you can do. Use something from nature and create useful and artful accents for your garden!
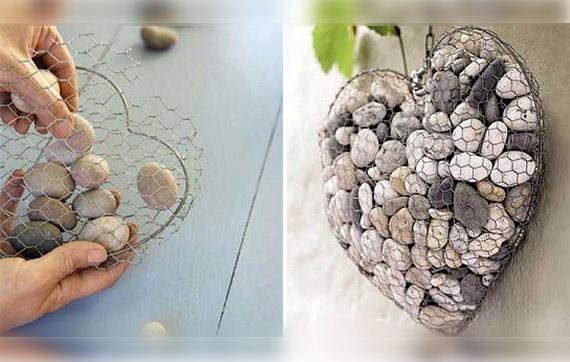
Our feature project above and below, is a wire and stone heart craft by ‘Country Woman’… Have I mentioned, I use to be the home decor expert for “Country Woman’? Love this project! Photos for Country Woman by StockFood/Gallo Images.

‘Better Homes Australia’ shows us how to make a water feature with stones. I love this! Can you think of a better use for rocks? Great tutorial with lots of photos.


‘Oh My Creative’ made a vegetables garden in a stone spiral, one of the most creative veggie gardens I have ever seen. Lot’s of photos!

Create a pebble mosaic with these instructions form ‘BHG’… Make you walkway or patio something special!


‘This Old House’ shows us how to make a stone sculpture for your garden with these easy instructions, They even tell you what kind of epoxy to use, which can be the hardest thing to figure out for these kind of outdoor projects.

Nancy at ‘Sugar Lump Studios‘ shared this great photo she took while on a girlfriend getaway in Michigan… This is just chicken wire forms filled with stones. Isn’t this the most charming front porch? Thanks for sharing Nancy!

From ‘Prairie Break‘, use this easy idea for all the stones you dig up planting your garden. Stones offer good drainage for a downspout area.

‘Fresh Ideen‘ brings us this photo from Pinterest (not sure about the original source)… Look for rebar forms or repurposed iron pieces to fill with stones.

This idea on creating a stone fence with wire and posts comes to us from ‘Green Landscapes to Envy‘. Just remember whatever posts/wire/cable set up you use, make sure it is strong enough to hold the weight of the rocks you fill it with.
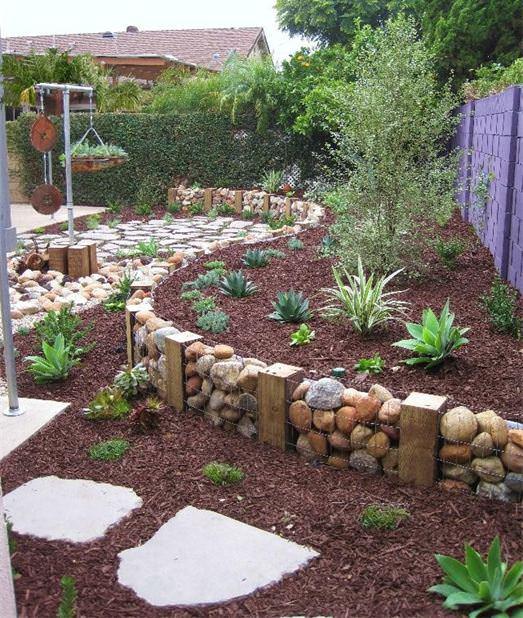
‘Project Landscape‘ brings us this idea of making wire rock towers… Use heavy duty wire fencing, join with wire ties, and fill with rocks! Use pieces of rebar stuck through the tower and into the ground to stabilize.

1
1
文章
Abigal
2017年04月17日


If you’ve been thinking about starting a water feature project in the garden this season, have you thought about adding the sights and sounds of a waterfall to your yard? Waterfalls are great for stress reduction- both watching and listening to water falling is a relaxing experience. Waterfalls can also block some neighborhood or traffic noise, attract birds and other wildlife, and let’s face it… the best reason for building a garden waterfall is that they look AMAZING. (And for the practical side of you, or your S.O., add value to your home.) And yes, you can DIY a garden waterfall! Not only is it much cheeper to do it yourself, it’s a fun project, especially for a couple or a family. Installing a waterfall is not difficult…it just takes some basic knowledge, and yes, who are we fooling’…some hard work. But most of us DIY’ers aren’t afraid of getting dirty and dragging our garden mud through the kitchen for a day or two… So here are our picks for DIY waterfall tutorials for our TGG readers. Have you installed a DIY water feature? Share with other TGG readers in comments!
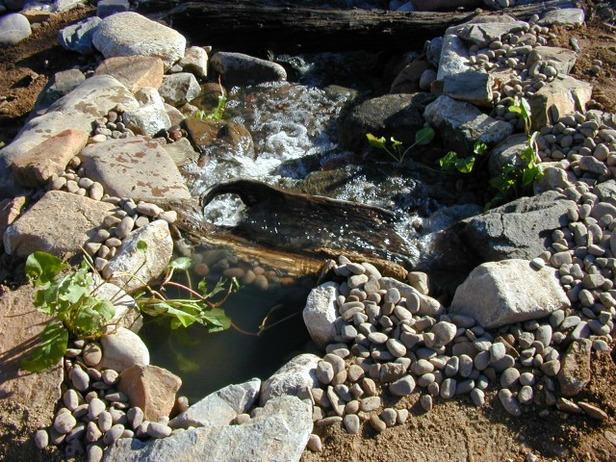
From Family Handyman, this backyard waterfall project can be done in less than one day. It’s rated as simple, and is small enough to be installed without having to excavate half the backyard! Pretty and functional, and it could even be used by a front walk. Good instructions.

There are several options on Family Handyman, and really useful information like this waterfall fountain graphic from their low maintenance water feature project to help you understand the dynamics of the pumps and water lines.

And if you would like to go all out and build their backyard waterfall and stream, they have so many photos walking you through the steps!

‘Reinventing the Ordinary’ did a great job with their DIY waterfall project, and their instructions are simple and if you don’t have the mechanics of how pumps and water lines work for such a project, check out a few of the other tutorials first. Then this will make perfect sense. Ehow has a good basic tutorial. Love this!

Susan at Oh My Creative has a great tutorial for you for this DIY waterfall and pond. She supplies you with good instructions, and step by step photos… Great job Susan!

Good step by step instructions over at Passion For Ponds, for this nice DIY waterfall project.

Lastly, DIY Network has a great tutorial on a DIY waterfall, with photos and instructions.
2
0
文章
Abigal
2017年03月27日


I would love to have my patio encircled with built in planters. Hardscape is central to any good garden design, and frankly, I can’t think of a better project than a garden element that is a constantly changing landscape! Built in planters would make it easy to change your container plants with the season, experiment with new types of plants, and even grow edibles close enough to the house to make it an easy harvest. All without having to haul out all the pots in the spring, and store them in the winter…
So until I get a built in planter project on mine and Steve’s calendar, here are some inspiring ideas, and a DIY project or two to get you going on creating a permanent, but always changing container garden – built in! Our feature photo, above, is from ‘Garden Club London’.
‘HGTV‘ brings us this inspiring built in planter bench from the book, ‘How to Grow Practically Anything’.

From ‘Family Handyman‘ the deck of your dreams includes, of course, built in planters!

‘Thomas Tree Carpentry‘ made these built in planters following the steps of a newly constructed deck.

‘Green Haven Designs‘ knows what you put into your built in can make a big difference in style.

‘900 House‘ brings us this contemporary garden… I like how the built in planter separates different areas – good design!
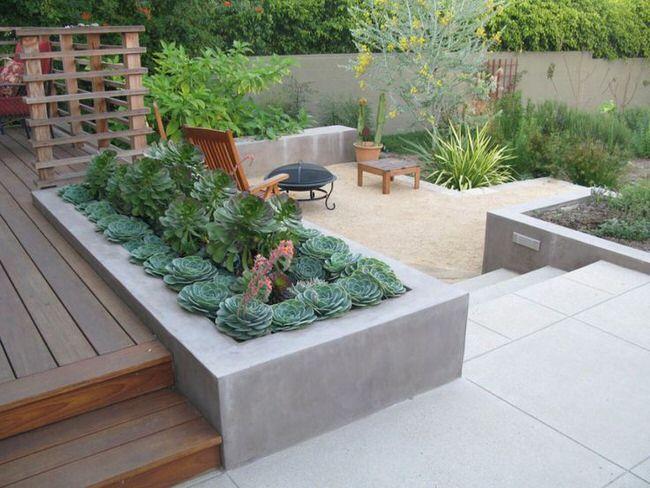
These planters are made from rail ties, from ‘Garden Gurus‘…

From ‘Dwell‘, these built in planters are simply part of the poured concrete patio.

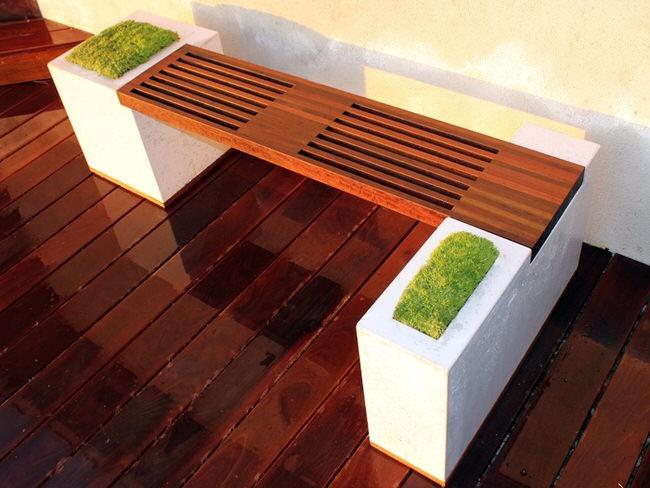
Finally, we have a DIY project for you! This Park Avenue bench and planter by ‘Concrete Exchange’ has detailed instructions. This is a high end detail for your garden, and the instructions are very thorough.
2
0
文章
Gina
2017年03月16日


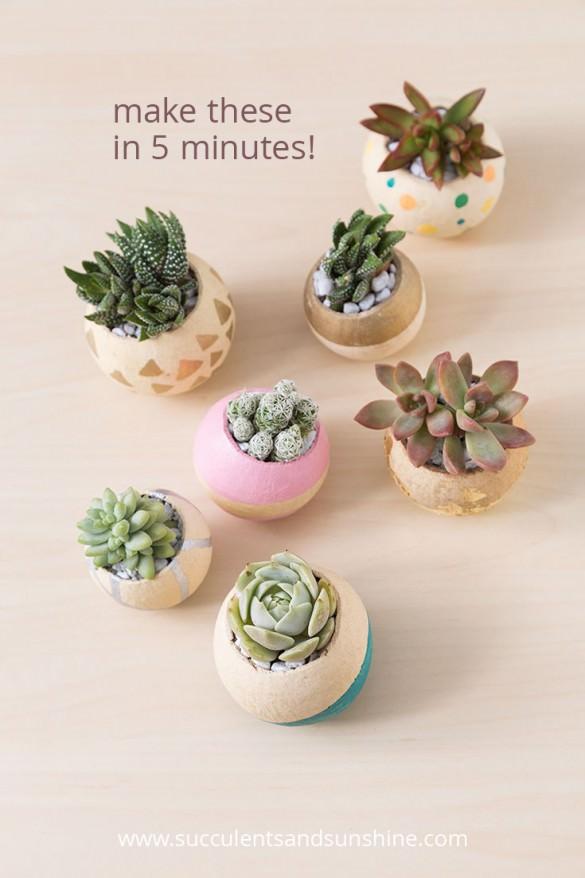
If you are looking for an indoor gardening project that is cool, easy and just a little bit trendy, cactus and succulent projects are for you! Here we found for you some great inspiration and tutorials to help you bring the modern vibe to any room of your home. Did we mention, they are really easy to take care of, too? So if your thumb is brown, that’s ok… these plants and projects are just for you! Our featured project above and below, is from Cassidy at ‘Succulents and Sunshine’. Oh my, these are cute! These DIY painted planters are perfect little accents, and the succulents are really easy to grow. While you are there checking out her tutorial, be sure to check out her e-book, “How to Grow Succulents Indoors“. Then you will be an expert too!
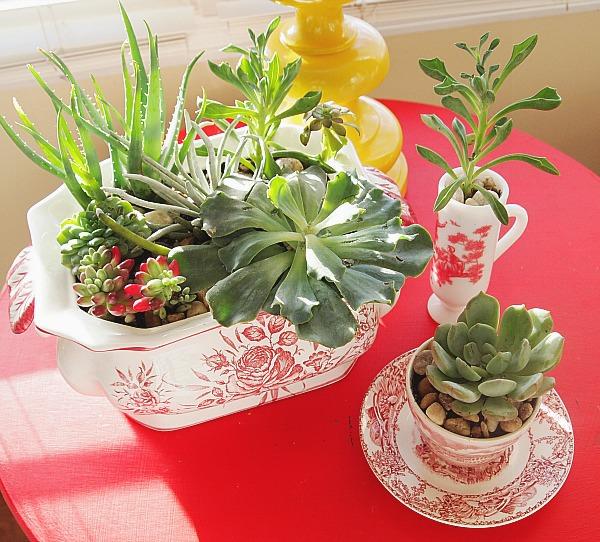
From Brittni Mehlhoff via ‘Curbly’, these DIY metallic planters took her 5 minutes to make. Cactus and succulents always look better when displayed in a cool pot… Simple, fast, easy!

Want to do a project that is a bit more traditional? Learn how to make an indoor succulent dish garden from Manuela at ‘A Cultivated Nest’. Pretty way to use those dishes that aren’t very practical, but too gorgeous to get rid of!
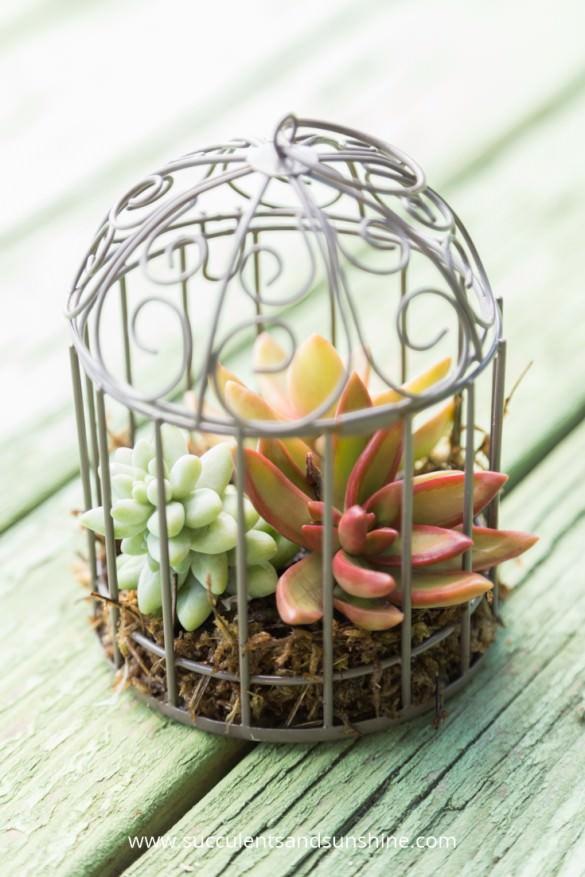
Again from Cassidy at ‘Succulents and Sunshine’, these miniature succulent bird cages look like so much fun to put together, and can be whimsical or traditional… Ok, and they are just so sweet! Find out just how to make them.
Looking for a simple cacti garden? Elsie at ‘A Beautiful Mess’ has you covered, and teaches you all about getting it done. Pretty colors on these desert plants!

Need a little “Zen”? Put down those adult coloring books, and try out this bright and cheerful Zen garden from Allison at ‘Dream a Little Bigger’. Step by step photos, and you gotta love that color! Perfect for your desk, right? That’s what I was thinking’…

Don’t want to figure it all out yourself? We found this Zen terrarium kit at the Etsy shop ‘Wendiland’… When we checked, this wasn’t available, but others like it were!

From ‘East Coast Creative’ learn how to make a DIY garden wall, from start to end! Great tutorial with step by step photos… depending on how large you make yours, this could be a major focal piece in a room. Love!

Make this DIY wire plant stand with this tutorial from ‘The Merry Thought’ to make your cacti stand out above the rest. Want to guess what she used?

I love these DIY mid century plant stands by ‘Sugar and Cloth’… they are perfect for the vibe of any cactus, don’t you think? These Christmas cacti will look amazing when they bloom! Yes, cacti bloom!

That isn’t enough? You need more ideas? Try this planted vintage dump truck from ‘The Potted Store’…

And if that wasn’t enough, jump on over to our post on sedum and succulent planters, for outdoors!
3
0
文章
Abigal
2017年03月15日

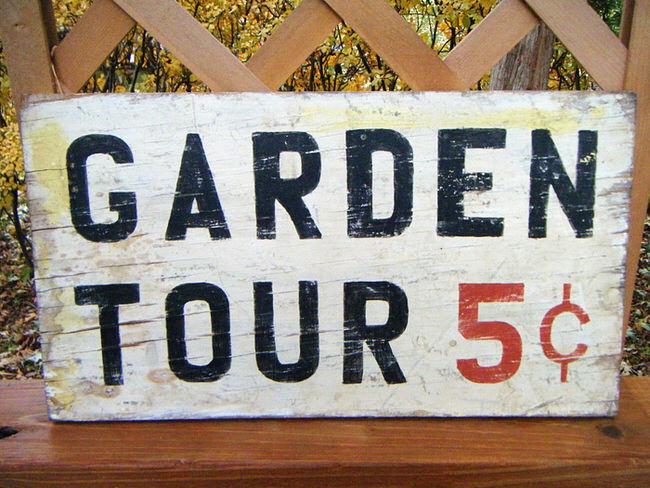
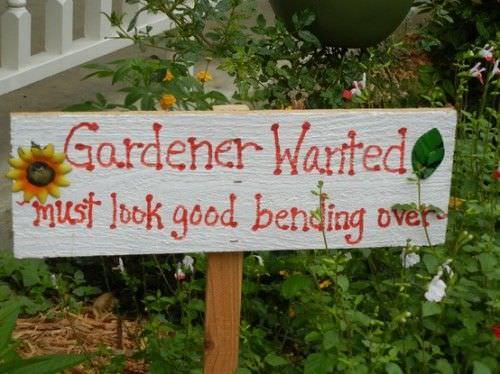
I love a little charm and whimsy in the garden, don’t you? And the garden is also the perfect place for a homemade DIY project as well. What better way to accomplish both things than with a garden sign you make yourself? Using one of these ideas, or a cute or inspirational quote of your own, make a garden sign for your special space that matches your personality. And consider using repurposed materials. The garden is a great place to implement habits that help keep our planet healthy, one project at a time. Ok, I’m off to the garden to plan my sign! Our feature project, above, is a DIY market sign from ‘Simply Chic’. The tutorial is short and easy, because the project is short and easy! You see signs like these in shops selling for $30- $50 all the time, and she made this from leftover wood and some stencils. Chic for cheap!
From ‘The Elegant Nest’, this hand painted garden sign is easier than it looks! Tutorial and step by step photos. She learned the technique from ‘Miss Mustard Seed‘, and you should pop on over to her site as well, she is one of the Queens of painted furniture! Great job on this sign by Laura!

‘The Country Chic Cottage‘ made this “Grow” garden sign in less than 10 minutes! I think we all can find 10 to make something this cute.

Carlene at ‘Organized Clutter Queen’ has tons of great garden sign ideas for you! And the rest of her site is a great resource, make sure you look around!

Ok, this one is my favorite! ‘The Little Green Bean’ has a complete how-to for this cute outdoor sign… This saying always makes me smile!

Now that you have the technique down, use these as great inspirations! I love these two from The Haunted Garden!


From ‘The Gardening Cook‘!
We actually found this one on Ebay, but I love the tool its hanging from so much, we had to include it!
These are from an online shop called ‘Second Shout Out‘…

Lastly, from ‘This Ivy House’, love this chalkboard garden sign.. another great use for chalkboard paint!
0
1
文章
Abigal
2017年03月15日


Building a pergola in your yard is a major DIY project, but adds value to your home, as well as to your garden enjoyment. Adding shade and structure to the garden, a pergola differs from an arbor in that is is usually a more “room like” structure, with posts supporting a roof covering of some type. In other words, an arbor on steroids. Perfect for creating romantic walkways, adding a seating area, or making a portion of the garden a major focal point. If you can dig a post hole and handle a drill and a saw, you can build a pergola with these DIY tutorials! So start planning, an as soon as the weather allows, set aside a weekend to build a pergola for your garden! Our feature project, above and below, is Ana White’s weatherly pergola. She always has such great tutorials, with drawings, material lists and instructions.

Another of Ana’s weatherly pergolas… See, you can do this!

We found this nice contemporary pergola project on ‘Instructables’, lots and lots of step by step photos on this one.

Find out how to build a backyard pergola from ‘Popular Mechanics’… I love how this one has the decorative notches on the beams and crossbeams, and how they show you how to build one on top of a concrete surface.


This tutorial from ‘DIY Network’ shows how to build a pergola, and even has little videos of certain steps. Really helpful!

The DIY Maven from ‘Curbly’ shows you how to make a pergola with a Skilsaw… and she makes it look pretty dang simple.

That’s it for tutorials, but we did find a couple of inspirational pergolas to get you planning…after all, now that you’ve learned so much from these tutorials, you’re ready to wing it a bit, right? :)
From Pinterest, this is a good example of how a pergola can take a ho hum patio and make it amazing…

And finally, if you need a little more modern style inspiration for your pergola, here’s a couple from ‘Houzz’! Let us know in comments how your projects go!


0
0
文章
Abigal
2017年03月14日


We all love those garden ornaments, but they can be pretty expensive anywhere you look. Here at TGG we decided to make our own DIY concrete garden globes, and it turned out to be a fun and pretty rewarding project that cost less than $15 for three balls. We also tried out a couple different recipes, including a hypertufa… we’ve included a shot of our sample balls and the recipes below! For our final globes, we used recipe 2, a good compromise between a little organic without being too rustic. Here’s what you need:
Supplies:
Old glass lamp globes (we also tried a playground ball, it worked, but didn’t keep a perfect round shape!) These are thrift store finds!
Portland cement
Peat Moss
Water
Mixing container (We used a Rubbermaid storage container)
Stir stick (we say that, but we pretty much just used our hands…)
Rubber gloves
Cooking spray
File
Wire Brush
Hammer
Eye protection
Optional recipes: Perlite and potting soil (Perlite is found in the indoor plant supply area of your home improvement store)
Recipe 1- Hypertufa
2 parts cement
3 parts peat moss
3 parts perlite
Water
Recipe 2- (This is what we used!)
1 part cement
1 part peat moss
Water
Recipe 3-
1 part cement
1 part potting soil
Water
Recipe 4-
Pure Portland cement
Water

Mix your chosen recipe in your container, spray the inside of the globes with cooking spray, then fill your globes…yes, it is messy! You want your recipe to be the consistency of thick cake batter. Add water if it thickens too much, and use your gloved hands to break up any peat moss chunks. The idea is to have it of a consistency that’s easy to pour into the mold, but not so wet that it takes forever to dry and cure. Don’t fill the neck of the globe, you want them to end up as round as possible. Set inside a plastic bag and set upright in a cool place (we used old towels to stabilize them). Let cure for 2-3 days.
After the globes have cured for a couple days, you are going to break the glass with the side of a hammer. We left the globes inside the bag while we did this to prevent flying glass shards. WEAR goggles or glasses protection! And use gloves.

After all the glass has been removed, use a file to take off any blemishes or protrusions, then rough up the whole surface with a wire brush. Some recipes come out really smooth and even polished looking…if you like that look, feel free to skip the wire brush.

Here is a shot of our four recipe balls. In order, from left to right… Hypertufa recipe 1, Recipe 2, Recipe 3, Recipe 4 or the pure Portland cement and water.
Our finished DIY concrete garden globes! Think of all the places you could tuck these in for a great contrast in form. In a later post, we will show you how to grow moss on your project… how cool is that?


1
0
文章
Abigal
2017年03月13日


I love bringing art into the garden. Even better if it turns out to be a fun project at the same time. These DIY garden mosaic projects are both practical and beautiful, and have complete tutorials. You can either buy tile specifically for mosaic projects, or you can use a wide variety of budget materials. Extra broken tiles, plates, or even glass can create gorgeous works of art for the garden! Follow their instructions in these tutorials and create your own DIY garden mosaic art pieces! Our featured project above is a DIY mosaic stepping stone tutorial by Midwest Living that takes you through step by step. This is a great beginners project.
We are big fans of artist Jeffrey Bale and his pebble mosaic stepping stones. Read his blog to find out how he does it.

Another from Jeffery Bale…

DIY garden mosaic blocks from Craftbits are a little different, but a great project when you need a quick one, especially with kids. I think I would use a calmer color scheme, but I like the simplicity a lot! They use concrete blocks and have all the instructions.
This heart mosaic stepping stone project from Specialty Art Glass is great, and has a full tutorial.

Lauren True for DIY Network created this amazing DIY mosaic ball, and you can find a video tutorial here.

Patterned mosaic pots from Martha are an easy project for both indoors and out. See her instructions.
If you aren’t a big fan of all the colors and patterns in mosaic, try making this mosaic window box planter by Centsational Girl!


I couldn’t leave out this incredible project, mostly because I didn’t believe (at first) that it was a DIY! This DIY mosaic chair is crazy cool, but is an advanced project, so definitely try out some simpler projects and get the hang of the whole medium. But the fact is, this is a tutorial, and you could potentially create this for your garden! BTW, she starts out with an ordinary metal garden chair…Designed by Frances Green,

And finally, we’ll leave you with a few more inspirational photos that we gathered from Pinterest (sorry – couldn’t find the source).


0
0
文章
Abigal
2017年02月24日

I love songbirds, and I have several feeders in my yard. But I get bored with the same old stuff you find at the box stores… I love the idea of making your own bird feeders because it’s an easy project even for beginners, and also because I think it makes the connection with nature stronger when you have had a hand in it. And since I love things that are just a little bit unique, here are our top picks for creative #DIY bird feeders that any gardener can make for their feathered buds. Most of these have tutorials with great step by step instructions, and some of these would be fun to make as a family as well. Tip: when feeding the birds in your area, don’t just buy “wild bird seed” in a mixed package. Most of those mixes contain filler seeds that just get tossed out by many birds. Also, if you take the time to learn what birds visit your yard (or which ones you want to visit) and what they like to eat, not only is there less waste, but more enjoyment for everyone. We get lots of finches at our house, so I use both thistle (their favorite) and black oil sunflower seed. Sometimes, I mix them and sometimes use them alone. See what works best for you!

Our first project below, is from Hoosier Homemade. This DIY repurposed bird feeder is made of household items, and sure doesn’t look it. Read their instructions, complete with photos at their tutorial.

I really love this DIY bird feeder by Erins Creative. Made with just a plate, bowl and some hardware, its cute as well as functional! Great tutorial at the site, jump over and check it out!

From Tonya at Create Celebrate Explore, this DIY popsicle stick bird feeder is a great project to do with kids. Easy, fun, neat! Directions and photos on the tutorial.

Let The Art of Doing Stuff teach you how to make a bird feeder from glass shades. This project has a more modern vibe to it, and I really like how different they are from every other bird feeder. We’ve also seen these made using an embroidery hoop around the globe to hang from. This might have to go on our “to make” list!

From Plum Adorable, this tin can bird feeder is…well, adorable! So easy, you can do this with kids, or without and make it look funky, or subtle.

Recycle with this soda bottle bird feeder from Here Comes the Sun! A couple of wooden spoons for perches, and there ya go!

More bottles? This wine bottle bird feeder by The Chicken Street has a complete step by step for you. Not hard, and I love the repurposing!

From Two Llamas and a Whole Lotta Dramas Facebook page, they made this DIY bird feeder using a mason jar, an old chicken feeder and some copper tubing…
Purely inspirational, but with the same design, Life. By Design. found these amazing bird feeders at a market and shared. Epoxy glue and imagination! We like Gorilla Glue for these kind of projects.

We have featured projects from The Garden Roof Coop before, and this is why… these DIY glass bottle bird feeders look store bought, but they have a great tutorial and you won’t believe how easy it is! Love these!


Our first project below, is from Hoosier Homemade. This DIY repurposed bird feeder is made of household items, and sure doesn’t look it. Read their instructions, complete with photos at their tutorial.

I really love this DIY bird feeder by Erins Creative. Made with just a plate, bowl and some hardware, its cute as well as functional! Great tutorial at the site, jump over and check it out!

From Tonya at Create Celebrate Explore, this DIY popsicle stick bird feeder is a great project to do with kids. Easy, fun, neat! Directions and photos on the tutorial.

Let The Art of Doing Stuff teach you how to make a bird feeder from glass shades. This project has a more modern vibe to it, and I really like how different they are from every other bird feeder. We’ve also seen these made using an embroidery hoop around the globe to hang from. This might have to go on our “to make” list!

From Plum Adorable, this tin can bird feeder is…well, adorable! So easy, you can do this with kids, or without and make it look funky, or subtle.

Recycle with this soda bottle bird feeder from Here Comes the Sun! A couple of wooden spoons for perches, and there ya go!

More bottles? This wine bottle bird feeder by The Chicken Street has a complete step by step for you. Not hard, and I love the repurposing!

From Two Llamas and a Whole Lotta Dramas Facebook page, they made this DIY bird feeder using a mason jar, an old chicken feeder and some copper tubing…
Purely inspirational, but with the same design, Life. By Design. found these amazing bird feeders at a market and shared. Epoxy glue and imagination! We like Gorilla Glue for these kind of projects.

We have featured projects from The Garden Roof Coop before, and this is why… these DIY glass bottle bird feeders look store bought, but they have a great tutorial and you won’t believe how easy it is! Love these!

1
0
文章
Abigal
2017年02月24日

I love a charming #garden project. Something creative and a bit unexpected, that has all the attributes of good art with all the care and concern of an aged and weathered object. So comes our next garden project ideas for our readers… repurposed door projects for the garden. All these projects can be done with old or new doors, but I do suggest visiting your local architectural salvage company, or even ReStore from Habitat for Humanity to find old doors with character. (And, it’s recycling, so it’s better for the earth!)

Our first two inspiring photos comes from Green wedding Shoes. While you may not be planning a wedding, this old door table hung from rope can’t be beat for charm – who wouldn’t want to eat a summer breakfast on a table like this?

From Finding Home, check out this vintage door bar station! I want this for my patio! Great job Laura! (Read the tutorial!)

While this next pic of this screen door potting bench is inspirational, it could easily be done as a #DIY project! From Hymns and Verses.

From Diana Wearing, this shutter door fence is amazing!

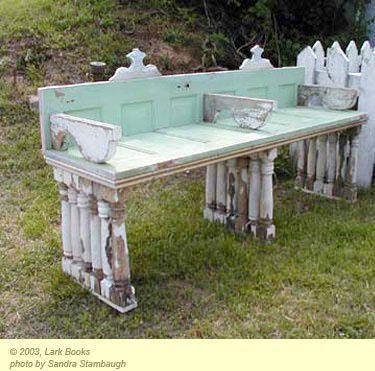
Very cool old door bench made with old spindles and a door cut lengthwise, from Lark Books.
Confessions of a Curb Shopaholic created this really cool old door potting bench! Love this!

From Pinterest, this old door painted this incredible color simply has a window box attached to the front, and is used as art in the garden. I am planning to do something like this to fill an empty corner!

From HGTV’s Rate My Space, this garden shed made from doors is totally inspirational…

From Jeanne Sammons – ‘Flea Market Gardening’… Oh my…this door arbor is cool…

This garden bench from BHG is using a newer door as the base… but you could make this idea as modern or as vintage as you wanted!

So create a re-purposed door project for your garden or outdoor spaces!

Our first two inspiring photos comes from Green wedding Shoes. While you may not be planning a wedding, this old door table hung from rope can’t be beat for charm – who wouldn’t want to eat a summer breakfast on a table like this?

From Finding Home, check out this vintage door bar station! I want this for my patio! Great job Laura! (Read the tutorial!)

While this next pic of this screen door potting bench is inspirational, it could easily be done as a #DIY project! From Hymns and Verses.

From Diana Wearing, this shutter door fence is amazing!

Very cool old door bench made with old spindles and a door cut lengthwise, from Lark Books.

Confessions of a Curb Shopaholic created this really cool old door potting bench! Love this!

From Pinterest, this old door painted this incredible color simply has a window box attached to the front, and is used as art in the garden. I am planning to do something like this to fill an empty corner!

From HGTV’s Rate My Space, this garden shed made from doors is totally inspirational…

From Jeanne Sammons – ‘Flea Market Gardening’… Oh my…this door arbor is cool…

This garden bench from BHG is using a newer door as the base… but you could make this idea as modern or as vintage as you wanted!

So create a re-purposed door project for your garden or outdoor spaces!
0
0
文章
Abigal
2017年02月23日

Stepping stones in a garden can create a path or patio, or simply point the way on a visual trail through your garden. They make a great DIY project year round, and most can be easily done on a covered craft table or in a corner of the garage. This is a great project to get creative with and allow your personality, or the personality of your garden shine through. Here are our favorite DIY stepping stone projects, complete with instructions for creating your own.

Our Basic Stepping Stone Recipe
Portland Cement
Water
Mold
Release Agent (We use Pam)
Decorative elements
You can use almost anything as a mold, as long as it’s smooth and can release the stone once it’s cured. I like disposable plastic containers, becasue the stone will pop right out like ice cubes from a tray. You could line boxes with plastic wrap, use cake pans or even line nursery flats for large stones. Trick we learned: if you are making a large stepping stone, or one that has a lot of detail and therefore not as thick, place a piece of chicken wire into the mold after you have poured or applied half the concrete. Then apply the rest of the concrete over the wire. This will strengthen your stones so they are less likely to crack. As you see in the photo below, partially burying the stones into gravel or soil will help protect the more delicate edges from breaking.
Next is one of our favorites – from Family Crafts, this tutorial takes you through using a leaf to create these garden stones that are more like natural art! Here are the instructions.


This is another example from Garden Mama.

You can also use this technique to make larger areas of patio or pathway. I’m fascinated by this art form using only natural elements!

Here is another idea, same technique.

And this one by artist Jeffery Bale, he explains how here.

If you want a simpler project, try these stones created by Madigan Made, using just concrete and plastic trays! Instructions here.

These last two are easier still… purchased stepping stones with paint. This first one is from Benjamin Moore using a stamp and concrete stain. I would link to the instructions for you, but that is them!
Finally, if you are looking for a fun project with the kids, this is it. Birds and Blooms has these easy glow in the dark stones we love! Here’s how.
Let us know which of these projects you plan to try!

Our Basic Stepping Stone Recipe
Portland Cement
Water
Mold
Release Agent (We use Pam)
Decorative elements
You can use almost anything as a mold, as long as it’s smooth and can release the stone once it’s cured. I like disposable plastic containers, becasue the stone will pop right out like ice cubes from a tray. You could line boxes with plastic wrap, use cake pans or even line nursery flats for large stones. Trick we learned: if you are making a large stepping stone, or one that has a lot of detail and therefore not as thick, place a piece of chicken wire into the mold after you have poured or applied half the concrete. Then apply the rest of the concrete over the wire. This will strengthen your stones so they are less likely to crack. As you see in the photo below, partially burying the stones into gravel or soil will help protect the more delicate edges from breaking.
Next is one of our favorites – from Family Crafts, this tutorial takes you through using a leaf to create these garden stones that are more like natural art! Here are the instructions.


This is another example from Garden Mama.

You can also use this technique to make larger areas of patio or pathway. I’m fascinated by this art form using only natural elements!

Here is another idea, same technique.

And this one by artist Jeffery Bale, he explains how here.

If you want a simpler project, try these stones created by Madigan Made, using just concrete and plastic trays! Instructions here.

These last two are easier still… purchased stepping stones with paint. This first one is from Benjamin Moore using a stamp and concrete stain. I would link to the instructions for you, but that is them!
Finally, if you are looking for a fun project with the kids, this is it. Birds and Blooms has these easy glow in the dark stones we love! Here’s how.
Let us know which of these projects you plan to try!
1
0


