文章
Dummer. ゛☀
2017年09月16日

Japanese beetles are 3/8" (8-11 mm) long and ¼" (5-7 mm) wide, brilliant metallic green insects with copper-brown wings whose hard body makes them unpalatable to many predators, including birds. To distinguish them from other metallic green or copper-colored beetles, the diagnostic sign is a row of 5 small tufts of white hairs under the wing covers on each side and a 6th pair at the tip of the abdomen. The larvae, called grubs, are grayish-white with a dark brown head. They are C-shaped when disturbed. The 1st instar (stage of an insect or arthropod between molts) is 1/16” (1.5 mm) long and the 3rd instar is 1¼” (32mm) long. They are found in the soil where they feed on the tender roots of vegetables, lawn grasses, and other plants.
Life Cycle
Japanese beetles overwinter as a partially grown grub in the soil below the frost line. The grubs resume feeding on grass roots in the spring, and then pupate near the soil surface. Adults emerge between May and July, depending on their geographic location . Adults live 30-45 days and feed, usually in groups, first on low-growing plants and then on tree leaves, working from the top of the plants downward. After feeding and mating, each female lays 1-5 eggs at a time before again feeding and mating until a total of 40-60 eggs are laid 2-4” under the soil surface in grassy areas. Most are laid by mid-August. The eggs hatch after 8-14 days, and the young grubs feed on fine grass roots until cold weather drives them below the frost line. Most are in the 3rd instar by this time. In spring the grubs come to the surface, continuing their development and forming a pupa in an earthen cell 1-3" deep in the soil.
Japanese beetle adults are active for about 6 weeks in the summer. Since adult beetle damage is primarily aesthetic, control is not essential for survival of ornamental plants. Because they are strong fliers and frequently move about, by season’s end, adults are capable of having traveled many miles from where they lived as grubs. As a result, local beetle control does not insure less grub damage to lawns. Likewise, local grub control will not necessarily prevent adult damage to garden plants.
Integrated Pest Management Strategies:
1. Hand-pick adult beetles. If only a few adults are present, shake plants early in the morning (~ 7 a.m.) when they are sluggish. They should be collected and dropped into a container of soapy water. Any beetles or damaged leaves will attract more insects and should be removed..
2. Pheromone traps. Research has found that pheromone traps attract many more beetles than they catch and probably do more harm than good to plants in the beetles’ flight path and near the traps. Their use is not recommended.
3. Use insecticides if necessary. To control adults, one of two very safe pesticide, pyrethrum or Neem, can be applied in two applications, 3 to 4 days apart, to control the problem. If something stronger is needed, carbaryl (Sevin) may be used (every 5-10 days during heavy infestation) with monitoring for mites or aphids, in which case acephate (Orthene; more toxic) or malathion should be used. Other insecticides include Turcam, Closure (bendiocarb), permethrin, and synthetic pyrethroids. With any insecticide, efficacy will be decreased if there is heavy rainfall shortly after application of the chemical.
To control grubs present in damaging numbers, newer chemicals, Merit (imidacloprid) and MACH2 (halofenozide), applied in June and July 20 days before anticipated Japanese beetle adult egg-laying activity, have enough residual to kill new grubs coming to the soil surface to feed in late July through August. It is important to apply evenly over all the ground and to water in well. These chemicals will also be effective on other grub species when applied at the appropriate times.
4. Biological controls. The hard body of the beetle makes them unpalatable to many predators, such as birds. However, toads, moles, shrews, and skunks are known to feed on the beetles.
To control grubs, bacterial milky spore disease (Paenibacillus popillae, formerly known as Bacillus popillae) can be applied as a dust for Japanese beetle grub control and must be ingested by the grub to be effective. Once inside the digestive tract; spores reproduce within the grub, eventually turning it an opaque milky white before killing it. Spores then disperse into the surrounding soil and can persist for many years, but do not spread until live hosts are present. The more grubs, the faster it spreads. Milky spore infects only Japanese beetle grubs and has no effect on beneficial organisms. Its efficacy is questionable and the spore count has to build up for 2-3 years, during which time no insecticides may be used. More research needs to be done.
Other biological controls are parasitic nematodes that need to be applied when the grubs are small, with irrigation before and after application. Species of Heterorhabditis are said to be more effective than strains of Steinernema carpocapsae.
5. Use trap crops. When practical, crops which are highly favored by Japanese beetles can be used to draw the adults away from other crops. Trap crops include: borage, white geraniums, grape vines, evening primroses, and zinnias. The beetles can be collected or killed on the trap crops. This method provides early detection and can limit the amount of spray needed to control the insects.
6. Select resistant plants. Among trees and shrubs are: ash, dogwood, American elder, shagbark hickory, holly, red and silver maple, oaks, pear, white poplar, sweet gum, and tulip tree; euonymus and common lilac.
Avoid planting the most susceptible plants: roses, grapes, and rose of Sharon; apple and crabapple, mountain ash, grey birch, American and horse chestnut, elm, linden, Japanese and Norway maple, London plane tree, Lombardy poplar, Prunus (cherry, etc.), sassafras, and black walnut.

Life Cycle
Japanese beetles overwinter as a partially grown grub in the soil below the frost line. The grubs resume feeding on grass roots in the spring, and then pupate near the soil surface. Adults emerge between May and July, depending on their geographic location . Adults live 30-45 days and feed, usually in groups, first on low-growing plants and then on tree leaves, working from the top of the plants downward. After feeding and mating, each female lays 1-5 eggs at a time before again feeding and mating until a total of 40-60 eggs are laid 2-4” under the soil surface in grassy areas. Most are laid by mid-August. The eggs hatch after 8-14 days, and the young grubs feed on fine grass roots until cold weather drives them below the frost line. Most are in the 3rd instar by this time. In spring the grubs come to the surface, continuing their development and forming a pupa in an earthen cell 1-3" deep in the soil.

Japanese beetle adults are active for about 6 weeks in the summer. Since adult beetle damage is primarily aesthetic, control is not essential for survival of ornamental plants. Because they are strong fliers and frequently move about, by season’s end, adults are capable of having traveled many miles from where they lived as grubs. As a result, local beetle control does not insure less grub damage to lawns. Likewise, local grub control will not necessarily prevent adult damage to garden plants.
Integrated Pest Management Strategies:
1. Hand-pick adult beetles. If only a few adults are present, shake plants early in the morning (~ 7 a.m.) when they are sluggish. They should be collected and dropped into a container of soapy water. Any beetles or damaged leaves will attract more insects and should be removed..

2. Pheromone traps. Research has found that pheromone traps attract many more beetles than they catch and probably do more harm than good to plants in the beetles’ flight path and near the traps. Their use is not recommended.
3. Use insecticides if necessary. To control adults, one of two very safe pesticide, pyrethrum or Neem, can be applied in two applications, 3 to 4 days apart, to control the problem. If something stronger is needed, carbaryl (Sevin) may be used (every 5-10 days during heavy infestation) with monitoring for mites or aphids, in which case acephate (Orthene; more toxic) or malathion should be used. Other insecticides include Turcam, Closure (bendiocarb), permethrin, and synthetic pyrethroids. With any insecticide, efficacy will be decreased if there is heavy rainfall shortly after application of the chemical.

To control grubs present in damaging numbers, newer chemicals, Merit (imidacloprid) and MACH2 (halofenozide), applied in June and July 20 days before anticipated Japanese beetle adult egg-laying activity, have enough residual to kill new grubs coming to the soil surface to feed in late July through August. It is important to apply evenly over all the ground and to water in well. These chemicals will also be effective on other grub species when applied at the appropriate times.
4. Biological controls. The hard body of the beetle makes them unpalatable to many predators, such as birds. However, toads, moles, shrews, and skunks are known to feed on the beetles.
To control grubs, bacterial milky spore disease (Paenibacillus popillae, formerly known as Bacillus popillae) can be applied as a dust for Japanese beetle grub control and must be ingested by the grub to be effective. Once inside the digestive tract; spores reproduce within the grub, eventually turning it an opaque milky white before killing it. Spores then disperse into the surrounding soil and can persist for many years, but do not spread until live hosts are present. The more grubs, the faster it spreads. Milky spore infects only Japanese beetle grubs and has no effect on beneficial organisms. Its efficacy is questionable and the spore count has to build up for 2-3 years, during which time no insecticides may be used. More research needs to be done.

Other biological controls are parasitic nematodes that need to be applied when the grubs are small, with irrigation before and after application. Species of Heterorhabditis are said to be more effective than strains of Steinernema carpocapsae.
5. Use trap crops. When practical, crops which are highly favored by Japanese beetles can be used to draw the adults away from other crops. Trap crops include: borage, white geraniums, grape vines, evening primroses, and zinnias. The beetles can be collected or killed on the trap crops. This method provides early detection and can limit the amount of spray needed to control the insects.

6. Select resistant plants. Among trees and shrubs are: ash, dogwood, American elder, shagbark hickory, holly, red and silver maple, oaks, pear, white poplar, sweet gum, and tulip tree; euonymus and common lilac.
Avoid planting the most susceptible plants: roses, grapes, and rose of Sharon; apple and crabapple, mountain ash, grey birch, American and horse chestnut, elm, linden, Japanese and Norway maple, London plane tree, Lombardy poplar, Prunus (cherry, etc.), sassafras, and black walnut.
0
0
文章
Miss Chen
2017年09月16日

相关图片

分布与危害
锈病是红花上重要病害,全国各种植区广泛发生,造成不同程度损失。
症状
主要危害叶片和苞叶。苗期染病子叶、下胚轴及根部密生黄色病斑,大小5-10×2-3(mm),其中密生针头状黄色颗粒状物,即病菌性子器。后期在锈子器边缘产生栗褐色近圆形斑点,即锈子器,表皮破裂后散出锈孢子。成株叶片染病叶背散生栗褐色至锈褐色或暗褐色稍隆起的小疱状物,即病菌的夏孢子堆,大小0.5-1mm。疮斑表皮破裂后,孢子堆周围表皮向上翻卷,逸出大量棕褐色夏孢子,有时叶片正面也可产生夏孢子堆。进入发病后期,夏孢子堆处生出暗褐色至黑褐色疱状物,即病菌的冬孢子堆,大小1-1.5mm。严重时叶面上孢子堆满布,叶片枯黄,病株常较健株提早15天枯死。
病原
Pucciniacarthami(Hutz.)Corda称#红花柄锈菌 ,属担子菌亚门真菌。性孢子器球形,蜜黄色,顶端突出在寄主表皮外,大小90-150×80-140(μm);性孢子卵圆形,单胞无色,大小2.7-5.0×2.4-3.6(μm)。性孢子成熟时从性子器孔口排出,呈蜜露状。锈孢子器栗褐色,近圆形至条状,产生黄褐色锈孢子,圆形至椭圆形,表生微刺,大小22-32×2l-26(μm)。夏孢子黄褐色至浅茶褐色,球形至广椭圆形,球形,表面生微刺,大小22-29×22-26(μm)。冬孢子褐色至茶褐色,双胞,椭圆形,表面生瘤状小突起,有短柄,大小31.7-41.5×21.5-26.8(μm)。冬孢子萌发温限10-35℃,25℃最适。夏孢子在干燥时能存活166天。
发生规律
红花锈菌系长循环型单主寄生锈菌。病菌以冬孢子随病残体遗留在田间或粘附在种子上越冬,翌春冬孢子萌发产虫担孢子引起初侵染。西北红花春播区,3月下旬播种的,30天后子叶、下胚轴及根部出现性子器,5-6天产生锈孢子器,锈孢子侵入叶片,5月下旬叶斑上产生夏孢子堆;夏孢子又通过风雨传播引致再侵染,8月中旬植株衰老产生冬孢子堆和冬孢子越冬。该病一般在6月中旬开始流行,其流行程度取决于5-8月的雨量和浇水次数。
防治方法
(1)因地制宜选育和种植抗病或早熟避病的品种。
(2)加强栽培管理。
选择高燥地块种植红花,出苗30天左右,间苗时注意拔除病株,尽量减少浇水次数,严格控制灌水量,雨后及时排水,防止湿气滞留,适当增施磷钾肥或草木灰,增强抗病力。
(3)种子处理。
播种前用种子重量0.2%-0.4%的15%三唑酮拌种。
(4)药剂防治。
发病初期喷洒25%三唑酮可湿性粉剂1000倍液或国光黑杀(12.5%烯唑醇)2500-3000倍液、70%代森锰锌可湿性粉剂500倍液、波美0.3°石硫合剂。对上述杀菌剂产生抗药性时,可改用25%丙环唑乳油3000倍液或40%杜邦福星乳油9000-10000倍。
0
1
文章
Dummer. ゛☀
2017年09月15日

Slightly smaller than a housefly, adult apple maggots (Rhagoletis pomonella) are 1/5 inch long and have conspicuous black bands — resembling a W — running across their transparent wings. The larvae (1/4 inch long) are white, tapered maggots that tunnel throughout the flesh of fruit. They are often found in large numbers and can quickly reduce a beautiful apple to a brown, pulpy mess. External signs of maggot infestation appear as pinpricks made on the apple surface. These are often small, distorted or pitted areas.
Life Cycle
The apple maggot overwinters as pupae in the soil. Adult flies emerge in late spring and begin to lay eggs just under the apple skin. The eggs hatch, and the larvae begin to tunnel through the fruit. When mature, the maggot leaves through a small opening made in the side of the fruit and enters the soil. One or two generations per year.
Control
The majority of maggots leave the fruit several days after it has fallen from the tree. As a result, a certain level of control can be achieved by picking up and discarding the dropped apples.
Red Sphere Traps will greatly reduce damage and work well to capture and reduce the number of egg laying adults. Traps should be placed within the canopy just as trees are finished blooming. Hang spheres high in the brightest areas of the tree, 6-7 feet from the ground. Set out one trap for every 150 apples (2 traps per dwarf tree).
Beneficial nematodes are microscopic, worm-like parasites that actively hunt, penetrate and destroy the pupal stage of this pest. For best results, apply in the early spring or fall around the base of trees, out to the drip line. One application will continue working for 18 months.
Surround WP — made from kaolin clay — will suppress a broad range of insects and has shown over 90% control of apple pests. It also has a positive effect on fungal diseases like fire blight, sooty blotch and flyspeck.
Fast-acting botanical insecticides should be used as a last resort. Derived from plants which have insecticidal properties, these natural pesticides have fewer harmful side effects than synthetic chemicals and break down more quickly in the environment.

Life Cycle
The apple maggot overwinters as pupae in the soil. Adult flies emerge in late spring and begin to lay eggs just under the apple skin. The eggs hatch, and the larvae begin to tunnel through the fruit. When mature, the maggot leaves through a small opening made in the side of the fruit and enters the soil. One or two generations per year.

Control
The majority of maggots leave the fruit several days after it has fallen from the tree. As a result, a certain level of control can be achieved by picking up and discarding the dropped apples.
Red Sphere Traps will greatly reduce damage and work well to capture and reduce the number of egg laying adults. Traps should be placed within the canopy just as trees are finished blooming. Hang spheres high in the brightest areas of the tree, 6-7 feet from the ground. Set out one trap for every 150 apples (2 traps per dwarf tree).

Beneficial nematodes are microscopic, worm-like parasites that actively hunt, penetrate and destroy the pupal stage of this pest. For best results, apply in the early spring or fall around the base of trees, out to the drip line. One application will continue working for 18 months.
Surround WP — made from kaolin clay — will suppress a broad range of insects and has shown over 90% control of apple pests. It also has a positive effect on fungal diseases like fire blight, sooty blotch and flyspeck.

Fast-acting botanical insecticides should be used as a last resort. Derived from plants which have insecticidal properties, these natural pesticides have fewer harmful side effects than synthetic chemicals and break down more quickly in the environment.
0
0
文章
Dummer. ゛☀
2017年09月14日

A reader from Charleston, South Carolina wrote in to say, "My Southern magnolia (Magnolia grandiflora) has yellow leaves. Is it dying?" The reader had had this balled-and-burlapped specimen for two years; it had been 5 feet tall when installed.
More specifically, this Charleston resident complained of not only sparse flowering in the tree's second spring, but also -- and more worrisome to this gardener -- "yellow leaves in fall that drop off of the tree" (note that this species is evergreen).
So what could be the cause of this?
Possible Reasons Why a Southern Magnolia Has Yellow Leaves
First of all, you need to rule out a nutrient deficiency in your soil. Yellow leaves on Southern magnolias can indicate that your soil has insufficient nitrogen. The only way to determine for sure whether or not this is the problem is to have a soil test done. If the test results do, in fact, show a nitrogen deficiency, you can fertilize accordingly to raise the nitrogen level. The nitrogen content of a fertilizer is indicated by the first number in the NPK sequence, which should be printed somewhere on the fertilizer bag.
Let's assume that you have had a soil test done and have been able to rule out nitrogen deficiency. What else could be the problem? Sometimes, when Southern magnolia trees develop yellow leaves (often accompanied by the presence of spots), it is only as a prelude to natural shedding (which happens periodically).
However, this seems to occur more often in the spring. With the reader reporting seeing the yellow leaves in fall, it makes one think there could perhaps be a problem with her Southern magnolia in terms of water and/or drainage. Let's expand on that observation.
Too much or too little water are both possibilities, whether you irrigate yourself and/or rely on rainfall.
But the issue of water is inextricably intertwined with that of drainage. Why? Because even if there is sufficient water, if it percolates through the ground too rapidly, the Southern magnolia tree would not be able to take full advantage of it. Conversely, if the drainage is impeded by an overly clayey soil, and you get a lot of rain and/or overwater your specimen, the roots will "drown." Either extreme is bad news.
If you think drainage is an issue, you may want to transplant your tree to another area, after first preparing the soil for optimal drainage. A loamy soil is ideal.
Growing Information for Southern Magnolia Trees
Popular in the American Southeast, to which region these plants are indigenous, Southern magnolia trees are best grown in USDA plant hardiness zones 7-9. Grow them in full sun to partial shade. Since they like fertile soil, ideal growing conditions would include a soil enriched with compost. They like a soil pH that is on the acidic side.
These trees are classified as broadleaf evergreens. They can grow to be as high as 80 feet tall. The fragrant flowers are white. Bloom time is late spring. Even the cone-like structure left over after flowering is attractive; it can be as much as 5 inches long.
If you live in the North and wish to grow a Southern magnolia, look for 'Bracken’s Brown Beauty,' a cold-hardy cultivar, which is suitable for all the way up to zone 5b.

More specifically, this Charleston resident complained of not only sparse flowering in the tree's second spring, but also -- and more worrisome to this gardener -- "yellow leaves in fall that drop off of the tree" (note that this species is evergreen).
So what could be the cause of this?
Possible Reasons Why a Southern Magnolia Has Yellow Leaves
First of all, you need to rule out a nutrient deficiency in your soil. Yellow leaves on Southern magnolias can indicate that your soil has insufficient nitrogen. The only way to determine for sure whether or not this is the problem is to have a soil test done. If the test results do, in fact, show a nitrogen deficiency, you can fertilize accordingly to raise the nitrogen level. The nitrogen content of a fertilizer is indicated by the first number in the NPK sequence, which should be printed somewhere on the fertilizer bag.

Let's assume that you have had a soil test done and have been able to rule out nitrogen deficiency. What else could be the problem? Sometimes, when Southern magnolia trees develop yellow leaves (often accompanied by the presence of spots), it is only as a prelude to natural shedding (which happens periodically).
However, this seems to occur more often in the spring. With the reader reporting seeing the yellow leaves in fall, it makes one think there could perhaps be a problem with her Southern magnolia in terms of water and/or drainage. Let's expand on that observation.
Too much or too little water are both possibilities, whether you irrigate yourself and/or rely on rainfall.

But the issue of water is inextricably intertwined with that of drainage. Why? Because even if there is sufficient water, if it percolates through the ground too rapidly, the Southern magnolia tree would not be able to take full advantage of it. Conversely, if the drainage is impeded by an overly clayey soil, and you get a lot of rain and/or overwater your specimen, the roots will "drown." Either extreme is bad news.
If you think drainage is an issue, you may want to transplant your tree to another area, after first preparing the soil for optimal drainage. A loamy soil is ideal.

Growing Information for Southern Magnolia Trees
Popular in the American Southeast, to which region these plants are indigenous, Southern magnolia trees are best grown in USDA plant hardiness zones 7-9. Grow them in full sun to partial shade. Since they like fertile soil, ideal growing conditions would include a soil enriched with compost. They like a soil pH that is on the acidic side.

These trees are classified as broadleaf evergreens. They can grow to be as high as 80 feet tall. The fragrant flowers are white. Bloom time is late spring. Even the cone-like structure left over after flowering is attractive; it can be as much as 5 inches long.
If you live in the North and wish to grow a Southern magnolia, look for 'Bracken’s Brown Beauty,' a cold-hardy cultivar, which is suitable for all the way up to zone 5b.
0
0
文章
权问薇
2017年09月13日


土壤的配制:
#康乃馨 适宜在含有较多的适合植物生长的养分、水分的土壤中生存,其最佳土壤配制为:0.5份河沙+0.5份草木灰+2份珍珠岩+2份园土+5份腐叶土。
栽种前施肥方式:
在栽种植物之前可以在土壤最底部放入20克腐熟菜叶渣+10克复混肥+10克腐熟饼肥作为基肥。

其它时期施肥方式:
1、生长时期:春季是其生长的时期,要每10天进行一次施肥,骨粉、肥液、尿素此三种要交替使用,且不可过量使用。
2、休眠期:到了炎热的夏季,也会进入休眠期,这时要暂停施肥,但要让其土壤持续在温润潮湿的状态,避免高温暴晒。但如果感觉其整株植物过于矮化,叶子的颜色也较浅时,可以给其叶子表面进行施肥,每七天左右施一次,要连续施肥2次至3次,肥料选用尿素,此症状就会有明显的改善。
3、摘心时:当年首次摘心时要施少量肥,第二次则要将10克复混肥+10克腐热饼肥埋入土壤中。
4、在花苞状态时,每个星期要用磷酸二氢钾与饼肥液进行施肥,要连续施肥2次至3次。
5、在花朵开放时最好不要施肥。

1
2
文章
权问薇
2017年09月13日

#杜鹃
1、选取半木质化的顶端枝条,剪下5~10厘米的长度,去掉枝条下面的叶子,只保留顶端的。
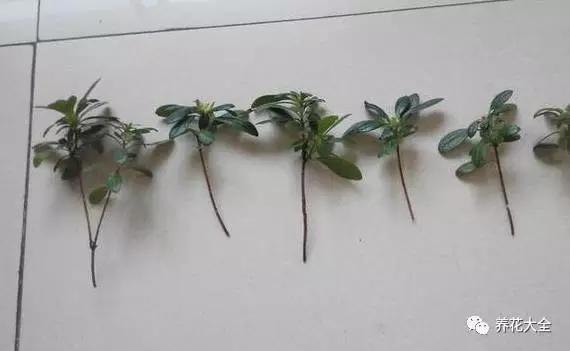
2、把处理好的杜鹃花枝条扦插到泡沫板中,枝条底部露出泡沫板三厘米左右。

3、把泡沫板放到一个大水缸中,先进行水培诱根。

4、等上半个月~1个月的时间,杜鹃就会长出根系,等根系长的健壮一些,差不多就可以进行上盆了。

5、上盆的时候,先把水培生根的杜鹃花捞出来,放在阴凉的地方晾个10分钟左右,再上盆,然后放到散射光处缓苗一段时间后再正常养护。

茶花
1、选择一年生的半木质化的枝条,用剪刀剪下10cm左右,顶端留3片叶子。

2、准备好干净的河沙,用河沙扦插生根会快。

3、把扦插用的枝条,伤口处放在多菌灵里泡一下,杀菌消毒,之后再在伤口上抹点儿生根粉,能够促进生根。

4、把枝条的1/3插进沙子中,浇透水,放在阴凉通风的地方,比如北阳台。

3、每天早晚用喷壶喷一次,一个月左右能够生根。如果空气湿度太低,可以套上个塑料袋哦~
但是塑料袋记得每天松开透透气。


月季
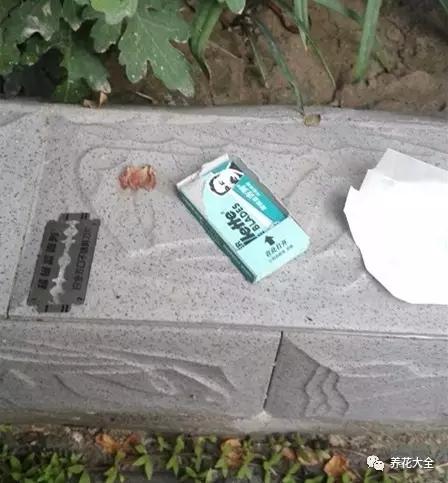
1.准备好刀片,剪刀,塑料瓶、透明胶带、蛭石。
2、把塑料瓶瓶底剪掉,再竖着剪开。

3、选取生长健壮的月季枝条,在离地10到15厘米的距离上,用刀片环剥,环剥的长度大约1cm即可。就像是下图那样。

4.把剪好的塑料瓶瓶口朝下,掰开套在已经剥皮了的月季枝条上,然后用透明胶带把塑料瓶子粘好。
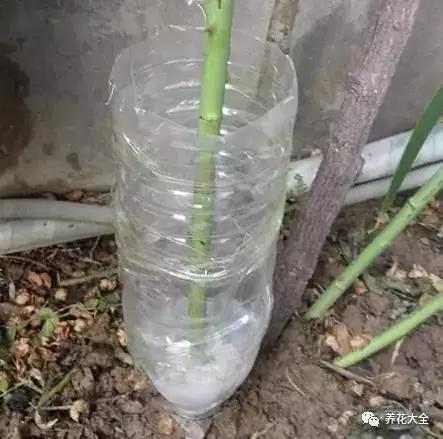
5.用蛭石把塑料瓶填满,浇透水。如果没有蛭石,也可以用珍珠岩之类的代替。
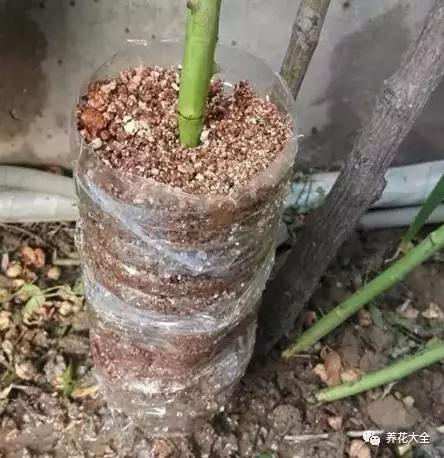
6.用塑料袋把封口封住,避免水分蒸发太快。

7.大约一个多月,就能长根,等根系长的健壮了一些,就可以去掉塑料瓶,然后移栽到新的花盆里了。在阴凉的地方缓根2~3天,就可以正常养护了。

茉莉
1、选择木质化的枝条,截取10cm。留顶端2片叶子,其余掐掉,以减少蒸发,就是留下的那两片叶子,也得剪掉一半。

2、将伤口处消毒之后,在生根粉溶液里面浸泡20分钟左右,阴干后插进细沙里。放在通风的墙角处,接受散射光即可。

3、每天喷洒水雾至少2次,保持湿度。大约1个月就能生根了。等根系长的健壮一些,再进行上盆即可。

栀子
1、截取2年生的枝条10cm。把下面的叶子摘掉,只留上面几片就行。

2、找个塑料瓶,倒上纯净水,把插条放进去。

3、瓶面覆盖保鲜膜,看见水没了就添点。当看见枝条表面长出白色的小凸起,就是快要长出根来了。出根后就能上盆了。

1、选取半木质化的顶端枝条,剪下5~10厘米的长度,去掉枝条下面的叶子,只保留顶端的。

2、把处理好的杜鹃花枝条扦插到泡沫板中,枝条底部露出泡沫板三厘米左右。

3、把泡沫板放到一个大水缸中,先进行水培诱根。

4、等上半个月~1个月的时间,杜鹃就会长出根系,等根系长的健壮一些,差不多就可以进行上盆了。

5、上盆的时候,先把水培生根的杜鹃花捞出来,放在阴凉的地方晾个10分钟左右,再上盆,然后放到散射光处缓苗一段时间后再正常养护。

茶花
1、选择一年生的半木质化的枝条,用剪刀剪下10cm左右,顶端留3片叶子。

2、准备好干净的河沙,用河沙扦插生根会快。

3、把扦插用的枝条,伤口处放在多菌灵里泡一下,杀菌消毒,之后再在伤口上抹点儿生根粉,能够促进生根。

4、把枝条的1/3插进沙子中,浇透水,放在阴凉通风的地方,比如北阳台。

3、每天早晚用喷壶喷一次,一个月左右能够生根。如果空气湿度太低,可以套上个塑料袋哦~
但是塑料袋记得每天松开透透气。


月季
1.准备好刀片,剪刀,塑料瓶、透明胶带、蛭石。

2、把塑料瓶瓶底剪掉,再竖着剪开。

3、选取生长健壮的月季枝条,在离地10到15厘米的距离上,用刀片环剥,环剥的长度大约1cm即可。就像是下图那样。

4.把剪好的塑料瓶瓶口朝下,掰开套在已经剥皮了的月季枝条上,然后用透明胶带把塑料瓶子粘好。

5.用蛭石把塑料瓶填满,浇透水。如果没有蛭石,也可以用珍珠岩之类的代替。

6.用塑料袋把封口封住,避免水分蒸发太快。

7.大约一个多月,就能长根,等根系长的健壮了一些,就可以去掉塑料瓶,然后移栽到新的花盆里了。在阴凉的地方缓根2~3天,就可以正常养护了。

茉莉
1、选择木质化的枝条,截取10cm。留顶端2片叶子,其余掐掉,以减少蒸发,就是留下的那两片叶子,也得剪掉一半。

2、将伤口处消毒之后,在生根粉溶液里面浸泡20分钟左右,阴干后插进细沙里。放在通风的墙角处,接受散射光即可。

3、每天喷洒水雾至少2次,保持湿度。大约1个月就能生根了。等根系长的健壮一些,再进行上盆即可。

栀子
1、截取2年生的枝条10cm。把下面的叶子摘掉,只留上面几片就行。

2、找个塑料瓶,倒上纯净水,把插条放进去。

3、瓶面覆盖保鲜膜,看见水没了就添点。当看见枝条表面长出白色的小凸起,就是快要长出根来了。出根后就能上盆了。

1
1
求助
xisquare
2017年09月06日

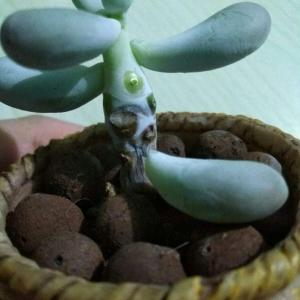
Help! The leaves on my moonstone keeps dropping by itself, and I don't know what's causing it. I did notice the stem turning dry and brown, don't know if it's related. Last time I watered was about 5 days ago.

2
1
Ueca:Make sure you use a sharp, sterile blade to thoroughly remove all the blackened tissue. Dry the wound in an unlit location (~2 days for your plant) before planting.
meriunkat:you can use the fallen leaves to propagate as well
meriunkat:you should take it out and if the bottom is all brown the plant may be dying, you would have to cut off the brown part let it dry for a day before repoting..
meriunkat:how much sun light is it taking in?
meriunkat:what soil do you use?
显示更多
文章
Dummer. ゛☀
2017年09月02日

When you think of Florida, you immediately think of palm trees. However, not all palm species do well in colder regions of the state where temperatures may dip down to 5 F. (-15 C.). Pindo palm trees (Butia capitata) are one type of palm that will tolerate cooler temperatures and can even be found along the East Coast up to the Carolinas. Let’s find out how to care for a pindo palm.
Hardy Pindo Info
Pindo palms, also known as jelly palms, grow slowly to a mature height of 15-20 feet with a trunk diameter of 1 to 1 1/2 feet. Flowers can be red, white or yellow and occur in groups of two male flowers and one female flower. The fruit of this graceful palm is light orange to brownish red and can be used to make jelly. The seeds can even be roasted for a coffee substitute. Pindo palms are often used as a specimen tree and draw a variety of wildlife with their sweet fruit.
Growing Pindo Palm Trees
Pindo palms will grow in full sun or partial shade and any type of soil as long as it is moderately salt tolerant and has good drainage. Falling fruit can make a mess, so it is recommended that pindo palms be planted at least ten feet from decks, patios or paved surfaces. Since these trees grow so slowly, it is best to buy at least a three-year-old nursery stock tree unless you are extremely patient.
How to Care of a Pindo Palm
Pindo palm care is not difficult at all. There are no diseases or insect problems with this tree, other than the odd micro-nutrient deficiency. Regular fertilization will help keep the pindo palm looking its best. Pindo palms are able to survive hot and windy conditions, but it is always best to keep the soil adequately moist. This Brazil native requires some pruning of dead fronds to keep its appearance tidy.

Hardy Pindo Info
Pindo palms, also known as jelly palms, grow slowly to a mature height of 15-20 feet with a trunk diameter of 1 to 1 1/2 feet. Flowers can be red, white or yellow and occur in groups of two male flowers and one female flower. The fruit of this graceful palm is light orange to brownish red and can be used to make jelly. The seeds can even be roasted for a coffee substitute. Pindo palms are often used as a specimen tree and draw a variety of wildlife with their sweet fruit.

Growing Pindo Palm Trees
Pindo palms will grow in full sun or partial shade and any type of soil as long as it is moderately salt tolerant and has good drainage. Falling fruit can make a mess, so it is recommended that pindo palms be planted at least ten feet from decks, patios or paved surfaces. Since these trees grow so slowly, it is best to buy at least a three-year-old nursery stock tree unless you are extremely patient.

How to Care of a Pindo Palm
Pindo palm care is not difficult at all. There are no diseases or insect problems with this tree, other than the odd micro-nutrient deficiency. Regular fertilization will help keep the pindo palm looking its best. Pindo palms are able to survive hot and windy conditions, but it is always best to keep the soil adequately moist. This Brazil native requires some pruning of dead fronds to keep its appearance tidy.
0
0
文章
Dummer. ゛☀
2017年09月01日

Originating in Japan, contorted mulberry trees (Morus alba) thrive in USDA plant hardiness zones 5 through 9. This deciduous, rapidly growing plant can easily reach 20 to 30 feet high and 15 to 20 feet wide if not controlled. This tree is also known as a contorted “Unryu” mulberry.
Contorted Mulberry Info
The leaves of this attractive tree are a light green color and somewhat glossy and heart-shaped. They turn yellow in the fall. From mid to late summer, small yellow flowers bloom followed by fruit similar in shape and size to a blackberry. Fruit is white and ripens to a pink or light violet. Depending on variety, it can take up to ten years for a tree to start producing fruit. A distinguishing feature of this interesting tree is the contorted or twisted branches that are often used in flower arrangements, which help to give these plants the name ‘corkscrew mulberries'.
Growing Contorted Unryu Mulberries
Many people plant contorted mulberries as an ornamental plant in the home landscape. They bring great interest during all garden seasons and draw wildlife with their fruit and foliage. Mulberry trees do best in full to part sun and require ample water while they are establishing, although they are drought tolerant once roots are established. Some people plant varieties in large containers where their growth can be controlled. They make lovely patio plants and are popular because of their fast growth.
Care of Contorted Mulberry
Mulberry trees need space to spread out; 15 feet between trees is recommended. Provide supplemental water during dry conditions. If the soil conditions become too dry, fruit drop will occur. An annual feeding using a 10-10-10 fertilizer will keep the tree at its best. Pruning is only necessary to remove dead or damaged limbs and to limit crowding and control growth.
Harvesting and Using Fruit
Pick fruit early in the morning when it is at the peak of ripeness. It will be deep red to almost black when it is ready. Spread a sheet on the ground and gently shake the tree. The fruit will fall to the ground. Use immediately or wash, dry and freeze. This delicious berry is great for jams, pies or when eaten fresh.

Contorted Mulberry Info
The leaves of this attractive tree are a light green color and somewhat glossy and heart-shaped. They turn yellow in the fall. From mid to late summer, small yellow flowers bloom followed by fruit similar in shape and size to a blackberry. Fruit is white and ripens to a pink or light violet. Depending on variety, it can take up to ten years for a tree to start producing fruit. A distinguishing feature of this interesting tree is the contorted or twisted branches that are often used in flower arrangements, which help to give these plants the name ‘corkscrew mulberries'.

Growing Contorted Unryu Mulberries
Many people plant contorted mulberries as an ornamental plant in the home landscape. They bring great interest during all garden seasons and draw wildlife with their fruit and foliage. Mulberry trees do best in full to part sun and require ample water while they are establishing, although they are drought tolerant once roots are established. Some people plant varieties in large containers where their growth can be controlled. They make lovely patio plants and are popular because of their fast growth.

Care of Contorted Mulberry
Mulberry trees need space to spread out; 15 feet between trees is recommended. Provide supplemental water during dry conditions. If the soil conditions become too dry, fruit drop will occur. An annual feeding using a 10-10-10 fertilizer will keep the tree at its best. Pruning is only necessary to remove dead or damaged limbs and to limit crowding and control growth.

Harvesting and Using Fruit
Pick fruit early in the morning when it is at the peak of ripeness. It will be deep red to almost black when it is ready. Spread a sheet on the ground and gently shake the tree. The fruit will fall to the ground. Use immediately or wash, dry and freeze. This delicious berry is great for jams, pies or when eaten fresh.
0
1
文章
Dummer. ゛☀
2017年09月01日

You will probably not find mulberries at the grocers (maybe at the farmers market) because of their short shelf life. But, if you live in USDA zones 5-9, you can enjoy your very own mulberry tree harvest. The question is when to pick mulberries? This leads to a follow up question of how to pick mulberries? Read on to find the answers.
Mulberry Tree Harvest
Mulberry trees attain a height of between 20-30 feet. They make lovely, fast-growing landscape trees with the added bonus of producing delicious berries and leaves suitable for steeping as tea. The berries are really the stand out though. They look much like elongated blackberries and are sinfully sweet.
Starting a mulberry tree from seed can be difficult. The seed needs 90 days of cold, moist stratification and even then has a low germination rate. If you dislike failure, it might be advisable to purchase a young tree, especially if you want fruit quicker for harvesting. Mulberry trees like full sun in moist, slightly acidic soil (pH of about 6.0). They need to be planted deep enough to support their extensive root system.
When to Pick Mulberries
A little patience is required before you can begin harvesting the mulberry trees. It will take about three years before you can sample the fruits of your labor and mulberry harvesting can commence. Mulberry harvesting season begins in mid-June through August. You will be looking for fruit that is large, black and sweet, so yes, a taste test is in order. If the fruit is ripe, then what?
How to Pick Mulberries
The time for harvesting the mulberry trees has arrived. There are two methods for picking the fruit. You can hand pick it, which depending upon your disposition can be tedious or relaxing, or you can use an old sheet or tarp to hasten the process. Spread the tarp under the mulberry tree and then shake the branches. Gather up all the fallen berries. Take care not to layer the berries too deep in the container or you will end up with a lot of crushed berries.
If you can keep your hands off them, mulberries will keep in the refrigerator, unwashed in a covered container for several days. Or freeze the berries for later use. Wash them and gently pat them dry, then pack them in freezer bags. Frozen berries will store for several months.

Mulberry Tree Harvest
Mulberry trees attain a height of between 20-30 feet. They make lovely, fast-growing landscape trees with the added bonus of producing delicious berries and leaves suitable for steeping as tea. The berries are really the stand out though. They look much like elongated blackberries and are sinfully sweet.
Starting a mulberry tree from seed can be difficult. The seed needs 90 days of cold, moist stratification and even then has a low germination rate. If you dislike failure, it might be advisable to purchase a young tree, especially if you want fruit quicker for harvesting. Mulberry trees like full sun in moist, slightly acidic soil (pH of about 6.0). They need to be planted deep enough to support their extensive root system.

When to Pick Mulberries
A little patience is required before you can begin harvesting the mulberry trees. It will take about three years before you can sample the fruits of your labor and mulberry harvesting can commence. Mulberry harvesting season begins in mid-June through August. You will be looking for fruit that is large, black and sweet, so yes, a taste test is in order. If the fruit is ripe, then what?

How to Pick Mulberries
The time for harvesting the mulberry trees has arrived. There are two methods for picking the fruit. You can hand pick it, which depending upon your disposition can be tedious or relaxing, or you can use an old sheet or tarp to hasten the process. Spread the tarp under the mulberry tree and then shake the branches. Gather up all the fallen berries. Take care not to layer the berries too deep in the container or you will end up with a lot of crushed berries.

If you can keep your hands off them, mulberries will keep in the refrigerator, unwashed in a covered container for several days. Or freeze the berries for later use. Wash them and gently pat them dry, then pack them in freezer bags. Frozen berries will store for several months.
0
0
文章
Dummer. ゛☀
2017年08月31日

Although lacebark elm (Ulmus parvifolia) is native to Asia, it was introduced to the United States in 1794. Since that time, it has become a popular landscape tree, suitable for growing in USDA hardiness zones 5 through 9. Read on for more helpful lacebark elm information.
Lacebark Elm Information
Also known as Chinese elm, lacebark elm is a medium size tree that typically reaches heights of 40 to 50 feet. It is valued for its shiny, dark green foliage and rounded shape. The multiple colors and rich textures of lacebark elm bark (the focus of its name) are an added bonus. Lacebark elm provides shelter, food and nesting sites for a variety of birds, and the leaves attract a number of butterfly larvae.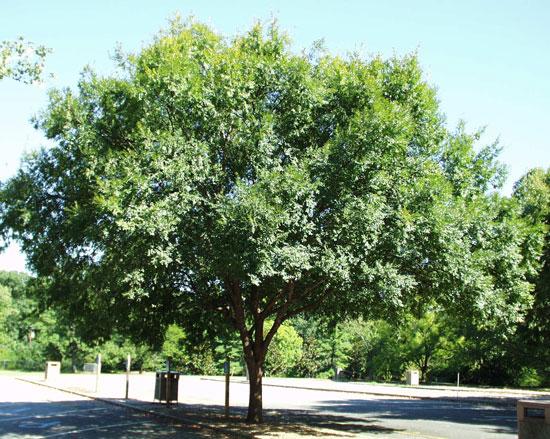
Lacebark Elm Pros and Cons
If you’re thinking about planting lacebark elm, growing this versatile tree is easy in well-drained soil, although it tolerates nearly any type of soil, including clay. It is a good shade tree and withstands a certain amount of drought. It is happy in prairies, meadows or home gardens. Unlike Siberian elm, lacebark is not considered to be a trash tree. Unfortunately, the two are frequently confused in nurseries.
One strong selling point is that lacebark elm has proven to be more resistant to Dutch elm disease, a deadly disease that often befalls other types of elm trees. It is also resistant to elm leaf beetle and Japanese beetle, both common elm tree pests. Any disease problems, including cankers, rots, leaf spots and wilt, tend to be relatively minor. There aren’t a lot of negatives when it comes to lacebark elm tree growing. However, the branches sometimes break when exposed to strong winds or laden with heavy snow or ice. Additionally, lacebark is considered to be invasive in some areas of the eastern and southwestern United States. It’s always a good idea to check with your local cooperative extension office before growing lacebark elm trees.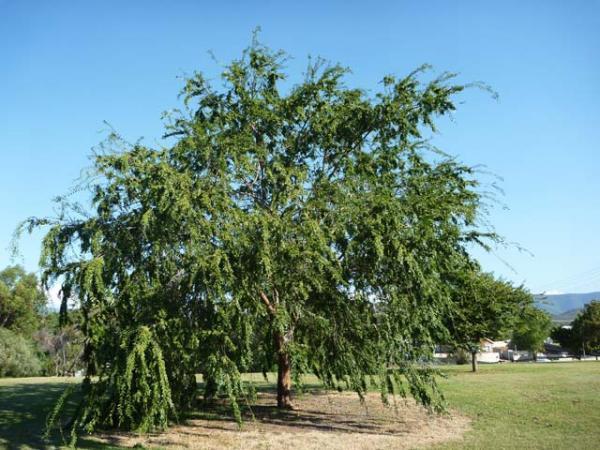
Care of Chinese Lacebark Elms
Once established, care of Chinese lacebark elms is uninvolved. However, careful training and staking when the tree is young will get your lacebark elm off to a good start. Otherwise, water regularly during spring, summer and early autumn. Although lacebark elm is relatively drought tolerant, regular irrigation means a healthier, more attractive tree. Lacebark elms don’t require a lot of fertilizer, but a once or twice yearly application of a high-nitrogen fertilizer ensures the tree has proper nutrition if soil is poor or growth appears slow. Fertilize lacebark elm in early spring and again in late autumn, well before the soil freezes.
It’s critical to select a fertilizer that releases nitrogen into the soil slowly, as a quick release of nitrogen can cause weak growth and severe structural damage that invites pests and disease.

Lacebark Elm Information
Also known as Chinese elm, lacebark elm is a medium size tree that typically reaches heights of 40 to 50 feet. It is valued for its shiny, dark green foliage and rounded shape. The multiple colors and rich textures of lacebark elm bark (the focus of its name) are an added bonus. Lacebark elm provides shelter, food and nesting sites for a variety of birds, and the leaves attract a number of butterfly larvae.

Lacebark Elm Pros and Cons
If you’re thinking about planting lacebark elm, growing this versatile tree is easy in well-drained soil, although it tolerates nearly any type of soil, including clay. It is a good shade tree and withstands a certain amount of drought. It is happy in prairies, meadows or home gardens. Unlike Siberian elm, lacebark is not considered to be a trash tree. Unfortunately, the two are frequently confused in nurseries.

One strong selling point is that lacebark elm has proven to be more resistant to Dutch elm disease, a deadly disease that often befalls other types of elm trees. It is also resistant to elm leaf beetle and Japanese beetle, both common elm tree pests. Any disease problems, including cankers, rots, leaf spots and wilt, tend to be relatively minor. There aren’t a lot of negatives when it comes to lacebark elm tree growing. However, the branches sometimes break when exposed to strong winds or laden with heavy snow or ice. Additionally, lacebark is considered to be invasive in some areas of the eastern and southwestern United States. It’s always a good idea to check with your local cooperative extension office before growing lacebark elm trees.

Care of Chinese Lacebark Elms
Once established, care of Chinese lacebark elms is uninvolved. However, careful training and staking when the tree is young will get your lacebark elm off to a good start. Otherwise, water regularly during spring, summer and early autumn. Although lacebark elm is relatively drought tolerant, regular irrigation means a healthier, more attractive tree. Lacebark elms don’t require a lot of fertilizer, but a once or twice yearly application of a high-nitrogen fertilizer ensures the tree has proper nutrition if soil is poor or growth appears slow. Fertilize lacebark elm in early spring and again in late autumn, well before the soil freezes.

It’s critical to select a fertilizer that releases nitrogen into the soil slowly, as a quick release of nitrogen can cause weak growth and severe structural damage that invites pests and disease.
0
0
文章
Miss Chen
2017年08月29日

The original cherry red-flowered Knock Out rose (Rosa 'Radrazz') and its varieties produce showy flowers and are relatively disease-resistant. The shrubs grow up to 5 feet high and wide, thriving in full sun and well-drained soil with a pH level between 6.0 and 6.5.

Knock Out rose varieties produce 3-inch-wide, lightly fragrant flowers throughout spring and summer, and nearly all year in locations such as Florida. The blooms of Double Knock Out rose (Rosa 'Radtko') and Pink Double Knock Out rose (Rosa 'Radtkopink') have twice as many petals as the flowers of other Knock Out varieties, referred to as single Knock Outs. Single and double Knock Outs are hardy in U.S. Department of Agriculture plant hardiness zones 4 through 10 or zones 5 through 11, depending on the source. Pruning both kinds of Knock Out roses on a regular basis helps keep them healthy and shaped.
Spring and Fall Pruning
Single and double Knock Out roses benefit from an annual late-winter or early-spring pruning, whether they grow in cool or warm climates. Wait until the shrubs have had at least their second year of growth to prune them, however; they are mature then.
The best time for spring pruning is when their leaf buds have swelled but before the new growth appears. In cool regions, the shrubs usually can be pruned from mid-February to early March or April. In warm regions, late January to mid-February is generally a suitable time to prune. You can prune again in late summer or early fall.

Conditions That Warrant Pruning
At any time of the year, you can remove dead, diseased or damaged branches from Knock Out roses. Although the shrubs tend to resist diseases, you may see occasional disease symptoms, including yellow leaves, peeling bark and a white, powdery mildew on the leaves and stems. Prune and destroy branches that show such symptoms; the disease-resistant plants probably will recover on their own.
If your Knock Out rose bushes serve as a privacy screen, then an option is simply to remove their dead wood and allow the shrubs to grow taller.
Promote air circulation and prevent diseases by removing branches that rub against other branches.
Pruning Gear and Methods
Wear a long-sleeved shirt and long, protective gloves to avoid injury from Knock Out roses' thorns. Prune the shrubs with bypass pruners, which have a scissorlike cutting action. Avoid using anvil pruners, which damage stem tissue, according to North Carolina Cooperative Extension.
Before you prune, sterilize the pruners by soaking them for five minutes in a solution that is 1 part 70-percent isopropyl rubbing alcohol and 1 part water to prevent spreading plant diseases; rinse the tool with clean water. Also sterilize the pruning tool occasionally between cuts on the same bush and before you prune a different bush. Keep pruning tools and disinfectants away from children and pets.
During spring and fall pruning, remove one-half to one-third of each Knock Out rose's growth,* but do not cut a plant shorter than 2 feet tall. Make each cut slanted and about 1/4 inch above an outward-facing leaf bud, with the cut slanting away from the bud. Staggering the cuts will give a shrub a dome shape.
Removal of Old Flowers
In summer, you have the option to deadhead, or remove, spent flower clusters from Knock Out rose bushes. Although deadheading is not a necessity, the practice helps control plant size and promotes late-season blooming. Deadheading is not a severe form of pruning and minimizes stress to the plants during hot summer months.
Deadhead a faded flower cluster by cutting its stem just above the first five-leaflet leaf below the flower cluster. If you want to trim leggy or uneven growth, then make the cut above a leaf that is 6 to 8 inches below the old flower cluster.

Knock Out rose varieties produce 3-inch-wide, lightly fragrant flowers throughout spring and summer, and nearly all year in locations such as Florida. The blooms of Double Knock Out rose (Rosa 'Radtko') and Pink Double Knock Out rose (Rosa 'Radtkopink') have twice as many petals as the flowers of other Knock Out varieties, referred to as single Knock Outs. Single and double Knock Outs are hardy in U.S. Department of Agriculture plant hardiness zones 4 through 10 or zones 5 through 11, depending on the source. Pruning both kinds of Knock Out roses on a regular basis helps keep them healthy and shaped.
Spring and Fall Pruning
Single and double Knock Out roses benefit from an annual late-winter or early-spring pruning, whether they grow in cool or warm climates. Wait until the shrubs have had at least their second year of growth to prune them, however; they are mature then.
The best time for spring pruning is when their leaf buds have swelled but before the new growth appears. In cool regions, the shrubs usually can be pruned from mid-February to early March or April. In warm regions, late January to mid-February is generally a suitable time to prune. You can prune again in late summer or early fall.

Conditions That Warrant Pruning
At any time of the year, you can remove dead, diseased or damaged branches from Knock Out roses. Although the shrubs tend to resist diseases, you may see occasional disease symptoms, including yellow leaves, peeling bark and a white, powdery mildew on the leaves and stems. Prune and destroy branches that show such symptoms; the disease-resistant plants probably will recover on their own.
If your Knock Out rose bushes serve as a privacy screen, then an option is simply to remove their dead wood and allow the shrubs to grow taller.
Promote air circulation and prevent diseases by removing branches that rub against other branches.
Pruning Gear and Methods
Wear a long-sleeved shirt and long, protective gloves to avoid injury from Knock Out roses' thorns. Prune the shrubs with bypass pruners, which have a scissorlike cutting action. Avoid using anvil pruners, which damage stem tissue, according to North Carolina Cooperative Extension.
Before you prune, sterilize the pruners by soaking them for five minutes in a solution that is 1 part 70-percent isopropyl rubbing alcohol and 1 part water to prevent spreading plant diseases; rinse the tool with clean water. Also sterilize the pruning tool occasionally between cuts on the same bush and before you prune a different bush. Keep pruning tools and disinfectants away from children and pets.
During spring and fall pruning, remove one-half to one-third of each Knock Out rose's growth,* but do not cut a plant shorter than 2 feet tall. Make each cut slanted and about 1/4 inch above an outward-facing leaf bud, with the cut slanting away from the bud. Staggering the cuts will give a shrub a dome shape.
Removal of Old Flowers
In summer, you have the option to deadhead, or remove, spent flower clusters from Knock Out rose bushes. Although deadheading is not a necessity, the practice helps control plant size and promotes late-season blooming. Deadheading is not a severe form of pruning and minimizes stress to the plants during hot summer months.
Deadhead a faded flower cluster by cutting its stem just above the first five-leaflet leaf below the flower cluster. If you want to trim leggy or uneven growth, then make the cut above a leaf that is 6 to 8 inches below the old flower cluster.
1
1


