文章
lenny
2017年05月23日
If you want to create a garden on terrace or you already own one, inspire yourself with these 21 ‘Beautiful Terrace Garden Images’.
To make a beautiful terrace garden, arrange everything neatly, do not use more than 3-5 colors on your terrace. Plan everything on paper, determine a theme and the ambiance you would like to create there and work accordingly.
1.
Create an alluring container garden on terrace, grow flowers to embellish it. Most of the terraces are sunny and flowers are easy to grow. Make a lovely flower garden with combination of both perennials and annuals equally.
2.
If you want to create a serene and calm garden on terrace, use colors like blue, green, indigo, pink and white instead of bright colors.
3.
Grow lot of vines and dwarf trees near the walls. These will use your vertical space efficiently.
4.
Create a low maintenance garden on terrace, if you are unable to do lot of care. Read these low maintenance garden tips.
5.
If you want to make a lush green garden, grow lot of dwarf conifers and ferns on your terrace. These will give an elegant look with wooden deck and furniture.
6.
This garden on terrace is simple yet good looking, not so many colors and accessories are used.
7.
Excellent use of old tires you can see here, these planters are made after doing some DIY hacks. See these DIY tire ideas for more.
8.
Both lavender and allium (ornamental onion) love sunny spot and well drained soil, growing them on terrace is easy too.
9.
Floor plays an essential role in creating a beautiful terrace garden. You can also use pebbles to add an extra element.
10.
Making a lawn on terrace is possible too. You’ll have your best seating place above your urban dwelling, if you’ll create a terrace lawn.
11.
Create a cottage garden like setup, wild and overgrown terrace garden that will give you peace of mind. In the garden you can white nicotianas are grown for scent and lavender in other corner with lot of perennials capturing the eyes. You can see more about this on Gardenista.
12.
What’s not you can do on your terrace? Make a water garden, if you love to grow aquatic plants.
13.
If you have a north or east facing terrace, you do not receive full sun. In that case grow plants that grows well in partial sun. Ferns, Ivies, violets and pansies are good choice for such terrace gardens.
14.
Make raised beds on your terrace to grow trees, this is a good idea if you want to grow large shrubs or trees that have deep roots.
15.
Classy and elegant, deck tiles are looking beautiful on this terrace in the evening. If you don’t want to grow lot of plants on your terrace, simply put some potted plants in the corner.
16.
Make your beautiful terrace garden more zippy at night so you can savor your dinner there, do some lightning and you will all set to enjoy.
17.
Growing a lawn needs lots of maintenance and care and if you are worried about this, use synthetic grass, it is a good option for both terrace and balcony gardens.
18.
Using light colored furniture is a great idea to follow on terraces, because light colored furniture don’t heat up early.
19.
Grow dwarf trees and bamboos for terrace garden privacy.
20.
You can grow annuals under potted trees, this is a good idea for limited space like terrace.
21.
To make a beautiful terrace garden, arrange everything neatly, do not use more than 3-5 colors on your terrace. Plan everything on paper, determine a theme and the ambiance you would like to create there and work accordingly.
1.

Create an alluring container garden on terrace, grow flowers to embellish it. Most of the terraces are sunny and flowers are easy to grow. Make a lovely flower garden with combination of both perennials and annuals equally.
2.

If you want to create a serene and calm garden on terrace, use colors like blue, green, indigo, pink and white instead of bright colors.
3.

Grow lot of vines and dwarf trees near the walls. These will use your vertical space efficiently.
4.

Create a low maintenance garden on terrace, if you are unable to do lot of care. Read these low maintenance garden tips.
5.

If you want to make a lush green garden, grow lot of dwarf conifers and ferns on your terrace. These will give an elegant look with wooden deck and furniture.
6.

This garden on terrace is simple yet good looking, not so many colors and accessories are used.
7.

Excellent use of old tires you can see here, these planters are made after doing some DIY hacks. See these DIY tire ideas for more.
8.

Both lavender and allium (ornamental onion) love sunny spot and well drained soil, growing them on terrace is easy too.
9.

Floor plays an essential role in creating a beautiful terrace garden. You can also use pebbles to add an extra element.
10.

Making a lawn on terrace is possible too. You’ll have your best seating place above your urban dwelling, if you’ll create a terrace lawn.
11.

Create a cottage garden like setup, wild and overgrown terrace garden that will give you peace of mind. In the garden you can white nicotianas are grown for scent and lavender in other corner with lot of perennials capturing the eyes. You can see more about this on Gardenista.
12.

What’s not you can do on your terrace? Make a water garden, if you love to grow aquatic plants.
13.

If you have a north or east facing terrace, you do not receive full sun. In that case grow plants that grows well in partial sun. Ferns, Ivies, violets and pansies are good choice for such terrace gardens.
14.

Make raised beds on your terrace to grow trees, this is a good idea if you want to grow large shrubs or trees that have deep roots.
15.

Classy and elegant, deck tiles are looking beautiful on this terrace in the evening. If you don’t want to grow lot of plants on your terrace, simply put some potted plants in the corner.
16.

Make your beautiful terrace garden more zippy at night so you can savor your dinner there, do some lightning and you will all set to enjoy.
17.

Growing a lawn needs lots of maintenance and care and if you are worried about this, use synthetic grass, it is a good option for both terrace and balcony gardens.
18.

Using light colored furniture is a great idea to follow on terraces, because light colored furniture don’t heat up early.
19.

Grow dwarf trees and bamboos for terrace garden privacy.
20.

You can grow annuals under potted trees, this is a good idea for limited space like terrace.
21.

1
1
文章
Rainbow
2017年05月22日

#观赏向日葵 的发芽适温22至30℃,播种后5至7天可发芽,发出4至6枚真叶时移植一次,苗高10厘米左右定植,并在根部覆土,巩固根部避免倒伏。定植成活后即施用追肥,有机肥和化肥效果均理想。花蕾形成后宜多灌水,保持土壤湿润。
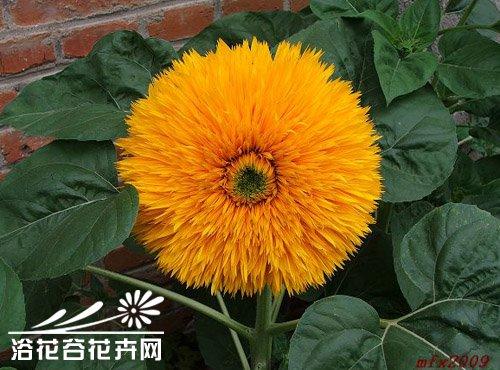
栽培要点如下:
1、矮生向日葵高30至40厘米,花径10至17厘米,单花瓣明亮金黄,花心黑色,一般插种后50至55天可开花,适于盆栽和花坛种植。
2、育苗采用播种繁殖,一般于4月进行播种,发芽的最适温度为15至18℃,可用浅盆或浅箱播,介质要求疏松,保水性良好,无菌等。播种以点播为宜,每穴播2粒,播后需覆盖1至2厘米厚介质,以维持发芽所需的湿度,并增加苗期的稳定性,减少带壳苗的发生。一般播后7至14天发芽,出苗后注意通风降温,控制湿度,并逐步见光。
3、定植及养护当幼苗出齐后陆续间苗,每穴留1株,苗高7至8厘米时可定植。盆土以富含腐殖质,排水良好的砂质土壤为好。定植时盆底施足基肥,掘取苗时尽量多带土,少伤根,以使植株较快恢复。矮生向日葵喜阳光充足和温热环境,不耐阴,不耐寒。生长期每20天施肥1次,但开花前应追施2至3次稀薄的磷钾肥。经常保持土壤的湿润状态,尤其夏季高温、干旱时需及时浇水。为使主枝顶芽健壮生长发育,可摘除(腋)芽。对于茎杆稍高的应设立支柱,防止风吹倒伏。开花时进行人工授粉,可提高结实率。
0
0
文章
Rainbow
2017年05月22日

1、花毛茛苗期管理
#花毛茛 苗期如光照过强,温度高,可搭遮阳网降温。为防止幼苗徒长,以白天温度低于15℃,夜间温度为5℃至8℃,温差小于10℃时生长最好。温度长期持续在20℃以上时,会使叶片黄化。
苗期要控制浇水,不干不浇,土壤太湿易造成幼根腐烂。浇水时尽量慢浇,防止水流过快冲出幼根或冲走基质。每隔10至15天,结合浇水浇施0.1%的尿素和KH2PO4混合液或追施0.3%的液态复合肥一次。

2、花毛茛花前管理
从幼苗长出约10片基生叶至植株抽生直立茎,形成花蕾前为花前管理,即营养生长期。为保证植株的营养生长,土壤不能缺水,否则植株生长矮小、分蘖少、根系不发达,影响花芽形成;但土壤过湿易烂根和发生病害,造成植株生长不良。
随着基生叶增多,株丛增大,每10天施一次氮、磷、钾比例为3:2:2的复合肥水溶液,并逐渐增加施肥的浓度和次数。春季温度适宜,花毛茛生长旺盛并抽生直立茎,应增大肥水的补充,经常浇水,保持土壤湿润;每周施1次稀薄饼肥液或复合肥,适当喷施1至2次以磷、钾为主的叶面肥,直至现蕾。
根据植株的生长情况,适时拉开盆距,摘除黄叶和病残叶,防止植株密度过大,造成徒长和通风不良。同时,加强病虫害防治,发现病株及时拔除,定期喷洒广谱杀菌剂灭菌;随时监控斑潜蝇、蚜虫等虫害的发生。以防为主,将病虫害杀灭在发生初期。
3、花毛茛花期管理
植株从花蕾形成、发育至开花这一段时间为花期。在花蕾形成和发育过程中,需肥量大,应每隔7至10天施稀薄饼肥液加0.2%的KH2PO4溶液一次。文章来源浴花谷花卉网:
为使花茎充实,防止受风折断和倒伏,现蕾前要增加钾肥的用量,每隔10天施一次草木灰浸出液(10千克清水加1千克草木灰浸泡一周),取上清液兑水50%追施根部,连施二次。为集中养分促使花大,现蕾初期应进行疏蕾,每株选3至5个健壮花蕾,其余全部摘除。为降低花毛茛高度,使株形更美,提高观赏价值,在花茎抽发初期至花蕾长出叶丛前,用0.2%至0.4%的B-9(比久)对茎顶与叶面喷洒,每10天一次,共进行2至3次,可促使植株矮化。或在现蕾时喷一次15%多效唑粉剂水溶液,现蕾早晚应分批喷,喷时不可重复。
花期浇水要适量均衡,保持土壤湿润,缺水将影响开花,致使花期短、色彩不艳,叶片黄化。开花时遇高温强光的天气,及时遮阴,通风降温,防止叶片变黄。如温度保持在15℃至18℃,及时剪掉开败的残花,花期可长达1至2个月。
4、花毛茛花后管理
花谢后至地上部茎叶逐渐枯黄,种子发育成熟,地下块根增大,进入休眠,为花后生长期。对不留种的植株,当花瓣脱落后,应及时剪掉残花、摘去幼果穗。适时浇水,追施1至2次以磷、钾为主的液肥。定期喷洒药剂,防治病虫害,尤其是要预防斑潜蝇的危害。
充分利用从花谢后到枝叶枯黄这段时间,使花毛茛正常生长,制造更多的营养输送给地下块根,促其增大,发育充实饱满。入夏后温度升高,要停止施肥和浇水,当枝叶完全枯黄时,选择连续2至3天晴天采收块根,为避免损伤,要小心细致逐个挖取。块根采后经冲洗、杀菌消毒、晾干后,再贮藏至秋季栽种。
#花毛茛 苗期如光照过强,温度高,可搭遮阳网降温。为防止幼苗徒长,以白天温度低于15℃,夜间温度为5℃至8℃,温差小于10℃时生长最好。温度长期持续在20℃以上时,会使叶片黄化。
苗期要控制浇水,不干不浇,土壤太湿易造成幼根腐烂。浇水时尽量慢浇,防止水流过快冲出幼根或冲走基质。每隔10至15天,结合浇水浇施0.1%的尿素和KH2PO4混合液或追施0.3%的液态复合肥一次。

2、花毛茛花前管理
从幼苗长出约10片基生叶至植株抽生直立茎,形成花蕾前为花前管理,即营养生长期。为保证植株的营养生长,土壤不能缺水,否则植株生长矮小、分蘖少、根系不发达,影响花芽形成;但土壤过湿易烂根和发生病害,造成植株生长不良。
随着基生叶增多,株丛增大,每10天施一次氮、磷、钾比例为3:2:2的复合肥水溶液,并逐渐增加施肥的浓度和次数。春季温度适宜,花毛茛生长旺盛并抽生直立茎,应增大肥水的补充,经常浇水,保持土壤湿润;每周施1次稀薄饼肥液或复合肥,适当喷施1至2次以磷、钾为主的叶面肥,直至现蕾。
根据植株的生长情况,适时拉开盆距,摘除黄叶和病残叶,防止植株密度过大,造成徒长和通风不良。同时,加强病虫害防治,发现病株及时拔除,定期喷洒广谱杀菌剂灭菌;随时监控斑潜蝇、蚜虫等虫害的发生。以防为主,将病虫害杀灭在发生初期。
3、花毛茛花期管理
植株从花蕾形成、发育至开花这一段时间为花期。在花蕾形成和发育过程中,需肥量大,应每隔7至10天施稀薄饼肥液加0.2%的KH2PO4溶液一次。文章来源浴花谷花卉网:
为使花茎充实,防止受风折断和倒伏,现蕾前要增加钾肥的用量,每隔10天施一次草木灰浸出液(10千克清水加1千克草木灰浸泡一周),取上清液兑水50%追施根部,连施二次。为集中养分促使花大,现蕾初期应进行疏蕾,每株选3至5个健壮花蕾,其余全部摘除。为降低花毛茛高度,使株形更美,提高观赏价值,在花茎抽发初期至花蕾长出叶丛前,用0.2%至0.4%的B-9(比久)对茎顶与叶面喷洒,每10天一次,共进行2至3次,可促使植株矮化。或在现蕾时喷一次15%多效唑粉剂水溶液,现蕾早晚应分批喷,喷时不可重复。
花期浇水要适量均衡,保持土壤湿润,缺水将影响开花,致使花期短、色彩不艳,叶片黄化。开花时遇高温强光的天气,及时遮阴,通风降温,防止叶片变黄。如温度保持在15℃至18℃,及时剪掉开败的残花,花期可长达1至2个月。
4、花毛茛花后管理
花谢后至地上部茎叶逐渐枯黄,种子发育成熟,地下块根增大,进入休眠,为花后生长期。对不留种的植株,当花瓣脱落后,应及时剪掉残花、摘去幼果穗。适时浇水,追施1至2次以磷、钾为主的液肥。定期喷洒药剂,防治病虫害,尤其是要预防斑潜蝇的危害。
充分利用从花谢后到枝叶枯黄这段时间,使花毛茛正常生长,制造更多的营养输送给地下块根,促其增大,发育充实饱满。入夏后温度升高,要停止施肥和浇水,当枝叶完全枯黄时,选择连续2至3天晴天采收块根,为避免损伤,要小心细致逐个挖取。块根采后经冲洗、杀菌消毒、晾干后,再贮藏至秋季栽种。
2
3
文章
滕华美
2017年05月22日

#红花 ,又称草红花。双子叶植物,菊科,干燥的管状花,长约1.5厘米,橙红色,花管狭细,先端5裂,裂片狭线形,长5~7毫米,雄蕊5枚,花药黄色,联合成管,高出裂片之外,其中央有柱头露出。具特异香气,味微苦。以花片长、色鲜红、质柔软者为佳。主产河南、浙江、四川等地。活血通经,去瘀止痛。活血通经药。
红花因其美丽的花朵也为大多数的花卉爱好者所喜爱,好多人选择种植红花作观赏花卉,但是红花也会受一些病虫害的侵害,其防治方法如下:
1.锈病:为害叶片,以叶背面发生较多。防治方法是:采花后拾净残株病叶烧毁;喷97%的敌锈钠300~400倍液,每隔10天一次,连续2~3次即可。进行轮作,以防治土壤中的病原菌为害。
2.根腐病:由根腐病菌侵染,整个生育阶段均可发生,尤其是幼苗期、开花期发病严重。发病后植株萎蔫,呈浅黄色,最后死亡。防治方法:发现病株要及时拔除烧掉,防止传染给周围植株,在病株穴中撒一些生石灰或快喃丹,杀死根际线虫,用50%的托布津1000倍液浇灌病株。
3.黑斑病:病原菌为半知菌,在4~5月发生,受害后叶片上呈椭圆形病斑,具同心轮纹。防治方法:清除病枝残叶,集中销毁;与禾本科作物轮作;雨后及时开沟排水,降低土壤湿度。发病时可用70%代森锰锌600~800倍液喷雾,每隔7天一次,连续2~3次。
4.炭疽病:为红花生产后期的病害,主要为害枝茎、花蕾茎部和总苞。防治方法:选用抗病品种;与禾本科作物轮作;用30%菲醌25克拌种5千克,拌后播种;用70%代森锰锌600~800倍液进行喷洒,每隔10天一次,连续2~3次。要注意排除积水,降低土壤湿度,抑制病原菌的传播。
5.钻心虫
对花序危害极大,一旦有虫钻进花序中,花朵死亡,严重影响产量。
防治方法:在现蕾期应用甲胺磷叶面喷雾2-3次,把钻心虫杀死。 在蚜虫发生期,可用乐果1000倍喷雾2~3次,可杀死蚜虫。
0
0
文章
stone
2017年05月22日
家里养#仙客来 的花友,很想知道仙客来什么时候开花,一般来说仙客来花期在每年的1-5月,因为各地气候不同,所以花期会有一些不同,下图是仙客来开花期和繁殖期的图表,供花友参考。

仙客来栽培要点:
仙客来种植土壤ph值6-6.5最佳,日常养护忌强光直射或露天淋雨,栽种时勿将球根深埋,应留球根1/3露出土面,施肥时不要触及叶面及球根,仙客来性喜冷凉,不容易越夏,在夏季容易死亡, 最佳的生长适温约15~22℃,在温度达到30℃的时候,仙客来则进入半休眠状态,这个时候很容易因为浇水不当导致腐烂死亡,
所以在夏季的时候,一个是停止施肥,二个是应该将仙客来防止在通风,阴凉的环境下养护,并且控水,适当保持盆土,微微有点潮就可以了。

仙客来栽培要点:
仙客来种植土壤ph值6-6.5最佳,日常养护忌强光直射或露天淋雨,栽种时勿将球根深埋,应留球根1/3露出土面,施肥时不要触及叶面及球根,仙客来性喜冷凉,不容易越夏,在夏季容易死亡, 最佳的生长适温约15~22℃,在温度达到30℃的时候,仙客来则进入半休眠状态,这个时候很容易因为浇水不当导致腐烂死亡,
所以在夏季的时候,一个是停止施肥,二个是应该将仙客来防止在通风,阴凉的环境下养护,并且控水,适当保持盆土,微微有点潮就可以了。
3
1
文章
笼岛 みどり
2017年05月22日


9月13日の誕生花
9月13日の誕生花は、「タマスダレ(玉簾・玉すだれ)」です。
ヒガンバナ科タマスダレ属の球根植物です。5月下旬~10月針のような細長い緑の葉と、真っ白な6枚の花びらが特徴的な花です。
タマスダレ(玉簾・玉すだれ)について科・属 ヒガンバナ科タマスダレ属英名 Zephyr flower, Zephyr lily, Fairy lily, Rain lily学名 Zephyranthes candida原産地 南アメリカ開花時期 6月~9月花名の由来
英名の 「レインリリー」は雨の後に一斉に上向きに花を咲かせることから付けられた名前です。タマスダレの学名は「ゼフィランサス・カンディダ(Zephyranthes candida)」です。ゼフィランサスは、ギリシャ語で西風という意味の「zephyros」と花という意味のanthosが語源とされています。 「candida」は白く輝くという意味で、まさにタマスダレの白花を表しています。
タマスダレ(玉簾)の花言葉と由来
タマスダレ(玉簾)の花言葉は、「汚れなき愛」「潔白な愛」「期待」。
原産地はペルーですが、白く小さな花を「玉」、葉が集まって咲いている姿が「すだれ」にたとえられた、とても日本的な和名が付けられています。白く可憐で美しい花は、汚れなさ・潔白さを、常緑の葉からは未来ある若者を連想させることからこの花言葉になったそうです。
タマスダレの仲間
タマスダレというと白花種のZephyranthes candidaを指しますが、同じゼフィランサス属では花がピンク色のサフランモドキ(Z. grandiflora)もよく見ることができます。ジャマイカ、キューバ、メキシコなど、こちらも中央~南アメリカ原産で、花は6cm前後とタマスダレよりもやや大きめです。
モモイロタマスダレとよばれているのは、Zephyranthes taubertiというブラジル原産の種です。この園芸品種として春に咲く「紅玉」や、夏咲きで大輪、濃いピンク色の「桃の里」があります。
また黄色の花を咲かせるのはゼフィランサス・キトリナで、寒さに若干弱いものの、タネで増やすこともできます。
タマスダレの育て方
地植えでは、日当たりの良いところか、明るい半日陰の場所に3月中旬から4月下旬に球根を植えつけます。球根は約5㎝程度の深さにできるだけ密に植えると花が咲いたときに綺麗です。
鉢で育てるなら、5号鉢に7球を目安に、球根の上部が土に隠れるくらいの浅めに植えつけます。数年は植えっぱなしで毎年咲いてくれますが、球根が殖えて混み合ってきたら咲きづらくなるので球根を分けて植え直します。
特に生育期は、地植えでも夏に雨の降らない日が続くなど乾燥するときは注意して水やりをします。
0
0
文章
stone
2017年05月22日

#郁金香 原产伊朗和土耳其等高山地带,适于冬季湿冷嘲热、夏季凉爽及稍干燥的生态环境。它夏季休眠,秋冬季生根并萌发新芽,但不出土,需经冬季低温,到了第二年2月气温达到5℃至20℃时才生长出土。种球贮藏期间的花芽分化适温为20℃至25℃,最高不得超过28℃。
郁金香为什么有蕾难开花有可能有以下几个方面的原因:
一是商品种球经连续2年至3年的栽培,出现种球退化由于栽培环境与郁金香的原产地环境相差较大,特别是夏季气温过高,致使其种球退化。一般情况下,从花市上购买的商品种球,在没有采取相应复壮措施的条件下,只能栽种一年,第二年无法继续 正常开花。
二是种球贮藏期间环境温度过高,造成鳞茎内部营养大量消耗,花芽分化阶段又没有与之相适应的温度条件(凉爽干燥),致使用其花朵发育不正常,因而不能开花。
三是水肥管理失误,如浇水过多,磷钾肥供应不足。
四是种球在种植前未经低温处理,一般发育好的种球,在栽种前须经5℃至9℃的低温环境处理2个至3个月,再转入棚室内栽培,可促成花莛粗壮,花朵硕大,花期提前。

五是其根系受到损伤,它的根系受伤后不能再生,因此经移栽的植株也不易开花。
六是鳞茎感染了病害,导致其出现腐烂,也会使植株不能正常开花。
家庭盆栽,可于9月至10月将其栽种于深筒盆中,盆土可用腐叶7份、沙2份、腐熟饼肥或厩肥1份,均匀混合配制。栽种前先将鳞茎外面的一层褐色膜质表皮撕去,再用0、1%的多菌灵药液浸泡消毒,方可植入盆中,一般情况下,一个口径20厘米以上的商品种球2个至3个,然后浇透水,置于光照等管理到位,一般均可顺利开花。
如果是采用未经低温处理的种球,可将栽种好的盆株先放在5℃至9℃的环境中60天至80天,然后转入15℃至18℃的室内,夜间温度可稍低2℃至3℃,多施速效磷钾肥,植树株也可很快抽莛开花。
郁金香为什么有蕾难开花有可能有以下几个方面的原因:
一是商品种球经连续2年至3年的栽培,出现种球退化由于栽培环境与郁金香的原产地环境相差较大,特别是夏季气温过高,致使其种球退化。一般情况下,从花市上购买的商品种球,在没有采取相应复壮措施的条件下,只能栽种一年,第二年无法继续 正常开花。
二是种球贮藏期间环境温度过高,造成鳞茎内部营养大量消耗,花芽分化阶段又没有与之相适应的温度条件(凉爽干燥),致使用其花朵发育不正常,因而不能开花。
三是水肥管理失误,如浇水过多,磷钾肥供应不足。
四是种球在种植前未经低温处理,一般发育好的种球,在栽种前须经5℃至9℃的低温环境处理2个至3个月,再转入棚室内栽培,可促成花莛粗壮,花朵硕大,花期提前。

五是其根系受到损伤,它的根系受伤后不能再生,因此经移栽的植株也不易开花。
六是鳞茎感染了病害,导致其出现腐烂,也会使植株不能正常开花。
家庭盆栽,可于9月至10月将其栽种于深筒盆中,盆土可用腐叶7份、沙2份、腐熟饼肥或厩肥1份,均匀混合配制。栽种前先将鳞茎外面的一层褐色膜质表皮撕去,再用0、1%的多菌灵药液浸泡消毒,方可植入盆中,一般情况下,一个口径20厘米以上的商品种球2个至3个,然后浇透水,置于光照等管理到位,一般均可顺利开花。
如果是采用未经低温处理的种球,可将栽种好的盆株先放在5℃至9℃的环境中60天至80天,然后转入15℃至18℃的室内,夜间温度可稍低2℃至3℃,多施速效磷钾肥,植树株也可很快抽莛开花。
0
0
文章
笼岛 みどり
2017年05月22日


8月17日の誕生花
8月17日の誕生花は、「ユリノキ(百合の木)」です。
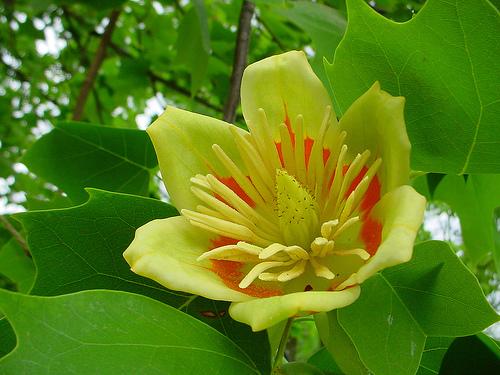
5月ごろから初夏にかけて、枝先から4から6枚にわかれた葉の間から、黄緑色の花弁の付け根あたりに、一輪の鐘形のオレンジがかった花を咲かせます。
ユリノキ(百合の木)について科・属 モクレン科ユリノキ属英名 American tulip tree学名 Liriodendron tulipifera原産地 北アメリカ開花時期 5月~6月ユリノキ(百合の木)の花名の由来
ギリシャ語でユリを意味する「leirion」、木を意味する「denderon」が語源の学名「Liriodendron tulipifera」からつけられたとされます。tulipiferaは チューリップに似た花をいう意味を持ち、英名はtulip treeとつけられています。
ユリノキ(百合の木)の花言葉の由来
ユリノキ(百合の木)の花言葉は、「見事な美しさ」「幸福」「田園の美しさ」。
上品な蜜をたっぷりと出すことから、「田園の美しさ」、オレンジ色の斑紋が花びらから浮きだって、不思議な美しさを際立たせていることから「見事な美しさ」、「幸福」といった花言葉が付けられたそうです。
0
0
文章
笼岛 みどり
2017年05月22日


7月25日の誕生花
7月25日の誕生花は、「ムギワラギク(#帝王貝細工 )」です。
オーストラリア原産で、キク科のムギワラ属の一年草で「ヘリクリサム」とも呼ばれています。5~9月に、茎先にカサカサとした花弁状の総苞片に包まれた黄色、オレンジ、赤、白などの鮮やかな色の花を咲かせます。
ムギワラギク(帝王貝細工)について科・属 キク科 ムギワラギク属英名 Strawflower学名 Helichrysum bracteatum原産地 オーストラリア開花時期 5月~9月
ムギワラギク(帝王貝細工)の花言葉と由来
ムギワラギク(帝王貝細工)の花言葉は、「不滅の愛」「いつまでも続く喜び」「永遠の思い出」「黄金の輝き」。
ドライフラワーのようにカサカサしているムギワラギクの花の感触が、乾燥した「麦わら」のような感じがする事から、麦わらで作られた菊という意味で「ムギワラギク」と名付けられたそうです。
また、別名の「帝王貝細工」は、花びらが薄い貝のような硬さをしているということからこう呼ばれるようになったと言われています。「ヘリクリサム」とはラテン語で「helios(太陽)」と「chrysos(金色)」で「太陽の黄金」を意味し、花に金属光沢があるように見えることからこう言われているそうです。
花言葉の「不滅の愛」「いつまでも続く喜び」「永遠の思い出」は、黄色やオレンジ、赤、白などの鮮やかな色の花が、ドライフラワーにしてもいつまでも変わらない花姿と質感を残すことからつけられ多と言われています。また、「黄金の輝き」は、「ヘリクリサム」の由来と同じく、花の見た目からついたそうです。

ムギワラギク(帝王貝細工)の花
ムギワラギクの花びらに見えるものは、がくが変化した「総苞片」と呼ばれる器官です。花びらにはガラス質の一種の「ケイ酸」を含み水分が少ないため、独特の質感をもっています。触るとカサカサしているだけでなく少し硬くて、キラキラとした金属のような光沢があります。花色は黄色、オレンジ、白、赤、ピンクなどがあります。
ヘリクリサム
ムギワラギクの別名はヘリクリサムと言いますが、ヘリクリサムはキク科ムギワラギク属の植物の総称で、500種類ほどあると言われています。ヘリクリサムといっても、種類によって見た目がとても違います。
ヘリクリサム・ペティオラレ
卵型の小さな葉をたくさんもち、葉や茎に細かい繊毛が生えており、銀色に見えます。カラーリーフとして寄せ植えやお庭のアクセントに人気があり、横に広がるように育つのでグランドカバーにも向いています。湿気が苦手なので水の切れや風通しを良くするため、ハンギングバスケットや鉢植えでも育てることができます。
カレープランツ
見た目はローズマリーに似た銀白色の美しいシルバーグラスですが、カレーに似たにおいをもっているため、「カレープランツ」という名でも呼ばれています。しかし花は苦くて食べられないため、ポプリや料理の香りづけなどとして使われます。

他の花言葉の記事はここから探してみよう
0
0
文章
Martha
2017年05月22日

In this article, learn how to grow pinto beans. The easy growing pinto beans are nutrient rich and eating them can reduce the cholesterol level and risk of heart disease.
USDA Zones— 5 – 11
Difficulty— Easy
Other names — Phaseolus vulgaris var. pinto (Scientific Name)Frijol pinto, Speckled bean, Poroto frutilla, Strawberry bean, Carioca bean, Mottled bean, Phaseolus vulgaris and Common beans.
Pinto beans are annual plants that grow best in areas with long hot summers as they take three to five months to mature for harvest.
How to Grow Pinto BeansVarieties
Pinto beans grow on both vine (pole) and bush. Pole bean varieties produce more yield than bush beans. But bushier varieties are relatively easy to grow.
Propagation
Sow seeds 1 inches deep in the soil when all the dangers of frost are passed. *Pinto beans require direct seed sowing as they are not easy to transplant. Also, remember that it is a subtropical plant and needs a temperature around 60 – 70 F (16 – 21 C) for germination. Space pinto bean seeds 3-4 inches apart in rows that are 2 to 3 feet apart. *Soak the seeds for 24 hours before planting to accelerate germination.
Location
Choose the sunniest spot in the garden that is less windy. For optimum growth, growing pinto beans in full sun is important. It needs at least six hours of direct sun a day but grows better if receive more sun.
Also Read: How to Grow Cluster Beans
Requirements for Growing Pinto BeansSoil
Pinto Beans do best in well-drained soil that is loamy, avoid clay-rich, heavy or soggy soil. Soil that is waterlogging causes root rot.
Watering
Water the plant only when top one inch of surface seems dry. Avoid overwatering because it does not tolerate excessive moisture but handle a bit of drought. Also, try not to wet the foliage while watering as it may promote fungal diseases.
Weeding
Keep the location weed free by gently pulling out the weeds around the plants by hand. Better not to use a tool as pinto beans have shallow roots that can be damaged by weeding with the help of tools.
Mulching
Since pinto beans have shallow feeder roots, it is best to do mulching to stop weeds from growing. Mulching also protects the plants from the cold.
Fertilizer
For growing pinto beans you’ll require low nitrogen fertilizer, legumes produce their own nitrogen and applying too much nitrogen can also result in comparatively more vegetative growth than fruits.
It needs fertilizer application twice for better yield. Admix 5-10-10 slow release fertilizer in the first 6 inches of the planting bed after the germination. Make sure not to apply fertilizer in 2 inches radius around the seedlings as it may damage them. Make a second application of 10-20-20 fertilizer when the plant begins to flowers.
Pests and Diseases
Its main problem is root rot, which you can easily prevent by moderate watering.
Pinto beans are sometimes attacked by aphids, spider mites, whiteflies, leafhoppers, and beetles. Use organic sprays to get rid of them or handpick if the infection is small. You can also invite beneficial insects into your garden to get rid of them.
Also Read: Plants that Attract Ladybugs
Harvesting
Pinto beans are ready for harvest within 90 to 120 days after planting. Harvest pinto beans by cutting the pods using clean scissors or pruning shear when they turn brown and become brittle and dry. You can also harvest the beans early if you want to use them green.
0
0
文章
stone
2017年05月22日

#徒长花 友们都不陌生,本文讲述的是酢浆草徒长怎么办,本文根据花友的实践总结了5种应对酢浆草徒长的方法,希望能对花友有所帮助!
1、补光法
既然说了徒长是因为光照不足的因素引起的,所以,补光是最关键的因素,当然,在补光的同时必须注意两个方面。
1)浇水,潮而不湿为原则,浇水太多容易徒长也容易烂球。
2)温度,30度左右甚至30度以上,不要直晒,会挂掉,会焦掉。
2、填土法。
这是比较普及也比较常用的一种方式,把徒长的枝条用土或者铺面填埋起来,保证土面以上的植株部分看起来更精神,如果徒长的部分已经很长,可以把枝条盘曲在花盆里做填土工作,当然需要注意的是手势要轻柔,不然很容易折断枝干。

3、剃头法。
顾名思义就是打顶了,大部分酢可以打顶修剪,修剪不是必须的操作,但完全可以当做补救徒货的方式之一,打顶可以促分枝,剪下的枝条还能扦插,是控制株型的好方法。用这个方式拯救徒货的同时,需要注意两个问题。
1)扦插的枝条会生根开花,但是不一定会生球。
2)剃头的植株可能会错过花期,花量稀少甚至当年不开花。
4、垂吊法。
把花盆搁置在略高的位置,让它徒去吧!徒着徒着就自然垂吊了,这种方式特别适合株型很高很容易失控的品种。比如:高个,黄麻子,大饼脸,长发酢,小橘饼等。
5、支架法,其实支架法也分两大类。
一是支撑式支架,就是笔直哒,或者一个圈型哒,以起到把植株徒长倒伏部分固定向上的作用。
二就是花式支架,可以让徒货攀缘在支架上生长。
这里就重点介绍一下第二种吧,我用2.0的铝线拗了个支架,然后把徒长的枝条盘在支架上,它会慢慢沿着支架生长,受到束缚后,株型也不会很乱。

1、补光法
既然说了徒长是因为光照不足的因素引起的,所以,补光是最关键的因素,当然,在补光的同时必须注意两个方面。
1)浇水,潮而不湿为原则,浇水太多容易徒长也容易烂球。
2)温度,30度左右甚至30度以上,不要直晒,会挂掉,会焦掉。
2、填土法。
这是比较普及也比较常用的一种方式,把徒长的枝条用土或者铺面填埋起来,保证土面以上的植株部分看起来更精神,如果徒长的部分已经很长,可以把枝条盘曲在花盆里做填土工作,当然需要注意的是手势要轻柔,不然很容易折断枝干。

3、剃头法。
顾名思义就是打顶了,大部分酢可以打顶修剪,修剪不是必须的操作,但完全可以当做补救徒货的方式之一,打顶可以促分枝,剪下的枝条还能扦插,是控制株型的好方法。用这个方式拯救徒货的同时,需要注意两个问题。
1)扦插的枝条会生根开花,但是不一定会生球。
2)剃头的植株可能会错过花期,花量稀少甚至当年不开花。
4、垂吊法。
把花盆搁置在略高的位置,让它徒去吧!徒着徒着就自然垂吊了,这种方式特别适合株型很高很容易失控的品种。比如:高个,黄麻子,大饼脸,长发酢,小橘饼等。
5、支架法,其实支架法也分两大类。
一是支撑式支架,就是笔直哒,或者一个圈型哒,以起到把植株徒长倒伏部分固定向上的作用。
二就是花式支架,可以让徒货攀缘在支架上生长。
这里就重点介绍一下第二种吧,我用2.0的铝线拗了个支架,然后把徒长的枝条盘在支架上,它会慢慢沿着支架生长,受到束缚后,株型也不会很乱。

0
0
文章
Micky
2017年05月22日

Learn how to grow spelt in this article. Planting and Growing spelt is easier in temperate climates. It is more winter hardy than conventional wheat varieties and also tolerates poor conditions well.

USDA Zones— 5 – 8
Difficulty— Easy
Other Names— Triticum Spelta, Dinkel wheat, Hulled wheat, Spelt, Spelt wheat, Espelta, Blé des Gaulois, Epeautre, Dinkel Spelt, Spelz, Spelta
Spelt (Triticum Spelta) is a plant belongs to the grass family. This rustic looking subspecies of wheat is resistant to diseases. Though it is is not widely grown, but it is of great interest in organic farming.
It adapts well to cold climates and thrives in various soil types: sandy, wet, poor and non-draining. It is less demanding for nutrients and more competitive against weeds than wheat. Making it an interesting cereal crop for mountain areas.
How to Grow SpeltSowing
The seeds are sown in rows, optimum distance between rows is about 18 – 20 cm apart. The seeds are buried 3 cm deep and spaced about 5 to 8 cm. To avoid competition with weeds, it is important not to plant too early in the season.
Seed Sowing Density for Growing Spelt
The best time for sowing is identical to that of wheat. The seeding density is recommended about 200-300 seeds per sqm, corresponding to 150-180 kg of seed per hectare.
Varieties
Spelt exists in two varieties – Winter and Spring.
Requirements for Growing SpeltPosition
Spelt grows similar to wheat but it is more winter hardy. Growing spelt in full sun is required for productivity and healthy growth.
Soil
For optimum growth, spelt must be grown in soil that is good, ie. Humus, rich in nutrients, with a pH close to neutral. Prepare soil similar to wheat. This grain also grows in soil types that are low in nutrients, poorly drained or sandy.
Watering
Keep the soil moist after planting until the germination of seeds. Once sprouted, it doesn’t require too much watering. Water only in hot and dry days. More regularly, if you live in a warmer zone.
Weeding
Weed the soil before planting and remove competitive weeds time to time.
Fertilization
Fertilizer requirements are similar to winter wheat. Excess nitrogen can cause lodging in spelt.
Pests and Diseases
As spelt is a subspecies of wheat, most of the pests and diseases are similar. It is recommended to select the most resistant varieties that are tolerant to pests and diseases.
Harvest
0
0
文章
Micky
2017年05月22日


Learn how to grow pecan trees. Planting and growing pecan trees is easy but it requires lot of space as the tree grows tall and wide.
USDA Zones— 5 to 9
Difficulty— Easy
Scientific Name— Carya illinoinensis
Pecan Tree Information
Pecan trees are native to America and Mexico and grow mostly in Georgia and grows in Florida to Illinois, even to the west of Texas. Pecan trees are rather large, a mature pecan tree can grow up to 40 m tall with a spread of 12 – 20 m. If you’ve large yard you can grow pecan trees as they are not suitable for small backyards or garden. These trees are the source of many medium-sized pecans that are eaten fresh or used to create sweet desserts and candies, including pecan pie, caramel-pecan tarts, pecan pie, pecan pralines and many others.
Planting Pecan TreesBefore planting remove all the dead and entangled roots and prune off 1/2 part of the plant. This will encourage the vigorous growth and healthy roots.Space candy pecan no closer than 40 feet (if planting in a garden). For planting pecan trees in orchard, a suitable distance is 40 – 50 feet.Grow at least two pecan trees to ensure that most of flowers produce nuts. Although self-pollination in candy pecan is possible, but it is preferred that at least two or three trees are planted nearby for maximum nut production.For planting pecan tree, dig a hole at least 2 feet wide and 2 feet deep as pecan trees have extensive root system. Fill the hole with well-drained soil. Pecan trees can generally be grown easily and efficiently in a variety of soil types, except the soil which drains poorly.Requirements for Growing Pecan TreesLocation
Location should be sunny and open as pecan tree spreads a lot and grow taller.
Soil
Growing pecan trees is possible in variety of soil types, but for optimum growth soil should be well drained, deep and rich in organic matter with pH level slightly acidic to neutral.
Water
Pecan tree grows in slightly moist soil. Regular and deep watering is important for growing pecan trees. In first three years water deeply, once a week (avoid during rain), reduce watering in winter. During fruit production watering should be increased.
Pecan Tree CareFertilizer
In the spring fertilize it with compost or farm manure, also apply fertilizer that is rich in potassium and phosphorus around the tree, 5-10-15 is suitable. After first year of planting, apply balanced fertilizer in spring and in summer use zinc sulphate, which is essential for healthy growth and production of pecan trees.
Mulching
Mulching is important for pecan trees as they require evenly moist soil, mulching also reduces the competitive weeds.
Harvest
A grafted tree start to produce fruit in 3 to 4 years after planting. It is an alternate fruit bearing tree, it means it bears heavy fruit one year and light in the next year. Pecan trees bear fruits in fall and are ready to harvest when the husk loose its green color and start to split.
Pecan Tree Diseases and Pests
0
0
文章
笼岛 みどり
2017年05月22日


7月14日の誕生花
7月14日の誕生花は、「カワラナデシコ(河原撫子)」です。
ナデシコ科ナデシコ属の多年草で、原産地は日本です。5~10月頃にピンクや薄紫、赤、紫などの色の花を咲かせます。花びらの先には細かい刻みがあります。
カワラナデシコ(河原撫子)について科・属 ナデシコ科ナデシコ属英名 Fringed pink学名 Dianthus superbus var. longicalycinus原産地 日本,東アジア開花時期 5月~10月
カワラナデシコ(河原撫子)の花言葉と由来
カワラナデシコ(河原撫子)の花言葉は、「大胆」「貞節」「可憐」。
ナデシコの名前の由来は、撫でるように可愛い花の意味からきています。生息している場所が主に河原などであるため、「カワラナデシコ」と名付けられました。同属で中国原産の「カラナデシコ(唐撫子)」と区別するために「ヤマトナデシコ(大和撫子)」とも呼ばれます。また、花期が夏から秋にかけてというところから、「常夏」と呼ばれていたこともあったそうです。
「大胆」という花言葉は、鮮やかなピンクの花が河原の中でも目立つ花の姿からきています。「可憐」は、花びらに細かい刻みが多く、優しげで清らかな印象からつけられたと言われています。

秋の七草
ナデシコは、秋の七草のひとつにも数えられます。秋の七草は、万葉集に詠まれた「萩の花 尾花 葛花 撫子の花 女郎花 また藤袴 朝顔の花」がもとになっています。「朝顔の花」は、現在の朝顔ではなく桔梗のことだと言われています。これと同じく、「撫子の花」はカワラナデシコのことだと言われています。
春の七草のように粥にして食べるものではありませんが、古くから漢方や民間薬として利用されてきました。
漢方として使われるカワラナデシコ
カワラナデシコの漢方としての名前は「瞿麦(くばく)」といいます。「瞿麦」はカワラナデシコの全草を乾燥させたものを指します。生薬では開花中の地上部を乾燥させたものを使います。
古典園芸植物のひとつ
カワラナデシコは、古くから園芸植物として栽培されてきた「古典園芸植物」の一種です。江戸時代には品種改良されたものもでまわっていたようですが、最近ではあまり見られないようです。
カワラナデシコは万葉集に数多く詠まれたほか、枕草子や小林一茶などの俳句にも登場していることから、古くから親しまれていたことがわかります。


他の花言葉の記事はここから探してみよう。LOVEGREEN 花言葉記事一覧
0
0
文章
Rainbow
2017年05月22日

品种特性
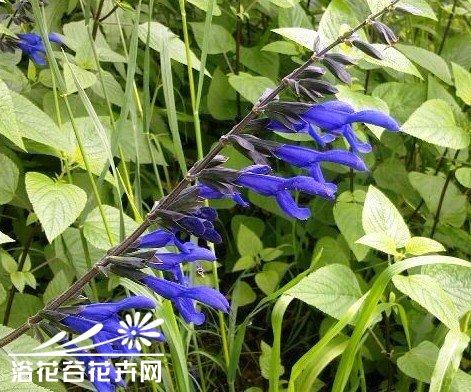
原产地北美南部科属唇形花科#鼠尾草 属特征多年生草本花卉,常作一年生花卉;植株呈丛生状;茎为四角柱状,且有毛,下部略木质化,呈亚低木状;叶对生,为长椭圆形,长3厘米至5厘米,灰绿色,叶表有凹凸状织纹,且有褶皱,灰白色,香味刺鼻浓郁;具长穗状花序,花量大;喜温暖、湿润和阳光充足的环境,耐寒性强,但怕炎热、干燥。
系列特征“鸵鸟”盆栽株高为20厘米,地栽株高为30厘米至35厘米,株形紧凑矮生,整个花穗为深蓝色;“发现者”盆栽株高为35厘米,地栽株高为45厘米至60厘米,花穗为蓝紫色。
播种育苗
种子每克920粒左右,一般选择200或者288穴盘进行播种,介质一般选择进口育苗草炭土或者经过消毒的国产育苗草炭土,其pH值应为5.5至5.8。播种后,需覆盖一层薄薄的蛭石,然后用薄膜覆盖,发芽适温为20℃至23℃,发芽天数为5至8天。
发芽第一阶段胚根出现,并且根开始形成。此阶段不用施肥,但保持育苗介质的湿润非常重要,需要一定的光照。出苗后逐渐撤掉薄膜。每周用1000倍百菌清或甲托防猝倒病,连续喷施2至3次。
发芽第二阶段继续生根,出现茎,且子叶已展开。保持适当湿度,防止过湿,可适当施用氮磷钾比例为20-10-20的水溶肥。
发芽第三阶段根部可以插入穴盘的孔穴中,并出现几片真叶。加大肥料浓度,控制湿度和温度,温度降低至20℃左右,需要一定光照,防止此阶段幼苗徒长。
发芽第四阶段根系成团,有2至3对真叶。继续增大肥料浓度,温度和湿度与第三阶段相同,适当控制水分,加强通风,仍需防止徒长,为移栽做好准备。
移栽上盆
植株真叶达到2至3片时开始移栽上盆,一般选择12厘米至13厘米的营养钵进行移栽,基质选择疏松通气性好的园土加有机肥和复合肥。
摘心处理植株长出4对真叶时留2对真叶摘心,促发侧枝。
栽培要点
温度上盆后温度降低至18℃,过一个月可降至15℃。如果温度在15℃以下,叶片就会发黄或脱落;温度在30℃以上时,则会出现花叶小、植株停止生长的现象。
施肥生长期施用稀释1500倍的硫铵,以改变叶色,效果较好。低温下不要施用尿素。为使植株根系健壮和枝叶茂盛,不断施肥非常重要,半月施用一次用含钙镁的复合肥料100ppm。
光照喜阳光充足的环境,炎热的夏季需要进行适当遮阴,幼苗期加强光照防止徒长。
病虫害管理
虫害鼠尾草常见虫害有粉虱、蚜虫等,需积极防治。
病害鼠尾草常见病害有霜霉博、叶斑病等。病害发生时,可喷洒50%托布津可湿性粉剂500倍液进行防治。
原产地北美南部科属唇形花科#鼠尾草 属特征多年生草本花卉,常作一年生花卉;植株呈丛生状;茎为四角柱状,且有毛,下部略木质化,呈亚低木状;叶对生,为长椭圆形,长3厘米至5厘米,灰绿色,叶表有凹凸状织纹,且有褶皱,灰白色,香味刺鼻浓郁;具长穗状花序,花量大;喜温暖、湿润和阳光充足的环境,耐寒性强,但怕炎热、干燥。
系列特征“鸵鸟”盆栽株高为20厘米,地栽株高为30厘米至35厘米,株形紧凑矮生,整个花穗为深蓝色;“发现者”盆栽株高为35厘米,地栽株高为45厘米至60厘米,花穗为蓝紫色。

播种育苗
种子每克920粒左右,一般选择200或者288穴盘进行播种,介质一般选择进口育苗草炭土或者经过消毒的国产育苗草炭土,其pH值应为5.5至5.8。播种后,需覆盖一层薄薄的蛭石,然后用薄膜覆盖,发芽适温为20℃至23℃,发芽天数为5至8天。
发芽第一阶段胚根出现,并且根开始形成。此阶段不用施肥,但保持育苗介质的湿润非常重要,需要一定的光照。出苗后逐渐撤掉薄膜。每周用1000倍百菌清或甲托防猝倒病,连续喷施2至3次。
发芽第二阶段继续生根,出现茎,且子叶已展开。保持适当湿度,防止过湿,可适当施用氮磷钾比例为20-10-20的水溶肥。
发芽第三阶段根部可以插入穴盘的孔穴中,并出现几片真叶。加大肥料浓度,控制湿度和温度,温度降低至20℃左右,需要一定光照,防止此阶段幼苗徒长。
发芽第四阶段根系成团,有2至3对真叶。继续增大肥料浓度,温度和湿度与第三阶段相同,适当控制水分,加强通风,仍需防止徒长,为移栽做好准备。
移栽上盆
植株真叶达到2至3片时开始移栽上盆,一般选择12厘米至13厘米的营养钵进行移栽,基质选择疏松通气性好的园土加有机肥和复合肥。
摘心处理植株长出4对真叶时留2对真叶摘心,促发侧枝。
栽培要点
温度上盆后温度降低至18℃,过一个月可降至15℃。如果温度在15℃以下,叶片就会发黄或脱落;温度在30℃以上时,则会出现花叶小、植株停止生长的现象。
施肥生长期施用稀释1500倍的硫铵,以改变叶色,效果较好。低温下不要施用尿素。为使植株根系健壮和枝叶茂盛,不断施肥非常重要,半月施用一次用含钙镁的复合肥料100ppm。
光照喜阳光充足的环境,炎热的夏季需要进行适当遮阴,幼苗期加强光照防止徒长。
病虫害管理
虫害鼠尾草常见虫害有粉虱、蚜虫等,需积极防治。
病害鼠尾草常见病害有霜霉博、叶斑病等。病害发生时,可喷洒50%托布津可湿性粉剂500倍液进行防治。
0
4


