文章
Miss Chen
2018年09月10日

梅雨时期很多植物都都会或多或少遭受一些病虫害的侵入,而此时也需要我们格外的用心去照顾它们。而杜鹃的花期在5-8月,由于不同的品种可能花期也会存在一定延迟。而作为夏季6-7月份的梅雨季节,恰逢杜鹃盆景花枝招展、竞相开放的季节,虽然在这个时间段更加适合赏花,同时也需要及时做好养护管理工作。否则,如果呵护不到位的话,可能引起花叶焦枯脱落的现象,这对于盆景而言是莫大的损失,对于赏花者而言,也必然让人感到遗憾,毕竟盆景的观赏价值会大打折扣。

从夏季的6月到七月上旬期间恰逢是梅雨季,同时也正是杜鹃开花抽叶、发枝旺盛的时期,所以需要尽可能为其提供光照。只要不是被长时间暴晒,一般不会对开花造成什么影响。但如果在烈日当空的晴天,一般从上午9点到下午4点之间这段时间需要及时采取必要的遮阴措施,以避免烈日灼伤花叶而出现杜鹃出现花叶焦枯脱落的现象。但仅此还不够,以为杜鹃耐寒而不耐热,当气温高于30°C时,往往脱水比较严重,同时也容易出现休眠现象,所以为了确保其在梅雨季开花旺盛,遮阴、降温、保湿等工作一定要做好。
杜鹃盆景在梅雨季出现花叶焦枯脱落的现象,主要是光照过强、气温太高、脱水严重等因素造成的。所以,为了避免这种现象的发生,我们首先需要将杜鹃盆景摆放在相对凉爽、通风顺畅的环境中养护,同时做好遮阴工作,一般为其提供半阴的环境即可。当然,确保杜鹃盆景在梅雨季不会出现花叶焦枯脱落的现象,仅仅靠遮阴通风的条件还不够,我们还需要及时做好补水工作。
杜鹃本身是比较喜欢湿润但不耐高温的生长环境,所以当发现盆土变干时要及时浇水,多在早上9点之前或下午4点之后进行。而为了达到降温保湿的效果,我们还需要结合喷水进行,尤其是在像梅雨季的6-7月这种炎热的夏季环境下,更应该多喷洒叶面水和地面水。喷洒叶面水和地面水除了可以起到保湿降温的作用之外,也可以让杜鹃盆景的叶片更显干净、鲜绿,而实现鲜花配绿叶的效果,提高盆景的观赏价值。不过浇水不宜太多,否则仍然可能引起落花的。

当然一般情况下,处于花期的花卉植物是不宜进行追肥的,尤其是处于梅雨季且不耐高温的杜鹃盆景,更应该在花期停止追肥。除此之外,也需要做好病虫害的管理,因为在湿热通风差的环境下,杜鹃盆景比较容易感染病虫害。相信只要通过大家对杜鹃盆景进行精心的呵护和管理,梅雨季出现花叶焦枯脱落的现象会逐渐消失的,而盆景的观赏效果也能得到保障。

从夏季的6月到七月上旬期间恰逢是梅雨季,同时也正是杜鹃开花抽叶、发枝旺盛的时期,所以需要尽可能为其提供光照。只要不是被长时间暴晒,一般不会对开花造成什么影响。但如果在烈日当空的晴天,一般从上午9点到下午4点之间这段时间需要及时采取必要的遮阴措施,以避免烈日灼伤花叶而出现杜鹃出现花叶焦枯脱落的现象。但仅此还不够,以为杜鹃耐寒而不耐热,当气温高于30°C时,往往脱水比较严重,同时也容易出现休眠现象,所以为了确保其在梅雨季开花旺盛,遮阴、降温、保湿等工作一定要做好。
杜鹃盆景在梅雨季出现花叶焦枯脱落的现象,主要是光照过强、气温太高、脱水严重等因素造成的。所以,为了避免这种现象的发生,我们首先需要将杜鹃盆景摆放在相对凉爽、通风顺畅的环境中养护,同时做好遮阴工作,一般为其提供半阴的环境即可。当然,确保杜鹃盆景在梅雨季不会出现花叶焦枯脱落的现象,仅仅靠遮阴通风的条件还不够,我们还需要及时做好补水工作。
杜鹃本身是比较喜欢湿润但不耐高温的生长环境,所以当发现盆土变干时要及时浇水,多在早上9点之前或下午4点之后进行。而为了达到降温保湿的效果,我们还需要结合喷水进行,尤其是在像梅雨季的6-7月这种炎热的夏季环境下,更应该多喷洒叶面水和地面水。喷洒叶面水和地面水除了可以起到保湿降温的作用之外,也可以让杜鹃盆景的叶片更显干净、鲜绿,而实现鲜花配绿叶的效果,提高盆景的观赏价值。不过浇水不宜太多,否则仍然可能引起落花的。

当然一般情况下,处于花期的花卉植物是不宜进行追肥的,尤其是处于梅雨季且不耐高温的杜鹃盆景,更应该在花期停止追肥。除此之外,也需要做好病虫害的管理,因为在湿热通风差的环境下,杜鹃盆景比较容易感染病虫害。相信只要通过大家对杜鹃盆景进行精心的呵护和管理,梅雨季出现花叶焦枯脱落的现象会逐渐消失的,而盆景的观赏效果也能得到保障。
0
1
文章
Miss Chen
2018年09月10日

Named for their large, broad leaves, elephant ears (Colocasia spp.) are moisture loving plants that can grow in up to 6 inches of standing water. Colocasia esculenta, which is hardy in U.S. Department of Agriculture plant hardiness zones 8 through 10, is a commonly grown variety of elephant ears. Also called taro, this elephant ears variety usually grows 3 to 6 feet tall and wide, and features boldly veined leaves up to 2 feet long. Uncooked elephant ears are poisonous, and the plants are invasive in some areas of the United States.

Transplanting Time
The best time for transplanting elephant ears is when new growth appears in spring. Elephant ears sprout from tubers in spring and quickly grow into large, spreading clumps. In frost-free areas elephant ears can be transplanted any time of year, but transplanting when the plants are small is easiest.
In areas of the United States that experience frosts, elephant ears must be transplanted after the final local average frost date. If late frosts threaten after the plants have been transplanted, cover elephant ears with old sheets or several layers of newspaper overnight.
Growing Spot
A sheltered, partially shaded spot with organically rich, medium moisture or wet soil provides the best growing conditions for transplanted elephant ears. These plants also need protection from strong winds. In a wet site, such as the edge of a pond, elephant ears tolerate up to eight hours of direct sunlight, but the plants grow best in filtered sun or shade during the hottest part of the day.
Improve the soil for elephant ears by mixing in organic matter before transplanting. Spread a 4-inch layer of garden compost or aged manure over the growing spot and mix it 12 inches deep into the soil with a garden fork.
Planting Hole
Elephant ears can establish quickly in wide planting holes. These vigorous plants can grow up to 8 feet tall in one growing season in ideal conditions and produce tubers that weigh 1 to 2 pounds.
Dig a hole as deep as an elephant ear's root ball and twice as wide. Remove the plant from its container and place it in the center of the hole. The plant should sit at its original growing depth. Holding the elephant ears plant upright with one hand, scoop the dug soil into the hole with the other hand until you fill the hole. Gently press the soil around the plant with the flats of your hands to firm the plant in the hole.

Watering Elephant Ears
Regular watering is essential for newly transplanted elephant ears. Spray water over the growing spot using a garden hose fitted with a soft spray attachment. When the water puddles, stop watering and wait an hour. Test the soil moisture level by pushing your fingers into it. If the soil is moist but not wet, water the plants again.
Don't allow the soil around elephant ears to dry out. Water elephant ears when the soil surface begins to dry or more frequently.

Transplanting Time
The best time for transplanting elephant ears is when new growth appears in spring. Elephant ears sprout from tubers in spring and quickly grow into large, spreading clumps. In frost-free areas elephant ears can be transplanted any time of year, but transplanting when the plants are small is easiest.
In areas of the United States that experience frosts, elephant ears must be transplanted after the final local average frost date. If late frosts threaten after the plants have been transplanted, cover elephant ears with old sheets or several layers of newspaper overnight.
Growing Spot
A sheltered, partially shaded spot with organically rich, medium moisture or wet soil provides the best growing conditions for transplanted elephant ears. These plants also need protection from strong winds. In a wet site, such as the edge of a pond, elephant ears tolerate up to eight hours of direct sunlight, but the plants grow best in filtered sun or shade during the hottest part of the day.
Improve the soil for elephant ears by mixing in organic matter before transplanting. Spread a 4-inch layer of garden compost or aged manure over the growing spot and mix it 12 inches deep into the soil with a garden fork.
Planting Hole
Elephant ears can establish quickly in wide planting holes. These vigorous plants can grow up to 8 feet tall in one growing season in ideal conditions and produce tubers that weigh 1 to 2 pounds.
Dig a hole as deep as an elephant ear's root ball and twice as wide. Remove the plant from its container and place it in the center of the hole. The plant should sit at its original growing depth. Holding the elephant ears plant upright with one hand, scoop the dug soil into the hole with the other hand until you fill the hole. Gently press the soil around the plant with the flats of your hands to firm the plant in the hole.

Watering Elephant Ears
Regular watering is essential for newly transplanted elephant ears. Spray water over the growing spot using a garden hose fitted with a soft spray attachment. When the water puddles, stop watering and wait an hour. Test the soil moisture level by pushing your fingers into it. If the soil is moist but not wet, water the plants again.
Don't allow the soil around elephant ears to dry out. Water elephant ears when the soil surface begins to dry or more frequently.
1
1
成长记
choya8684
2018年09月09日

8/15 士童有部份發橘塌陷且範圍慢慢擴大,於是把橘色部分切掉,待傷口乾種回,終於救回來
9/2 收獲種子9顆
9/8 與蘆薈、紫龍角、仙人掌和蕾絲公主小苗併盆
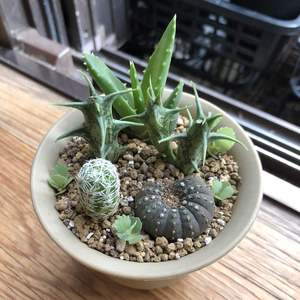
9/2 收獲種子9顆
9/8 與蘆薈、紫龍角、仙人掌和蕾絲公主小苗併盆

0
0
文章
Miss Chen
2018年09月08日

Peonies (Paeonia spp.) can grow well in containers. Common garden peonies (Paeonia lactiflora), which are hardy in U.S. Department of Agriculture plant hardiness zones 3 through 8, are herbaceous perennials that die down in fall. Tree peonies (Paeonia suffruticosa, USDA zones 4 through 8) are woody shrubs. Select containers that complement your garden's style, such as metal containers for contemporary gardens, faded terracotta for Mediterranean gardens, or decorative clay pots for cottage gardens.

Containers for Growing Peonies
Peonies need large containers with drainage holes. Peony root balls are large, and their containers should fit the root balls without crushing them, plus another inch or two of space around root balls' sides and bases. A 5-gallon container is usually large enough for one peony.
Most frost-proof containers are suitable, including clay, wood and plastic. Common garden peonies don't tolerate transplanting well, and tree peonies are slow-growing, so both plants should stay in their containers for three or four years. Heavy containers such as clay help prevent tree peonies from blowing over in strong winds, but dry out quickly compared to wood and plastic containers. Wood containers made of cypress or cedar are rot-resistant.
Sites and Potting Soils
Full-sun or partially shaded sites are best for growing peonies, and the plants need organically-rich, well-draining potting soil. These large plants are heavy and difficult to move, so choose your growing site well, or place the pots on boards with wheels.
A mixture of soilless potting soil and well-rotted manure or rich garden compost is suitable for growing peonies. You can buy commercial soilless potting soil or you can mix your own using 1 part sphagnum peat moss and 1 part perlite or vermiculite. Mix 2 shovels of potting soil with 1 shovel of manure or compost, and fill the containers with this mixture. Every spring, when new growth appears on the peonies, scrape the loose potting soil mixture from the surface of the containers and replace it with fresh mixture.
Water and Fertilizer
Peonies in containers need more water and fertilizer than plants in the ground. Water the peonies when the soil surface is dry. Slowly pour water over the potting soil until it appears through the drainage holes in the base of the container. In hot weather, peonies may need watering once or more per day.

Fertilize peonies in pots once every month while the plants are in leaf. Dilute 1/2 teaspoon of a liquid 15-30-15 fertilizer in 1 gallon of water, and apply the solution to the potting soil. You can replace water with fertilizer solution if the peonies need watering. Manufacturer's instructions vary between products, so read and follow the instructions on the label.
Frost Protection
An advantage of growing peonies in containers is that you can move them indoors to protect them from frosts. Freezing temperatures can damage peonies and affect flowering in the following season.
When common garden peonies have died down and tree peonies have lost all their leaves, move the containers to an unheated indoor area, such as a garage. Water the containers when the soil surface is dry to a depth of 1 inch. The peonies aren't growing and using water at this time. It's important not to water so much that the potting soil becomes soggy, which can cause rotting. Move the containers outdoors again when new growth appears in spring.

Containers for Growing Peonies
Peonies need large containers with drainage holes. Peony root balls are large, and their containers should fit the root balls without crushing them, plus another inch or two of space around root balls' sides and bases. A 5-gallon container is usually large enough for one peony.
Most frost-proof containers are suitable, including clay, wood and plastic. Common garden peonies don't tolerate transplanting well, and tree peonies are slow-growing, so both plants should stay in their containers for three or four years. Heavy containers such as clay help prevent tree peonies from blowing over in strong winds, but dry out quickly compared to wood and plastic containers. Wood containers made of cypress or cedar are rot-resistant.
Sites and Potting Soils
Full-sun or partially shaded sites are best for growing peonies, and the plants need organically-rich, well-draining potting soil. These large plants are heavy and difficult to move, so choose your growing site well, or place the pots on boards with wheels.
A mixture of soilless potting soil and well-rotted manure or rich garden compost is suitable for growing peonies. You can buy commercial soilless potting soil or you can mix your own using 1 part sphagnum peat moss and 1 part perlite or vermiculite. Mix 2 shovels of potting soil with 1 shovel of manure or compost, and fill the containers with this mixture. Every spring, when new growth appears on the peonies, scrape the loose potting soil mixture from the surface of the containers and replace it with fresh mixture.
Water and Fertilizer
Peonies in containers need more water and fertilizer than plants in the ground. Water the peonies when the soil surface is dry. Slowly pour water over the potting soil until it appears through the drainage holes in the base of the container. In hot weather, peonies may need watering once or more per day.

Fertilize peonies in pots once every month while the plants are in leaf. Dilute 1/2 teaspoon of a liquid 15-30-15 fertilizer in 1 gallon of water, and apply the solution to the potting soil. You can replace water with fertilizer solution if the peonies need watering. Manufacturer's instructions vary between products, so read and follow the instructions on the label.
Frost Protection
An advantage of growing peonies in containers is that you can move them indoors to protect them from frosts. Freezing temperatures can damage peonies and affect flowering in the following season.
When common garden peonies have died down and tree peonies have lost all their leaves, move the containers to an unheated indoor area, such as a garage. Water the containers when the soil surface is dry to a depth of 1 inch. The peonies aren't growing and using water at this time. It's important not to water so much that the potting soil becomes soggy, which can cause rotting. Move the containers outdoors again when new growth appears in spring.
0
0
文章
Miss Chen
2018年09月08日

For a colorful, showy display of flowers, few plants out-perform the peony (Paeonia spp.), a perennial that grows in U.S. Department of Agriculture plant hardiness zones 3 through 8, with some variation among the different varieties. Although most peonies are attractive even when not in bloom, it can be discouraging when a plant fails to bloom or produces only a few flowers. Giving a peony some extra care or making a few adjustments can help prevent or correct this problem.

Plant Maturity and Depth
A peony might not bloom simply because it's too immature; in that case, all you need to do is wait a while to see flowers. If you've recently planted a new, nursery-grown peony, it may take several years to reach a size and maturity that can support flowering. It could take even longer to see flowers -- up to four or five years -- if you've grown the plant from seed. If you're dividing a larger plant to make new plants, the number of dormant buds, or "eyes," on each new division can also influence the length of time before flowers appear. To speed flowering by these new plants, make large divisions with at least three to five eyes each. Planting peonies too deeply can also inhibit flowering, so position new plants or divisions so buds are no more than 1 or 2 inches below the soil surface.
Correct Fertilizer
Although peonies benefit from rich soil that contains a good supply of nutrients, it's important to feed the plants properly and not use too much nitrogen, which can promote growth of stems and leaves at the expense of flowers. For best results, select a granular, low-nitrogen fertilizer such as 5-10-10, applying it at a rate of 2 to 3 pounds per 100 square feet of planted area. Apply the fertilizer once per season in the spring, when the plant's stems are about 3 inches tall, working it carefully into the ground. Keep fertilizer away from the plant's stems to prevent burning, and don't disturb tender new shoots; water the fertilizer in well.
Sun and Other Issues
Peonies need abundant light to set flower buds, so pick a planting site that gets at least six or more hours of full sun daily; a spot that gets too much shade can result in few or no flowers. If you have a peony that's recently stopped blooming, this could be because other nearby plants have become large and block the peony's access to light. Prune back surrounding plants as needed to give the peony more light, or consider relocating the peony to a brighter spot. Removing leaves and stems as you tidy the garden during the summer can also contribute to poor flowering because this weakens the plant and interferes with its ability to store energy for the next year. Delay cleanup until fall, when the plant's growth has slowed and foliage is wilted and partly dry.

Disease Control
Sometimes you might see flower buds develop on a peony plant that don't enlarge, and they eventually dry up and drop off the plant. This can indicate the presence of a fungal disorder such as blight or leaf blotch that stops the bud from producing a flower. These diseases might also cause black spots on leaves and stems. They are best prevented by keeping foliage as dry as possible, so water only at the plant's base on sunny days, and cut peonies back to the ground in late fall, removing all plant debris that can harbor fungal microorganisms. Wear gloves and clean pruning blades in rubbing alcohol between each cut to prevent spreading disease.

Plant Maturity and Depth
A peony might not bloom simply because it's too immature; in that case, all you need to do is wait a while to see flowers. If you've recently planted a new, nursery-grown peony, it may take several years to reach a size and maturity that can support flowering. It could take even longer to see flowers -- up to four or five years -- if you've grown the plant from seed. If you're dividing a larger plant to make new plants, the number of dormant buds, or "eyes," on each new division can also influence the length of time before flowers appear. To speed flowering by these new plants, make large divisions with at least three to five eyes each. Planting peonies too deeply can also inhibit flowering, so position new plants or divisions so buds are no more than 1 or 2 inches below the soil surface.
Correct Fertilizer
Although peonies benefit from rich soil that contains a good supply of nutrients, it's important to feed the plants properly and not use too much nitrogen, which can promote growth of stems and leaves at the expense of flowers. For best results, select a granular, low-nitrogen fertilizer such as 5-10-10, applying it at a rate of 2 to 3 pounds per 100 square feet of planted area. Apply the fertilizer once per season in the spring, when the plant's stems are about 3 inches tall, working it carefully into the ground. Keep fertilizer away from the plant's stems to prevent burning, and don't disturb tender new shoots; water the fertilizer in well.
Sun and Other Issues
Peonies need abundant light to set flower buds, so pick a planting site that gets at least six or more hours of full sun daily; a spot that gets too much shade can result in few or no flowers. If you have a peony that's recently stopped blooming, this could be because other nearby plants have become large and block the peony's access to light. Prune back surrounding plants as needed to give the peony more light, or consider relocating the peony to a brighter spot. Removing leaves and stems as you tidy the garden during the summer can also contribute to poor flowering because this weakens the plant and interferes with its ability to store energy for the next year. Delay cleanup until fall, when the plant's growth has slowed and foliage is wilted and partly dry.

Disease Control
Sometimes you might see flower buds develop on a peony plant that don't enlarge, and they eventually dry up and drop off the plant. This can indicate the presence of a fungal disorder such as blight or leaf blotch that stops the bud from producing a flower. These diseases might also cause black spots on leaves and stems. They are best prevented by keeping foliage as dry as possible, so water only at the plant's base on sunny days, and cut peonies back to the ground in late fall, removing all plant debris that can harbor fungal microorganisms. Wear gloves and clean pruning blades in rubbing alcohol between each cut to prevent spreading disease.
0
1
简杰
2018年09月08日

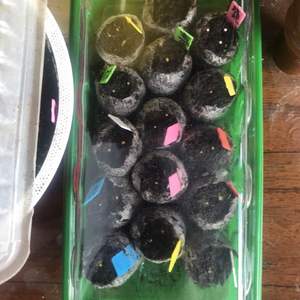
秋播9月8日
角堇:小马,天蓝,钱币
垂钓天竺葵:龙卷风
没名字的某花
满天星:吉普赛白色,机灵鬼
百日草,马鞭草,翠菊,美女樱,非洲菊
洋桔梗7种
虞美人棉花糖
矮牵牛:晨光,小鸭
海棠高高
舞春花白色
赛船天蓝
角堇:小马,天蓝,钱币
垂钓天竺葵:龙卷风
没名字的某花
满天星:吉普赛白色,机灵鬼
百日草,马鞭草,翠菊,美女樱,非洲菊
洋桔梗7种
虞美人棉花糖
矮牵牛:晨光,小鸭
海棠高高
舞春花白色
赛船天蓝

1
0
成长记
echo_zly
2018年09月07日

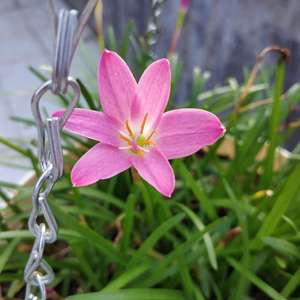
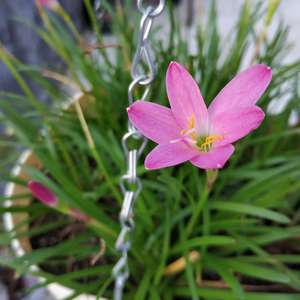
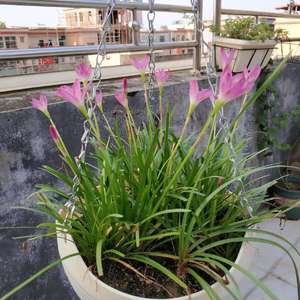
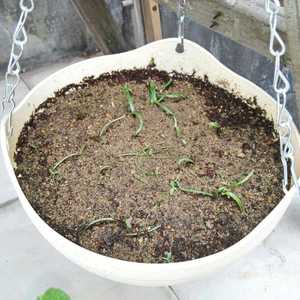
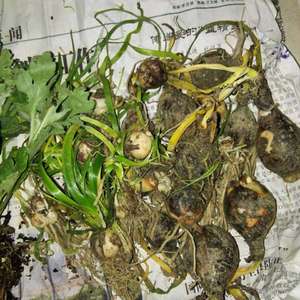
3月25日就种下11球,挤在23口径的吊盆。8月左右开花的,球种就是最后一张图里的白色小球,大点的球是普粉,隔月就能陆续开花。风雨兰很好养,粗养即可。


1
0
文章
Miss Chen
2018年09月05日

虫害分布
分布于黑龙江、吉林、辽宁、内蒙古、北京、安徽、台湾、广东、陕西、四川等地。寄主是苹果、山楂、核桃、柞等。
虫害形态特征
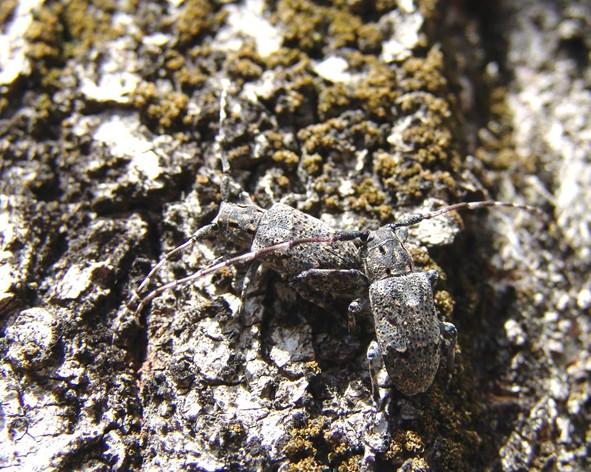
成虫体长8-15mm,体宽3-6mm。体黑色,全身被灰色短绒毛,并杂有许多火黄色或金黄色毛斑。前胸背板中央具丝绒般的斑纹4个,每边两个,前后各1,排成直行,前斑长形,后斑较短,近乎卵圆形,两者之间的距离超过后斑的长度;每个黑斑的左右两边都镶有相当宽的火金或金黄色毛斑。鞘翅饰有许多黄色和黑色的斑点,每翅中端的灰色毛较淡,在此淡色区的上缘和下缘中央,各有一个较大的不规则形的黑斑,其他较小的黑斑大致圆形,分布于基部之上,基部中央则极少或缺如;黄斑形状各异,分布全翅。小盾片中央火黄或金黄色,两翅较深。鞘翅沿小盾片周围的毛大致淡色。触角部分赤褐色,第1节背面杂有金黄色毛,第3节起每节基部近1/2为灰白色,各节下缘密生灰白及棕色缨毛。体腹面及足亦有灰白色长毛。体卵形。头部静止时与前足基部接触;额极宽;复眼很小,分成上下两叶,期间仅有一线相连,下叶较大,但长度只及颊长之半;头面布有刻点及颗粒。雄虫触角超出体长1/3,雌虫与体等长,柄节端疤有时不大显著,开放式。前胸背板具刻点及小颗粒,表面不平坦,中央后方及两侧有瘤状突起,侧面近前缘处有一瘤突。鞘翅基部1/4具颗粒。
虫害发生规律
黑龙江2年1代,以幼虫或成虫越冬。翌春5月初越冬成虫开始活动取食并交配产卵。卵多产在树皮缝、枝节、死节处,尤喜产在腐朽变软的树皮上,卵期15天。5月底孵公,初孵幼虫蛀入皮层至皮下于韧皮部与木质部之间蛀食。秋后于蛀道内越冬。第2年为在至7月底前后开始老熟于隧道内化蛹,蛹期10余天,羽化后咬圆形羽化孔出树,于落叶层和干基各种缝隙内越冬。

虫害防治方法
主要的措施包括选育抗性树种,加强林地水肥管理,保证林木生长健旺,营造各种混交林,保护和招引啄木鸟及其他天敌,及时清除虫害木,避免天牛的大量发生等。局部发生时,须及时采取措施加以控制,如立即清除严重被害木,就地剥皮,置阳光下曝晒数周后利用。
虫害药剂防治
(1)涂白。秋、冬季至成虫产卵前,国光糊涂(树干涂白粉剂)与水按1:1比例混配好,加入200倍国光必治涂于树干基部(2米以内),防止产卵,可加入多菌灵、甲基托布津等药剂防腐烂,做到有虫治虫,无虫防病。同时,还可以起到防寒、防日灼的效果。
(2) 喷药防治。成虫发生期,向树干喷洒40%国光必治乳油800倍液、国光依它(45%丙溴辛硫磷)800-1000倍液,或者国光Bt、国光苏松质病毒等杀灭成虫。
(3)虫孔注药。幼虫危害期(6-8月),用小型喷雾器从虫道注入国光防蛀液剂,也可浸药棉塞孔,然后用粘泥或塑料袋堵注虫孔。
(4)熏蒸防治。磷化铝片是良好的熏蒸杀虫剂,可用该药堵孔,黄土封口,杀死幼虫。每孔放1/20片(3克/片)。或薄膜封干后,往薄膜内放药片熏蒸。
分布于黑龙江、吉林、辽宁、内蒙古、北京、安徽、台湾、广东、陕西、四川等地。寄主是苹果、山楂、核桃、柞等。

虫害形态特征
成虫体长8-15mm,体宽3-6mm。体黑色,全身被灰色短绒毛,并杂有许多火黄色或金黄色毛斑。前胸背板中央具丝绒般的斑纹4个,每边两个,前后各1,排成直行,前斑长形,后斑较短,近乎卵圆形,两者之间的距离超过后斑的长度;每个黑斑的左右两边都镶有相当宽的火金或金黄色毛斑。鞘翅饰有许多黄色和黑色的斑点,每翅中端的灰色毛较淡,在此淡色区的上缘和下缘中央,各有一个较大的不规则形的黑斑,其他较小的黑斑大致圆形,分布于基部之上,基部中央则极少或缺如;黄斑形状各异,分布全翅。小盾片中央火黄或金黄色,两翅较深。鞘翅沿小盾片周围的毛大致淡色。触角部分赤褐色,第1节背面杂有金黄色毛,第3节起每节基部近1/2为灰白色,各节下缘密生灰白及棕色缨毛。体腹面及足亦有灰白色长毛。体卵形。头部静止时与前足基部接触;额极宽;复眼很小,分成上下两叶,期间仅有一线相连,下叶较大,但长度只及颊长之半;头面布有刻点及颗粒。雄虫触角超出体长1/3,雌虫与体等长,柄节端疤有时不大显著,开放式。前胸背板具刻点及小颗粒,表面不平坦,中央后方及两侧有瘤状突起,侧面近前缘处有一瘤突。鞘翅基部1/4具颗粒。
虫害发生规律
黑龙江2年1代,以幼虫或成虫越冬。翌春5月初越冬成虫开始活动取食并交配产卵。卵多产在树皮缝、枝节、死节处,尤喜产在腐朽变软的树皮上,卵期15天。5月底孵公,初孵幼虫蛀入皮层至皮下于韧皮部与木质部之间蛀食。秋后于蛀道内越冬。第2年为在至7月底前后开始老熟于隧道内化蛹,蛹期10余天,羽化后咬圆形羽化孔出树,于落叶层和干基各种缝隙内越冬。

虫害防治方法
主要的措施包括选育抗性树种,加强林地水肥管理,保证林木生长健旺,营造各种混交林,保护和招引啄木鸟及其他天敌,及时清除虫害木,避免天牛的大量发生等。局部发生时,须及时采取措施加以控制,如立即清除严重被害木,就地剥皮,置阳光下曝晒数周后利用。
虫害药剂防治
(1)涂白。秋、冬季至成虫产卵前,国光糊涂(树干涂白粉剂)与水按1:1比例混配好,加入200倍国光必治涂于树干基部(2米以内),防止产卵,可加入多菌灵、甲基托布津等药剂防腐烂,做到有虫治虫,无虫防病。同时,还可以起到防寒、防日灼的效果。
(2) 喷药防治。成虫发生期,向树干喷洒40%国光必治乳油800倍液、国光依它(45%丙溴辛硫磷)800-1000倍液,或者国光Bt、国光苏松质病毒等杀灭成虫。
(3)虫孔注药。幼虫危害期(6-8月),用小型喷雾器从虫道注入国光防蛀液剂,也可浸药棉塞孔,然后用粘泥或塑料袋堵注虫孔。
(4)熏蒸防治。磷化铝片是良好的熏蒸杀虫剂,可用该药堵孔,黄土封口,杀死幼虫。每孔放1/20片(3克/片)。或薄膜封干后,往薄膜内放药片熏蒸。
0
0
文章
Miss Chen
2018年09月05日

Bearing spikes of fluffy, purple, summer flowers, Liatris spicata, also known as blazing star, provides its best effect in mass plantings. Hardy in U.S. Department of Agriculture plant hardiness zones 3 through 8, blazing star is a U.S. native that's also called gayfeather, snakeroot and dense blazing star. Its grass-like clumps grow 24 to 48 inches tall and 9 to 18 inches wide, and its flower spikes are 6 to 12 inches long. White, bluish and deep purple cultivars are available. A perennial plant, blazing star can be planted as a corm, which is a swollen underground stem, and also as a young plant. Blazing star flowers are attractive to butterflies.

Blazing Star Corms
Step 1
Till moist, well-drained soil in full sun with a garden fork to a depth of 6 inches in fall or spring. Mix in a 2-inch layer of garden compost, leaf mold or other organic matter if the soil is sandy and dry.
Step 2
Scatter blazing star corms across the growing site to create an informal effect or arrange the corms in the desired pattern. Space the corms about 2 to 4 inches apart and at a rate of 10 to 20 blazing star corms per square foot.
Step 3
Dig a hole beneath a blazing star corm 5 inches deep and as wide as the corm. Place it in the hole so that the widest, flattest part of the corm lies on the base of the hole. Fill in the hole with dug soil and plant the rest of the corms in the same way.
Step 4
Water the blazing star corms thoroughly and water regularly throughout the growing season so that the soil is constantly moist but not saturated.

Blazing Star Plants
Step 1
Dig a hole as wide and deep as the blazing star root ball in a full-sun growing site with a trowel in spring. Blazing star tolerates dry, infertile soil but grows and flowers best in moist, well-drained, rich soil.
Step 2
Place a blazing star plant in the hole so that the surface of the root ball is level with the surrounding soil. Fill in gaps around the root ball with dug soil. Space blazing star plants 9 to 18 inches apart.
Step 3
Water the blazing star plants thoroughly and apply water throughout the growing season to keep the soil moist, especially when conditions are dry.
Step 4
Spread a 9-18-9 ready-to-use, slow-release fertilizer around the planting site at a rate of 1 tablespoon per square foot. Apply the fertilizer every three months during the growing season.

Blazing Star Corms
Step 1
Till moist, well-drained soil in full sun with a garden fork to a depth of 6 inches in fall or spring. Mix in a 2-inch layer of garden compost, leaf mold or other organic matter if the soil is sandy and dry.
Step 2
Scatter blazing star corms across the growing site to create an informal effect or arrange the corms in the desired pattern. Space the corms about 2 to 4 inches apart and at a rate of 10 to 20 blazing star corms per square foot.
Step 3
Dig a hole beneath a blazing star corm 5 inches deep and as wide as the corm. Place it in the hole so that the widest, flattest part of the corm lies on the base of the hole. Fill in the hole with dug soil and plant the rest of the corms in the same way.
Step 4
Water the blazing star corms thoroughly and water regularly throughout the growing season so that the soil is constantly moist but not saturated.

Blazing Star Plants
Step 1
Dig a hole as wide and deep as the blazing star root ball in a full-sun growing site with a trowel in spring. Blazing star tolerates dry, infertile soil but grows and flowers best in moist, well-drained, rich soil.
Step 2
Place a blazing star plant in the hole so that the surface of the root ball is level with the surrounding soil. Fill in gaps around the root ball with dug soil. Space blazing star plants 9 to 18 inches apart.
Step 3
Water the blazing star plants thoroughly and apply water throughout the growing season to keep the soil moist, especially when conditions are dry.
Step 4
Spread a 9-18-9 ready-to-use, slow-release fertilizer around the planting site at a rate of 1 tablespoon per square foot. Apply the fertilizer every three months during the growing season.
0
0


