文章
Miss Chen
2017年08月14日

Dwarf snapdragon cultivars (Antirrhinum majus) grow 8 to 12 inches tall, significantly shorter than standard snapdragons, which grow 1 1/2 to 3 1/2 feet tall. With full sun and well-draining soil, these little perennials brighten up the landscape with colorful white, yellow, peach, pink, purple, red and bi-colored flowers. Through dwarf snapdragons are technically perennials in U.S. Department of Agriculture plant hardiness zones 7 through 10, you can also treat them as annuals in USDA zones 7 and lower.

Continuous-Release Fertilizer
Fertilize dwarf snapdragons once in spring, right after planting, in USDA zones 2 through 7. In USDA zones 8 through 10, fertilize in fall after planting to provide nutrients for the winter growing season. Use a continuous-release fertilizer, such as a 12-4-8 product, to provide sustained nutrients. Use 4 tablespoons per 4 square feet or bed around the dwarf snapdragons. Scatter the dry fertilizer evenly over the soil, then water the area until the soil is damp 6 inches deep.
Water Regularly
Water dwarf snapdragons when the top 1/2 to 1 inch of the soil starts to feel dry, giving the bed enough water to dampen the soil 6 inches deep. Caring for dwarf snapdragons successfully requires a delicate balance of regular water, without watering too much. Constantly wet, muddy soil can cause them to grow poorly.
Removing the Flowers
As dwarf snapdragons bloom and go to seed, remove the dead and fading flowers. This encourages the plants to bloom more abundantly through the season. To remove the dead flowers, a process called deadheading, pinch the stalk directly below the flower using your fingernails. Wash your hands with soap and water after.

Pests and Problems
Check dwarf snapdragons for aphids through the growing season. Aphids, small, soft-bodied insects that can be green, black or pink, feed on the leaves and flowers. Also keep an eye out for spider mites, which are minuscule white pests that form a fine webbing over the leaves where they are feeding. Start by washing aphids and spider mites off with a strong stream of water, then check daily and follow up with additional water. If the pests keep coming back, mix 4 teaspoons of insecticidal soap with 1 quart of water in a clean garden sprayer or spray bottle. Use the mixture to spray the insects and affected leaves, until the area is wet. Repeat every four to seven days until the pests are eradicated.

Continuous-Release Fertilizer
Fertilize dwarf snapdragons once in spring, right after planting, in USDA zones 2 through 7. In USDA zones 8 through 10, fertilize in fall after planting to provide nutrients for the winter growing season. Use a continuous-release fertilizer, such as a 12-4-8 product, to provide sustained nutrients. Use 4 tablespoons per 4 square feet or bed around the dwarf snapdragons. Scatter the dry fertilizer evenly over the soil, then water the area until the soil is damp 6 inches deep.
Water Regularly
Water dwarf snapdragons when the top 1/2 to 1 inch of the soil starts to feel dry, giving the bed enough water to dampen the soil 6 inches deep. Caring for dwarf snapdragons successfully requires a delicate balance of regular water, without watering too much. Constantly wet, muddy soil can cause them to grow poorly.
Removing the Flowers
As dwarf snapdragons bloom and go to seed, remove the dead and fading flowers. This encourages the plants to bloom more abundantly through the season. To remove the dead flowers, a process called deadheading, pinch the stalk directly below the flower using your fingernails. Wash your hands with soap and water after.

Pests and Problems
Check dwarf snapdragons for aphids through the growing season. Aphids, small, soft-bodied insects that can be green, black or pink, feed on the leaves and flowers. Also keep an eye out for spider mites, which are minuscule white pests that form a fine webbing over the leaves where they are feeding. Start by washing aphids and spider mites off with a strong stream of water, then check daily and follow up with additional water. If the pests keep coming back, mix 4 teaspoons of insecticidal soap with 1 quart of water in a clean garden sprayer or spray bottle. Use the mixture to spray the insects and affected leaves, until the area is wet. Repeat every four to seven days until the pests are eradicated.
0
0
文章
Miss Chen
2017年08月11日

Orchids, members of the Orchidaceae family, are prized for their attractive and exotic flowers. Considered difficult for amateurs to grow from seed, orchid species may be hardy from USDA zones 4 through 12. From hardy natives to tropical beauties, orchid seeds contain few food reserves, naturally relying on a symbiotic relationship with a fungus to provide their nutrients. Home growers imitate this relationship by sowing orchid seeds on a gelled, algae-based nutrient solution known as agar. Because the seeds and agar are generally kept in a flask, this process is called flasking. Agar or nutrient agar mixtures can be purchased. Alternatively, home growers can make an orchid-flasking, agar medium of their own.

Step 1
Mix water, gelatin, sugar and beef bouillon cubes or granules together in a saucepan. The amount of each used will depend on the amount of growing medium desired, but a sample mixture would have the following ingredient proportions: 4 cups of water, four packets of plain gelatin or a substitutable amount of agar, 8 teaspoons of sugar and four bouillon cubes or 4 teaspoons of bouillon granules.
Step 2
Boil this mixture, stirring constantly.
Step 3
Cool the mixture once it has been brought to a boil and all of the ingredients have dissolved. Keep the mixture sterile. Avoid exposing it to any surfaces, skin or other materials that may harbor any amount of bacteria. Keep it covered to prevent contamination and let it cool for no more than eight minutes.
Step 4
Pour the mixture into sterilized flasks. Purchase sterilized flasks and avoid opening them and exposing them to microorganisms until immediately before they will be filled with the growing medium, or sterilize the flasks in a pressure cooker or oven. In a pressure cooker, sterilize the flasks for 15 minutes at 15 psi (pounds per square inch). For oven sterilization, put glassware in the oven for two to three hours at 350 degrees Fahrenheit.
Step 5
Cover the flasks and let them cool until the gelatin has set. The flasks may be refrigerated to encourage setting.

Step 6
Keep the flasks cool, ideally refrigerated, until the orchid seeds are ready to sow. For best results, the medium should be put to use within three days after you have made it.

Step 1
Mix water, gelatin, sugar and beef bouillon cubes or granules together in a saucepan. The amount of each used will depend on the amount of growing medium desired, but a sample mixture would have the following ingredient proportions: 4 cups of water, four packets of plain gelatin or a substitutable amount of agar, 8 teaspoons of sugar and four bouillon cubes or 4 teaspoons of bouillon granules.
Step 2
Boil this mixture, stirring constantly.
Step 3
Cool the mixture once it has been brought to a boil and all of the ingredients have dissolved. Keep the mixture sterile. Avoid exposing it to any surfaces, skin or other materials that may harbor any amount of bacteria. Keep it covered to prevent contamination and let it cool for no more than eight minutes.
Step 4
Pour the mixture into sterilized flasks. Purchase sterilized flasks and avoid opening them and exposing them to microorganisms until immediately before they will be filled with the growing medium, or sterilize the flasks in a pressure cooker or oven. In a pressure cooker, sterilize the flasks for 15 minutes at 15 psi (pounds per square inch). For oven sterilization, put glassware in the oven for two to three hours at 350 degrees Fahrenheit.
Step 5
Cover the flasks and let them cool until the gelatin has set. The flasks may be refrigerated to encourage setting.

Step 6
Keep the flasks cool, ideally refrigerated, until the orchid seeds are ready to sow. For best results, the medium should be put to use within three days after you have made it.
0
0
文章
Colour_
2017年08月08日
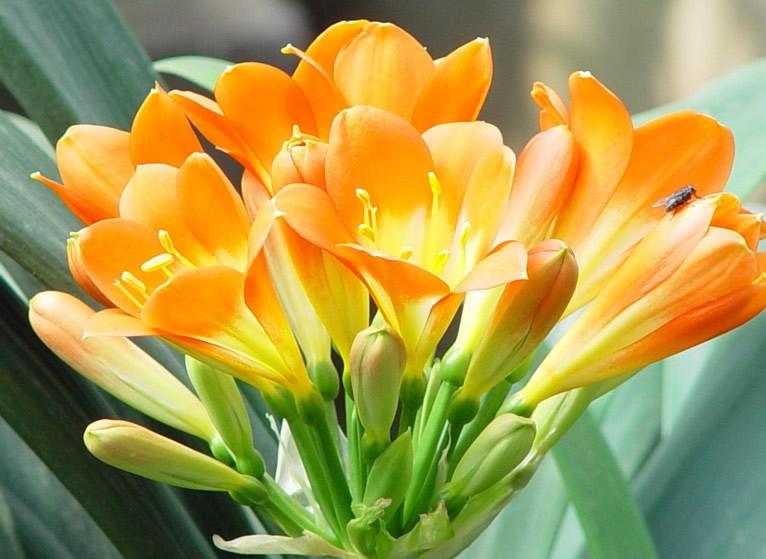
君子兰主要通过种子播种进行繁殖。
#君子兰 的花期是入冬后至次年3-4月份,花后种子成熟也需9-10个月,故君子兰的播种宜在11-12月份。播种前要进行选种,将空瘪发育不良的种子剔除。可用一般花盆播种,下面用粗沙砾或碎石砾铺成2厘米厚的排水层,然后铺一层腐叶土和河沙混合的培养土,厚约4-5厘米,在铺上0.5-1厘米的河沙作播种层。点播时,株距2厘米,然后用沙覆盖。覆土后浸1次水,盖上玻璃盖。播后保持20℃-25℃的气温有利发芽。
从发芽到长出第一片叶需2个月,以后要揭开玻璃盖通风,并逐渐去掉玻璃盖。播后90天便可移栽。移植时,先用竹签或竹筷扎孔,将肉质根插入土中,深度以埋住根茎露出种子为宜,同时注意叶片朝向一致。移后浇1次透水,过数日缓苗后再接受光照。苗期温度控制在15℃-20℃,冬春可见阳光,春、夏季应在散射光下生长,入秋后即可定植栽培。
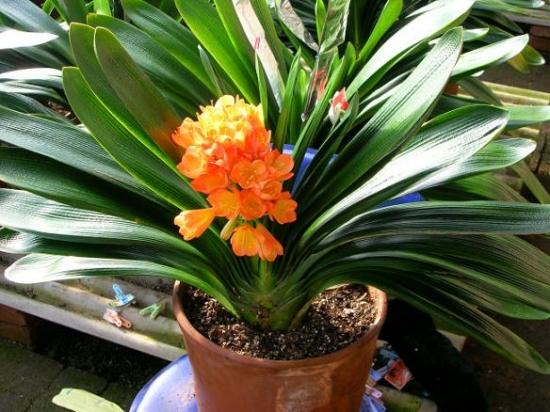
君子兰分株繁殖,需做好以下工作:
①家庭盆栽宜用泥瓦盆,这种盆透气性好,有利于植株生长。
②准备好已消毒过的介质土。如用腐殖土混合细沙的,腐殖土要用高锰酸钾1000-2000倍水溶液喷洒消毒;细河沙也要用开水烫洗消毒,避免幼苗受病菌感染腐烂。
③准备少量木炭粉涂抹伤口,供吸潮防腐之用。
④分株时,将君子兰从盆中磕出来,拍松盆土,理顺根系,找出可以分株的腋芽:如果子株长在母株的外沿,株体较小,可以一手握住鳞茎部分,另一手捏住子株基部,轻轻一掰,就能将子株掰离母株;如果子株粗壮,则用锋利的刀将其切下。然后用于木炭粉涂抹伤口,以吸干流液,防止腐烂。让子株、母株在室内晾干后再种植,种植深度以埋住子株的基部假鳞茎为度,靠植株的部位要使其略高些,并盖上已消毒的沙土。种好后过2天再浇1次透水,2周后待伤口愈合时,再加盖一层培养土。一般需1-2个月才能生出新根,1-2年后便可开花。
0
0
文章
Dummer. ゛☀
2017年08月07日

Freesia is a genus of about 14 species. Freesia bulbs are usually grown for use asCut Flowers. All the 14 species of Freesia are African in origin. Of The 14 Freesia species, 12 are native to Cape Province, South Africa, the remaining two to tropical Africa, with one these species extending north of the equator to Sudan. Freesia flowers are very fragrant, typically white or yellow, and are borne in spikelike racemes. This blooming beauty captures your heart and is a springtime favorite.
Freesia plants grow from a corm (a solid bulb, as in Gladiolus). The Freesia orm sends up a tuft of long narrow leaves and a slightly branched stem. Freesia Flowers are borne as loose one-sided spikes of narrowly funnel-shaped flowers along a side few leaves. Some excellent Freesia varieties (old-fashioned) for fragrance include: Athene, Allure, Demeter, Excelsior, Golden Wave, Mirabel, Pink Westlind, Snowdon, and Welkin.
The tender, cormous plant, Freesia originated in South Africa. The leaves on Freesia are sword shaped and light green and may be up to 1 feet high. Freesia Flower stalks are slender and about the same height. As many as 8 funnel-shaped Freesia flowers form a loose cluster at the top of each stalk. Where the flowers begin, the stem makes a sharp bend so that the Freesia flowers face upward.
Facts About Freesia
Freesia bloom was named by Dr. Freese (1785-1876) , a native of Kiel, Germany.
The flowers come in a great variety of colors - white, golden yellow, orange, red, pink, mauve, lavender, purple and bicolors.
Freesia perfume has a light, sweet, soap-like floral scent - trendy in soaps, lotions and so forth.
Freesia flower bouquets are also used for gifting on special occassions. Freesia flowers are symbolic of innocence.
Freesia are very poularly used in the perfume, scented oils and baths and other related industries.
Freesia Fragrance Oil
Fragrance Oils are artificially created fragrances, which contain artificial substances. Freesia fragrance oil is suitable for use in oil burners and vapourisers. It can also be used to refragrance pot pourries. Freesia fragrance oil can also be used in any of the vapourisers, such as the ceramic lamp ring, drivetime car vapouriser, radiator vapouriser or mini vaporiser.
Freesia essence oil is uncut, undiluted, alcohol free, long lasting, high grade essence oil. The oil is excellent for aromatherapy uses - to scent candles, freshen potpourri, in soap making, massage oils, bath oil and of course, as a Freesia perfume body oil - to smell just truly great.
Growing Freesia Flowers
The corms should be planted close - six will do nicely in a 5 inch pot.
Soil should be light and should be drained well.
Place the top of the corm, 1 inch below the soil.
For winter flowers, plant freesia in late summer or early fall and keep them cool until frosts are due.
During winter, bring freesia bulbs in and keep them in a sunny window.
Plant Care
Freesias are propagated by offsets of bulbs and seeds.
Freesia plants need full sun and cool night temperatures, preferably between 45 and 40 degrees.
Keep the plants well watered while the leaves and flowers are developing.
When the leaves begin to brown after the flowers have faded, the plants may be gradually dried off and the corms saved for the following year.

Freesia plants grow from a corm (a solid bulb, as in Gladiolus). The Freesia orm sends up a tuft of long narrow leaves and a slightly branched stem. Freesia Flowers are borne as loose one-sided spikes of narrowly funnel-shaped flowers along a side few leaves. Some excellent Freesia varieties (old-fashioned) for fragrance include: Athene, Allure, Demeter, Excelsior, Golden Wave, Mirabel, Pink Westlind, Snowdon, and Welkin.
The tender, cormous plant, Freesia originated in South Africa. The leaves on Freesia are sword shaped and light green and may be up to 1 feet high. Freesia Flower stalks are slender and about the same height. As many as 8 funnel-shaped Freesia flowers form a loose cluster at the top of each stalk. Where the flowers begin, the stem makes a sharp bend so that the Freesia flowers face upward.

Facts About Freesia
Freesia bloom was named by Dr. Freese (1785-1876) , a native of Kiel, Germany.
The flowers come in a great variety of colors - white, golden yellow, orange, red, pink, mauve, lavender, purple and bicolors.
Freesia perfume has a light, sweet, soap-like floral scent - trendy in soaps, lotions and so forth.
Freesia flower bouquets are also used for gifting on special occassions. Freesia flowers are symbolic of innocence.
Freesia are very poularly used in the perfume, scented oils and baths and other related industries.
Freesia Fragrance Oil
Fragrance Oils are artificially created fragrances, which contain artificial substances. Freesia fragrance oil is suitable for use in oil burners and vapourisers. It can also be used to refragrance pot pourries. Freesia fragrance oil can also be used in any of the vapourisers, such as the ceramic lamp ring, drivetime car vapouriser, radiator vapouriser or mini vaporiser.
Freesia essence oil is uncut, undiluted, alcohol free, long lasting, high grade essence oil. The oil is excellent for aromatherapy uses - to scent candles, freshen potpourri, in soap making, massage oils, bath oil and of course, as a Freesia perfume body oil - to smell just truly great.

Growing Freesia Flowers
The corms should be planted close - six will do nicely in a 5 inch pot.
Soil should be light and should be drained well.
Place the top of the corm, 1 inch below the soil.
For winter flowers, plant freesia in late summer or early fall and keep them cool until frosts are due.
During winter, bring freesia bulbs in and keep them in a sunny window.
Plant Care
Freesias are propagated by offsets of bulbs and seeds.
Freesia plants need full sun and cool night temperatures, preferably between 45 and 40 degrees.
Keep the plants well watered while the leaves and flowers are developing.
When the leaves begin to brown after the flowers have faded, the plants may be gradually dried off and the corms saved for the following year.
1
1
文章
Miss Chen
2017年08月06日


Description: This perennial wildflower consists of a low rosette of basal leaves up to 1½' across and a flowering stalk about 1½–2' tall. The floppy basal leaves are 6-12" long and 1/3" (8 mm.) across; they are medium to dark green, linear in shape, parallel-veined, glabrous, and smooth along their margins. Along the underside of each basal leaf, there is a prominent mid-rib. The erect central stalk is slender, light to medium green, and glabrous; it terminates in a spike-like raceme of flowers that is several inches in length. Underneath the floral spike, there are usually 1-3 bracts along the stalk. These bracts are green, linear to linear-lanceolate in shape, and up to ¾" long. Each flower is ¾–1" across, consisting of 6 tepals, 6 stamens with bright yellow anthers, and a green central ovary with a slender style. The tepals are light blue-violet to nearly white; they are oblong in shape and spread widely from the center of the flower. Each tepal (petal or petal-like sepal) has 1-3 poorly defined veins along its length.
At the base of each flower, there is a single linear bract up to ¾" long that is early-deciduous. The slender pedicel of each flower is about the same length as the bract. The flowers begin to bloom from the bottom of the raceme and continue to bloom upward toward the apex; each flower lasts only 2-3 days. The blooming period occurs from mid- to late spring and lasts about 2-3 weeks. Each fertilized flower is replaced by a 3-celled seed capsule that is about 1/3" in length and nearly as much across. Each seed capsule contains many small seeds that are black and shiny. The basal leaves turn yellow and wither away by mid-summer. The root system consists of a bulb with fibrous roots. This wildflower reproduces by reseeding itself.
Cultivation: The preference is full sun to light shade, moist conditions, and rich loamy soil. Wild Hyacinth is slow to develop, but fairly long-lived. Vegetative growth and development occurs during the cool weather of spring, when adequate moisture is essential.
Range & Habitat: Wild Hyacinth is found occasionally throughout Illinois (see Distribution Map), where it is native. Habitats include moist black soil prairies, moist savannas, moist open woodlands (particularly along the banks of streams), rocky wooded slopes, and limestone glades. This species is typically found in high quality habitats, whether prairies or woodlands.
Faunal Associations: The flowers attract their fair share of insects, including many bees and flies, and occasional butterflies and wasps. Most of these insects seek nectar from the flowers, although some short-tongued bees also collect pollen. Bee visitors include honeybees, bumblebees, Cuckoo bees (Nomada spp.), and Halictid bees (Halictus spp., Lasioglossum spp., etc.). Other floral-faunal relationships are poorly understood. White-Tailed Deer occasionally chomp off the tops of the basal leaves. Both the foliage and bulbs are not known to be toxic to mammalian herbivores.
Photographic Location: Along a woodland stream in Douglas or Coles County in east-central Illinois.
Comments: Wild Hyacinth has attractive flowers that are conspicuous during the spring. It is usually found in woodland habitats, but also occurs in prairies. Wild Hyacinth differs from the less common Camassia angusta (Prairie Hyacinth) in several ways, among them: 1) It has slightly larger flowers than the latter, 2) its flowers are usually a slightly lighter shade of blue-violet, 3) its seed capsules are about as broad as long, while Prairie Hyacinth has seed capsules that are slightly longer than broad, 4) the bracts of its flowering stalk are less persistent than those of Prairie Hyacinth, and 5) it blooms earlier in the spring.

0
0
文章
Dummer. ゛☀
2017年08月06日

BOTANICAL NAME: Citrus spp
PLANT TYPE: Fruit
SUN EXPOSURE: Full Sun
SOIL TYPE: Loamy
SOIL PH: Slightly Acidic to Neutral
Standard-size grapefruit and orange trees can grow 18 to 22 feet tall, whereas dwarf varieties only grow 8 to 12 feet tall.
Most citrus varieties are self-fertile, so only one tree is needed for fruit production. On average, fruit bearing begins when the trees are between 3 and 6 years old; however, exact timing will depend on the type of citrus (lemons, oranges, grapefruit, etc.), the cultivar, your climate, the health of the plant and its care, and other factors. Flowering is not seasonal, but occurs during warm weather and regular rainfall. Flowers and fruits may coincide.
PLANTING
Citrus trees should be planted in a sunny and wind-protected area.
In the citrus belt (a loosely defined area stretching from southern California to Florida), trees can be planted at any time, however, spring is the best time for container-grown plants.
Standard-size citrus trees should be spaced 12 to 25 feet apart and dwarf citrus trees should be set 6 to 10 feet apart. The exact distance depends on the variety. The bigger the fruit, the farther the distance.
If the soil is not well-drained, plant the trees on a slight mound to prevent waterlogging.
To plant citrus trees inside from seeds, remove the seeds from the desired fruit. Soak the seeds overnight in water and plant them ½ inch deep in moist potting soil. Cover the pot with a plastic bag or wrap and let it sit in a warm and sunny spot for a few weeks until the seeds start to grow. Then, remove the plastic but keep the pot near a warm and sunny window.
CARE
A few weeks after planting, and for the first few years (before bearing age), feed the tree a balanced (such as 6-6-6) fertilizer. Learn more about soil amendments and preparing soil for planting.
For newly bearing trees, provide nutrients to continue branch and leaf growth, but also to replace nutrients lost by fruit forming. A citrus blend is ideal.
Check manufacturer’s directions, ask a garden nursery, or consult your local cooperative extension as to how often and how much fertilizer to apply during each year of a tree’s growth.
Mulches are not recommended for citrus trees, but if trees are located in a cultivated plant bed where mulch is used, keep at least 12 inches of bare ground between the tree trunk and the mulch. Pre-emergent herbicides may be used to prevent weed seeds from germinating.
Fruit thinning is unnecessary for citrus trees, as they typically experience something called the “June drop.” In late spring or early summer (May or June for most of the country), citrus trees naturally drop a number of their immature fruit.
PESTS/DISEASES
Aphids
Spider Mites
Root and Crown Rots
Fungal Leaf Spots
Fruit Flies
Tristeza Virus spread by Aphids
PLANT TYPE: Fruit
SUN EXPOSURE: Full Sun
SOIL TYPE: Loamy
SOIL PH: Slightly Acidic to Neutral
Standard-size grapefruit and orange trees can grow 18 to 22 feet tall, whereas dwarf varieties only grow 8 to 12 feet tall.
Most citrus varieties are self-fertile, so only one tree is needed for fruit production. On average, fruit bearing begins when the trees are between 3 and 6 years old; however, exact timing will depend on the type of citrus (lemons, oranges, grapefruit, etc.), the cultivar, your climate, the health of the plant and its care, and other factors. Flowering is not seasonal, but occurs during warm weather and regular rainfall. Flowers and fruits may coincide.

PLANTING
Citrus trees should be planted in a sunny and wind-protected area.
In the citrus belt (a loosely defined area stretching from southern California to Florida), trees can be planted at any time, however, spring is the best time for container-grown plants.
Standard-size citrus trees should be spaced 12 to 25 feet apart and dwarf citrus trees should be set 6 to 10 feet apart. The exact distance depends on the variety. The bigger the fruit, the farther the distance.
If the soil is not well-drained, plant the trees on a slight mound to prevent waterlogging.
To plant citrus trees inside from seeds, remove the seeds from the desired fruit. Soak the seeds overnight in water and plant them ½ inch deep in moist potting soil. Cover the pot with a plastic bag or wrap and let it sit in a warm and sunny spot for a few weeks until the seeds start to grow. Then, remove the plastic but keep the pot near a warm and sunny window.

CARE
A few weeks after planting, and for the first few years (before bearing age), feed the tree a balanced (such as 6-6-6) fertilizer. Learn more about soil amendments and preparing soil for planting.
For newly bearing trees, provide nutrients to continue branch and leaf growth, but also to replace nutrients lost by fruit forming. A citrus blend is ideal.
Check manufacturer’s directions, ask a garden nursery, or consult your local cooperative extension as to how often and how much fertilizer to apply during each year of a tree’s growth.
Mulches are not recommended for citrus trees, but if trees are located in a cultivated plant bed where mulch is used, keep at least 12 inches of bare ground between the tree trunk and the mulch. Pre-emergent herbicides may be used to prevent weed seeds from germinating.
Fruit thinning is unnecessary for citrus trees, as they typically experience something called the “June drop.” In late spring or early summer (May or June for most of the country), citrus trees naturally drop a number of their immature fruit.

PESTS/DISEASES
Aphids
Spider Mites
Root and Crown Rots
Fungal Leaf Spots
Fruit Flies
Tristeza Virus spread by Aphids
2
1


