Gerald Pitter
2017年11月23日

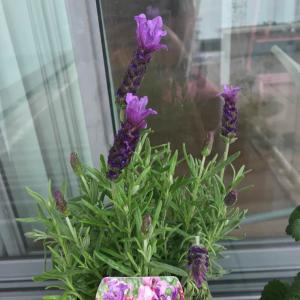
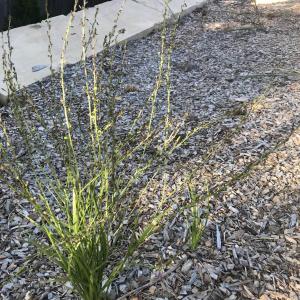
Anyone know what this is? I thought it might be lavender as i thre dome seeds down a while ago. Bees come for the purple flowers

0
0
Mr.Snow:Sorry, it is not lavender. See if your county extension can ID this pretty monocot.
文章
Dummer. ゛☀
2017年09月22日

Christmas Cactus is a jungle cactus that prefers humidity and moisture, unlike its standard cactus cousins, which require a warm, arid climate. A winter-bloomer, Christmas Cactus displays flowers in shades of red, lavender, rose, purple, white, peach, cream and orange, depending on the variety. These prolific growers eventually need to be repotted. Repotting Christmas Cactus isn’t complicated, but the key is knowing when and how to repot a Christmas Cactus.
When to Repot
Most plants are best repotted when they display new growth in spring, but Christmas Cactus repotting should be done after blooming ends and the flowers have wilted in late winter or early spring. Never attempt to repot the plant while it is actively blooming.
Don’t rush to repot Christmas Cactus because this hardy succulent is happiest when its roots are slightly crowded. Frequent repotting can damage the plant.
Repotting Christmas Cactus every 3 to 4 years is usually adequate, but you may prefer to wait until the plant begins to look tired or you notice a few roots growing through the drainage hole. Often, a plant can bloom happily in the same pot for years.
How to Repot
Here are some Christmas Cactus potting tips that will help you find success:
Take your time because repotting a Christmas Cactus can be tricky. A lightweight, well-drained potting mixture is critical, so look for a commercial mix for bromeliads or succulents. You can also use a mixture of two-thirds regular potting soil and one-third sand.
Repot Christmas Cactus into a pot only slightly larger than the current container. Be sure the container has a drainage hole in the bottom. Although Christmas Cactus likes moisture, it will soon rot if the roots are deprived of air.
Remove the plant from its pot, along with the surrounding soil ball, and then gently loosen the roots. If the potting mix is compacted, gently wash it away from the roots with a little water.
Replant the Christmas cactus in the new pot so the top of the root ball is about an inch (2.5 cm) below the rim of the pot. Fill in around the roots with fresh potting mix and pat the soil lightly to remove air pockets. Water it moderately.
Put the plant in a shady location for two or three days, then resume the plant’s normal care routine.

When to Repot
Most plants are best repotted when they display new growth in spring, but Christmas Cactus repotting should be done after blooming ends and the flowers have wilted in late winter or early spring. Never attempt to repot the plant while it is actively blooming.

Don’t rush to repot Christmas Cactus because this hardy succulent is happiest when its roots are slightly crowded. Frequent repotting can damage the plant.
Repotting Christmas Cactus every 3 to 4 years is usually adequate, but you may prefer to wait until the plant begins to look tired or you notice a few roots growing through the drainage hole. Often, a plant can bloom happily in the same pot for years.

How to Repot
Here are some Christmas Cactus potting tips that will help you find success:
Take your time because repotting a Christmas Cactus can be tricky. A lightweight, well-drained potting mixture is critical, so look for a commercial mix for bromeliads or succulents. You can also use a mixture of two-thirds regular potting soil and one-third sand.

Repot Christmas Cactus into a pot only slightly larger than the current container. Be sure the container has a drainage hole in the bottom. Although Christmas Cactus likes moisture, it will soon rot if the roots are deprived of air.
Remove the plant from its pot, along with the surrounding soil ball, and then gently loosen the roots. If the potting mix is compacted, gently wash it away from the roots with a little water.

Replant the Christmas cactus in the new pot so the top of the root ball is about an inch (2.5 cm) below the rim of the pot. Fill in around the roots with fresh potting mix and pat the soil lightly to remove air pockets. Water it moderately.
Put the plant in a shady location for two or three days, then resume the plant’s normal care routine.
0
0
文章
Dummer. ゛☀
2017年09月15日

If the shoots tips of rosemary and lavender are turning brown and dying back it could be the sign of an infestation of rosemary leaf beetle. These small beetles feed on the new shoot tips causing them to die back. They're easy to spot because they have metallic green and purple stripes across their backs. Their larvae, which are slug-like and pale grey in colour with a dark stripe down the side, also cause damage by feeding on the shoots as they grow.
Plants affected
Rosemary leaf beetles only feed on a small number of plant species which includes rosemary, lavender, sage and thyme.
About Rosemary leaf beetle
These attractive leaf beetles are an invasive species that first appeared in the UK in 1994.
Since their introduction, they've been spreading steadily throughout the southern counties of England.
The adult beetles are around 1cm long with metallic green and purple stripes down their wing cases.
They're usually found in groups on stems, or feeding on the new growth of plants.
The larvae are small slug-like grubs which are usually found on the underside of leaves. They are light grey with horizontal dark stripes along their body.
Adult beetles are usually first seen in late spring, although they remain largely stationary on plants until later in the year.
In late summer they'll begin to mate and lay eggs.
Eggs are usually laid on the underside of leaves and are around 2mm in length.
Larvae will hatch in about ten day's time and feed for a few weeks before dropping down to pupate below the soil surface.
Adults may continue to mate during warmer winter periods, although this is rare.
Treatment
Chemical
Products containing the following chemical ingredients are all effective on Rosemary leaf beetle
Pyrethrum
Natural fatty acids
Surfactant-based products
Note: It is important to read manufacturer's instructions for use and the associated safety data information before applying chemical treatments.
Organic
Regular observation in late spring each year is essential to prevent infestations establishing.
Removing adults and larvae by hand will help to reduce numbers. Shaking infested bushes over an old towel or sheet will enable large infestations to be collected and removed.
Netting and fleeces can be used to stop adults moving between plants.
There are currently no natural enemies commercially available to control rosemary leaf beetle.
Prevention
Check plants on a weekly basis for signs of infestation and deal with them as soon as they appear.
Encourage insectivorous birds by hanging feeders in the winter and provide nesting boxes in the spring.

Plants affected
Rosemary leaf beetles only feed on a small number of plant species which includes rosemary, lavender, sage and thyme.
About Rosemary leaf beetle
These attractive leaf beetles are an invasive species that first appeared in the UK in 1994.
Since their introduction, they've been spreading steadily throughout the southern counties of England.
The adult beetles are around 1cm long with metallic green and purple stripes down their wing cases.
They're usually found in groups on stems, or feeding on the new growth of plants.

The larvae are small slug-like grubs which are usually found on the underside of leaves. They are light grey with horizontal dark stripes along their body.
Adult beetles are usually first seen in late spring, although they remain largely stationary on plants until later in the year.
In late summer they'll begin to mate and lay eggs.
Eggs are usually laid on the underside of leaves and are around 2mm in length.
Larvae will hatch in about ten day's time and feed for a few weeks before dropping down to pupate below the soil surface.
Adults may continue to mate during warmer winter periods, although this is rare.

Treatment
Chemical
Products containing the following chemical ingredients are all effective on Rosemary leaf beetle
Pyrethrum
Natural fatty acids
Surfactant-based products
Note: It is important to read manufacturer's instructions for use and the associated safety data information before applying chemical treatments.
Organic
Regular observation in late spring each year is essential to prevent infestations establishing.
Removing adults and larvae by hand will help to reduce numbers. Shaking infested bushes over an old towel or sheet will enable large infestations to be collected and removed.

Netting and fleeces can be used to stop adults moving between plants.
There are currently no natural enemies commercially available to control rosemary leaf beetle.
Prevention
Check plants on a weekly basis for signs of infestation and deal with them as soon as they appear.
Encourage insectivorous birds by hanging feeders in the winter and provide nesting boxes in the spring.
0
0
文章
Dummer. ゛☀
2017年08月29日

What is a Mexican heather plant? Also known as false heather, Mexican heather (Cuphea hyssopifolia) is a flowering groundcover that produces masses of bright green leaves. Small pink, white or lavender flowers decorate the plant throughout most of the year. Mexican heather plants, which actually aren’t members of the heather family, are suitable for growing in the warm climates of USDA plant hardiness zones 9 to 11. You can grow Mexican heather as an annual if you live in a chillier climate.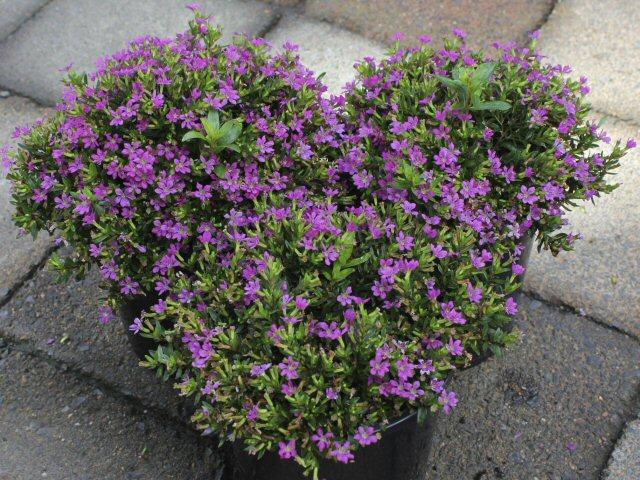
How to Plant Mexican Heather
Planting Mexican heather is uninvolved, although the plant benefits from a little added compost or manure if soil is poor. Allow at least 18 inches (46 cm.) between each plant. This tough, drought-tolerant plant loves direct sunlight and thrives in intense heat. Remember that although Mexican heather plants grow in a wide range of soils, good drainage is critical.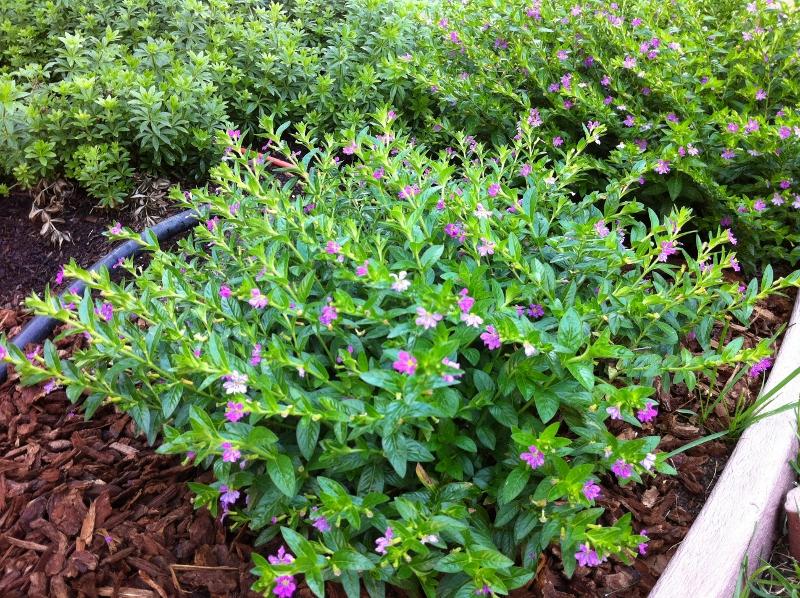
Care of Mexican Heather
Water Mexican heather plants deeply about once every week, then allow the soil to dry slightly before watering again. Container plants will need water more often, especially during the summer months. Prune Mexican heather lightly during the spring if the plant looks scraggly or overgrown. Otherwise, no pruning is required. Surround the plant with a thin layer of mulch in spring to minimize moisture evaporation and keep weeds in check. Feed the plant in spring, summer and fall, using a balanced, general-purpose fertilizer.
Healthy Mexican heather plants are seldom bothered by insects. However, if you notice spider mites during hot, dry weather, treat the pests with insecticidal soap spray on a day when the sun isn’t directly on the plant. Insecticidal soap spray with a few drops of rubbing alcohol will also take care of flea beetles.

How to Plant Mexican Heather
Planting Mexican heather is uninvolved, although the plant benefits from a little added compost or manure if soil is poor. Allow at least 18 inches (46 cm.) between each plant. This tough, drought-tolerant plant loves direct sunlight and thrives in intense heat. Remember that although Mexican heather plants grow in a wide range of soils, good drainage is critical.

Care of Mexican Heather
Water Mexican heather plants deeply about once every week, then allow the soil to dry slightly before watering again. Container plants will need water more often, especially during the summer months. Prune Mexican heather lightly during the spring if the plant looks scraggly or overgrown. Otherwise, no pruning is required. Surround the plant with a thin layer of mulch in spring to minimize moisture evaporation and keep weeds in check. Feed the plant in spring, summer and fall, using a balanced, general-purpose fertilizer.

Healthy Mexican heather plants are seldom bothered by insects. However, if you notice spider mites during hot, dry weather, treat the pests with insecticidal soap spray on a day when the sun isn’t directly on the plant. Insecticidal soap spray with a few drops of rubbing alcohol will also take care of flea beetles.
0
0
文章
Dummer. ゛☀
2017年08月27日

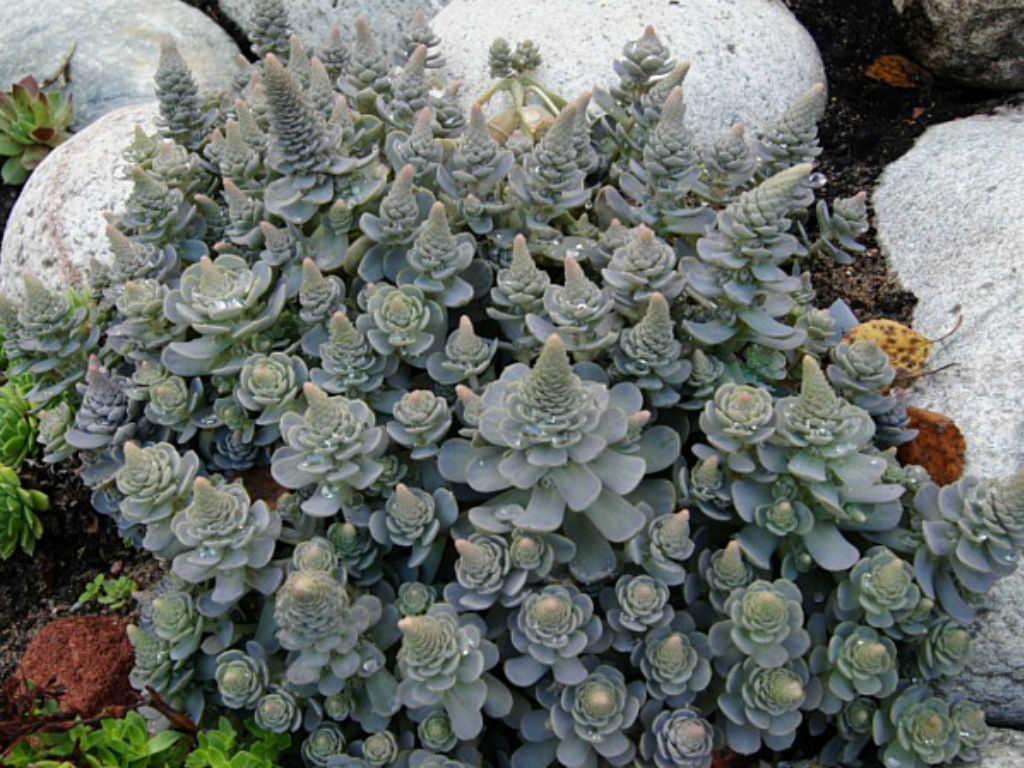
What is Orostachys Dunce Cap and why does the plant have such an odd name? Dunce Cap, also known as Chinese Dunce Cap (Orostachys iwarenge), is a succulent plant named for its spires of silvery-lavender cone-shaped rosettes. The plant spreads via slender runners with offsets that fall off and take root to form new plants. Eventually, the pointy cones may produce tiny flowers. Read on for more information about Chinese Dunce Cap succulents.

Orostachys Plant Info
Orostachys is a hardy succulent native to the frigid mountainous regions of North China, Mongolia and Japan. The structure and growing habit of the plant is similar to the more familiar hens and chicks, although considerably smaller with a more delicate appearance. Chinese Dunce Cap succulents are suitable for growing in USDA plant hardiness zones 5 through 10.
Dunce Cap Plant Care
Growing Chinese Dunce Cap is easy. Most importantly, like all succulent plants, Orostachys Dunce Cap requires well-drained soil and is likely to rot in humid conditions. If you’re concerned that your soil may be a little too moist, dig in a generous amount of coarse sand or grit. You can also grow the plant in a container, indoors or outside. Use a well-drained potting mix product formulated for cacti and succulents, or simply add coarse sand or grit to a regular potting mix. Locate Chinese Dunce Cap succulents in bright sunlight. Feed the plant twice during the growing season, using a low-nitrogen fertilizer. Water Chinese Dunce Cap sparingly when the soil feels dry to the touch. Also, water the plant during the morning hours so the leaves have time to dry thoroughly before evening. Keep the leaves as dry as possible. Chinese Dunce Cap succulents are easy to propagate by division. Just locate an offshoot large enough to have a few roots, then cut the stolon (runner) close to the offshoot. Plant the offshoot in a pot filled with sandy soil, or directly in your garden. Watch for mealybugs, especially on indoor plants. If you notice the pests, usually evidenced by a waxy, cottony substance, pick them off carefully with a toothpick or spray the plants lightly with isopropyl alcohol or insecticidal soap. Never spray when the plants are in direct sunlight or when the temperatures is above 90 F. (32 C.).

Orostachys Plant Info
Orostachys is a hardy succulent native to the frigid mountainous regions of North China, Mongolia and Japan. The structure and growing habit of the plant is similar to the more familiar hens and chicks, although considerably smaller with a more delicate appearance. Chinese Dunce Cap succulents are suitable for growing in USDA plant hardiness zones 5 through 10.

Dunce Cap Plant Care
Growing Chinese Dunce Cap is easy. Most importantly, like all succulent plants, Orostachys Dunce Cap requires well-drained soil and is likely to rot in humid conditions. If you’re concerned that your soil may be a little too moist, dig in a generous amount of coarse sand or grit. You can also grow the plant in a container, indoors or outside. Use a well-drained potting mix product formulated for cacti and succulents, or simply add coarse sand or grit to a regular potting mix. Locate Chinese Dunce Cap succulents in bright sunlight. Feed the plant twice during the growing season, using a low-nitrogen fertilizer. Water Chinese Dunce Cap sparingly when the soil feels dry to the touch. Also, water the plant during the morning hours so the leaves have time to dry thoroughly before evening. Keep the leaves as dry as possible. Chinese Dunce Cap succulents are easy to propagate by division. Just locate an offshoot large enough to have a few roots, then cut the stolon (runner) close to the offshoot. Plant the offshoot in a pot filled with sandy soil, or directly in your garden. Watch for mealybugs, especially on indoor plants. If you notice the pests, usually evidenced by a waxy, cottony substance, pick them off carefully with a toothpick or spray the plants lightly with isopropyl alcohol or insecticidal soap. Never spray when the plants are in direct sunlight or when the temperatures is above 90 F. (32 C.).
1
0
文章
Dummer. ゛☀
2017年08月26日

Catmint is an aromatic herb that is commonly grown in the garden. It produces clusters of lavender-blue flowers amid mounds of gray-green foliage. This easily grown plant has an interesting history regarding its various uses in the landscape. For example, the herb is thought to have been first cultivated in the Roman town of Nepeti, where it was used as herbal tea and insect repellent. This is also believed to be the origin of its genus name, Nepeta.
Difference Between Catnip and Catmint
Many people wonder what is the difference between catnip and catmint. While basically considered the same plant that shares many of the same characteristics, there are differences between the two species. Catnip (Nepeta cataria) has less ornamental value in the garden than its catmint (Nepeta mussinii) counterpart. Catnip is also found to be highly attractive to cats, with many of them exhibiting a naturally induced euphoria around the plant. They may nibble on it or even roll around in the foliage. This type is most suitable for “cat friendly” gardens. If you don’t want your garden overrun with felines, plant catmint instead, which is much less attractive to them.
How to Grow Catmint
Catmint herb is easy to grow. These plants are good for mass planting or edging and are suitable near vegetables as an insect deterrent—especially aphids and Japanese beetles. Catmint can be grown in sun or partial shade with average, well-draining soil. They are even heat and drought tolerant, making them excellent plants for dry garden areas. Catmint is most often grown by seed or through division.
How & When to Plant Catmint
The seeds or divisions of catmint plant are planted in spring. They require plenty of space too and should be spaced (or thinned) to at least a foot or so apart. Overcrowded plants can lead to powdery mildew or leaf spot, especially in hot, humid climates. Caution is needed when planting some types of catmint plants, as they can be aggressive growers. Therefore, you may want to add some edging around them. Likewise, catmint can be planted and grown in containers.
Care of Catmint
Basic care of catmint is easy. Water catmint plants regularly until they become well established. Mulch will help retain moisture and keep down weeds. Once plants are a few inches tall, pinch them back to promote bushier growth. Catmint blooms throughout summer and fall. Deadheading spent blooms promotes additional flowering. It can also help prevent reseeding. Faassen’s catmint (Nepeta x faassenii) is sterile however, and doesn’t require deadheading. Shear the plants back to half their size in fall or following harvest.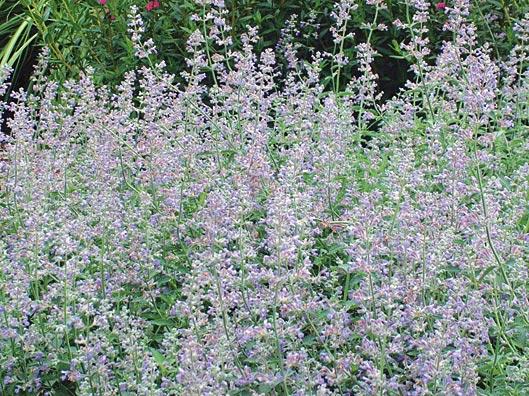
Harvesting and Uses of Catmint Herb
Catmint can be used fresh, dried, or frozen for both culinary and herbal use. Harvest leaves as flowers begin to bloom, cutting top leaves, stems, and flowers if desired. Spread out to dry in a cool, ventilated area and store the dried herb in an airtight container or bag to preserve its potency. The leaves and shoots can be added to soups and sauces. Tea made from the leaves and flowers can be used for calming nerves and relieving coughs, congestion, and menstrual cramps.

Difference Between Catnip and Catmint
Many people wonder what is the difference between catnip and catmint. While basically considered the same plant that shares many of the same characteristics, there are differences between the two species. Catnip (Nepeta cataria) has less ornamental value in the garden than its catmint (Nepeta mussinii) counterpart. Catnip is also found to be highly attractive to cats, with many of them exhibiting a naturally induced euphoria around the plant. They may nibble on it or even roll around in the foliage. This type is most suitable for “cat friendly” gardens. If you don’t want your garden overrun with felines, plant catmint instead, which is much less attractive to them.

How to Grow Catmint
Catmint herb is easy to grow. These plants are good for mass planting or edging and are suitable near vegetables as an insect deterrent—especially aphids and Japanese beetles. Catmint can be grown in sun or partial shade with average, well-draining soil. They are even heat and drought tolerant, making them excellent plants for dry garden areas. Catmint is most often grown by seed or through division.

How & When to Plant Catmint
The seeds or divisions of catmint plant are planted in spring. They require plenty of space too and should be spaced (or thinned) to at least a foot or so apart. Overcrowded plants can lead to powdery mildew or leaf spot, especially in hot, humid climates. Caution is needed when planting some types of catmint plants, as they can be aggressive growers. Therefore, you may want to add some edging around them. Likewise, catmint can be planted and grown in containers.

Care of Catmint
Basic care of catmint is easy. Water catmint plants regularly until they become well established. Mulch will help retain moisture and keep down weeds. Once plants are a few inches tall, pinch them back to promote bushier growth. Catmint blooms throughout summer and fall. Deadheading spent blooms promotes additional flowering. It can also help prevent reseeding. Faassen’s catmint (Nepeta x faassenii) is sterile however, and doesn’t require deadheading. Shear the plants back to half their size in fall or following harvest.

Harvesting and Uses of Catmint Herb
Catmint can be used fresh, dried, or frozen for both culinary and herbal use. Harvest leaves as flowers begin to bloom, cutting top leaves, stems, and flowers if desired. Spread out to dry in a cool, ventilated area and store the dried herb in an airtight container or bag to preserve its potency. The leaves and shoots can be added to soups and sauces. Tea made from the leaves and flowers can be used for calming nerves and relieving coughs, congestion, and menstrual cramps.
1
1
文章
Dummer. ゛☀
2017年08月26日

Santolina herb plants were introduced to the United States from the Mediterranean in 1952. Today, they are recognized as a naturalized plant in many areas of California. Also known as lavender cotton, Santolina herb plants are members of the sunflower/aster family (Asteraceae). So what is Santolina and how do you use Santolina in the garden landscape?
What is Santolina?
An herbaceous perennial suited to hot, dry summer and full sun, Santolina (S. chamaecyperissus) is indigent to areas of sandy, rocky infertile soils but will also do well in garden loam and even clay, provided it is well amended and well-drained.
These evergreen shrubs have either silvery grey or green leaves reminiscent of conifers. Santolina has a mounded, round and dense habit reaching only 2 feet high and wide with vibrant yellow ½-inch flowers perched on stems above the foliage, which are notably attractive in dried flower arrangements and wreaths. The silver foliage makes a nice contrast to other green tones of the garden and persists through the winter. It is a prominent specimen for xeriscapes and mixes well with other Mediterranean herbs such as lavender, thyme, sage, oregano, and rosemary.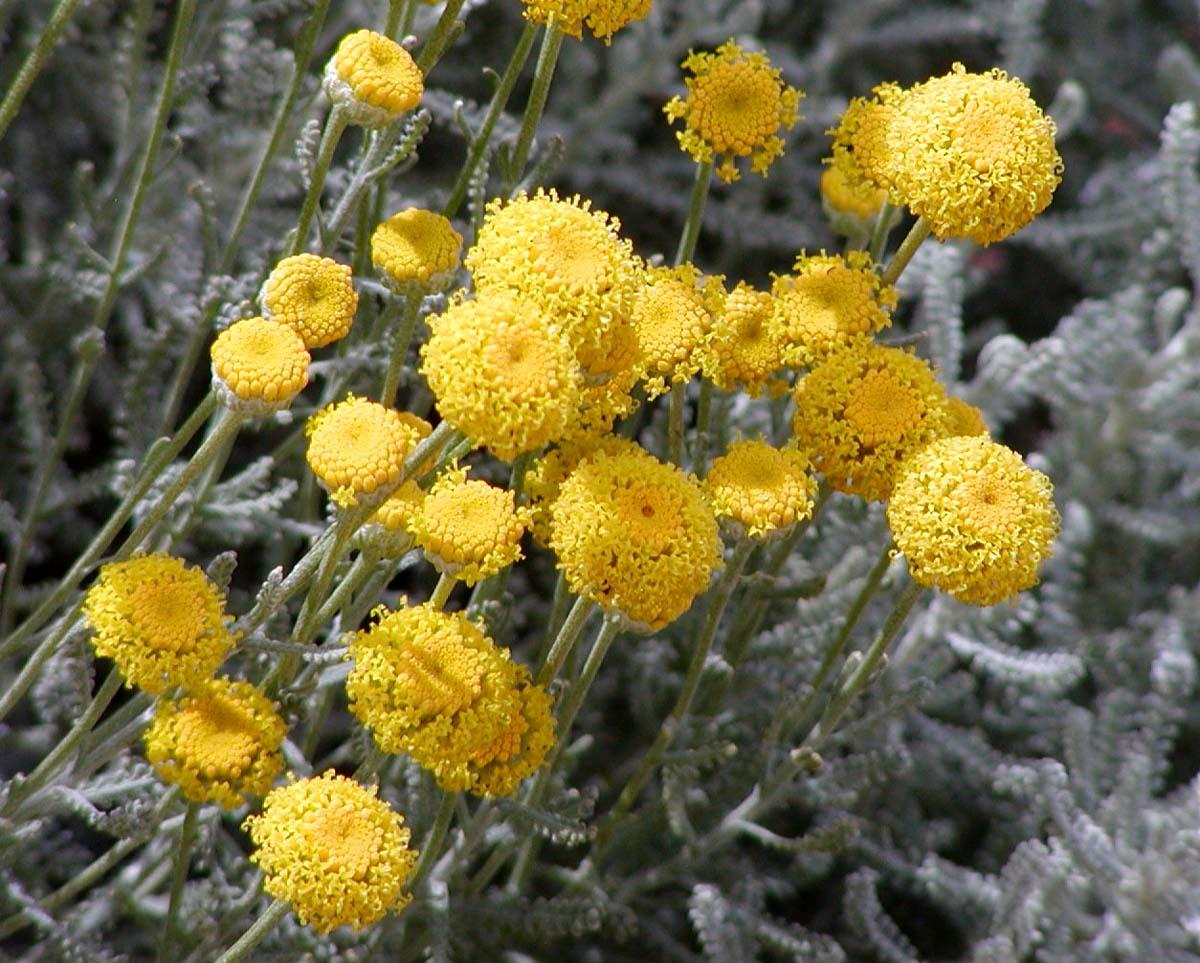
Lovely in a mixed perennial border along with rockroses, Artemisia and buckwheat, growing Santolina has a virtual plethora of uses in the home landscape. Growing Santolina can even be trained into a low hedge. Give the plants plenty of room to spread or allow them to take over and create a massed ground cover. Santolina herb plants also have a fairly pungent aroma akin to camphor and resin mixed when the foliage is bruised. Perhaps this is why deer don’t seem to have a yen for it and leave it alone.
Santolina Plant Care
Plant your Santolina herb in areas of full sun through USDA zone 6 in almost any type of soil. Drought tolerant, Santolina herb requires minimal to moderate irrigation once established. Overwatering will likely kill the plant. Wet, humid weather will foster fungal development. Prune Santolina back drastically in the late winter or spring to keep it from splitting or dying out in the center of the plant. However, if this happens, other Santolina plant care indicates ease of propagation.
Simply take 3-4 inch cuttings in the fall, pot them and provide heat, then plant in the garden in summer. Or, seed can be sown under a cold frame in fall or spring. The herb will also begin to grow roots when a branch touches the soil (called layering), thereby creating a new Santolina. Besides over watering, the downfall of Santolina is its short life; about every five years or so (as lavender) the plant needs to be replaced. Luckily it is easy to propagate. Plants can also be divided in the spring or fall. Santolina herb plant is fairly pest and disease resistant, drought tolerant and deer resistant, and easy to propagate. Santolina herb plant is a must have specimen for the water-efficient garden or an excellent replacement when eliminating a lawn entirely.

What is Santolina?
An herbaceous perennial suited to hot, dry summer and full sun, Santolina (S. chamaecyperissus) is indigent to areas of sandy, rocky infertile soils but will also do well in garden loam and even clay, provided it is well amended and well-drained.
These evergreen shrubs have either silvery grey or green leaves reminiscent of conifers. Santolina has a mounded, round and dense habit reaching only 2 feet high and wide with vibrant yellow ½-inch flowers perched on stems above the foliage, which are notably attractive in dried flower arrangements and wreaths. The silver foliage makes a nice contrast to other green tones of the garden and persists through the winter. It is a prominent specimen for xeriscapes and mixes well with other Mediterranean herbs such as lavender, thyme, sage, oregano, and rosemary.

Lovely in a mixed perennial border along with rockroses, Artemisia and buckwheat, growing Santolina has a virtual plethora of uses in the home landscape. Growing Santolina can even be trained into a low hedge. Give the plants plenty of room to spread or allow them to take over and create a massed ground cover. Santolina herb plants also have a fairly pungent aroma akin to camphor and resin mixed when the foliage is bruised. Perhaps this is why deer don’t seem to have a yen for it and leave it alone.
Santolina Plant Care
Plant your Santolina herb in areas of full sun through USDA zone 6 in almost any type of soil. Drought tolerant, Santolina herb requires minimal to moderate irrigation once established. Overwatering will likely kill the plant. Wet, humid weather will foster fungal development. Prune Santolina back drastically in the late winter or spring to keep it from splitting or dying out in the center of the plant. However, if this happens, other Santolina plant care indicates ease of propagation.

Simply take 3-4 inch cuttings in the fall, pot them and provide heat, then plant in the garden in summer. Or, seed can be sown under a cold frame in fall or spring. The herb will also begin to grow roots when a branch touches the soil (called layering), thereby creating a new Santolina. Besides over watering, the downfall of Santolina is its short life; about every five years or so (as lavender) the plant needs to be replaced. Luckily it is easy to propagate. Plants can also be divided in the spring or fall. Santolina herb plant is fairly pest and disease resistant, drought tolerant and deer resistant, and easy to propagate. Santolina herb plant is a must have specimen for the water-efficient garden or an excellent replacement when eliminating a lawn entirely.
1
0
文章
Dummer. ゛☀
2017年08月25日

Many herb plants come from the Mediterranean and as such are drought, soil and exposure tolerant. Creeping germander is one of those. Germander herb plants are members of the Lamiaceae or Mint family, which includes lavender and salvia. This is a large genus of evergreens, from ground covers to shrubs to sub shrubs. Creeping germander (Teucrium canadense) is a woody, perennial ground cover varietal that spreads through underground rhizomes and reaches to only about 12 to 18 inches tall and spreading 2 feet across. Germander herb plants bloom lavender-hued flowers in the spring borne off of green serrated foliage.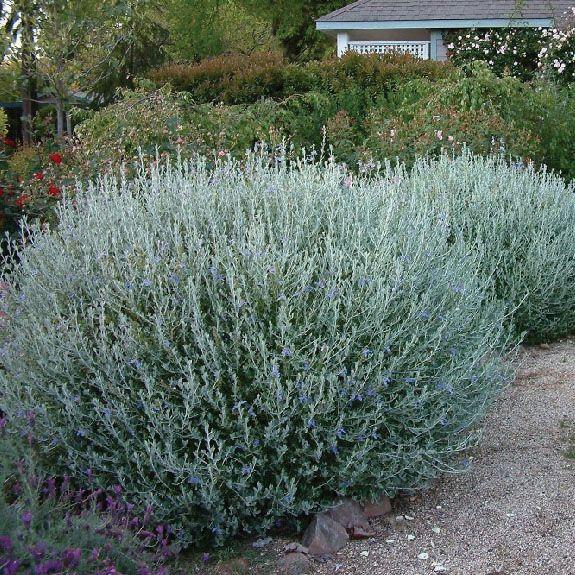
Germander Growing
The adaptable germander ground cover isn’t particularly picky about its location. This herb can be grown in full sun to part shade, in hot climates, or poor and rocky soil. Ideally, however, creeping germander prefers well drained soil (pH of 6.3), although clay will work in a pinch. You can grow these little plants in USDA zones 5-10. Because of its ability to tolerate less than ideal conditions, including drought, creeping germander makes an ideal xeriscape specimen. If you live in a cooler climate, mulch around the plants prior to fall frosts.
How to Use Germander Ground Cover
All of the Teucriums are low maintenance plants and are, therefore, perfect for planting in difficult areas of the garden. They all also react beautifully to pruning and can be shaped easily into borders or low hedges, used in knot gardens or among other herbs or in a rockery. Their easygoing care is just one reason to plant creeping germander; they are deer resistant as well!
Varieties of Low Growing Germanders
Teucrium canadense is just one of several germanders with a creeping habitat. A little easier to find is T. chamaedrys, or wall germander, with a short mounding form up to 1 1/2 feet tall with pinkish purple blooms and oak leaf shaped foliage. Its name derives from the Greek ‘chamai’ for ground and ‘drus’ meaning oak and is indeed a germander found growing wild in Greece and Syria. T.cossoni majoricum, or fruity germander, is a slower growing spreading perennial that is non-invasive with rosy lavender flowers. Flowers are heaviest in the spring but continue to bloom in lesser numbers until fall, which makes the pollinators very happy. Fruity germander has a strong aromatic scent when bruised and does well among rock gardens.
Further Information on Creeping Germander
Germander can be propagated via seed and takes about 30 days to germinate, or you may also use cuttings in the spring and/or divide in the fall. Plants should be spaced 6 inches apart for a hedge with the addition of some organic matter worked into the soil. Spider mite infestations are a hazard and can be eradicated with a stream of water or an insecticidal soap.

Germander Growing
The adaptable germander ground cover isn’t particularly picky about its location. This herb can be grown in full sun to part shade, in hot climates, or poor and rocky soil. Ideally, however, creeping germander prefers well drained soil (pH of 6.3), although clay will work in a pinch. You can grow these little plants in USDA zones 5-10. Because of its ability to tolerate less than ideal conditions, including drought, creeping germander makes an ideal xeriscape specimen. If you live in a cooler climate, mulch around the plants prior to fall frosts.

How to Use Germander Ground Cover
All of the Teucriums are low maintenance plants and are, therefore, perfect for planting in difficult areas of the garden. They all also react beautifully to pruning and can be shaped easily into borders or low hedges, used in knot gardens or among other herbs or in a rockery. Their easygoing care is just one reason to plant creeping germander; they are deer resistant as well!
Varieties of Low Growing Germanders
Teucrium canadense is just one of several germanders with a creeping habitat. A little easier to find is T. chamaedrys, or wall germander, with a short mounding form up to 1 1/2 feet tall with pinkish purple blooms and oak leaf shaped foliage. Its name derives from the Greek ‘chamai’ for ground and ‘drus’ meaning oak and is indeed a germander found growing wild in Greece and Syria. T.cossoni majoricum, or fruity germander, is a slower growing spreading perennial that is non-invasive with rosy lavender flowers. Flowers are heaviest in the spring but continue to bloom in lesser numbers until fall, which makes the pollinators very happy. Fruity germander has a strong aromatic scent when bruised and does well among rock gardens.

Further Information on Creeping Germander
Germander can be propagated via seed and takes about 30 days to germinate, or you may also use cuttings in the spring and/or divide in the fall. Plants should be spaced 6 inches apart for a hedge with the addition of some organic matter worked into the soil. Spider mite infestations are a hazard and can be eradicated with a stream of water or an insecticidal soap.
0
0
文章
Dummer. ゛☀
2017年08月25日

There is a large genus of evergreen shrubs and sub shrubs known as Teucrium, whose members are low maintenance. Members of the Lamiaceae or mint family, which also includes lavender and salvia, wood sage plants, also referred to as American germander, are one such member. So, what other info about wood sage can we uncover and how to grow American germander?
Info about Wood Sage
Wood sage (Teucrium canadense) goes by many other names too, including Canadian germander, germander wood sage and wood sage wildflower. This germander is a perennial herb native to many areas of North America.
Wood sage plants form a low creeping ground cover that is native to the United States. Growing germander wood sage can often be found in shaded to partially shaded, moist areas such as along stream banks, lake shores, marshes, prairies, ditches and pastures. Wood sage wildflowers bloom pinkish purple in the spring through late summer from 4-inch tufts of soft green leaves with fluted or ruffled edges. Blossoms are about a foot in height and are majestic swaying atop a sea of foliage. The flowers make lovely additions to cut flower arrangements. The plant spreads rapaciously along rhizomes. Perfect for covering less than habitable areas of the property, but otherwise must be kept in check. Wood sage was also once used to flavor beer before hops became in vogue.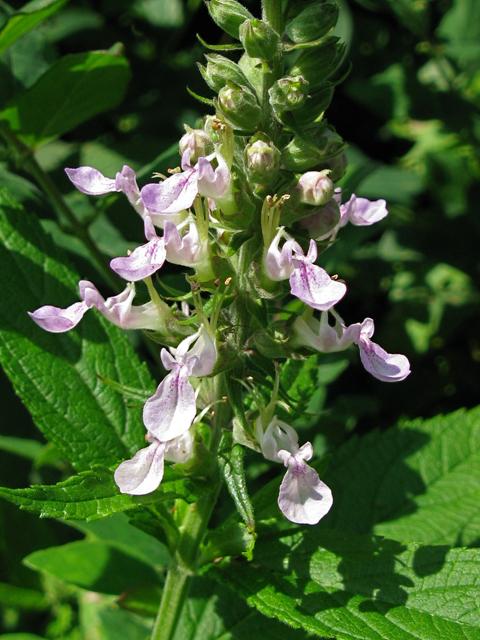
How to Grow American Germander
Wood sage wildflowers are low maintenance, easy to grow native plants. They prefer areas with more moisture or shallow, submerged soils. They are tolerant of a variety of soil, from sandy, loam, clay, limestone and combinations thereof, although they prefer fertile, loamy soil. Although American germander can tolerate poorly drained conditions, it cannot tolerate drought. Once established, growing germander wood sage really only needs consistent moisture.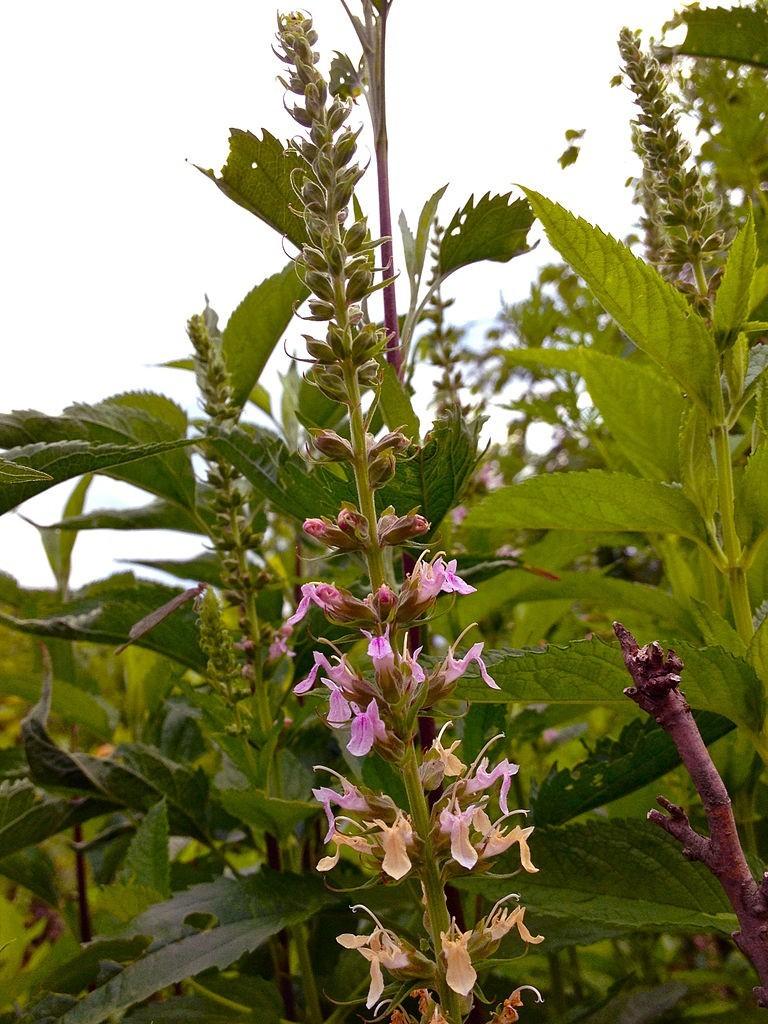
As mentioned, it will aggressively spread, so either plant it in an area that you wish to be filled in or be prepared to be aggressive yourself to retard its spread. It is susceptible to foliar disease but less so than other mint family members, such as Bergamot. Plant clumps of wood sage in part shade. American germander is an aromatic great in the perennial garden (if you manage it), or as a lovely carpeting ground cover. Deer find it uninteresting, but wood sage wildflowers are a big hit with the butterflies.

Info about Wood Sage
Wood sage (Teucrium canadense) goes by many other names too, including Canadian germander, germander wood sage and wood sage wildflower. This germander is a perennial herb native to many areas of North America.
Wood sage plants form a low creeping ground cover that is native to the United States. Growing germander wood sage can often be found in shaded to partially shaded, moist areas such as along stream banks, lake shores, marshes, prairies, ditches and pastures. Wood sage wildflowers bloom pinkish purple in the spring through late summer from 4-inch tufts of soft green leaves with fluted or ruffled edges. Blossoms are about a foot in height and are majestic swaying atop a sea of foliage. The flowers make lovely additions to cut flower arrangements. The plant spreads rapaciously along rhizomes. Perfect for covering less than habitable areas of the property, but otherwise must be kept in check. Wood sage was also once used to flavor beer before hops became in vogue.

How to Grow American Germander
Wood sage wildflowers are low maintenance, easy to grow native plants. They prefer areas with more moisture or shallow, submerged soils. They are tolerant of a variety of soil, from sandy, loam, clay, limestone and combinations thereof, although they prefer fertile, loamy soil. Although American germander can tolerate poorly drained conditions, it cannot tolerate drought. Once established, growing germander wood sage really only needs consistent moisture.

As mentioned, it will aggressively spread, so either plant it in an area that you wish to be filled in or be prepared to be aggressive yourself to retard its spread. It is susceptible to foliar disease but less so than other mint family members, such as Bergamot. Plant clumps of wood sage in part shade. American germander is an aromatic great in the perennial garden (if you manage it), or as a lovely carpeting ground cover. Deer find it uninteresting, but wood sage wildflowers are a big hit with the butterflies.
0
0


