文章
Andrea
2017年02月17日

If you want a great #vegetable #garden you need to use raised garden beds. Raised beds are great for growing healthy, productive vegetables and flowers and they’re easy to make.
Making a raised bed is a simple bit of carpentry that anyone should be able to do. The easiest way to buy some 2×12 lumber and screw them together in the shape of a rectangle. You can make them as long as you like but you should limit the width to 3 or 4 feet so you can easily reach in the bed to plant seeds, pull weeds or to harvest crops.
The next question you’re probably asking is what kind of wood do I use to build raised beds. The whole pressure treated vs. non issue is a complicated one. Does pressure treated wood leach chemicals into the soil? Well the answers are yes and maybe.

The old pressure treated lumber (CCA) is preserved with a process that uses arsenic. Obviously you don’t want arsenic anywhere near something you’re going to eat even in the small amounts that might be present in a raised bed vegetable garden. CCA wood isn’t too readily available anymore so you probably don’t have to worry about coming across it. The new improved pressure treated wood (ACQ) replace CCA pressure treated wood a few years ago. The lumber industry says it safer to handle and use but guess what? It eats through normal galvanized screws and fasteners. You have to use stainless steel screws with ACQ wood. I’m not an expert with lumber or chemicals but that sounds like something that shouldn’t be near my vegetables.
I think I’ll avoid all pressure treated wood until some long term studies are done.
Naturally rot resistant woods like cedar and redwood are great for building raised beds. But cedar and redwood are expensive. You could also use regular non-pressure treated lumber but just be aware that the wood will probably rot in a few years. It’s inexpensive enough that it shouldn’t be an issue.
If you plan on growing vegetables or flowers in your yard this year, why not try growing them in raised garden beds.
Making a raised bed is a simple bit of carpentry that anyone should be able to do. The easiest way to buy some 2×12 lumber and screw them together in the shape of a rectangle. You can make them as long as you like but you should limit the width to 3 or 4 feet so you can easily reach in the bed to plant seeds, pull weeds or to harvest crops.
The next question you’re probably asking is what kind of wood do I use to build raised beds. The whole pressure treated vs. non issue is a complicated one. Does pressure treated wood leach chemicals into the soil? Well the answers are yes and maybe.
The old pressure treated lumber (CCA) is preserved with a process that uses arsenic. Obviously you don’t want arsenic anywhere near something you’re going to eat even in the small amounts that might be present in a raised bed vegetable garden. CCA wood isn’t too readily available anymore so you probably don’t have to worry about coming across it. The new improved pressure treated wood (ACQ) replace CCA pressure treated wood a few years ago. The lumber industry says it safer to handle and use but guess what? It eats through normal galvanized screws and fasteners. You have to use stainless steel screws with ACQ wood. I’m not an expert with lumber or chemicals but that sounds like something that shouldn’t be near my vegetables.
I think I’ll avoid all pressure treated wood until some long term studies are done.
Naturally rot resistant woods like cedar and redwood are great for building raised beds. But cedar and redwood are expensive. You could also use regular non-pressure treated lumber but just be aware that the wood will probably rot in a few years. It’s inexpensive enough that it shouldn’t be an issue.
If you plan on growing vegetables or flowers in your yard this year, why not try growing them in raised garden beds.
0
0
文章
Micky
2017年02月16日

Learn how to grow bamboo from cuttings, growing bamboo from cuttings is possible if you grow it in warm temperature.
Bamboo is actually a grass, but its wood is strong enough to be used in flooring and furniture. In the garden bamboo is usually grown for its ornamental aspect or as a privacy tree as it grows quickly and mostly in clumps that can be so dense that you can not walk through them.

How to Grow Bamboo from Cuttings in WaterTo grow bamboo from cuttings in water, cut several 10 inches long cuttings from new growth that has at least two nodes and two internodes. Cut it in a slight 45 degree angle with a sharp knife.Dip the ends of cutting in melted wax. Place the cutting in water and leave it on a well lit location for several weeks.Change the water every other day as standing water will quickly run out of oxygen.Move the cutting in a pot as soon as it has 2 inches long roots. Fill the pot with potting mix or a mixture of 1 part loam to 1 part sand to improve drainage. Make a hole in soil and plant the cutting to 1 inch depth into the soil.For support tie it to a stick with string. This will stabilize the bamboo cutting until it establishes.Growing Bamboo from RhizomesTake bamboo rhizomes and cut them into portions leaving two or three growth buds on each with a gardening knife. Don’t use rhizomes with a dark and patched appearance as they will not grow well.Lay the bamboo rhizomes horizontally on pots with the buds facing up. Spread a 3 inch layer of soil over them and water thoroughly until the soil looks deeply moist.Place the container in a warm spot under light shade.

Keep the soil slightly moist consistently. Remember not to overwater the rhizome cuttings otherwise they will rot.Rhizomes will take four to six weeks to grow, you can plant them outside once nighttime temperature start to stay around 55 F.How to Grow Bamboo from Culm CuttingsCut a few cuttings from three or four years old bamboo plant in various sections with a hacksaw. Each section must contain at least one node and one internode. Remove the existing leaves in between.Fill a pot with potting mix or a mixture of equal parts of coarse sand and loam.Seal the first ridges of bamboo cuttings with wax to save them from rotting or drying. Melt the wax and simply dip it in about 1/8 inch.Pour 2 tablespoons of rooting hormone in a plastic bag and immerse the bamboo cuttings in it. Shake off the excess rooting hormone and make several holes in soil and plant cuttings in it.Cover the cuttings with clear plastic bag and set the pot in a warm area, out of direct sunlight. Water them to keep the soil moist.When you see new shoots, it means cuttings are forming roots. Continue to grow the bamboo plants in containers or plant outside when whether warms up.
Bamboo is actually a grass, but its wood is strong enough to be used in flooring and furniture. In the garden bamboo is usually grown for its ornamental aspect or as a privacy tree as it grows quickly and mostly in clumps that can be so dense that you can not walk through them.
How to Grow Bamboo from Cuttings in WaterTo grow bamboo from cuttings in water, cut several 10 inches long cuttings from new growth that has at least two nodes and two internodes. Cut it in a slight 45 degree angle with a sharp knife.Dip the ends of cutting in melted wax. Place the cutting in water and leave it on a well lit location for several weeks.Change the water every other day as standing water will quickly run out of oxygen.Move the cutting in a pot as soon as it has 2 inches long roots. Fill the pot with potting mix or a mixture of 1 part loam to 1 part sand to improve drainage. Make a hole in soil and plant the cutting to 1 inch depth into the soil.For support tie it to a stick with string. This will stabilize the bamboo cutting until it establishes.Growing Bamboo from RhizomesTake bamboo rhizomes and cut them into portions leaving two or three growth buds on each with a gardening knife. Don’t use rhizomes with a dark and patched appearance as they will not grow well.Lay the bamboo rhizomes horizontally on pots with the buds facing up. Spread a 3 inch layer of soil over them and water thoroughly until the soil looks deeply moist.Place the container in a warm spot under light shade.
Keep the soil slightly moist consistently. Remember not to overwater the rhizome cuttings otherwise they will rot.Rhizomes will take four to six weeks to grow, you can plant them outside once nighttime temperature start to stay around 55 F.How to Grow Bamboo from Culm CuttingsCut a few cuttings from three or four years old bamboo plant in various sections with a hacksaw. Each section must contain at least one node and one internode. Remove the existing leaves in between.Fill a pot with potting mix or a mixture of equal parts of coarse sand and loam.Seal the first ridges of bamboo cuttings with wax to save them from rotting or drying. Melt the wax and simply dip it in about 1/8 inch.Pour 2 tablespoons of rooting hormone in a plastic bag and immerse the bamboo cuttings in it. Shake off the excess rooting hormone and make several holes in soil and plant cuttings in it.Cover the cuttings with clear plastic bag and set the pot in a warm area, out of direct sunlight. Water them to keep the soil moist.When you see new shoots, it means cuttings are forming roots. Continue to grow the bamboo plants in containers or plant outside when whether warms up.
0
0
文章
Joss
2017年02月16日


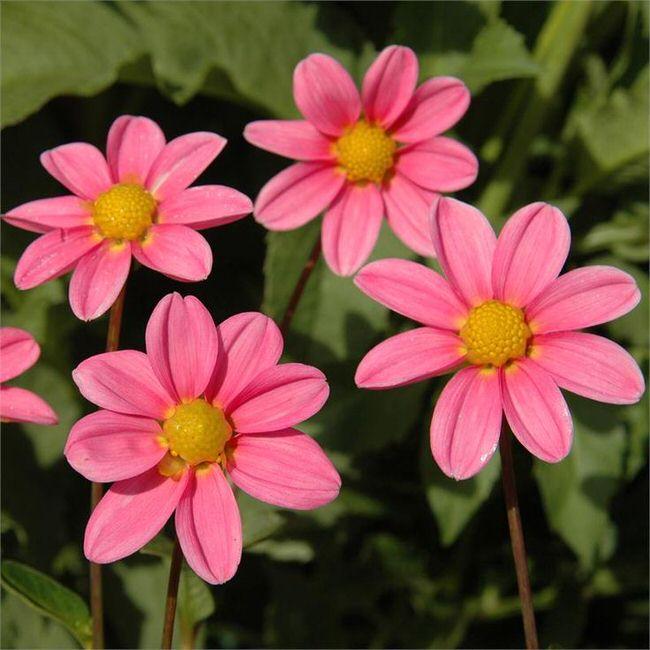
If your garden looks tired at the end of the season, but your neighbors’ is full of color and texture, chances are they may be growing dahlias. Dahlias bloom from mid summer until frost, and come in small bedding sizes to large 3 foot plants with dinner plate size blooms. They are easy to grow with a few basic guidelines and tips, and will bloom when few other things in the garden will. Did I mention they are gorgeous? Great cutting flowers and pretty in the garden. What more could you want? Here’s how to grow dahlias, the easy way!
Dahlias are most often grown from tubers (like bulbs) planted in the spring. If you want the best varieties though, be taking notice of the plants that are blooming in early fall, and take note of the variety. One way to do this is to visit a nursery and check out plants in pots. I don’t recommend planting them from pots in the fall… they just aren’t a good value for the time they will bloom before frost. Start them in the spring for a longer bloom time and healthier plants.
Choose tubers that are healthy and starting to sprout, or order online from a good quality company.
Plant in late spring after the soil is warm in full sun… don’t plant too early. A good rule of thumb is to plant when it’s safe to put tomato plants in the ground.
Plant in rich, well drained soil, so that the crown is just below the soil. Don’t water until they start to sprout out of the soil They are prone to rot.
For tall or dinner plate varieties, put several stakes around the plant, so that you can secure the heavy plant as it grows. Tomato or peony cages are good for this also, depending on the size you are growing.
Fertilize every two weeks with a bloom fertilizer. Its important that you use a fertilizer low in nitrogen, (thats the first of the three numbers on a fertilizer) because too much nitrogen will grow big plants with no blooms.
Keep well watered, but try not to water late in the evening, especially later in the fall. They can develop powdery mildew. if your area is prone to mildew (on roses, for instance) then you can use a commercial or natural anti fungal spray starting in July to prevent it.
When your plant is 6-8 inches tall, pinch off the top growing point above the third set of leaves to encourage a bushier plant. Remember to clip off dying flowers at least once a week to promote more blooms.
Dahlias can be hardy down to zone 7, but are usually treated as an annual.
If you want to lift your tubers and save them to replant next spring, do so before the first frost. Cut them back to 6 inches, and use a fork to gently pry them from the soil. Let them dry out for a few days, then store them in loose sawdust or vermiculite in an area that doesn’t freeze, such as an insulated garage.
To cut dahlias, cut them in the early morning hours. BHG has this tip for making the blooms last… “After you’ve harvested dahlia flowers, make a fresh horizontal cut at the bottom of the stem and place the cut ends in about 2-3 inches of very hot (not quite boiling) water. Let the stems stay in the water for at least one hour. This hot-water treatment conditions the stems so the blooms will last four to six days.”
That’s it! Here are some of our favorite varieties, both large and small! We recommend Swan Island Dahlias for ordering the best varieties online. Here are some of their choices…
Dreamcatcher – Grows to 4 feet with 6 inch blooms… This one is a focal point for the garden!

Tahiti Sunrise – This spiky bloomer is a smaller plant, about 2 1/2 feet tall, with 5 inch blooms.

Bonne Esperance – A variety from the ’40’s, this single blooming pink beauty shows you that not all dahlias are of the double appearance… Low growing to 12 inches, this blooms early and long for a charming bedding plant!
Emory Paul – This is a large, dinner plate variety, growing to 4 1/2 feet tall, with blooms over 10 inches across! Support is a must for this variety that is often used for exhibition. Color is amazing!

Bridezilla – Dahlias can be just as stunning without all the flashy color… this white variety with a yellow “eye” would be gorgeous in any garden and would make a wedding bouquet worthy cut flower. Tall, at 5 feet plus, the blooms are 6 inches across. My fav!

I am planning on ordering a few of these for my own garden… Do you have a dahlia experience you can share with us? Comment!
4
2
文章
Andy
2017年02月16日

Learn how to grow bay leaf laurel, it is a Mediterranean herb famous for its culinary uses. Growing bay leaf laurel requires a basic knowledge of its requirements and growing conditions.
Among the best known and most used herbs, one is bay. It has diverse uses, from simple ornamental plant in a garden to a culinary herb on a small balcony kitchen garden. Leaves of this small tree are aromatic and emit intense scent that complements most of the Mediterranean cuisines.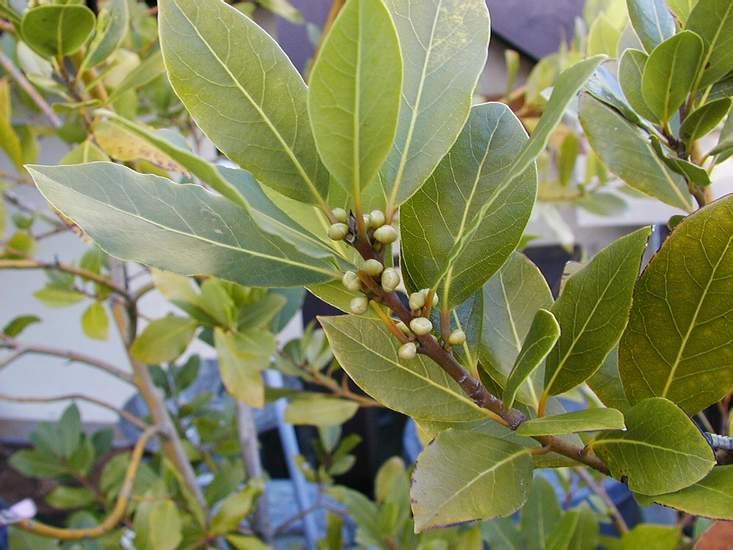
Among the best known and most used herbs, one is bay. It has diverse uses, from simple ornamental plant in a garden to a culinary herb on a small balcony kitchen garden. Leaves of this small tree are aromatic and emit intense scent that complements most of the Mediterranean cuisines.
0
0
文章
Andy
2017年02月15日
Turmeric is a superfood and has many medicinal benefits. Growing turmeric in pots is not so difficult if you follow this how-to guide.

USDA Zones— 7b – 11, below these zones grow it from spring to fall
Difficulty— Easy to Moderate
Other Names— Curcuma, Curcuma aromatica, Curcuma domestica, Curcumae longa, Curcumae Longae Rhizoma, Curcumin, Curcumine, Curcuminoid, Curcuminoïde, Curcuminoïdes, Curcuminoids, Halada, Haldi, Haridra, Indian Saffron, Nisha, Pian Jiang Huang, Racine de Curcuma, Radix Curcumae, Rajani, Rhizoma Cucurmae Longae, Safran Bourbon, Safran de Batallita, Safran des Indes, Turmeric Root, Yu Jin.
Soil pH— Slightly acidic to slightly alkaline soil
Turmeric (Curcuma longa) is obtained from the underground tubers or rhizomes. Originated in India, it is now cultivated throughout the tropical Asia and in smaller extent in other subtropical and tropical parts of the world.
Turmeric plants look good too, you can grow them outdoors to get a tropical look in your garden.

Where to Find the Rhizome or Turmeric Plant
As you may already know, turmeric grows from the rhizomes like ginger. The easiest way to find them is to search for fresh turmeric rhizome in organic food stores. Also, try searching for it in the local garden center or seed store. Alternatively, you can find a turmeric plant or rhizome online.
Choosing a Pot
For growing turmeric in pots, choose a large pot as this amazing herb can easily exceed the height of 1 m. Pot should be at least 12 inches deep and 12-18 inches wide so that the plant can spread its tubers freely. Plant 1 or 2 rhizomes in such a pot.
Planting Turmeric
The best season to plant turmeric is spring or summer when the temperature starts to stay above 54 F (12 C), but if you are living in tropics, it can be planted throughout the year.
After you have got the rhizome follow the steps below for planting:
Break large rhizome into small pieces, each one should have at least two or three buds.Fill a pot with rich organic soil that is moist and well-drained.Place it about 2 inches (5 cm) below the soil surface, with the buds facing up.Water the pot thoroughly.Requirements for Growing Turmeric in Containers

Growing turmeric is similar to ginger, it requires warm and humid climate to thrive. If you live in a cool temperate climate or if you’re short of space and want to grow your own turmeric rhizomes then learn how to grow turmeric in pots.
Position
The position must be sheltered from the wind. In tropics, the plant is grown in dappled shade and does not like all day long intense direct sun, considering this keep the turmeric plant in partial sun in the warmer zones (USDA Zone 9 and above). However, in temperate climates, provide it full sun for optimum growth, some shade in the afternoon would be okay.
Soil
Plant turmeric in a light and loamy soil that is rich in organic matters. Use well-drained soil otherwise the plant will suffer.
Water
Watering requirements are similar to ginger. Keep the soil moist throughout the growing season from spring to fall and do not hesitate to mist the foliage in dry weather to increase the humidity level around the plant.
If growing turmeric in a warmer region, keep watering the plant to maintain moist soil in winters too.
Temperature
The ideal temperature range for growing turmeric is between 68-95 F (20-35 C). When the temperature drop below 50 F (10 C) the plant suffers.
Turmeric Plant Care
Overwintering
Since you are growing turmeric in a pot, move the plant inside even in low-light conditions. Because you have to only overwinter the roots. It is important that when you grow turmeric indoors maintain a constant ambient temperature of approximately 64 F (18 C).
Overwintering turmeric on ground
If you’re growing turmeric in true tropical climate then you don’t need to care about winter. But in warm temperate zones (below USDA Zones 9b and down to 7) to overwinter your turmeric plants, reduce watering around the end of fall and when the leaves begin to wilt and turn yellow due to temperature drop cut the plant back to the ground so that it can hibernate. It will perk up again in the spring.
If you want to grow turmeric in cooler areas (below zone 7) then you have to dig up the rhizomes to save them from freezing. For this, dig up the rhizomes and rinse off excess soil from them, snap off rotting pieces. Air dry them and store in a cool and dry place until spring.
Fertilizer
Fertilize turmeric every month with an all-purpose liquid fertilizer during the growing season. Application of manure or compost also helps.
Pruning
The turmeric plant should not be pruned. It is sufficient if you remove dried leaves time to time.
Pests and Diseases
Turmeric plant is not prone to any serious disease or pests. However, red spider mites and scales can become a problem. In diseases, it only suffers from rhizome rot and leaf spot. Rot appears when the plant is grown in waterlogged soil. Therefore, it is important to grow turmeric in well-drained soil.
Harvesting
Turmeric plant takes 8 to 10 months to mature. Harvesting is done once the leaves become yellow and stems start to dry. Harvesting turmeric is not difficult, simply dig up the plant entirely, including the roots.
Cut the required amount and then replant the remaining part again to get a new plant growing.
After you cut the rhizome, follow the steps below to process it:
Boil the rhizomes.Carefully remove the skin from rhizomes.Place the bare rhizomes in a tray.Dry them by exposing to sunlight.
When the rhizomes are dry, grind them and store your homemade organic fresh turmeric powder in an air tight container.
Turmeric Uses and Benefits
Turmeric powder has many medicinal properties that have long been known in the India and China. Turmeric is termed as ‘Super Food‘ probably the most powerful natural anti-inflammatory and antioxidant. It is used as an anti-depressant and plays a protective role against Alzheimer’s disease and against different types of cancers. Turmeric powder is the most prominent ingredient in almost all kind of curry recipes, a pinch of it is used to provide pretty orange color. Its leaves are also useful. Young shoots and flowers are used in Thai cuisines while the leaves are used to flavor the fish in Indonesia.
One thing you did not know and surprise you is the addition of pepper in a diet as it contains piperine helps in the absorption of turmeric. Especially the black pepper, it can tenfold the benefits of this superfood.
USDA Zones— 7b – 11, below these zones grow it from spring to fall
Difficulty— Easy to Moderate
Other Names— Curcuma, Curcuma aromatica, Curcuma domestica, Curcumae longa, Curcumae Longae Rhizoma, Curcumin, Curcumine, Curcuminoid, Curcuminoïde, Curcuminoïdes, Curcuminoids, Halada, Haldi, Haridra, Indian Saffron, Nisha, Pian Jiang Huang, Racine de Curcuma, Radix Curcumae, Rajani, Rhizoma Cucurmae Longae, Safran Bourbon, Safran de Batallita, Safran des Indes, Turmeric Root, Yu Jin.
Soil pH— Slightly acidic to slightly alkaline soil
Turmeric (Curcuma longa) is obtained from the underground tubers or rhizomes. Originated in India, it is now cultivated throughout the tropical Asia and in smaller extent in other subtropical and tropical parts of the world.
Turmeric plants look good too, you can grow them outdoors to get a tropical look in your garden.
Where to Find the Rhizome or Turmeric Plant
As you may already know, turmeric grows from the rhizomes like ginger. The easiest way to find them is to search for fresh turmeric rhizome in organic food stores. Also, try searching for it in the local garden center or seed store. Alternatively, you can find a turmeric plant or rhizome online.
Choosing a Pot
For growing turmeric in pots, choose a large pot as this amazing herb can easily exceed the height of 1 m. Pot should be at least 12 inches deep and 12-18 inches wide so that the plant can spread its tubers freely. Plant 1 or 2 rhizomes in such a pot.
Planting Turmeric
The best season to plant turmeric is spring or summer when the temperature starts to stay above 54 F (12 C), but if you are living in tropics, it can be planted throughout the year.
After you have got the rhizome follow the steps below for planting:
Break large rhizome into small pieces, each one should have at least two or three buds.Fill a pot with rich organic soil that is moist and well-drained.Place it about 2 inches (5 cm) below the soil surface, with the buds facing up.Water the pot thoroughly.Requirements for Growing Turmeric in Containers
Growing turmeric is similar to ginger, it requires warm and humid climate to thrive. If you live in a cool temperate climate or if you’re short of space and want to grow your own turmeric rhizomes then learn how to grow turmeric in pots.
Position
The position must be sheltered from the wind. In tropics, the plant is grown in dappled shade and does not like all day long intense direct sun, considering this keep the turmeric plant in partial sun in the warmer zones (USDA Zone 9 and above). However, in temperate climates, provide it full sun for optimum growth, some shade in the afternoon would be okay.
Soil
Plant turmeric in a light and loamy soil that is rich in organic matters. Use well-drained soil otherwise the plant will suffer.
Water
Watering requirements are similar to ginger. Keep the soil moist throughout the growing season from spring to fall and do not hesitate to mist the foliage in dry weather to increase the humidity level around the plant.
If growing turmeric in a warmer region, keep watering the plant to maintain moist soil in winters too.
Temperature
The ideal temperature range for growing turmeric is between 68-95 F (20-35 C). When the temperature drop below 50 F (10 C) the plant suffers.
Turmeric Plant Care
Overwintering
Since you are growing turmeric in a pot, move the plant inside even in low-light conditions. Because you have to only overwinter the roots. It is important that when you grow turmeric indoors maintain a constant ambient temperature of approximately 64 F (18 C).
Overwintering turmeric on ground
If you’re growing turmeric in true tropical climate then you don’t need to care about winter. But in warm temperate zones (below USDA Zones 9b and down to 7) to overwinter your turmeric plants, reduce watering around the end of fall and when the leaves begin to wilt and turn yellow due to temperature drop cut the plant back to the ground so that it can hibernate. It will perk up again in the spring.
If you want to grow turmeric in cooler areas (below zone 7) then you have to dig up the rhizomes to save them from freezing. For this, dig up the rhizomes and rinse off excess soil from them, snap off rotting pieces. Air dry them and store in a cool and dry place until spring.
Fertilizer
Fertilize turmeric every month with an all-purpose liquid fertilizer during the growing season. Application of manure or compost also helps.
Pruning
The turmeric plant should not be pruned. It is sufficient if you remove dried leaves time to time.
Pests and Diseases
Turmeric plant is not prone to any serious disease or pests. However, red spider mites and scales can become a problem. In diseases, it only suffers from rhizome rot and leaf spot. Rot appears when the plant is grown in waterlogged soil. Therefore, it is important to grow turmeric in well-drained soil.
Harvesting
Turmeric plant takes 8 to 10 months to mature. Harvesting is done once the leaves become yellow and stems start to dry. Harvesting turmeric is not difficult, simply dig up the plant entirely, including the roots.
Cut the required amount and then replant the remaining part again to get a new plant growing.
After you cut the rhizome, follow the steps below to process it:
Boil the rhizomes.Carefully remove the skin from rhizomes.Place the bare rhizomes in a tray.Dry them by exposing to sunlight.
When the rhizomes are dry, grind them and store your homemade organic fresh turmeric powder in an air tight container.
Turmeric Uses and Benefits
Turmeric powder has many medicinal properties that have long been known in the India and China. Turmeric is termed as ‘Super Food‘ probably the most powerful natural anti-inflammatory and antioxidant. It is used as an anti-depressant and plays a protective role against Alzheimer’s disease and against different types of cancers. Turmeric powder is the most prominent ingredient in almost all kind of curry recipes, a pinch of it is used to provide pretty orange color. Its leaves are also useful. Young shoots and flowers are used in Thai cuisines while the leaves are used to flavor the fish in Indonesia.
One thing you did not know and surprise you is the addition of pepper in a diet as it contains piperine helps in the absorption of turmeric. Especially the black pepper, it can tenfold the benefits of this superfood.
4
1
文章
Andy
2017年02月15日
Learn how to grow cilantro in a pot. Growing cilantro in containers is not difficult all you need is to follow a few tips and fulfill a few growing requirements.

Cilantro is a highly aromatic herb that is used to enhance the flavor of many South-East Asian and Mexican cuisines and as a dressing to improve the appearance of meal served. Most of the people tend to think that cilantro is one of the most difficult herbs to grow but that’s not true. However, it is little but easy to grow if you follow the way of growing cilantro.
Choosing A Pot
Mostly people choose too shallow pots for growing cilantro but that’s a mistake. Similar to dill, cilantro needs a pot that is deep and wide. For growing cilantro in a pot, choose one that is 18 inches wide and at least 10-12 inches deep, this would be a perfect size.
Best Cilantro Planting Time
Start cilantro once all the dangers of frost are passed. You can grow cilantro successively from spring to fall. In warm temperates and much hotter regions (USDA Zone 8 and above) you can grow cilantro in winters too. Cilantro can tolerate light frost easily. Below the zone 8, in much cooler regions, you can grow cilantro in cold frames and overwinter it.
In warm tropical climate (USDA Zone 10-11), cilantro grows best in fall and winter. However, it can be grown year round in such climate as in many tropical countries fresh cilantro leaves are available all year but you’ll need to cope with the bolting problem. You may need to harvest quickly and provide shade in spring and summer.
Growing Cilantro From Seeds
It is better if you sow the seeds directly in a pot in which you like to grow the plants later as cilantro has long taproot and it doesn’t transplant well, especially when the plant grows up slightly. Sow seeds 1/4 inches deep. Keep the soil moist until the seedlings germinate. If you have grown them in the seed tray, once the plants have formed 2-3 leaves, plant them to their final location in a pot.
If you’re planting grocery store seeds, gently crush the seed husk before sowing. As cilantro seeds are enclosed in a husk that you’ll need to crush to improve the germination rate.Requirements For Growing Cilantro In Pot

Location
It is a plant that grows best in the sun. But be careful, too much heat will make it go to seed quickly. In summer (or in warm climates) place it in a position that receives shade in the afternoon.
Watering
Cilantro likes evenly moist soil. When watering, make sure you never wet the foliage as cilantro is really susceptible to powdery mildew.
Soil
Neutral soil that is very rich in organic matter and crumbly in texture helps this plant to grow. Also, the addition of aged manure or compost provide a good steady supply of nitrogen and other trace elements, thus promotes the vegetative growth.
Spacing
You can grow cilantro plants thickly but for optimum growth space the plants 4 inches apart.
Cilantro Plant Care
Fertilizer
Feed the cilantro bimonthly with any half strength nitrogen-rich fertilizer to promote the foliage growth. You don’t need to fertilize your cilantro plants much if you side dress them with compost or manure. Also, the application of fish emulsion is recommended.
Deadheading
Inspect your cilantro plants every day to see if the flowers are appearing, deadhead them regularly to promote the production of leaves. However, you can leave them if you want your plants to seed.
Problem With Coriander/Cilantro:
The recurring problem with cilantro is bolting.
The plant eventually goes to seed but a lot earlier in hot weather. Flowers start to appear quickly, then giving way to seed and after seeding the plant dies.
The best solution for this problem is to sow seeds successively, plant seeds every other week to get a regular harvest. Also, once the plant starts to bolt pinch the top of it to slow down the process.
Pests And Diseases
In pests, look out for aphids. Mildew is the most common disease that kills this herb, more consistently occurs in humid warm weather.
To prevent powdery mildew, keep a good distance between the plants, provide good air circulation and avoid overhead watering, wetting the leaves also promote the growth of many other fungal infections.
Harvesting
You can start to harvest young cilantro leaves too early, about 3-4 weeks after sowing seeds. Leaves can be picked from the plant when they have reached 3-6 inches in length.
If you want to harvest the entire plant you should wait at least 45-70 days. Cutting the entire plant at soil level or 2 inches above the crown.
Cilantro is a highly aromatic herb that is used to enhance the flavor of many South-East Asian and Mexican cuisines and as a dressing to improve the appearance of meal served. Most of the people tend to think that cilantro is one of the most difficult herbs to grow but that’s not true. However, it is little but easy to grow if you follow the way of growing cilantro.
Choosing A Pot
Mostly people choose too shallow pots for growing cilantro but that’s a mistake. Similar to dill, cilantro needs a pot that is deep and wide. For growing cilantro in a pot, choose one that is 18 inches wide and at least 10-12 inches deep, this would be a perfect size.
Best Cilantro Planting Time
Start cilantro once all the dangers of frost are passed. You can grow cilantro successively from spring to fall. In warm temperates and much hotter regions (USDA Zone 8 and above) you can grow cilantro in winters too. Cilantro can tolerate light frost easily. Below the zone 8, in much cooler regions, you can grow cilantro in cold frames and overwinter it.
In warm tropical climate (USDA Zone 10-11), cilantro grows best in fall and winter. However, it can be grown year round in such climate as in many tropical countries fresh cilantro leaves are available all year but you’ll need to cope with the bolting problem. You may need to harvest quickly and provide shade in spring and summer.
Growing Cilantro From Seeds
It is better if you sow the seeds directly in a pot in which you like to grow the plants later as cilantro has long taproot and it doesn’t transplant well, especially when the plant grows up slightly. Sow seeds 1/4 inches deep. Keep the soil moist until the seedlings germinate. If you have grown them in the seed tray, once the plants have formed 2-3 leaves, plant them to their final location in a pot.
If you’re planting grocery store seeds, gently crush the seed husk before sowing. As cilantro seeds are enclosed in a husk that you’ll need to crush to improve the germination rate.Requirements For Growing Cilantro In Pot
Location
It is a plant that grows best in the sun. But be careful, too much heat will make it go to seed quickly. In summer (or in warm climates) place it in a position that receives shade in the afternoon.
Watering
Cilantro likes evenly moist soil. When watering, make sure you never wet the foliage as cilantro is really susceptible to powdery mildew.
Soil
Neutral soil that is very rich in organic matter and crumbly in texture helps this plant to grow. Also, the addition of aged manure or compost provide a good steady supply of nitrogen and other trace elements, thus promotes the vegetative growth.
Spacing
You can grow cilantro plants thickly but for optimum growth space the plants 4 inches apart.
Cilantro Plant Care
Fertilizer
Feed the cilantro bimonthly with any half strength nitrogen-rich fertilizer to promote the foliage growth. You don’t need to fertilize your cilantro plants much if you side dress them with compost or manure. Also, the application of fish emulsion is recommended.
Deadheading
Inspect your cilantro plants every day to see if the flowers are appearing, deadhead them regularly to promote the production of leaves. However, you can leave them if you want your plants to seed.
Problem With Coriander/Cilantro:
The recurring problem with cilantro is bolting.
The plant eventually goes to seed but a lot earlier in hot weather. Flowers start to appear quickly, then giving way to seed and after seeding the plant dies.
The best solution for this problem is to sow seeds successively, plant seeds every other week to get a regular harvest. Also, once the plant starts to bolt pinch the top of it to slow down the process.
Pests And Diseases
In pests, look out for aphids. Mildew is the most common disease that kills this herb, more consistently occurs in humid warm weather.
To prevent powdery mildew, keep a good distance between the plants, provide good air circulation and avoid overhead watering, wetting the leaves also promote the growth of many other fungal infections.
Harvesting
You can start to harvest young cilantro leaves too early, about 3-4 weeks after sowing seeds. Leaves can be picked from the plant when they have reached 3-6 inches in length.
If you want to harvest the entire plant you should wait at least 45-70 days. Cutting the entire plant at soil level or 2 inches above the crown.
2
1
文章
Andy
2017年02月15日
Love growing herbs? But have you tried to preserve and store them? Here’re the best ways to HARVEST, preserve, and store herbs. Must see!
Summer is a great time to replenish stocks of herbs in our kitchen shelves and pantries. Thanks to the cheerful warm and sunny weather, in that season many herbs achieves the strongest aroma as well as essential oils. Therefore, it is important to learn how to harvest herbs at an appropriate time and how to dry and store them collectively to keep as much of their flavor.
How and When to Harvest Herbs

Leaves
Generally, most herbs have the best flavor and fragrance before flowering. So make sure to harvest them before the flowering. As a rule of thumb, never harvest more than one-third of the entire aerial growth at one time so that the plant can recover again. Although, exception are some fast growing herbs like chives and mint (or any other particular herb that grows best in your region) that can be harvested more aggressively. The leaves are collected according to the characteristics of the plant, for example– Harvest the top set of basil leaves to keep it bushy, while for parsley the outer leaves should be harvested first.
The best time of day to harvest herbs is the late morning or early afternoon after the dew has dried off (which can promote fungus after harvesting), but it must be done before the intense midday sun.
Seeds
To harvest herbs grown for their seeds, say– dill, fennel, cumin, coriander, and caraway; wait for a dry day and when the seedpods are dry and brittle. Shake the ripened seed pod into a paper bag, label it and store it in a dry place.
Flowers
Harvest herb flowers just as they start to open. The flowers, like those of nasturtium, borage, chives, cilantro or fennel are mainly used as a flavoring when fresh. Lavender, chamomile, and bergamot etc. can be harvested the same way you read about harvesting the leaves. Learn how to store and harvest chamomile here.
Preserving Herbs
Before proceeding with any of the following methods given below, you must take into account some basic steps before herbs are preserved properly. First, make sure that the leaves (or any other part) are pest and disease free. Also, it is important to give a quick wash: it is necessary to remove dust and maintain the essential oils. After this, shake the herbs first to remove excess water and clean them gently with a soft, clean cloth or paper towel. If, in case you’re drying roots too, wash them thoroughly, use a vegetable brush to scrub them.
1. Drying Herbs

One of the most commonly used methods to preserve herbs is drying them. The most important rule is to dry herbs in the shortest possible time, this is to keep the maximum content of essential oils and active substances inside them.
Also, tender leaf herbs such as basil, lemon balm, mint, oregano, and tarragon will mold due to their high moisture content if not dried quickly. For this, spread the herbs in a thin layer on a double layer of paper towel or newspaper and leave them until they dry out completely (during this time rotate them regularly). The place should be shady, cool, dry, well-ventilated and airy.
Note: Herbs can be dried outside in the sun but for the better flavor and color and to save the essential oils it is better to dry them indoors.
If you have a dry and shady attic that is clean, you should hang in there cut stalks of herbs tied in loose bunches. The stalks in these conditions will slowly dry out without losing the valuable components.
Drying Herbs in a Microwave
Another solution for drying of leaves and roots is to use the microwave oven. Its use will significantly reduce the time required for drying.
Place a really thin layer of herb branches on a paper towel over a microwave safe plate or tray.Now, lay another paper towel on top of herbs.Set the microwave on high for a couple of minutes, keep checking every 30 seconds to stop if the herbs start to burn.Do this until the herbs dry out completely.Drying Seeds
The seeds should be dried in brown paper bags at room temperature for 2 to 3 weeks, well protected from the moisture.
Drying Roots
Unearth the plant carefully and thoroughly wash the root to remove all dirt. (Use brush if necessary). Cut the roots into pieces and place them on a rack to dry them either in the sun or indoors in some warm dry place until crisp. You can also tie roots in bunches and hang to let them dry.
2. Freezing Herbs

A completely different method of fixation is the use of very low temperatures. The herbs remain frozen are comparably much fresh than subjected to drying and at the same time they are convenient to use too.
Excellent way to store herbs is to freeze chopped herbs in the ice cubes. Read this excellent article on Gardener’s world.
Freezing Herbs in Oil

Preserving herbs in olive oil is one of the best kitchen tricks— it takes almost no effort but still infuses a lot of flavor into a dish. It makes the perfect addition to winter and fall stews, roasts, soups, and it’s the perfect way to top mashed potatoes. You can use these little cubes of deliciousness in just about anything, and you’ll be so pumped that you took 10 minutes to whip them up while herbs were in abundance. Read more of this on The Pioneer Woman.
Please remember, if you freeze a number of different herbs, it is worth to mark trays or containers in which you’re keeping them
3. Preserving Herbs in Vinegar

Preserving herbs in vinegar is one of the best ways to store and preserve herbs. Herbal vinegar makes great additions to salad dressings, fresh or sautéed vegetables, and make great gifts as well. All you will need are fresh herbs, vinegar, and canning jars. Use about 4 cups of fresh herbs to a gallon of vinegar, more if you want a stronger flavor. Check out this post to learn how to do it.
4. Preserving Herbs with Salt or Sugar

Preserving herbs with salt or sugar is an old and traditional but less popular method these days. You can also use flavored sugar or salt to preserve your garden herbs. Check out the tutorial here.
Summer is a great time to replenish stocks of herbs in our kitchen shelves and pantries. Thanks to the cheerful warm and sunny weather, in that season many herbs achieves the strongest aroma as well as essential oils. Therefore, it is important to learn how to harvest herbs at an appropriate time and how to dry and store them collectively to keep as much of their flavor.
How and When to Harvest Herbs
Leaves
Generally, most herbs have the best flavor and fragrance before flowering. So make sure to harvest them before the flowering. As a rule of thumb, never harvest more than one-third of the entire aerial growth at one time so that the plant can recover again. Although, exception are some fast growing herbs like chives and mint (or any other particular herb that grows best in your region) that can be harvested more aggressively. The leaves are collected according to the characteristics of the plant, for example– Harvest the top set of basil leaves to keep it bushy, while for parsley the outer leaves should be harvested first.
The best time of day to harvest herbs is the late morning or early afternoon after the dew has dried off (which can promote fungus after harvesting), but it must be done before the intense midday sun.
Seeds
To harvest herbs grown for their seeds, say– dill, fennel, cumin, coriander, and caraway; wait for a dry day and when the seedpods are dry and brittle. Shake the ripened seed pod into a paper bag, label it and store it in a dry place.
Flowers
Harvest herb flowers just as they start to open. The flowers, like those of nasturtium, borage, chives, cilantro or fennel are mainly used as a flavoring when fresh. Lavender, chamomile, and bergamot etc. can be harvested the same way you read about harvesting the leaves. Learn how to store and harvest chamomile here.
Preserving Herbs
Before proceeding with any of the following methods given below, you must take into account some basic steps before herbs are preserved properly. First, make sure that the leaves (or any other part) are pest and disease free. Also, it is important to give a quick wash: it is necessary to remove dust and maintain the essential oils. After this, shake the herbs first to remove excess water and clean them gently with a soft, clean cloth or paper towel. If, in case you’re drying roots too, wash them thoroughly, use a vegetable brush to scrub them.
1. Drying Herbs
One of the most commonly used methods to preserve herbs is drying them. The most important rule is to dry herbs in the shortest possible time, this is to keep the maximum content of essential oils and active substances inside them.
Also, tender leaf herbs such as basil, lemon balm, mint, oregano, and tarragon will mold due to their high moisture content if not dried quickly. For this, spread the herbs in a thin layer on a double layer of paper towel or newspaper and leave them until they dry out completely (during this time rotate them regularly). The place should be shady, cool, dry, well-ventilated and airy.
Note: Herbs can be dried outside in the sun but for the better flavor and color and to save the essential oils it is better to dry them indoors.
If you have a dry and shady attic that is clean, you should hang in there cut stalks of herbs tied in loose bunches. The stalks in these conditions will slowly dry out without losing the valuable components.
Drying Herbs in a Microwave
Another solution for drying of leaves and roots is to use the microwave oven. Its use will significantly reduce the time required for drying.
Place a really thin layer of herb branches on a paper towel over a microwave safe plate or tray.Now, lay another paper towel on top of herbs.Set the microwave on high for a couple of minutes, keep checking every 30 seconds to stop if the herbs start to burn.Do this until the herbs dry out completely.Drying Seeds
The seeds should be dried in brown paper bags at room temperature for 2 to 3 weeks, well protected from the moisture.
Drying Roots
Unearth the plant carefully and thoroughly wash the root to remove all dirt. (Use brush if necessary). Cut the roots into pieces and place them on a rack to dry them either in the sun or indoors in some warm dry place until crisp. You can also tie roots in bunches and hang to let them dry.
2. Freezing Herbs
A completely different method of fixation is the use of very low temperatures. The herbs remain frozen are comparably much fresh than subjected to drying and at the same time they are convenient to use too.
Excellent way to store herbs is to freeze chopped herbs in the ice cubes. Read this excellent article on Gardener’s world.
Freezing Herbs in Oil
Preserving herbs in olive oil is one of the best kitchen tricks— it takes almost no effort but still infuses a lot of flavor into a dish. It makes the perfect addition to winter and fall stews, roasts, soups, and it’s the perfect way to top mashed potatoes. You can use these little cubes of deliciousness in just about anything, and you’ll be so pumped that you took 10 minutes to whip them up while herbs were in abundance. Read more of this on The Pioneer Woman.
Please remember, if you freeze a number of different herbs, it is worth to mark trays or containers in which you’re keeping them
3. Preserving Herbs in Vinegar
Preserving herbs in vinegar is one of the best ways to store and preserve herbs. Herbal vinegar makes great additions to salad dressings, fresh or sautéed vegetables, and make great gifts as well. All you will need are fresh herbs, vinegar, and canning jars. Use about 4 cups of fresh herbs to a gallon of vinegar, more if you want a stronger flavor. Check out this post to learn how to do it.
4. Preserving Herbs with Salt or Sugar
Preserving herbs with salt or sugar is an old and traditional but less popular method these days. You can also use flavored sugar or salt to preserve your garden herbs. Check out the tutorial here.
1
1
文章
Andy
2017年02月15日
Want to grow an Indoor Herb Garden? Learn everything you need to know in these 7 INFOGRAPHICS that’ll teach you everything about growing herbs indoors.
Growing an indoor herb garden is the best way to grow your own herbs if you don’t have space outdoors.
1. Growing Herbs From Seeds

Starting herb seeds successfully either indoor or outdoor requires a number of things including ample light, quality growing medium, moisture, the right temperature, air circulation, and the MOST important thing– lots of patience. Save and use the infographic given above to learn how to start herb seeds.
2. Herb Planting Tips

Use this infographic to learn about a few basic herb planting tips.
3. How To Grow Your Own Indoor Herb Garden

Source: Chadwicks
If you live in an apartment the best way to always have fresh herbs is to make your very own indoor herb garden or if you have a balcony you can create a Balcony Herb Garden. Also, Chadwicks have put together this perfect infographic to help you successfully grow your own indoor herb garden.
4. Light Requirements Of Indoor Herbs

Source: The Growers Exchange
Check out this comprehensive infographic on light requirements of indoor herbs. This infographic will help you ensure that your indoor herbs are receiving proper amount of light so that you’ll get bountiful and flavourful harvest.
5. Easiest Herbs To Grow Indoors

Source: Desima
If you are just beginning with indoor herb gardening it is worth to grow easiest herbs first to ensure successful harvest. This great infographic will help you in choosing the easiest herbs to grow.
6. Guide To Flavoring With Herbs

Source: Cooksmarts
This infographic is about storing and using herbs in cooking. To help you get cooking with herbs and learn how to keep them fresh, take help of this infographic. It will tell you all about herbs and their flavors, when to use fresh herbs and dried herbs and how to properly store them so that they’ll last longer.
7. How To Create A Windowsill Herb Garden

Source: TheTruthAboutCancer
This inforgraphic is about the herbs you can grow on the windowsill, to learn more you can read our guide on Windowsill Herb Gardening.
Growing an indoor herb garden is the best way to grow your own herbs if you don’t have space outdoors.
1. Growing Herbs From Seeds
Starting herb seeds successfully either indoor or outdoor requires a number of things including ample light, quality growing medium, moisture, the right temperature, air circulation, and the MOST important thing– lots of patience. Save and use the infographic given above to learn how to start herb seeds.
2. Herb Planting Tips
Use this infographic to learn about a few basic herb planting tips.
3. How To Grow Your Own Indoor Herb Garden
Source: Chadwicks
If you live in an apartment the best way to always have fresh herbs is to make your very own indoor herb garden or if you have a balcony you can create a Balcony Herb Garden. Also, Chadwicks have put together this perfect infographic to help you successfully grow your own indoor herb garden.
4. Light Requirements Of Indoor Herbs
Source: The Growers Exchange
Check out this comprehensive infographic on light requirements of indoor herbs. This infographic will help you ensure that your indoor herbs are receiving proper amount of light so that you’ll get bountiful and flavourful harvest.
5. Easiest Herbs To Grow Indoors
Source: Desima
If you are just beginning with indoor herb gardening it is worth to grow easiest herbs first to ensure successful harvest. This great infographic will help you in choosing the easiest herbs to grow.
6. Guide To Flavoring With Herbs
Source: Cooksmarts
This infographic is about storing and using herbs in cooking. To help you get cooking with herbs and learn how to keep them fresh, take help of this infographic. It will tell you all about herbs and their flavors, when to use fresh herbs and dried herbs and how to properly store them so that they’ll last longer.
7. How To Create A Windowsill Herb Garden
Source: TheTruthAboutCancer
This inforgraphic is about the herbs you can grow on the windowsill, to learn more you can read our guide on Windowsill Herb Gardening.
2
1
文章
Andy
2017年02月15日
Fragrant, fast-growing, and one of the most used culinary herbs– Mint can be grown indoors. Growing mint indoors is easy and doesn’t require many efforts!
Herbs can be grown indoors and mint is one of them. However, mint (or any other herb) growing indoors can’t grow as vigorously as outdoors. Still, you can enjoy those freshly picked leaves year-round, even in winters!

Growing Mint in Water
It is also possible, to grow mint in water all you need to do is to take tip cuttings of about 5-6 inches length from an established mint plant. Remove the bottom leaves and place the cuttings in a water-filled glass or bottle. Keep the bottle in a cool spot that is bright and receives indirect light. Keep changing the water every other day. The cutting will develop a few leaves and last for several days, you can either plant it in a container filled with soil or use it.
Requirements For Growing Mint Indoors
Growing mint indoors is rewarding, it complements vegetables, salads, yogurt, and meat and freshly picked leaves taste so great. Also, if you want to make an Indoor Herb Garden, mint is the best herb, to begin with.
There are about 600 mint species to choose from, grow which one you like most!
There are a few simple needs you need to care about– use a medium sized pot (2-3 gallon would be fine) when growing mint in containers, a wide planter is good as mint spread through runners and it’ll give space to plant to cover.
Location
Mint can tolerate some shade outside but it needs a minimum 3-4 hour of direct sunlight to grow well. Choose a location where this can receive that much sun and proper air circulation. Near a window or door, if you can keep it on a windowsill or on a balcony it would be best!
Also Read: Windowsill Herb Garden
Soil
Quality potting mix that is light and soilless is what you need to grow mint indoors. You can also make it yourself:
Combine 4-6 parts peat moss, 1 part perlite and 1 part vermiculite. If adding nutrients, blend 1/2 cup each bone meal, oyster shell lime (raises pH) and cottonseed meal/canola meal per 8 gallons of potting mix.ORFollow this basic recipe– Add 1 part peat moss or coco peat, 1 part perlite (sand if you don’t have access to perlite), 1 part compost, 1 part sterile garden soil (optional).Water
Mint loves moist soil, remember, moist soil not overly wet. You should be careful (especially in winter) with watering and don’t soak the plant both in the morning and evening to pamper it. Just keep the plant well watered and slightly moist. Both underwatering and overwatering should be avoided.
Fertilizer
Herbs growing indoors or anywhere shouldn’t be fertilized heavily or else they lose flavor. Feeding the mint plant occasionally using water-soluble all-purpose fertilizer should be enough. You can also mulch the top layer of the pot with compost or manure.
How to Care for Indoor Mint Plant

Pinching and Pruning
Pinch off the tips regularly to encourage the plant to grow more branches and become bushier. Prune off the lanky, spindly and dried branches time to time to keep the plant in shape.
Temperature
Mint loves moderate temperature, it should be saved from cold drafts in temperates. If you live in a warm tropical climate keep it away from hot and dry air, also, you’ll need to water the plant regularly. The indoor temperature should be around at least 65-70 F (18-21 C) in day and 55-60 F (13-15 C) in the night.
Harvest
Harvesting mint is easy. The best method is picking when you need. Pick off the sprigs or leaves just when you need whether you’re using them for dessert or lunch. Never let the flowers bloom and pinch off once you see them.
Herbs can be grown indoors and mint is one of them. However, mint (or any other herb) growing indoors can’t grow as vigorously as outdoors. Still, you can enjoy those freshly picked leaves year-round, even in winters!
Growing Mint in Water
It is also possible, to grow mint in water all you need to do is to take tip cuttings of about 5-6 inches length from an established mint plant. Remove the bottom leaves and place the cuttings in a water-filled glass or bottle. Keep the bottle in a cool spot that is bright and receives indirect light. Keep changing the water every other day. The cutting will develop a few leaves and last for several days, you can either plant it in a container filled with soil or use it.
Requirements For Growing Mint Indoors
Growing mint indoors is rewarding, it complements vegetables, salads, yogurt, and meat and freshly picked leaves taste so great. Also, if you want to make an Indoor Herb Garden, mint is the best herb, to begin with.
There are about 600 mint species to choose from, grow which one you like most!
There are a few simple needs you need to care about– use a medium sized pot (2-3 gallon would be fine) when growing mint in containers, a wide planter is good as mint spread through runners and it’ll give space to plant to cover.
Location
Mint can tolerate some shade outside but it needs a minimum 3-4 hour of direct sunlight to grow well. Choose a location where this can receive that much sun and proper air circulation. Near a window or door, if you can keep it on a windowsill or on a balcony it would be best!
Also Read: Windowsill Herb Garden
Soil
Quality potting mix that is light and soilless is what you need to grow mint indoors. You can also make it yourself:
Combine 4-6 parts peat moss, 1 part perlite and 1 part vermiculite. If adding nutrients, blend 1/2 cup each bone meal, oyster shell lime (raises pH) and cottonseed meal/canola meal per 8 gallons of potting mix.ORFollow this basic recipe– Add 1 part peat moss or coco peat, 1 part perlite (sand if you don’t have access to perlite), 1 part compost, 1 part sterile garden soil (optional).Water
Mint loves moist soil, remember, moist soil not overly wet. You should be careful (especially in winter) with watering and don’t soak the plant both in the morning and evening to pamper it. Just keep the plant well watered and slightly moist. Both underwatering and overwatering should be avoided.
Fertilizer
Herbs growing indoors or anywhere shouldn’t be fertilized heavily or else they lose flavor. Feeding the mint plant occasionally using water-soluble all-purpose fertilizer should be enough. You can also mulch the top layer of the pot with compost or manure.
How to Care for Indoor Mint Plant
Pinching and Pruning
Pinch off the tips regularly to encourage the plant to grow more branches and become bushier. Prune off the lanky, spindly and dried branches time to time to keep the plant in shape.
Temperature
Mint loves moderate temperature, it should be saved from cold drafts in temperates. If you live in a warm tropical climate keep it away from hot and dry air, also, you’ll need to water the plant regularly. The indoor temperature should be around at least 65-70 F (18-21 C) in day and 55-60 F (13-15 C) in the night.
Harvest
Harvesting mint is easy. The best method is picking when you need. Pick off the sprigs or leaves just when you need whether you’re using them for dessert or lunch. Never let the flowers bloom and pinch off once you see them.
3
2
Andy:@Katie Marie Thank you for reading my article!😃
Katie Marie:take two
文章
Andy
2017年02月14日
Learn how to build a herb spiral in this article. A spiral herb garden is used for growing different herbs in a small space. With it, you can make a perfect use of your vertical space in an arranged manner.The principle of spiral herb garden is simple but functional
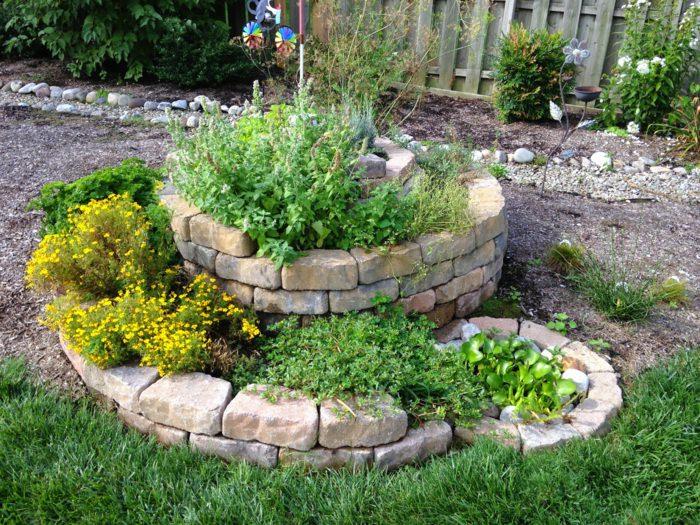
A herb spiral is basically a small herb garden. It is three-dimensional and have beds in a confined, sloppy space of spiral shape, which can be used to grow various herbs. The top area of the spiral receives the full sun and has superior drainage, therefore, herbs that like exposure to the sun and good drainage are planted there. The bottom area of the spiral is suitable to grow herbs that require moist soil and less sun.
Herb spiral has spirally upward walls that are made of natural stones or bricks. The spiral shape is enlarged in contrast to the raised bed, the bed area has sufficient space to grow herbs and there are several zones with different soil characteristics and exposure to the sun.
The walls of herb spiral store solar heat and pass it at night back to the plant. Gabion walls look very attractive and are suitable for spiral herb gardens, too. At the foot of the herb spiral you can even make a mini pond, which will retain the moisture in the lower area, or if you want, you can create a wetland where you can grow plants that love saturated soil.
Making a herb spiral is relatively cheap or almost free. It utilizes vertical space, which means you can grow more plants in small space. It also provides microclimates to different plants that mean you can grow more variety of plants. You can also make it on a concrete floor in your urban space.
How to Build a Herb Spiral
Build a herb spiral in a spot that receives at least 5 hours of sunlight daily. A sunny spot is good, but if you live in tropics choose an area that receives shade in the afternoon. You can also make herb spiral on a rooftop garden or on a large balcony or terrace.
Materials Required for a Spiral herb Garden
• Limestone and limestone rubble
• Soil
• Compost or aged manure
• Geotextile, pond liner or large container
• Gravel, crushed stones or wood chips for the driveway around the spiral
• Plants
• Working Tools: Spade, shovel, wheelbarrow, a stick, a rope and a measurement tape.
An 80-100 cm (0.8-1 m) high herb spiral should have a minimum diameter of 1.5-2 m.How to Make a Herb Spiral

1. Decide where on the ground you’ll make a herb spiral. Plant a pole exactly at the center of that area and with the help of the measurement tape and rope, make a circle with a stick and then mark it with limestone.
2. Now erode the topsoil with the help of a shovel or spade to level the spot, also remove weeds and other debris.
3. If you want to create a pond or wetland at the foot of the spiral dig the soil more deeply at that point.
4. Before you lay the stones to make the wall, cover the excavation for the future pond with pond liner and around the spiral and its path with geotextile to prevent the weeds. If you don’t want to use geotextile, lay the cardboards. You can skip this step if you want.
5. Use the larger stones for the very bottom file of the spiral wall and smaller stones for the top. Keep the top layer of stones slightly inclined towards the interior.
6. Raise the row of layered stones and spiral up to a height of about 0.80 to 1 m. Always fill in the gaps with gravel or rubble. Also, at the center of the spiral, which is deepest, you can fill half of its depth with rubble or gravel.
7. Space for the plants to grow between the spirals should be, according to the amplitude of the spiral, ideally 30 to 50 cm.
8. Add a thin layer of crushed stone, gravel, wood chips or other materials in the base of your spiral bed where you’ll grow plants to cover the gap and improve drainage. At last, fill the spiral with soil and aged manure or compost. Once done, your spiral herb garden is ready for planting.

9. In the case of very large spirals, it could be difficult to collect herbs from the center without stepping on the bed so it is a good idea to lay the stones as footholds. For stability, it is important that the stones are placed with the smooth side down, and they are arranged staggered to avoid creating continuous joints.
Herb Spiral Plans for PlantingPlan 1
Here we have provided you a plan for a small Mediterranean spiral herb garden: For this, you will need a warm and sunny place. You can easily adjust your choice of herbs according to your climate and amount of sun your herb spiral may receive.

In a herb spiral, grow all the herbs you need for everyday cooking. The top of the herb spiral is a dry spot, which is ideal for the Mediterranean herbs such as lavender, sage, rosemary, or thyme. The middle circle of the spiral inhabits herbs that like slight moisture and requires the sun to thrive– cilantro, dill, lemon balm, lemon grass or chives. In the lower side, plant herbs that tolerate evenly moist soils and some shade such as mint, basil or parsley.
Plan 2
According to the plan 2, at the time of filling the soil in your spiral herb garden, bear in mind that this should be ideally divided into the four zones, each of which fades into the next without the continuity to give a different environment to your plants.

The area which is marked as A is on top of the spiral – Here you can grow Mediterranean or tropical herbs– Fill it with a light and loamy soil with the slight amount of sand.
In the second turn of the spiral, which is marked as B – Fill it with the soil that has some clay, also add a lot of compost to lighten it.
The lowest curve of the spiral, which is C– Fill it with rich potting soil and plenty of aged manure.
If you have not made a small water pond, then last is the swampy area D– Here add nutrient-rich soil so that you can grow here the plants that love wet soils.
Herb Spiral PlantsA
Rosemary (1), lavender (2), hyssop (3), Roman chamomile (4), sage (5), Oregano (6), savory (7), thyme (8), rui or (fake curry plant) helichrysum italicum (9).
B
Rocket (10), nasturtium (11), tarragon (or tarragon) (12), cilantro (13) Bishop’s weed (14), calendula (15), Marjoram (16 ), ginger (17).
C
Lemon balm (18), parsley (can not be close to chives), Bee balm (19) dill (20), garlic (21), chervil (22), chive (23), marshmallow (24), mint (25).
D
A herb spiral is basically a small herb garden. It is three-dimensional and have beds in a confined, sloppy space of spiral shape, which can be used to grow various herbs. The top area of the spiral receives the full sun and has superior drainage, therefore, herbs that like exposure to the sun and good drainage are planted there. The bottom area of the spiral is suitable to grow herbs that require moist soil and less sun.
Herb spiral has spirally upward walls that are made of natural stones or bricks. The spiral shape is enlarged in contrast to the raised bed, the bed area has sufficient space to grow herbs and there are several zones with different soil characteristics and exposure to the sun.
The walls of herb spiral store solar heat and pass it at night back to the plant. Gabion walls look very attractive and are suitable for spiral herb gardens, too. At the foot of the herb spiral you can even make a mini pond, which will retain the moisture in the lower area, or if you want, you can create a wetland where you can grow plants that love saturated soil.
Making a herb spiral is relatively cheap or almost free. It utilizes vertical space, which means you can grow more plants in small space. It also provides microclimates to different plants that mean you can grow more variety of plants. You can also make it on a concrete floor in your urban space.
How to Build a Herb Spiral
Build a herb spiral in a spot that receives at least 5 hours of sunlight daily. A sunny spot is good, but if you live in tropics choose an area that receives shade in the afternoon. You can also make herb spiral on a rooftop garden or on a large balcony or terrace.
Materials Required for a Spiral herb Garden
• Limestone and limestone rubble
• Soil
• Compost or aged manure
• Geotextile, pond liner or large container
• Gravel, crushed stones or wood chips for the driveway around the spiral
• Plants
• Working Tools: Spade, shovel, wheelbarrow, a stick, a rope and a measurement tape.
An 80-100 cm (0.8-1 m) high herb spiral should have a minimum diameter of 1.5-2 m.How to Make a Herb Spiral
1. Decide where on the ground you’ll make a herb spiral. Plant a pole exactly at the center of that area and with the help of the measurement tape and rope, make a circle with a stick and then mark it with limestone.
2. Now erode the topsoil with the help of a shovel or spade to level the spot, also remove weeds and other debris.
3. If you want to create a pond or wetland at the foot of the spiral dig the soil more deeply at that point.
4. Before you lay the stones to make the wall, cover the excavation for the future pond with pond liner and around the spiral and its path with geotextile to prevent the weeds. If you don’t want to use geotextile, lay the cardboards. You can skip this step if you want.
5. Use the larger stones for the very bottom file of the spiral wall and smaller stones for the top. Keep the top layer of stones slightly inclined towards the interior.
6. Raise the row of layered stones and spiral up to a height of about 0.80 to 1 m. Always fill in the gaps with gravel or rubble. Also, at the center of the spiral, which is deepest, you can fill half of its depth with rubble or gravel.
7. Space for the plants to grow between the spirals should be, according to the amplitude of the spiral, ideally 30 to 50 cm.
8. Add a thin layer of crushed stone, gravel, wood chips or other materials in the base of your spiral bed where you’ll grow plants to cover the gap and improve drainage. At last, fill the spiral with soil and aged manure or compost. Once done, your spiral herb garden is ready for planting.
9. In the case of very large spirals, it could be difficult to collect herbs from the center without stepping on the bed so it is a good idea to lay the stones as footholds. For stability, it is important that the stones are placed with the smooth side down, and they are arranged staggered to avoid creating continuous joints.
Herb Spiral Plans for PlantingPlan 1
Here we have provided you a plan for a small Mediterranean spiral herb garden: For this, you will need a warm and sunny place. You can easily adjust your choice of herbs according to your climate and amount of sun your herb spiral may receive.
In a herb spiral, grow all the herbs you need for everyday cooking. The top of the herb spiral is a dry spot, which is ideal for the Mediterranean herbs such as lavender, sage, rosemary, or thyme. The middle circle of the spiral inhabits herbs that like slight moisture and requires the sun to thrive– cilantro, dill, lemon balm, lemon grass or chives. In the lower side, plant herbs that tolerate evenly moist soils and some shade such as mint, basil or parsley.
Plan 2
According to the plan 2, at the time of filling the soil in your spiral herb garden, bear in mind that this should be ideally divided into the four zones, each of which fades into the next without the continuity to give a different environment to your plants.
The area which is marked as A is on top of the spiral – Here you can grow Mediterranean or tropical herbs– Fill it with a light and loamy soil with the slight amount of sand.
In the second turn of the spiral, which is marked as B – Fill it with the soil that has some clay, also add a lot of compost to lighten it.
The lowest curve of the spiral, which is C– Fill it with rich potting soil and plenty of aged manure.
If you have not made a small water pond, then last is the swampy area D– Here add nutrient-rich soil so that you can grow here the plants that love wet soils.
Herb Spiral PlantsA
Rosemary (1), lavender (2), hyssop (3), Roman chamomile (4), sage (5), Oregano (6), savory (7), thyme (8), rui or (fake curry plant) helichrysum italicum (9).
B
Rocket (10), nasturtium (11), tarragon (or tarragon) (12), cilantro (13) Bishop’s weed (14), calendula (15), Marjoram (16 ), ginger (17).
C
Lemon balm (18), parsley (can not be close to chives), Bee balm (19) dill (20), garlic (21), chervil (22), chive (23), marshmallow (24), mint (25).
D
3
1
文章
Rainbow
2016年12月27日

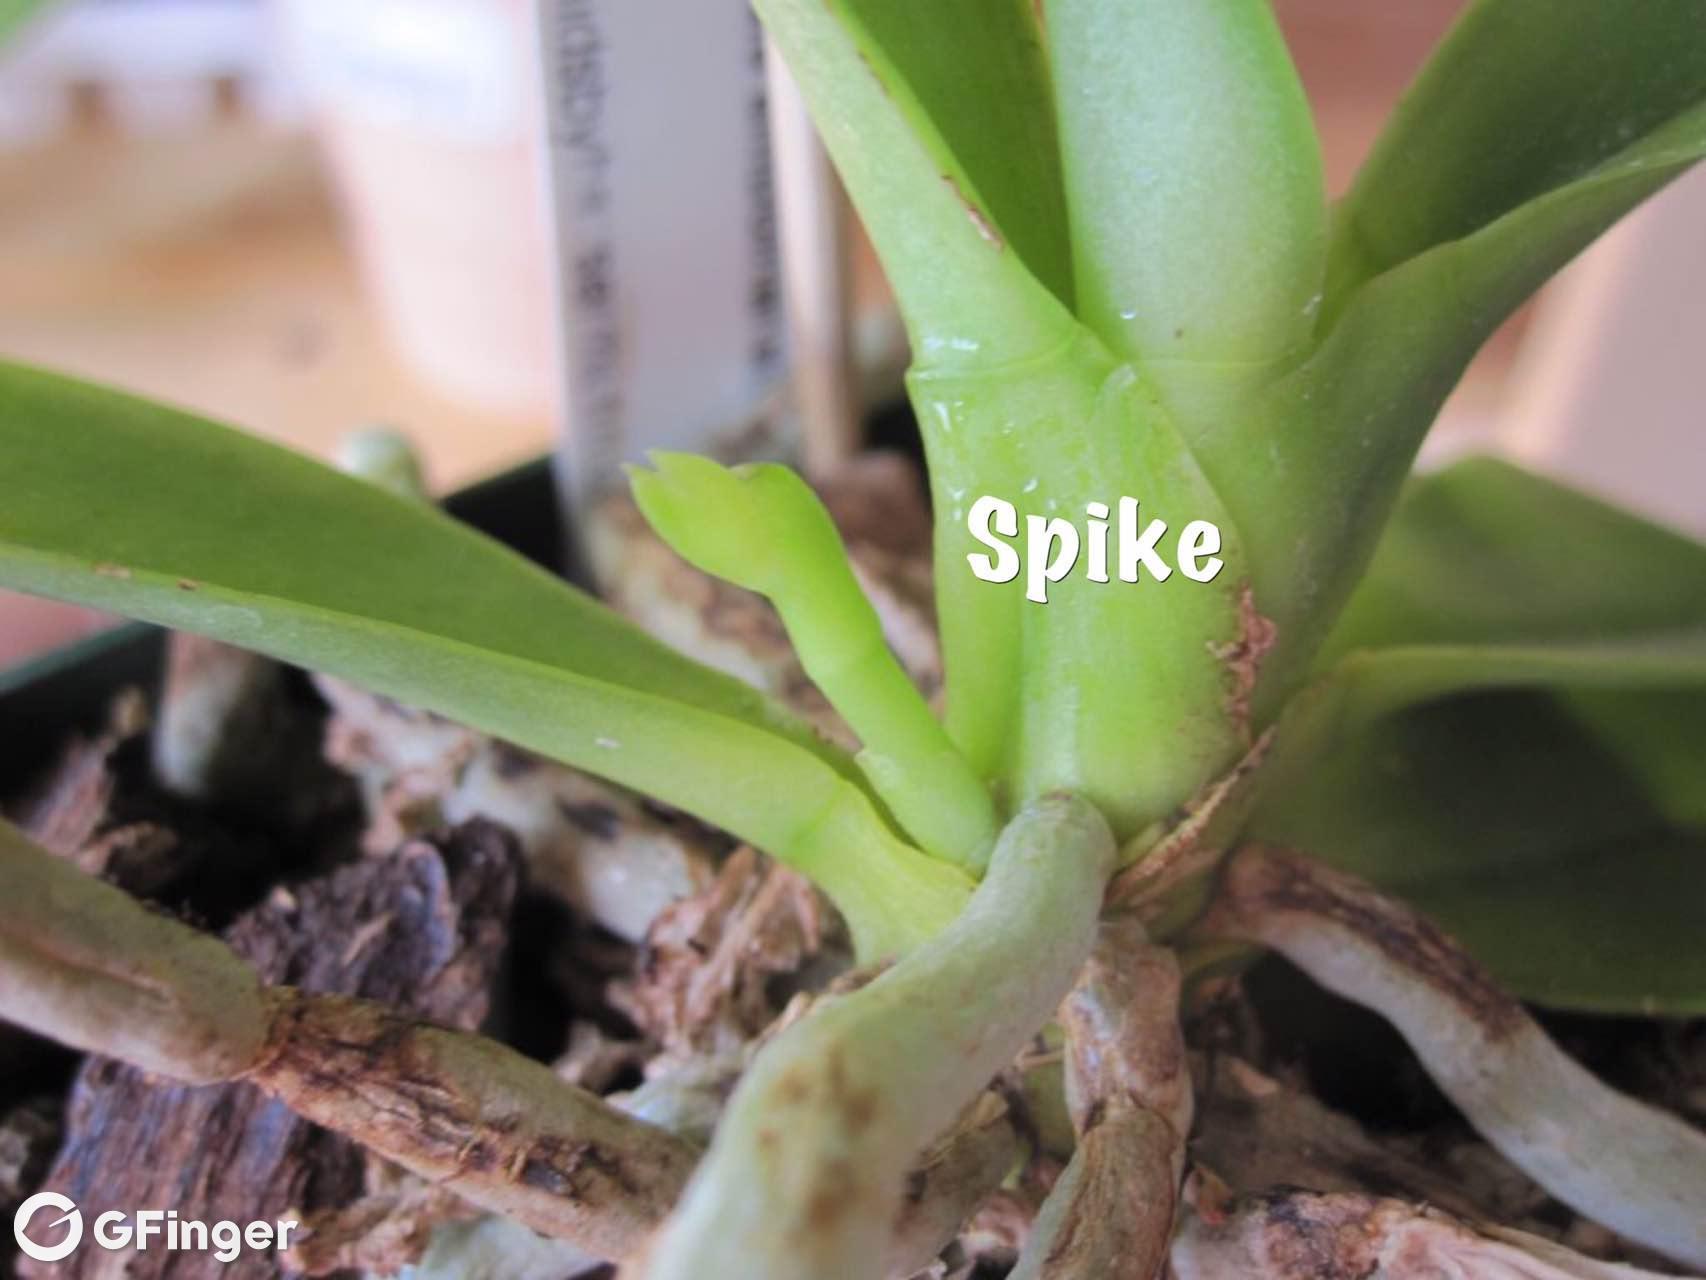
How to Recognize Orchid Roots and Orchid Spikes?
1.If you look very closely, you will see a “mitten shape” indicative of spikes.
2.The new root is growing down, the new spike is growing up!


1.If you look very closely, you will see a “mitten shape” indicative of spikes.
2.The new root is growing down, the new spike is growing up!
3
0
文章
Erin
2016年12月26日

#growing-fruit How to Grow Roma Tomatoes
Roma tomatoes are not considered as heirloom tomatoes. They are determinate tomatoes that grow up to 1 m tall, suitable for containers. The period of maturation of roma tomatoes takes 75-90 days from germination to maturity.
Growing Roma tomatoes is not much different than cultivating other varieties. They may only differ in shape and size and the growing process and requirements are similar. You just have to make sure that they get enough sunlight, water and fertile soil and cared against pests and diseases.<img src="1000062744_24273_1482734611.jpg">
Requirements for Growing Roma Tomatoes
Position
It requires a lot of sunlight at least 6 hours is essential. If you are living in tropics protect the plant from scorching afternoon sun. It is safe to say that good amount of sun is the main component of a productive and successful harvest.
Soil
The most suitable soil for the cultivation of this variety is well drained, light and loamy soil, rich in organic matters like humus and compost or aged manure.
Watering
Water your plants regularly. Growing roma tomatoes require plenty of water. In colder climates take care in watering, especially if grown in partially shaded spot. Tomato plant requires more water at the time of fruiting. Lack of water can cause split tomatoes.<img src="1000062745_24273_1482734611.jpg">
Roma Tomato Care
Fertilizer
You can fertilize the plant with liquid fish fertilizer once a week if grown in container during the growing season, moreover when plant is setting fruits. Also add balanced slow release fertilizer during planting. Application of manure or compost time to time is also recommended.
Pests and diseases
Roma tomatoes are resistant to many pests and diseases. In diseases they are commonly infected by blossom end rot and fungal diseases if foliage are kept wet. Tomato hornworms can be controlled by hand picking or using neem oil or you can try companion planting to prevent them.
Pinch Suckers
Small suckers will grow at each leaf axil. This can weaken the plant and won’t bear fruit. Pinch these out to encourage great plant growth.
Harvesting
Since it is a determinate variety, all tomatoes ripens at about the same time. Harvest roma tomato when it turns red from all sides and skin remains slightly soft.
3
0
lrgarden:👍
文章
Erin
2016年12月26日
#growing-fruit-tips
DON’TS
1. Don’t water from above. Doing so encourages water born pathogens and spreads disease.
2. Don’t Overcrowd. Tomato seedlings need plenty of room to grow and will be stunted if they are over crowded. The same is true for mature plants. The size of a mature tomato plant is about 3 feet in diameter, so don’t plant young plants a foot apart.
3. Don’t forget tomato cages. While a tall stake will work okay, tomato plants can get very large and will benefit from having a tomato cage around them to keep sprawling stems off the ground.
4. Don’t wait too long to stake. I place my stakes in at the time that I plant the seedlings. I won’t damage the roots if I do this and the stems will be ready to tie up as the plant grows.
5. Don’t forget that critters like tomatoes too! If you have followed my blog, you will know of my exploits with the squirrels. Nothing is worse than seeing a dozen half ripe tomatoes on the ground with a bite out of each one. See my tips for dealing with squirrels. Hint…they don’t like cayenne pepper!
6. Don’t over-fertilize. Doing so will often result in bushy tomato plants with few flowers and flowers are what makes tomatoes later.
7. Don’t go for seedlings with flowers. You may think this will give you a head start on the growing season but the opposite is the case. Go for strong root systems and healthy looking stems. The flowers will come soon enough. (The same goes for flowering plants – why buy those already in flower? Enjoy them in your garden, not at the garden center!)
8. Don’t plant too early. Tomatoes are best if the soil temperature is consistently above 50º F outside. And make sure to measure the temp down a ways into the soil. 6 inches doesn’t sound like a lot, but think of where the roots are!
9. Don’t be impatient. The sweetest tomatoes are those that grow on the vine as long as possible. Don’t be in a hurry to take them off too early. If any fall off the vine, see my tips for ripening green tomatoes.
10. Don’t panic at the end of the season. If you have plants left and a frost is threatening at season end, pull up the whole plant, tomatoes and all and hang upside down in a garage or basement. The fruit will continue to ripen.
11. Don’t store tomatoes in the fridge. Doing so will spoil the taste and take away much of the sweetness that you are looking for. See this tip for sweet tomatoes.
Sun-ripened tomatoes deliver the taste of summer in every bite all summer long. Plant just a few healthy plants and you will ensure the production of buckets of this delicious fruit.
2
0
文章
Erin
2016年12月26日
#growing-fruit-tips
DOS
1.Do provide plenty of sunlight. Tomato plants need sunlight and lots of it. They need about 10 hours of direct sunlight a day during the summer (and 10-14 hours of bright diffused light a day as seedlings.)
2.Do start with healthy soil. A well amended soil is a must. I like to add a scoop of compost to every hole that I dig for any plant, and tomatoes are no exception. Soil that is full of rich compost is the secret weapon to any tomato grower and organic material is the best. There is just on chemical substitute for well good, old fashioned compost.
3.Do plant seedlings deeply. Tomato plants do best with a healthy root system. I like to choose a tall plant and pull of some of the lower leaves and plant it deeply into the hole. Roots will form along the planted stem and this will make for a very healthy plant.<img src="1000062739_24273_1482734228.jpg">
4.Do know your soil type. Tomatoes like soil that will hold water but not make them too soggy. The wrong soil type an cause all sorts of problems from flower drop, blossom end rot and split fruit.
5.Do remove lower leaves. These are the first leaves to grow on your plant and they are the easiest ones to develop fungus and other problems. As they plant grows, they also get the least amount of light ans circulation so they are more vulnerable to disease. Removing them also keeps them out of reach of the water.
6.Do Water Deeply from the roots. Tomato plants love water and they like a deep watering. A soaker hose works best for tomato plants. (affiliate link) Also see my tutorial for a soda bottle drip feeder here.
7.Do stake your plants. Indeterminate tomato plants can grow to 10 feet or more and definitely need some staking. Even determinate plants will get to 3 feet. If you don’t stake, the weight of fruit may break your stems.<img src="1000062740_24273_1482734228.jpg">
8.Do Mulch. While we are on the topic of watering, be sure to add mulch. Bring it to a few inches from the stem, right over a soaker hose. This conserves the water and helps to prevent soil born pathogens from getting on to the leaves.
9.Do pinch suckers. Small suckers will grow at each leaf axil. This can weaken the plant and won’t bear fruit. Pinch these out to encourage great plant growth.<img src="1000062741_24273_1482734229.jpg">
10.Do rotate your crop. If you plant your tomatoes in the same spot each year, you encourage soil borne pests and diseases to take hold. Move the area where you plant to another spot in your garden every three years or so.
11.Do choose a spot with good air circulation. Making sure there is plenty of air around the plants keeps the risk of many diseases at bay.
12.Do watch out for caterpillars. Horn worm caterpillars can devastate a tomato crop. Be on the look out and remove if you find them.
13.Do plant again. If you live in a sunny growing zone, be sure to practice succession planting. Add another crop a few weeks after you plant the first one to ensure luscious tomatoes all summer long.
3
0
文章
Andy
2016年12月19日
Obtain a Pineapple
From the local grocery store, choose a mature pineapple that has healthy, firm, green leaves (not yellow or brown) and with a fruit skin that is golden brown (not too green). Actually, I'd recommend growing two pineapples in the not unlikely event that one of them dies. At the very least you can pick the healthiest of the two plants to nurture to full growth.
Inspect the base of the leaves for small grayish spots which are scale insects. If these are found, the crown should be discarded and one selected which is free of these insects. Try to find one that is ripe but not overripe. Test for ripeness by gently pulling on a leaf. If it pops out with ease, the fruit is overripe.
Prepare the Crown
Grab hold of the entire top set of leaves. Twist hard and it will come out with a bit of stalk. (If you cut the top off you will need to remove all of the excess fruit flesh, otherwise it will only rot and may kill the whole plant). Any adhering flesh should be trimmed off its base to prevent rotting after planting. After trimming, carefully slice small, horizontal sections from the bottom of the crown until you see root buds that appear as small dots or circles on the flat, cut surface (see picture). Remove as little tissue as possible to avoid cutting into young stem tissue.
Next, strip off some of the lower leaves, exposing up to about an inch of the base of the crown (the stalk will root but the leaves will rot - see photo). They will come off in sort of a spiral fashion. The idea is to bare the stalk. The small brown-colored bumps below the leaf scars are root primordia (baby roots waiting to grow) and there may even be a few short roots at the base of the crown (the picture at right shows a crown with a lot of roots). Though these won't be the roots that will grow in the next step, try not to damage these.
After trimming and stripping, let the crown dry out for a couple days before going to the next step. This will permit the cut end and the leaf scars to heal and prevent rot.<img src="1000060347_24277_1482134060.jpg">Root the Crown
There are various ways to do this, but I have found after trying several methods, that the simplest is the most effective. Place the crown in a clear glass of water and change out the water every few days. Place the crown away from any temperature extremes (heating or cooling vents/hot south-facing windows). On top of the refrigerator will work. In three weeks you'll see healthy root growth as illustrated in the pictures at right. You're now ready to plant the crown. As an aside, I've been told that if you use a dark colored glass, like a red plastic cup for example, you'll get better rooting. However I haven't tried this myself.<img src="1000060348_24277_1482134060.jpg">Plant the Crown
Once roots appear, plant the pineapple in a fast draining potting soil such as a Bromeliad or Cactus Potting Soil mixed with a third perlite. An eight-inch porous clay pot with bottom drainage is ideal. Layer about two inches of stones in the bottom of the pot prior to putting in the soil/perlite mix. The picture to the left illustrates the materials needed (the two pottery shards in the front are to put over the drainage holes; these came from an extra clay saucer that I broke up).
The first step is to cover the drainage hole with the pottery shard. Second, put in a layer of stones followed by the soil and perlite mix. Finally, plant the crown and water it thoroughly prior to placing it in a window or some other sunny place. You can see the sequence in the pictures to the right (the inner leaves of the pineapple on the left are easily pulled out which doesn't bode well for the plant. Only time will tell which is a good example of why it's good to root two plants in case one dies).
In terms of watering, the soil should always be slightly moist; not wet (which will promote rot) and not dry. It will take six to eight weeks for the stalk to really start sending out strong roots. Do not rush this process or fertilize at this point.
After about two months, the pineapple should be supporting itself as a new plant. Gently tug on the plant to see if new roots have formed. If they are present, they will resist your tug. If absent, the top of the pineapple will pull from the soil revealing the absence of new roots. If there are no new roots, replace the pineapple top in the soil and wait longer. If the base looks like it is rotting, start again with a new pineapple top, root it again as above and then use fresh potting soil. Repeat the process, but be sure not to over water.
At this point you should notice that the original leaves of the pineapple will begin to die and turn brown, with new leaves beginning to grow at the center. Over the course of the following year, remove the original leaves as they die. During this time the pineapple should be watered no more than once a week.
If roots have developed with the new leaf growth, it is a sign that things are going well.<img src="1000060349_24277_1482134061.jpg">After one full year of growth, repot the plant.
Below you can see these two plants one year later. Three lessons I've learned:
1) don't give up on your plant even when things are looking grim (the pictures on the right are of one of the plants that had rotted in the center; you can see two brand new sprouts that formed along side the original plant.)
2) my plants rooted indoors, however real growth didn't begin until I took them outside in the spring. With the next growing season they'll be repotted as instructed below.
3) grow two crowns as one will likely not be as strong as the other. Then you can repot the healthier one. You may also notice that I clipped the tips off of the plants as I think I left them outside too long, and the cold turned their tips brown.<img src="1000060350_24277_1482134061.jpg">
6
3

