文章
Gina
2017年03月15日


With every new growing season comes the need for outdoor planters… and we’ve rounded up some unique planter tutorials for every gardener, whether you want a traditional window box, or an up-cycled art piece. Most of these outdoor planter projects have complete instructions, so check them out, pick one or two, and plan some garden projects for the weekend! Our featured project, above, comes to us from Popular Mechanics. Learn how to make this simple DIY wood planter with this great tutorial and lots of step by step photos.
Lowes has a nice contemporary indoor outdoor planter project with step by step photos and a video.

This wooden planter box by Family Handyman can be built in less than an hour with their tutorial. I love this because you can easily change out plants, and even combine plants with different watering needs because they are in separate pots.

Tracie over at Cleverly Inspired wanted some large planters that were similar to some that are available at Restoration Hardware. She came up with these wonderful planters. See how she did it.

Want to make a large DIY planter on wheels? Then head over to Four Generations, One Roof, and find out how Jessica and her dad made this one! They have excellent step by step photos in their tutorial. This is great for small garden spaces… You can create an entire garden in this one planter! Love this!

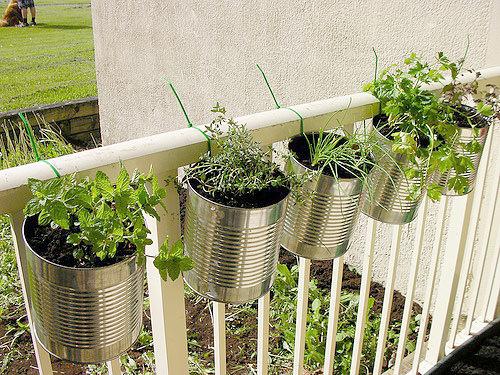
This is a clever idea we got from Christie on Flickr… Using recycled cans as planters, and drill holes to attach with zip ties! (Also for drainage). Obviously you can cut off the excess zip tie after they are hung, they are left to illustrate the project. Love this! What other kinds of containers could you up cycle?
These low cost drum planters have downloadable instructions, and are made with recycled drums and recycled wood. What a really cool idea for little cash! You could use this idea for a lot of recycled containers!

This Coppice Vertical Planter is sold on a UK website but we think it would be very easily DIY’able! Even better would be to use old wine crates as the boxes.

Gotta love these more modern patio paver planters by Stephanie Lynn we found on Apartment Therapy. She has a step by step for you, (its easy!) and even some suggested plants!

I like these simple pallet planters, they would look amazing growing small vegetables! From Creative Homemaking.

These Criss Cross Outdoor Planters from Centsational Girl look fantastic. Love them painted white but could look really nice in a natural stained finish as well. See how she made these.

From Kate Was Here, Check out this cool DIY vertical planter.
Learn how to make a garden trough that looks old, but isn’t! From This Old House.

From Ruffles and Truffles, this DIY vertical planter is really easy! Great for awkward corners of your garden. Good tutorial!

3
3
文章
Colorful
2017年03月15日

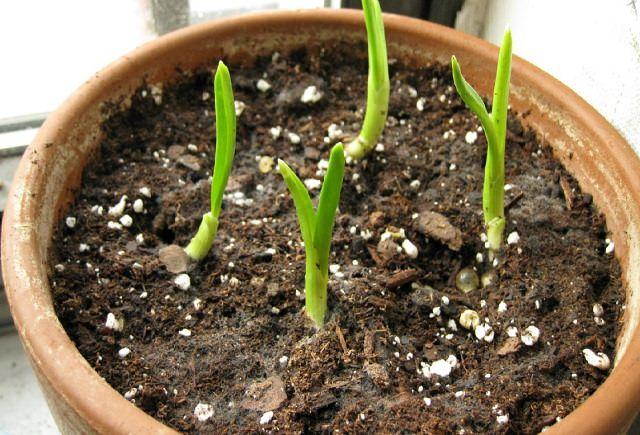
Growing garlic indoors is not difficult and you’ll be able to get the supply of fresh green stalks, flowers, and even the garlic bulbs. Learn more!
If you have ever wondered about how to grow garlic indoors then the good news is that it is going to be considerably easier than you were perhaps aware. This is something that you will be able to achieve even with next to no previous gardening experience.
What You Need and Getting Started

When to Plant Garlic Indoors
Usually, the fall is the right planting season, outdoors in our gardens it’s the time when we plant garlic. However, when growing indoors, you can try to plant garlic anytime in the year.
Choosing a Container and Spacing
Look for a pot around 8-10 inches deep, minimum and if you are planning on growing more than one bulb at a time then the pot has to be big enough to maintain a four-inch gap between each clove. Also, make sure that the pot has drainage holes in the bottom. If you’re growing garlic for its GREENS– you can grow them more closely.
You can try growing garlic indoors from the grocery store garlic but they are treated with chemicals so for the best result buy from local farmers, order them online or check out your local gardening store for the organic garlic bulbs. Also, remember that you don’t need to remove the paper like husk from cloves.Planting and Getting them Growing
The next step is to fill the pot with the organic soil mixture. You then need to remove the individual cloves from the garlic bulbs and make sure that the flat end is going to be pointing down in the soil as that is where the roots come from.
At the time of filling the soil, you can also mix time-based granular fertilizer such as 10-10-10.
When planting them, you need to push the cloves down at least 2-3 inches deep into the soil. There should also be roughly 1 inch of soil between the top of the clove and the top layer of the soil.
Placement and Caring for the Bulbs
Soil
It is important that you use the right soil that is well-draining, and permeable. Soil-less potting medium is best, you can also make one for yourself instead of buying– Mix peat or cocopeat (coconut fiber), compost or manure, and either perlite or vermiculite (if you don’t have both, use sand) in equal parts.
Location
Once you have planted the bulbs decide where you should place the pot. If there is a room in your home with a South or West facing window where it can receive at least six hours of direct sunlight per day, consider that. You can also purchase indoor grow lights to make life easier and they can certainly be rather effective.
Watering
Outdoors, garlic prefers evenly moist soil, however, since you’re growing garlic indoors you may need to careful. Watering must be done according to the indoor growing conditions. Like, how much sunlight and warmth your potted garlic plants are receiving. Regular watering to keep the soil slightly moist is preferable.
Fertilizer
Garlic needs a good amount of fertilizer to grow well, indoors is no different. Fertilize the garlic plant twice a month with organic general purpose fertilizer during the warm growing season. You can also use kelp meal or fish fertilizer to ensure your garlic plant has enough nutrients for optimum growth.
HarvestingPicking Garlic Greens
With the right soil, sunlight and proper watering, in a week or so you’ll be able to see the fresh new garlic shoots coming out. You can start picking the greens once they are at least 4-6 inches tall, which will happen in a few more weeks (depending on the weather). Leave an inch of growth on each clove to let your garlic plants regrow again.
Harvesting Bulbs
If you’re growing garlic indoors for garlic bulbs, note that it’ll be ready in around eight to ten months and you will know this when you see the leaves starting to turn brown. At this point, you need to remove them from the soil and allow them to dry for a week. By this time, they will be ready to include in your cooking or, of course, you could use some of them to then grow your next batch of garlic.
If you have ever wondered about how to grow garlic indoors then the good news is that it is going to be considerably easier than you were perhaps aware. This is something that you will be able to achieve even with next to no previous gardening experience.
What You Need and Getting Started
When to Plant Garlic Indoors
Usually, the fall is the right planting season, outdoors in our gardens it’s the time when we plant garlic. However, when growing indoors, you can try to plant garlic anytime in the year.
Choosing a Container and Spacing
Look for a pot around 8-10 inches deep, minimum and if you are planning on growing more than one bulb at a time then the pot has to be big enough to maintain a four-inch gap between each clove. Also, make sure that the pot has drainage holes in the bottom. If you’re growing garlic for its GREENS– you can grow them more closely.
You can try growing garlic indoors from the grocery store garlic but they are treated with chemicals so for the best result buy from local farmers, order them online or check out your local gardening store for the organic garlic bulbs. Also, remember that you don’t need to remove the paper like husk from cloves.Planting and Getting them Growing
The next step is to fill the pot with the organic soil mixture. You then need to remove the individual cloves from the garlic bulbs and make sure that the flat end is going to be pointing down in the soil as that is where the roots come from.
At the time of filling the soil, you can also mix time-based granular fertilizer such as 10-10-10.
When planting them, you need to push the cloves down at least 2-3 inches deep into the soil. There should also be roughly 1 inch of soil between the top of the clove and the top layer of the soil.
Placement and Caring for the Bulbs
Soil
It is important that you use the right soil that is well-draining, and permeable. Soil-less potting medium is best, you can also make one for yourself instead of buying– Mix peat or cocopeat (coconut fiber), compost or manure, and either perlite or vermiculite (if you don’t have both, use sand) in equal parts.
Location
Once you have planted the bulbs decide where you should place the pot. If there is a room in your home with a South or West facing window where it can receive at least six hours of direct sunlight per day, consider that. You can also purchase indoor grow lights to make life easier and they can certainly be rather effective.
Watering
Outdoors, garlic prefers evenly moist soil, however, since you’re growing garlic indoors you may need to careful. Watering must be done according to the indoor growing conditions. Like, how much sunlight and warmth your potted garlic plants are receiving. Regular watering to keep the soil slightly moist is preferable.
Fertilizer
Garlic needs a good amount of fertilizer to grow well, indoors is no different. Fertilize the garlic plant twice a month with organic general purpose fertilizer during the warm growing season. You can also use kelp meal or fish fertilizer to ensure your garlic plant has enough nutrients for optimum growth.
HarvestingPicking Garlic Greens
With the right soil, sunlight and proper watering, in a week or so you’ll be able to see the fresh new garlic shoots coming out. You can start picking the greens once they are at least 4-6 inches tall, which will happen in a few more weeks (depending on the weather). Leave an inch of growth on each clove to let your garlic plants regrow again.
Harvesting Bulbs
If you’re growing garlic indoors for garlic bulbs, note that it’ll be ready in around eight to ten months and you will know this when you see the leaves starting to turn brown. At this point, you need to remove them from the soil and allow them to dry for a week. By this time, they will be ready to include in your cooking or, of course, you could use some of them to then grow your next batch of garlic.
2
2
riverrun
2017年03月14日

Internet be like; it takes a month for avocado roots to start growing. dont believe the internet, it sometimes takes only take a few days 🌿


4
0
riverrun:@lrgarden me too ♡ i have never done this before even though it is so simple
lrgarden:Waiting it's grow diary
文章
Mirella
2017年03月13日

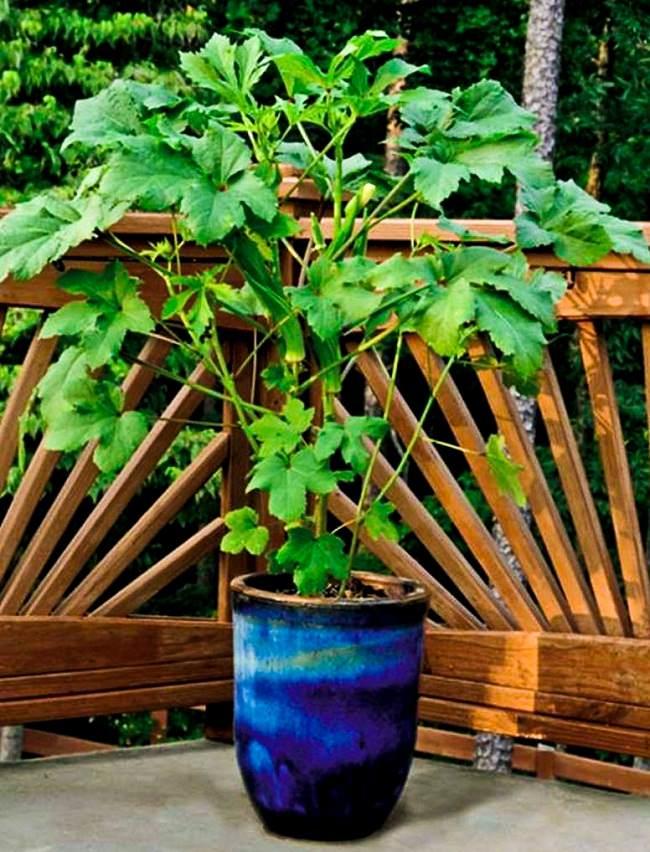
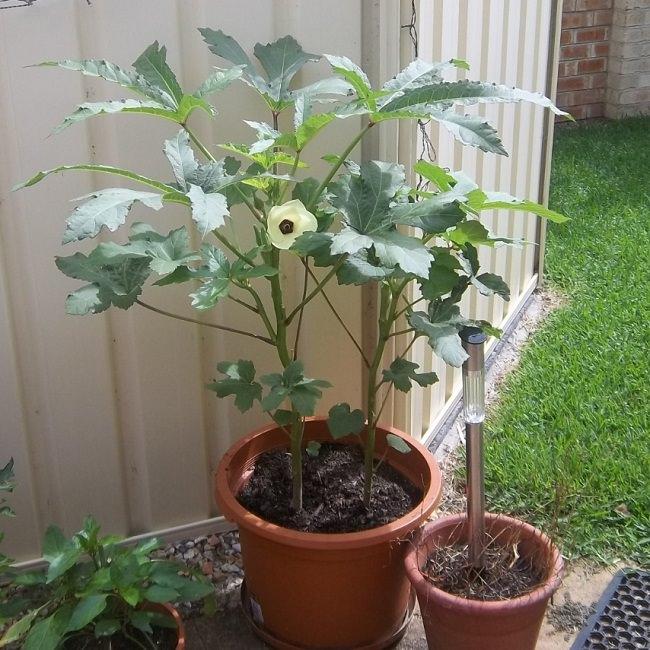
Learn how to grow okra in containers in this article. Growing okra in pots doesn’t require a lot of space and it is easy too if you complete all of the planting requirements.
Okra, which is also called lady’s finger is a warm season tropical vegetable that is also grown for ornamental purposes. Its delicate foliage and showy blooms that look like hibiscus (don’t forget okra belongs to the same hibiscus family) look amazing.
Very low in calories (25 to 40 kcal per 100g), okra is a vegetable rich in vitamins A, C and P, calcium and many minerals.
Choosing a pot
Choose a pot of whatever material you like. Pot should be at least 3 gallons in size. Ideally, a 5-gallon pot that is 10-12 inches deep and similar in diameter would be perfect for one okra plant if you have got a larger pot you can grow a few plants in it. Best to choose a black colored pot as okra loves heat.
Planting Okra Seeds
The first step for growing okra is to get the seeds. Ask for the dwarf okra variety that will not grow above 5 feet tall. However, you can grow any okra variety in a pot, but it is best if you choose the dwarf one. If you live in a climate with short summers, search for varieties that mature fast.
The best planting time is when the temperature starts to stay above 55-60 F (13-16 C) and all the dangers of frost are passed. Growing okra is possible year round if you live in USDA Zones 9-11 or any other subtropical or tropical region on our earth.
Due to its taproot, okra doesn’t transplant well that’s why you’ll have to directly plant the seeds in the container or a biodegradable pot. Sow 2-3 okra seeds 1/2 to 1 inch deep in each pot. Water with a sprayer and keep the seeds in a bright, warm place, the substrate should remain moist until seeds germinate. The germination takes 5 to 10 days after sowing. The more warmth, the faster the germination.
Requirements for Growing Okra in PotsPosition
Pick a spot that receives full sun (at least 5-6 hours of sunlight is essential). Like tomatoes and peppers, okra requires plenty of sunlight to produce well.
Soil
The soil you use must be loamy and crumbly; it must be well draining too. Opt for a soilless potting mix that is rich in organic matter. You can also add a lot of compost or aged manure to provide the constant supply of nutrients to your okra plant.
Watering
Okra requires slightly moist soil. Water regularly to keep the soil uniformly moist and particularly more from the beginning of the flowering period and until the end of production.
Temperature
The cultivation of okra plant is extremely easy but requires a lot of heat. The plant can grow above 50 F (10 C), but to flower and to bear fruit abundantly the temperature must be around 75 to 95 F (23-35 C) ideally. The plant can tolerate higher temperatures well but fails to grow when the temperature starts to touch lower levels.
Okra Plant Care
Fertilization
Mix manure in soil to provide nutrients to the plant, you can also side dress the plant with it. Also, at the time of planting, you can add balanced fertilizer if you want. Once the plant has reached the height of 6 inches, apply a dose of balanced fertilizer again. Keep in mind that if the soil is nitrogen rich, it may promote vegetative growth at the expense of fruiting so maintain the balance. Later on, feed the plant with low in nitrogen fertilizer such as NPK 5-10-15 or 6-12-12.
Pollination
Okra is self-pollinating so you don’t need to care about pollination.
Pinching and Topping
As you’re growing okra in containers, dwarf varieties we consider, the plant will not exceed the height of 5 feet. In that case, you don’t need to care about pinching or topping.
Pests and Diseases
Okra is susceptible to fusarium wilt and nematode attack as well as aphids and whiteflies in pests. Mealybugs also affect the plant’s growth. However, these pests do more damage on plants grown in large quantities. As you’re growing okra in pots, you can easily control them.
Harvesting
Okra requires frequent harvesting. It blooms about two months from planting, and the fruits appear 5-7 days after flowering. The fruits/pods are harvested when they are still tender. Otherwise, they become fibrous and too hard to be eaten. Ideally, the picking length is between 3 to 5 inches.
How to see if okras are not too late to be picked?
Bend the tip of any fruit and if it breaks easily this means that they are still tender and crispy and good to harvest.
1
0
文章
Andy
2017年03月13日

Learn how to grow licorice (Mulethi) in this article if you love to grow medicinal herbs. Growing licorice and licorice plant care is easy.

The licorice (Glycyrrhiza glabra), which means sweet root in Greek is actually a legume. It is native to the Mediterranean and parts of the South-West Asia and particularly to the Indian subcontinent, where it is called ‘Mulethi’ It is a perennial herb that grows to over a meter and a half tall. It is cultivated for its roots, the plant has an extensive root system. Roots grow 3 to 4 feet (1 – 1.2 m) deep and can extend to 25 feet (10 m) in a deep, permeable soil. Growing licorice in container is also possible.
Licorice Uses
Roots of this shrub are the part that usually consumed. Licorice roots, besides having a sweet anise like flavor are also beneficial to health with medicinal properties, such as anti-inflammatory and expectorant effect. It is used in traditional Chinese, Ayurvedic and greek medicines too.
Learn more about Licorice uses
USDA Zones— 6 – 11
Difficulty— Easy
Other Names— Acide Glycyrrhizique, Acide Glycyrrhizinique, Alcacuz, Alcazuz, Bois Doux, Bois Sucré, Can Cao, Chinese Licorice, Deglycyrrhized Licorice, Gan Cao, Gan Zao, Glabra, Glycyrrhiza, Glycyrrhiza glabra, Glycyrrhiza glabra typica, Glycyrrhiza glabra violacea, Glycyrrhiza glabra glandulifera, Glycyrrhiza Radix, Glycyrrhiza uralensis, Glycyrrhizae, Glycyrrhizic Acid, Glycyrrhizinic Acid, Isoflavone, Jethi-Madh, Kanzo, Lakritze, Licorice Root, Liquiritiae Radix, Liquirizia, Mulathi, Mulethi, Orozuz, Phytoestrogen, Phyto-œstrogène, Racine de Réglisse, Racine Douce, Radix Glycyrrhizae, Régalissse, Regaliz, Reglisse, Réglisse, Réglisse Déglycyrrhisée, Réglisse Espagnole, Réglisse Russe, Regliz, Russian Licorice, Spanish Licorice, Subholz, Sussholz, Sweet Root, Yashtimadhu, Yashti-Madhu, Yashti-Madhuka, Zhi Gan Cao, liquorice.
How to Grow LicoricePropagation
Propagating licorice is easy. It can be propagated from cuttings, division or seeds.
Growing Licorice from seeds
Soak the seeds for at least 24 hours in lukewarm water and then sow seeds in seed starting mix, which you can make yourself from these seed mix recipes. Sow the seeds at a depth of 1/2 inch. Cover the seeds with soil and keep it evenly moist until the seeds germinate. Germination occurs within two weeks. Optimum germination ranges around 68 F (20 C). Leave space of 2 feet between each plant.
Growing Licorice from Divison
Divide the licorice plant in spring or fall. Every division must have about one growth bud. If are dividing the plant in the fall (autumn), divisions must be replanted immediately or you can also store them in clamps for spring planting.
Planting
Licorice should be planted in the spring or summer. In warm subtropical or tropical climate growing licorice is possible year around except peak summer.
How to Grow Licorice on the Ground
Plant licorice on the ground in any land loosened deep, well-draining soil, devoid of stones.
Dig a pit that is 60 cm wide and 50 cm deep and then backfill it with the soil. If the soil is clay rich lighten it by adding compost and sand.
How to Grow Licorice in Pot
Choose a large pot (at least 20 cm) of a light color so that the temperature does not rise too much for the roots. Make a mixture of 1 parts sand 1 part compost and 1 part loam. In colder zones keep the pot indoors during winter.
Requirements for Growing Licorice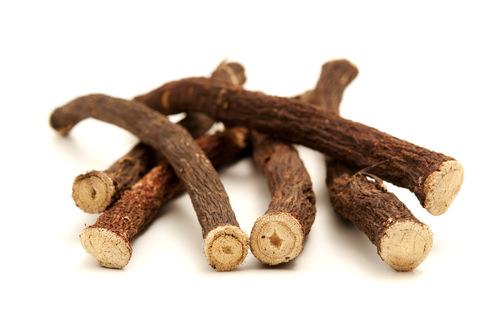
Position
This shrub needs to be in a location that is sunny to grow properly but if you’re growing licorice in tropics, plant it in on a location that receives shade in the afternoon.
Soil
A soil that is light and rich in humus facilitates the harvesting of the roots and maintains moisture. It prefers slightly sandy soil that is well draining but retains moisture with neutral to slightly alkaline pH levels.
Watering
Growing licorice requires regular and abundant watering during the growing period. Regular and deep watering is required to keep the soil slightly moist all the time. In winter, watering should be reduced.
Licorice Plant Care
Licorice plant care is simple, you just need to be careful about a few basic needs. This herbaceous perennial is mildly frost tolerant can bear temperature down to 5 F (-15 C)
Mulching
Mulch is required to retain the moisture in the soil.
Fertilizer
Licorice doesn’t need fertilizer. Although, if the soil is poor, mix compost at the time of planting or mulch around the base of plant with compost.
Temperature
It prefers average temperature around 60 – 85 F (15 to 30 C). Frost, high winds or too warm temperature can damage the plant.
Pests and Diseases
It usually remains pests and diseases free. Spider mites may invade the foliage, particularly in dry summers. Spraying the foliage with water helps to prevent them. Powdery mildew, slugs, and caterpillars can be a problem too.
Harvesting Licorice
Licorice roots are ready for harvest after two years of planting. Harvest the plant in fall. Extract the horizontal roots with a sharp spade and replant the plant so that it will regrow again. Preserve the main roots so as not to damage the plant.
Storage
Once dried, the licorice roots can be kept for several months.
Companion Plants for Licorice
Good companions — Marjoram, rosemary, and marigold.
0
0
文章
Abigal
2017年03月13日


Growing vines and other vertical elements in a garden adds height, interest, expands useful space, and sometimes even acts as a privacy screen! It’s pretty impossibly to grow most vines, however, without the proper support. You can build DIY garden trellises for any garden from anything from inexpensive lumber to recycled and repurpose materials. Check out these DIY garden trellis tutorials and find one that’s right for the style, feel, and needs in your garden!
Our first project, above, is a freestanding DIY trellis from Lowes, with complete step by step instructions.
Next we have a $6 DIY Trellis from Two Zero One… Love this cost saving project!

We found this great project on Flickr…there is no tutorial, but it’s a pretty basic idea…using the narrow strips of wood gives it a more modern feel.

Sybil Alfano created this great DIY trellis out of an old coat rack… Love this idea! Great instructions.

Find out how to make a basic wood trellis from Remove and Replace…

This is a great idea for inspiration… Using a recycled old mattress base as a trellis! Great idea!
Flea Market Gardening showcases this old ladder trellis… another amazing repurposed idea!

Renee Garner stapled chicken wire to an old window frame for her trellis… So cute!

Another idea from Ecosalon…

And another DIY trellis idea!
Using the side of an old crib as a trellis…

Finally, if your style is a little more modern, Modern in MN has a short tutorial on creating this Kee Klamp Trellis.

0
1
文章
Abigal
2017年03月13日
Learn how to grow cloves in this clove cultivation guide. Growing cloves is somewhat similar to that of the other spices. The scent and flavor of cloves is intense and spicy with a hot note.
USDA Zones— 9b – 12
Difficulty— Moderate to Hard
Family: Myrtaceae
Other Names— Syzygium aromaticum (Scientific name), Bourgeon Floral de Clou de Girofle, Bouton Floral de Clou de Girofle, Caryophylli Flos, Caryophyllum, Caryophyllus aromaticus, Clavo de Olor, Clous de Girolfe, Clove Flower, Clove Flowerbud, Clove Leaf, Clove Oil, Clove Stem, Cloves, Cloves Bud, Ding Xiang, Eugenia aromatica, Eugenia caryophyllata, Eugenia caryophyllus, Feuille de Clou de Girofle, Fleur de Clou de Girofle, Flores Caryophylli, Flores Caryophyllum, Gewurznelken Nagelein, Girofle, Giroflier, Huile de Clou de Girofle, Kreteks, Laung, Lavang, Lavanga, Oil of Clove, Syzygium aromaticum, Tige de Clou de Girofle.

It is an evergreen tree and on favorable climates, it grows up to more than 8 meters high, while the cultivated varieties are of a smaller height of around 5 meters.
Clove tree trunk has smooth bark with grayish yellow aromatic foliage. It is a slow growing but a long-lived tree and can exceed 100 years of age easily.
How to Grow ClovesClove Cultivation
Growing cloves require humid tropical or subtropical climate. Constant temperature above 50 F (10 C) is essential, the optimum temperature for growing clove tree is around 70 – 85 F (20 – 30 C). You can not grow it outdoors in temperate zones. However, growing clove tree in a pot is possible if proper care is done in winters.
Propagation
Growing cloves from seeds and cuttings is possible. For seed propagation, buy seeds that are recently harvested and not dried out completely since completely dried out seeds are not viable and do not germinate.
Plant seeds as soon as you get them. The seeds don’t need to be covered with soil and should be placed on top of the soil. You can cover the pot or seed tray with the plastic sheet to increase the humidity.
Requirements for Growing Cloves

Position
For healthy and strong growth, it needs a tropical climate. The Clove prefers a semi-shaded exposure similar to black pepper. It can not withstand winter temperatures below 32 F (0 C). So do not plant it outside in an area with cold and harsh winters. However, it can tolerate occasional frosts.
Soil
Soil should be rich and loamy with good drainage and lot of organic matter.
Water
Clove tree grows in wet tropics. It requires regular watering especially when the plant is young (first 3-4 years). Overwatering must be avoided.
Fertilizer
Apply 50 kg aged manure or compost and bone meal or fish meal 2-4 kg per year. Usually, the organic fertilizer is applied in the beginning of rainy season in the regions where clove is cultivated. Once the plant starts to grow, apply 40-gram urea, 110-gram superphosphate, and 80-gram MOP, instead of MOP you can also apply potassium sulfate. The dosage must be increased and for the tree that is mature and older than 15 years apply 600 gm urea,1560 gm superphosphate and 1250 gm MOP per year.The fertilizer must be applied in equal split doses in shallow trenches dug around the plant after the end of summer.
Pests and Diseases
In diseases, it suffers from seedling wilt, leaf rot, leaf spot and bud shedding. Stem borer, scales, and mealybugs are the pests that attack it.
Harvesting
The cloves you use as a spice is actually the result of the harvest of dried unopened flower buds. A Clove tree starts to flower after 6 years of its planting if grown in favorable conditions. However, it takes at least 15 – 20 years reach the full bearing stage.
Because opened flowers are not valued as a spice the unopened buds are picked before they turn pink and when they are rounded and plump. At that time, they are less than 2 cm long. Harvesting must be done carefully without damaging the branches.
The buds once picked are dried in the sun or in the hot air chambers until they have lost two-thirds of their original weight and the color of the bud stem has darkened to dark brown and rest of the bud in slight brown color.
Properties and Benefits of ClovesClove is used in the ancient Chinese medicines and in traditional Ayurvedic medicines for its antiseptic and anti-fermentation properties.Clove is used as a disinfectant in the oral cavity and teeth. The action of clove covers micro-organisms, including viruses, bacteria and fungi. It also has analgesic or anesthetic properties.Additionally, it treats digestive disorders such as diarrhea, abdominal pain of spastic origin, bloating and dyspepsia. Since it is an antiseptic, it can also be used in a sore throat.Other Clove Uses
USDA Zones— 9b – 12
Difficulty— Moderate to Hard
Family: Myrtaceae
Other Names— Syzygium aromaticum (Scientific name), Bourgeon Floral de Clou de Girofle, Bouton Floral de Clou de Girofle, Caryophylli Flos, Caryophyllum, Caryophyllus aromaticus, Clavo de Olor, Clous de Girolfe, Clove Flower, Clove Flowerbud, Clove Leaf, Clove Oil, Clove Stem, Cloves, Cloves Bud, Ding Xiang, Eugenia aromatica, Eugenia caryophyllata, Eugenia caryophyllus, Feuille de Clou de Girofle, Fleur de Clou de Girofle, Flores Caryophylli, Flores Caryophyllum, Gewurznelken Nagelein, Girofle, Giroflier, Huile de Clou de Girofle, Kreteks, Laung, Lavang, Lavanga, Oil of Clove, Syzygium aromaticum, Tige de Clou de Girofle.
It is an evergreen tree and on favorable climates, it grows up to more than 8 meters high, while the cultivated varieties are of a smaller height of around 5 meters.
Clove tree trunk has smooth bark with grayish yellow aromatic foliage. It is a slow growing but a long-lived tree and can exceed 100 years of age easily.
How to Grow ClovesClove Cultivation
Growing cloves require humid tropical or subtropical climate. Constant temperature above 50 F (10 C) is essential, the optimum temperature for growing clove tree is around 70 – 85 F (20 – 30 C). You can not grow it outdoors in temperate zones. However, growing clove tree in a pot is possible if proper care is done in winters.
Propagation
Growing cloves from seeds and cuttings is possible. For seed propagation, buy seeds that are recently harvested and not dried out completely since completely dried out seeds are not viable and do not germinate.
Plant seeds as soon as you get them. The seeds don’t need to be covered with soil and should be placed on top of the soil. You can cover the pot or seed tray with the plastic sheet to increase the humidity.
Requirements for Growing Cloves
Position
For healthy and strong growth, it needs a tropical climate. The Clove prefers a semi-shaded exposure similar to black pepper. It can not withstand winter temperatures below 32 F (0 C). So do not plant it outside in an area with cold and harsh winters. However, it can tolerate occasional frosts.
Soil
Soil should be rich and loamy with good drainage and lot of organic matter.
Water
Clove tree grows in wet tropics. It requires regular watering especially when the plant is young (first 3-4 years). Overwatering must be avoided.
Fertilizer
Apply 50 kg aged manure or compost and bone meal or fish meal 2-4 kg per year. Usually, the organic fertilizer is applied in the beginning of rainy season in the regions where clove is cultivated. Once the plant starts to grow, apply 40-gram urea, 110-gram superphosphate, and 80-gram MOP, instead of MOP you can also apply potassium sulfate. The dosage must be increased and for the tree that is mature and older than 15 years apply 600 gm urea,1560 gm superphosphate and 1250 gm MOP per year.The fertilizer must be applied in equal split doses in shallow trenches dug around the plant after the end of summer.
Pests and Diseases
In diseases, it suffers from seedling wilt, leaf rot, leaf spot and bud shedding. Stem borer, scales, and mealybugs are the pests that attack it.
Harvesting
The cloves you use as a spice is actually the result of the harvest of dried unopened flower buds. A Clove tree starts to flower after 6 years of its planting if grown in favorable conditions. However, it takes at least 15 – 20 years reach the full bearing stage.
Because opened flowers are not valued as a spice the unopened buds are picked before they turn pink and when they are rounded and plump. At that time, they are less than 2 cm long. Harvesting must be done carefully without damaging the branches.
The buds once picked are dried in the sun or in the hot air chambers until they have lost two-thirds of their original weight and the color of the bud stem has darkened to dark brown and rest of the bud in slight brown color.
Properties and Benefits of ClovesClove is used in the ancient Chinese medicines and in traditional Ayurvedic medicines for its antiseptic and anti-fermentation properties.Clove is used as a disinfectant in the oral cavity and teeth. The action of clove covers micro-organisms, including viruses, bacteria and fungi. It also has analgesic or anesthetic properties.Additionally, it treats digestive disorders such as diarrhea, abdominal pain of spastic origin, bloating and dyspepsia. Since it is an antiseptic, it can also be used in a sore throat.Other Clove Uses
1
0


文章
lenny
2017年02月24日

#Growing corn in containers is possible, however the yield is less than the corn grown in a #garden . Corn requires more #space than most small or medium sized containers provide. If you’re planting corn in containers, use large pots and reproduce optimum external conditions as close as possible.Choosing Containers to Grow Corn in Pots

Choose a large container that is at least 12 inches deep and wide. You can grow about four corn plants in this size of pot. Make sure your pot have enough drainage holes in the bottom.
Varieties for Growing Corn in Containers
As you grow corn in pots, choose a dwarf variety that does not exceed 4 or 5 feet (1.2 to 1.5 m) height. Some good choices are short stemmed ‘Trinity’ and ‘Sweet Painted Mountain’.
Planting
Sow four to six seeds per pot about 1 inch (2.5 cm) deep and rake a bit of soil above them. Don’t worry if the corn is planted together closely in a pot. In fact, sowing seeds closely helps in pollination and allow the corn to fruit abundantly.
Requirements
Sweet corn needs full sun, plenty of water and fertile soil to thrive. It depends on the wind for pollination, which is best achieved when the corn is planted in a block of several short rows.
Mulch around the corn to hold in moisture. Use wood chips, newspapers or grass to help prevent moisture loss. Mulching also keeps weeds to a minimum.
Soil
Corn plants require soil that retains moisture without drying out quickly but drains well enough so it doesn’t become soggy or waterlogged. A peat based potting soil works best for them.
Water
Water the plant every other day, keeping the soil constantly moist. Water is important ingredient to get sweet and soft corns, especially at the time of fruiting you’ll need to water your potted corns more.
Fertilizer
Add fertilizer after 10 weeks from sowing. Dig a hole about 2 cm in depth and diameter around each plant. Pour 1/2 tablespoons of 5-10-10 or 10-20-20 fertilizer per plant, and incorporate the soil.
Harvesting
If you know how to grow corn in pots, you can grow your own corns without the need of lot of space, usually corns are ready to harvest between 60 to 100 days after planting, depending on the variety and weather conditions.
0
0
文章
Andy
2017年02月24日
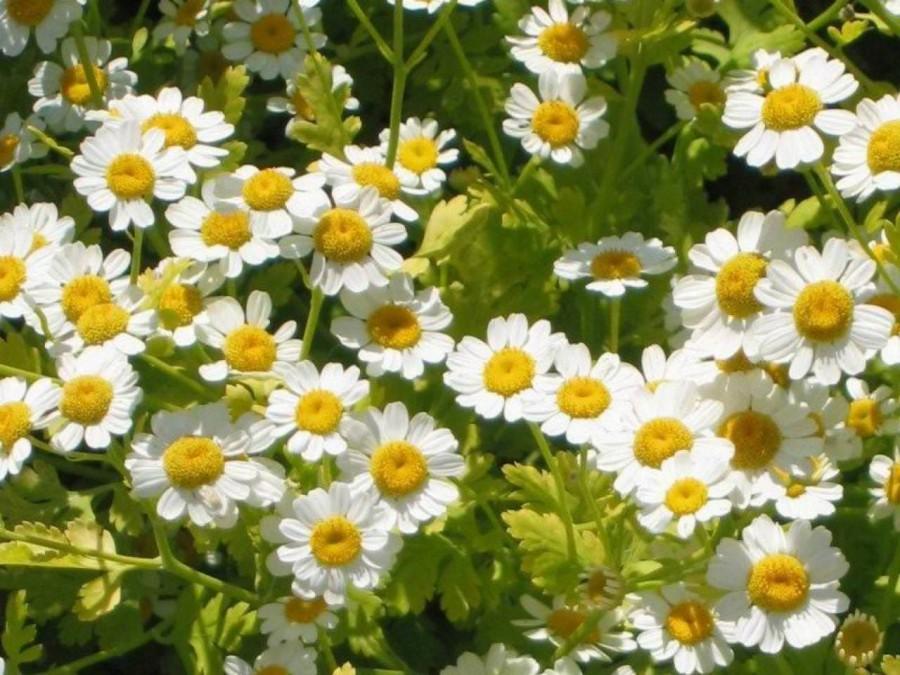
Learn how to #grow feverfew. Growing feverfew plant is relatively easy. It is a useful medicinal herb, plus it embellishes itself with beautiful yellow-white #flowers .
Difficulty — Easy
Other Names — Featherfew, Fever few, Febrifuge #plant , Featherfoil, Mid-summer daisy and wild chamomile .
Feverfew (Tanacetum parthenium) belong to the Asteraceae family (family of chrysanthemums). This plant is also called “false chamomile”. It is native to the Eastern Mediterranean. From there it was brought to Central and Western Europe a long time ago, where it was grown in gardens as a medicinal and ornamental plant.
In temperate areas, the feverfew is a short living perennial. Where the winters are harder, growing feverfew is possible as an annual plant. It is a low maintenance plant that loves to grow in typically variety of soil types and therefore frequently occurs as a garden weed.
Feverfew Uses
Feverfew is used to treat a wide range of health problems, such as fever, cold, rheumatism and cramps. It is also widely used to treat migraines. The flowers, stems and leaves are harvested for medicinal purposes. Parthenolide, a sesquiterpene lactone is considered the main biological active ingredient found in feverfew.
How to Grow FeverfewPropagation and Planting Feverfew
It can be propagated by seeds, cuttings and division.
To propagate it from seeds, since they are somewhat rare if you don’t find them locally, buy online. Sow them indoors in early spring in a seed tray using well draining starting mix. Scatter the seeds over the surface of soil and lightly tamp them. Cover the tray with plastic sheet or put in a plastic bag and keep that in a bright spot.
If you want to sow seeds directly on the ground wait until the temperature warms up around 60 F (15 C) and last frost date passes away in the spring. Keep the soil evenly moist until the germination. Germination occurs within one or two weeks after seed sowing.
To know more about feverfew propagation, read this article.
Requirements for Growing FeverfewLocation
Often this herb settles down by itself in the garden and is regarded by many gardeners wrongly as a weed. Ideal location to grow feverfew is full to partially sunny spot. Growing feverfew in pots, railing planters and window boxes is possible too, you can easily cultivate it on your balcony garden, just be careful not to keep it on windy spot.
Watering
Feverfew plants prefer soil which never dry out completely. Regular watering is important but overwatering can lead it to death, care in watering is required in cold weather conditions, in winter.
Soil
This undemanding plant grows in all soil types except heavy clay rich soil. Best to plant it in nutrient-rich, well drained and loose soil.
Feverfew Plant CareFertilizer
Growing feverfew doesn’t require fertilizer, if soil is rich in organic matter. However, you can apply a fertilizer you use for other flowers monthly.
Overwinter
Feverfew plants are grown as perennial and annual. Annual varieties die off in the winter and then germinate again in the spring. Feverfews are sensitive to extreme cold and need special care in winter time.
Mulching
Do protect mulching to protect the plant from severe cold in winters. Mulching also helps in summers in conserving moisture.
Pruning
Deadhead the faded flowers and slightly prune off the plant after the first flowering. Pruning stimulates the growth of new flowers. Prune long, leggy and diseased
branches with discolored leaves. You can prune off the plant up to about one-third of its size.
Pests and diseases
While growing feverfew plants, gardeners sometimes face problems due to wrong planting site and permanent waterlogging in soil. In pests and diseases, care feverfew plant from slugs, powdery mildew, spider mites and aphids. To prevent the pests, colonize geraniums, garlics or cress as companion plants.
Harvesting
1
0
文章
Abigal
2017年02月23日
Growing season is creeping nearer, and we all are looking at our #garden beds from last year in the harsh light of winters lack of plant cover…and possible being disappointed by their condition. Have you considered using raised beds this year? Raised beds are great for veggies and herbs, and can be the perfect solution for flower beds when the soil is poor, or when a gardener just needs an easier way to maintain their garden #space . Easy to put together, raised beds are nothing more than a box with no bottom, filled with good garden soil. Plants that are grown in raised beds are healthier, weeds are easier to control, and watering and fertilizing is concentrated right where you need it. Gardeners that have trouble bending over find raised beds easier to work in, and you can make them any height that works for you. Plus, they just keep the garden neat! If you want to try raised garden beds this year, check out these tutorials for #DIY raised garden beds. Our featured project, using water troughs as raised beds! I love this because it looks like art in the garden, yet tall enough to make working the beds easy for an older gardener, or someone like me who has trouble with her knees… Love this!

This raised bed has minimal side, but it’s an easy way to organize the vegetable patch. They used simple lengths of re-purposed steel rods as edging.

Just need a basic raised bed tutorial? This Old House shows you how…

Project Alicia created this unique raised bed from tin roofing and some lumber… They give complete directions on how they made it, and their son helped!

I Save A 2 Z created this budget friendly raised bed from cinder blocks. I like how they lined the bottom with cardboard to prevent weeds from growing up into the bed.

Life on the Balcony created this project that is a cross between a raised bed and a garden container… but it serves the raised bed purpose, and you have to love the vintage charm it gives the garden. Heres how to create a wine box raised garden bed.

Lastly, I’m throwing this one in because we love it for inspiring small gardens to having raised beds as well!

Create a basic garden bed, or a unique DIY raised garden bed like the ones shown here… Think of how much healthier you could eat, for less! (Oh, and EASIER!)
This raised bed has minimal side, but it’s an easy way to organize the vegetable patch. They used simple lengths of re-purposed steel rods as edging.
Just need a basic raised bed tutorial? This Old House shows you how…
Project Alicia created this unique raised bed from tin roofing and some lumber… They give complete directions on how they made it, and their son helped!
I Save A 2 Z created this budget friendly raised bed from cinder blocks. I like how they lined the bottom with cardboard to prevent weeds from growing up into the bed.
Life on the Balcony created this project that is a cross between a raised bed and a garden container… but it serves the raised bed purpose, and you have to love the vintage charm it gives the garden. Heres how to create a wine box raised garden bed.
Lastly, I’m throwing this one in because we love it for inspiring small gardens to having raised beds as well!
Create a basic garden bed, or a unique DIY raised garden bed like the ones shown here… Think of how much healthier you could eat, for less! (Oh, and EASIER!)
0
0
文章
Joss
2017年02月22日

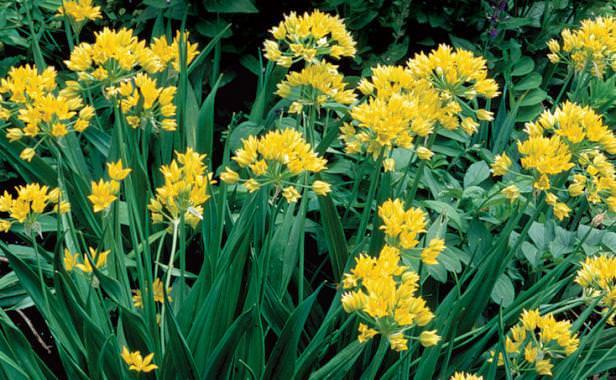
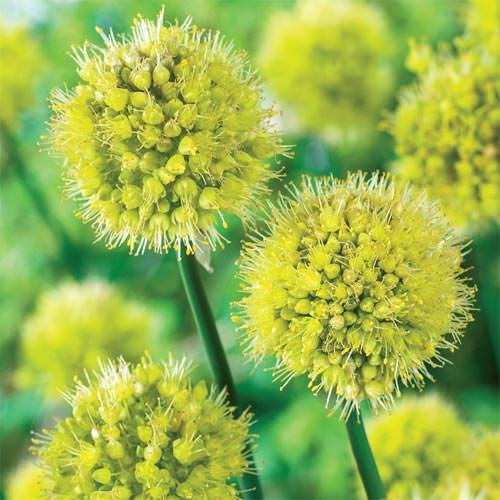
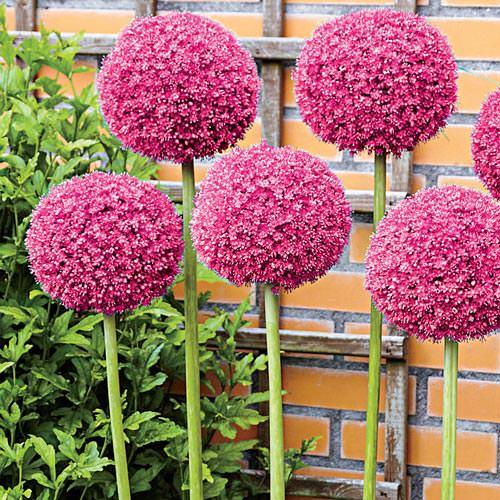
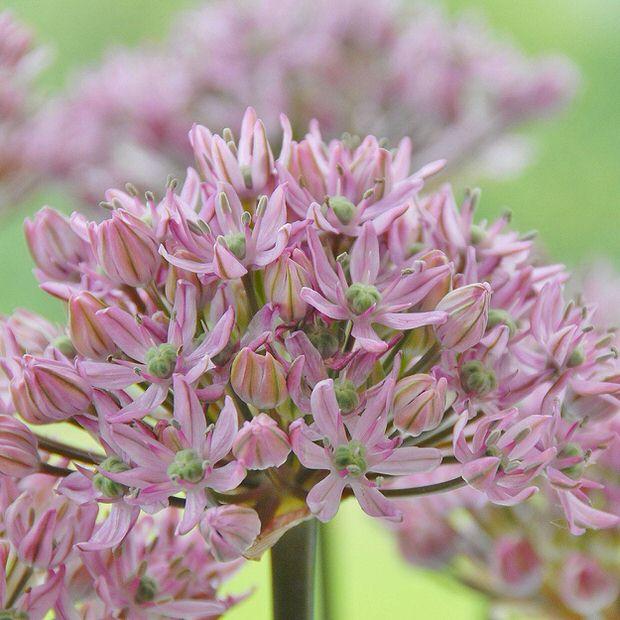
Alliums are one of the best and easiest bulbs to #grow in the gardening world, but often overlooked. Gorgeous, show stopping blooms, easy growing requirements, and amazing architectural shape make these perfect for any gardener, beginner or seasoned veteran. The large round or oval #flowers are borne on single stalks that tower over the garden from 1-4 feet, usually in mid spring to early summer, but there are varieties that bloom even in the fall. Flowers can be tiny little globes, or large 6 inch giants. One of the best traits of the allium over other spring and summer bulbs is that most animals will avoid eating them. Apparently, people aren’t the only ones who want to avoid onion breath! That’s right, alliums are simply ornamental, or flowering onions. Don’t let images of big smelly onions growing in your garden dissuade you, these plants are nothing of the sort, with a gorgeous, sweet scent. Beautiful as cut flowers as well, they come in whites, blues, purples, pinks and even yellow. Your tulips and daffodils may still get top billing in the spring, but make sure you tuck some alliums into your flower beds as well. Here is how to grow those amazing alliums! Photo below by ‘Dutch Flower Bulbs‘.

Photo below by ‘Fine Gardening‘. Allium “Jeannine”.
How To Grow Alliums
Buy allium bulbs from a good nursery or online resource. You want healthy bulbs with no cuts or soft spots. Research varieties to include several varieties of different bloom times to keep the show going!
Most varieties are hardy zones 3-9.
Like most bulbs, these look best planted in groups.
Plant the bulbs in the fall, before the ground freezes. Plant them to a depth of 3 times their diameter in a sunny or mostly sunny position. Generally, 6-8 inches.
Fertilize at planting and yearly in spring with bone meal or a bulb food.
Water well, then leave till they burst out in flower in spring and summer! After flowering, allium foliage will wither, brown, and go dormant.
Plant them under, behind, and around other perennial plants whose growing foliage will cover the allium foliage later in the summer when it browns.
Do not cut back the browning allium leaves until fall, that is how they store energy for flowers the next season. (This is why planting foliage plants around them is important.)
Photo below by ‘Gardener’s Supply‘.
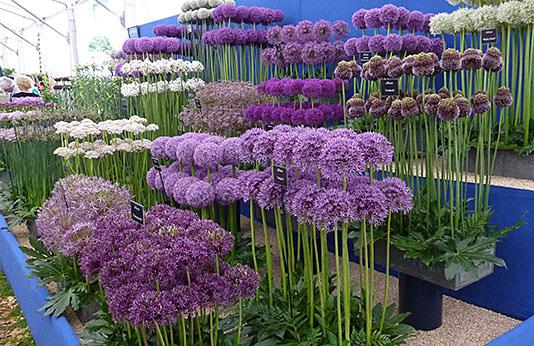
Our Favorite Allium Varieties
Gladiator – A giant variety. 3-4 feet tall, this showstopper blooms with 6 inch flowers in May-June. It prefers sun but will tolerate partial shade, and has a sweet scent. From ‘Eden Brothers‘. If you are looking to make a statement in your garden, this is it.

Globe Master – This one is the biggest giant we know of, with blooms topping out at a foot across! 36-40 inches high, it’s a gorgeous pick for any spring to early summer garden. Blooms are slightly more blue than Gladiator. From ‘American Meadows‘.

Allium obliquum – This unusual shade of yellow in a small flowered allium is a perfect selection for a naturalized planting. Growing to just 24 inches high, it’s fragrant and blooms late spring to early summer. From ‘Dutch Bulbs‘.
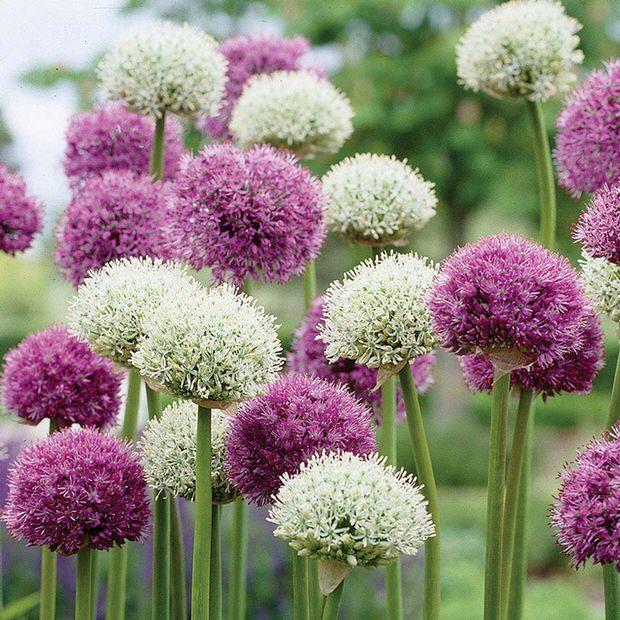
Mount Everest / Purple Sensation – Long the standard for garden alliums , “Purple Sensation” has 4-5 inch globes and grows to 24-30 inches high. It’s white partner here is “Mount Everest”, perfect in combination because they grow to similar sizes and have similar late spring – early summer bloom times. From ‘Longfield Gardens‘.
Twinkling Stars – This giant pink variety has 5-6 inch blooms and 3 1/2 – 4 foot stems, making it perfect for the back of the border. Blooms in May – June. From ‘Breck’s Bulbs‘.
Pink Jewel – A later blooming allium, starting in June into July. This light pink selection grows to 24 inches high, and has 3 inch blooms. From ‘White Flower Farm‘.
Drumstick Allium – Our last selection is the drumstick allium, an oval shaped reddish bloom that grows to 24 inches high. This allium can actually be grown down to zone 2! Blooms early spring to early summer. Another variety great for naturalizing. From ‘American Meadows‘. So which is your favorite?
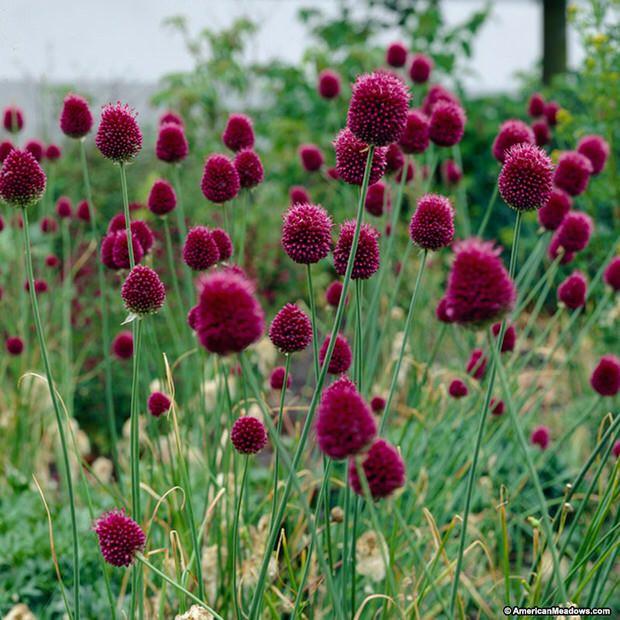
Photo below by ‘Fine Gardening‘. Allium “Jeannine”.
How To Grow Alliums
Buy allium bulbs from a good nursery or online resource. You want healthy bulbs with no cuts or soft spots. Research varieties to include several varieties of different bloom times to keep the show going!
Most varieties are hardy zones 3-9.
Like most bulbs, these look best planted in groups.
Plant the bulbs in the fall, before the ground freezes. Plant them to a depth of 3 times their diameter in a sunny or mostly sunny position. Generally, 6-8 inches.
Fertilize at planting and yearly in spring with bone meal or a bulb food.
Water well, then leave till they burst out in flower in spring and summer! After flowering, allium foliage will wither, brown, and go dormant.
Plant them under, behind, and around other perennial plants whose growing foliage will cover the allium foliage later in the summer when it browns.
Do not cut back the browning allium leaves until fall, that is how they store energy for flowers the next season. (This is why planting foliage plants around them is important.)
Photo below by ‘Gardener’s Supply‘.
Our Favorite Allium Varieties
Gladiator – A giant variety. 3-4 feet tall, this showstopper blooms with 6 inch flowers in May-June. It prefers sun but will tolerate partial shade, and has a sweet scent. From ‘Eden Brothers‘. If you are looking to make a statement in your garden, this is it.
Globe Master – This one is the biggest giant we know of, with blooms topping out at a foot across! 36-40 inches high, it’s a gorgeous pick for any spring to early summer garden. Blooms are slightly more blue than Gladiator. From ‘American Meadows‘.
Allium obliquum – This unusual shade of yellow in a small flowered allium is a perfect selection for a naturalized planting. Growing to just 24 inches high, it’s fragrant and blooms late spring to early summer. From ‘Dutch Bulbs‘.
Mount Everest / Purple Sensation – Long the standard for garden alliums , “Purple Sensation” has 4-5 inch globes and grows to 24-30 inches high. It’s white partner here is “Mount Everest”, perfect in combination because they grow to similar sizes and have similar late spring – early summer bloom times. From ‘Longfield Gardens‘.
Twinkling Stars – This giant pink variety has 5-6 inch blooms and 3 1/2 – 4 foot stems, making it perfect for the back of the border. Blooms in May – June. From ‘Breck’s Bulbs‘.
Pink Jewel – A later blooming allium, starting in June into July. This light pink selection grows to 24 inches high, and has 3 inch blooms. From ‘White Flower Farm‘.
Drumstick Allium – Our last selection is the drumstick allium, an oval shaped reddish bloom that grows to 24 inches high. This allium can actually be grown down to zone 2! Blooms early spring to early summer. Another variety great for naturalizing. From ‘American Meadows‘. So which is your favorite?
0
1
文章
Abigal
2017年02月22日
I have a secret. I used to hate succulents. With a passion. I think I was influenced #growing up in the ’70’s in California, where succulents were usually half dead hen and chicks filling a yard people thought was “no maintenance”… So when succulents began to gain a resurgence in popularity, I scoffed. Until I opened my eyes and saw the truth. The truth is that succulents and sedums are gorgeously colored, textural, easy to grow and offer an amazing amount of variety. These are not my childhood hen and chicks! I’m still trying to sell Steve on the succulents, though I think he’s seeing the light… (He’s more of a cactus guy… another area to which my eyes are a little closed… Hey, I’m a work in progress, ok? :)) I’ve come to love sedums so much that half my yard is covered in my fav, Sedum ‘Angelina’ – it is proof that succulents can be lush and green, too! In fact, we used mostly sedums to fill our recent #DIY cinder block planter. (And they are filling in nicely!) So what is my next move? Sedum and succulent planters are the perfect way to showcase these beauties, without them getting lost in the garden. So here are our picks for gorgeous planter projects that should have you all rethinking succulents, and possibly cause you to run, not walk, to the nursery. Did I mention these plants are easy? Come on people, jump on the succulent train! Note: If you want you succulent planter to stay outdoors all year, make sure you buy them from the nursery’s hardy stock, usually kept outside. The succulents you find in the greenhouse are not hardy, but can be used outdoors in the summer and brought inside for winter. They make great houseplants too!

Talk about simple… this succulent planter from ‘BHG‘ is simply pvc pipe cut into rounds, tucked in to a tray filled with stones, and planters with succulent starts. (Starts are tiny new plants, usually less expensive, too.)

This DIY vertical brick succulent planter is in the book ‘Design Sponge at Home’. Need to get my hands on a copy and find out exactly how they did it! Anyone have a copy and want to share the basics?

These are various succulents planted in a trunk. Cute! Keep in mind, succulents need excellent drainage, so make sure there is a good layer of rocks in the bottom of any container that does not drain well, and use soil mixed with sand.

From ‘Gardenista‘, by Lila B. Design, this succulent log planter is beautiful and natural… And would have good drainage for these plants. An easy DIY project! (Ok, simple, maybe not easy! That’s a lot of plants!) Baylor Chapman is the owner of Lila B. Design, and has a book out I’m dying to get my hands on, called ‘The Plant Recipe Book’. Their motto is “we make beautiful statements with living things”… Wow, do they ever! Wish I still lived in the Bay Area, just to go visit that shop!

Another project from “Lila B.’… this succulent planter from window shutters is a perfect example of using starts, tucked into the slats of the shutters. You can create your own small plants from many succulents just by breaking off a piece. Most will root easily.

‘Sunset Magazine’ shows us how to make our own living art from succulents. Be sure to check out all the steps, it shows variations and different parts of the project.


From ‘Ciao! Newport Beach‘, one of their readers created this succulent garden with a beach theme. Don’t be afraid to add other elements to your succulent container to give it the right feel for your garden.

This photo was taken by Sue Brown at ‘Cottage Gardens Nursery’ in Petaluma, California. Using an old water fountain gives this container garden real character! What other types of upcycled containers would work well?

Another idea from ‘Sunset’, this water wise succulent garden was planted in an old chicken trough…

From ‘Gardening Gone Wild‘, these succulents pots are grouped together for impact. I like the concrete pots with the sedums…

This last one I had to throw in, just to highlight the beauty of these plants, and their versatility. SG Plants in Castroville, California (I spent time in Castroville as a a kid, great growing area! Artichokes everywhere!) has perfected these succulent vertical planter panels. They use these large scale panels to create garden art. Could a DIY’er do this same thing on a smaller scale? Beautiful and inspiring!
Talk about simple… this succulent planter from ‘BHG‘ is simply pvc pipe cut into rounds, tucked in to a tray filled with stones, and planters with succulent starts. (Starts are tiny new plants, usually less expensive, too.)
This DIY vertical brick succulent planter is in the book ‘Design Sponge at Home’. Need to get my hands on a copy and find out exactly how they did it! Anyone have a copy and want to share the basics?
These are various succulents planted in a trunk. Cute! Keep in mind, succulents need excellent drainage, so make sure there is a good layer of rocks in the bottom of any container that does not drain well, and use soil mixed with sand.
From ‘Gardenista‘, by Lila B. Design, this succulent log planter is beautiful and natural… And would have good drainage for these plants. An easy DIY project! (Ok, simple, maybe not easy! That’s a lot of plants!) Baylor Chapman is the owner of Lila B. Design, and has a book out I’m dying to get my hands on, called ‘The Plant Recipe Book’. Their motto is “we make beautiful statements with living things”… Wow, do they ever! Wish I still lived in the Bay Area, just to go visit that shop!
Another project from “Lila B.’… this succulent planter from window shutters is a perfect example of using starts, tucked into the slats of the shutters. You can create your own small plants from many succulents just by breaking off a piece. Most will root easily.
‘Sunset Magazine’ shows us how to make our own living art from succulents. Be sure to check out all the steps, it shows variations and different parts of the project.
From ‘Ciao! Newport Beach‘, one of their readers created this succulent garden with a beach theme. Don’t be afraid to add other elements to your succulent container to give it the right feel for your garden.
This photo was taken by Sue Brown at ‘Cottage Gardens Nursery’ in Petaluma, California. Using an old water fountain gives this container garden real character! What other types of upcycled containers would work well?
Another idea from ‘Sunset’, this water wise succulent garden was planted in an old chicken trough…
From ‘Gardening Gone Wild‘, these succulents pots are grouped together for impact. I like the concrete pots with the sedums…
This last one I had to throw in, just to highlight the beauty of these plants, and their versatility. SG Plants in Castroville, California (I spent time in Castroville as a a kid, great growing area! Artichokes everywhere!) has perfected these succulent vertical planter panels. They use these large scale panels to create garden art. Could a DIY’er do this same thing on a smaller scale? Beautiful and inspiring!
6
3
文章
Hande Salcan
2017年02月21日

I don’t like the idea of adding chemicals to our environment, whenever it can be helped. And let’s be honest… If you are growing your own veggies, you are probably after some of the health benefits, right? Ok, and then there is the cost factor as well… why wouldn’t you make your own #organic fertilizers for your garden, instead of buying expensive specialty products? It is easy, it is healthy for both your family and the earth at large, and it is cost effective.

Basically #plants need three major nutrients to thrive, Nitrogen (N), Phosphorus (P) and Potassium (K). You might see these displayed on commercially made fertilizers in number form, for example, 10-5-5. Nitrogen is necessary for leaf and green growth, Phosphorus for flowers and fruit, and Potassium for gemeral health of the plant. That having been said, plants need a lot of other nutrients as well, called Micronutrients. Some of these include Magnesium, Calcium and Sulfur. Plants are also affected by the acidity of a soil, and the biodiversity of bacteria that creates a healthy environment, all of which can be improved with organic fertilizers. Now that you have the basics down of why we are doing this, let’s get down to some simple recipes for our choices for top organic #garden fertilizers you can make!

Coffee Grounds Fertilizer
Coffee grounds is a natural fertilizer that not only adds nitrogen to poor soil, it also increases the acidity of soil. This will especially make your roses, hydrangeas, magnolias and rhodies happy!
Work up to 25% coffee grounds into soil at the base of the plants. Coffee grounds will also improve the organic matter in the soil.
Banana Peel Fertilizer
High in potassium, phosphorus and calcium, banana peels are great for flowering and fruiting plants. Simply bury a peel under the ground at the base of the plant, and allow to decompose. You can also freeze overripe bananas that you would have otherwise thrown away, and then bury next to a needy plant when needed. If you prefer to make a spray, soak a peel in water for 2-3 days, then use the water to spray plants or seedlings.
Epsom Salt Fertilizer
Epsom salt is available at your local drug store, and adds important magnesium and sulfur to the soil. Especially good for tomatoes and roses, Epsom salt tea is great for starting seedlings and reducing transplant shock as well. Known for giving plants a deep green color, especially on magnesium low soils, this is a simple and quick recipe. It is pretty impossible to over do this fertilizer, as it breaks down in to a simple magnesium component.
Recipe
1 Tablespoon Epsom Salt
1 Gallon water
Use from a watering can for both indoor and outdoor plants. Can also be mixed into the soil around plants at a rate of 1 tablespoon for every 1-2 feet in height of plant. Water in well.
Egg Shell Fertilizer
Egg shells are very high in calcium, which is necessary for good cellular growth in all plants. If you have ever had blossom end rot on your tomatoes, then you probably have calcium deficient soil. You can crush up used egg shells and just bury them beneath the surface of the soil, or for a faster response, you can make a spray.
Recipe
20 egg shells
1 Gallon Water
Boil the egg shells in the water for a few minutes, then let them sit in the water overnight. Strain and use as a spray or water from a can directly into the soil.
Grass Clippings Tea
Here is a great way to get a high nitrogen fertilizer, and use up those annoying grass clippings at the same time!
Recipe
1 Five gallon bucket filled with fresh grass clippings.
Cover with water
Allow to sit for 3-5 days. Dilute the strained fertilizer tea by using one cup tea mixed with 10 cups fresh water. Pour onto soil.
Compost Tea
Made in exactly the same way as grass clippings tea, but with organic compost. This gives a much richer tea with a variety of nutrients, perfect for any plant.
So spend a little time setting aside some egg shells and coffee grounds, or drop by the drugstore for some Epsom salts. You will be saving yourself some cash, and creating a healthier environment for your plants, and the planet!
Basically #plants need three major nutrients to thrive, Nitrogen (N), Phosphorus (P) and Potassium (K). You might see these displayed on commercially made fertilizers in number form, for example, 10-5-5. Nitrogen is necessary for leaf and green growth, Phosphorus for flowers and fruit, and Potassium for gemeral health of the plant. That having been said, plants need a lot of other nutrients as well, called Micronutrients. Some of these include Magnesium, Calcium and Sulfur. Plants are also affected by the acidity of a soil, and the biodiversity of bacteria that creates a healthy environment, all of which can be improved with organic fertilizers. Now that you have the basics down of why we are doing this, let’s get down to some simple recipes for our choices for top organic #garden fertilizers you can make!
Coffee Grounds Fertilizer
Coffee grounds is a natural fertilizer that not only adds nitrogen to poor soil, it also increases the acidity of soil. This will especially make your roses, hydrangeas, magnolias and rhodies happy!
Work up to 25% coffee grounds into soil at the base of the plants. Coffee grounds will also improve the organic matter in the soil.
Banana Peel Fertilizer
High in potassium, phosphorus and calcium, banana peels are great for flowering and fruiting plants. Simply bury a peel under the ground at the base of the plant, and allow to decompose. You can also freeze overripe bananas that you would have otherwise thrown away, and then bury next to a needy plant when needed. If you prefer to make a spray, soak a peel in water for 2-3 days, then use the water to spray plants or seedlings.
Epsom Salt Fertilizer
Epsom salt is available at your local drug store, and adds important magnesium and sulfur to the soil. Especially good for tomatoes and roses, Epsom salt tea is great for starting seedlings and reducing transplant shock as well. Known for giving plants a deep green color, especially on magnesium low soils, this is a simple and quick recipe. It is pretty impossible to over do this fertilizer, as it breaks down in to a simple magnesium component.
Recipe
1 Tablespoon Epsom Salt
1 Gallon water
Use from a watering can for both indoor and outdoor plants. Can also be mixed into the soil around plants at a rate of 1 tablespoon for every 1-2 feet in height of plant. Water in well.
Egg Shell Fertilizer
Egg shells are very high in calcium, which is necessary for good cellular growth in all plants. If you have ever had blossom end rot on your tomatoes, then you probably have calcium deficient soil. You can crush up used egg shells and just bury them beneath the surface of the soil, or for a faster response, you can make a spray.
Recipe
20 egg shells
1 Gallon Water
Boil the egg shells in the water for a few minutes, then let them sit in the water overnight. Strain and use as a spray or water from a can directly into the soil.
Grass Clippings Tea
Here is a great way to get a high nitrogen fertilizer, and use up those annoying grass clippings at the same time!
Recipe
1 Five gallon bucket filled with fresh grass clippings.
Cover with water
Allow to sit for 3-5 days. Dilute the strained fertilizer tea by using one cup tea mixed with 10 cups fresh water. Pour onto soil.
Compost Tea
Made in exactly the same way as grass clippings tea, but with organic compost. This gives a much richer tea with a variety of nutrients, perfect for any plant.
So spend a little time setting aside some egg shells and coffee grounds, or drop by the drugstore for some Epsom salts. You will be saving yourself some cash, and creating a healthier environment for your plants, and the planet!
3
1
文章
Martha
2017年02月17日

Learn how to grow #peanuts in this article. Growing Peanuts in containers is fun as well as easy to do and somewhat similar to #potatoes .
Difficulty— Easy
Other Names— Arachis hypogaea (Scientific Name), Groundnut
Soil pH— 6 – 6.5
Peanut (Arachis hypogaea) is an annual plant belonging to the Fabaceae family, a legume. It is a hardy plant that requires minimal attention. Peanut, which is also called groundnut contains many trace elements like copper, zinc, manganese and vitamin B and is very nutritious.
How to Grow Peanuts in ContainersPropagation and Planting Peanuts in containers
Fill the seed tray or container with potting soil or potting mix. Sow seeds at the depth of 3 cm. Cover them up with a thin layer of soil. Also note that peanut seeds you obtain for sowing must remain in their shell and you should open them just before planting.
For proper germination and maximum yield, temperature must be above 70 F (21 ° C), 80 F is optimum. After a week or two, the seeds will germinate.
Let the seedlings grow a bit and replant them in individual pots.

If you’re growing peanuts in cooler zone you should remember that peanuts require at least 100 frost free days to mature. You’ll need to start the seeds indoors, earlier, at least 30 days before the final frost date in the spring.
Choosing Containers
Peanut develops its pod from 5 to 10 cm under the ground. So select pot at least 30 cm deep and 40 – 50 cm. wide (1 feet deep and 1 – 2 feet wide). Make sure the pots have sufficient drainage holes. You can grow 2 – 3 plants in such a pot.
Requirements for Growing Peanuts in ContainersPosition
Peanut is a tropical plant, it loves to grow in slightly humid and warm conditions. When growing peanuts in containers place them in the sunniest but less windy spot of your balcony or terrace. The plant does not survive below 32 F (0 ° C). It flowers and fruits at a temperature between 70 – 95 F (20 to 35 ° C).
Soil
For growing peanuts in containers fertile and light soil is required, which is neutral in pH and well-drained. Best to buy a good quality organic potting mix or make your own.
Watering
When growing peanuts in pots, keep the soil slightly moist. During early growth and flowering period, increase watering. However, the plant tolerates short dry periods.

Peanut Plant CareEarthing up
The base of the peanut plant should be covered with soil to increase production. Once the plant reaches 10 inches of height earthen up the soil around the base, as is the case of potatoes, so as to favor the development of the pods.
Fertilizer
Initially it will not need any type of fertilization, but when you see the first yellow flowers forming, it is then useful to help the plant with the organic fertilizer that is rich in phosphorus and potassium as peanuts are legumes and form their own nitrogen you don’t need to fertilize them with additional nitrogen fertilizer.
Pests and Diseases
The most common diseases in addition to molds and fungi are leaf spots. In pests it is attacked by aphids, potato leafhopper and spider mites.
Harvesting PeanutsWhen and How to Harvest Peanuts?
Difficulty— Easy
Other Names— Arachis hypogaea (Scientific Name), Groundnut
Soil pH— 6 – 6.5
Peanut (Arachis hypogaea) is an annual plant belonging to the Fabaceae family, a legume. It is a hardy plant that requires minimal attention. Peanut, which is also called groundnut contains many trace elements like copper, zinc, manganese and vitamin B and is very nutritious.
How to Grow Peanuts in ContainersPropagation and Planting Peanuts in containers
Fill the seed tray or container with potting soil or potting mix. Sow seeds at the depth of 3 cm. Cover them up with a thin layer of soil. Also note that peanut seeds you obtain for sowing must remain in their shell and you should open them just before planting.
For proper germination and maximum yield, temperature must be above 70 F (21 ° C), 80 F is optimum. After a week or two, the seeds will germinate.
Let the seedlings grow a bit and replant them in individual pots.
If you’re growing peanuts in cooler zone you should remember that peanuts require at least 100 frost free days to mature. You’ll need to start the seeds indoors, earlier, at least 30 days before the final frost date in the spring.
Choosing Containers
Peanut develops its pod from 5 to 10 cm under the ground. So select pot at least 30 cm deep and 40 – 50 cm. wide (1 feet deep and 1 – 2 feet wide). Make sure the pots have sufficient drainage holes. You can grow 2 – 3 plants in such a pot.
Requirements for Growing Peanuts in ContainersPosition
Peanut is a tropical plant, it loves to grow in slightly humid and warm conditions. When growing peanuts in containers place them in the sunniest but less windy spot of your balcony or terrace. The plant does not survive below 32 F (0 ° C). It flowers and fruits at a temperature between 70 – 95 F (20 to 35 ° C).
Soil
For growing peanuts in containers fertile and light soil is required, which is neutral in pH and well-drained. Best to buy a good quality organic potting mix or make your own.
Watering
When growing peanuts in pots, keep the soil slightly moist. During early growth and flowering period, increase watering. However, the plant tolerates short dry periods.
Peanut Plant CareEarthing up
The base of the peanut plant should be covered with soil to increase production. Once the plant reaches 10 inches of height earthen up the soil around the base, as is the case of potatoes, so as to favor the development of the pods.
Fertilizer
Initially it will not need any type of fertilization, but when you see the first yellow flowers forming, it is then useful to help the plant with the organic fertilizer that is rich in phosphorus and potassium as peanuts are legumes and form their own nitrogen you don’t need to fertilize them with additional nitrogen fertilizer.
Pests and Diseases
The most common diseases in addition to molds and fungi are leaf spots. In pests it is attacked by aphids, potato leafhopper and spider mites.
Harvesting PeanutsWhen and How to Harvest Peanuts?
0
1

