文章
Abigal
2017年03月26日


If you want to make a dramatic statement in your garden, without a lot of maintenence, a DIY dry creek bed is the way to go. It gives your yard a natural feel, without having to manage a real water feature. And they are surprisingly easy to DIY, but still have a professional look to the finished project. They are great options for an area that doesn’t drain well, has poor soil, or perhaps has an easement. A few tips to keep in mind?
The creek or stream bed should meander naturally, never in a straight line.
Add larger boulders at turns in the creek bed for drama.
Vary the size of the rock in your creek bed.
Anchor the “banks” of your creek bed with plants.
Choose rock that looks natural for your region.
Let’s start with a tutorial on the basics, how to build a dry creek bed, by BHG.


Fine Gardening also has a great tutorial on making a dry stream bed, but to get to the actual directions, you need to go to page 3 in their post. The first two pages has good information though, so take a peek.

‘Pink and Green Mama’ did an entire backyard makeover, and they have a DIY dry river bed to cover a drainage problem… Read about how they did it!

‘My Weeds are Very Sorry‘ has a lot of great tips on stone placement, and how much is enough. (And what is too much!) Good advice on getting a professional look.

Ok, now on to the inspiration. These don’t have tutorials, (you don’t need them now anyway, you got the basics above!) but they have great ideas for us to.. ahem… steal. :) This dry stream bed by Johnsen Landscapes & Pools was brought to us by ‘Serenity in the Garden‘.

Again from ‘Serenity’, this is a dry stream bed in the backyard of Jan Johnsen… Love the black rocks! This was done in a small backyard for all of you who think you don’t have enough space.
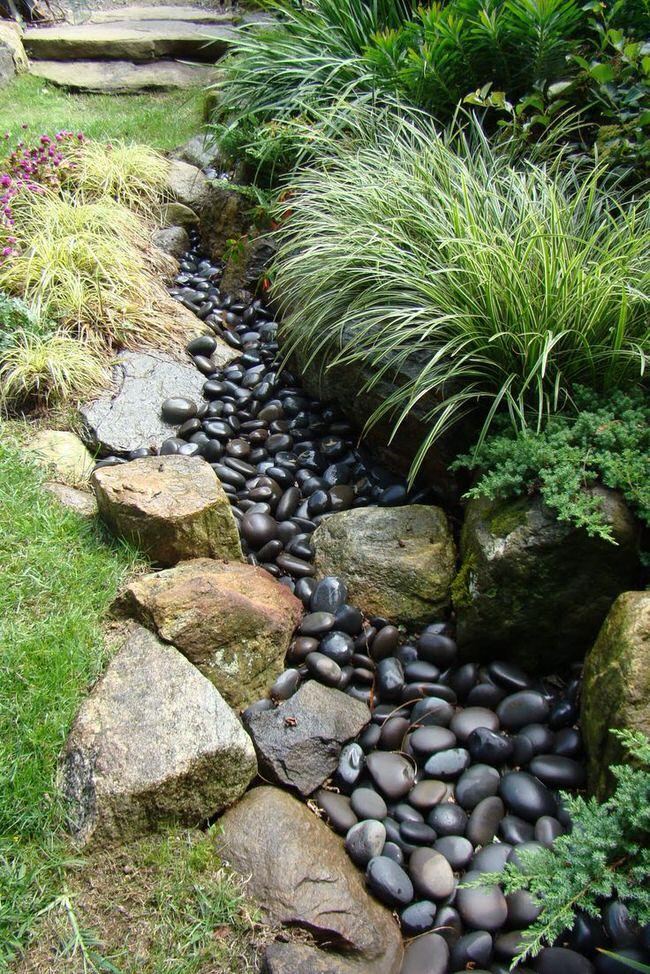
Lastly, from ‘Sharons Scrapbook’, this dry creek bed is a great example of lining the “bank” with plants.

1
0
文章
Abigal
2017年03月21日


The garden season is upon us, and what better way to spend time in a garden than in a DIY garden swing? Make it yourself and save money, but better still, customize it to your style and needs. Many of these projects repurpose supplies, and most are easy even for a beginner DIY’er with these instructions and tutorials. So get out your basic tools and let’s get to it!
Our featured project, above, is from A Beautiful Mess. Find out how to make their DIY tree swing! So cute!
From Sheryl Salisbury Photography, this DIY pallet swing looks easy, and I love this for a front porch! She even tackles some FAQ’s on her tutorial page.

Looking for something different, and a little organic looking? Oh, and it’s repurposed! Try the instructions for this laced pallet chair swing.

From The Rustic Pig, any country garden will love this back porch headboard swing! Great instructions too!
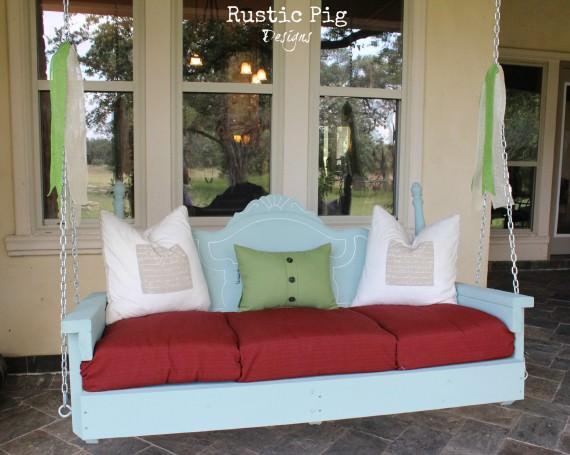
This DIY chair swing from This DIY Life is really fun, and inventive! Full tutorial with photos!

From Ana White, our fav DIY woodworking plan source, this large modern porch swing has a complete plan at the site. What would this be like painted a delicate pink?

From Julie at Life at Fire Lake Camp, this dreamy DIY hanging bed swing is exactly where I want to spend many long hours this summer reading novels and sipping lemonade. Ok, red wine, who am I kidding?

Download complete plans for this DIY garden swing from Sunset magazine for free. Amazing!

Relive your childhood with this DIY tire swing from Live Dan 330…

Lastly, a super simple DIY rope swing from Dukes and Duchesses. Not just for kids!

2
0
文章
Gina
2017年03月15日


You may have seen other cinder block planters circulating the internet. Well we decided to post a version ourselves, because they’re just… so. darn. cool. We wanted to try one of our own, but do it a little different. So we went up! We made this DIY cinder block planter go vertical, and we did it in an afternoon. The cool thing about this project, is you can pretty much make it as big or small as you want… Just buy more blocks! We recommend you play with the design…which blocks go which way, how far you can go with weight and stability,etc… then take a photo of the completed idea. We did this right in the aisle at Home Depot, so we would know how many blocks to buy. Buy a couple extra for flexibility. We capped the bottom of the planter section with these metal flashing squares and some landscape adhesive. Here’s how we did it.
Supply List:
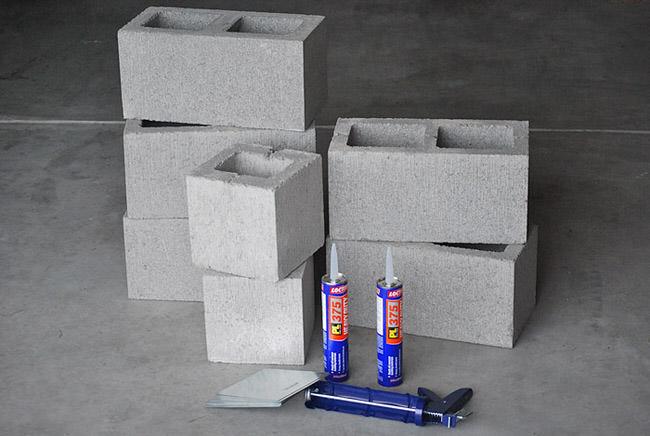
Cinder blocks. We used both dual and single blocks, as I mentioned above, work out your own design, or copy our photos. We used 5 duals and 2 singles.
Metal flashing rectangles, precut that we found in the roofing dept for 59 cents a piece. Be careful their edges can be a little sharp.We heard there are such things as cinder block caps, but good luck finding them.
Landscape adhesive and caulking gun. We used Loctite PL 375 heavy duty construction adhesive – good for masonry and metal (Found in the paint department at Home Depot). Worked like a charm.
Plants.

First, adhere the caps to the bottom of the sections that will be planted. This is where your photo from your original design session will come in handy. Insert the adhesive tube into the gun, and squeeze a generous 1/4″ bead onto the block, then press on the cap. Wipe away the excess, as this stuff does not dry clear… you don’t want a goopy mess all over the outside of your finished project. (Additional note: We originally thought that we should only adhere two of the sides so that it wasn’t completely sealed and water could drain out. But quickly found out that all four sides of the metal needed to be adhered to the block to be secure enough to stay attached.)

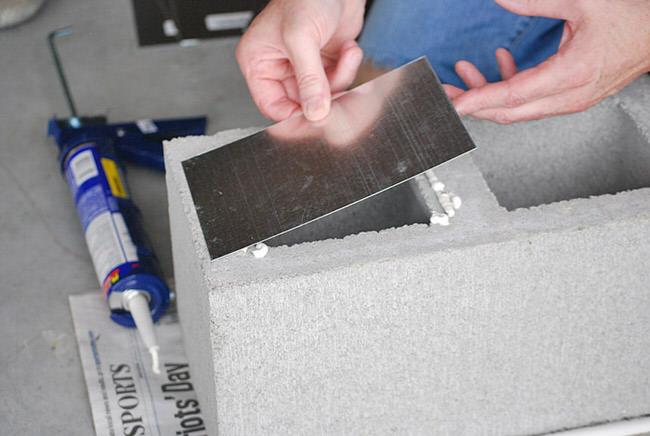
We felt like they need some weight on them as they dried, so we simply flipped them over onto a piece of newspaper, so that the cap was on the bottom. That way, the weight of the block worked for us. Yes, some of the adhesive sticks to the newspaper, but it peels off later with water really easily.

Assembling the planter definitely takes two. Again, use your original design photo to assemble, and make sure the planter sections with the bottom caps are in the right places. Apply a bead of adhesive, then place the block. Have the second person hold it in place until the weight of the upper blocks stabilizes the lower ones. Hopefully your original design allowed for gravity. :)
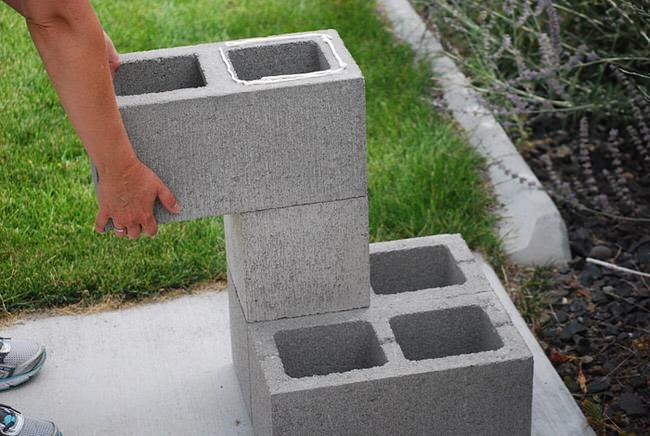
Plant with a lightweight potting soil and 4 inch plants. We used sedum (and one lavender!) because they love the porous nature of the cinder blocks, and ours will be in sun much of the day. If yours is in shade, how about ferns and mosses?

We love the way it turned out. It has a cool urban garden look!


Pin this photo to share, or just to make sure you save this idea for yourself, for later!

0
0
文章
Abigal
2017年03月15日

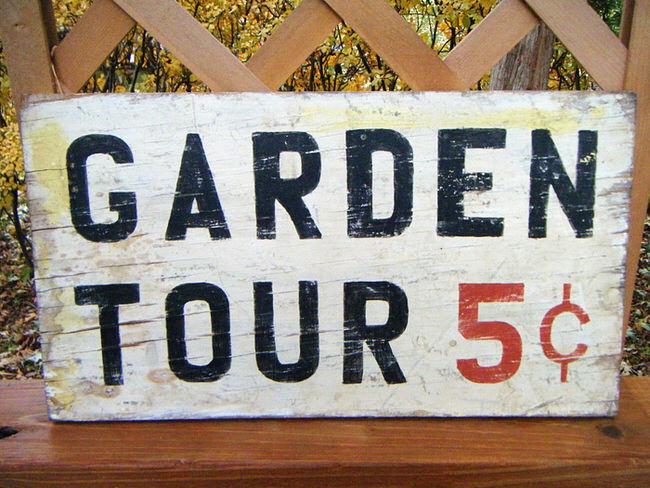
I love a little charm and whimsy in the garden, don’t you? And the garden is also the perfect place for a homemade DIY project as well. What better way to accomplish both things than with a garden sign you make yourself? Using one of these ideas, or a cute or inspirational quote of your own, make a garden sign for your special space that matches your personality. And consider using repurposed materials. The garden is a great place to implement habits that help keep our planet healthy, one project at a time. Ok, I’m off to the garden to plan my sign! Our feature project, above, is a DIY market sign from ‘Simply Chic’. The tutorial is short and easy, because the project is short and easy! You see signs like these in shops selling for $30- $50 all the time, and she made this from leftover wood and some stencils. Chic for cheap!
From ‘The Elegant Nest’, this hand painted garden sign is easier than it looks! Tutorial and step by step photos. She learned the technique from ‘Miss Mustard Seed‘, and you should pop on over to her site as well, she is one of the Queens of painted furniture! Great job on this sign by Laura!

‘The Country Chic Cottage‘ made this “Grow” garden sign in less than 10 minutes! I think we all can find 10 to make something this cute.

Carlene at ‘Organized Clutter Queen’ has tons of great garden sign ideas for you! And the rest of her site is a great resource, make sure you look around!

Ok, this one is my favorite! ‘The Little Green Bean’ has a complete how-to for this cute outdoor sign… This saying always makes me smile!

Now that you have the technique down, use these as great inspirations! I love these two from The Haunted Garden!


From ‘The Gardening Cook‘!
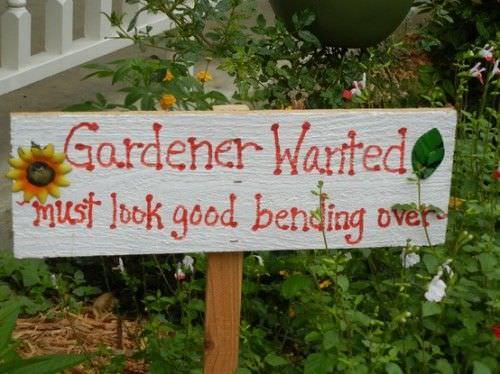
We actually found this one on Ebay, but I love the tool its hanging from so much, we had to include it!
These are from an online shop called ‘Second Shout Out‘…

Lastly, from ‘This Ivy House’, love this chalkboard garden sign.. another great use for chalkboard paint!
0
1
文章
Abigal
2017年03月15日


Building a pergola in your yard is a major DIY project, but adds value to your home, as well as to your garden enjoyment. Adding shade and structure to the garden, a pergola differs from an arbor in that is is usually a more “room like” structure, with posts supporting a roof covering of some type. In other words, an arbor on steroids. Perfect for creating romantic walkways, adding a seating area, or making a portion of the garden a major focal point. If you can dig a post hole and handle a drill and a saw, you can build a pergola with these DIY tutorials! So start planning, an as soon as the weather allows, set aside a weekend to build a pergola for your garden! Our feature project, above and below, is Ana White’s weatherly pergola. She always has such great tutorials, with drawings, material lists and instructions.

Another of Ana’s weatherly pergolas… See, you can do this!

We found this nice contemporary pergola project on ‘Instructables’, lots and lots of step by step photos on this one.

Find out how to build a backyard pergola from ‘Popular Mechanics’… I love how this one has the decorative notches on the beams and crossbeams, and how they show you how to build one on top of a concrete surface.


This tutorial from ‘DIY Network’ shows how to build a pergola, and even has little videos of certain steps. Really helpful!

The DIY Maven from ‘Curbly’ shows you how to make a pergola with a Skilsaw… and she makes it look pretty dang simple.

That’s it for tutorials, but we did find a couple of inspirational pergolas to get you planning…after all, now that you’ve learned so much from these tutorials, you’re ready to wing it a bit, right? :)
From Pinterest, this is a good example of how a pergola can take a ho hum patio and make it amazing…

And finally, if you need a little more modern style inspiration for your pergola, here’s a couple from ‘Houzz’! Let us know in comments how your projects go!


0
0
文章
Abigal
2017年03月15日


I love wind chimes. They are a peaceful way to remind us of all the forces in nature that we can’t see. Wind and water are the two most calming elements in the garden. Make your own DIY wind chime crafts, and use them on your porch or patio, in a tree, or from a fence to add that little tinkle of happy sounds all through your garden space!
Our feature project, above, is from ‘Inner Child Giving’. This is a simple tutorial for their DIY key wind chime. I love the bright colors they use, and the simple and repurposed materials. You could choose a more subtle color scheme as well.
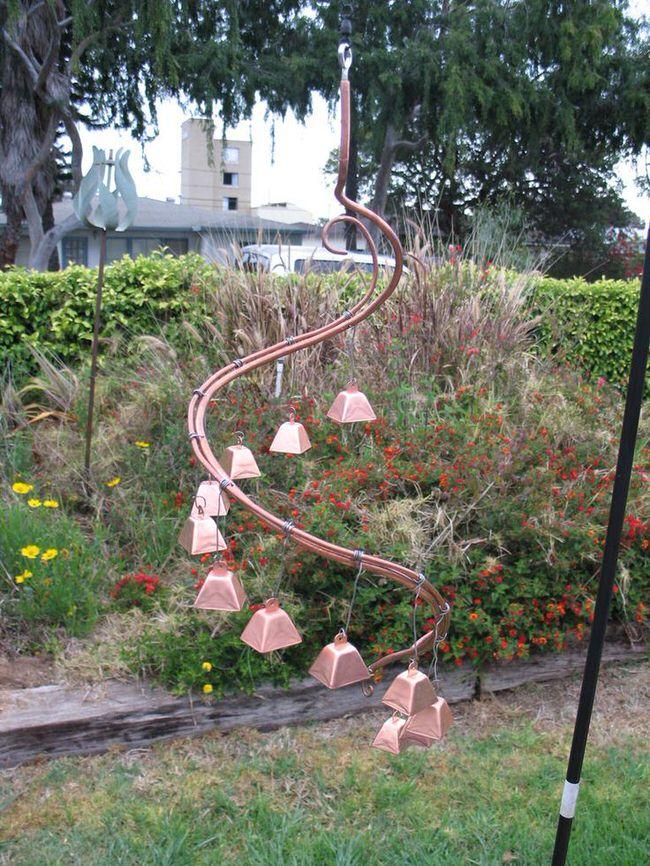
This hardware store hanging wind chime from ‘Instructables’ is an inexpensive project. Made from copper tubing, and the little copper bells meant for fishing, this is a pretty clever use of materials.
From Martha, this short, easy tutorial shows you how to make a simple seashell wind chime, perfect for an after vacation project with the kids!

A more extensive tutorial on making shell chimes, by ‘Kleas’. Step by step photos are easy to follow. They use embroidery floss instead of string, which I like because it ties easier. I think I would go for less color, but you can make it your own!

This flower pot garden chime by ‘Lowes’ is so cute, and super easy. Made with nothing but clothesline, flower pots, and a key! Paint it like they did, or leave it natural.

Create these colorful wind chimes with the tutorial by ‘My Home My Style’. A flower pot and pretty shells, I can just hear the delicate sound this chime would make!

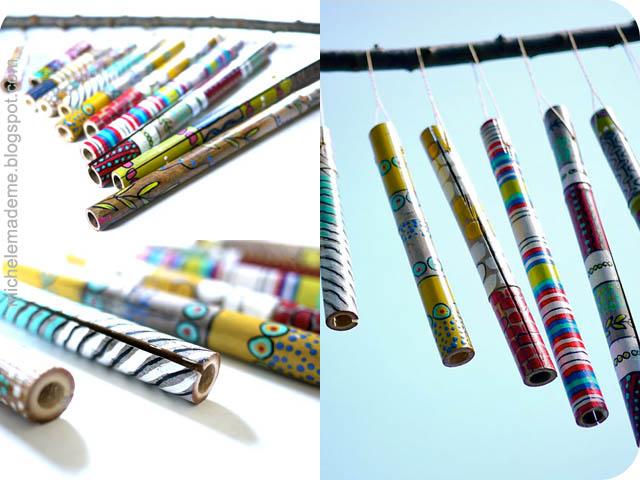
From ‘Michelle Made Me’, this summer time chime is simply bamboo stakes and pretty painting. I love how bamboo sounds striking in the wind.
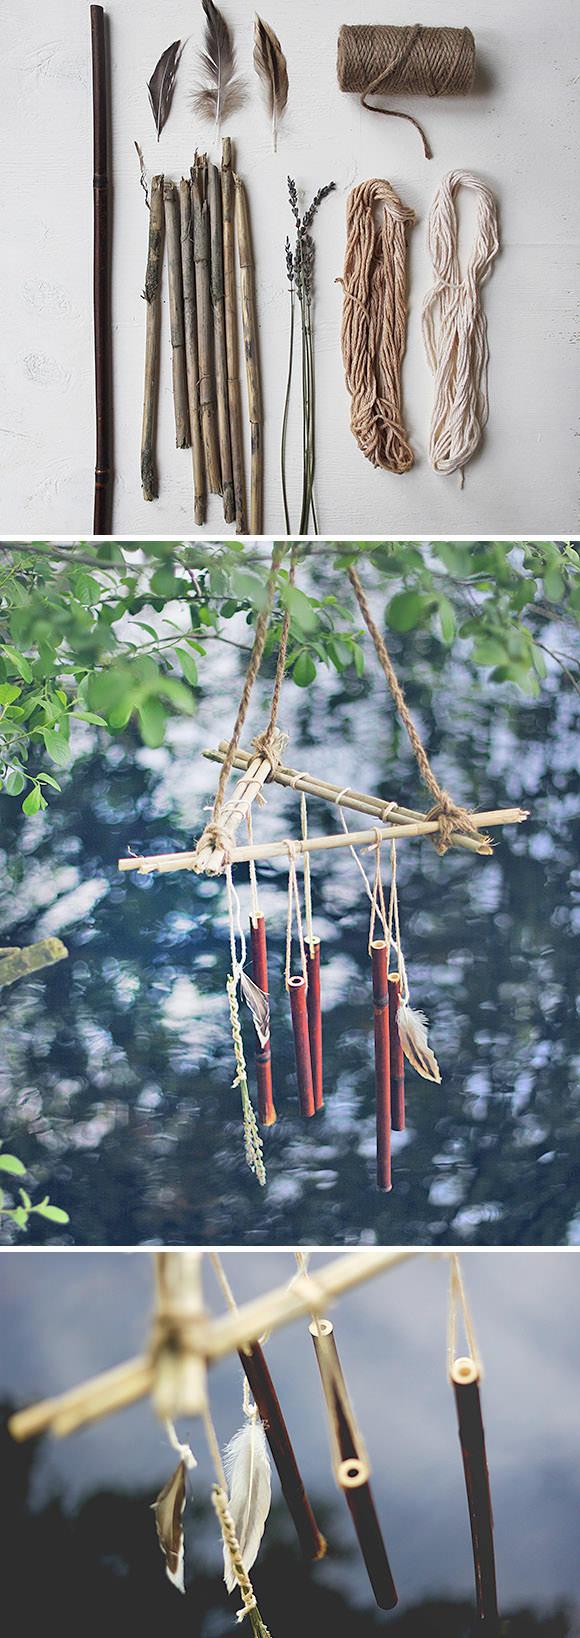
‘Free People’ has another take on bamboo wind chimes… they have directions on making a more natural version, and I love these ones using feathers as well. Lots of step by step photos.
This bottle cap wind chime is from Krafty Katreena’s Etsy shop, and totally worth the buy. You could try making this yourself using a sink strainer top with an eye bolt, and jewelry findings (called jump rings) to string the bottle caps together.
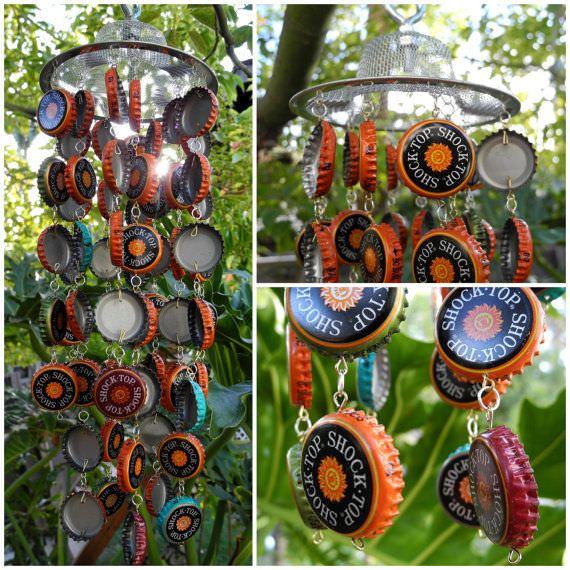
Another inspirational idea, this bottle cap wind chime is from, ‘From the Alley to the Gallery‘.

More inspiration, from ‘Home Sweet Homemade‘… this sea pebble wind chime has such beautiful colors, and I think just listening to it would remind me of the beach!

Another one from “Home Sweet Homemade‘, this driftwood wind chime is beautiful… so talented to make these creations!

Our last DIY project is from ‘Maker Mama’, and it’s easy enough to make with the kids. This recycled wind chime tutorial uses tin juice caps and wire hangar! Enjoy your wind chime crafts!

0
0
文章
Abigal
2017年03月15日


Anything that can make our lives easier in the garden is a good thing. Strike that. A great thing. And if it saves us a little money and time while we’re at it, then sign us up. These DIY garden hacks are the best ideas we’ve found for making everyday things work for you in the garden! Clever and full of ingenuity, we just wish we had thought of them! But hey, we’re bringing them to you, aren’t we? You can thank us later. ;)
Our feature photo above, is a photo Steve took while we were at a wedding event in the Walla Walla wine country. We have a whole post on this wine bottle watering hack!
You know those cheap plastic pots you get from the nursery, only to throw away? Recycle them by using them to control those invasive plants in your garden (we’re looking’ at you, mint!) with this easy tip from ‘Family Handyman‘. Simply cut the bottom out of the pot, then sink it into the ground with the lip below ground level. The open bottom allows the roots to grow down, but prevents the plant from spreading through your petunias!

Another use for cheap plastic pots? From ‘Vegetable Gardener‘, sink plastic pots to make summer squash grow like mad. The open bottom pots force water to go deep into the soil, making watering easier and more efficient, and creating healthier plants that produce more fruit.

‘Popsugar‘ has a great tip for you from the kitchen… Place a coffee filter in the bottom of a pot before you plant to keep soil from washing out through the drainage holes. Great for indoor and outdoor potted plants.

From Missy at ‘Graceful Little Honey Bee’, improve your soil with eggshells and a blender. The blender helps speed up the breakdown of the eggshells adding valuable nutrients and organic matter to the soil.

Tired of heavy large planters filled with expensive potting soil? Me too, especially since when filling them with annuals, their roots only use the top 6 inches! ‘Bees Knees Bungalow‘ has a great tip for you… Fill the bottom half of the pot with old (lightweight) things lying around to take up space. Then you only need to use half the soil. Check out her site to see how pretty that planter was after!

Same idea from ‘Family Handyman‘… except they use those styrofoam packing peanuts so you don’t have to just throw them away!

Help those window sill seedlings thrive by creating a mini greenhouse from a pop bottle with the top cut off, from ‘Disney Family‘. Be sure to take the cover off the seedlings for an hour or so a day, and don’t leave it on in direct sun. Poke a hole or two in the top if it is consistently steamy. You want it warm, but not a tropical jungle!

Simple tutorial from ‘A Journey to Dream‘ on how to create a simple watering can from plastic juice or milk bottles. They also show you how to create a fine spray, or a faster spray depending on your needs. Smart!

From ‘One Good Thing with Jillee’, make a self cleaning and sharpening garden tool holder. This is easy, just sand and mineral oil, plus some pretty touches only Jillee can add! The sand and oil act like sandpaper on the tools’ metal edges.

These clear plastic storage containers become mini greenhouses or cold frames to protect seedlings from wind, frost and rain. You can always pop on the lid when you need extra protection. Great idea from ‘The Prairie Cottage‘. I think I have like 4 of these in my garage right now!

Save wasted water by making this inexpensive rain barrel from ‘BHG“. This even has a spigot so that you can access the water as easily as the hose!

Last, learn even more about rain barrels and make this gorgeous one from ‘HGTV Gardens‘. You won’t have to hide this hack!

0
1
文章
Abigal
2017年03月14日


Most of us are really busy, and if we end up spending several weekends in the yard finishing projects, they tend to not get finished. I like simple, and fast for most of the DIY projects I do…probably because, if you ask Steve, I have an issue with patience. And procrastination. But that’s another post. :) In any case, the first thing I want to do in the garden each year is all those projects that sounded so perfect at the end of last season! So let’s jump right in and find some great DIY one day backyard projects that are perfect for beginner DIY’ers, and give quick gratification. And who doesn’t love that in the garden?
Our featured project, above, is from Shelstring Blog. A wooden bench made from logs, lumber, and a few well learned lessons! Read their tutorial, this would be amazing in a shade garden!
This is one of our original projects, and still one of my fav garden projects we’ve done so far… It’s come along way since this photo was taken, so Ill try to update this season with all the plants filled in. But if you are looking for something simple and more contemporary, try our DIY Project: Contemporary Garden Water Feature – Less than $30.

This must be the simplest bench ever! From Family Handyman, these free plans for this wooden bench are easy to follow and for the novice. And, it takes a minimum of budget supplies!

Read all about how to build a pond and fountain in one day, for less than $200! This is quite a project for this budget, and could take your garden to wow factor in…yes, just one day!

Want to know how to make a simple tree house? What a great one day project! From Apartment Therapy.

From HGTV Gardens, build a brick fire pit in an afternoon! Need another fire pit tutorial?

More water features! This DIY bamboo water feature had complete instructions, I love how different this is! Great idea if you have a slope you don’t know what to do with, or want to bring a more Zen feel to the garden.

Love this cobblestone path from Home is Where They Love You! Made with a form and concrete, this is a budget project as well!

Really like the look of this DIY outdoor day bed from Apprentice Extrovert.

Finally, Alison at How Does She? made this amazing window box for only $3.12! Read all about how she did it, she has great photos as well.

1
1
文章
Abigal
2017年03月14日


We all love those garden ornaments, but they can be pretty expensive anywhere you look. Here at TGG we decided to make our own DIY concrete garden globes, and it turned out to be a fun and pretty rewarding project that cost less than $15 for three balls. We also tried out a couple different recipes, including a hypertufa… we’ve included a shot of our sample balls and the recipes below! For our final globes, we used recipe 2, a good compromise between a little organic without being too rustic. Here’s what you need:
Supplies:
Old glass lamp globes (we also tried a playground ball, it worked, but didn’t keep a perfect round shape!) These are thrift store finds!
Portland cement
Peat Moss
Water
Mixing container (We used a Rubbermaid storage container)
Stir stick (we say that, but we pretty much just used our hands…)
Rubber gloves
Cooking spray
File
Wire Brush
Hammer
Eye protection
Optional recipes: Perlite and potting soil (Perlite is found in the indoor plant supply area of your home improvement store)
Recipe 1- Hypertufa
2 parts cement
3 parts peat moss
3 parts perlite
Water
Recipe 2- (This is what we used!)
1 part cement
1 part peat moss
Water
Recipe 3-
1 part cement
1 part potting soil
Water
Recipe 4-
Pure Portland cement
Water

Mix your chosen recipe in your container, spray the inside of the globes with cooking spray, then fill your globes…yes, it is messy! You want your recipe to be the consistency of thick cake batter. Add water if it thickens too much, and use your gloved hands to break up any peat moss chunks. The idea is to have it of a consistency that’s easy to pour into the mold, but not so wet that it takes forever to dry and cure. Don’t fill the neck of the globe, you want them to end up as round as possible. Set inside a plastic bag and set upright in a cool place (we used old towels to stabilize them). Let cure for 2-3 days.
After the globes have cured for a couple days, you are going to break the glass with the side of a hammer. We left the globes inside the bag while we did this to prevent flying glass shards. WEAR goggles or glasses protection! And use gloves.

After all the glass has been removed, use a file to take off any blemishes or protrusions, then rough up the whole surface with a wire brush. Some recipes come out really smooth and even polished looking…if you like that look, feel free to skip the wire brush.

Here is a shot of our four recipe balls. In order, from left to right… Hypertufa recipe 1, Recipe 2, Recipe 3, Recipe 4 or the pure Portland cement and water.
Our finished DIY concrete garden globes! Think of all the places you could tuck these in for a great contrast in form. In a later post, we will show you how to grow moss on your project… how cool is that?


1
0
文章
Abigal
2017年03月13日


I love bringing art into the garden. Even better if it turns out to be a fun project at the same time. These DIY garden mosaic projects are both practical and beautiful, and have complete tutorials. You can either buy tile specifically for mosaic projects, or you can use a wide variety of budget materials. Extra broken tiles, plates, or even glass can create gorgeous works of art for the garden! Follow their instructions in these tutorials and create your own DIY garden mosaic art pieces! Our featured project above is a DIY mosaic stepping stone tutorial by Midwest Living that takes you through step by step. This is a great beginners project.
We are big fans of artist Jeffrey Bale and his pebble mosaic stepping stones. Read his blog to find out how he does it.

Another from Jeffery Bale…

DIY garden mosaic blocks from Craftbits are a little different, but a great project when you need a quick one, especially with kids. I think I would use a calmer color scheme, but I like the simplicity a lot! They use concrete blocks and have all the instructions.
This heart mosaic stepping stone project from Specialty Art Glass is great, and has a full tutorial.

Lauren True for DIY Network created this amazing DIY mosaic ball, and you can find a video tutorial here.

Patterned mosaic pots from Martha are an easy project for both indoors and out. See her instructions.
If you aren’t a big fan of all the colors and patterns in mosaic, try making this mosaic window box planter by Centsational Girl!


I couldn’t leave out this incredible project, mostly because I didn’t believe (at first) that it was a DIY! This DIY mosaic chair is crazy cool, but is an advanced project, so definitely try out some simpler projects and get the hang of the whole medium. But the fact is, this is a tutorial, and you could potentially create this for your garden! BTW, she starts out with an ordinary metal garden chair…Designed by Frances Green,

And finally, we’ll leave you with a few more inspirational photos that we gathered from Pinterest (sorry – couldn’t find the source).


0
0
文章
Abigal
2017年03月13日


Growing vines and other vertical elements in a garden adds height, interest, expands useful space, and sometimes even acts as a privacy screen! It’s pretty impossibly to grow most vines, however, without the proper support. You can build DIY garden trellises for any garden from anything from inexpensive lumber to recycled and repurpose materials. Check out these DIY garden trellis tutorials and find one that’s right for the style, feel, and needs in your garden!
Our first project, above, is a freestanding DIY trellis from Lowes, with complete step by step instructions.
Next we have a $6 DIY Trellis from Two Zero One… Love this cost saving project!

We found this great project on Flickr…there is no tutorial, but it’s a pretty basic idea…using the narrow strips of wood gives it a more modern feel.

Sybil Alfano created this great DIY trellis out of an old coat rack… Love this idea! Great instructions.

Find out how to make a basic wood trellis from Remove and Replace…

This is a great idea for inspiration… Using a recycled old mattress base as a trellis! Great idea!
Flea Market Gardening showcases this old ladder trellis… another amazing repurposed idea!

Renee Garner stapled chicken wire to an old window frame for her trellis… So cute!

Another idea from Ecosalon…

And another DIY trellis idea!
Using the side of an old crib as a trellis…

Finally, if your style is a little more modern, Modern in MN has a short tutorial on creating this Kee Klamp Trellis.

0
1
文章
Abigal
2017年02月23日

Stepping stones in a garden can create a path or patio, or simply point the way on a visual trail through your garden. They make a great DIY project year round, and most can be easily done on a covered craft table or in a corner of the garage. This is a great project to get creative with and allow your personality, or the personality of your garden shine through. Here are our favorite DIY stepping stone projects, complete with instructions for creating your own.

Our Basic Stepping Stone Recipe
Portland Cement
Water
Mold
Release Agent (We use Pam)
Decorative elements
You can use almost anything as a mold, as long as it’s smooth and can release the stone once it’s cured. I like disposable plastic containers, becasue the stone will pop right out like ice cubes from a tray. You could line boxes with plastic wrap, use cake pans or even line nursery flats for large stones. Trick we learned: if you are making a large stepping stone, or one that has a lot of detail and therefore not as thick, place a piece of chicken wire into the mold after you have poured or applied half the concrete. Then apply the rest of the concrete over the wire. This will strengthen your stones so they are less likely to crack. As you see in the photo below, partially burying the stones into gravel or soil will help protect the more delicate edges from breaking.
Next is one of our favorites – from Family Crafts, this tutorial takes you through using a leaf to create these garden stones that are more like natural art! Here are the instructions.


This is another example from Garden Mama.

You can also use this technique to make larger areas of patio or pathway. I’m fascinated by this art form using only natural elements!

Here is another idea, same technique.

And this one by artist Jeffery Bale, he explains how here.

If you want a simpler project, try these stones created by Madigan Made, using just concrete and plastic trays! Instructions here.

These last two are easier still… purchased stepping stones with paint. This first one is from Benjamin Moore using a stamp and concrete stain. I would link to the instructions for you, but that is them!
Finally, if you are looking for a fun project with the kids, this is it. Birds and Blooms has these easy glow in the dark stones we love! Here’s how.
Let us know which of these projects you plan to try!

Our Basic Stepping Stone Recipe
Portland Cement
Water
Mold
Release Agent (We use Pam)
Decorative elements
You can use almost anything as a mold, as long as it’s smooth and can release the stone once it’s cured. I like disposable plastic containers, becasue the stone will pop right out like ice cubes from a tray. You could line boxes with plastic wrap, use cake pans or even line nursery flats for large stones. Trick we learned: if you are making a large stepping stone, or one that has a lot of detail and therefore not as thick, place a piece of chicken wire into the mold after you have poured or applied half the concrete. Then apply the rest of the concrete over the wire. This will strengthen your stones so they are less likely to crack. As you see in the photo below, partially burying the stones into gravel or soil will help protect the more delicate edges from breaking.
Next is one of our favorites – from Family Crafts, this tutorial takes you through using a leaf to create these garden stones that are more like natural art! Here are the instructions.


This is another example from Garden Mama.

You can also use this technique to make larger areas of patio or pathway. I’m fascinated by this art form using only natural elements!

Here is another idea, same technique.

And this one by artist Jeffery Bale, he explains how here.

If you want a simpler project, try these stones created by Madigan Made, using just concrete and plastic trays! Instructions here.

These last two are easier still… purchased stepping stones with paint. This first one is from Benjamin Moore using a stamp and concrete stain. I would link to the instructions for you, but that is them!
Finally, if you are looking for a fun project with the kids, this is it. Birds and Blooms has these easy glow in the dark stones we love! Here’s how.
Let us know which of these projects you plan to try!
1
0
文章
Abigal
2017年02月22日

We have some of our favorite #DIY garden projects that we have found around the web. Enjoy these great ideas from our favorite blogs!

I LOVE the pot wreath from ‘Bees Knees Bungalow’! Filled with herbs for fall, or violas for spring?… Read for the full tutorial… this is a budget project too!

Want a cool fire pit for your back patio? This one has a modern vibe that we love, and would update any #garden décor. It’s smooth lines go well with nature. Full tutorial here from ‘Man Made DIY’.

From ‘Tatortots & Jello’. Stamped silverware as garden markers! What a great idea! Check out thrift stores near you for flatware. Here’s the tutorial
I love this idea for a garden pond! If you don’t relish digging a hole and laying down liner (which can leak eventually, BTW…) this is the water garden for you. Check out the tutorial here courtesy of ‘Pam Penick’.

This last one is pretty cool…all I’m gonna say is fall leaves.

Thats it! Tgg’s fav five for the week… Love those DIY garden projects!

I LOVE the pot wreath from ‘Bees Knees Bungalow’! Filled with herbs for fall, or violas for spring?… Read for the full tutorial… this is a budget project too!

Want a cool fire pit for your back patio? This one has a modern vibe that we love, and would update any #garden décor. It’s smooth lines go well with nature. Full tutorial here from ‘Man Made DIY’.

From ‘Tatortots & Jello’. Stamped silverware as garden markers! What a great idea! Check out thrift stores near you for flatware. Here’s the tutorial
I love this idea for a garden pond! If you don’t relish digging a hole and laying down liner (which can leak eventually, BTW…) this is the water garden for you. Check out the tutorial here courtesy of ‘Pam Penick’.

This last one is pretty cool…all I’m gonna say is fall leaves.

Thats it! Tgg’s fav five for the week… Love those DIY garden projects!
0
0
文章
Abigal
2017年02月22日

Garden furniture can be one of the most expensive (and boring) parts of a backyard design. It’s not an easy task to find interesting #garden pieces that fit into your budget. It is easy however, to build these great #DIY garden furniture pieces to add a unique element to your yard. Did we also mention you will be up-cycling, on a budget? Win win!

Cinder Block & Wood – One Hour Bench
Try this tutorial from Kayla’s Basement, our featured image above! This is an easy and fast bench to create for any outdoor #space and nice because it is easily adjusted to fit different size cushions.

Yard Sale Chair Garden Bench:
This is a great touch to any garden, and you can use any style depending on the style of chairs you choose. This is the toughest of our five projects, so if it isn’t in your skill range, we have more! This one takes a little cutting of lumber, but still a pretty easy project for anyone willing to get their hands dirty. If you look at the bench, you will see how the basic assembly process goes, but here’s a quick step by step.
Face two wooden chairs next to each other. Using lumber from the home improvement yard, or better yet, recycle wood pallet slats, connect the chairs on both sides along the seat base. Don’t make these side pieces too long as you want the bench to be stable. Now measure the length from the back of one seat, to the back of the other. Cut and attach lumber over the seat to create a new bench seat. Now add lumber pieces for the “back” of the bench. Paint and seal, and enjoy!

Up-Cycled Cement Block Bench:
This one from BHG is a bit easier for the average DIY’er. Simply stack cinder or cement blocks (Can you get recycled ones from your local Habitat for Humanity Store?). Add a pad to the top of the bench for comfort. You can create one by covering a piece of foam from the craft store with fabric, or try finding a “last of it’s kind” garden cushion on clearance (or thrift store!) and lay it flat. Even scattered throw pillows!

Small Log Table:
If you have a wood pile, or access to a cut down tree, all this takes is cutting an armful of logs to the same length. Secure tightly with two straps. Done!

DIY Garden Tree Trunk Dining Table
LOVE this table! The biggest issue with this table is making sure the stump top is level. This can be pretty difficult but if you have access to a chain saw, this is a good bet. For the rest of us, we will be screwing scrap wood shims to the surface until we can create a level surface to secure a wood table top to.

Wood Tree Trunk Garden Stools (Or Ottomans!)
This tutorial from Shelterness is a cute idea for making easy garden stools from tree trunks. Great for kids or for putting your feet up! Easy!

Unique DIY garden furniture, for the cost of some up-cycled materials and a little elbow grease. Which one would you most like to try?

Cinder Block & Wood – One Hour Bench
Try this tutorial from Kayla’s Basement, our featured image above! This is an easy and fast bench to create for any outdoor #space and nice because it is easily adjusted to fit different size cushions.

Yard Sale Chair Garden Bench:
This is a great touch to any garden, and you can use any style depending on the style of chairs you choose. This is the toughest of our five projects, so if it isn’t in your skill range, we have more! This one takes a little cutting of lumber, but still a pretty easy project for anyone willing to get their hands dirty. If you look at the bench, you will see how the basic assembly process goes, but here’s a quick step by step.
Face two wooden chairs next to each other. Using lumber from the home improvement yard, or better yet, recycle wood pallet slats, connect the chairs on both sides along the seat base. Don’t make these side pieces too long as you want the bench to be stable. Now measure the length from the back of one seat, to the back of the other. Cut and attach lumber over the seat to create a new bench seat. Now add lumber pieces for the “back” of the bench. Paint and seal, and enjoy!

Up-Cycled Cement Block Bench:
This one from BHG is a bit easier for the average DIY’er. Simply stack cinder or cement blocks (Can you get recycled ones from your local Habitat for Humanity Store?). Add a pad to the top of the bench for comfort. You can create one by covering a piece of foam from the craft store with fabric, or try finding a “last of it’s kind” garden cushion on clearance (or thrift store!) and lay it flat. Even scattered throw pillows!

Small Log Table:
If you have a wood pile, or access to a cut down tree, all this takes is cutting an armful of logs to the same length. Secure tightly with two straps. Done!

DIY Garden Tree Trunk Dining Table
LOVE this table! The biggest issue with this table is making sure the stump top is level. This can be pretty difficult but if you have access to a chain saw, this is a good bet. For the rest of us, we will be screwing scrap wood shims to the surface until we can create a level surface to secure a wood table top to.

Wood Tree Trunk Garden Stools (Or Ottomans!)
This tutorial from Shelterness is a cute idea for making easy garden stools from tree trunks. Great for kids or for putting your feet up! Easy!

Unique DIY garden furniture, for the cost of some up-cycled materials and a little elbow grease. Which one would you most like to try?
0
0


