文章
Dummer. ゛☀
2017年08月10日

Japanese aralia is a tropical plant that makes a bold statement in the garden, in outdoor containers or as a houseplant. Find out about fatsia growing conditions and care requirements in this article.
Fatsia Plant Info
The common names Japanese aralia plant and Japanese fatsia refer to the same broadleaf evergreen, known botanically as Aralia japonica or Fatsia japonica. The plant features huge, deeply lobed leaves that grow to about a foot in width atop long leaf stems that reach up and outward. The plant often leans to one side because of the weight of the leaves, and it can reach a height of 8 to 10 feet. Older plants may grow to a height of 15 feet. The bloom time depends on the climate. In the U.S., fatsia usually blooms in fall. Some people think the flowers and the shiny black berries that follow them aren’t much to look at, but the terminal clusters of bright white flowers offer relief from shades of green in deep shade where aralia likes to grow. Birds love the berries and visit the garden often until they are gone. Despite the name, fatsia is not native to Japan. It is grown around the world as a cultivated plant, and it originally came to the U.S. from Europe. There are some lovely cultivars, but they are hard to find. Here are some varieties that are available online:
‘Variegata’ has beautiful leaves with irregular white edges. The edges turn brown when exposed to sunlight.
Fatshedera lizei is a hybrid cross between English ivy and fatsia. It is a vining shrub, but it has weak attachments, so you’ll have to attach it to the support manually.
‘Spider’s Web’ has leaves splotched with white.
‘Annelise’ has large, gold and lime green splotches.
How to Grow Fatsia
Japanese aralia care is easy if you give the plant a good location. It likes medium to full shade and slightly acidic, compost-rich soil. It also grows well in large containers placed on shady patios or under trees. Excessive sunlight and strong winds damage the leaves. It is a tropical plant that needs the warm temperatures found in U.S. Department of Agriculture plant hardiness zones 8 through 11. Water the plant often enough to keep the soil moist at all times. Check plants growing in containers often as they can dry out quickly. Fertilize plants growing in the ground in spring after the danger of frost has passed. Use a tree and shrub fertilizer with an analysis of 12-6-6 or similar every year. Fertilize potted plants with a fertilizer designed for plants growing in containers. Follow the package instructions, withholding fertilizer in fall and winter.
Fatsia needs annual pruning to maintain a bushy growth habit and healthy, glossy leaves. Renewal pruning is best. You can cut the entire plant to the ground in late winter just before new growth begins, or you can remove one-third of the oldest stems each year for three years. In addition, remove leaf stems that reach too far beyond the plant to improve the appearance.
0
0
文章
Miss Chen
2017年08月08日


Yucca cane plants grow as indoor houseplants and as outdoor ornamental plants in the garden. Yucca thrives at temperatures between 60 and 95 degrees Fahrenheit with partial shade. If you live in an area with freezing winters, plant your yucca canes in containers so they can be brought indoors during the cold months.
Repot the Plant
Step 1
Repot the yucca cane plant every two years. Choose a growing container at least 2 inches larger than the previous pot.
Step 2
Place 1 inch of pea gravel in the bottom of the growing container. This will help the water drain.
Step 3
Fill the container with a mixture comprised of three parts peat moss and one part sand.
Step 4
Remove the plant from the existing container and gently shake the soil medium from the roots.
Step 5
Dig a hole in the center of the container large enough for the root ball of the plant.
Step 6
Center the root ball in the hole and cover with the growing medium, packing the soil mixture around the stem and roots of the plant.
Step 7
Water the plant until water drains from the bottom of the container.
Other Care
Step 8
Place the yucca plant in a sunny window or an area that receives full light for part of the day.

Step 9
Water the plant only when the soil is dry. Insert a pencil or a chopstick 2 inches into the soil. Remove the pencil -- if it is completely dry, water the plant.
Step 10
Fertilize the plant using a 19-6-12 slow release fertilizer according to label directions every three months.
Step 11
Place the plants outdoors during the late spring and early summer.
1
1
文章
Dummer. ゛☀
2017年08月08日
From indoor and outdoor gardeners alike, one of the most common gardening questions is, Why do my plants have spotted and brown leaves? And while there are many reasons for plain old brown spots, when those spots look like little brown bull’s-eyes, the answer my friends, is fairly simple , organism-wise that is. Those plant leaf spots are caused by one of nature’s most basic organisms: a fungus. Plants with Spotted Leaves Fungal leaf spot can be found in your outdoor garden as well as on your houseplant. Spotted leaves occur when fungal spores in the air find a warm, wet, plant surface to cling to. As soon as that microscopic spore gets comfortable in its new home, sporulation (the fungal method of reproduction) occurs and the tiny brown fungal leaf spot begins to grow. Soon the circle grows large enough to touch another circle and now the fungal leaf spot looks more like a blotch. Eventually the leaf turns brown and falls to the soil where the spores sit and wait for the next available warm, wet, plant surface so the fungal leaf spot process can begin again.
Preventing Plant Leaf Spots
There are a few easy steps you can take to prevent the problem in your garden or on your houseplant. Spotted leaves or the causal fungus need two things to flourish: moisture and poor air circulation. For your houseplant, spotted leaves can be prevented by watering the soil and not the foliage. Leave enough space between your pots for good air circulation. In the garden, water in the early morning so the moisture will evaporate from the leaves. Closely packed foliage should be thinned. Always treat pruning and cutting tools with a 1:10 bleach solution after each use. Rake and remove all debris from around your plants before leaf bud each spring.
How to Treat Leaf Spot Fungus
No matter how diligent you are, the day will come when those tiny brown circles on the leaves of your plant so it’s important to know how to treat leaf spot fungus. As soon as you see plant leaf spots, treatment begins. For houseplants, isolate the pot immediately to prevent the fungus from spreading. Remove any leaf that has been affected. Stop misting. In the garden, the plant’s leaf spot treatment depends on preference. For organic treatment, there are several safe and convenient treatments available. Most contain sulfur or copper octanate. Or you can try a more traditional treatment by spraying with a mild solution of bicarbonate of soda (baking soda), using ½ teaspoon per gallon of water. For those gardeners who have no objection, many all-purpose fungicides are available. Please read the label carefully before applying.
0
0
文章
Dummer. ゛☀
2017年08月04日
Deciding on what is the best location to place your Bonsai trees can be hard, as several factors (local climate, time of year, tree species, etc.) should be taken into consideration.

Bonsai location; rule of thumb
Most outdoor trees are best placed on a bright spot, about half the day in direct sunlight and protected from the wind. Continue reading about outdoor species here.

Indoor trees are best placed on a bright position as well; usually right in front of a window facing the South. Place indoor trees somewhere with a constant temperature. Continue reading about indoor Bonsai here.
Bonsai location; rule of thumb
Most outdoor trees are best placed on a bright spot, about half the day in direct sunlight and protected from the wind. Continue reading about outdoor species here.
Indoor trees are best placed on a bright position as well; usually right in front of a window facing the South. Place indoor trees somewhere with a constant temperature. Continue reading about indoor Bonsai here.
0
0
文章
Dummer. ゛☀
2017年08月04日
Give your garden and outdoor living spaces a shot of steady, season-long color by planting marigolds. This popular annual flower is a garden favorite because they are easy to care for, grow well from seeds, and attract pollinators. Many varieties of marigolds can also help repel root-knot nematodes, microscopic worms that live in the soil and can damage vegetable and fruit plants. Here is everything you need to know to grow marigolds.

How to Choose Marigolds
Before planting marigolds, decide which type you want to grow. The most commonly grown marigolds are African (also called American or Aztec) and French types. African marigolds have large flower heads (up to 5 inches across) on plants that grow from 10 to 36 inches tall, making them good for fresh cutting. French marigolds are smaller and bushier, with flowers up to 2 inches across on plants that are 6 to 18 inches tall. They are excellent for planting among taller plants in need of pollination.
Where to Plant Marigolds
When planting marigolds, choose a spot in full sun. In warmest regions, provide protection from the sun during the hottest part of the day. As you ponder where to plant, understand that these annual flowers crave fertile, well-drained soil. Marigolds planted in heavy clay soil that doesn’t drain well are usually not productive.

How to Water Marigolds
When growing marigolds, check soil weekly: When the top inch is dry, it’s time to water. (Marigolds growing in containers may need more frequent watering.) Each time you water, be sure to drench the soil, and aim the nozzle or spout of your watering device toward the base of the plants.
How to Care for Marigolds
While growing marigolds, you may discover Japanese beetles on the blooms, especially the larger blossoms of the African types. Knock the beetles into soapy water to drown them, or spray plants with Ortho® Insect Killer Rose & Flower. You will also want to keep an eye out for spent flowers, and remove them as soon as you see them. This process is called deadheading, and it encourages plants to form new flower buds. Marigolds stand up to heat and humidity, but in the hottest regions, plants can enter a rest period during summer’s most sizzling days. Keep plants well-watered during this time. As soon as intense heat lifts, plants should resume blooming.
How to Use Marigolds
In the garden, French marigolds create a colorful edging that beckons butterflies and other pollinators. African marigolds are ideal for picking for fresh arrangements. In addition to the beauty they offer, marigolds can also be planted as pest control in the vegetable garden or flower beds. They contain a chemical (thiophene) that helps control nematodes in soil. Marigold flowers make great additions to bouquets and dry well. You can also eat the petals, which have a slightly peppery flavor. Put them in salads or on baked goods, or add them to stir-fries.
How to Pick Marigolds
If you’re picking marigolds for bouquets or drying, cut blossoms in the morning or late afternoon. Harvest flowers for either use when they are fully open. Choose newly opened flowers for edible uses.
How to Choose Marigolds
Before planting marigolds, decide which type you want to grow. The most commonly grown marigolds are African (also called American or Aztec) and French types. African marigolds have large flower heads (up to 5 inches across) on plants that grow from 10 to 36 inches tall, making them good for fresh cutting. French marigolds are smaller and bushier, with flowers up to 2 inches across on plants that are 6 to 18 inches tall. They are excellent for planting among taller plants in need of pollination.
Where to Plant Marigolds
When planting marigolds, choose a spot in full sun. In warmest regions, provide protection from the sun during the hottest part of the day. As you ponder where to plant, understand that these annual flowers crave fertile, well-drained soil. Marigolds planted in heavy clay soil that doesn’t drain well are usually not productive.
How to Water Marigolds
When growing marigolds, check soil weekly: When the top inch is dry, it’s time to water. (Marigolds growing in containers may need more frequent watering.) Each time you water, be sure to drench the soil, and aim the nozzle or spout of your watering device toward the base of the plants.
How to Care for Marigolds
While growing marigolds, you may discover Japanese beetles on the blooms, especially the larger blossoms of the African types. Knock the beetles into soapy water to drown them, or spray plants with Ortho® Insect Killer Rose & Flower. You will also want to keep an eye out for spent flowers, and remove them as soon as you see them. This process is called deadheading, and it encourages plants to form new flower buds. Marigolds stand up to heat and humidity, but in the hottest regions, plants can enter a rest period during summer’s most sizzling days. Keep plants well-watered during this time. As soon as intense heat lifts, plants should resume blooming.
How to Use Marigolds
In the garden, French marigolds create a colorful edging that beckons butterflies and other pollinators. African marigolds are ideal for picking for fresh arrangements. In addition to the beauty they offer, marigolds can also be planted as pest control in the vegetable garden or flower beds. They contain a chemical (thiophene) that helps control nematodes in soil. Marigold flowers make great additions to bouquets and dry well. You can also eat the petals, which have a slightly peppery flavor. Put them in salads or on baked goods, or add them to stir-fries.
How to Pick Marigolds
If you’re picking marigolds for bouquets or drying, cut blossoms in the morning or late afternoon. Harvest flowers for either use when they are fully open. Choose newly opened flowers for edible uses.
0
0


文章
Gina
2017年05月23日

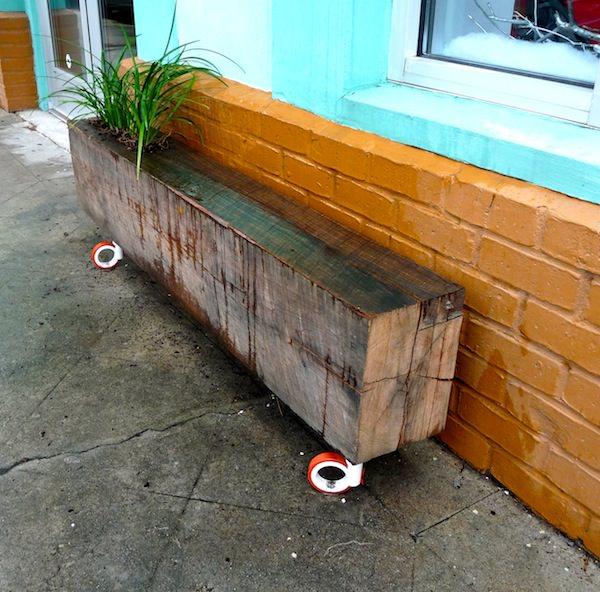
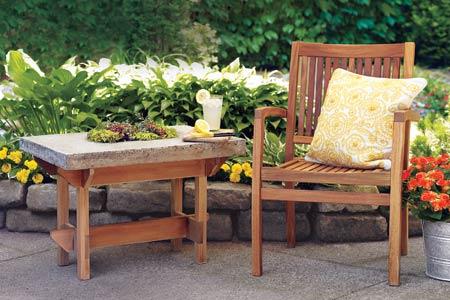
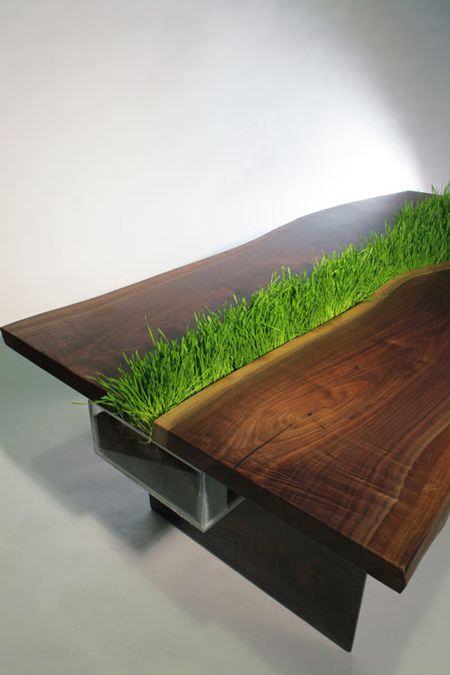
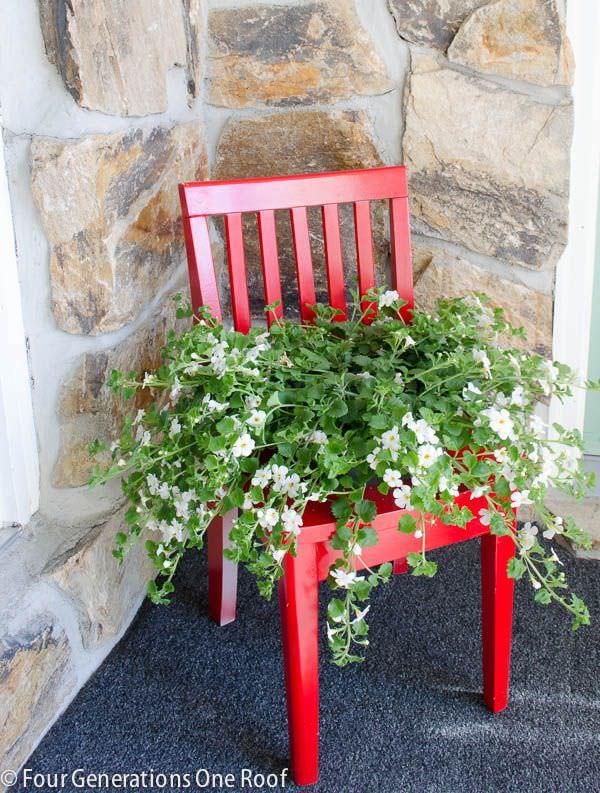
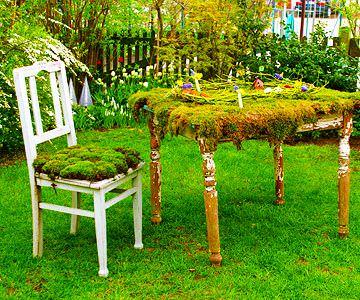
Plant your furniture…literally! We have run across these really neat ways to integrate plantings into your garden rooms, by planting your furniture itself! Really unique containers, and I love the idea of having plants as part of the outdoor room, not just next to it. Some of these have some easy DIY instructions, and others are just inspirational to get your creative ideas flowing… but they are all great ideas for any garden seating area. Remember, you can always alter a tutorial to fit your style and needs… love the chair planter, but it’s too cottage for you? Plant a simpler chair with succulents, or all foliage plants for a more minimalistic look. Use moss, or succulents, or try using all one type of flower in a project instead of a mix. I actually love the simple green of the modern table with the grass… the deep green color also brings out the amazing wood the table is made of… Remember, if you decide to go it alone, and dive into creating a planter out of furniture, you must either accept that the weathering of the water and plants will eventually rot away the piece, or you must provide a moisture barrier to protect the furniture. This can be as simple as attaching some plastic sheeting with a staple gun. Remember, the thrift store and yard sales are your friend here. So here are our picks for planting your furniture, send us pics and share your projects readers!
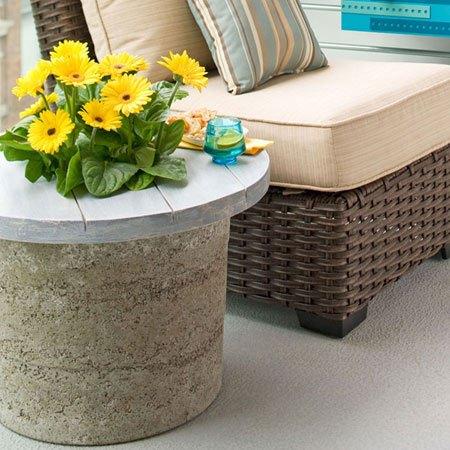
Our featured project, above, from HomeJelly is one of my favorites, and simple enough for anyone… Its a ceiling beam planter bench, and has a complete tutorial. All you need for this is a drill, a chisel, and wheels if you want it to be movable…You could also do this with railroad ties, but I would worry about seeping creosote myself… Don’t forget to read their safety advice! Want a similar, upscale look? Tao Concrete on Etsy sells this version. We could see this being DIY’able as well.
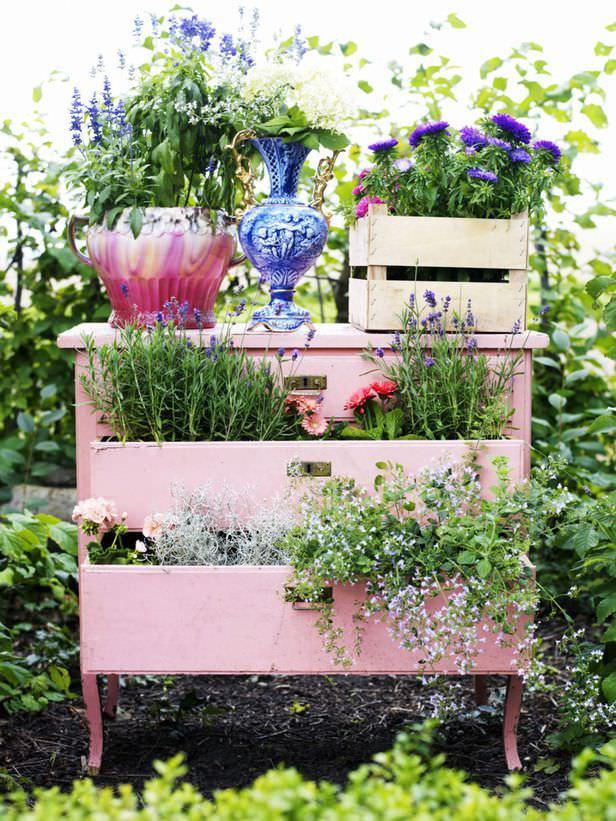
From HGTV, this dresser planter is an easy one…just remember to line the drawers before you fill with soil if you want to preserve the wood. You could use the top as a serving buffet!
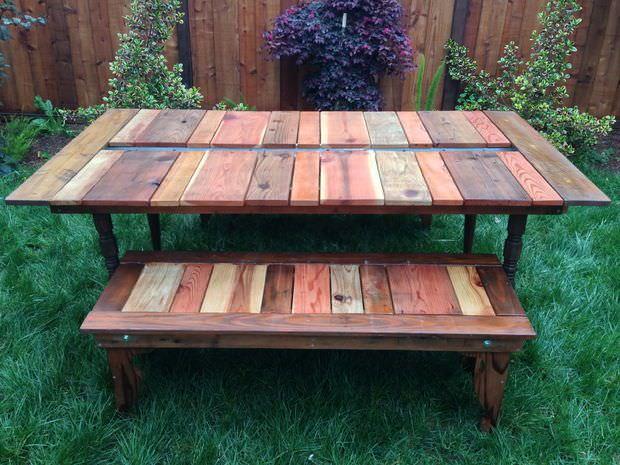
FromKatie Jackson Woodworks on Instructables, this Reclaimed Wood Flat Pack Picnic Table With Planter is pretty cool… you can use the center trough for ice and drinks, or plant herbs, pretty lettuce or edible flowers. This design is an award winner as well!
From This Old House, this hypertufa planter table is clearly amazing… and the hypertufa is so much lighter and stronger than concrete. Great instructions for this project, and even a video.
Since we are on hypertufa, Lowes has this step by step for this hypertufa planter table as well, and this might be a better beginner project. So cute!
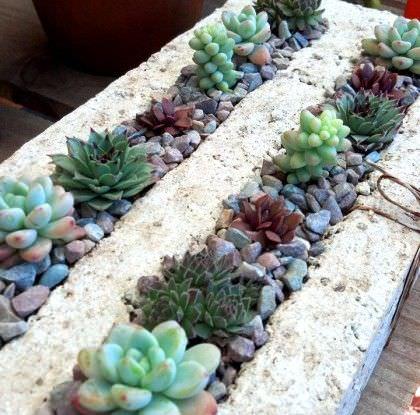
Cactus Jungle took the hypertufa table idea, created two troughs and used succulents. Cool!
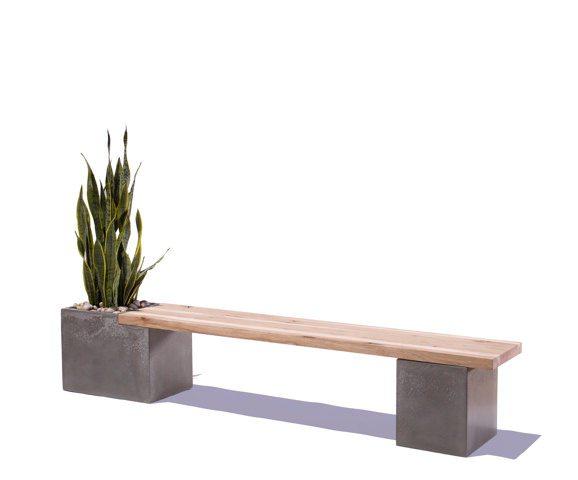
From Libby James, and totally inspirational, this is the modern table I talked about in my intro… This. Is. Cool.
From Four Generations, One Roof, we love this DIY chair planter. Color, not too cute but fun and fresh! Don’t forget to check out her complete tutorial.
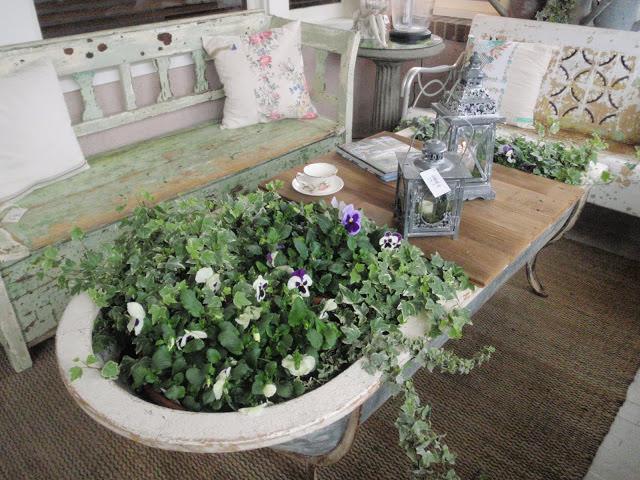
This tin bathtub planter table is great inspiration… This photo is by Hammers and High Heels from Bachmans in Minneapolis… This would be an easy DIY folks!
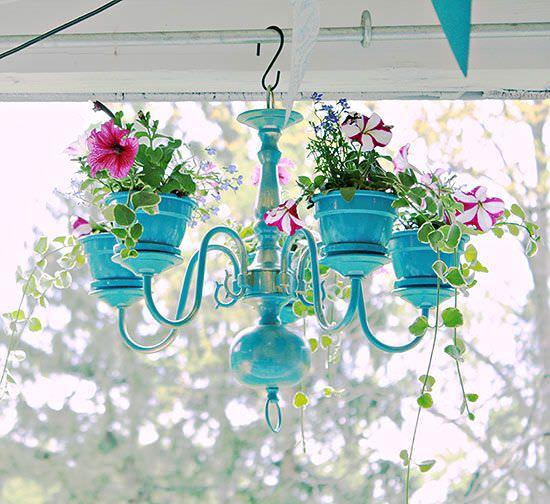
Who needs lighting? This DIY chandelier planter by DIY Show Off will make your outdoor room glow all by itself! Follow her step by step instructions to find our how to take your thrift store (or basement) find and turn it into garden treasure. (BTW, this project was featured by BHG!)
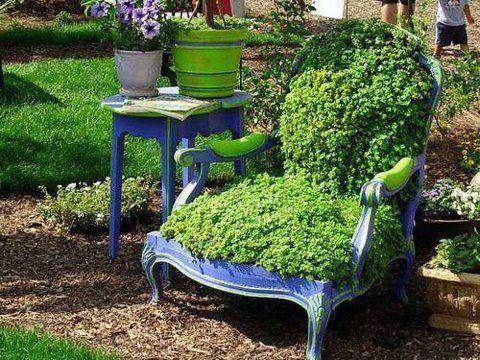
Purely inspirational, we found this photo on Pinterest, and I would love to have this whimsical piece in a corner of my garden! I would think you could DIY this with some chicken wire, a staple gun and some patience. If anyone knows who created this marvelous piece, please let us know, we’d like to pick their brain!
The blog that originally posted this idea no longer exists, but I had to include it… Again, staple gun, some soil, and some moss is all it would take. Remember if you use moss that it requires shade and water… There are some sedums now that have find texture that would give you the same look for sunnier and drier gardens. Sedum “Acre” would be great choice, and has tiny yellow flowers in summer.
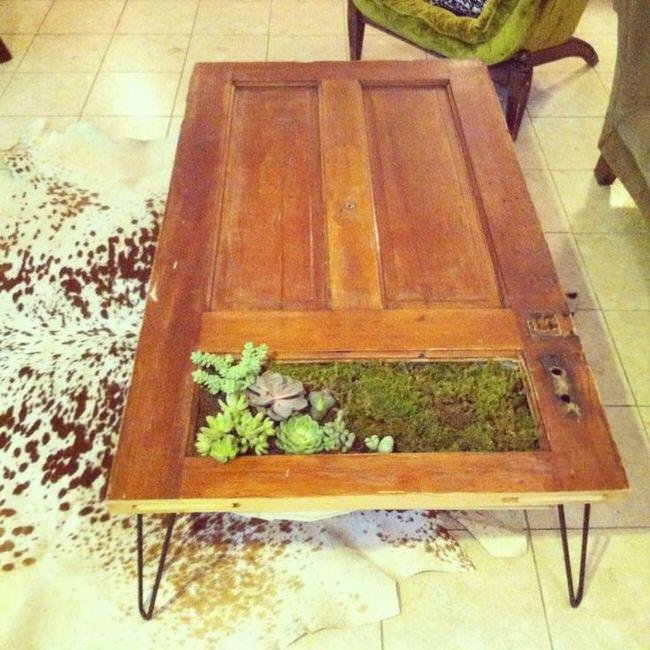
An engineering gardener created this planter table form an old door, and some hairpin table legs. Amazing ingenuity!
A lot of mid-century furniture was designed with planters, it was part of the theory behind the modern movement to integrate nature in design. Keep your eye out for pieces like this at yard and estate sales, and don’t be afraid to press them into use outdoors in a covered or protected area.
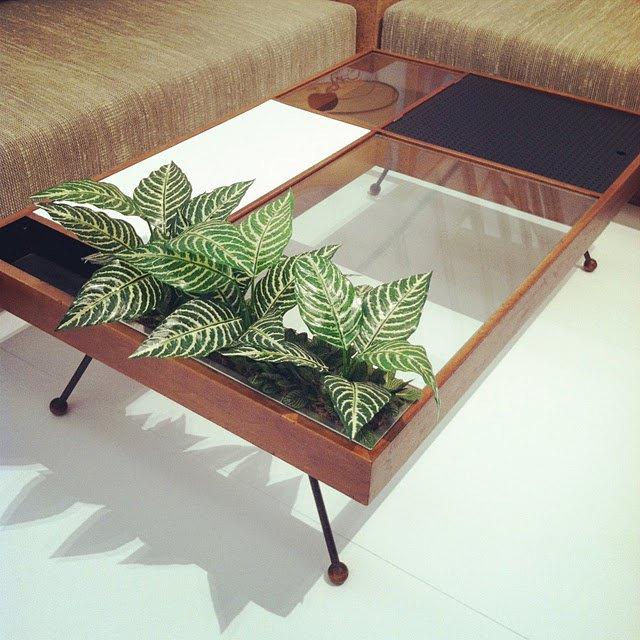
And this one from ModAttic…

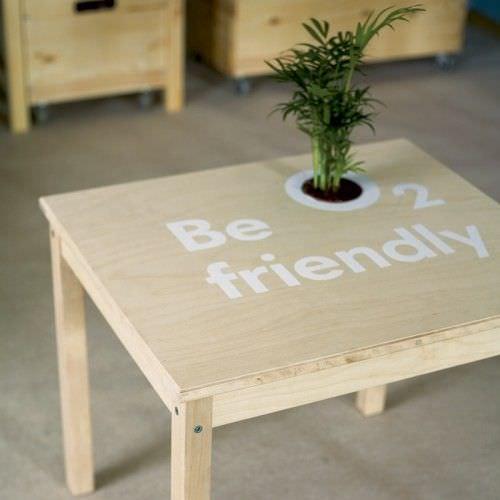
Lastly, this DIY coffee table with built in planter from Shelterness… Good instructions, easy project…
2
0
文章
Micky
2017年05月23日

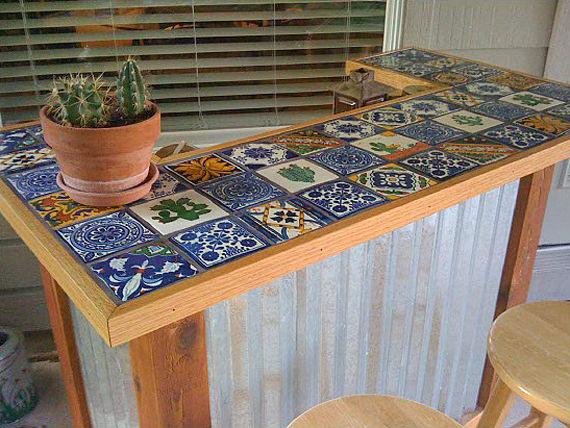
With summer festivities and holidays rushing toward us, there is no better time to stop and think about how you want to enjoy your outdoor space this season. Me? I love Steve’s margaritas… and a glass of wine. A good craft beer in the heat of the summer works too! With outdoor spaces being extensions of the indoors in todays homes, making a DIY bar just seems like a dang good idea. And if you don’t prefer to serve alcohol, use your DIY bar to serve the best iced tea around!
Our featured photo, above, is a tiled outdoor bar from ‘My Carpentry’. It has a full tutorial, with step by step drawings. What a great style for a mediterranean or exotic feel to your garden! I love the corrugated metal, it keeps this project looking updated.
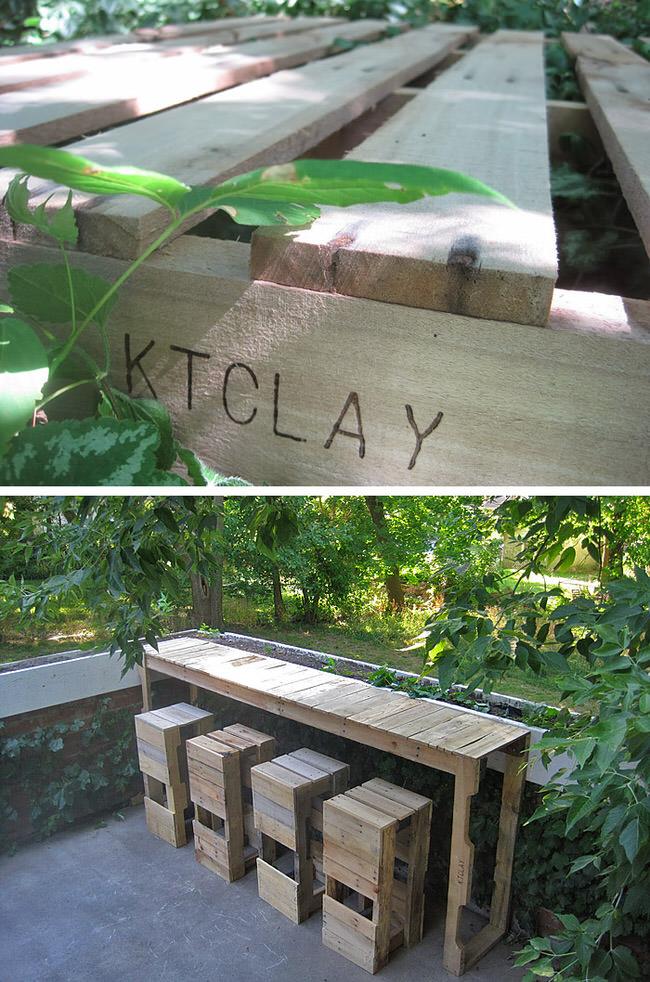
‘Stacked Design’ has a tutorial with tons of photos for this pallet bar/table project. And stools!
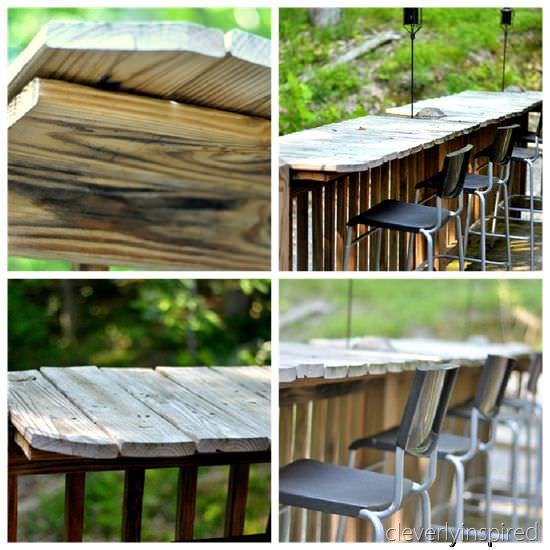
Cleverly Inspired’ shows you how to build an outdoor bar, using their deck railing! Great use of space!
This DIY bar idea by ‘The Wedding Chicks’ is easy, vintage and fun! Just place boards across the rungs of a wood ladder…instant bar!

Build a hanging outdoor bar with Sam Henderson from ‘Todays Nest’, for HGTV. This bar was made from old pallets, so its recycling too… great choice for small gardens.

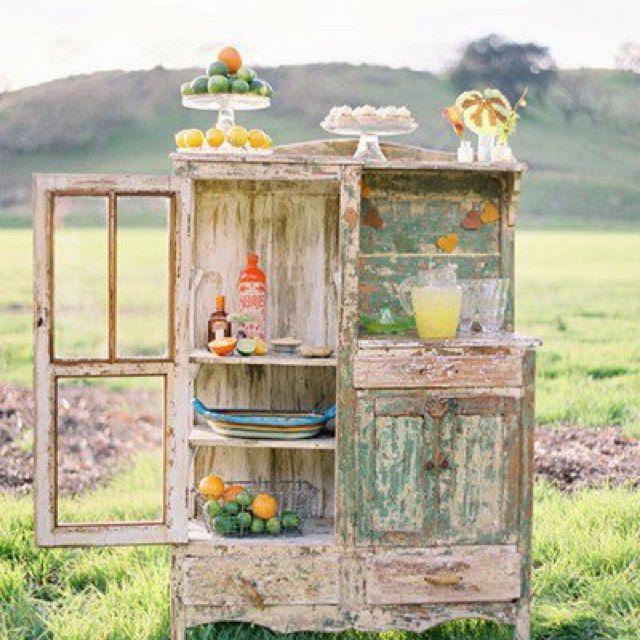
One of our Pinterest finds, using an old hutch as an outdoor bar. Cute and funky! You could pick up a thrift store hutch, then use distressed paint finishes to get this look as well. Be sure to seal it with an exterior grade sealer.
This cinder block planter bar on ‘Design Sponge’ is uber cool, and pretty easy. The basic steps are all there, be sure to read through the comments for additional tips.

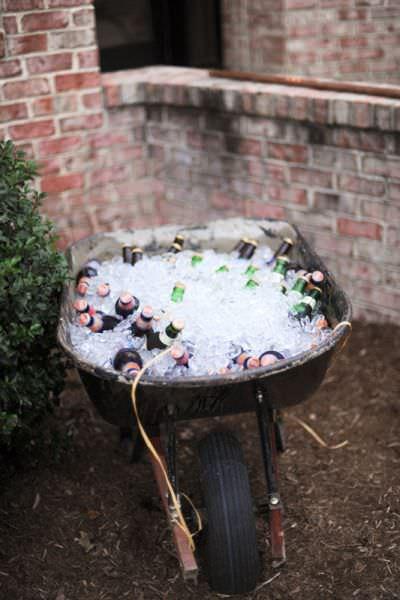
Here is an idea that couldn’t be simpler. What more festive way to share drinks than an ice filled wheelbarrow? And, it’s portable! You know, for when the party moves from the patio to the lawn for the inevitable football “game”. From ‘Style Me Pretty‘.
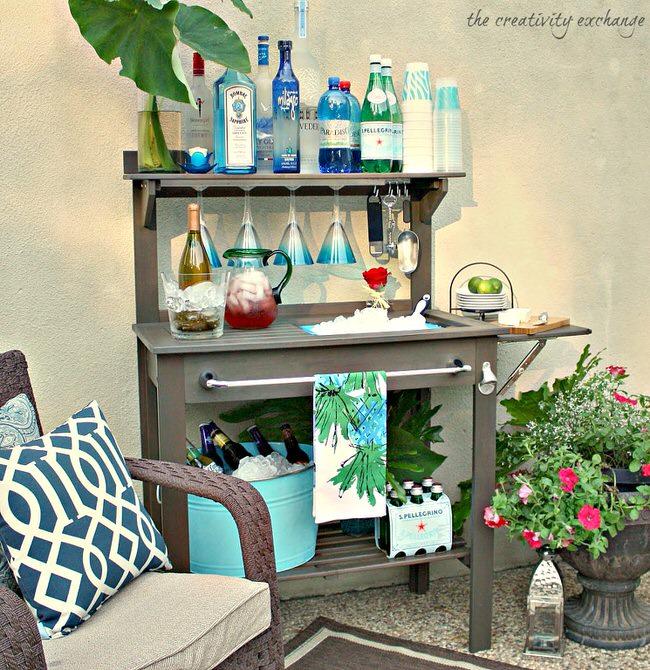
The Creativity Exchange’ has a great project for those who like to “remake” things… their potting bench turned outdoor bar is more than just repurposing. They has a full tutorial on how to add hardware, make glass storage, etc… Great project for those who don’t want to do actual construction.
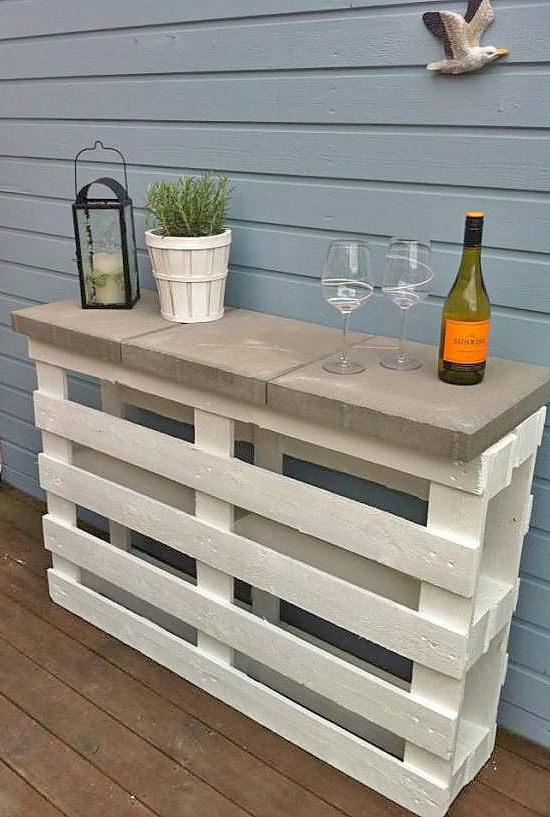
Lastly, another Pinterest inspirational project. This one is pretty easy…attach two pallets together with screws, paint, then top with landscape pavers. Pick up some landscape adhesive at Home Depot and attach the pavers permanently for safety. Done!
0
0
文章
Micky
2017年05月23日
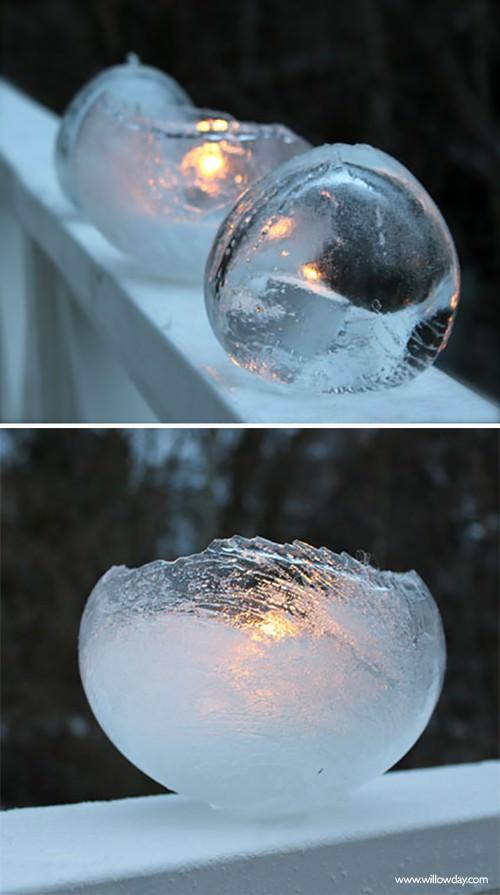
During the winter, you may think there is not much to be done outside. But I love the outdoors the whole year, and I think there is always a way to find happiness in the garden! So take advantage of those frigid outdoor temps, don some good gloves and a scarf, and head out to the garden to create these 7 crafty outdoor projects with ice! Our feature project, above, is from Kate at ‘Faceless 39’. She shows us how to make decorative ice gems for your garden with step by step photos… This is an easy project that’s lots of fun!

Learn to make ice lanterns, from ‘Willowday’! I love how the candle glows against the melting ice… these would be amazing along a walkway for a holiday party!
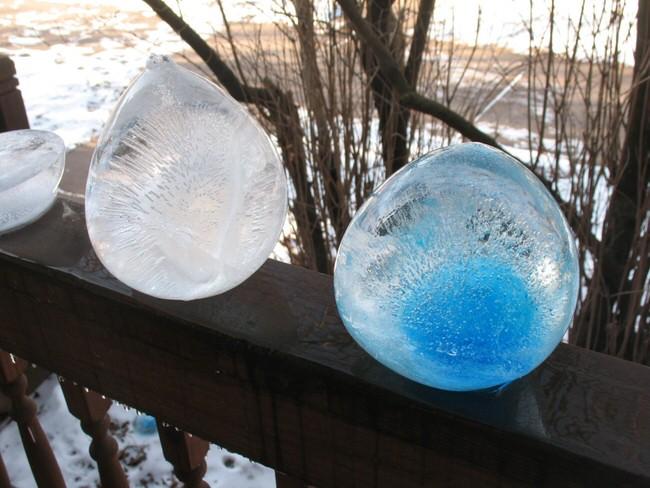
I have never seen a craft quite like these winter ice sun catchers from Tracy on ‘Hubpages’. Easy to follow tutorial, these are so cool! What if you just used all blues, to create a look of glowing ice?

hese DIY ice luminaries from Gabrielle at ‘Design Mom’ are the perfect way to light up a porch or add splash to a garden to be viewed from indoors, perhaps during a holiday get together? If it’s not quite cold enough to freeze them hard outdoors, and you are just using them for an event, you can freeze them on a cookie sheet in your freezer, then place outside just before use.

From ‘Queen Vanna Creations’, these ice balloons use food coloring to get that bright color. Fun!

Want to make an ice project that looks like you suddenly have the ability to craft your own giant snowflakes? Make lace and ice, with the help of ‘Resurrection Fern’. Easy and so pretty!

Lastly, if you want to make those great ice globes, and you want to do it the easy way… check out these ice globe luminary kits by ‘Gardeners Supply‘. For the amount of fun you get from them, they aren’t real expensive.


0
0
文章
Micky
2017年05月23日

Some of us really look forward to our outdoor Christmas lighting each year… to some of us it’s just an obligatory pain… That’s kind of sad, becasue it gives us a reason to celebrate the outdoors at a time of year when we don’t get out into the garden much. I think those who dread it only feel that way becasue they haven’t been inspired! So here are some great ideas for DIY Christmas outdoor lighting to really make you want to celebrate the season!
When I saw these Christmas light balls for the first time, all I could think was “wow”. Simple, using ordinary chicken wire and lights, and such an impact! Find out how to create these Christmas light balls from Christmas Lights Etc…

Rose Knows Coupons has a tutorial on creating these outdoor lighted holiday gift boxes. Much less expensive than the ones in the store!

Wanna know how to make these shooting star lights? Go see the tutorial here!

Write a message in lights to share with all who pass by. Here they used LED rope lighting. The rope lighting is secured to a grid of wire wreath forms with heavy-duty cable ties.

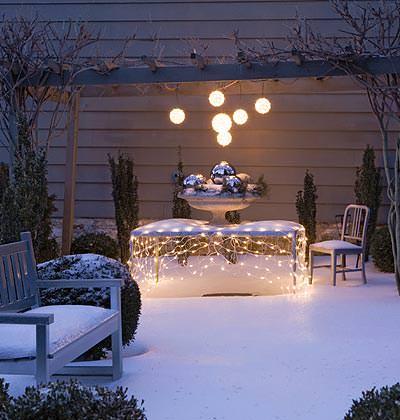
This is one of the most creative DIY lighting projects I’ve seen… net lights draped over an outdoor table, and lighted globes hung as a “chandelier”… Like party time for the Christmas creatures!
Love this message lighting sign by Little Bit Funky. Find out how they made this giant lighted star for less than $5. I would either use dark paint, or lights with white wires to make it a little neater looking during the day, but whatever you like!

This is a great idea for the patio…fill your hanging baskets with led lights, then push some through to the outside… Fill the basket with some garden goodies!

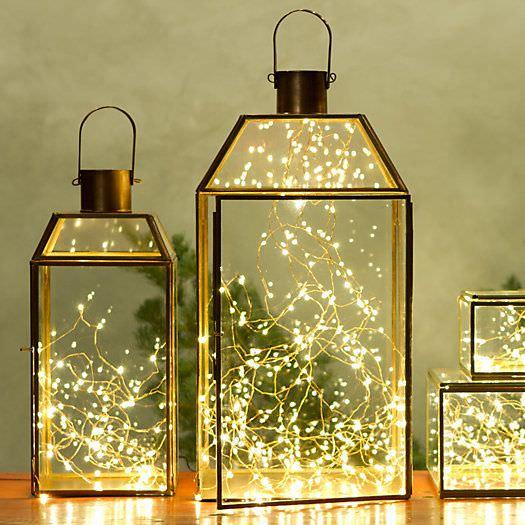
Lighted lanterns…just insert led lights into anything clear!
This last one is just plain old good inspiration…old fashioned bulb multi lights wrapped around an older bicycle… Charming!

0
0
文章
Micky
2017年05月23日

Come Fourth of July, most of us spend that day outdoors. It’s a great time to show your patriotic pride by making some outdoor 4th of July decor for your yard and garden. We’ve found some cool projects for you that are fun, easy and great for the kids to help on as well. So fly your flag and get out the red, white and blue! It’s Fourth of July!
Our featured project, above – ‘A Diamond in the Stuff’ has a project that just might be the best use for a wood pallet I’ve seen yet. Try her wood flag wreath… This could be a great porch decoration all year round!
From ‘Sunshine Girl Crafts’, this outdoor “fireworks” display is made from simple 4×4 wood scraps, some paint and a little dollar store froo froo!

‘For the Love Of’ has a simple tutorial to create these DIY patriotic luminaries with tissue paper…great craft with the kids!

‘Pink and Green Mama’ made these DIY 4th of July lawn stars with her kids…flour and water, and a homemade stencil… this is festive and fun!

This easy to make patriotic bunting from ‘Create and Babble’ will have your front porch just oozing the red, white and blue!

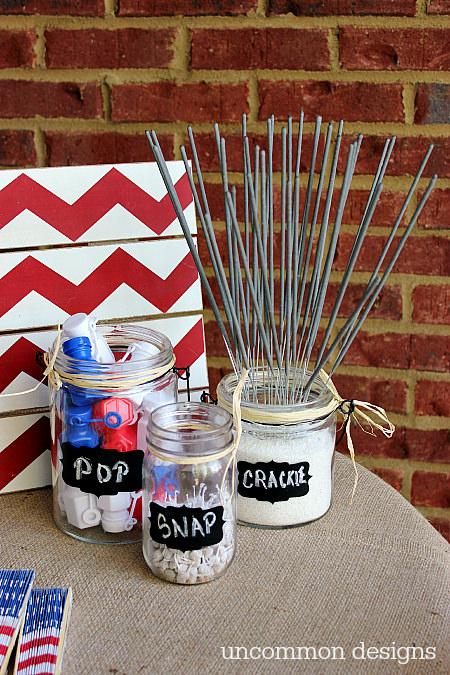
Set up this cool fun and games station by ‘Uncommon Designs’, and make sure all the kids make those wonderful summer memories at your 4th celebration.
Ehow has this cute cupcake liner wreath tutorial… you might even find all these supplies at your dollar store. Fun!

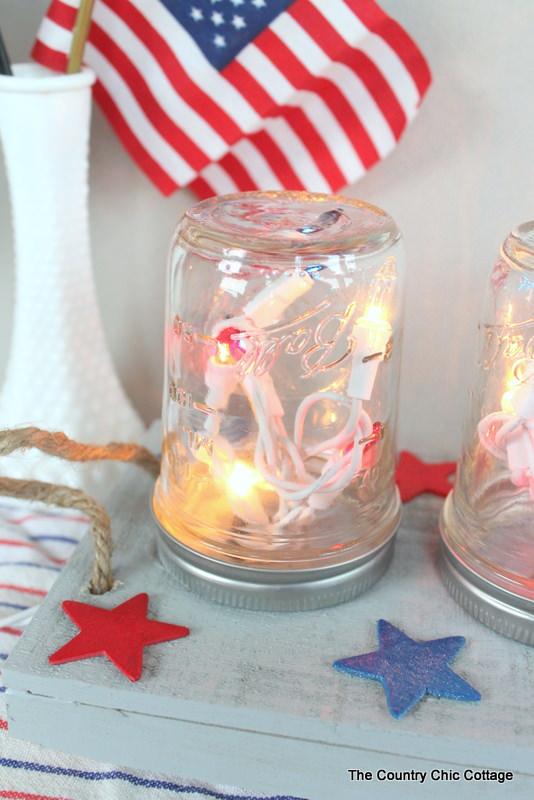
Love, love, love this DIY mason jar centerpiece by ‘Country Chic Cottage’… Lighted and amazing, you could use this year after year!
Our final project is by ‘Addicted 2 DIY’, these DIY patriotic jar lanterns are easy, and I love the glow they put off when lit at night.


What are your fav outdoor Fourth of July decorations? Share!
0
0
文章
安静的美女子
2017年05月23日

Check out this list of best flowering houseplants! They can add a bright touch to your home, growing them is similar to other indoor plants.1. Begonia

Although begonias are considered as outdoor plants, there are many plants from begonia genus that makes great flowering houseplants. Most of them are easy to grow and good for beginners. Wax Begonia, Rieger Begonia, and Angel-Wing Begonia are among the best and most popular houseplants.
2. Bromeliads

Its colorful foliage and long lasting flowers can beautify any interior. It thrives easily without much care and the best thing is that you can grow this houseplant in low light conditions too.
3. African violet

African violets are easy to grow flowering plants that can be grown indoors for their beautiful flowers and foliage, they prefer warm climate rather than cold. Keep these plant in a spot where they receive filtered sun.
4. Scented Geranium

Scented geraniums with fragrant leaves and bright colorful flowers become incredible houseplants. However, growing geranium indoors is not as easy as other flowering houseplants we have here in this list. It requires a south or west facing window that receives ample sun and moderate watering.
5. Poinsettia

Growing poinsettias in your home can add a bright touch to your interior. Its multicolor bracts look more colorful than its flowers. This tropical plant requires, light, warmth and protection from drafts to thrive indoors.
6. Peace Lily

If you want to grow a low-care plant, grow peace lily. Inside your home, it can live without water for days. Peace lily’s beautiful white flowers flourish in low lighting conditions. It also removes the toxins from the air.
7. Lipstick Plant

Although not commonly grown as a houseplant, lipstick plant can be grown indoors. It requires constantly warm temperature and humid surrounding to grow and thrive. Here is more on how to grow lipstick plant.
8. Jasmine

Many jasmine varieties can be grown indoors. If you keep this most fragrant vine in a bright spot where it receives some hours of direct sunlight daily, it’ll grow. The selection of jasmine varieties you want to plant indoors depends on the climate you live in. For colder regions, Jasminum polyanthum is the one you can try, whereas in tropics most of the plants from this species will grow.
9. Impatiens
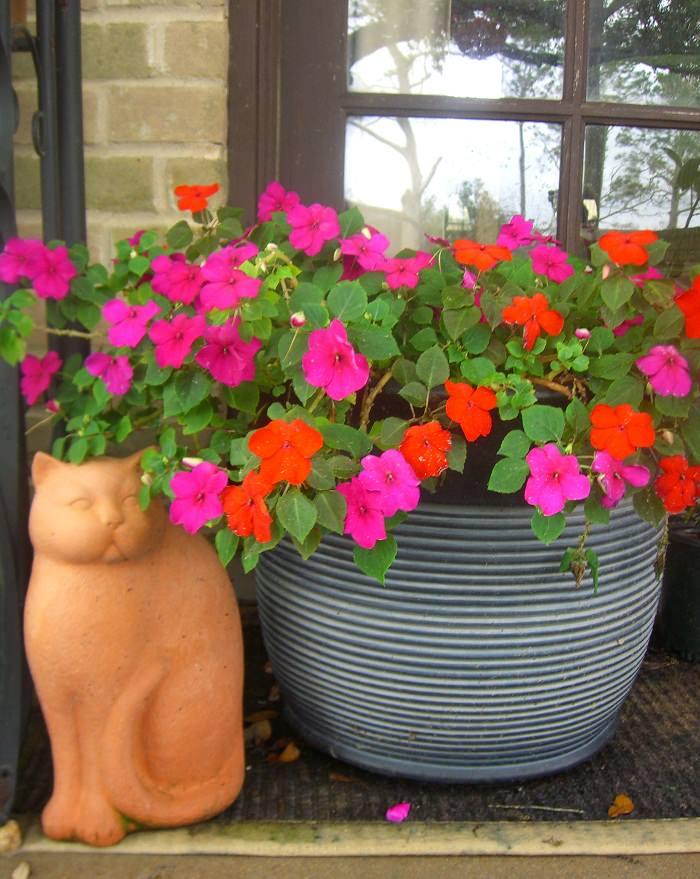
Impatiens are beautiful shade loving annuals but in optimum conditions, you can grow them year-round as a houseplant. Maintain room temperature above 50-55 F and place the pot in a spot that receives bright indirect sun all day long, it would be better if you can provide 1-2 hours of direct sunlight too.
10. Kalanchoe

Kalanchoe is a tropical succulent, plants of this genus grows best outdoors in warm climates. However, it can be grown indoors. This flowering succulent comes in a variety of colors and has low watering needs. You can keep it near a window where it can receive a few hours of sun in order to bloom.
11. Oxalis or Purple Leaf Shamrock

This beautiful flowering houseplant can adorn your house with showy purple foliage and white or pink flowers. Place it at a bright spot for abundant blooms and allow the soil to dry out between watering spells.
12. Cape Primrose

Cape Primrose or “Streptocarpus x hybridus” is a relative of the African violet. If you keep the soil lightly moist and give it bright, indirect sun year-round, it will bloom continuously. Also, there are many new hybrid varieties available with bigger flowers, longer blooming time, and more compact foliage.
13. Christmas Cactus

Christmas cactus is an old-fashioned favorite houseplant of many. When it blooms it creates a warm atmosphere. Red, pink, white or orange: The lovely flowers can quickly brighten up any interior. If maintained well, it can even bloom again from one year to another for years.
Also Read: How to Make Christmas Cactus Bloom at Christmas
14. Crown of Thorns

The Crown of Thorns becomes an exceptional houseplant due to its continuous blooms and low watering needs. If you can provide a sunny window where the plant can be placed, it will grow happily. Available in so many colors, the plant prefers loamy succulent soil and warm temperature.
15. Black Eyed Susan Vine

Black-eyed Susan vine can be grown indoors. Depending on your climate, this annual or perennial flowering plant can add a dramatic appeal to your rooms. Keep it near a window, where it receives a lot of sun.
Also Read: Best Indoor Vines
16. Purple Heart or Inch Plant (Wandering Jew)

A cluster of purple, lance-shaped leaves makes purple heart an impressive houseplant with or without its pink flowers. This beautiful trailing indoor plant can be grown in small colorful pots or hanging baskets and can be used as a table accent. Keep your purple heart (Tradescantia pallida) plant in a spot where it will receive 2-3 hours of sun for a healthy plant.
Note: Several other plants from this genus apart from Tradescantia pallida are known with similar names! For example, Tradescantia zebrina and Tradescantia fluminensis17. Orchids

Orchids are different from other houseplants. Unlike ferns, philodendrons, palms and Swedish ivy, orchids do not grow in soil. Putting an orchid in soil is actually one of the best ways to kill it. You can learn more about growing orchid indoors here.
Although begonias are considered as outdoor plants, there are many plants from begonia genus that makes great flowering houseplants. Most of them are easy to grow and good for beginners. Wax Begonia, Rieger Begonia, and Angel-Wing Begonia are among the best and most popular houseplants.
2. Bromeliads
Its colorful foliage and long lasting flowers can beautify any interior. It thrives easily without much care and the best thing is that you can grow this houseplant in low light conditions too.
3. African violet
African violets are easy to grow flowering plants that can be grown indoors for their beautiful flowers and foliage, they prefer warm climate rather than cold. Keep these plant in a spot where they receive filtered sun.
4. Scented Geranium
Scented geraniums with fragrant leaves and bright colorful flowers become incredible houseplants. However, growing geranium indoors is not as easy as other flowering houseplants we have here in this list. It requires a south or west facing window that receives ample sun and moderate watering.
5. Poinsettia
Growing poinsettias in your home can add a bright touch to your interior. Its multicolor bracts look more colorful than its flowers. This tropical plant requires, light, warmth and protection from drafts to thrive indoors.
6. Peace Lily
If you want to grow a low-care plant, grow peace lily. Inside your home, it can live without water for days. Peace lily’s beautiful white flowers flourish in low lighting conditions. It also removes the toxins from the air.
7. Lipstick Plant
Although not commonly grown as a houseplant, lipstick plant can be grown indoors. It requires constantly warm temperature and humid surrounding to grow and thrive. Here is more on how to grow lipstick plant.
8. Jasmine
Many jasmine varieties can be grown indoors. If you keep this most fragrant vine in a bright spot where it receives some hours of direct sunlight daily, it’ll grow. The selection of jasmine varieties you want to plant indoors depends on the climate you live in. For colder regions, Jasminum polyanthum is the one you can try, whereas in tropics most of the plants from this species will grow.
9. Impatiens
Impatiens are beautiful shade loving annuals but in optimum conditions, you can grow them year-round as a houseplant. Maintain room temperature above 50-55 F and place the pot in a spot that receives bright indirect sun all day long, it would be better if you can provide 1-2 hours of direct sunlight too.
10. Kalanchoe
Kalanchoe is a tropical succulent, plants of this genus grows best outdoors in warm climates. However, it can be grown indoors. This flowering succulent comes in a variety of colors and has low watering needs. You can keep it near a window where it can receive a few hours of sun in order to bloom.
11. Oxalis or Purple Leaf Shamrock
This beautiful flowering houseplant can adorn your house with showy purple foliage and white or pink flowers. Place it at a bright spot for abundant blooms and allow the soil to dry out between watering spells.
12. Cape Primrose
Cape Primrose or “Streptocarpus x hybridus” is a relative of the African violet. If you keep the soil lightly moist and give it bright, indirect sun year-round, it will bloom continuously. Also, there are many new hybrid varieties available with bigger flowers, longer blooming time, and more compact foliage.
13. Christmas Cactus
Christmas cactus is an old-fashioned favorite houseplant of many. When it blooms it creates a warm atmosphere. Red, pink, white or orange: The lovely flowers can quickly brighten up any interior. If maintained well, it can even bloom again from one year to another for years.
Also Read: How to Make Christmas Cactus Bloom at Christmas
14. Crown of Thorns
The Crown of Thorns becomes an exceptional houseplant due to its continuous blooms and low watering needs. If you can provide a sunny window where the plant can be placed, it will grow happily. Available in so many colors, the plant prefers loamy succulent soil and warm temperature.
15. Black Eyed Susan Vine
Black-eyed Susan vine can be grown indoors. Depending on your climate, this annual or perennial flowering plant can add a dramatic appeal to your rooms. Keep it near a window, where it receives a lot of sun.
Also Read: Best Indoor Vines
16. Purple Heart or Inch Plant (Wandering Jew)
A cluster of purple, lance-shaped leaves makes purple heart an impressive houseplant with or without its pink flowers. This beautiful trailing indoor plant can be grown in small colorful pots or hanging baskets and can be used as a table accent. Keep your purple heart (Tradescantia pallida) plant in a spot where it will receive 2-3 hours of sun for a healthy plant.
Note: Several other plants from this genus apart from Tradescantia pallida are known with similar names! For example, Tradescantia zebrina and Tradescantia fluminensis17. Orchids
Orchids are different from other houseplants. Unlike ferns, philodendrons, palms and Swedish ivy, orchids do not grow in soil. Putting an orchid in soil is actually one of the best ways to kill it. You can learn more about growing orchid indoors here.
1
2
文章
Micky
2017年05月23日

Sometimes when decking out the halls, we forget that the garden needs some Christmas love too! After all, he was born in a manger, with the animals and the cold… not in a warm cozy inn! So isn’t it fitting we treat our outdoor space with some Christmas decorations? These DIY front yard Christmas decorating projects will make the season special in your garden, and for all those who pass by it! Our featured photo above comes from ‘HGTV’. They show you how to dress up trees with moravian stars.
Also from ‘HGTV’, make a simple wooden Christmas tree with reclaimed wood! Easy tutorial…

Make these glowing gift boxes by ‘Martha’, and give the gift that keeps on giving! Holiday spirit!

If you live in an area that freezes hard at Christmas, these frozen ice luminaries are an amazing way to light the garden path. Do it for a party, or just for your family! SOOOOO pretty! These first ones are from ‘Henhurst Interiors‘, and here’s what they said on making them… “Beautiful way to welcome guests to your party–illuminate your entry with luminaries made from frozen ice. Use half gallon milk cartons and empty wine bottles. After initial freeze, remove wine bottle and add more water to raise bottom level to accommodate a votive candle.”…

If that isn’t clear enough, ‘BHG’ offers you a full video on how to make ice luminarias.

This I’ve never seen, but love! Make these snow lanterns with the help of ‘Little Green Fingers’… Easy, just requires lot’s of snowballs! Great way to burn off some energy with the whole family, making a snowball pile for your creations.

Make rustic nail head Christmas trees with this tutorial from ‘HGTV’… I’d love a forest of these!

Last year we tried to create a magical forest scene with lights in our front yard… These DIY tomato cage Christmas trees would have been the thing to make it perfect! From ’17 Apart’…

Want a simple look? Make these scrap wood Christmas trees by ‘Restyled Junk’. Quick tutorial on how to make these happen.

‘Finding Home’ “found” the perfect Christmas decorating project… a reindeer! I love that this reclaimed wood reindeer isn’t too cutesy, but they don’t leave out the red nose. Gotta have some magic, people!

Last, we have this rustic log slice snowman by ‘Grandparents Plus‘. I couldn’t find a tutorial for it, but it looks pretty simple in design. Flatten the log slice edges where you attach for a tight fit,( and so they won’t tip over!) then screw from the back or use wood glue and clamps.

That’s it! Do you have any DIY front yard Christmas decorations that you use or make every year? Share in comments!
0
0
文章
Abigal
2017年05月22日

The great outdoors and food just kinda go together, don’t they? Think camping, picnics, and of course, BBQ’s! So instead of schlepping all your food, dishes and cooking prep through the house over and over, how about making yourself an amazing outdoor kitchen or grilling station? The cook in your life will be out where the people are, and those who are helping with the prep won’t be stuck indoors. Ok, there is also that cool feeling of cooking outside. Don’t know what it is, it’s kind of a primal, survival deal. It just tastes better and feels oh so satisfying! So let’s do it! Tackle one of these DIY projects this weekend, and wait for the jealous ooo’s and ahhh’s from your guests!

Our feature project above, is a DIY outdoor serving center from ‘Build Something’. The tutorial has complete plans and cutting instructions. We love that this is made of cedar, and also the sliding top that can still be used as a counter when it’s open. And it’s a pretty piece of furniture too!
Wanna have everything you need to grill at your fingertips? AND have room to set things while you are at the BBQ? This DIY rolling outdoor island has complete building plans and instructions, from Elisha at ‘Pneumatic Addict’. This one has it all, and it rolls out of the way when not in use too!

This DIY grill station from Angela at ‘Unexpected Elegance’ is ah-mazing! Why? She not only made it practical, it’s pretty! She used stone veneer over a sheet metal frame that she created herself. A lot of value for a weekend project! Easy instructions with photos.

This patio cooler stand from ‘Eddie and Steph‘ is a great idea, with a short little tutorial. A DIY’er with some projects under their belt could take this idea and make it amazing! There is nothing worse than having to go inside every 5 minutes for more drinks!

Here is another idea straight from a Pinterest user… Using a dorm fridge to make an outdoor refrigerator in a really pretty box! (See similar project with plans at the end!)

These DIY outdoor concrete countertops are kind of a two parter… The actual concrete counter how-to is from ‘Kara Paslay’, but you will find a general tutorial on making a countertop for outdoors at ‘HomeDit‘. This is a more permanent outdoor kitchen design that can add value to your home.

From ‘Old World Garden Farms’ via ‘Hometalk’, this rustic outdoor summer kitchen is the perfect look for a farm style home. (Or one where you just want to add some rustic charm!) Photos and instructions. We are loving’ on that corrugated metal!

Our last two are from one of our favorite woodworker sites, ‘Ana White’. This BBQ built in was uploaded by one of her readers, and unfortunately they did not share which of Ana’s free plans they used! (You can search on the site though!)

This last one is a wooden cooler stand from ‘Ana White‘ done by ‘Birds and Soap, and this time, we found the tutorial to make this outdoor cooler project. Be sure to scroll down to find the drawings and plans. Which version would you make?

Our feature project above, is a DIY outdoor serving center from ‘Build Something’. The tutorial has complete plans and cutting instructions. We love that this is made of cedar, and also the sliding top that can still be used as a counter when it’s open. And it’s a pretty piece of furniture too!
Wanna have everything you need to grill at your fingertips? AND have room to set things while you are at the BBQ? This DIY rolling outdoor island has complete building plans and instructions, from Elisha at ‘Pneumatic Addict’. This one has it all, and it rolls out of the way when not in use too!
This DIY grill station from Angela at ‘Unexpected Elegance’ is ah-mazing! Why? She not only made it practical, it’s pretty! She used stone veneer over a sheet metal frame that she created herself. A lot of value for a weekend project! Easy instructions with photos.
This patio cooler stand from ‘Eddie and Steph‘ is a great idea, with a short little tutorial. A DIY’er with some projects under their belt could take this idea and make it amazing! There is nothing worse than having to go inside every 5 minutes for more drinks!
Here is another idea straight from a Pinterest user… Using a dorm fridge to make an outdoor refrigerator in a really pretty box! (See similar project with plans at the end!)
These DIY outdoor concrete countertops are kind of a two parter… The actual concrete counter how-to is from ‘Kara Paslay’, but you will find a general tutorial on making a countertop for outdoors at ‘HomeDit‘. This is a more permanent outdoor kitchen design that can add value to your home.
From ‘Old World Garden Farms’ via ‘Hometalk’, this rustic outdoor summer kitchen is the perfect look for a farm style home. (Or one where you just want to add some rustic charm!) Photos and instructions. We are loving’ on that corrugated metal!
Our last two are from one of our favorite woodworker sites, ‘Ana White’. This BBQ built in was uploaded by one of her readers, and unfortunately they did not share which of Ana’s free plans they used! (You can search on the site though!)
This last one is a wooden cooler stand from ‘Ana White‘ done by ‘Birds and Soap, and this time, we found the tutorial to make this outdoor cooler project. Be sure to scroll down to find the drawings and plans. Which version would you make?
0
0
文章
Abigal
2017年05月21日

We don’t always think of our outdoor spaces like rooms, but we should! There should be design elements in every garden that make us smile, and that shouldn’t be limited to just plants. Garden fences are like our virtual “walls” in a garden, and if you think of them that way, you know they need some sprucing! As you would hang photos and art on your interior walls, don’t be afraid to try these 15 creative garden fence spruce ups! Keeyla Meadows is one of my favorite garden artists, and she would tell you that nature is a work of art, so celebrate it! She introduced me some years ago to the idea of a garden as more than just flowers and plants in her book, ‘Making Gardens Works of Art”. So let’s do like Keeyla, and and spruce up (at least) our fences! The photo above, is from Keeyla’s Morroccan sanctuary garden. Ok, we probably aren’t going to weld and form and paint and sculpt a fence like this entry gate. But let it inspire you to think creatively!
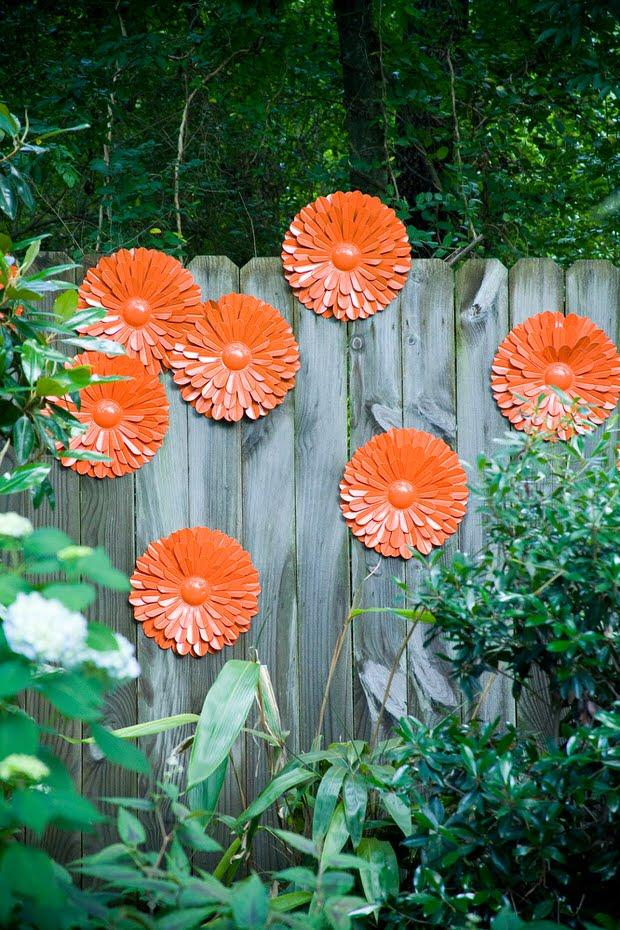
‘Chris H. Olsen‘ has the idea, he used store bought metal flowers, but then spray painted them a vibrant color and hung them on the garden fence! You could even do this with old tools, or even rusty metal parts.
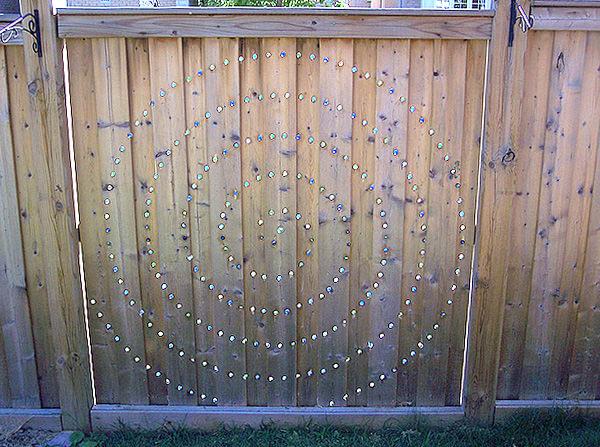
So we found this idea on Pinterest, but we love it! This is colored glass marbles set into a pattern in the fence. You could recreate this by first tracing out your pattern onto the fence with pencil, marking where each hole for each marble should go. Make sure the drill bit you use is just a tiny bit smaller than the diameter of the marble, and then drill your holes. You want the marble to fit very tightly in each hole so they will stay in place. Practice with your drill bit(s) to check for sizing on a scrap piece of wood first. BTW, if anyone knows who did this project, please share it with us in comments or email.
From ‘Sensibly Sara’, this DIY fence table is perfect for extra space when entertaining, a potting bench, a play space for the kids (perfect place to finger paint!) or even a place to do home work on a nice day! Simple, easy to follow tutorial.

Some sticks and some plywood come together to make this DIY outdoor letter art from ‘Better Homes and Gardens Australia’. I could think of so many words I would like to see on my garden fence!

CC at ‘Hometalk‘ made this amazing faux secret garden door on the fence. Starting with an old door, porch poles, bunk bed slats, and even flower pots as finials turned this salvage into something sweet!

From ‘Garden Tenders‘, this dragonfly art looks right at home here on this fence. Want to know how to do something like this yourself? Check out our post on TBD on garden spruce ups.

Donna at ‘Funky Junk Interiors‘, hung this canning jar lid wreath on her fence for a little rusty charm. This is simply old canning jar lids strung onto an old tie!

‘Babblings and More‘ used an old window and some jars to create a homey little vignette. They filled the jars with stones to keep them in place. Cute!

‘Creative Star Learning‘ made this fence hung water wall (it’s almost like a fancy rain chain!) from bamboo.

From ‘There Was a Crooked House‘, this is a brilliant idea on a budget! After you paint your frames, we recommend giving them a coat of clear exterior sealer to extend their life outdoors.

We found this idea on Pinterest, and it’s pretty simple. Hang string lights from your fence line!

From ‘Creative Raisins‘, these antique looking signs are actually DIY reproductions!

‘Flea Market Gardening‘ simply found this cute barrel hoop heart hung on a fence from Patty Hicks. Adorable!

So finally, another Pinterest photo we can’t find a source for, but didn’t want to let go by. This tree painting on a fence would not be hard to do, think kindergarten! (Ok, maybe a little time consuming. Scale it down, maybe?) So fun!

0
0

