文章
Abigal
2017年05月21日


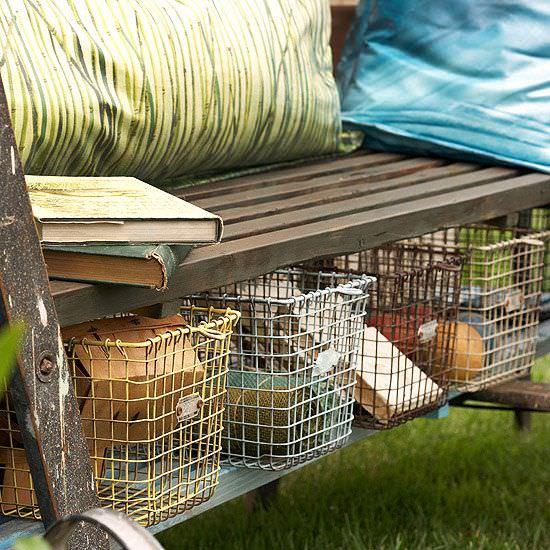
There is never enough storage outside on the deck, porch or patio. I’m always having to run to the garage to look for a yard game, candles, small garden tools or a couple of outdoor pillows for that afternoon book. While we’re busy complaining, there are also never enough places to read that book! So whether you have a small garden space, or just want to maximize your organization, we found some solutions to both problems! These DIY outdoor storage benches are a great idea for adding additional seating and always making sure that bocce ball set is just within reach. Our feature project above, is from the very talented Kim at ‘Sand and Sisal’. Her DIY outdoor storage box and bench is even on caster wheels for easy relocating. She has plenty of step by step photos on how she did it.
Kim at ‘The Kim Six Fix’ designed this X leg bench with crate storage, and shares her tutorial on how she did it for around $40!

I like this bench with hidden storage project from ‘This Old House’ because it has a back rest. Sometimes that’s all I need after working in the garden, is a spot I can lean back and relax.

This outdoor storage bench from Ana White was designed after a West Elm line… and it looks like it! Her complete plans and tutorial are all free, so give this one a try!

From ‘Home Depot’, this DIY outdoor corner bench with storage is from Caitlin at ‘Desert Domicile’… I love her backyard! It feels like an expensive resort. The tutorial has lot’s of instruction and step by step photos. This is one of those projects that could transform a garden space.

From ‘Canadian Home Workshop’, this stylish water storage bench was meant for holding everything from dock supplies to pool toys!

This DIY outdoor storage box by ‘Build Basic’ has some real style factor to it… all you have to do is turn the slats to get a coastal louvered look!

This storage seat box from ‘Better Homes Australia’ has a cool modern look , and is portable with industrial wheels. Good photos take you through it.

Now that you have some great skills from these tutorials, how about a couple to inspire you to do it your own way? From ‘BHG‘, these vintage locker bins make great DIY outdoor storage!
Last, from ‘Twig Decor’, they used an old door and headboard to repurpose into an outdoor bench with storage. Ok, could this have looked any more amazing? I would love to see it still as a headboard too!

0
0
文章
Abigal
2017年05月21日
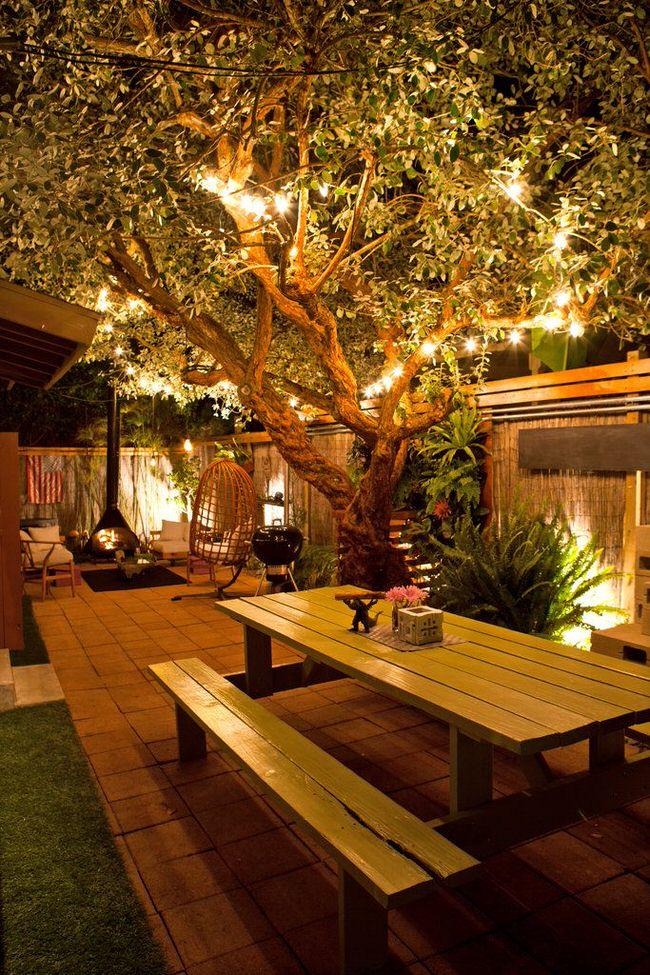
When the warmer seasons come around, most of us like to spend some evenings (or most!) lounging in our yards and gardens. Having good outdoor lighting can make your outdoor space a usable and enjoyable spot to visit with loved ones, have a late snack, or sip a good glass of red. Try these backyard lighting ideas and tutorials to get your yard in shape for when the sun goes down! Our feature photo below is a gorgeous backyard globe light set up by ‘Willow Jade Floral‘ in L.A. If I could have my whole yard look just like this!

Make these geometric light columns with this tutorial from ‘Martha’. This uses just three simple materials, and would be great for a graduation or Fourth of July party!

From ‘House of Fifty’ magazine, make mason jar candle lanterns! These are easy, and who doesn’t love mason jars!

Another version of a mason jar lantern, these we found on Pinterest, but can’t find the original source. Please share if you know where these are from! We really like how they look hanging against the wood fence. It makes for a really pretty look, but if you do this, consider using LED candles instead.

This outdoor lighted cube table is a woodworking tutorial from ‘Lowes’… This would make additional lighting in your patio area unnecessary!

A great idea from ‘Sunset‘… hang tea light lanterns from different heights as an outdoor chandelier…

Robin at ‘All Things Heart and Home’ has a tutorial for her easy DIY outdoor chandelier made from grapevine balls! Love this project!

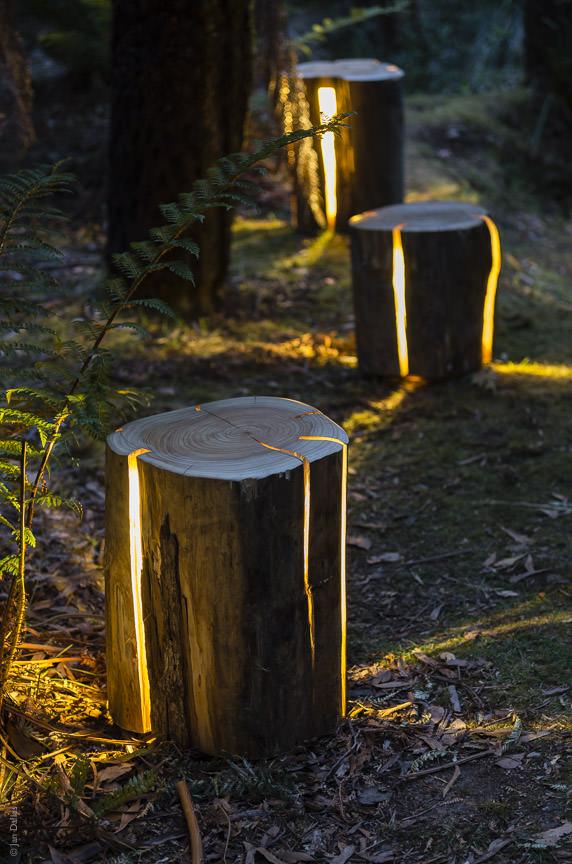
Ok, these are just cool. These are cracked log lamps made by artist Duncan Meerding, via ‘Recycled Interiors’. You have to go check out how he makes these! I would love these all through a woodland garden! Fairy garden!
Love the idea of string lights, but want to make it really amazing? Just use this photo from ‘Fondly Forever‘ to inspire you!

Use uplighting to brighten dark corners or to light focal plantings at night. Photo by Laura Joliet for ‘The NY Times‘.
Try lighting the pass through areas between yards to add dimension to your outdoor space. Photo by ‘Martha‘.

Ok, last we have these moonlight globes from ‘Home Infatuation’… These. Are. Cool. Not cheap, but amazingly cool! They can float, or be mounted, and can be recharged over and over.

Make these geometric light columns with this tutorial from ‘Martha’. This uses just three simple materials, and would be great for a graduation or Fourth of July party!
From ‘House of Fifty’ magazine, make mason jar candle lanterns! These are easy, and who doesn’t love mason jars!
Another version of a mason jar lantern, these we found on Pinterest, but can’t find the original source. Please share if you know where these are from! We really like how they look hanging against the wood fence. It makes for a really pretty look, but if you do this, consider using LED candles instead.
This outdoor lighted cube table is a woodworking tutorial from ‘Lowes’… This would make additional lighting in your patio area unnecessary!
A great idea from ‘Sunset‘… hang tea light lanterns from different heights as an outdoor chandelier…
Robin at ‘All Things Heart and Home’ has a tutorial for her easy DIY outdoor chandelier made from grapevine balls! Love this project!
Ok, these are just cool. These are cracked log lamps made by artist Duncan Meerding, via ‘Recycled Interiors’. You have to go check out how he makes these! I would love these all through a woodland garden! Fairy garden!
Love the idea of string lights, but want to make it really amazing? Just use this photo from ‘Fondly Forever‘ to inspire you!
Use uplighting to brighten dark corners or to light focal plantings at night. Photo by Laura Joliet for ‘The NY Times‘.
Try lighting the pass through areas between yards to add dimension to your outdoor space. Photo by ‘Martha‘.
Ok, last we have these moonlight globes from ‘Home Infatuation’… These. Are. Cool. Not cheap, but amazingly cool! They can float, or be mounted, and can be recharged over and over.
0
1
文章
Gina
2017年03月15日


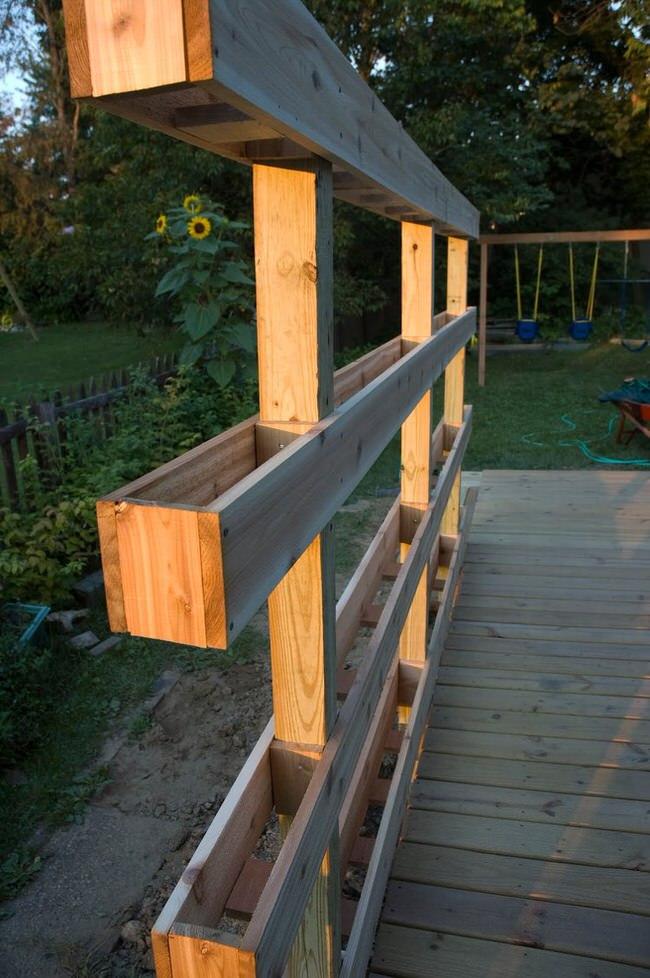
With every new growing season comes the need for outdoor planters… and we’ve rounded up some unique planter tutorials for every gardener, whether you want a traditional window box, or an up-cycled art piece. Most of these outdoor planter projects have complete instructions, so check them out, pick one or two, and plan some garden projects for the weekend! Our featured project, above, comes to us from Popular Mechanics. Learn how to make this simple DIY wood planter with this great tutorial and lots of step by step photos.
Lowes has a nice contemporary indoor outdoor planter project with step by step photos and a video.

This wooden planter box by Family Handyman can be built in less than an hour with their tutorial. I love this because you can easily change out plants, and even combine plants with different watering needs because they are in separate pots.

Tracie over at Cleverly Inspired wanted some large planters that were similar to some that are available at Restoration Hardware. She came up with these wonderful planters. See how she did it.

Want to make a large DIY planter on wheels? Then head over to Four Generations, One Roof, and find out how Jessica and her dad made this one! They have excellent step by step photos in their tutorial. This is great for small garden spaces… You can create an entire garden in this one planter! Love this!

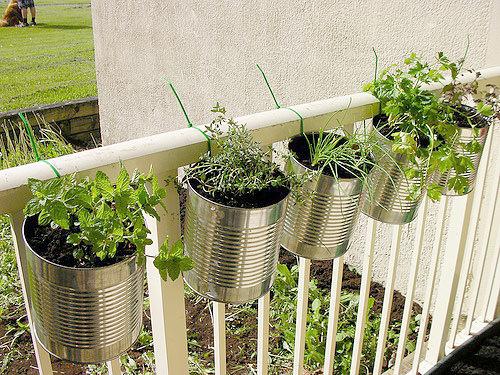
This is a clever idea we got from Christie on Flickr… Using recycled cans as planters, and drill holes to attach with zip ties! (Also for drainage). Obviously you can cut off the excess zip tie after they are hung, they are left to illustrate the project. Love this! What other kinds of containers could you up cycle?
These low cost drum planters have downloadable instructions, and are made with recycled drums and recycled wood. What a really cool idea for little cash! You could use this idea for a lot of recycled containers!

This Coppice Vertical Planter is sold on a UK website but we think it would be very easily DIY’able! Even better would be to use old wine crates as the boxes.

Gotta love these more modern patio paver planters by Stephanie Lynn we found on Apartment Therapy. She has a step by step for you, (its easy!) and even some suggested plants!

I like these simple pallet planters, they would look amazing growing small vegetables! From Creative Homemaking.

These Criss Cross Outdoor Planters from Centsational Girl look fantastic. Love them painted white but could look really nice in a natural stained finish as well. See how she made these.

From Kate Was Here, Check out this cool DIY vertical planter.
Learn how to make a garden trough that looks old, but isn’t! From This Old House.

From Ruffles and Truffles, this DIY vertical planter is really easy! Great for awkward corners of your garden. Good tutorial!

3
3
文章
Abigal
2017年03月15日

The garden is an extension of your home, so there is no reason you can’t give just as much attention to your outdoor rooms as you do your indoor ones! Just remember to look at your outdoor room in the same way…floor, walls, ceiling, furniture and accessories. Your accessories might just be flowers and plants is all! Along the way, use these DIY outdoor room ideas and tutorials to style a fresh space outdoors!
In our feature photo, above, HGTV uses a standard chaise lounge to create a daybed on their outdoor room, by laying it flat and pushing it against the deck railing as backdrop. Add pillows, and maybe a cozy throw, and what a wonderful place to nap away a summer afternoon!
Create a painted outdoor rug with a can of spray paint, some stencils or hand painting, and a clear sealant.

Lighting in your outdoor room makes a paradise on warm summer evenings… Hanging lights can be inexpensive and can make or break a room used after sunset.

This DIY twinkle light porch canopy from Opaque Canvas was made for less than $25, and they have a full tutorial. This would look amazing at night!
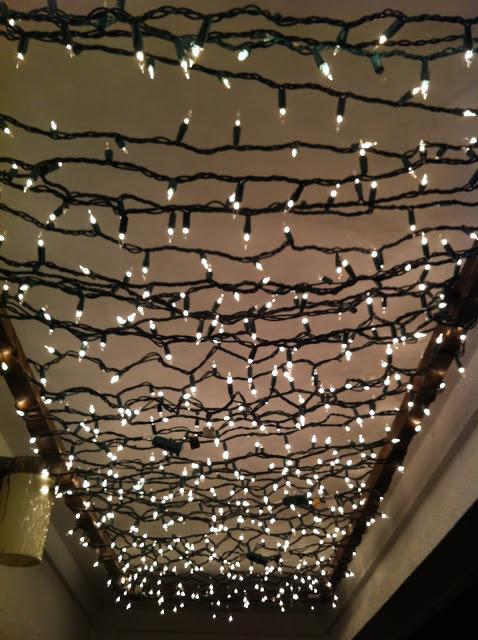
From The Project Table, this DIY icicle chandelier is made with simple twinkle lights and a grapevine wreath. Follow her instructions for an inexpensive but organic version of the hula hoop chandelier we see all over Pinterest. (Which we also love!)

The Budget Fashionista shows us how to make DIY outdoor pillows from vinyl table cloths or shower curtains! Love this!

This DIY metal tub coffee table by Liz Marie Blog is crazy cool! And while you are looking up the instructions on this project at her site, check out how inspiring her whole outdoor room is!

From Rachel at Thrifty Inspirations through 36th Ave… this amazing DIY outdoor sectional could solve that expensive outdoor furniture problem! She has full step by step instructions and links to the plans she used. Love this!

Need some more inspiration?
From BHG…build this DIY outdoor room in a weekend!

This pretty room from ‘Hayneedle‘ has been pinned thousands of times! Great inspiration, in collaboration with Brian Patrick Flynn!!

Last one, just to get you dreaming! Now get to creating your outdoor room!

0
0
文章
Gina
2017年03月15日

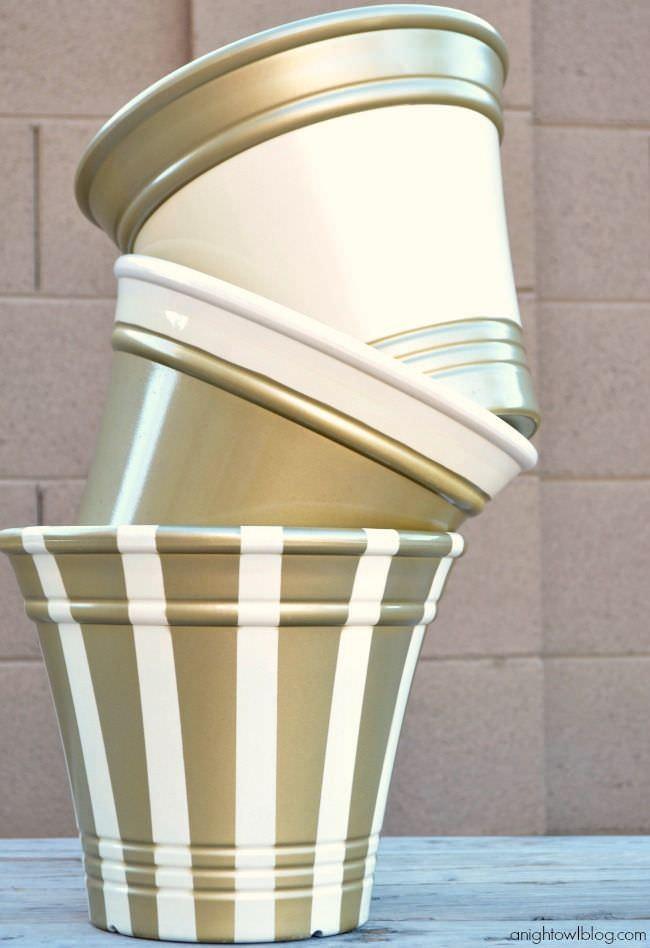
One of the easiest (and cheapest) ways to inject a bit of personality into any garden is to pump up the garden decor. Painting pots is easy, fast and really makes an impact of your outdoor spaces. Here are three tips for painting pots, and a bunch of great projects with instructions, and inspiration!
Painting Pots Tips
Choose the same style for all your painted pots within the same garden. If half your pots are formal and the other half are whimsical (although there is always room for some crossover) then your outdoor spaces will seem disjointed. Keep in mind the same decorating principles you use indoors…tie the pots together by style or color.
Follow the instructions for prepping your pots properly. (Then say that ten times fast.) Outdoor painting projects can deteriorate quickly if they are done lazily…it’s worth the extra step.
Consider sealing your painted pots with an outdoor grade clear sealer. Same reason as prepping properly!
Enjoy!
Our first project from The Lovely Cupboard are DIY paint dipped pots… Easy, and really cool, she has step by step instructions for you.

Since dipped pots seem so popular right now, we thought you would like this neon dipped pot project from Hello Bee.

We really like this project from Amanda at Wit & Whistle. Here’s how she did it.

From Sunset, Terra Cotta Dress Ups! You could do these in any color combo, but I like the idea of keeping it to one color with a neutral, or two colors for a more lively look. Any more than that and it will be a very “busy” project! I especially love this project because it’s done in my favorite colors!
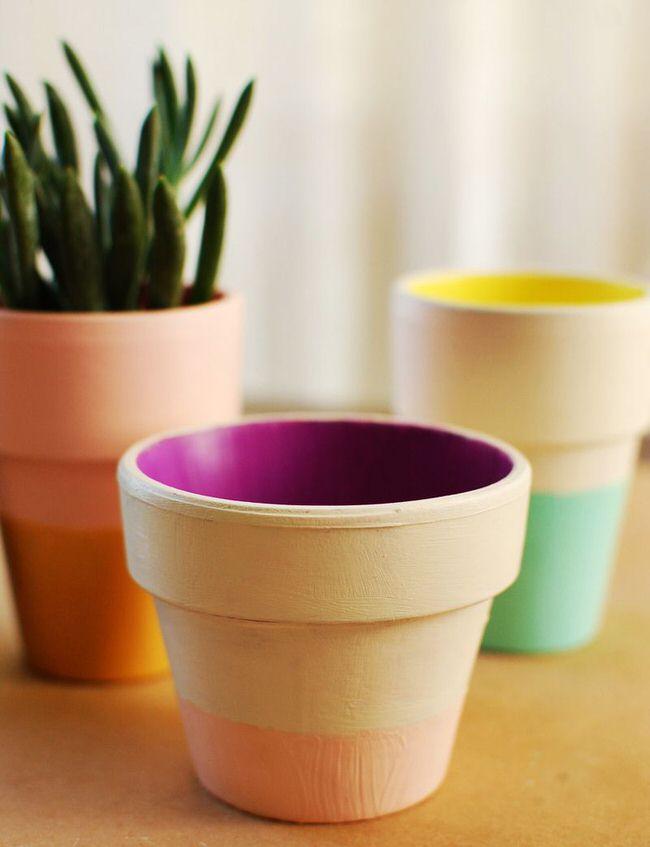
From A Beautiful Mess, I really like how they also painted the inside of these Color Block Terra Cotta Pots!
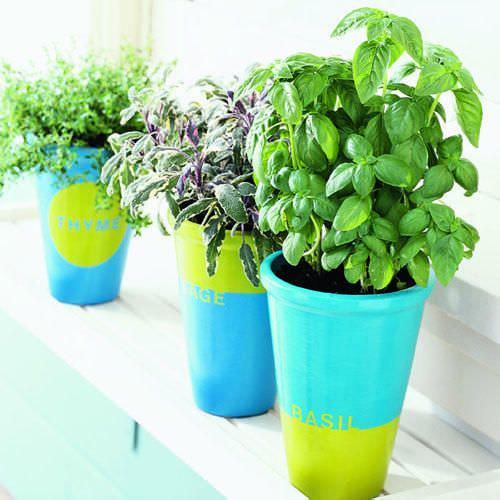
These very cute chalkboard flowerpots are from Fiskars, and they have really good instructions and step by step photos. Very crafty!

These DIY terra cotta plant pots from Dellie are simple and colorful, and I love this idea.

These golden fall planters from A Night Owl Blog don’t need to wait for fall as far as I’m concerned! What a great project for bringing some of the metallic trend into the garden.
Last on our list, this Raku look pot was created with spray paint! Find out how here.

Get crafting for the garden, what better time of year for it?
1
0
文章
Abigal
2017年02月23日
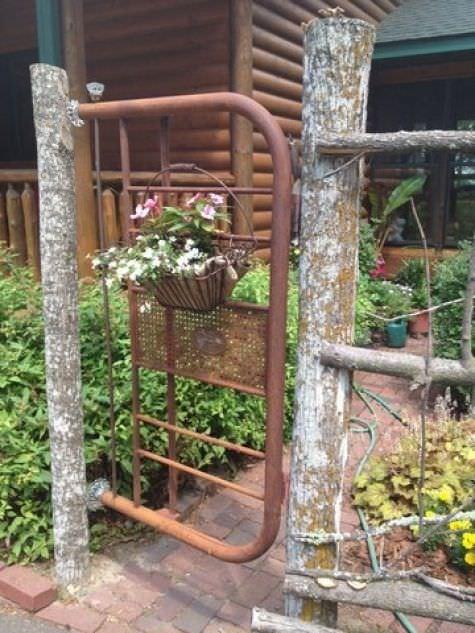
The garden gate is the quintessential “first impression” of any #garden , and making it special sets the tone for your outdoor #space . Why not use up-cycled materials to create a garden gate with charm, cleverness, creativity…and is a good thing for nature. (Recycling!)

We scoured Pinterest and the web for bloggers that have some great ideas for up-cycled garden gates, and anyone who is handy (or can lean on a handy loved one!) can accomplish these garden projects.
This old window makes a marvelous garden gate… Simply place posts a distance apart equal to the width of the window, add hinges and latches…

This garden gate was created from old tools. So creative! Montana Wildlife Gardener used all recycled tools for his project.
Dishfunctional Designs recently featured a great garden gate made from an old screen door… Check out your local Habitat for Humanity ReStore!

Finally, we found a bunch of great gates done out of old metal headboards… I think these might be my favorite!

What ideas have you run across for creative up-cycled garden gates? Share!
We scoured Pinterest and the web for bloggers that have some great ideas for up-cycled garden gates, and anyone who is handy (or can lean on a handy loved one!) can accomplish these garden projects.
This old window makes a marvelous garden gate… Simply place posts a distance apart equal to the width of the window, add hinges and latches…
This garden gate was created from old tools. So creative! Montana Wildlife Gardener used all recycled tools for his project.
Dishfunctional Designs recently featured a great garden gate made from an old screen door… Check out your local Habitat for Humanity ReStore!
Finally, we found a bunch of great gates done out of old metal headboards… I think these might be my favorite!
What ideas have you run across for creative up-cycled garden gates? Share!
0
0
文章
Abigal
2017年02月22日
No matter what time of year it is, there are times when we want to bring the beauty and gifts from the #garden indoors. Whether it’s to keep your “green thumb” warm during the winter months, because you live in a space with no outdoor gardening spot, or just because you love to have #plants indoors as well as out, here are some easy indoor gardening projects to keep you busy when you aren’t outdoors!

From ‘The Kitchn’, learn how to plant succulents in eggshells! Our feature project, above and below – This is a really organic project great for a kitchen, and especially for someone who loves to cook. Could you do the same thing with sprouts?

‘Holiday Sparkle’ shows us how to grow green onions indoors. These are great because the more you cut them, the more they grow!

Heres a project for more onions for a bigger household… make this vertical onion planter from a pop bottle! From ‘Auntie Dogmas Garden Spot‘…

From ‘Remove and Replace’, learn how to regrow romaine lettuce from that salad stump… Grow it once, never again!

‘Parents.com’ shows us how to plant an odds and ends garden, this with leftover celery. Kids love this kind of thing, fun family project.

Last, learn to grow a lemon tree indoors! From ‘The Kitchn’, this is a good tutorial on how to grow lemons indoors, and also some information on where, and what type, to buy! Find even more information on growing lemons from ‘Jim Hofman‘.

So no matter what your reason for keeping it indoors, here are a couple of projects to bring the garden to the window sill!
From ‘The Kitchn’, learn how to plant succulents in eggshells! Our feature project, above and below – This is a really organic project great for a kitchen, and especially for someone who loves to cook. Could you do the same thing with sprouts?
‘Holiday Sparkle’ shows us how to grow green onions indoors. These are great because the more you cut them, the more they grow!
Heres a project for more onions for a bigger household… make this vertical onion planter from a pop bottle! From ‘Auntie Dogmas Garden Spot‘…
From ‘Remove and Replace’, learn how to regrow romaine lettuce from that salad stump… Grow it once, never again!
‘Parents.com’ shows us how to plant an odds and ends garden, this with leftover celery. Kids love this kind of thing, fun family project.
Last, learn to grow a lemon tree indoors! From ‘The Kitchn’, this is a good tutorial on how to grow lemons indoors, and also some information on where, and what type, to buy! Find even more information on growing lemons from ‘Jim Hofman‘.
So no matter what your reason for keeping it indoors, here are a couple of projects to bring the garden to the window sill!
0
0
文章
Abigal
2017年02月21日
Everyone loves the mason jar… it holds a sense of nostalgia and is a versatile #decorating element in any style #garden ! Here are five great ways to turn the inexpensive and easy to find mason jar into great outdoor garden lighting for your yard or patio!
Project One:
Candle Lighting
Fill mason jars one third full with sand, beans or gravel, and nestle a small candle into the sand. Hang from trees and rooftops with heavy twine. Looks best in groups hung at different heights. Great if done over a dining table under the trees!

Project Two:
Got an unused clothesline? Hang mason jars randomly along the clothesline with wire. Now string white mini lights along the clothesline, wrapping as you go. When you reach a mason jar, wrap lights down into the jar, then back out again, and continue along the clothesline. Back yard bbq’s will never be the same!

Project Three:
Mason Jar Light Cluster
Create your own pendant lights with mason jars!

Project Four:
Mason Jar Oil Lamps
These are pretty easy to make… Poke a hole in the lid of the jar with a nail or drill. Insert a wick through the hole into the bottom of the jar. Fill with non toxic burning oil. I hear even olive oil will burn! Use a fiberglass wick from the craft store for best results, but you could even use a 100% cotton strip of fabric in a pinch. Light, and enjoy!

Project Five:
Solar Mason Jar Lantern
This #DIY mason jar project is easy, and inexpensive! Simply buy those small inexpensive garden solar lights at the dollar or discount store. Take the top “light and battery” section off of the stake. Place the light into the jar. Make sure the jar is positioned so that the solar panel gets lots of sun during the day.Five easy, inexpensive mason jar outdoor lighting projects anyone can do! Enjoy your outdoors
Project One:
Candle Lighting
Fill mason jars one third full with sand, beans or gravel, and nestle a small candle into the sand. Hang from trees and rooftops with heavy twine. Looks best in groups hung at different heights. Great if done over a dining table under the trees!
Project Two:
Got an unused clothesline? Hang mason jars randomly along the clothesline with wire. Now string white mini lights along the clothesline, wrapping as you go. When you reach a mason jar, wrap lights down into the jar, then back out again, and continue along the clothesline. Back yard bbq’s will never be the same!
Project Three:
Mason Jar Light Cluster
Create your own pendant lights with mason jars!
Project Four:
Mason Jar Oil Lamps
These are pretty easy to make… Poke a hole in the lid of the jar with a nail or drill. Insert a wick through the hole into the bottom of the jar. Fill with non toxic burning oil. I hear even olive oil will burn! Use a fiberglass wick from the craft store for best results, but you could even use a 100% cotton strip of fabric in a pinch. Light, and enjoy!
Project Five:
Solar Mason Jar Lantern
This #DIY mason jar project is easy, and inexpensive! Simply buy those small inexpensive garden solar lights at the dollar or discount store. Take the top “light and battery” section off of the stake. Place the light into the jar. Make sure the jar is positioned so that the solar panel gets lots of sun during the day.Five easy, inexpensive mason jar outdoor lighting projects anyone can do! Enjoy your outdoors
0
0
文章
Abigal
2017年02月16日
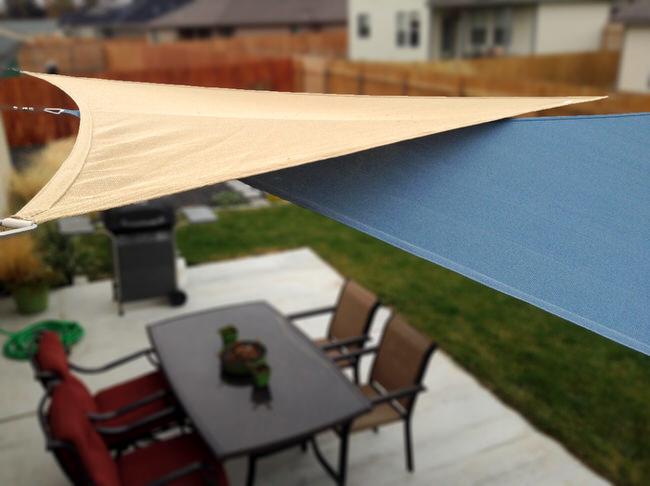
Steve and I were looking for an outdoor patio cover that was a little different, and that didn’t require major construction either. We found it in shade sails. Popular in Europe for quite awhile, they are catching on in the US quickly because of their ease of installation, ability to adjust them to each lighting situation, and let’s face it… they are just plain awesome. If you want to use shade sails to cover your outdoor room, this is how to install them, and to get around the issues these types of coverings present.
Buy your shade sails to cover the area you intend. There are many brands, shapes and sizes. Be careful you don’t purchase ones made of cheap materials, unless you only expect them to last one season. We bought Cooleroo brand from Amazon. They have lasted us three seasons so far, without fading. They come with all the hardware to hang, though you can buy an extra hardware kit if you need it. You should have mounting brackets and turnbuckles, which tighten to adjust. We preferred to layer several triangle shaped sails, but if you prefer, they come in squares and rectangles too. If I didn’t have Steve to think through the triangle thing, I would have gone with a rectangle. Sounds simpler, but not as cool!

Installing the shade sails is as easy as making sure you have strong supports, such as the side of a building, or a post. Keep in mind, these shade sails require a lot of tension to get them to stretch tight enough so that they look right, and don’t flap around in the wind. Make sure you attach them to a stud on a building, a sturdy metal pole, or learn how to make a wooden post work, as we did. (More on that below!)
The first challenge we encountered is that our sturdy supports were not close enough together to directly attach the three sides of the triangle. We laid out the shade sails on the ground in the manner in which we wanted to hang them, then measured how much we would need to extend each end to reach a fastener. Then we mounted the brackets at each corresponding support with a drill and screws. We got some metal cable and crimps from home depot. The metal cable goes through one end of the crimp, loops through the buckle on the shade sail, then back through the other side of the crimp. See photo, below. Use a hammer to pound the crimp closed, and it locks it tight.
Measure the length to the turnbuckle for the opposite fastener, and create another loop at that end. It doesn’t have to be a perfect measurement because the turnbuckle tightens down. Make sure when you measure the length of your extension wire, the turnbuckle is adjusted at its most open position. That way, you have room to tighten it down. It will tighten more then you think. When you have extension wire made for all the ends that needs it, move to the next step.

Attach the turnbuckles to the mounting bracket, and loop the extension end of the wire onto the open end of the turnbuckle, tighten each turnbuckle until the sail is taut.
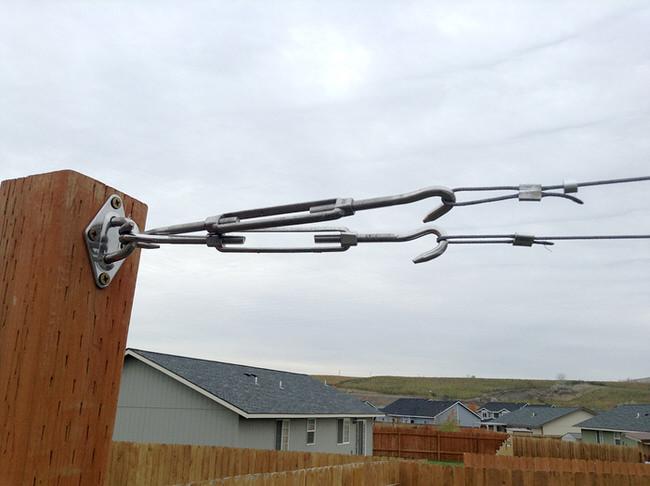
Now you want to really tighten the turnbuckles. We stuck a screwdriver throughout the open body of the turnbuckle, and used it to turn the buckle when it got tight, to tighten it even further. Tighten each end a little at a time, so that all the ends tighten evenly.

We mounted one of our mounting brackets lower on a pole, so that we could angle one of the sails against the afternoon sun.


This last photo, below, gives you a picture of one of our issues with the wooden poles we used as supports. (Please ignore the ugly patio, these photos were right after I moved in!) We installed these poles ourselves for the purpose of mounting the shade sails. (We also hang bird feeders off them!) We used several bags of concrete and buried them two feet under, 4×4 pressure treated lumber. When we attached the extension wires and tightened them down, they still bent! That is what we mean when we say a lot of tension! Possibly that won’t be an issue for you, or you will decide the slight amount of bending of the pole doesn’t bother you, (Steve’s a perfectionist… and it’s a good thing, too, or we never would have pulled this off to look so great! Me? I would have planted a vine on it and called it done. Yes, I can be a little lazy. :)) But if you decide to go with our brilliant plan, we found a fix. We used the same metal cable, and braced the pole by wiring it down to the base of a fence post that is also cemented in the ground, you can see a touch of the cable to the right side of the photo…. I know, sounds like a lot… But it turned out to be awesome! Any questions? In the end we found out that if you need to use poles to attach to, the best thing would be very sturdy 4 to 5 inch (diameter) metal poles.

Want to see more shade sails used to make amazing outdoor spaces? Be inspired!


0
0

