文章
Miss Chen
2017年10月01日

El Ceibo es un árbol que pertenece a la familia Leguminosas, género Eryhtrina, especie crita-galli.
Sus principales características son:
Altura: de 5 a 8 metros.
Diámetro: de 8 a 10 metros.
Crecimiento: mediano a rápido.
Suelo: es poco exigente, pero de preferencia los húmedos.
Temperatura: sensible a las fuertes heladas.
Transplante: buena tolerancia.
Uso: ornamental.
Origen: Argentina.
Este árbol con flor es la “Flor Nacional Argentina” de Argentina, Sudamérica. Fue declarado como tal en 1942. Es además, una especie autóctona que se desarrolla muy bien en las regiones subtropicales del país.
Su porte es de pequeño a mediano; su copa es irregular y extendida. Presenta ramas arqueadas que se secan en su extremidad durante el invierno, y su corteza es rugosa y oscura.
Las hojas son caducas o semipersistentes en climas cálidos. Las flores, rojas y muy vistosas, aparecen en el verano y atraen una gran cantidad de insectos y colibríes.
Es una especie que prefiere los suelos húmedos y crece naturalmente en las islas del Delta Argentino.
Es una especie de crecimiento rápido, muy apta para jardines, donde se lo suele plantar solo. Su cultivo es ornamental y su madera liviana se usa para tallado.
En las regiones con inviernos muy fríos es recomendable plantarlo en la primavera. Las podas deben efectuarse en dicha estación, cortando los extremos de las ramas que estén secos.


0
0
文章
Miss Chen
2017年09月29日

Create gorgeous displays while protecting tulip (Tulipa) bulbs from predators and the elements by growing them in containers. Tulips are perennial in U.S. Department of Agriculture plant hardiness zones 3 through 8, although they don't always come back year after year. Container-grown plants can be interspersed with other in-ground landscaping or used as a focal point in the garden or an entryway. The same technique also works for forcing tulip bulbs to bloom indoors to give a bright, spring-like flair to winter decor.
Choosing a Pot

One of the most important factors when choosing a pot is to make sure it has drainage holes in the bottom to prevent the soil from becoming waterlogged. Size is also crucial. Look for containers at least 15 inches high with a diameter of 18 inches or more. The container can be simple or ornate. Choose your favorite type of pot, whether it's made of terra cotta, stone, clay or plastic. As long as it is big enough to accommodate the bulbs, any flowerpot can work.
Choosing Bulbs

Stay with one hue or intersperse tulips with different flower colors, depending on your preference. Maximize the visual impact of blooms by planting tulip varieties that have similar bloom times such as Single Early and Fosteriana, both early bloomers. For a longer blooming season, plant varieties with staggering bloom times. For example, pair early-bloomers such as Double Early with mid-season bloomers such as Triumph and late bloomers such as Parrot and Viridiflora. If you're choosing tulips to force indoors, select shorter varieties such as Tulipa humilis, which tend to force more easily, according to the National Gardening Association. Start the forcing process in October for flowers in late December or start in late fall for flowers in mid-winter.
Planting Tulip Bulbs

Mix a general granular fertilizer, such as a 5-10-10 formula, into potting soil. Plant each bulb two to three times as deep as the bulb's height, placing them close together in a circular pattern without letting the bulbs touch. Cover the bulbs with potting mix and water the pot thoroughly. Place the pot in a protected, unheated spot such as an unheated garage to chill the bulbs while keeping them above freezing. In early spring, water the pots lightly. Move the potted tulips to their intended location once the bulbs begin sprouting above the soil's surface. Maintain even soil moisture during the growing season. If you're forcing the bulbs, plant them right below the soil's surface so you can still see the tips of the bulbs.
Forcing Tulips

To force potted tulips to flower, first chill the unplanted bulbs for six weeks in a paper bag placed in the crisper drawer of the refrigerator. Then, plant them in the pot and place it in a dark room that's approximately 55 F for one month before moving them to a warmer, sunny spot to bloom. Alternatively, place potted bulbs in a dark room for eight to 16 weeks, maintaining temperatures of 32 to 50 F. Once the bulbs start growing sprouts, move the pots into a room that has bright, indirect light and temperatures of 50 to 65 F for two weeks. Once the shoots reach heights of 2 inches, move the pot to flower in a sunny area with temperatures of approximately 68 F during the day and 60 F at night.
Choosing a Pot

One of the most important factors when choosing a pot is to make sure it has drainage holes in the bottom to prevent the soil from becoming waterlogged. Size is also crucial. Look for containers at least 15 inches high with a diameter of 18 inches or more. The container can be simple or ornate. Choose your favorite type of pot, whether it's made of terra cotta, stone, clay or plastic. As long as it is big enough to accommodate the bulbs, any flowerpot can work.
Choosing Bulbs

Stay with one hue or intersperse tulips with different flower colors, depending on your preference. Maximize the visual impact of blooms by planting tulip varieties that have similar bloom times such as Single Early and Fosteriana, both early bloomers. For a longer blooming season, plant varieties with staggering bloom times. For example, pair early-bloomers such as Double Early with mid-season bloomers such as Triumph and late bloomers such as Parrot and Viridiflora. If you're choosing tulips to force indoors, select shorter varieties such as Tulipa humilis, which tend to force more easily, according to the National Gardening Association. Start the forcing process in October for flowers in late December or start in late fall for flowers in mid-winter.
Planting Tulip Bulbs

Mix a general granular fertilizer, such as a 5-10-10 formula, into potting soil. Plant each bulb two to three times as deep as the bulb's height, placing them close together in a circular pattern without letting the bulbs touch. Cover the bulbs with potting mix and water the pot thoroughly. Place the pot in a protected, unheated spot such as an unheated garage to chill the bulbs while keeping them above freezing. In early spring, water the pots lightly. Move the potted tulips to their intended location once the bulbs begin sprouting above the soil's surface. Maintain even soil moisture during the growing season. If you're forcing the bulbs, plant them right below the soil's surface so you can still see the tips of the bulbs.
Forcing Tulips

To force potted tulips to flower, first chill the unplanted bulbs for six weeks in a paper bag placed in the crisper drawer of the refrigerator. Then, plant them in the pot and place it in a dark room that's approximately 55 F for one month before moving them to a warmer, sunny spot to bloom. Alternatively, place potted bulbs in a dark room for eight to 16 weeks, maintaining temperatures of 32 to 50 F. Once the bulbs start growing sprouts, move the pots into a room that has bright, indirect light and temperatures of 50 to 65 F for two weeks. Once the shoots reach heights of 2 inches, move the pot to flower in a sunny area with temperatures of approximately 68 F during the day and 60 F at night.
0
0
文章
Miss Chen
2017年09月29日

During the winter and early spring months many people buy or are given potted tulip plants (Tulipa spp.), which are hardy in U.S. Department of Agriculture plant hardiness zones 3 through 8. These tulips have been "forced" in nurseries, made to bloom out of season by careful manipulation of light, temperature and growing conditions. After forcing, the plant's energy, stored in the tulip bulb, is depleted. The key to successful aftercare of forced bulbs is building up the plant's energy supply once again. Forced tulips can be planted outside and will bloom again, though possibly not for a year or two.

After Bloom Care
Begin preparing potted tulips for outdoor planting as soon as the petals fade. Keep plants inside, preferably in a south- or east-facing window, at normal room temperature. Remove dead flowers, clipping the stem close to the base of the plant. Disinfect clippers before and after cutting by soaking for 5 minutes in a 50-50 solution of rubbing alcohol and water. Removing spent flowers allows the plant to put energy into the bulb, rather than seed production. Continue watering when the surface of the soil feels dry and monitor the plant's leaves. Fertilize with an all-purpose product, like 24-8-16, mixing 1/2 teaspoon per gallon of water, applied every two weeks. Do not remove the leaves until they have turned brown and brittle.
Planting in Spring
Plant the tulips outdoors any time in spring, beginning when the soil is workable. If the leaves are still green, wait until they turn brown and remove them. Choose a sunny location, preferably one that receives relatively little water in summer.
Carefully dig the bulbs out of the pot and dig a hole 8 inches deep for each bulb. Mix dirt from the holes with an equal measure of compost. Plant bulbs pointed-side up, at least 5 inches apart. Fill the holes with the amended soil, and water.
Fertilize with the same all-purpose product, using 1 tablespoon per gallon of water, applied every 14 days until the soil cools to 60 degrees Fahrenheit.

Planting in Fall
If it is not convenient to plant your tulips outdoors in the spring, you can wait until fall with an equal chance of success. After the leaves have died, remove the tulip bulbs from the soil. Place the bulbs in a brown paper bag and store in a cool, dry spot. In the fall, after the soil cools to about 60 degrees Fahrenheit, plant the tulips outdoors. Water after planting, but don't water again until after leaves appear.
Forced Tulip Considerations
Not all tulip varieties rebloom as readily as others, even with the best of care. Generally Darwin hybrids, single early and single late tulips are the best rebloomers. However, the tulips sold in pots during the winter are often not labeled as to type. Potted tulips that rebloom after being transplanted outside may bear smaller flowers than those borne in the first year inside. When planting outside, position previously potted bulbs within plantings of new tulip bulbs to ensure a good floral display even if the potted bulb never reblooms or waits until the second year after planting.

After Bloom Care
Begin preparing potted tulips for outdoor planting as soon as the petals fade. Keep plants inside, preferably in a south- or east-facing window, at normal room temperature. Remove dead flowers, clipping the stem close to the base of the plant. Disinfect clippers before and after cutting by soaking for 5 minutes in a 50-50 solution of rubbing alcohol and water. Removing spent flowers allows the plant to put energy into the bulb, rather than seed production. Continue watering when the surface of the soil feels dry and monitor the plant's leaves. Fertilize with an all-purpose product, like 24-8-16, mixing 1/2 teaspoon per gallon of water, applied every two weeks. Do not remove the leaves until they have turned brown and brittle.
Planting in Spring
Plant the tulips outdoors any time in spring, beginning when the soil is workable. If the leaves are still green, wait until they turn brown and remove them. Choose a sunny location, preferably one that receives relatively little water in summer.
Carefully dig the bulbs out of the pot and dig a hole 8 inches deep for each bulb. Mix dirt from the holes with an equal measure of compost. Plant bulbs pointed-side up, at least 5 inches apart. Fill the holes with the amended soil, and water.
Fertilize with the same all-purpose product, using 1 tablespoon per gallon of water, applied every 14 days until the soil cools to 60 degrees Fahrenheit.

Planting in Fall
If it is not convenient to plant your tulips outdoors in the spring, you can wait until fall with an equal chance of success. After the leaves have died, remove the tulip bulbs from the soil. Place the bulbs in a brown paper bag and store in a cool, dry spot. In the fall, after the soil cools to about 60 degrees Fahrenheit, plant the tulips outdoors. Water after planting, but don't water again until after leaves appear.
Forced Tulip Considerations
Not all tulip varieties rebloom as readily as others, even with the best of care. Generally Darwin hybrids, single early and single late tulips are the best rebloomers. However, the tulips sold in pots during the winter are often not labeled as to type. Potted tulips that rebloom after being transplanted outside may bear smaller flowers than those borne in the first year inside. When planting outside, position previously potted bulbs within plantings of new tulip bulbs to ensure a good floral display even if the potted bulb never reblooms or waits until the second year after planting.
0
0
文章
Miss Chen
2017年09月29日

Cool-season bulb plants, tulips (Tulipa spp.) were first discovered in eastern Turkey. Although tulips grow in U.S. Department of Agriculture plant hardiness zones 3 through 8, they don't bloom reliably in mild-winter climates unless you dig them up and refrigerate them. In regions where temperatures rarely drop below 25 degrees Fahrenheit, you'll need to chill the bulbs if you want to see flowers each year.

Prepare Bulbs for Digging
Tulips spend their energy while they're flowering, and they need to replenish this energy after their spring show. If you plan to dig, store and replant your tulip bulbs, leave them in the ground until the leaves yellow and wither. As long as the leaves are green, they're photosynthesizing -- building energy stores for the next season's flowers. Clip the spent flower off the stalk to prevent seed formation. Setting seed takes energy and weakens the bulb.
Dig and Store Tulip Bulbs
If you live in USDA zone 8 or cooler and your bulbs are planted in an area of your yard that remains relatively dry, you can leave the bulbs in the ground until June or July. If you live in a warmer climate or your soil will stay moist, dig the bulbs as soon as the leaves wither. Use a garden fork to dig under the bulbs and lift them from the ground. Separate the bulbs. Remove roots and loose soil from the bulbs and store them in a dry place with good air circulation in mesh bags or shallow wooden crates, with bulbs no more than 5 inches deep in the container. Avoid storing bulbs where temperatures exceed 90 degrees Fahrenheit.
Allow Tulips to Chill
If you live in USDA zones 8 through 10, plant tulips between early November and early January. In colder climates, plant tulips in early fall.

Count back 16 to 18 weeks before planting time for your area, and place the bulbs in ventilated bags or dry peat moss and put them in your refrigerator, an unheated building or other spot where temperatures remain between 35 and 45 F. Keep the bulbs chilled until it's time to plant.
Prepare the Bed
Fertilize the tulip bed at planting time by digging in a 2-inch layer of compost or well-rotted cow manure, or use a 10-10-10 or 10-15-10 commercial fertilizer after planting. Apply commercial fertilizer at the rate of 2 pounds per 100 square feet, or follow label instructions. Spread the fertilizer on top of the bed after planting, then water the area.
Set bulbs 6 to 8 inches deep, with the pointed end facing up. If you plan to mulch, add the mulch depth to your calculation. For example, if you plan to add 2 inches of mulch, plant the bulbs 4 to 6 inches deep. After green shoots emerge, apply a balanced, slow-release fertilizer such as 10-10-10 or 10-15-10 at the same rate you used at planting time.

Prepare Bulbs for Digging
Tulips spend their energy while they're flowering, and they need to replenish this energy after their spring show. If you plan to dig, store and replant your tulip bulbs, leave them in the ground until the leaves yellow and wither. As long as the leaves are green, they're photosynthesizing -- building energy stores for the next season's flowers. Clip the spent flower off the stalk to prevent seed formation. Setting seed takes energy and weakens the bulb.
Dig and Store Tulip Bulbs
If you live in USDA zone 8 or cooler and your bulbs are planted in an area of your yard that remains relatively dry, you can leave the bulbs in the ground until June or July. If you live in a warmer climate or your soil will stay moist, dig the bulbs as soon as the leaves wither. Use a garden fork to dig under the bulbs and lift them from the ground. Separate the bulbs. Remove roots and loose soil from the bulbs and store them in a dry place with good air circulation in mesh bags or shallow wooden crates, with bulbs no more than 5 inches deep in the container. Avoid storing bulbs where temperatures exceed 90 degrees Fahrenheit.
Allow Tulips to Chill
If you live in USDA zones 8 through 10, plant tulips between early November and early January. In colder climates, plant tulips in early fall.

Count back 16 to 18 weeks before planting time for your area, and place the bulbs in ventilated bags or dry peat moss and put them in your refrigerator, an unheated building or other spot where temperatures remain between 35 and 45 F. Keep the bulbs chilled until it's time to plant.
Prepare the Bed
Fertilize the tulip bed at planting time by digging in a 2-inch layer of compost or well-rotted cow manure, or use a 10-10-10 or 10-15-10 commercial fertilizer after planting. Apply commercial fertilizer at the rate of 2 pounds per 100 square feet, or follow label instructions. Spread the fertilizer on top of the bed after planting, then water the area.
Set bulbs 6 to 8 inches deep, with the pointed end facing up. If you plan to mulch, add the mulch depth to your calculation. For example, if you plan to add 2 inches of mulch, plant the bulbs 4 to 6 inches deep. After green shoots emerge, apply a balanced, slow-release fertilizer such as 10-10-10 or 10-15-10 at the same rate you used at planting time.
0
0
文章
素雅
2017年09月28日


育苗
选取#香瓜 种子以后,先把它晒两天。然后再用55度的温水一遍倒水一遍搅拌后泡上5到8个小时即可。将种子取出洗净以后再用湿的棉毛巾包好套一个塑料袋,放到30到32度的环境中,一般18到20个小时后芽就能出来了。等到长出了四片叶子的时候就能定植了 。

管理
在植物的苗期,除了花打顶以外等枝杈长到3到5cm时再将杈打掉,最好是在天气比较好的上午,不能用剪刀或是手掐。浇水的话要在长出2片叶子再浇,第一次的时候不需要施肥。等到第一茬瓜鸡蛋大时再用膨瓜肥。一般10到15天浇一次水就可以了。
施肥
幼苗期的时候,一般施氮磷含量都比较多的。茎叶生长较快的时期主要用氮肥。结瓜的时候主要施用钾氮肥。
授粉
如果需要手动授粉就要在上午进行,建议在9到10点之间,应该在雌花开后的两小时授粉。
采收
等到香瓜成熟了之后就可以采收了,具体方法是用手指按靠近果脐的那一面,发软就是熟了,或者是闻一下有么有香瓜所独有的浓香,如果熟了的话就用剪刀剪下来。

0
2
成长记
Deanna Dubbs
2017年09月27日

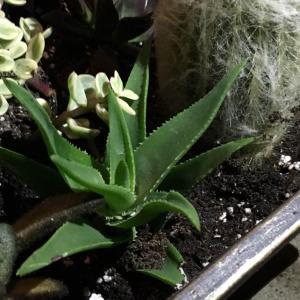
This is a photo from 9-13-17. The day I bought my first 8 Succs. I didn’t think that this one had grown any, but now that I look at this photo it has indeed gotten taller!

0
0
文章
Miss Chen
2017年09月25日

l árbol del cacao crece siempre verde, alcanza de 8 a 10 metros de altura y presenta la copa abierta. Su estructura radical es potentísima.
Las hojas son oblongas, enteras y glabras (lampiñas), apuntadas en uno de sus extremos. El pecíolo posee una articulación que le faculta para orientar su limbo en dirección de la máxima intensidad lumínica, por ello en ocasiones se pueden observar cómo las hojas cuelgan paralelas al tronco.
Las flores son pentámeras, insertadas directamente sobre las ramas o en el propio tronco. Su disposición puede ser aisladas o en grupos de hasta tres. El cáliz es rosáceo y dividido en 5 partes, sobrepasando a las de la corola, que es de color amarillo.

El fruto es una baya ovoide, amarillenta o rojiza, de unos 400 gramos de peso y unos 15 cm. de longitud. La corteza es rugosa y está recorrida longitudinalmente por 10 estrías o surcos. Cuando maduran se destruyen las cubiertas externas quedando sólo una pulpa blanda y blanquecina (dulce pero ácida) que aloja las semillas. Éstas están distribuidas entre las cinco divisiones del fruto, dispuestas longitudinalmente a lo largo de cada una ellas.

El cultivo del cacaotero es muy exigente en cuanto a cuidados. El ciclo vegetativo es ininterrumpido, y durante él se requieren temperaturas medias de entre 24 y 28 ºC, procurando siempre que no descienda en ningún caso de los 12 ºC.
El régimen de pluviosidad de la zona en que se asiente debe ser superior a los 160 cm3, pero manteniéndose un periodo de sequedad de unos dos meses. La humedad ambiental debe ser alta.
Precisa un suelo profundo y donde pueda vegetar a la sombra, por eso es común cultivarlos intercalados con otros árboles de porte más alto, o de forma que sus copas desarrollen en un estrato superior para protegerlos del sol directo.
La forma de multiplicación del cacaotero más utilizada es la siembra, limpiando bien las semillas de la pulpa que las envuelve. Para la producción, se suele utilizar la propagación por injerto de yema o escudete.
Las hojas son oblongas, enteras y glabras (lampiñas), apuntadas en uno de sus extremos. El pecíolo posee una articulación que le faculta para orientar su limbo en dirección de la máxima intensidad lumínica, por ello en ocasiones se pueden observar cómo las hojas cuelgan paralelas al tronco.
Las flores son pentámeras, insertadas directamente sobre las ramas o en el propio tronco. Su disposición puede ser aisladas o en grupos de hasta tres. El cáliz es rosáceo y dividido en 5 partes, sobrepasando a las de la corola, que es de color amarillo.

El fruto es una baya ovoide, amarillenta o rojiza, de unos 400 gramos de peso y unos 15 cm. de longitud. La corteza es rugosa y está recorrida longitudinalmente por 10 estrías o surcos. Cuando maduran se destruyen las cubiertas externas quedando sólo una pulpa blanda y blanquecina (dulce pero ácida) que aloja las semillas. Éstas están distribuidas entre las cinco divisiones del fruto, dispuestas longitudinalmente a lo largo de cada una ellas.

El cultivo del cacaotero es muy exigente en cuanto a cuidados. El ciclo vegetativo es ininterrumpido, y durante él se requieren temperaturas medias de entre 24 y 28 ºC, procurando siempre que no descienda en ningún caso de los 12 ºC.
El régimen de pluviosidad de la zona en que se asiente debe ser superior a los 160 cm3, pero manteniéndose un periodo de sequedad de unos dos meses. La humedad ambiental debe ser alta.
Precisa un suelo profundo y donde pueda vegetar a la sombra, por eso es común cultivarlos intercalados con otros árboles de porte más alto, o de forma que sus copas desarrollen en un estrato superior para protegerlos del sol directo.
La forma de multiplicación del cacaotero más utilizada es la siembra, limpiando bien las semillas de la pulpa que las envuelve. Para la producción, se suele utilizar la propagación por injerto de yema o escudete.
0
0
文章
Dummer. ゛☀
2017年09月24日

LIGHT: Abutilons bloom freely provided they receive 6-8 hours of direct sun. A south-facing window is usually ideal.
TEMPERATURE: Day and night temperatures above 65°F are fine year round. Avoid putting plants in the path of cold drafts.
WATERING: Water when the top ½ inch of the potting mix is dry to the touch.
FERTILIZER: Feed every 2 weeks with a balanced, water-soluble fertilizer (such as 20-20-20) mixed at ½ strength. A fertilizer designed to promote blossoms (formula 10-30-20) may be used instead..

CONTINUING CARE: Abutilons are vigorous growers. To keep your plant compact and bushy, prune back long stems with pruning shears, cutting just beyond the point where a leaf joins a stem. Prune just enough to give a pleasing overall shape; if you remove too much growth, you may prevent the plant from setting flower buds. Repot your plant into a slightly larger pot in spring.
PROBLEM: If pests appear, flush plant with water to wash them off; if they persist, spray with insecticidal soap.
Growing Standards: A standard is a woody plant trained to a long, single stem. The stem is crowned with a round head of foliage and flowers. This arrangement is beautiful but also unnatural, requiring a bit of effort on the part of the gardener to prevent gravity and the unrepressed inclinations of the plant from undoing the horticulturist's handiwork.

Staking a Standard: To keep your standard standing, put it out of reach of strong winds and support it with a stake that has a diameter at least as large as the stem's and long enough that when plunged into the pot or the ground it just reaches inside the head. Fasten the standard to the stake at several points with garden twine or green plastic tie tape looped in a figure-eight around stem and stake. Check the ties periodically during the growing season and loosen them if they constrict the outward growth of the stem.
Pruning, fertilizing, and repotting: Maintain the shape of the head with selective pinching of the new shoots (overzealous pinching will prevent the formation of flower buds). Pinch each shoot between thumb and forefinger or cut with pruning shears. Do not shear the plant as though it were a hedge. Fertilize standards grown in pots as you would other pot-grown plants. If you find that a standard in a container dries out quickly after watering, the plant probably needs a larger pot. Lift it from its current pot, make four deep vertical cuts in the root ball, and place it in a new pot that is 2in wider and taller than the old one, filling in around the root ball with fresh potting mix. Water thoroughly after repotting.

Overwintering a standard: Most standards require special care to overwinter. In cold winter climates, bring standards of Abutilon, Anisodontea, Fuchsia, Heliotrope, Lantana, and Rosemary indoors before frost and place them in an east- or west-facing window in a cool room. Water just enough to keep plants from drying out completely, and do not fertilize while plants are in this not-quite-dormant period. Set back outdoors in spring when nighttime temperatures remain consistently above 55°F.to bloom too early.
TEMPERATURE: Day and night temperatures above 65°F are fine year round. Avoid putting plants in the path of cold drafts.
WATERING: Water when the top ½ inch of the potting mix is dry to the touch.
FERTILIZER: Feed every 2 weeks with a balanced, water-soluble fertilizer (such as 20-20-20) mixed at ½ strength. A fertilizer designed to promote blossoms (formula 10-30-20) may be used instead..

CONTINUING CARE: Abutilons are vigorous growers. To keep your plant compact and bushy, prune back long stems with pruning shears, cutting just beyond the point where a leaf joins a stem. Prune just enough to give a pleasing overall shape; if you remove too much growth, you may prevent the plant from setting flower buds. Repot your plant into a slightly larger pot in spring.
PROBLEM: If pests appear, flush plant with water to wash them off; if they persist, spray with insecticidal soap.
Growing Standards: A standard is a woody plant trained to a long, single stem. The stem is crowned with a round head of foliage and flowers. This arrangement is beautiful but also unnatural, requiring a bit of effort on the part of the gardener to prevent gravity and the unrepressed inclinations of the plant from undoing the horticulturist's handiwork.

Staking a Standard: To keep your standard standing, put it out of reach of strong winds and support it with a stake that has a diameter at least as large as the stem's and long enough that when plunged into the pot or the ground it just reaches inside the head. Fasten the standard to the stake at several points with garden twine or green plastic tie tape looped in a figure-eight around stem and stake. Check the ties periodically during the growing season and loosen them if they constrict the outward growth of the stem.
Pruning, fertilizing, and repotting: Maintain the shape of the head with selective pinching of the new shoots (overzealous pinching will prevent the formation of flower buds). Pinch each shoot between thumb and forefinger or cut with pruning shears. Do not shear the plant as though it were a hedge. Fertilize standards grown in pots as you would other pot-grown plants. If you find that a standard in a container dries out quickly after watering, the plant probably needs a larger pot. Lift it from its current pot, make four deep vertical cuts in the root ball, and place it in a new pot that is 2in wider and taller than the old one, filling in around the root ball with fresh potting mix. Water thoroughly after repotting.

Overwintering a standard: Most standards require special care to overwinter. In cold winter climates, bring standards of Abutilon, Anisodontea, Fuchsia, Heliotrope, Lantana, and Rosemary indoors before frost and place them in an east- or west-facing window in a cool room. Water just enough to keep plants from drying out completely, and do not fertilize while plants are in this not-quite-dormant period. Set back outdoors in spring when nighttime temperatures remain consistently above 55°F.to bloom too early.
0
0
文章
小九
2017年09月23日

#薄荷 是一种适合勤快人养护的盆栽植物,它的叶子带有天然的香气,而且还能用来泡茶,使用很不错的香草植物,如果给你一段薄荷的茎,你能不能繁殖一个阳台的薄荷
1、栽培的时机
8、9月是非常适合栽种薄荷的时间,栽种一些薄荷,能够让你整个夏秋季节都充满活力,只需要从健壮的薄荷上剪下来一些长约8厘米长的茎,去掉底部的叶子,这样就能变成插穗了。
2、清水浸泡
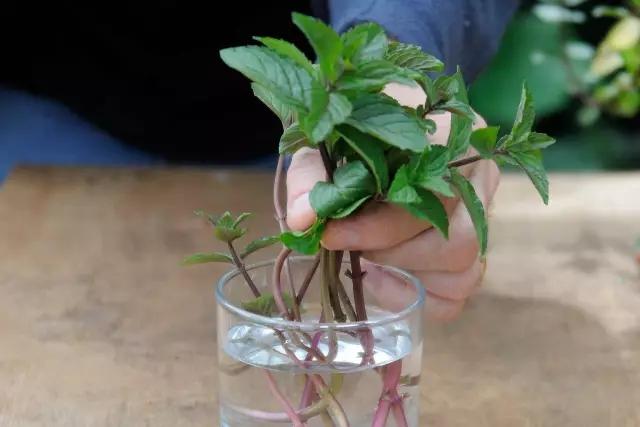
将处理好叶子的茎浸泡在清水中,放在一个通风和光线明亮的地方,薄荷茎的叶子不能沾到水,每2~3天换水一次,等待茎生根。
3、水培转土培
水培的薄荷茎只需要1~2周就能重新长满根系,之后我们就准备好肥沃疏松盆栽土,直接将土壤放入长满根系的薄荷茎里面,容器最选泡水孔较多的塑料盆,保证排水性好。

4、浇水养护
添加土壤之后,可以里面适当混入堆肥土,栽种好之后,就要将盆土浇透水。

5、修剪和掐顶
薄荷移栽土壤一周后见光,保持盆土微润,环境通风,这样薄荷就能保持旺盛的生长。
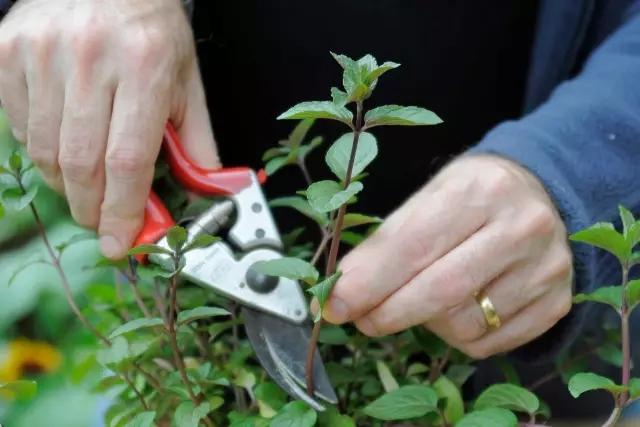
薄荷的茎长到10多厘米就进行掐顶,可以促进薄荷长出更多分枝,分枝长长之后再进行修剪,剪下来的茎可以继续培育。
1、栽培的时机
8、9月是非常适合栽种薄荷的时间,栽种一些薄荷,能够让你整个夏秋季节都充满活力,只需要从健壮的薄荷上剪下来一些长约8厘米长的茎,去掉底部的叶子,这样就能变成插穗了。
2、清水浸泡
将处理好叶子的茎浸泡在清水中,放在一个通风和光线明亮的地方,薄荷茎的叶子不能沾到水,每2~3天换水一次,等待茎生根。

3、水培转土培
水培的薄荷茎只需要1~2周就能重新长满根系,之后我们就准备好肥沃疏松盆栽土,直接将土壤放入长满根系的薄荷茎里面,容器最选泡水孔较多的塑料盆,保证排水性好。

4、浇水养护
添加土壤之后,可以里面适当混入堆肥土,栽种好之后,就要将盆土浇透水。

5、修剪和掐顶
薄荷移栽土壤一周后见光,保持盆土微润,环境通风,这样薄荷就能保持旺盛的生长。
薄荷的茎长到10多厘米就进行掐顶,可以促进薄荷长出更多分枝,分枝长长之后再进行修剪,剪下来的茎可以继续培育。

5
15
文章
Dummer. ゛☀
2017年09月23日

Portulacaria afra, (known as Elephant Bush) is a perennial succulent native to South Africa. It thrives in Sunset Climate Zones 8 through 9 and 12 through 24. This plant reaches heights of 3 feet (90 cm) with a spread of 4 feet (1.2 m) and adapts to either full sun or shade. Elephant Bush also adapts to a range of soil and is not particular about the pH, but does require well-drained soil.
1. Cut a 4- to 6-inches (10- to 15-cm) cutting from the growing tip of your Elephant Bush with a clean sterilized razor blade. Pruning shears or scissors can bruise the stem causing delayed healing.
2. Remove the bottom leaves from the stem cutting, leaving a 2- to 4-inches (5- to 10-cm) section of the stem bare.
3. Dip the bottom 2 inches (5 cm) of the stem of your Elephant Bush cutting in rooting compound. Tap the stem against the container to remove excess powder. Many prefer to pour the rooting powder into a paper cup and then dispose of the excess powder and cup together. This prevents contaminating the container of rooting powder.
4. Place the cutting in a warm well-ventilated area to heal and form a callous. Healing time varies, but typically ranges from a few days to a week for Elephant Bush.
5. Mix four parts sand or perlite with one part potting soil and fill a 4-inch (10-cm) pot with the mixture. Firm the soil down with your hands to level the surface. This creates soil that drains well and provides good aeration for your cuttings.
6. Insert the stem of your Elephant Bush into the mixture to a depth of 2 inches (5 cm). Firm the soil around the stem of your cutting with your hands to secure it in the soil.
7. Add a 1/4- to 1/2-inch (0.6- to 1.2-cm) layer of gravel over the top of the pot to conserve water and prevent soil from spilling over the edges when watering.
8. Water to moisten the soil. Although Elephant Bush does not typically require frequent watering, it needs even moisture for young roots to grow.
9. Place your cutting in a sunny, warm, well-ventilated area. Move your Elephant Bush to its permanent location once roots have formed and the plant shows new growth.

1. Cut a 4- to 6-inches (10- to 15-cm) cutting from the growing tip of your Elephant Bush with a clean sterilized razor blade. Pruning shears or scissors can bruise the stem causing delayed healing.
2. Remove the bottom leaves from the stem cutting, leaving a 2- to 4-inches (5- to 10-cm) section of the stem bare.

3. Dip the bottom 2 inches (5 cm) of the stem of your Elephant Bush cutting in rooting compound. Tap the stem against the container to remove excess powder. Many prefer to pour the rooting powder into a paper cup and then dispose of the excess powder and cup together. This prevents contaminating the container of rooting powder.
4. Place the cutting in a warm well-ventilated area to heal and form a callous. Healing time varies, but typically ranges from a few days to a week for Elephant Bush.

5. Mix four parts sand or perlite with one part potting soil and fill a 4-inch (10-cm) pot with the mixture. Firm the soil down with your hands to level the surface. This creates soil that drains well and provides good aeration for your cuttings.
6. Insert the stem of your Elephant Bush into the mixture to a depth of 2 inches (5 cm). Firm the soil around the stem of your cutting with your hands to secure it in the soil.

7. Add a 1/4- to 1/2-inch (0.6- to 1.2-cm) layer of gravel over the top of the pot to conserve water and prevent soil from spilling over the edges when watering.
8. Water to moisten the soil. Although Elephant Bush does not typically require frequent watering, it needs even moisture for young roots to grow.

9. Place your cutting in a sunny, warm, well-ventilated area. Move your Elephant Bush to its permanent location once roots have formed and the plant shows new growth.
1
2
文章
Dummer. ゛☀
2017年09月22日

Disocactus flagelliformis commonly known as Rat Tail Cactus, is a cactus with a thick hanging stems, each with 8 – 13 ribs, up to 3.3 feet (1 m) long and up to 0.75 inches (1.9 cm) in diameter. The needle groups are tiny, almost fuzzy-looking and have 15 – 20 fine reddish-yellow spines each. Flowers are a beautiful magenta color, curved, up to 3 inches (7.5 cm) long and up to 1.5 inches (3.8 cm) in diameter.
Disocactus flagelliformis is epiphytic in the wild (it grows in trees). It is perfectly adapted to hanging baskets. It is the most cultivated species in the genus. Due to its ease of cultivation and attractive floral displays, Disocactus flagelliformis is often grown as an ornamental pot plant.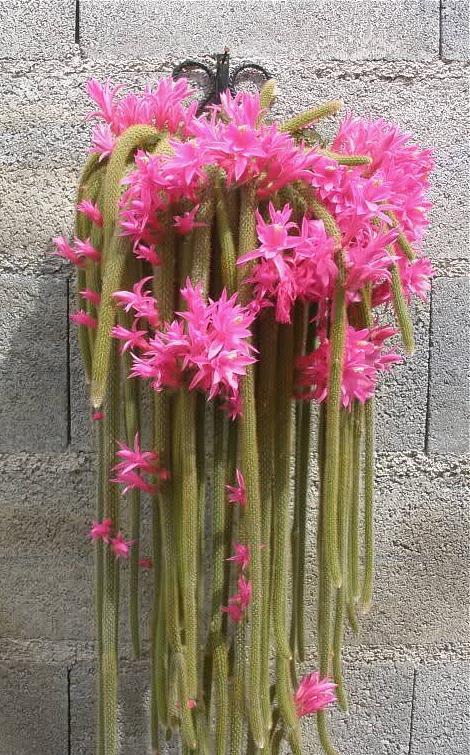
Growing Conditions
Light: Disocactus flagelliformis requires full sunlight. Hang the pot or basket in the sunniest window available. If possible, hang the plant outdoors in summer to give it fresh air and extra light.
Soil: A good draining soil mix that is gritty is advisable to use, which is sold and used for cacti and succulents.
Temperature: During the active growth period normal room temperatures are suitable. In winter these plants should be rested at 45 to 50 °F (7 to 10 °C), if possible, but they tolerate temperatures up to 59 to 61 °F (15 to 16 °C).
Watering: During the active growth period water plentifully, keeping the potting mixture thoroughly moist, but do not let plants stand in water. During the winter rest period just keep the mixture from drying out.
Fertilizing: Use half-strength liquid fertilizer sprayed on to the stems of the plant once every two weeks during the active growth period only.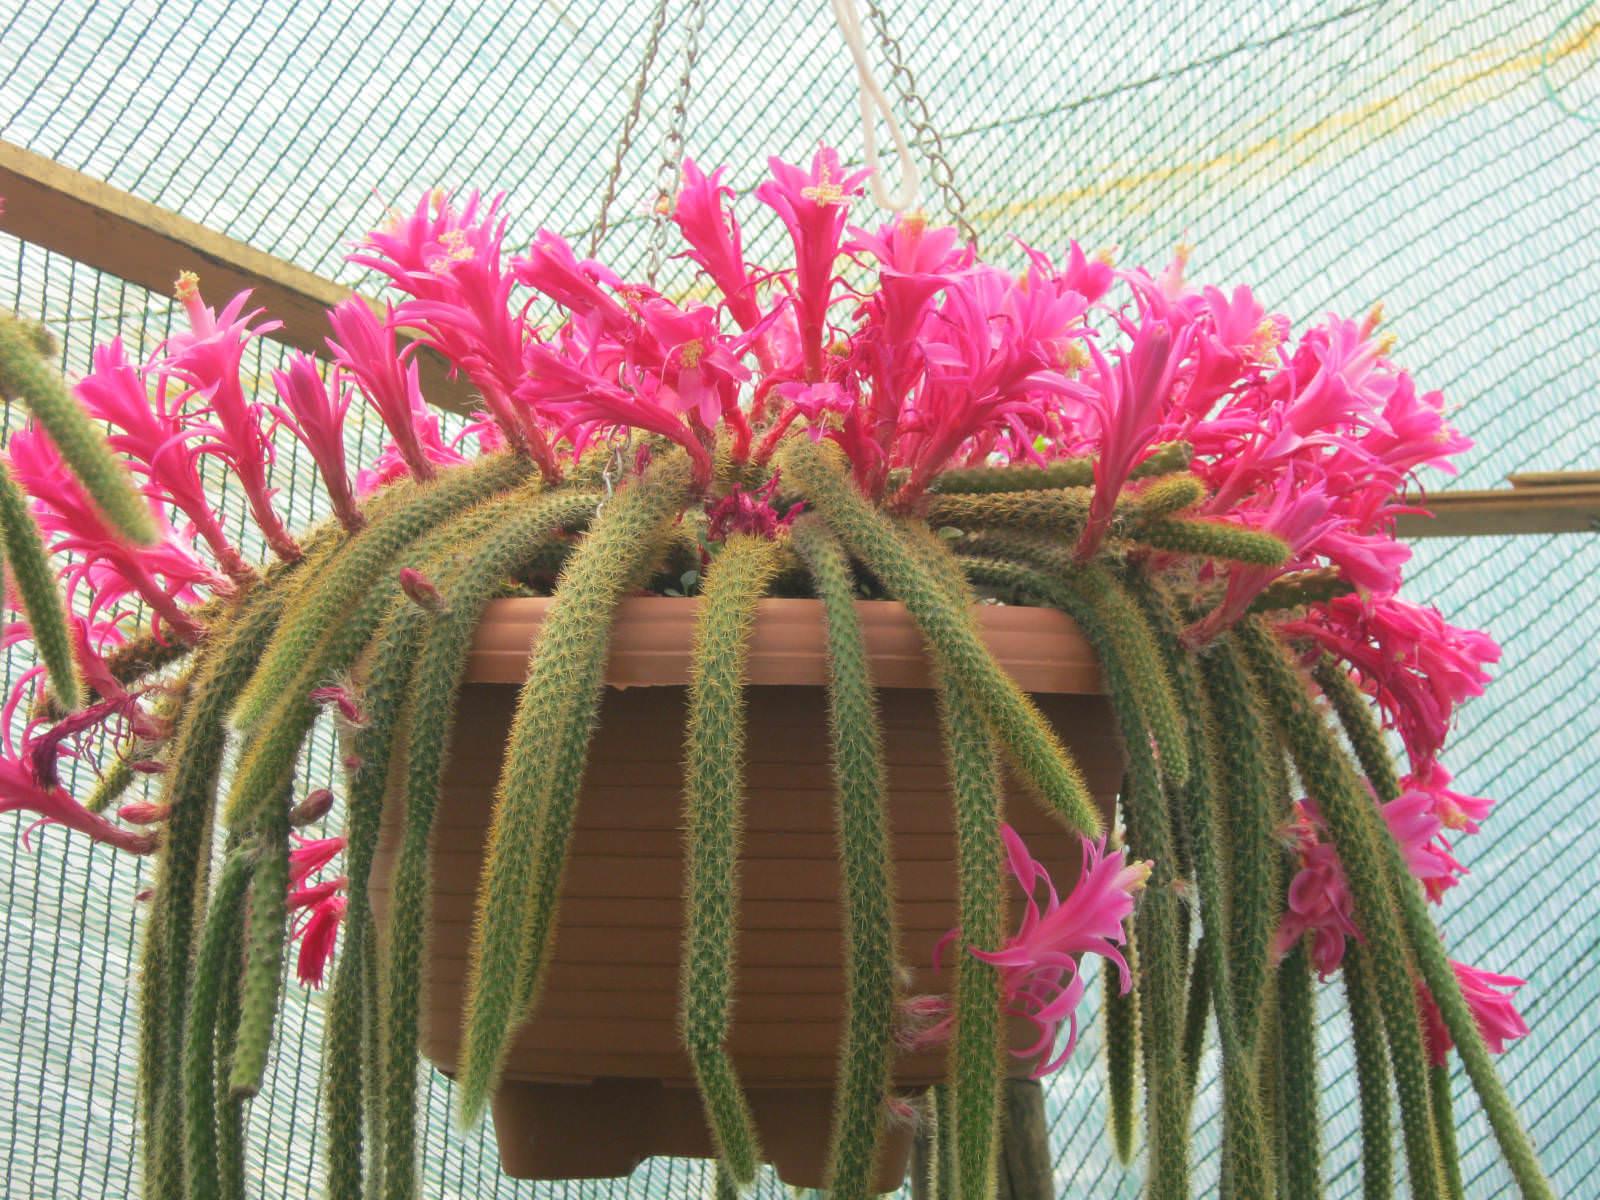
General Care
Disocactus flagelliformis is easy to cultivate and relatively fast growing cactus. Their trailing stems make these cacti ideal plants for a hanging basket. Line the basket with sphagnum moss before filling it with potting mixture and make sure it is hung where the prickly stems will not pose a treat to the unwary. If Disocactus flagelliformis is grown in a pot, hang the pot up or attache it to a high shelf. If it is left free-standing, it can soon be overbalanced by the lengthening stems.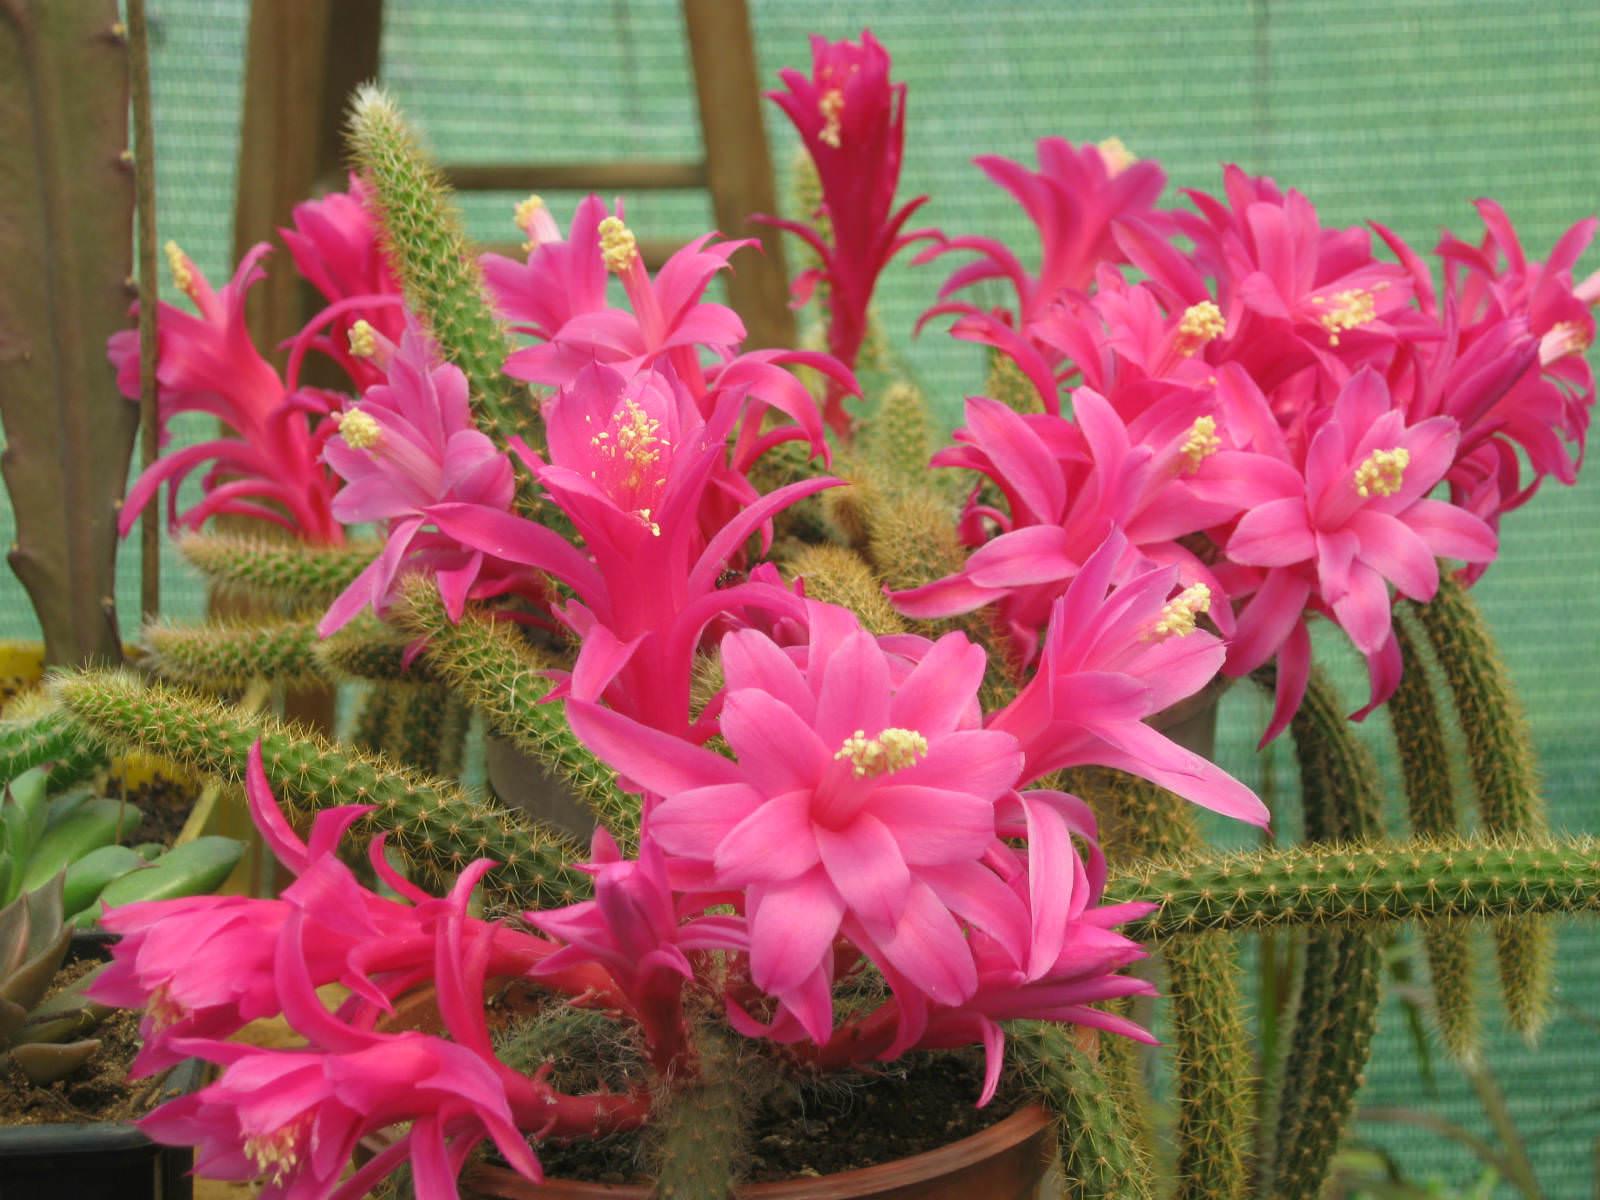
Propagation
To propagate, use either 6 inches (15 cm) tip or 6 inches (15 cm) segment of any part of the stem. Allow each cutting or segment to dry for three days; then insert it about 0.8 inch (2 cm) deep in a small pan or pot of the recommended potting mixture for mature plants; be sure that any stem segment is planted with the bottom end down. If this shallowly inserted cutting tends to fall over, it can be supported by being gently tied to a small wooden stick. Cultivation needs of cuttings are the same as those for mature Disocactus flagelliformis and rooting will occur within a few weeks.

Disocactus flagelliformis is epiphytic in the wild (it grows in trees). It is perfectly adapted to hanging baskets. It is the most cultivated species in the genus. Due to its ease of cultivation and attractive floral displays, Disocactus flagelliformis is often grown as an ornamental pot plant.

Growing Conditions
Light: Disocactus flagelliformis requires full sunlight. Hang the pot or basket in the sunniest window available. If possible, hang the plant outdoors in summer to give it fresh air and extra light.
Soil: A good draining soil mix that is gritty is advisable to use, which is sold and used for cacti and succulents.
Temperature: During the active growth period normal room temperatures are suitable. In winter these plants should be rested at 45 to 50 °F (7 to 10 °C), if possible, but they tolerate temperatures up to 59 to 61 °F (15 to 16 °C).
Watering: During the active growth period water plentifully, keeping the potting mixture thoroughly moist, but do not let plants stand in water. During the winter rest period just keep the mixture from drying out.
Fertilizing: Use half-strength liquid fertilizer sprayed on to the stems of the plant once every two weeks during the active growth period only.

General Care
Disocactus flagelliformis is easy to cultivate and relatively fast growing cactus. Their trailing stems make these cacti ideal plants for a hanging basket. Line the basket with sphagnum moss before filling it with potting mixture and make sure it is hung where the prickly stems will not pose a treat to the unwary. If Disocactus flagelliformis is grown in a pot, hang the pot up or attache it to a high shelf. If it is left free-standing, it can soon be overbalanced by the lengthening stems.

Propagation
To propagate, use either 6 inches (15 cm) tip or 6 inches (15 cm) segment of any part of the stem. Allow each cutting or segment to dry for three days; then insert it about 0.8 inch (2 cm) deep in a small pan or pot of the recommended potting mixture for mature plants; be sure that any stem segment is planted with the bottom end down. If this shallowly inserted cutting tends to fall over, it can be supported by being gently tied to a small wooden stick. Cultivation needs of cuttings are the same as those for mature Disocactus flagelliformis and rooting will occur within a few weeks.
0
0
文章
Dummer. ゛☀
2017年09月22日

The succulent Jade Plant (Crassula ovata) grows wild in its native southern Africa, where it can reach 8 to 9 feet tall and spread about as wide. The fleshy oval leaves measure about 1 inch long at maturity. Mature stems are barklike, with softer tip growth. The plant responds to leaf pruning or removal by quickly sending out new, small leaves. Use this natural trait to your advantage with jade bonsai to keep the leaves in scale and to help keep a mature jade from becoming top-heavy.
1. Prune unwieldy branches with bonsai pruners or small, sharp-pointed scissors to achieve a tree framework. Do this in stages, if necessary, allowing the plant to fill in with new growth between prunings so you can better envision the shape of the mature bonsai. Remove large leaves to open the plant and allow light to reach inner stems where you want new, smaller leaves to grow. Pruning cuts should be flush with the main branch so they can form a smooth callus. Both stubs and scooped-out cuts create conditions for stem rot infections.
2. Trim jade once or twice a week to control the size and density of the leaf buds. Pinch off oversized leaves, or pinch off leaf buds growing in unwanted places, such as on the lower trunk of the plant. Nip the tips of leggy branches to encourage clusters of new leaf buds to develop. Long tweezers make it easy to reach within the plant to remove pruned bits.
3. Avoid using wound sealant. Instead, let pruned areas air dry and form a callus. Pathogens trapped under sealant can cause bacterial or fungal rot. Clean the pruning cutter blades with rubbing alcohol after each cut to prevent the spread of disease, especially if you use the same tools with several plants.
4. Train longer branches into interesting configurations by gently coiling copper wire around each branch you want to manipulate. The coil should be loose. Carefully bend the branch once or twice a week in small increments, nudging it into the desired shape. Jade responds quickly to wiring and can maintain its new form in as little as three weeks. If the wire leaves small imprints where it contacted the branch, the marks typically disappear as water replenishes the branch after the wire is removed.
Things You Will Need
Sharp-pointed small scissors or bonsai pruners
Rubbing alcohol
Long tweezers
Copper wire, optional.
Tip
Don’t water jade immediately before wiring. After watering, jade cells fill with water, making the stems rigid and more likely to break during the wiring process. Resume normal watering after the wire is in place.
A similar plant sometimes sold as a jade, Portulacaria afra has naturally smaller, 1/2-inch leaves. It is useful for creating a smaller scale bonsai with minimum pruning. The space between leaf nodes is also shorter, so Portulacaria afra bonsai appears to be more compact than Crassula ovata.

1. Prune unwieldy branches with bonsai pruners or small, sharp-pointed scissors to achieve a tree framework. Do this in stages, if necessary, allowing the plant to fill in with new growth between prunings so you can better envision the shape of the mature bonsai. Remove large leaves to open the plant and allow light to reach inner stems where you want new, smaller leaves to grow. Pruning cuts should be flush with the main branch so they can form a smooth callus. Both stubs and scooped-out cuts create conditions for stem rot infections.

2. Trim jade once or twice a week to control the size and density of the leaf buds. Pinch off oversized leaves, or pinch off leaf buds growing in unwanted places, such as on the lower trunk of the plant. Nip the tips of leggy branches to encourage clusters of new leaf buds to develop. Long tweezers make it easy to reach within the plant to remove pruned bits.

3. Avoid using wound sealant. Instead, let pruned areas air dry and form a callus. Pathogens trapped under sealant can cause bacterial or fungal rot. Clean the pruning cutter blades with rubbing alcohol after each cut to prevent the spread of disease, especially if you use the same tools with several plants.

4. Train longer branches into interesting configurations by gently coiling copper wire around each branch you want to manipulate. The coil should be loose. Carefully bend the branch once or twice a week in small increments, nudging it into the desired shape. Jade responds quickly to wiring and can maintain its new form in as little as three weeks. If the wire leaves small imprints where it contacted the branch, the marks typically disappear as water replenishes the branch after the wire is removed.

Things You Will Need
Sharp-pointed small scissors or bonsai pruners
Rubbing alcohol
Long tweezers
Copper wire, optional.
Tip
Don’t water jade immediately before wiring. After watering, jade cells fill with water, making the stems rigid and more likely to break during the wiring process. Resume normal watering after the wire is in place.

A similar plant sometimes sold as a jade, Portulacaria afra has naturally smaller, 1/2-inch leaves. It is useful for creating a smaller scale bonsai with minimum pruning. The space between leaf nodes is also shorter, so Portulacaria afra bonsai appears to be more compact than Crassula ovata.
1
2


