文章
Dummer. ゛☀
2017年08月29日

Bunchberry (Cornus canadensis) ground cover is a petite ground-hugging perennial plant that reaches only 8 inches at maturity and spreads by underground rhizomes. It has a woody stem and four to seven leaves that are set up in a whorled pattern at the tip of the stem. Also known as creeping dogwood vine, pretty yellow flowers appear first followed by clusters of red berries that ripen midsummer. The foliage turns a beautiful burgundy red in the fall, making it a great addition to the garden for year round interest.
This showy evergreen ground cover is native to the Pacific Northwest and is particularly at home in moist soil and in shaded locations. If you live in USDA plant hardiness zones 2 through 7, you can enjoy the attractive bunchberry ground cover as it draws birds, deer and other wildlife to the area. Some people even eat the berries, which are said to taste a bit like apples.
How to Grow Bunchberry
Although bunchberry prefers shade, it will tolerate some light morning sun. If you have acidic soil, this plant will also be right at home. Be sure to add plenty of compost or peat moss to the planting area. Bunchberry dogwood plants can be propagated by seed or cuttings. Take cuttings below the ground level in mid July through August. If you choose to use seeds, they must be sown fresh in the fall or after they have had three months of cold treatment. Plant seeds 3/4 of an inch deep into the soil. Be sure the growing area is moist but also well-draining.
Caring for Bunchberry
It is important that creeping dogwood be kept moist and the soil temperature cool. This is one of the reasons why they do so well in the shade. If the soil temperature is above 65 degrees F., they can wither and die. Cover with a thick layer of pine needles or mulch for added protection and moisture retention. Caring for bunchberry is easy once they get started as long as you keep the soil moist and the plants receive plenty of shade. This ground cover has no known disease or pest problems, making it a truly easy keeper.

This showy evergreen ground cover is native to the Pacific Northwest and is particularly at home in moist soil and in shaded locations. If you live in USDA plant hardiness zones 2 through 7, you can enjoy the attractive bunchberry ground cover as it draws birds, deer and other wildlife to the area. Some people even eat the berries, which are said to taste a bit like apples.

How to Grow Bunchberry
Although bunchberry prefers shade, it will tolerate some light morning sun. If you have acidic soil, this plant will also be right at home. Be sure to add plenty of compost or peat moss to the planting area. Bunchberry dogwood plants can be propagated by seed or cuttings. Take cuttings below the ground level in mid July through August. If you choose to use seeds, they must be sown fresh in the fall or after they have had three months of cold treatment. Plant seeds 3/4 of an inch deep into the soil. Be sure the growing area is moist but also well-draining.

Caring for Bunchberry
It is important that creeping dogwood be kept moist and the soil temperature cool. This is one of the reasons why they do so well in the shade. If the soil temperature is above 65 degrees F., they can wither and die. Cover with a thick layer of pine needles or mulch for added protection and moisture retention. Caring for bunchberry is easy once they get started as long as you keep the soil moist and the plants receive plenty of shade. This ground cover has no known disease or pest problems, making it a truly easy keeper.
0
0
文章
Dummer. ゛☀
2017年08月29日

Fountain grass is a spectacular ornamental specimen that provides movement and color to the landscape. It is hardy in United States Department of Agriculture zone 8, but as a warm season grass, it will only grow as an annual in cooler areas. Fountain grass plants are perennial in the warmer climates but to save them in cooler areas try taking care of fountain grass indoors. Learn how to winter over fountain grass in containers. This will allow you to enjoy the playful foliage for years to come.
Fountain Grass Plants
This ornamental has astounding inflorescences that look like purple squirrel tales. The foliage is a wide grassy blade with a swath of deep purplish-red along the edges. Fountain grass plants may get two to five feet tall, in a clumping habit. The arching leaves that radiate from the center of the plant give it its name. Mature fountain grass plants may get up to four feet wide. This is a really versatile plant that tolerates full sun to partial shade, walnut proximity, and moist to slightly dry soils. Most zones can only grow this plant as an annual, but bringing purple fountain grass inside can save it for another season.
How to Winter Over Fountain Grass in Containers
The relatively wide and shallow roots of the grass are no match for freezing temperatures. Plants in cold zones should be dug up. You can put purple fountain grass in containers and bring them indoors where it’s warm. Dig out several inches wider than the farthest reach of the foliage. Gently excavate until you find the edge of the root mass. Dig down and pop out the whole plant. Place it in a pot with good drainage holes in a quality potting soil. The pot should be slightly wider than the root base. Press the soil in firmly and water well.
Taking care of fountain grass indoors is not difficult, but you need to be careful not to overwater the plant. Keep it moist, (but not wet) because it can die very easily from drying out. Clip the foliage down to about 3 inches from the top of the pot and stick it in a sunny window in a cool room. It will revert to green coloration and won’t look like much for the winter, but when it goes back outside in the spring, it should come back.
Bringing Purple Fountain Grass Inside
Put purple fountain grass in containers in late summer to early fall, so you are prepared to bring them inside when freezes threaten. You can bring fountain grass plants inside and save them in the basement, garage, or other semi-cool area. As long as there are no freezing temperatures and moderate light, the plant will survive winter. Gradually acclimate the plant to warmer conditions and higher light during spring by putting the pot outside for longer and longer periods over a week’s time. You can also divide the roots and plant each section to start new plants.

Fountain Grass Plants
This ornamental has astounding inflorescences that look like purple squirrel tales. The foliage is a wide grassy blade with a swath of deep purplish-red along the edges. Fountain grass plants may get two to five feet tall, in a clumping habit. The arching leaves that radiate from the center of the plant give it its name. Mature fountain grass plants may get up to four feet wide. This is a really versatile plant that tolerates full sun to partial shade, walnut proximity, and moist to slightly dry soils. Most zones can only grow this plant as an annual, but bringing purple fountain grass inside can save it for another season.

How to Winter Over Fountain Grass in Containers
The relatively wide and shallow roots of the grass are no match for freezing temperatures. Plants in cold zones should be dug up. You can put purple fountain grass in containers and bring them indoors where it’s warm. Dig out several inches wider than the farthest reach of the foliage. Gently excavate until you find the edge of the root mass. Dig down and pop out the whole plant. Place it in a pot with good drainage holes in a quality potting soil. The pot should be slightly wider than the root base. Press the soil in firmly and water well.

Taking care of fountain grass indoors is not difficult, but you need to be careful not to overwater the plant. Keep it moist, (but not wet) because it can die very easily from drying out. Clip the foliage down to about 3 inches from the top of the pot and stick it in a sunny window in a cool room. It will revert to green coloration and won’t look like much for the winter, but when it goes back outside in the spring, it should come back.

Bringing Purple Fountain Grass Inside
Put purple fountain grass in containers in late summer to early fall, so you are prepared to bring them inside when freezes threaten. You can bring fountain grass plants inside and save them in the basement, garage, or other semi-cool area. As long as there are no freezing temperatures and moderate light, the plant will survive winter. Gradually acclimate the plant to warmer conditions and higher light during spring by putting the pot outside for longer and longer periods over a week’s time. You can also divide the roots and plant each section to start new plants.
0
0
文章
Dummer. ゛☀
2017年08月29日

New Zealand flax (Phormium tenax) was once thought to be related to Agave but has since been placed in the Phormium family. New Zealand flax plants are popular ornamentals in United States Department of Agriculture zone 8. Their fan-like form and easy growth from rhizomes are excellent accents in containers, perennial gardens, and even coastal regions. Once you know how to grow New Zealand flax, you may be rewarded with 6- to 10-foot wide plants with an amazing potential height of 20 feet in perfect conditions.
New Zealand Flax Plant Information
New Zealand flax plants have two main species in cultivation but numerous cultivars. Cultivars exhibit red, yellow, green, burgundy, purple, maroon and many more foliage colors. There are even variegated flax for exciting foliar contrast. If plants are in warm enough regions, caring for New Zealand flax is a breeze with few insect or disease complaints and hardy establishment.
This flax is named for its fibrous leaves, which were once used to make baskets and textiles. All parts of the plant were used with medicine made from roots, face powder from flower pollen and old blooming stems roped together as rafts. Leaves are keel shaped, coming to a decided point. They can be used as decorative plants in zones 9 to 11 with best growth in zone 8.
New Zealand flax plant information indicates that tubular, showy flowers appear on erect stems but only in their native region and rarely in greenhouse care. New Zealand flax plants offer architectural interest but are not winter hardy and should be brought indoors for winter in most climates.
How to Grow New Zealand Flax
New Zealand flax is a slow growing perennial plant. The most common method of propagation is through division and fully rooted specimens are widely available at nursery centers. One of the main requirements this plant has is well-draining soil. Boggy or heavy clay soils will reduce growth and can contribute to rotten stems and rhizomes. The flax tolerates partial sun but will perform better in full sun situations. New Zealand flax attracts birds and is not attractive to deer. It is easy to maintain, drought tolerant when established and makes a good erosion control. New Zealand flax plant care is minimal once plants are mature, but the flax may suffer damaged and shredded leaf tips in windy and exposed sites.
Caring for New Zealand Flax
Hybrid flax plants are not as durable as the two base species. They require more water and some shelter from hot sunlight, which can burn the leaf tips. They are reliably hardy to 20 degrees Fahrenheit (-6 C.), but all species can simply be moved indoors in fall to prevent damage. Use a couple of inches of organic mulch around the root zone to conserve moisture, prevent weeds and insulate the rhizomes. Occasionally, pruning is necessary where damage has occurred due to sun or cold. Cut off dead and damaged leaves as needed.
The flax thrives in poor soils, so fertilization is not necessary, but annual top dressings of finely rotted compost can help add nutrients to the soil and increase percolation. New Zealand flax plant care is easiest to manage in containers in northern climates. Bring the plant inside for winter and gradually reintroduce it to outdoors when ambient temperatures warm in spring.

New Zealand Flax Plant Information
New Zealand flax plants have two main species in cultivation but numerous cultivars. Cultivars exhibit red, yellow, green, burgundy, purple, maroon and many more foliage colors. There are even variegated flax for exciting foliar contrast. If plants are in warm enough regions, caring for New Zealand flax is a breeze with few insect or disease complaints and hardy establishment.
This flax is named for its fibrous leaves, which were once used to make baskets and textiles. All parts of the plant were used with medicine made from roots, face powder from flower pollen and old blooming stems roped together as rafts. Leaves are keel shaped, coming to a decided point. They can be used as decorative plants in zones 9 to 11 with best growth in zone 8.

New Zealand flax plant information indicates that tubular, showy flowers appear on erect stems but only in their native region and rarely in greenhouse care. New Zealand flax plants offer architectural interest but are not winter hardy and should be brought indoors for winter in most climates.
How to Grow New Zealand Flax
New Zealand flax is a slow growing perennial plant. The most common method of propagation is through division and fully rooted specimens are widely available at nursery centers. One of the main requirements this plant has is well-draining soil. Boggy or heavy clay soils will reduce growth and can contribute to rotten stems and rhizomes. The flax tolerates partial sun but will perform better in full sun situations. New Zealand flax attracts birds and is not attractive to deer. It is easy to maintain, drought tolerant when established and makes a good erosion control. New Zealand flax plant care is minimal once plants are mature, but the flax may suffer damaged and shredded leaf tips in windy and exposed sites.

Caring for New Zealand Flax
Hybrid flax plants are not as durable as the two base species. They require more water and some shelter from hot sunlight, which can burn the leaf tips. They are reliably hardy to 20 degrees Fahrenheit (-6 C.), but all species can simply be moved indoors in fall to prevent damage. Use a couple of inches of organic mulch around the root zone to conserve moisture, prevent weeds and insulate the rhizomes. Occasionally, pruning is necessary where damage has occurred due to sun or cold. Cut off dead and damaged leaves as needed.

The flax thrives in poor soils, so fertilization is not necessary, but annual top dressings of finely rotted compost can help add nutrients to the soil and increase percolation. New Zealand flax plant care is easiest to manage in containers in northern climates. Bring the plant inside for winter and gradually reintroduce it to outdoors when ambient temperatures warm in spring.
0
0
文章
Dummer. ゛☀
2017年08月29日

Purple moor grass (Molinia caerulea) is a true grass native to Eurasia and found in moist, fertile, acidic soil. It has excellent use as an ornamental due to its neat tufting habit and charming, persistent inflorescence. The flowers may soar 5 to 8 feet above the basal foliage, producing an architectural appearance that stands out in the garden. Try growing ornamental moor grass in a massed planting for maximum effect.
How to Grow Moor Grass
Ornamental grass lovers should not pass up the opportunity to acquire autumn moor grass. Also, called purple moor grass, this attractive plant has appeal as a single specimen in a combined planter, an accent in the perennial garden or even perched in the rockery. Moor grasses come in many cultivars and are commercially represented by 12 commonly available names. Each has a slightly different foliage trait, height and inflorescence but the basic mounding habit and fine blades recognize them as part of the family.
Moor grass is seasonally interesting from summer to winter. The plant is hardy to United States Department of Agriculture zone 4 and adaptable to many types of soils as long as they are moist but well draining.
Some partner plants with similar moisture needs to try growing with moor grass are:
Epimediums
Coreopsis
Salix or willow
Evergreen ornamental grasses
The plant produces numerous seeds, so remove the seed head in fall to prevent spread. Spread mulch around the grass to a depth of at least 2 inches of good organic material to prevent weed competitors and conserve moisture. Keep mulch away from direct contact with the base of the plant to prevent mold issues.
Moor Grass Care
One of the most important aspects of moor grass care is water. While the plant may rot out in boggy soils, it needs consistent moisture. Water the grass deeply once per week. Overhead watering may promote rust and other fungal diseases, so it is advised to water from the base of the plant. This is a deciduous grass, which will die back in winter. This means there is no need to cut back the plant. In fact, the spent grass is attractive for nesting material to wild birds and helps form a protective nest around the root zone. Simply rake it away in early spring so new blade emergence is not impeded.
Dividing Moor Grass
Division of ornamental grasses is undertaken to prevent center die out, increase vigor, and best of all, to make more of these attractive ornamentals. Moor grass can be divided every 3 to 4 years. The optimum time for division is late winter to very early spring. Dig out around the root zone and deeply into soil to remove the entire plant. Use a root saw to cut it into 2 or 3 sections. Make sure each has plenty of sprouting leaves and a good healthy clump of roots. Plant each section separately. Keep them watered as the plant sprouts and spreads out new roots. This easy step guarantees healthier grasses and increases the number of the regal moor grass.

How to Grow Moor Grass
Ornamental grass lovers should not pass up the opportunity to acquire autumn moor grass. Also, called purple moor grass, this attractive plant has appeal as a single specimen in a combined planter, an accent in the perennial garden or even perched in the rockery. Moor grasses come in many cultivars and are commercially represented by 12 commonly available names. Each has a slightly different foliage trait, height and inflorescence but the basic mounding habit and fine blades recognize them as part of the family.
Moor grass is seasonally interesting from summer to winter. The plant is hardy to United States Department of Agriculture zone 4 and adaptable to many types of soils as long as they are moist but well draining.

Some partner plants with similar moisture needs to try growing with moor grass are:
Epimediums
Coreopsis
Salix or willow
Evergreen ornamental grasses
The plant produces numerous seeds, so remove the seed head in fall to prevent spread. Spread mulch around the grass to a depth of at least 2 inches of good organic material to prevent weed competitors and conserve moisture. Keep mulch away from direct contact with the base of the plant to prevent mold issues.

Moor Grass Care
One of the most important aspects of moor grass care is water. While the plant may rot out in boggy soils, it needs consistent moisture. Water the grass deeply once per week. Overhead watering may promote rust and other fungal diseases, so it is advised to water from the base of the plant. This is a deciduous grass, which will die back in winter. This means there is no need to cut back the plant. In fact, the spent grass is attractive for nesting material to wild birds and helps form a protective nest around the root zone. Simply rake it away in early spring so new blade emergence is not impeded.

Dividing Moor Grass
Division of ornamental grasses is undertaken to prevent center die out, increase vigor, and best of all, to make more of these attractive ornamentals. Moor grass can be divided every 3 to 4 years. The optimum time for division is late winter to very early spring. Dig out around the root zone and deeply into soil to remove the entire plant. Use a root saw to cut it into 2 or 3 sections. Make sure each has plenty of sprouting leaves and a good healthy clump of roots. Plant each section separately. Keep them watered as the plant sprouts and spreads out new roots. This easy step guarantees healthier grasses and increases the number of the regal moor grass.
0
0
文章
Miss Chen
2017年08月26日

1. Luz para Orquídeas
2. Temperatura
3. Humedad
4. Ventilación
5. Riego Orquídeas
6. Abonado Orquídeas
7. Trasplante y fijación a árbol
8. Poda
9. Plagas, enfermedades y trastornos de las Orquídeas
10. Multiplicación de Orquídeas

7. Trasplante
• El drenaje en las macetas con Orquídeas debe ser perfecto. Para conseguirlo es necesario un sustrato muy aireado, suelto y con un agujero de drenaje en el fondo libre. Piensa que la mayoría viven adheridas a la corteza de los árboles (epífitas) con las raíces al aire y adaptadas a secarse rápidamente.
• En general, el sustrato a los 2 ó 3 años pierde sus cualidades, se compacta reteniendo demasiada agua y acumulando sales de los fertilizantes. Si el riego y la fertilización han sido altos, se deteriora en sólo 1 año. Por tanto, hay que renovarlo haciendo un trasplante cada 1 ó 2 años.
• Los materiales que se utilizan para sustratos son diversos. Una mezcla general y buena es la formada por cortezas trituradas con musgo en una proporción del 70% y 30% respectivamente.Para más comodidad, en el mercado se encuentran sustratos preparados para orquídeas.
• Usa la misma maceta que tenía, se trata únicamente de cambiar el sustrato. En una maceta grande no florecerá hasta que pasen 3 ó 4 años. Recuerda que las orquídeas son felices en tiestos pequeños. Elige un tiesto mayor si la planta ha crecido mucho.
• Los tiestos para Orquídeas epífitas suelen ser de plástico transparente para facilitar que la luz llegue a todas las raíces, como ocurre cuando está enganchada en un árbol de la selva.
• El mejor momento para trasplantar es a finales de invierno o como máximo a principios de primavera, que es cuando las Orquídeas comienzan su período de mayor actividad.
• Si las raíces están en mal estado, desmenuza el cepellón de sustrato, corta las raíces estropeadas o podridas y traslada a una maceta igual ó más pequeña, rellenando con sustrato nuevo.
• Puedes aprovechar el trasplante para dividir la planta y obtener varios ejemplares. Desmorona el cepellón, divide con las manos y planta cada división en una maceta distinta de tamaño apropiado y con sustrato fresco.
Troncos de los árboles
En lugar de macetas, las Orquídeas epífitas pueden colocarse amarradas a un tronco o corteza que no tenga resina.
La mejor época para "plantarlas" así, son los meses lluviosos o durante la temporada en la que la planta está en flor.
La rama o tronco donde irá la planta no debe recibir sol directo durante todo el día.
Retira la orquídea del recipiente para limpiar sus raíces. En el caso de que queden restos de sustrato no pasará nada.
Las raíces que tocan el árbol se pegarán a él. Aún así es necesario atar la orquídea al árbol, preferiblemente con algún material de fibra vegetal, como la rafia o el algodón. En poco más de un mes, la orquídea quedará prendida.
El riego tendrá que ser diario en época de crecimiento, ya que al estar las raíces al descubierto se pueden deshidratar con mucha facilidad. Por eso, lo ideal es que el clima sea uno muy similar al de su origen, lluvioso y cálido.
Puede que las orquídeas no den flor el primer año, pero las darán posteriormente.
8. Poda
• Corta las puntas negras que aparecen cuando la planta envejece.
• Retira las hojas y flores marchitas.
• Al finalizar la época de floración, corta por la base las varas de las flores. Si no la cortas, se fuerza la planta a que produzca otra de nuevo, lo que se traducirá en unas flores más pequeñas y el agotamiento de la planta.
• Con el fin de evitar propagar enfermedades (hongos, bacterias y virus) es imprescindible que las herramientas de corte estén perfectamente desinfectadas. Para limpiarlas puedes hacerlo con agua y jabón. Para desinfectarlas lo más corriente es la lejía diluida en agua (1 parte de lejía por 9 de agua). Las herramientas se sumergen en esta solución 1 ó 2 minutos. Como la lejía oxida el metal, lava después con agua y jabón y seca.
9. Plagas, enfermedades y trastornos

Prevenir
• Compra preferentemente en un establecimiento de garantías y donde te puedan asesorar sobre sus cuidados.
• Lo mejor es comprarlas en sitios donde no las tengan tan "mimadas". Es decir, si están en invernaderos climatizados y forzadas en cuanto a fertilización, humedad, etc., resultan plantas menos rústicas para el hogar o el jardín. Son preferibles las plantas que han pasado un poco de frío o calor, exceso de luz o de oscuridad, que hayan recibido pocos fertilizantes...
• Deben estar fuertes y vigorosas, sin manchas ni hojas amarillentas.
• Las raíces si son negras u oscuras indican podredumbre.
• Es recomendable mantener un tiempo aisladas las plantas recién adquiridas por si traen plagas o enfermedades que puedan extender a las demás.
• Inspecciona las plantas con frecuencia. Cuanto antes detectes el problema, será mucho más fácil su control.
• Pasa una esponja por las hojas de vez en cuando para quitarle el polvo y que puedan respirar.
• La mejor medida preventiva general es tener las plantas bien cultivadas en cuanto a iluminación, humedad, ventilación, riego, fertilización, trasplante, etc. Así es muy difícil que se enferme.
Plagas
Plagas comunes son Pulgones, Araña roja, Cochinillas, Trips, etc. Moja bien con los insecticidas para llegar a todos los recovecos de la planta. Seguramente será necesario repetir el tratamiento a los 15 días.
Enfermedades
• Hay hongos que atacan manifestándose en puntos o manchas oscuras en hojas y flores y otros pudren las raíces y el cuello de la planta. Éstos últimos son los más peligrosos. Infectan cuando hay un exceso de riego o un mal drenaje.
Para prevenir hongos se pueden pulverizar las Orquídeas con fungicida en otoño y primavera.
• Las bacterias son patógenos que producen lesiones acuosas o manchas redondeados en pseudobulbos u hojas. Necesitan mucha humedad para infectar. Son muy peligrosas debido a que se desarrollan rápidamente y contagian a las demás plantas. Aísla inmediatamente la planta de las demás, corta el tejido infectado y no riegues durante varios días. No hay cura con productos químicos.
• Virus: los dos más comunes son el Virus del Mosaico del Cymbidium y el Virus del Mosaico del Tabaco. Producen clorosis, malformaciones en flores y hojas marcadas. Los pulgones son sus principales propagadores de una planta a otra. Contrólalos y desinfecta las herramientas de corte. Las plantas con virus no tienen cura por lo que se deben destruirse (quemar).
Trastornos Aparte de plagas y enfermedades, la tercera causa de problemas en las plantas son los llamados trastornos o fisiopatías. Estos son los más típicos:
• Luz insuficiente: provoca falta de floración, poco crecimiento, tallos que se caen, hojas de un verde muy oscuro...
• Quemaduras por el sol: hojas amarillas o secas. (Foto inferior)
• Sequedad ambiental: la falta de humedad se manifiesta por el arrugamiento de hojas por un exceso de transpiración. Para aumentar la humedad del aire practica alguno de estos métodos ya comentados en el apartado de "Humedad". • Temperaturas bajas, corrientes de aire o gas etileno que desprenden las frutas cercanas a la planta pueden causar la caída de las flores.
• Exceso de riego: se pudren las raíces. Saca la planta del tiesto, corta las raíces podridas (negras y blandas), lava y desinfecta el tiesto y cambiar el sustrato por otro nuevo.
• Mal drenaje ó sustrato compactado por estar viejo: el resultado es el mismo que antes, se pudren las raíces. Asegúrate que el agujero de drenaje inferior no está obstruido y cambia el sustrato cada 1 ó 2 años haciendo un trasplante.
• Exceso de fertilizantes: puntas secas.
• Ocasionalmente la planta pierde sus hojas y es algo normal.
10. Multiplicación
División
Se puede aprovechar el trasplante para dividir la planta y obtener varios ejemplares. Se desmorona el cepellón de tierra, se divide con las manos y se planta cada división en una maceta distinta de tamaño apropiado y con sustrato fresco. Semillas
Por semillas es como se hace comercialmente y tiene su complejidad. Deben cultivarse en laboratorio y con unas técnicas complejas.
La Orquídea produce un gran número de semillas, miles por cada fruto, incluso hasta 2 millones de semillas, son como granitos de polvo. Sin embargo, sólo unas cuantas logran germinar debido a que casi no tienen sustancias de reserva y requieren ser colonizadas por un hongo que vive en el suelo que le proporciona los nutrientes necesarios para germinar y desarrollarse en un principio.
El desarrollo es lento, dependiendo del tipo de orquídea, puede tardar en florecer hasta siete años.
Lo más producido comercialmente son los híbridos de Orquídeas. En invernaderos es posible generar híbridos cruzando especies de un mismo género o especies de distintos géneros pero la misma subtribu.
2. Temperatura
3. Humedad
4. Ventilación
5. Riego Orquídeas
6. Abonado Orquídeas
7. Trasplante y fijación a árbol
8. Poda
9. Plagas, enfermedades y trastornos de las Orquídeas
10. Multiplicación de Orquídeas

7. Trasplante
• El drenaje en las macetas con Orquídeas debe ser perfecto. Para conseguirlo es necesario un sustrato muy aireado, suelto y con un agujero de drenaje en el fondo libre. Piensa que la mayoría viven adheridas a la corteza de los árboles (epífitas) con las raíces al aire y adaptadas a secarse rápidamente.
• En general, el sustrato a los 2 ó 3 años pierde sus cualidades, se compacta reteniendo demasiada agua y acumulando sales de los fertilizantes. Si el riego y la fertilización han sido altos, se deteriora en sólo 1 año. Por tanto, hay que renovarlo haciendo un trasplante cada 1 ó 2 años.
• Los materiales que se utilizan para sustratos son diversos. Una mezcla general y buena es la formada por cortezas trituradas con musgo en una proporción del 70% y 30% respectivamente.Para más comodidad, en el mercado se encuentran sustratos preparados para orquídeas.
• Usa la misma maceta que tenía, se trata únicamente de cambiar el sustrato. En una maceta grande no florecerá hasta que pasen 3 ó 4 años. Recuerda que las orquídeas son felices en tiestos pequeños. Elige un tiesto mayor si la planta ha crecido mucho.
• Los tiestos para Orquídeas epífitas suelen ser de plástico transparente para facilitar que la luz llegue a todas las raíces, como ocurre cuando está enganchada en un árbol de la selva.
• El mejor momento para trasplantar es a finales de invierno o como máximo a principios de primavera, que es cuando las Orquídeas comienzan su período de mayor actividad.
• Si las raíces están en mal estado, desmenuza el cepellón de sustrato, corta las raíces estropeadas o podridas y traslada a una maceta igual ó más pequeña, rellenando con sustrato nuevo.
• Puedes aprovechar el trasplante para dividir la planta y obtener varios ejemplares. Desmorona el cepellón, divide con las manos y planta cada división en una maceta distinta de tamaño apropiado y con sustrato fresco.
Troncos de los árboles
En lugar de macetas, las Orquídeas epífitas pueden colocarse amarradas a un tronco o corteza que no tenga resina.
La mejor época para "plantarlas" así, son los meses lluviosos o durante la temporada en la que la planta está en flor.
La rama o tronco donde irá la planta no debe recibir sol directo durante todo el día.
Retira la orquídea del recipiente para limpiar sus raíces. En el caso de que queden restos de sustrato no pasará nada.
Las raíces que tocan el árbol se pegarán a él. Aún así es necesario atar la orquídea al árbol, preferiblemente con algún material de fibra vegetal, como la rafia o el algodón. En poco más de un mes, la orquídea quedará prendida.
El riego tendrá que ser diario en época de crecimiento, ya que al estar las raíces al descubierto se pueden deshidratar con mucha facilidad. Por eso, lo ideal es que el clima sea uno muy similar al de su origen, lluvioso y cálido.
Puede que las orquídeas no den flor el primer año, pero las darán posteriormente.
8. Poda
• Corta las puntas negras que aparecen cuando la planta envejece.
• Retira las hojas y flores marchitas.
• Al finalizar la época de floración, corta por la base las varas de las flores. Si no la cortas, se fuerza la planta a que produzca otra de nuevo, lo que se traducirá en unas flores más pequeñas y el agotamiento de la planta.
• Con el fin de evitar propagar enfermedades (hongos, bacterias y virus) es imprescindible que las herramientas de corte estén perfectamente desinfectadas. Para limpiarlas puedes hacerlo con agua y jabón. Para desinfectarlas lo más corriente es la lejía diluida en agua (1 parte de lejía por 9 de agua). Las herramientas se sumergen en esta solución 1 ó 2 minutos. Como la lejía oxida el metal, lava después con agua y jabón y seca.
9. Plagas, enfermedades y trastornos

Prevenir
• Compra preferentemente en un establecimiento de garantías y donde te puedan asesorar sobre sus cuidados.
• Lo mejor es comprarlas en sitios donde no las tengan tan "mimadas". Es decir, si están en invernaderos climatizados y forzadas en cuanto a fertilización, humedad, etc., resultan plantas menos rústicas para el hogar o el jardín. Son preferibles las plantas que han pasado un poco de frío o calor, exceso de luz o de oscuridad, que hayan recibido pocos fertilizantes...
• Deben estar fuertes y vigorosas, sin manchas ni hojas amarillentas.
• Las raíces si son negras u oscuras indican podredumbre.
• Es recomendable mantener un tiempo aisladas las plantas recién adquiridas por si traen plagas o enfermedades que puedan extender a las demás.
• Inspecciona las plantas con frecuencia. Cuanto antes detectes el problema, será mucho más fácil su control.
• Pasa una esponja por las hojas de vez en cuando para quitarle el polvo y que puedan respirar.
• La mejor medida preventiva general es tener las plantas bien cultivadas en cuanto a iluminación, humedad, ventilación, riego, fertilización, trasplante, etc. Así es muy difícil que se enferme.
Plagas
Plagas comunes son Pulgones, Araña roja, Cochinillas, Trips, etc. Moja bien con los insecticidas para llegar a todos los recovecos de la planta. Seguramente será necesario repetir el tratamiento a los 15 días.
Enfermedades
• Hay hongos que atacan manifestándose en puntos o manchas oscuras en hojas y flores y otros pudren las raíces y el cuello de la planta. Éstos últimos son los más peligrosos. Infectan cuando hay un exceso de riego o un mal drenaje.
Para prevenir hongos se pueden pulverizar las Orquídeas con fungicida en otoño y primavera.
• Las bacterias son patógenos que producen lesiones acuosas o manchas redondeados en pseudobulbos u hojas. Necesitan mucha humedad para infectar. Son muy peligrosas debido a que se desarrollan rápidamente y contagian a las demás plantas. Aísla inmediatamente la planta de las demás, corta el tejido infectado y no riegues durante varios días. No hay cura con productos químicos.
• Virus: los dos más comunes son el Virus del Mosaico del Cymbidium y el Virus del Mosaico del Tabaco. Producen clorosis, malformaciones en flores y hojas marcadas. Los pulgones son sus principales propagadores de una planta a otra. Contrólalos y desinfecta las herramientas de corte. Las plantas con virus no tienen cura por lo que se deben destruirse (quemar).
Trastornos Aparte de plagas y enfermedades, la tercera causa de problemas en las plantas son los llamados trastornos o fisiopatías. Estos son los más típicos:
• Luz insuficiente: provoca falta de floración, poco crecimiento, tallos que se caen, hojas de un verde muy oscuro...
• Quemaduras por el sol: hojas amarillas o secas. (Foto inferior)
• Sequedad ambiental: la falta de humedad se manifiesta por el arrugamiento de hojas por un exceso de transpiración. Para aumentar la humedad del aire practica alguno de estos métodos ya comentados en el apartado de "Humedad". • Temperaturas bajas, corrientes de aire o gas etileno que desprenden las frutas cercanas a la planta pueden causar la caída de las flores.
• Exceso de riego: se pudren las raíces. Saca la planta del tiesto, corta las raíces podridas (negras y blandas), lava y desinfecta el tiesto y cambiar el sustrato por otro nuevo.
• Mal drenaje ó sustrato compactado por estar viejo: el resultado es el mismo que antes, se pudren las raíces. Asegúrate que el agujero de drenaje inferior no está obstruido y cambia el sustrato cada 1 ó 2 años haciendo un trasplante.
• Exceso de fertilizantes: puntas secas.
• Ocasionalmente la planta pierde sus hojas y es algo normal.
10. Multiplicación
División
Se puede aprovechar el trasplante para dividir la planta y obtener varios ejemplares. Se desmorona el cepellón de tierra, se divide con las manos y se planta cada división en una maceta distinta de tamaño apropiado y con sustrato fresco. Semillas
Por semillas es como se hace comercialmente y tiene su complejidad. Deben cultivarse en laboratorio y con unas técnicas complejas.
La Orquídea produce un gran número de semillas, miles por cada fruto, incluso hasta 2 millones de semillas, son como granitos de polvo. Sin embargo, sólo unas cuantas logran germinar debido a que casi no tienen sustancias de reserva y requieren ser colonizadas por un hongo que vive en el suelo que le proporciona los nutrientes necesarios para germinar y desarrollarse en un principio.
El desarrollo es lento, dependiendo del tipo de orquídea, puede tardar en florecer hasta siete años.
Lo más producido comercialmente son los híbridos de Orquídeas. En invernaderos es posible generar híbridos cruzando especies de un mismo género o especies de distintos géneros pero la misma subtribu.
1
1
文章
Dummer. ゛☀
2017年08月26日

The pineapple sage plant is found in gardens to attract hummingbirds and butterflies. Salvia elegans is a perennial in USDA zones 8-11 and is often used as an annual in other places. The crushed plant leaves smell like pineapple, hence comes the common name of the pineapple sage plant. The easy care of pineapple sage is one more reason to have it in the garden.
Is Pineapple Sage Edible?
The fragrance may lead one to wonder is pineapple sage edible? Indeed it is. Leaves of the pineapple sage plant may be steeped for teas and the minty-tasting blossoms can be used as an attractive garnish for salads and deserts. Leaves are best used fresh. Pineapple sage flowers may also be used in jelly and jam concoctions, potpourri, and other uses limited only by the imagination. Pineapple sage has long been used as a medicinal herb with antibacterial and antioxidant properties.
How to Grow Pineapple Sage
Pineapple sage prefers a sunny location with well-draining soil that is consistently moist, although established plants will tolerate drought conditions. Pineapple sage is a semi-woody sub shrub that can get as tall as 4 feet with red flowers that bloom in late summer to early fall. Pineapple sage grows rapidly in a location with morning sun and afternoon shade. Those in more Northern zones may plant in a protected location, mulch in winter and experience perennial performance from the pineapple sage plant.
The tubular shaped flowers of the pineapple sage plant are a favorite of hummingbirds, butterflies and bees. Include these in the butterfly garden or the herb garden or plant in other areas where fragrance is desired. Combine this plant in groupings, with other sages for a plethora of flying friends in the garden.

Is Pineapple Sage Edible?
The fragrance may lead one to wonder is pineapple sage edible? Indeed it is. Leaves of the pineapple sage plant may be steeped for teas and the minty-tasting blossoms can be used as an attractive garnish for salads and deserts. Leaves are best used fresh. Pineapple sage flowers may also be used in jelly and jam concoctions, potpourri, and other uses limited only by the imagination. Pineapple sage has long been used as a medicinal herb with antibacterial and antioxidant properties.

How to Grow Pineapple Sage
Pineapple sage prefers a sunny location with well-draining soil that is consistently moist, although established plants will tolerate drought conditions. Pineapple sage is a semi-woody sub shrub that can get as tall as 4 feet with red flowers that bloom in late summer to early fall. Pineapple sage grows rapidly in a location with morning sun and afternoon shade. Those in more Northern zones may plant in a protected location, mulch in winter and experience perennial performance from the pineapple sage plant.

The tubular shaped flowers of the pineapple sage plant are a favorite of hummingbirds, butterflies and bees. Include these in the butterfly garden or the herb garden or plant in other areas where fragrance is desired. Combine this plant in groupings, with other sages for a plethora of flying friends in the garden.
0
0
文章
Dummer. ゛☀
2017年08月26日

Tangerine sage plants (Salvia elegans) are hardy perennial herbs that grow in USDA plant hardiness zones 8 through 10. In cooler climates, the plant is grown as an annual. Highly ornamental and relatively speedy, growing tangerine sage couldn’t be easier, as long as you meet the plant’s basic growing conditions. Read on find out how to grow tangerine sage.
Tangerine Sage Plant Info
Tangerine sage, also known as pineapple sage, is a member of the mint family. This is a good time to mention that although not as wildly invasive as many of its mint cousins, tangerine sage can be somewhat aggressive in certain conditions. If this is a concern, tangerine sage is easily grown in a large container. This is a good-sized plant, topping off at 3 to 5 feet at maturity, with a 2- to 3-foot spread. Butterflies and hummingbirds are attracted to the red, trumpet-shaped flowers, which appear in late summer and autumn.
How to Grow Tangerine Sage
Plant tangerine sage in moderately rich, well-drained soil. Tangerine sage thrives in sunlight, but also tolerates partial shade. Allow plenty of space between plants, as crowding inhibits air circulation and may lead to disease. Water tangerine sage as needed to keep the soil moist after planting. Once the plants are established, they are relatively drought tolerant, but benefit from irrigation during dry weather. Feed tangerine sage plants with an all-purpose, time-release fertilizer at planting time, which should provide nutrients to last throughout the growing season. If you live in a warm climate, cut tangerine sage plants to the ground after blooming ends in autumn.
Is Tangerine Sage Edible?
Absolutely. In fact, this sage plant (as you may have guessed) has a delightful fruity, citrus-like aroma. It is frequently incorporated into herbal butter or fruit salads, or brewed into herbal tea, much like its minty cousins. Other uses for tangerine sage include dried flower arrangements, herbal wreaths and potpourri.

Tangerine Sage Plant Info
Tangerine sage, also known as pineapple sage, is a member of the mint family. This is a good time to mention that although not as wildly invasive as many of its mint cousins, tangerine sage can be somewhat aggressive in certain conditions. If this is a concern, tangerine sage is easily grown in a large container. This is a good-sized plant, topping off at 3 to 5 feet at maturity, with a 2- to 3-foot spread. Butterflies and hummingbirds are attracted to the red, trumpet-shaped flowers, which appear in late summer and autumn.

How to Grow Tangerine Sage
Plant tangerine sage in moderately rich, well-drained soil. Tangerine sage thrives in sunlight, but also tolerates partial shade. Allow plenty of space between plants, as crowding inhibits air circulation and may lead to disease. Water tangerine sage as needed to keep the soil moist after planting. Once the plants are established, they are relatively drought tolerant, but benefit from irrigation during dry weather. Feed tangerine sage plants with an all-purpose, time-release fertilizer at planting time, which should provide nutrients to last throughout the growing season. If you live in a warm climate, cut tangerine sage plants to the ground after blooming ends in autumn.

Is Tangerine Sage Edible?
Absolutely. In fact, this sage plant (as you may have guessed) has a delightful fruity, citrus-like aroma. It is frequently incorporated into herbal butter or fruit salads, or brewed into herbal tea, much like its minty cousins. Other uses for tangerine sage include dried flower arrangements, herbal wreaths and potpourri.
0
0
文章
Miss Chen
2017年08月26日

1. Luz
2. Viento
3. Humedad del aire
4. Sustratos
5. Riego de macetas
6. Abona para macetas
7. Limpiar las plantas
8. Aireado
9. Poda
10. Plagas y enfermedades
11. Cambio de maceta

1. Luz
• Según el sol que reciba la terraza por su orientación (Este, Oeste, Norte, etc.), deberás escoger plantas para sol o para sombra.
• Las plantas con flor, en general, necesitan más sol.
• Es bueno dar la vuelta regularmente a las macetas para que reciban la misma luz por todos lados, si no, te encontrarás con plantas torcidas y despobladas por una parte y con menos flores.
• No expongas nunca una que ha estado en sombra al sol directo de golpe y porrazo porque se pueden quemar las hojas; debes acostumbrarla progresivamente. Este es el caso, por ejemplo, de cuando se sacan a la terraza las plantas que han pasado el invierno en el interior.
• Los tiestos al sol se calientan mucho (más si es de color oscuro).
• Por debajo de los 0ºC los de barro se agrietan y pueden romperse. Los recipientes de barro sin cocer y la cerámica vidriada debes aislarlos con sacos de arpillera, plástico de burbujas, lonas, etc. para protegerlos de las heladas, o bien, situarlos en sitios protegidos. Las macetas de barro con grietas pequeñas se pueden arreglar rodeándolas con un alambre.

Falta de luz
¿Tus plantas florecen poco?
¿Tienen un crecimiento alargado?
¿Están poco frondosas y sin hojas por la parte de abajo?
Son síntomas de falta de luz.
2. Viento
Los vientos fríos del norte.
Los vientos cálidos que secan las plantas.
El viento costero que transporta sales que se depositan sobre las hojas y las queman. Protege las plantas de todo esto.
En condiciones difíciles de viento fuerte, elige especies duras.
3. Humedad del aire
Pulveriza con agua las hojas en tiempo seco sin mojar las flores, puesto que durarían menos.
Otros métodos para aumentar la humedad ambiental son:
Agrupándolas para crear un microclima húmedo.
Poniendo las macetas sobre un plato con piedras y agua pero sin que toque dicha agua el fondo del tiesto.
4. Sustratos
• Compra sustratos de calidad para macetas. Los hay muy bueno y muy malos.
• No emplees tierra de jardín porque contiene mucha arcilla, se compacta, lleva hongos, malas hierbas...
• Es muy recomendable mezclar perlita con el sustrato que compres. Proporcionará aireación y más retención del agua. Otro material bueno para mezclar en sustratos es la fibra de coco. Un ejemplo sería: turba + fibra + perlita, los tres a partes iguales.
• Si no encuentras ni perlita ni fibra de coco, usa para airear el sustrato arena de río gruesa y lavada o corcho blanco picado.
Cualquiera de estos cuatro materiales (perlita, fibra de coco, arena o corcho) proporciona aireación y además ahorrarás dinero puesto que son más baratos que la turba o el mantillo para hacer volumen.
• No te olvides de depositar en el fondo de la maceta o jardinera, sobre los agujeros, grava, arcilla expandida, trozos de cerámica, etc.. Y si tienes macetas en la ventana, pon una capa de gravilla sobre la tierra para que la lluvia no salpique de tierra los cristales.
5. Riego de macetas
• Error frecuentísimo en el cultivo de plantas en maceta es el exceso de riego que pudre las raíces. La falta de agua también es fatal, aunque siempre es mejor quedarse corto que pasarse.
• Si se te muere alguna, fíjate en primer lugar en cómo estás regando y comprueba si el recipiente tiene obstruido el orificio en la parte inferior por donde sale el agua sobrante.
• Para saber cuándo regar, el mejor método es introducir los dedos en el sustrato y verificar si está húmedo o seco. Otros métodos son:
Coge el mango de un cuchillo y golpea la maceta. Si se produce un ruido nítido o claro significa que la planta necesita agua. El sonido sordo indica que está llena. Pruébalo en una maceta antes y después de regar, verás como suena distinto.
Con práctica puedes notar al coger el tiesto en peso si tiene más agua o menos.
Medidores de humedad que se pinchan. También orienta.
• Es bueno que entre riego y riego se seque un poco la tierra. No es lo mismo una tierra húmeda que empapada.
• Más riego si está al sol y más también si le da el viento secante. Con viento caliente en verano, riega prácticamente a diario las macetas y jardineras.
• Si tienes macetas de barro, recuerda que las paredes son porosas y pierden agua por ahí. Necesitará más riego que una de plástico o esmaltada.
• Riega por la mañana temprano o al atardecer, no con el sol en todo lo alto.
• Si puedes, instala en la terraza un sistema de riego por goteo automatizado. En verano, cuando se riega casi a diario, te darás cuenta de lo cómodo que resulta.
• También existen jardineras de autorriego con un depósito que suministra el agua según vaya necesitándolo.
• En la temporada que las plantas dejen de echar flores, reduce la frecuencia de riego para no saturarlas, ya que precisan menos cantidad.
• Para intentar recuperar una planta excesivamente regada, saca con cuidado el cepellón del tiesto y envuélvelo en varias capas de papel de cocina absorbente. Déjalo todo así durante 24 horas. Si se empapan las hojas, ponle otras nuevas. Vuelve después a meter la planta en la maceta y no la riegues durante varios días.
• Es fundamental que drenen bien los orificios inferiores. Cúbrelos por dentro con trozos de cerámica de tiestos rotos mejor que grava y no se taponarán.
• Si pones un plato debajo de la maceta para que recoja el agua sobrante del riego o un cubremacetas, vacíalo al poco rato (por ejemplo, 30 minutos) ya que el agua estancada puede pudrir las raíces de la planta.
Consejos para ahorrar agua
1. Usa especies resistentes a la sequía (hay que regarlas menos).
2. Cubre la superficie del sustrato con cortezas de pino de grano fino, chinos, grava, bolitas de arcilla expandida, etc.; esto protegerá la humedad del sustrato.
3. Sombrea las especies más sensibles al calor.
4. Agrupa las plantas para crear un microclima húmedo.
5. El riego por la madrugada o al atardecer es lo mejor. Se pierde menos por evaporación y la planta la toma mejor.
2. Viento
3. Humedad del aire
4. Sustratos
5. Riego de macetas
6. Abona para macetas
7. Limpiar las plantas
8. Aireado
9. Poda
10. Plagas y enfermedades
11. Cambio de maceta

1. Luz
• Según el sol que reciba la terraza por su orientación (Este, Oeste, Norte, etc.), deberás escoger plantas para sol o para sombra.
• Las plantas con flor, en general, necesitan más sol.
• Es bueno dar la vuelta regularmente a las macetas para que reciban la misma luz por todos lados, si no, te encontrarás con plantas torcidas y despobladas por una parte y con menos flores.
• No expongas nunca una que ha estado en sombra al sol directo de golpe y porrazo porque se pueden quemar las hojas; debes acostumbrarla progresivamente. Este es el caso, por ejemplo, de cuando se sacan a la terraza las plantas que han pasado el invierno en el interior.
• Los tiestos al sol se calientan mucho (más si es de color oscuro).
• Por debajo de los 0ºC los de barro se agrietan y pueden romperse. Los recipientes de barro sin cocer y la cerámica vidriada debes aislarlos con sacos de arpillera, plástico de burbujas, lonas, etc. para protegerlos de las heladas, o bien, situarlos en sitios protegidos. Las macetas de barro con grietas pequeñas se pueden arreglar rodeándolas con un alambre.

Falta de luz
¿Tus plantas florecen poco?
¿Tienen un crecimiento alargado?
¿Están poco frondosas y sin hojas por la parte de abajo?
Son síntomas de falta de luz.
2. Viento
Los vientos fríos del norte.
Los vientos cálidos que secan las plantas.
El viento costero que transporta sales que se depositan sobre las hojas y las queman. Protege las plantas de todo esto.
En condiciones difíciles de viento fuerte, elige especies duras.
3. Humedad del aire
Pulveriza con agua las hojas en tiempo seco sin mojar las flores, puesto que durarían menos.
Otros métodos para aumentar la humedad ambiental son:
Agrupándolas para crear un microclima húmedo.
Poniendo las macetas sobre un plato con piedras y agua pero sin que toque dicha agua el fondo del tiesto.
4. Sustratos
• Compra sustratos de calidad para macetas. Los hay muy bueno y muy malos.
• No emplees tierra de jardín porque contiene mucha arcilla, se compacta, lleva hongos, malas hierbas...
• Es muy recomendable mezclar perlita con el sustrato que compres. Proporcionará aireación y más retención del agua. Otro material bueno para mezclar en sustratos es la fibra de coco. Un ejemplo sería: turba + fibra + perlita, los tres a partes iguales.
• Si no encuentras ni perlita ni fibra de coco, usa para airear el sustrato arena de río gruesa y lavada o corcho blanco picado.
Cualquiera de estos cuatro materiales (perlita, fibra de coco, arena o corcho) proporciona aireación y además ahorrarás dinero puesto que son más baratos que la turba o el mantillo para hacer volumen.
• No te olvides de depositar en el fondo de la maceta o jardinera, sobre los agujeros, grava, arcilla expandida, trozos de cerámica, etc.. Y si tienes macetas en la ventana, pon una capa de gravilla sobre la tierra para que la lluvia no salpique de tierra los cristales.
5. Riego de macetas
• Error frecuentísimo en el cultivo de plantas en maceta es el exceso de riego que pudre las raíces. La falta de agua también es fatal, aunque siempre es mejor quedarse corto que pasarse.
• Si se te muere alguna, fíjate en primer lugar en cómo estás regando y comprueba si el recipiente tiene obstruido el orificio en la parte inferior por donde sale el agua sobrante.
• Para saber cuándo regar, el mejor método es introducir los dedos en el sustrato y verificar si está húmedo o seco. Otros métodos son:
Coge el mango de un cuchillo y golpea la maceta. Si se produce un ruido nítido o claro significa que la planta necesita agua. El sonido sordo indica que está llena. Pruébalo en una maceta antes y después de regar, verás como suena distinto.
Con práctica puedes notar al coger el tiesto en peso si tiene más agua o menos.
Medidores de humedad que se pinchan. También orienta.
• Es bueno que entre riego y riego se seque un poco la tierra. No es lo mismo una tierra húmeda que empapada.
• Más riego si está al sol y más también si le da el viento secante. Con viento caliente en verano, riega prácticamente a diario las macetas y jardineras.
• Si tienes macetas de barro, recuerda que las paredes son porosas y pierden agua por ahí. Necesitará más riego que una de plástico o esmaltada.
• Riega por la mañana temprano o al atardecer, no con el sol en todo lo alto.
• Si puedes, instala en la terraza un sistema de riego por goteo automatizado. En verano, cuando se riega casi a diario, te darás cuenta de lo cómodo que resulta.
• También existen jardineras de autorriego con un depósito que suministra el agua según vaya necesitándolo.
• En la temporada que las plantas dejen de echar flores, reduce la frecuencia de riego para no saturarlas, ya que precisan menos cantidad.
• Para intentar recuperar una planta excesivamente regada, saca con cuidado el cepellón del tiesto y envuélvelo en varias capas de papel de cocina absorbente. Déjalo todo así durante 24 horas. Si se empapan las hojas, ponle otras nuevas. Vuelve después a meter la planta en la maceta y no la riegues durante varios días.
• Es fundamental que drenen bien los orificios inferiores. Cúbrelos por dentro con trozos de cerámica de tiestos rotos mejor que grava y no se taponarán.
• Si pones un plato debajo de la maceta para que recoja el agua sobrante del riego o un cubremacetas, vacíalo al poco rato (por ejemplo, 30 minutos) ya que el agua estancada puede pudrir las raíces de la planta.
Consejos para ahorrar agua
1. Usa especies resistentes a la sequía (hay que regarlas menos).
2. Cubre la superficie del sustrato con cortezas de pino de grano fino, chinos, grava, bolitas de arcilla expandida, etc.; esto protegerá la humedad del sustrato.
3. Sombrea las especies más sensibles al calor.
4. Agrupa las plantas para crear un microclima húmedo.
5. El riego por la madrugada o al atardecer es lo mejor. Se pierde menos por evaporación y la planta la toma mejor.
1
1
666
2017年08月25日

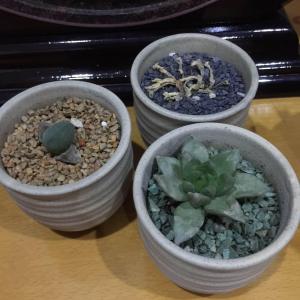
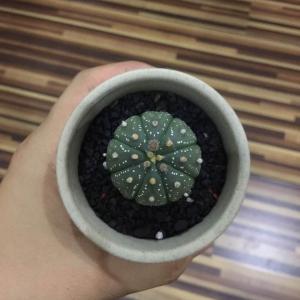
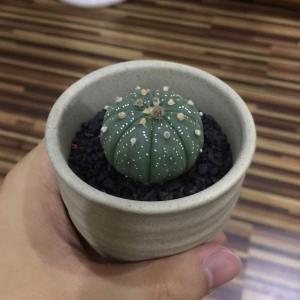
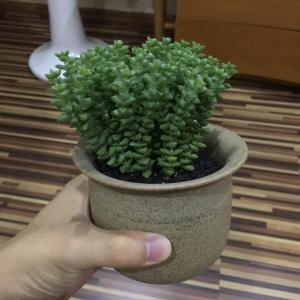
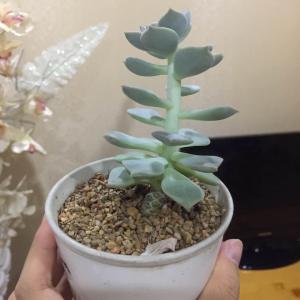
2017年8月20日 自16年7月 第一批幸存 ①星球 ②小米星 (①②长势最好) ③静夜 ④奥普琳娜(③④长高抽条 都快认不出了) ⑤帝玉 (⑤本来好好的都分瓣了 不知道怎么回事 抢救中)
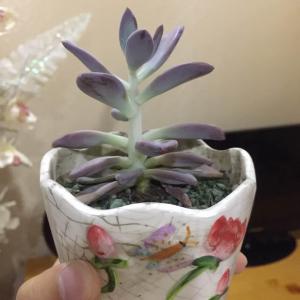
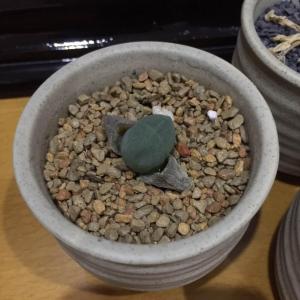


0
0
文章
Dummer. ゛☀
2017年08月24日

Given the right conditions, rosemary plants thrive, eventually reaching heights of 6 to 8 feet. They grow out as well as up, sending out stems that seem determined to explore their surroundings and invade the space of adjacent plants. If your rosemary plant has grown out of control, it’s time to take drastic action. Rejuvenation pruning of rosemary may be needed.
Can You Hard Prune Rosemary?
Gardeners are sometimes hesitant to make drastic cuts on rosemary shrubs because a few herbs with similar, woody stems don’t recover if you make severe cuts. A mature rosemary plant, however, tolerates this drastic pruning, even into the woody parts of the stem.
You can do light pruning and harvesting any time of year, but a rosemary plant responds best to hard pruning in winter when it isn’t actively growing. When pruned in winter, the plant grows back in spring looking better than ever. Read on to find out how to rejuvenate a rosemary shrub. Note: For most people who grow rosemary, the plant will go through a cold period. It isn’t a good idea to prune any herb, rosemary or otherwise, shortly before or during cold because it will cause the plant to grow new shoots, which are very vulnerable to cold damage. In warmer areas where rosemary is more apt to grow to the size in which rejuvenation pruning is needed, the plant is not experiencing the same killing cold, so winter pruning while it’s in dormancy is best. That being said, for those of us NOT living in such areas, stick to spring pruning after the threat of frost has passed.
Rejuvenating Rosemary Plants
The first step in rejuvenating rosemary plants is to determine the size at which you want to maintain the plant. Cut the shrub back to about half of the desired size, and by the end of spring it will fill the allotted space. You can maintain the size of the shrub through summer with light pruning and harvesting. Cutting through the thick, woody parts of the stem on a mature rosemary shrub may be too much for your hand pruners. If you find the stems hard to cut, use loppers with long handles. The length of the handles gives you more leverage and you’ll be able to make the cuts easily. When tender new shoots replace the old growth, you’ll be able to make cuts easily with hand pruners. Don’t toss the prunings on the compost pile! Save the best tips to start new plants, and strip the needles off the remaining stems for drying. The tough stems make excellent kabob skewers.

Can You Hard Prune Rosemary?
Gardeners are sometimes hesitant to make drastic cuts on rosemary shrubs because a few herbs with similar, woody stems don’t recover if you make severe cuts. A mature rosemary plant, however, tolerates this drastic pruning, even into the woody parts of the stem.
You can do light pruning and harvesting any time of year, but a rosemary plant responds best to hard pruning in winter when it isn’t actively growing. When pruned in winter, the plant grows back in spring looking better than ever. Read on to find out how to rejuvenate a rosemary shrub. Note: For most people who grow rosemary, the plant will go through a cold period. It isn’t a good idea to prune any herb, rosemary or otherwise, shortly before or during cold because it will cause the plant to grow new shoots, which are very vulnerable to cold damage. In warmer areas where rosemary is more apt to grow to the size in which rejuvenation pruning is needed, the plant is not experiencing the same killing cold, so winter pruning while it’s in dormancy is best. That being said, for those of us NOT living in such areas, stick to spring pruning after the threat of frost has passed.

Rejuvenating Rosemary Plants
The first step in rejuvenating rosemary plants is to determine the size at which you want to maintain the plant. Cut the shrub back to about half of the desired size, and by the end of spring it will fill the allotted space. You can maintain the size of the shrub through summer with light pruning and harvesting. Cutting through the thick, woody parts of the stem on a mature rosemary shrub may be too much for your hand pruners. If you find the stems hard to cut, use loppers with long handles. The length of the handles gives you more leverage and you’ll be able to make the cuts easily. When tender new shoots replace the old growth, you’ll be able to make cuts easily with hand pruners. Don’t toss the prunings on the compost pile! Save the best tips to start new plants, and strip the needles off the remaining stems for drying. The tough stems make excellent kabob skewers.

0
0
文章
Dummer. ゛☀
2017年08月24日

A pungent perennial, horseradish (Armoracia rusticana) is a member of the Cruciferae family (Brassicaceae). A very hardy plant, horseradish flourishes in USDA zones 4-8. It is used primarily for its roots, which are grated and used as a condiment. Like its cousins, broccoli and radish, the horseradish plant has flowers; the question is, are horseradish flowers edible? If not, should you cut horseradish flowers?
Are Horseradish Flowers Edible?
As mentioned, horseradish is grown primarily for its peppery root. A cold hardy crop, horseradish thrives in either sun or partial shade and is propagated from root cuttings. Horseradish establishes rapidly and even after harvesting the roots, will more than likely pop up in the garden whether you want it to or not. For this reason, many people plant horseradish in pots to retard the possibility of spreading.
If you plant horseradish in the garden, choose a sunny to partially sunny site and allow 18-20 inches between plantings. Plant the root cuttings as soon as the ground is thawed enough to dig in the spring. Plant the cuttings twice as deep as the piece of root since the plants develop a very long taproot. This, of course, is why they plants tend to return and can become invasive. Although you are digging up the root to harvest, it’s very difficult to get every bit. The remaining root pieces easily propagate and, voila, you have horseradish growing again.
As the plants grow, you can pick young leaves to add to salads for a peppery kick. The older leaves, while edible, are tough and unpalatable. So how about flowers on horseradish? On some crops, the flowers are pinched or cut back to encourage leafy growth, especially on herbaceous plants. On other plants, flowers are encouraged because the end goal is for fruit. Horseradish falls into neither of these categories. While you may see a horseradish plant flowering, the blooms are neither here nor there. As the plant grows, small leaves become large, up to 2 feet long, and coarse, and a flower stalk pokes out from atop the plant. From the stalks, small, insignificant, white flowers are borne. In the summer, you may or may not see the horseradish plant flowering. Flowers on horseradish are not of any great importance since they produce little, if any, viable seed. Some years the plant may not bloom at all. In either case, while the aromatic young leaves are used in cooking, the flowers are not.
Because the plant is being grown for its root, there is no need to cut horseradish flowers, unless, of course, you wish to use them for indoor flower arrangements – although the flowers are not showy. If your horseradish plant has flowers, it may even be of some benefit to leave the blossoms alone. They may attract pollinators to the rest of the vegetable garden, which is certainly not a bad thing.

Are Horseradish Flowers Edible?
As mentioned, horseradish is grown primarily for its peppery root. A cold hardy crop, horseradish thrives in either sun or partial shade and is propagated from root cuttings. Horseradish establishes rapidly and even after harvesting the roots, will more than likely pop up in the garden whether you want it to or not. For this reason, many people plant horseradish in pots to retard the possibility of spreading.
If you plant horseradish in the garden, choose a sunny to partially sunny site and allow 18-20 inches between plantings. Plant the root cuttings as soon as the ground is thawed enough to dig in the spring. Plant the cuttings twice as deep as the piece of root since the plants develop a very long taproot. This, of course, is why they plants tend to return and can become invasive. Although you are digging up the root to harvest, it’s very difficult to get every bit. The remaining root pieces easily propagate and, voila, you have horseradish growing again.

As the plants grow, you can pick young leaves to add to salads for a peppery kick. The older leaves, while edible, are tough and unpalatable. So how about flowers on horseradish? On some crops, the flowers are pinched or cut back to encourage leafy growth, especially on herbaceous plants. On other plants, flowers are encouraged because the end goal is for fruit. Horseradish falls into neither of these categories. While you may see a horseradish plant flowering, the blooms are neither here nor there. As the plant grows, small leaves become large, up to 2 feet long, and coarse, and a flower stalk pokes out from atop the plant. From the stalks, small, insignificant, white flowers are borne. In the summer, you may or may not see the horseradish plant flowering. Flowers on horseradish are not of any great importance since they produce little, if any, viable seed. Some years the plant may not bloom at all. In either case, while the aromatic young leaves are used in cooking, the flowers are not.

Because the plant is being grown for its root, there is no need to cut horseradish flowers, unless, of course, you wish to use them for indoor flower arrangements – although the flowers are not showy. If your horseradish plant has flowers, it may even be of some benefit to leave the blossoms alone. They may attract pollinators to the rest of the vegetable garden, which is certainly not a bad thing.
0
0
文章
玲儿
2017年08月23日

ネメシアの育て方・栽培方法
育て方のポイント
栽培環境・日当たり・置き場
鉢植えは、1年を通して戸外に置きましょう。9月から6月は日なた、7月から8月は風通しのよい半日陰、1月から2月は北風を避けられる南向きの軒下などの、暖かい場所に置きましょう。夏は雨に当てないほうが、夏越ししやすくなります。
庭植えでは、日当たりがよく水はけのよい場所に植えましょう。レイズドベッドやロックガーデンにも適します。
水やり
鉢植えには、1年を通じて土の表面が乾いたら、たっぷり水を与えましょう。庭植えの場合は、雨がまったくかからない場所以外は、特に水を与える必要はありません。
肥料
鉢植えでは、9月から10月と3月から6月の間に、薄めの液体肥料を2週間に1回施します。濃い肥料を施すと、根が傷むので注意します。
庭植えでは、植えつけ時に緩効性化成肥料を元肥として施せば、追肥の必要はありません。夏越しさせた株には、9月から10月に緩効性化成肥料を追肥しましょう。

病気と害虫
病気:灰色かび病、ウイルス病など
灰褐色のかびで覆われる灰色かび病の発生は、10月から11月、3月から7月に見られます。特に長雨時や、株が茂って風通しが悪いと多発します。放置した花がらが発生源になるので、こまめに取り除きましょう。
風通しをよくすれば灰色かび病は改善しますが、改善が見られず、葉や茎が黒く枯れる症状はウイルスが原因である可能性があります。周囲の植物にも伝染する危険性が高いので、見つけしだい、株を抜き取って廃棄しましょう。ハサミなどの器具で伝染したり、スリップスやアブラムシなどの害虫が媒介するので注意します。
害虫:アブラムシなど
3月から11月にアブラムシが発生することがあります。

用土(鉢植え)
水はけのよい土(赤玉土中粒5、腐葉土3、酸度調整済みピートモス2の配合土など)に、有機石灰を1~3g/1リットル加えた土を好みます。リン酸分に富んだ緩効性化成肥料を適量混合して、使用します。
植えつけ、 植え替え
植えつけ、植え替えともに、春と秋が適期です。植え替えは、年1回行いましょう。根鉢を軽くくずし、一回り大きな鉢に植えつけます。庭植えの場合は、秋に掘り上げて元肥を施し、軽く耕してから再度植え直しましょう。

ふやし方
タネまき:タネまきの適期は10月です。タネは高温では発芽しにくいので、涼しくなってからまきましょう。覆土は、タネが見える程度にごく薄くかけます。
さし木:さし木の適期は3月から6月、9月から10月です。葉をつけて2~3節に切った茎を、肥料分の少ない清潔な用土にさします。3週間程度で、移植できる株に育ちます。

主な作業
花がら摘み:10月から6月の開花期間中、咲き終わった花はすぐに散って株の上に散乱するので、こまめに取り除きましょう。そのままにしておくと、灰色かび病が発生して健全な葉や茎も枯れてしまいます。
切り戻し:9月から6月、花が咲き終わってきたら、草丈の半分程度の長さに切り戻します。切り戻すことで、新芽の発生が促されます。切る際は、ウイルスの感染を予防するために、熱湯や塩素で消毒したハサミを使うか、清潔な手で折り取るとよいでしょう。
育て方のポイント
栽培環境・日当たり・置き場
鉢植えは、1年を通して戸外に置きましょう。9月から6月は日なた、7月から8月は風通しのよい半日陰、1月から2月は北風を避けられる南向きの軒下などの、暖かい場所に置きましょう。夏は雨に当てないほうが、夏越ししやすくなります。
庭植えでは、日当たりがよく水はけのよい場所に植えましょう。レイズドベッドやロックガーデンにも適します。
水やり
鉢植えには、1年を通じて土の表面が乾いたら、たっぷり水を与えましょう。庭植えの場合は、雨がまったくかからない場所以外は、特に水を与える必要はありません。
肥料
鉢植えでは、9月から10月と3月から6月の間に、薄めの液体肥料を2週間に1回施します。濃い肥料を施すと、根が傷むので注意します。
庭植えでは、植えつけ時に緩効性化成肥料を元肥として施せば、追肥の必要はありません。夏越しさせた株には、9月から10月に緩効性化成肥料を追肥しましょう。

病気と害虫
病気:灰色かび病、ウイルス病など
灰褐色のかびで覆われる灰色かび病の発生は、10月から11月、3月から7月に見られます。特に長雨時や、株が茂って風通しが悪いと多発します。放置した花がらが発生源になるので、こまめに取り除きましょう。
風通しをよくすれば灰色かび病は改善しますが、改善が見られず、葉や茎が黒く枯れる症状はウイルスが原因である可能性があります。周囲の植物にも伝染する危険性が高いので、見つけしだい、株を抜き取って廃棄しましょう。ハサミなどの器具で伝染したり、スリップスやアブラムシなどの害虫が媒介するので注意します。
害虫:アブラムシなど
3月から11月にアブラムシが発生することがあります。

用土(鉢植え)
水はけのよい土(赤玉土中粒5、腐葉土3、酸度調整済みピートモス2の配合土など)に、有機石灰を1~3g/1リットル加えた土を好みます。リン酸分に富んだ緩効性化成肥料を適量混合して、使用します。
植えつけ、 植え替え
植えつけ、植え替えともに、春と秋が適期です。植え替えは、年1回行いましょう。根鉢を軽くくずし、一回り大きな鉢に植えつけます。庭植えの場合は、秋に掘り上げて元肥を施し、軽く耕してから再度植え直しましょう。

ふやし方
タネまき:タネまきの適期は10月です。タネは高温では発芽しにくいので、涼しくなってからまきましょう。覆土は、タネが見える程度にごく薄くかけます。
さし木:さし木の適期は3月から6月、9月から10月です。葉をつけて2~3節に切った茎を、肥料分の少ない清潔な用土にさします。3週間程度で、移植できる株に育ちます。

主な作業
花がら摘み:10月から6月の開花期間中、咲き終わった花はすぐに散って株の上に散乱するので、こまめに取り除きましょう。そのままにしておくと、灰色かび病が発生して健全な葉や茎も枯れてしまいます。
切り戻し:9月から6月、花が咲き終わってきたら、草丈の半分程度の長さに切り戻します。切り戻すことで、新芽の発生が促されます。切る際は、ウイルスの感染を予防するために、熱湯や塩素で消毒したハサミを使うか、清潔な手で折り取るとよいでしょう。
0
0


