成长记
Rosalinda Sardo Infirri
2018年10月04日

I now added "10" in my "garden"


1
0
Francesco Cellarosi:Looks like dragonfruit
成长记
kensong
2018年10月02日

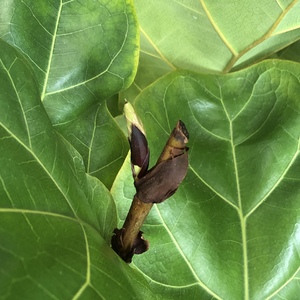
I have 5 branches of Ficus Lyrata and 4 of them have been sprouting new leaves regularly except for one. The four have grown about 10-12 inches taller than the one that never sprouted. So I decided to cut it above a node and guess what!??? I see a new shoot from the side. This one has lots of catching up to do.


0
0
文章
Miss Chen
2018年09月10日

Named for their large, broad leaves, elephant ears (Colocasia spp.) are moisture loving plants that can grow in up to 6 inches of standing water. Colocasia esculenta, which is hardy in U.S. Department of Agriculture plant hardiness zones 8 through 10, is a commonly grown variety of elephant ears. Also called taro, this elephant ears variety usually grows 3 to 6 feet tall and wide, and features boldly veined leaves up to 2 feet long. Uncooked elephant ears are poisonous, and the plants are invasive in some areas of the United States.

Transplanting Time
The best time for transplanting elephant ears is when new growth appears in spring. Elephant ears sprout from tubers in spring and quickly grow into large, spreading clumps. In frost-free areas elephant ears can be transplanted any time of year, but transplanting when the plants are small is easiest.
In areas of the United States that experience frosts, elephant ears must be transplanted after the final local average frost date. If late frosts threaten after the plants have been transplanted, cover elephant ears with old sheets or several layers of newspaper overnight.
Growing Spot
A sheltered, partially shaded spot with organically rich, medium moisture or wet soil provides the best growing conditions for transplanted elephant ears. These plants also need protection from strong winds. In a wet site, such as the edge of a pond, elephant ears tolerate up to eight hours of direct sunlight, but the plants grow best in filtered sun or shade during the hottest part of the day.
Improve the soil for elephant ears by mixing in organic matter before transplanting. Spread a 4-inch layer of garden compost or aged manure over the growing spot and mix it 12 inches deep into the soil with a garden fork.
Planting Hole
Elephant ears can establish quickly in wide planting holes. These vigorous plants can grow up to 8 feet tall in one growing season in ideal conditions and produce tubers that weigh 1 to 2 pounds.
Dig a hole as deep as an elephant ear's root ball and twice as wide. Remove the plant from its container and place it in the center of the hole. The plant should sit at its original growing depth. Holding the elephant ears plant upright with one hand, scoop the dug soil into the hole with the other hand until you fill the hole. Gently press the soil around the plant with the flats of your hands to firm the plant in the hole.

Watering Elephant Ears
Regular watering is essential for newly transplanted elephant ears. Spray water over the growing spot using a garden hose fitted with a soft spray attachment. When the water puddles, stop watering and wait an hour. Test the soil moisture level by pushing your fingers into it. If the soil is moist but not wet, water the plants again.
Don't allow the soil around elephant ears to dry out. Water elephant ears when the soil surface begins to dry or more frequently.

Transplanting Time
The best time for transplanting elephant ears is when new growth appears in spring. Elephant ears sprout from tubers in spring and quickly grow into large, spreading clumps. In frost-free areas elephant ears can be transplanted any time of year, but transplanting when the plants are small is easiest.
In areas of the United States that experience frosts, elephant ears must be transplanted after the final local average frost date. If late frosts threaten after the plants have been transplanted, cover elephant ears with old sheets or several layers of newspaper overnight.
Growing Spot
A sheltered, partially shaded spot with organically rich, medium moisture or wet soil provides the best growing conditions for transplanted elephant ears. These plants also need protection from strong winds. In a wet site, such as the edge of a pond, elephant ears tolerate up to eight hours of direct sunlight, but the plants grow best in filtered sun or shade during the hottest part of the day.
Improve the soil for elephant ears by mixing in organic matter before transplanting. Spread a 4-inch layer of garden compost or aged manure over the growing spot and mix it 12 inches deep into the soil with a garden fork.
Planting Hole
Elephant ears can establish quickly in wide planting holes. These vigorous plants can grow up to 8 feet tall in one growing season in ideal conditions and produce tubers that weigh 1 to 2 pounds.
Dig a hole as deep as an elephant ear's root ball and twice as wide. Remove the plant from its container and place it in the center of the hole. The plant should sit at its original growing depth. Holding the elephant ears plant upright with one hand, scoop the dug soil into the hole with the other hand until you fill the hole. Gently press the soil around the plant with the flats of your hands to firm the plant in the hole.

Watering Elephant Ears
Regular watering is essential for newly transplanted elephant ears. Spray water over the growing spot using a garden hose fitted with a soft spray attachment. When the water puddles, stop watering and wait an hour. Test the soil moisture level by pushing your fingers into it. If the soil is moist but not wet, water the plants again.
Don't allow the soil around elephant ears to dry out. Water elephant ears when the soil surface begins to dry or more frequently.
1
1


