文章
Miss Chen
2017年08月26日

Un suelo cultivado reiteradamente aumenta las poblaciones de hongos que viven en el suelo, deNematodos (gusanitos microscópicos que parasitan raíces), de malas hierbas... Por tanto, cada 3 ó 4 años, se recomienda desinfectarlo.

Para desinfectar los suelos hay productos químicos, pero existe un método ecológico de desinfección llamado SOLARIZACIÓN que ofrece una gran eficacia. Está admitido en Agricultura Ecológica.
Con este método, podrás desinfectar el suelo antes de sembrar o plantar en la parcela. Su efecto es sobre:
Hongos del suelo: mata a hongos como Fusarium, Verticillium, Rhizoctonia, Pythium... que parasitan las raíces.
Nematodos: son unos gusanitos microscópicos que se alimentan de las raíces de las plantas.Meloidogyne spp. es uno de los Nematodos más frecuentes y hay datos contradictorios en cuanto a la eficacia de este método en su control.
Gusanos y otros insectos que viven en el suelo alimentándose de las raíces.
Muchas hierbas anuales (deja inservibles las semillas), aunque no controla bien malas hierbas perennes: Cyperus, Cynodon, Portulaca...
Bacterias: acaba con bacterias perjudiciales y aumenta la población de otras beneficiosas.
La solarización conlleva una elevación del rendimiento del cultivo posterior, más crecimiento, vigor, más altura, más producción de flores y frutos... Hay un aumento temporal de más nutrientes minerales disueltos y materia orgánica soluble.

¿Cómo se desinfecta un suelo mediante solarización?
• Hay que realizarlo en verano, cuando hace más calor.
• El terreno desnudo se labra con un motocultor y se retiran los restos vegetales y las piedras gruesas que salgan.
• A continuación se le da un riego muy abundante que cale bien, que moje a una profundidad de 40 centímetros.
• Se cubre el suelo con un plástico transparente fino (polietileno entre 100 y 200 galgas de espesor).
• La lámina debe quedar tensa y con los bordes perfectamente enterrados para que no se escape el calor.
• En general, se considera necesario dejarlo así, de 4 a 6 semanas como mínimo. Si no está haciendo mucho calor, deja más tiempo.
• Se puede aplicar al aire libre y también en el interior de un invernadero.
• Las plagas y enfermedades disminuirán en el cultivo siguiente.
• Quizás a los 3 ó 4 años haya que repetirlo.
• Es un método eficaz, sencillo y no contaminante. No es de desinfección tan fuerte como las fumigaciones químicas, pero es una alternativa buena y ecológica.
Limitaciones
• Aplicable a regiones que tengan una elevada irradiación solar y altas temperaturas veraniegas.
• Durante el tratamiento, el suelo debe estar libre de cultivo, como mínimo durante 1 mes en verano.
• No es un método de desinfección total 100%.
• También hay productos químicos para desinfección de suelos aptos para el horticultor aficionado.
• Por supuesto, la prevención rotando cultivos es una medida necesaria para que no degenere la tierra.

Para desinfectar los suelos hay productos químicos, pero existe un método ecológico de desinfección llamado SOLARIZACIÓN que ofrece una gran eficacia. Está admitido en Agricultura Ecológica.
Con este método, podrás desinfectar el suelo antes de sembrar o plantar en la parcela. Su efecto es sobre:
Hongos del suelo: mata a hongos como Fusarium, Verticillium, Rhizoctonia, Pythium... que parasitan las raíces.
Nematodos: son unos gusanitos microscópicos que se alimentan de las raíces de las plantas.Meloidogyne spp. es uno de los Nematodos más frecuentes y hay datos contradictorios en cuanto a la eficacia de este método en su control.
Gusanos y otros insectos que viven en el suelo alimentándose de las raíces.
Muchas hierbas anuales (deja inservibles las semillas), aunque no controla bien malas hierbas perennes: Cyperus, Cynodon, Portulaca...
Bacterias: acaba con bacterias perjudiciales y aumenta la población de otras beneficiosas.
La solarización conlleva una elevación del rendimiento del cultivo posterior, más crecimiento, vigor, más altura, más producción de flores y frutos... Hay un aumento temporal de más nutrientes minerales disueltos y materia orgánica soluble.

¿Cómo se desinfecta un suelo mediante solarización?
• Hay que realizarlo en verano, cuando hace más calor.
• El terreno desnudo se labra con un motocultor y se retiran los restos vegetales y las piedras gruesas que salgan.
• A continuación se le da un riego muy abundante que cale bien, que moje a una profundidad de 40 centímetros.
• Se cubre el suelo con un plástico transparente fino (polietileno entre 100 y 200 galgas de espesor).
• La lámina debe quedar tensa y con los bordes perfectamente enterrados para que no se escape el calor.
• En general, se considera necesario dejarlo así, de 4 a 6 semanas como mínimo. Si no está haciendo mucho calor, deja más tiempo.
• Se puede aplicar al aire libre y también en el interior de un invernadero.
• Las plagas y enfermedades disminuirán en el cultivo siguiente.
• Quizás a los 3 ó 4 años haya que repetirlo.
• Es un método eficaz, sencillo y no contaminante. No es de desinfección tan fuerte como las fumigaciones químicas, pero es una alternativa buena y ecológica.
Limitaciones
• Aplicable a regiones que tengan una elevada irradiación solar y altas temperaturas veraniegas.
• Durante el tratamiento, el suelo debe estar libre de cultivo, como mínimo durante 1 mes en verano.
• No es un método de desinfección total 100%.
• También hay productos químicos para desinfección de suelos aptos para el horticultor aficionado.
• Por supuesto, la prevención rotando cultivos es una medida necesaria para que no degenere la tierra.
0
0
文章
Miss Chen
2017年08月26日

1. Luz
2. Viento
3. Humedad del aire
4. Sustratos
5. Riego de macetas
6. Abona para macetas
7. Limpiar las plantas
8. Aireado
9. Poda
10. Plagas y enfermedades
11. Cambio de maceta

1. Luz
• Según el sol que reciba la terraza por su orientación (Este, Oeste, Norte, etc.), deberás escoger plantas para sol o para sombra.
• Las plantas con flor, en general, necesitan más sol.
• Es bueno dar la vuelta regularmente a las macetas para que reciban la misma luz por todos lados, si no, te encontrarás con plantas torcidas y despobladas por una parte y con menos flores.
• No expongas nunca una que ha estado en sombra al sol directo de golpe y porrazo porque se pueden quemar las hojas; debes acostumbrarla progresivamente. Este es el caso, por ejemplo, de cuando se sacan a la terraza las plantas que han pasado el invierno en el interior.
• Los tiestos al sol se calientan mucho (más si es de color oscuro).
• Por debajo de los 0ºC los de barro se agrietan y pueden romperse. Los recipientes de barro sin cocer y la cerámica vidriada debes aislarlos con sacos de arpillera, plástico de burbujas, lonas, etc. para protegerlos de las heladas, o bien, situarlos en sitios protegidos. Las macetas de barro con grietas pequeñas se pueden arreglar rodeándolas con un alambre.

Falta de luz
¿Tus plantas florecen poco?
¿Tienen un crecimiento alargado?
¿Están poco frondosas y sin hojas por la parte de abajo?
Son síntomas de falta de luz.
2. Viento
Los vientos fríos del norte.
Los vientos cálidos que secan las plantas.
El viento costero que transporta sales que se depositan sobre las hojas y las queman. Protege las plantas de todo esto.
En condiciones difíciles de viento fuerte, elige especies duras.
3. Humedad del aire
Pulveriza con agua las hojas en tiempo seco sin mojar las flores, puesto que durarían menos.
Otros métodos para aumentar la humedad ambiental son:
Agrupándolas para crear un microclima húmedo.
Poniendo las macetas sobre un plato con piedras y agua pero sin que toque dicha agua el fondo del tiesto.
4. Sustratos
• Compra sustratos de calidad para macetas. Los hay muy bueno y muy malos.
• No emplees tierra de jardín porque contiene mucha arcilla, se compacta, lleva hongos, malas hierbas...
• Es muy recomendable mezclar perlita con el sustrato que compres. Proporcionará aireación y más retención del agua. Otro material bueno para mezclar en sustratos es la fibra de coco. Un ejemplo sería: turba + fibra + perlita, los tres a partes iguales.
• Si no encuentras ni perlita ni fibra de coco, usa para airear el sustrato arena de río gruesa y lavada o corcho blanco picado.
Cualquiera de estos cuatro materiales (perlita, fibra de coco, arena o corcho) proporciona aireación y además ahorrarás dinero puesto que son más baratos que la turba o el mantillo para hacer volumen.
• No te olvides de depositar en el fondo de la maceta o jardinera, sobre los agujeros, grava, arcilla expandida, trozos de cerámica, etc.. Y si tienes macetas en la ventana, pon una capa de gravilla sobre la tierra para que la lluvia no salpique de tierra los cristales.
5. Riego de macetas
• Error frecuentísimo en el cultivo de plantas en maceta es el exceso de riego que pudre las raíces. La falta de agua también es fatal, aunque siempre es mejor quedarse corto que pasarse.
• Si se te muere alguna, fíjate en primer lugar en cómo estás regando y comprueba si el recipiente tiene obstruido el orificio en la parte inferior por donde sale el agua sobrante.
• Para saber cuándo regar, el mejor método es introducir los dedos en el sustrato y verificar si está húmedo o seco. Otros métodos son:
Coge el mango de un cuchillo y golpea la maceta. Si se produce un ruido nítido o claro significa que la planta necesita agua. El sonido sordo indica que está llena. Pruébalo en una maceta antes y después de regar, verás como suena distinto.
Con práctica puedes notar al coger el tiesto en peso si tiene más agua o menos.
Medidores de humedad que se pinchan. También orienta.
• Es bueno que entre riego y riego se seque un poco la tierra. No es lo mismo una tierra húmeda que empapada.
• Más riego si está al sol y más también si le da el viento secante. Con viento caliente en verano, riega prácticamente a diario las macetas y jardineras.
• Si tienes macetas de barro, recuerda que las paredes son porosas y pierden agua por ahí. Necesitará más riego que una de plástico o esmaltada.
• Riega por la mañana temprano o al atardecer, no con el sol en todo lo alto.
• Si puedes, instala en la terraza un sistema de riego por goteo automatizado. En verano, cuando se riega casi a diario, te darás cuenta de lo cómodo que resulta.
• También existen jardineras de autorriego con un depósito que suministra el agua según vaya necesitándolo.
• En la temporada que las plantas dejen de echar flores, reduce la frecuencia de riego para no saturarlas, ya que precisan menos cantidad.
• Para intentar recuperar una planta excesivamente regada, saca con cuidado el cepellón del tiesto y envuélvelo en varias capas de papel de cocina absorbente. Déjalo todo así durante 24 horas. Si se empapan las hojas, ponle otras nuevas. Vuelve después a meter la planta en la maceta y no la riegues durante varios días.
• Es fundamental que drenen bien los orificios inferiores. Cúbrelos por dentro con trozos de cerámica de tiestos rotos mejor que grava y no se taponarán.
• Si pones un plato debajo de la maceta para que recoja el agua sobrante del riego o un cubremacetas, vacíalo al poco rato (por ejemplo, 30 minutos) ya que el agua estancada puede pudrir las raíces de la planta.
Consejos para ahorrar agua
1. Usa especies resistentes a la sequía (hay que regarlas menos).
2. Cubre la superficie del sustrato con cortezas de pino de grano fino, chinos, grava, bolitas de arcilla expandida, etc.; esto protegerá la humedad del sustrato.
3. Sombrea las especies más sensibles al calor.
4. Agrupa las plantas para crear un microclima húmedo.
5. El riego por la madrugada o al atardecer es lo mejor. Se pierde menos por evaporación y la planta la toma mejor.
2. Viento
3. Humedad del aire
4. Sustratos
5. Riego de macetas
6. Abona para macetas
7. Limpiar las plantas
8. Aireado
9. Poda
10. Plagas y enfermedades
11. Cambio de maceta

1. Luz
• Según el sol que reciba la terraza por su orientación (Este, Oeste, Norte, etc.), deberás escoger plantas para sol o para sombra.
• Las plantas con flor, en general, necesitan más sol.
• Es bueno dar la vuelta regularmente a las macetas para que reciban la misma luz por todos lados, si no, te encontrarás con plantas torcidas y despobladas por una parte y con menos flores.
• No expongas nunca una que ha estado en sombra al sol directo de golpe y porrazo porque se pueden quemar las hojas; debes acostumbrarla progresivamente. Este es el caso, por ejemplo, de cuando se sacan a la terraza las plantas que han pasado el invierno en el interior.
• Los tiestos al sol se calientan mucho (más si es de color oscuro).
• Por debajo de los 0ºC los de barro se agrietan y pueden romperse. Los recipientes de barro sin cocer y la cerámica vidriada debes aislarlos con sacos de arpillera, plástico de burbujas, lonas, etc. para protegerlos de las heladas, o bien, situarlos en sitios protegidos. Las macetas de barro con grietas pequeñas se pueden arreglar rodeándolas con un alambre.

Falta de luz
¿Tus plantas florecen poco?
¿Tienen un crecimiento alargado?
¿Están poco frondosas y sin hojas por la parte de abajo?
Son síntomas de falta de luz.
2. Viento
Los vientos fríos del norte.
Los vientos cálidos que secan las plantas.
El viento costero que transporta sales que se depositan sobre las hojas y las queman. Protege las plantas de todo esto.
En condiciones difíciles de viento fuerte, elige especies duras.
3. Humedad del aire
Pulveriza con agua las hojas en tiempo seco sin mojar las flores, puesto que durarían menos.
Otros métodos para aumentar la humedad ambiental son:
Agrupándolas para crear un microclima húmedo.
Poniendo las macetas sobre un plato con piedras y agua pero sin que toque dicha agua el fondo del tiesto.
4. Sustratos
• Compra sustratos de calidad para macetas. Los hay muy bueno y muy malos.
• No emplees tierra de jardín porque contiene mucha arcilla, se compacta, lleva hongos, malas hierbas...
• Es muy recomendable mezclar perlita con el sustrato que compres. Proporcionará aireación y más retención del agua. Otro material bueno para mezclar en sustratos es la fibra de coco. Un ejemplo sería: turba + fibra + perlita, los tres a partes iguales.
• Si no encuentras ni perlita ni fibra de coco, usa para airear el sustrato arena de río gruesa y lavada o corcho blanco picado.
Cualquiera de estos cuatro materiales (perlita, fibra de coco, arena o corcho) proporciona aireación y además ahorrarás dinero puesto que son más baratos que la turba o el mantillo para hacer volumen.
• No te olvides de depositar en el fondo de la maceta o jardinera, sobre los agujeros, grava, arcilla expandida, trozos de cerámica, etc.. Y si tienes macetas en la ventana, pon una capa de gravilla sobre la tierra para que la lluvia no salpique de tierra los cristales.
5. Riego de macetas
• Error frecuentísimo en el cultivo de plantas en maceta es el exceso de riego que pudre las raíces. La falta de agua también es fatal, aunque siempre es mejor quedarse corto que pasarse.
• Si se te muere alguna, fíjate en primer lugar en cómo estás regando y comprueba si el recipiente tiene obstruido el orificio en la parte inferior por donde sale el agua sobrante.
• Para saber cuándo regar, el mejor método es introducir los dedos en el sustrato y verificar si está húmedo o seco. Otros métodos son:
Coge el mango de un cuchillo y golpea la maceta. Si se produce un ruido nítido o claro significa que la planta necesita agua. El sonido sordo indica que está llena. Pruébalo en una maceta antes y después de regar, verás como suena distinto.
Con práctica puedes notar al coger el tiesto en peso si tiene más agua o menos.
Medidores de humedad que se pinchan. También orienta.
• Es bueno que entre riego y riego se seque un poco la tierra. No es lo mismo una tierra húmeda que empapada.
• Más riego si está al sol y más también si le da el viento secante. Con viento caliente en verano, riega prácticamente a diario las macetas y jardineras.
• Si tienes macetas de barro, recuerda que las paredes son porosas y pierden agua por ahí. Necesitará más riego que una de plástico o esmaltada.
• Riega por la mañana temprano o al atardecer, no con el sol en todo lo alto.
• Si puedes, instala en la terraza un sistema de riego por goteo automatizado. En verano, cuando se riega casi a diario, te darás cuenta de lo cómodo que resulta.
• También existen jardineras de autorriego con un depósito que suministra el agua según vaya necesitándolo.
• En la temporada que las plantas dejen de echar flores, reduce la frecuencia de riego para no saturarlas, ya que precisan menos cantidad.
• Para intentar recuperar una planta excesivamente regada, saca con cuidado el cepellón del tiesto y envuélvelo en varias capas de papel de cocina absorbente. Déjalo todo así durante 24 horas. Si se empapan las hojas, ponle otras nuevas. Vuelve después a meter la planta en la maceta y no la riegues durante varios días.
• Es fundamental que drenen bien los orificios inferiores. Cúbrelos por dentro con trozos de cerámica de tiestos rotos mejor que grava y no se taponarán.
• Si pones un plato debajo de la maceta para que recoja el agua sobrante del riego o un cubremacetas, vacíalo al poco rato (por ejemplo, 30 minutos) ya que el agua estancada puede pudrir las raíces de la planta.
Consejos para ahorrar agua
1. Usa especies resistentes a la sequía (hay que regarlas menos).
2. Cubre la superficie del sustrato con cortezas de pino de grano fino, chinos, grava, bolitas de arcilla expandida, etc.; esto protegerá la humedad del sustrato.
3. Sombrea las especies más sensibles al calor.
4. Agrupa las plantas para crear un microclima húmedo.
5. El riego por la madrugada o al atardecer es lo mejor. Se pierde menos por evaporación y la planta la toma mejor.
1
1
文章
Dummer. ゛☀
2017年08月24日

Creeping savory in gardens are compact, fragrant plants at home in herb gardens or along borders or pathways. These easy-to-grow herbs are also well suited for containers or window boxes where the trailing stems can cascade over the edges. At only 2 to 4 inches tall, creeping savory plants make ideal ground covers. This hardy little herb is suitable for growing in USDA plant hardiness zones 6 through 9. Read to learn about growing creeping savory in your own garden.
Creeping Savory Uses
Creeping savory (Satureja spicigera) is a variety of savory herb and, as such, its uses are many. Here are just a few of the most common creeping savory uses in the garden:
Traditionally, savory was used to relieve sore throats, coughs, flatulence, diarrhea, menstrual problems, arthritis and insect bites. It shouldn’t be used by pregnant women. Creeping savory has a flavor similar to thymeor marjoram. It is used either fresh or dried to flavor a variety of foods. In the garden, creeping savory blooms attract bees and other beneficial insects. It is said to repel certain types of pests when companion planted near onionsor beans.
Growing Creeping Savory Plants
Learn how to care for creeping savory in the garden is an easy endeavor. Creeping savory thrives in sunny, arid conditions and nearly any type of well-drained soil, including poor, highly alkaline soil. The plant tolerates intense heat and drought and tends to become leggy in shade. Plant creeping savory seeds in late winter or after frost danger has passed in early spring. You can also propagate creeping savory by taking cuttings of mature plants. The seeds may be difficult to find. Keep new creeping savory plants moist until the plants are established. Thereafter, water sparingly. In general, creeping savory plants require water only during dry spells. Pinch the tips of new growth in spring to encourage full, bushy growth.

Creeping Savory Uses
Creeping savory (Satureja spicigera) is a variety of savory herb and, as such, its uses are many. Here are just a few of the most common creeping savory uses in the garden:
Traditionally, savory was used to relieve sore throats, coughs, flatulence, diarrhea, menstrual problems, arthritis and insect bites. It shouldn’t be used by pregnant women. Creeping savory has a flavor similar to thymeor marjoram. It is used either fresh or dried to flavor a variety of foods. In the garden, creeping savory blooms attract bees and other beneficial insects. It is said to repel certain types of pests when companion planted near onionsor beans.

Growing Creeping Savory Plants
Learn how to care for creeping savory in the garden is an easy endeavor. Creeping savory thrives in sunny, arid conditions and nearly any type of well-drained soil, including poor, highly alkaline soil. The plant tolerates intense heat and drought and tends to become leggy in shade. Plant creeping savory seeds in late winter or after frost danger has passed in early spring. You can also propagate creeping savory by taking cuttings of mature plants. The seeds may be difficult to find. Keep new creeping savory plants moist until the plants are established. Thereafter, water sparingly. In general, creeping savory plants require water only during dry spells. Pinch the tips of new growth in spring to encourage full, bushy growth.
0
0
文章
Dummer. ゛☀
2017年08月24日

A pungent perennial, horseradish (Armoracia rusticana) is a member of the Cruciferae family (Brassicaceae). A very hardy plant, horseradish flourishes in USDA zones 4-8. It is used primarily for its roots, which are grated and used as a condiment. Like its cousins, broccoli and radish, the horseradish plant has flowers; the question is, are horseradish flowers edible? If not, should you cut horseradish flowers?
Are Horseradish Flowers Edible?
As mentioned, horseradish is grown primarily for its peppery root. A cold hardy crop, horseradish thrives in either sun or partial shade and is propagated from root cuttings. Horseradish establishes rapidly and even after harvesting the roots, will more than likely pop up in the garden whether you want it to or not. For this reason, many people plant horseradish in pots to retard the possibility of spreading.
If you plant horseradish in the garden, choose a sunny to partially sunny site and allow 18-20 inches between plantings. Plant the root cuttings as soon as the ground is thawed enough to dig in the spring. Plant the cuttings twice as deep as the piece of root since the plants develop a very long taproot. This, of course, is why they plants tend to return and can become invasive. Although you are digging up the root to harvest, it’s very difficult to get every bit. The remaining root pieces easily propagate and, voila, you have horseradish growing again.
As the plants grow, you can pick young leaves to add to salads for a peppery kick. The older leaves, while edible, are tough and unpalatable. So how about flowers on horseradish? On some crops, the flowers are pinched or cut back to encourage leafy growth, especially on herbaceous plants. On other plants, flowers are encouraged because the end goal is for fruit. Horseradish falls into neither of these categories. While you may see a horseradish plant flowering, the blooms are neither here nor there. As the plant grows, small leaves become large, up to 2 feet long, and coarse, and a flower stalk pokes out from atop the plant. From the stalks, small, insignificant, white flowers are borne. In the summer, you may or may not see the horseradish plant flowering. Flowers on horseradish are not of any great importance since they produce little, if any, viable seed. Some years the plant may not bloom at all. In either case, while the aromatic young leaves are used in cooking, the flowers are not.
Because the plant is being grown for its root, there is no need to cut horseradish flowers, unless, of course, you wish to use them for indoor flower arrangements – although the flowers are not showy. If your horseradish plant has flowers, it may even be of some benefit to leave the blossoms alone. They may attract pollinators to the rest of the vegetable garden, which is certainly not a bad thing.

Are Horseradish Flowers Edible?
As mentioned, horseradish is grown primarily for its peppery root. A cold hardy crop, horseradish thrives in either sun or partial shade and is propagated from root cuttings. Horseradish establishes rapidly and even after harvesting the roots, will more than likely pop up in the garden whether you want it to or not. For this reason, many people plant horseradish in pots to retard the possibility of spreading.
If you plant horseradish in the garden, choose a sunny to partially sunny site and allow 18-20 inches between plantings. Plant the root cuttings as soon as the ground is thawed enough to dig in the spring. Plant the cuttings twice as deep as the piece of root since the plants develop a very long taproot. This, of course, is why they plants tend to return and can become invasive. Although you are digging up the root to harvest, it’s very difficult to get every bit. The remaining root pieces easily propagate and, voila, you have horseradish growing again.

As the plants grow, you can pick young leaves to add to salads for a peppery kick. The older leaves, while edible, are tough and unpalatable. So how about flowers on horseradish? On some crops, the flowers are pinched or cut back to encourage leafy growth, especially on herbaceous plants. On other plants, flowers are encouraged because the end goal is for fruit. Horseradish falls into neither of these categories. While you may see a horseradish plant flowering, the blooms are neither here nor there. As the plant grows, small leaves become large, up to 2 feet long, and coarse, and a flower stalk pokes out from atop the plant. From the stalks, small, insignificant, white flowers are borne. In the summer, you may or may not see the horseradish plant flowering. Flowers on horseradish are not of any great importance since they produce little, if any, viable seed. Some years the plant may not bloom at all. In either case, while the aromatic young leaves are used in cooking, the flowers are not.

Because the plant is being grown for its root, there is no need to cut horseradish flowers, unless, of course, you wish to use them for indoor flower arrangements – although the flowers are not showy. If your horseradish plant has flowers, it may even be of some benefit to leave the blossoms alone. They may attract pollinators to the rest of the vegetable garden, which is certainly not a bad thing.
0
0
文章
Dummer. ゛☀
2017年08月19日

The peace lily (Spathiphyllum wallisii) is an attractive indoor flower known for its ability to thrive in low light. It usually grows between 1-4 feet (.3-1.2 m.) in height and produces pale white flowers that give off a pleasant fragrance and last a long time. Sometimes, however, peace lilies suffer from browning or yellowing leaves. Keep reading to learn about what causes peace lily leaves to turn yellow and how to treat it.
Reasons for Peace Lilies with Brown and Yellow Leaves
Normally, peace lily leaves are long and dark green, emerging directly from the soil and growing up and out. The leaves are strong and oval shaped, narrowing to a point at the tip. They are durable, and often the biggest problem they encounter is that they collect dust and need to be wiped off periodically.
Sometimes, however, the edges of peace lily leaves turn a sickly yellow or brown color. The root of the problem is almost definitely water related. This browning can be caused by too little or too much watering.
There is a good chance, however, that it is due to a buildup of minerals. Since peace lilies are primarily kept as houseplants, they are almost always watered with tap water. If you have hard water in your house, it may be accumulating too much calcium in your plant’s soil. Conversely, this mineral buildup is just as likely if you use a water softener. Some minerals are good, but too many can build up around your plant’s roots and slowly suffocate it.
Treating a Peace Lily with Brown Tips
Spathiphyllum leaf problems like this can normally be cleared up fairly easy. If you have a peace lily with brown tips, try watering it with bottled drinking water. First, flush the plant with lots of bottled water until it runs out of the drainage holes. The minerals will bond with the water and wash away with it (if you can see white deposits around the drainage holes, mineral buildup is almost definitely your problem). After this, water your peace lily like normal, but with bottled water, and your plant ought to recover just fine. You can also snip out unsightly brown/yellow leaves.

Reasons for Peace Lilies with Brown and Yellow Leaves
Normally, peace lily leaves are long and dark green, emerging directly from the soil and growing up and out. The leaves are strong and oval shaped, narrowing to a point at the tip. They are durable, and often the biggest problem they encounter is that they collect dust and need to be wiped off periodically.
Sometimes, however, the edges of peace lily leaves turn a sickly yellow or brown color. The root of the problem is almost definitely water related. This browning can be caused by too little or too much watering.

There is a good chance, however, that it is due to a buildup of minerals. Since peace lilies are primarily kept as houseplants, they are almost always watered with tap water. If you have hard water in your house, it may be accumulating too much calcium in your plant’s soil. Conversely, this mineral buildup is just as likely if you use a water softener. Some minerals are good, but too many can build up around your plant’s roots and slowly suffocate it.

Treating a Peace Lily with Brown Tips
Spathiphyllum leaf problems like this can normally be cleared up fairly easy. If you have a peace lily with brown tips, try watering it with bottled drinking water. First, flush the plant with lots of bottled water until it runs out of the drainage holes. The minerals will bond with the water and wash away with it (if you can see white deposits around the drainage holes, mineral buildup is almost definitely your problem). After this, water your peace lily like normal, but with bottled water, and your plant ought to recover just fine. You can also snip out unsightly brown/yellow leaves.
0
0
文章
Miss Chen
2017年08月15日

Portulaca grandiflora, also called moss rose, tends to self-seed, but harvesting seeds from this annual plant helps keep it where you want it. Moss rose quickly spreads in full-sun, dry areas when seed capsules are left on the plant. Growing 4 to 8 inches tall and 6 to 24 inches wide, moss rose varieties include the early-flowering Margarita series, "Sundial," which produces early, double flowers in sunset colors, and "Calypso," which features white, yellow, orange, pink or purple double flowers.

Moss Rose Varieties
Suppliers sell moss rose cultivars, hybrids, strains, heirlooms and mixes, and only some of these come true from seed. Cultivars and hybrids are specially bred to have certain characteristics, such as flower color, shape or performance, but they don't pass on these characteristics to their offspring. Some cultivar and hybrid seeds may not even sprout. Strains and heirloom plants are often older varieties, and these are more reliable in producing plants that are similar to themselves. Mixes are different varieties mixed together, and these may cross-fertilize, producing unpredictable results. Moss rose cultivars and hybrids are often more expensive than other varieties. If you aren't sure what type of moss rose you're growing, ask the garden center where you bought it.
Harvesting Seed
Moss rose seeds are fine as dust and develop inside seed capsules, which you can harvest. Moss rose flowers in summer. The seed capsules are 1/8 to 1/4 inch long, and they develop after the flowers are pollinated. When the seed capsules are ripe, they turn dry and papery and split open. Inside are many tiny, blue-gray seeds.

Harvest ripe moss rose seed capsules on a dry, sunny day. If you aren't sure whether the capsules are ripe, gently rub one between your thumb and forefinger. To avoid spilling the seeds on the soil, where they may sprout the following year, take a seed capsule indoors before testing it. Pinch off the ripe capsules and put them in a paper bag.
Separating Seed
Moss rose seeds should be separated from the seed capsules and dried before storing. Crush the seed capsules over a sheet of newspaper in a draft-free place. Place a colander on another sheet of newspaper, and pour the the crushed seed capsules into the colander. Gently shake the colander so that the seeds fall through but the capsule debris is left behind.
Moss rose seeds must be stored in an airtight container. Lift the newspaper and close it along its crease. Place one edge of the crease at the lip of an open airtight container, and lift the newspaper so the seeds slide into the container. Flick the newspaper once or twice with your finger to loosen any remaining seeds, put the newspaper down, then seal the container.
Storing Seed
A refrigerator is the best place for storing moss rose seeds, where they will remain fresh for sowing the following year. Put moss rose seeds in their sealed, airtight container in a refrigerator or similar cool, dry place such as a basement or cellar. Don't place the container in direct light, and don't open the container to check on the seeds until it's time to sow them. Direct light warms up the inside of the container, damaging the seeds, and opening the container allows moisture inside, which encourages the seeds to rot.

Moss Rose Varieties
Suppliers sell moss rose cultivars, hybrids, strains, heirlooms and mixes, and only some of these come true from seed. Cultivars and hybrids are specially bred to have certain characteristics, such as flower color, shape or performance, but they don't pass on these characteristics to their offspring. Some cultivar and hybrid seeds may not even sprout. Strains and heirloom plants are often older varieties, and these are more reliable in producing plants that are similar to themselves. Mixes are different varieties mixed together, and these may cross-fertilize, producing unpredictable results. Moss rose cultivars and hybrids are often more expensive than other varieties. If you aren't sure what type of moss rose you're growing, ask the garden center where you bought it.
Harvesting Seed
Moss rose seeds are fine as dust and develop inside seed capsules, which you can harvest. Moss rose flowers in summer. The seed capsules are 1/8 to 1/4 inch long, and they develop after the flowers are pollinated. When the seed capsules are ripe, they turn dry and papery and split open. Inside are many tiny, blue-gray seeds.

Harvest ripe moss rose seed capsules on a dry, sunny day. If you aren't sure whether the capsules are ripe, gently rub one between your thumb and forefinger. To avoid spilling the seeds on the soil, where they may sprout the following year, take a seed capsule indoors before testing it. Pinch off the ripe capsules and put them in a paper bag.
Separating Seed
Moss rose seeds should be separated from the seed capsules and dried before storing. Crush the seed capsules over a sheet of newspaper in a draft-free place. Place a colander on another sheet of newspaper, and pour the the crushed seed capsules into the colander. Gently shake the colander so that the seeds fall through but the capsule debris is left behind.
Moss rose seeds must be stored in an airtight container. Lift the newspaper and close it along its crease. Place one edge of the crease at the lip of an open airtight container, and lift the newspaper so the seeds slide into the container. Flick the newspaper once or twice with your finger to loosen any remaining seeds, put the newspaper down, then seal the container.
Storing Seed
A refrigerator is the best place for storing moss rose seeds, where they will remain fresh for sowing the following year. Put moss rose seeds in their sealed, airtight container in a refrigerator or similar cool, dry place such as a basement or cellar. Don't place the container in direct light, and don't open the container to check on the seeds until it's time to sow them. Direct light warms up the inside of the container, damaging the seeds, and opening the container allows moisture inside, which encourages the seeds to rot.
0
0
文章
Miss Chen
2017年08月14日

Annual bread-seed or lettuce-leaf poppies (Papaver somniferum) produce flat, tissue-papery blooms in shades of pink, red, purple and white. They grow 4 to 5 feet tall, with lush, pale green foliage that stands upright from the stalk. These are the same poppies that are the source of opium and it is illegal in the United States to grow them for that purpose.

Colors
While specific strains, such as Lauren's Grape (purple), Danish Flag (deep orange with white feathery centers) and peony poppies (multiple petals in jewel tones) are offered in commercial seed packages, grocery-store poppy seeds grow just as well, although in limited colors and types. Most produce a single pink poppy flower.
Timing
Annual poppies grow best if they get a period of cold, so it is often recommended that they be planted in fall or sprinkled on the snow. However, especially in areas with wet winters and cold springs, planting in mid-February yields better results.
Planting
Scatter the seeds on the ground and do not cover them, as sunlight is needed for germination. If your climate is dry, keep the seeds moist with a fine spray from the hose until they come up. When the plants are about 3 inches tall, thin out any crowded clumps.
Gathering Seeds
Poppy flowers last only a few days. After the petals drop, the poppy seed heads will begin to dry. Leave them on the plant until the stalks have turned beige and the slits at the top of the poppy pod have opened to release the seeds. Gather the heads and let them dry completely, then shake out the seeds.

Replanting
Many of the seeds will fall to the ground and plant themselves, but save some seeds to scatter again in spring, especially if the grocery-store seeds yield any unusual colors or forms that you wish to grow again.

Colors
While specific strains, such as Lauren's Grape (purple), Danish Flag (deep orange with white feathery centers) and peony poppies (multiple petals in jewel tones) are offered in commercial seed packages, grocery-store poppy seeds grow just as well, although in limited colors and types. Most produce a single pink poppy flower.
Timing
Annual poppies grow best if they get a period of cold, so it is often recommended that they be planted in fall or sprinkled on the snow. However, especially in areas with wet winters and cold springs, planting in mid-February yields better results.
Planting
Scatter the seeds on the ground and do not cover them, as sunlight is needed for germination. If your climate is dry, keep the seeds moist with a fine spray from the hose until they come up. When the plants are about 3 inches tall, thin out any crowded clumps.
Gathering Seeds
Poppy flowers last only a few days. After the petals drop, the poppy seed heads will begin to dry. Leave them on the plant until the stalks have turned beige and the slits at the top of the poppy pod have opened to release the seeds. Gather the heads and let them dry completely, then shake out the seeds.

Replanting
Many of the seeds will fall to the ground and plant themselves, but save some seeds to scatter again in spring, especially if the grocery-store seeds yield any unusual colors or forms that you wish to grow again.
1
1
求助
succulentnewbie
2017年08月12日

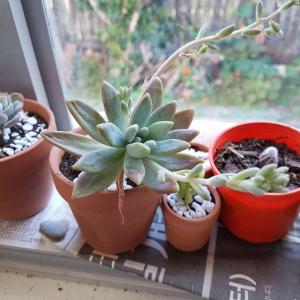
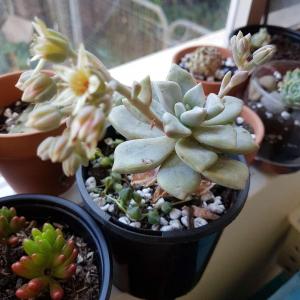
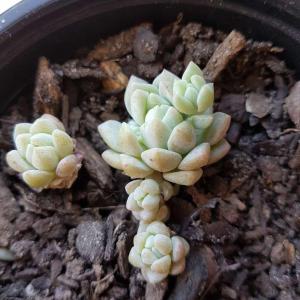
Can anyone help me ID the first 4? Also if someone knows what's wrong with the last two, it would help me out a lot! Last one is a crassula sub species


1
0
fearlessgrower:i agree, flapjack needs water
meriunkat:the first one is Graptosedum Francesco Baldi
Haleyfleeanne:Last two, looks like they need water.


