文章
Dummer. ゛☀
2017年08月13日

Lucky bamboo plants (Dracaena sanderiana) are common houseplants, and are fun and easy to grow. Indoors, they can quickly reach a height of 3 feet (91 cm.) or more, prompting gardeners to ask, “Can you prune lucky bamboo?” Fortunately, the answer to that question is a resounding “yes!”—and it is a cinch to do.
Can You Prune Lucky Bamboo Plants?
Lucky bamboo isn’t really a type of bamboo at all, but rather a plant in a genus of trees and shrubs called Dracaena. Because lucky bamboo grows so fast, it has a tendency to become top-heavy, and the extra weight puts stress on the roots and the rest of the plant. Cutting back a lucky bamboo plant invigorates and refreshes it and encourages new growth. If desired, selective lucky bamboo plant pruning can even change the shape of the plant entirely.
When to Prune a Lucky Bamboo Plant
When to prune a lucky bamboo plant depends on the height of the plant. You don’t have to wait until a certain time of year to do the job. You can prune lucky bamboo whenever it gets too large to manage.
Lucky Bamboo Plant Pruning
Using very sharp, sterile pruning shears, cut back any shoots that are thin, overly long, or growing crookedly. The shoots are the stems that have leaves on them. Trim back shoots to a length of 1 or 2 inches (2.5-5 cm.) from the stalk. This will encourage more shoots to grow from the cut area and will create a denser, bushier look. If you wish to cut back your lucky bamboo more drastically, with the intention to reshape it, you can cut as many shoots as you want flush to the stalk. Usually, new shoots will not regrow from the pruned areas due to the close cuts. Alternatively, you can cut the stalk to the desired height. Because of the possibility of infection, this is riskier than simply trimming shoots away. Plan carefully before you prune and be aware that the stalk will not grow any taller than where you make the cut. Only the new shoots will increase in height. If you take a close look at the stalk of your lucky bamboo plant, you will see clearly defined rings, called nodes, on it. Make your pruning cut just above one of the nodes. Your cuts must be clean and smooth to minimize the chance of infection. There is no need to cut either the shoots or the stalk at an angle. With a little planning and a few choice cuts, pruning lucky bamboo plants is an easy task!

Can You Prune Lucky Bamboo Plants?
Lucky bamboo isn’t really a type of bamboo at all, but rather a plant in a genus of trees and shrubs called Dracaena. Because lucky bamboo grows so fast, it has a tendency to become top-heavy, and the extra weight puts stress on the roots and the rest of the plant. Cutting back a lucky bamboo plant invigorates and refreshes it and encourages new growth. If desired, selective lucky bamboo plant pruning can even change the shape of the plant entirely.

When to Prune a Lucky Bamboo Plant
When to prune a lucky bamboo plant depends on the height of the plant. You don’t have to wait until a certain time of year to do the job. You can prune lucky bamboo whenever it gets too large to manage.

Lucky Bamboo Plant Pruning
Using very sharp, sterile pruning shears, cut back any shoots that are thin, overly long, or growing crookedly. The shoots are the stems that have leaves on them. Trim back shoots to a length of 1 or 2 inches (2.5-5 cm.) from the stalk. This will encourage more shoots to grow from the cut area and will create a denser, bushier look. If you wish to cut back your lucky bamboo more drastically, with the intention to reshape it, you can cut as many shoots as you want flush to the stalk. Usually, new shoots will not regrow from the pruned areas due to the close cuts. Alternatively, you can cut the stalk to the desired height. Because of the possibility of infection, this is riskier than simply trimming shoots away. Plan carefully before you prune and be aware that the stalk will not grow any taller than where you make the cut. Only the new shoots will increase in height. If you take a close look at the stalk of your lucky bamboo plant, you will see clearly defined rings, called nodes, on it. Make your pruning cut just above one of the nodes. Your cuts must be clean and smooth to minimize the chance of infection. There is no need to cut either the shoots or the stalk at an angle. With a little planning and a few choice cuts, pruning lucky bamboo plants is an easy task!
0
0
文章
Miss Chen
2017年08月11日

Native to tropical Asia, the bamboo orchid (Arundina graminifolia or Arundina barbusifolia) grows to 8 feet with reedy stems and evergreen, grass-like leaves up to 1-foot long. Its 2- to 3-inch-wide flowers appear in clusters at the stems' tips in summer and autumn, each lasting for about three days. Those fragrant blooms vary in color from white to pinkish mauve with a darker purple lip. The Missouri Botanical Garden lists the bamboo orchid as perennial only in U.S. Department of Agriculture plant hardiness zones 11 through 12, but other sources consider it hardy as far north as USDA zone 9.

Indoor Position
Due to its large size and preference for high humidity, this orchid generally performs better outdoors than indoors. If you wish to try it as a houseplant, a clump – which usually contains three to five canes – needs a pot at least 12 inches in diameter. The bamboo orchid isn't picky about its medium and can be grown in regular potting soil, sphagnum moss or a more typical orchid mix of 1 part organic potting soil, 1 part coarse orchid bark and 1 part sand.
The bamboo orchid prefers full sun or at least partial sun, so position it on or near a south-facing windowsill where it receives temperatures between 60 and 80 degrees Fahrenheit.
Keep the air moist around it by placing it in a humid room, such as a bathroom, or setting it atop a humidity tray.
The plant is seldom bothered by pests or diseases.
Indoor Provisions
Water the orchid frequently enough that its medium or mix never dries out completely.
Fertilize it once a week from spring to fall with a 20-20-20 plant food, mixing 1/4 teaspoon of the crystals into 1 gallon of water. Always follow label instructions.
If possible, move the plant outdoors during the summer, setting it in shade at first, and gradually accustoming it to full sun.
Outdoor Position
If you wish to grow the bamboo orchid outdoors, place it in a protected, raised bed in full or partial sun. That bed should be filled with a humus-rich soil, which is about 2 parts compost, 1 part topsoil and 1 part coarse sand. Space the plants 1 foot apart in that bed and mulch it with 3 inches of shredded bark -- to keep the soil moist -- but don't allow the mulch to touch the plant's stems.

Outdoor Provisions
Water the bed about once every three days when there is no rain, or however often is necessary to prevent the soil from drying out.
Feed the orchids once every two months during spring and summer by pulling back the mulch and sprinkling the pellets of an organic fertilizer, such as 5-5-5 around the bases of the plants, using 1 cup for each 20 square feet of bed.
When all the buds on a cane have bloomed, snip that cane off near soil level with sterilized pruning tools.

Indoor Position
Due to its large size and preference for high humidity, this orchid generally performs better outdoors than indoors. If you wish to try it as a houseplant, a clump – which usually contains three to five canes – needs a pot at least 12 inches in diameter. The bamboo orchid isn't picky about its medium and can be grown in regular potting soil, sphagnum moss or a more typical orchid mix of 1 part organic potting soil, 1 part coarse orchid bark and 1 part sand.
The bamboo orchid prefers full sun or at least partial sun, so position it on or near a south-facing windowsill where it receives temperatures between 60 and 80 degrees Fahrenheit.
Keep the air moist around it by placing it in a humid room, such as a bathroom, or setting it atop a humidity tray.
The plant is seldom bothered by pests or diseases.
Indoor Provisions
Water the orchid frequently enough that its medium or mix never dries out completely.
Fertilize it once a week from spring to fall with a 20-20-20 plant food, mixing 1/4 teaspoon of the crystals into 1 gallon of water. Always follow label instructions.
If possible, move the plant outdoors during the summer, setting it in shade at first, and gradually accustoming it to full sun.
Outdoor Position
If you wish to grow the bamboo orchid outdoors, place it in a protected, raised bed in full or partial sun. That bed should be filled with a humus-rich soil, which is about 2 parts compost, 1 part topsoil and 1 part coarse sand. Space the plants 1 foot apart in that bed and mulch it with 3 inches of shredded bark -- to keep the soil moist -- but don't allow the mulch to touch the plant's stems.

Outdoor Provisions
Water the bed about once every three days when there is no rain, or however often is necessary to prevent the soil from drying out.
Feed the orchids once every two months during spring and summer by pulling back the mulch and sprinkling the pellets of an organic fertilizer, such as 5-5-5 around the bases of the plants, using 1 cup for each 20 square feet of bed.
When all the buds on a cane have bloomed, snip that cane off near soil level with sterilized pruning tools.
0
0
Lindsay
2017年08月10日

Echeveria Runyonii or Topsy Turvy has 3 stalks of blooms. The one on top of the pot.
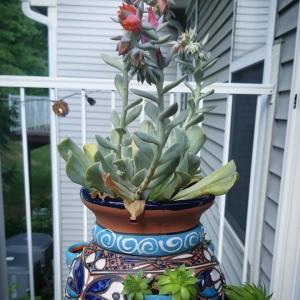
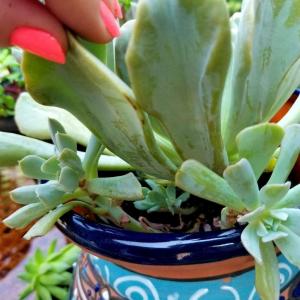
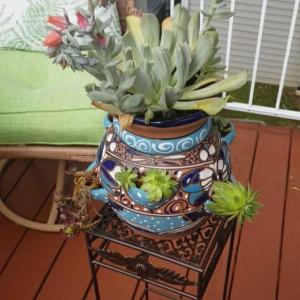
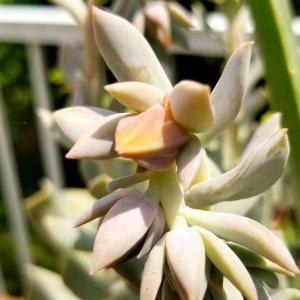


3
1
文章
Dummer. ゛☀
2017年08月10日

Boston ferns are fabulously popular houseplants. Hardy in USDA zones 9-11, they are kept indoors in pots in most regions. Capable of growing 3 feet (0.9 m) high and 4 feet (1.2 m) wide, Boston ferns can brighten any room with their lush green foliage. That’s why it can be so disheartening to see your vibrant green fern fronds turning black or brown. Keep reading to learn what causes a Boston fern with black fronds, and what to do about it.
Boston Fern Fronds Turning Black Isn’t Always Bad
There is one case in which a Boston fern with black fronds is perfectly natural, and it’s good to be able to spot it. You may see small black spots on the undersides of your fern’s leaves, lined up in regular rows. These spots are spores, and they’re the fern’s way of reproducing. Eventually, the spores will drop to the soil below and grow into reproductive structures. If you see these spots, don’t take any action! It’s a sign that your fern is healthy. Your fern will also experience some natural browning as it ages. As new growth emerges, the oldest leaves at the bottom of the fern will wither and turn brown to black to make way for new growth. This is totally normal. Cut away the discolored leaves to keep the plant looking fresh.
When Boston Fern Fronds Turning Black is Not Good
Boston fern fronds turning brown or black may also signal trouble, however. If your fern’s leaves are suffering from brown or black spots or strips, there may be nematodes in the soil. Add lots of compost to the soil – this will encourage the growth of beneficial fungi that should destroy the nematodes. If the infestation is bad, remove any infected plants. Small, but spreading, soft brown to black spots with an unpleasant odor are most likely a sign of bacterial soft rot. Destroy any infected plants.
Small, but spreading, soft brown to black spots with an unpleasant odor are most likely a sign of bacterial soft rot. Destroy any infected plants. Leaf tip burn manifests as browning and withering tips on fronds and leaves. Destroy any infected plants. Rhizoctonia Blight appears as irregular brownish-black spots that start near the crown of the fern but spread very rapidly. Spray with fungicide.

Boston Fern Fronds Turning Black Isn’t Always Bad
There is one case in which a Boston fern with black fronds is perfectly natural, and it’s good to be able to spot it. You may see small black spots on the undersides of your fern’s leaves, lined up in regular rows. These spots are spores, and they’re the fern’s way of reproducing. Eventually, the spores will drop to the soil below and grow into reproductive structures. If you see these spots, don’t take any action! It’s a sign that your fern is healthy. Your fern will also experience some natural browning as it ages. As new growth emerges, the oldest leaves at the bottom of the fern will wither and turn brown to black to make way for new growth. This is totally normal. Cut away the discolored leaves to keep the plant looking fresh.

When Boston Fern Fronds Turning Black is Not Good
Boston fern fronds turning brown or black may also signal trouble, however. If your fern’s leaves are suffering from brown or black spots or strips, there may be nematodes in the soil. Add lots of compost to the soil – this will encourage the growth of beneficial fungi that should destroy the nematodes. If the infestation is bad, remove any infected plants. Small, but spreading, soft brown to black spots with an unpleasant odor are most likely a sign of bacterial soft rot. Destroy any infected plants.

Small, but spreading, soft brown to black spots with an unpleasant odor are most likely a sign of bacterial soft rot. Destroy any infected plants. Leaf tip burn manifests as browning and withering tips on fronds and leaves. Destroy any infected plants. Rhizoctonia Blight appears as irregular brownish-black spots that start near the crown of the fern but spread very rapidly. Spray with fungicide.
0
0
文章
Miss Chen
2017年08月10日

Primroses (Primula polyanthus), an old-fashioned perennial popular in gardens for hundreds of years, is native to the Northern Hemisphere. Most primroses are hardy in U.S. Department of Agriculture plant hardiness zones 3 to 8. Over 400 species of the rosette-like plant grow both in the wild and cultivated in proper gardens, and one of the tricks gardeners learn early is that their primrose bed will last much longer if the plants are properly deadheaded.

Deadheading Primroses
Deadheading simply means grooming the plant. By removing the spent flowers, you prevent your plant from going to seed, and allow it to mature. Cutting back the spent flower stems also encourages new growth, so you'll see fresh flowers. Once your plants have started to thrive, a simple walk around the garden several times a week allows you to see how your primroses are progressing and whether you might need to clean up the flowers that are spent.
Make sure you sterilize your scissors or pruning shears with rubbing alcohol before using them to deadhead your primroses.
Start checking your garden in late spring.
Carry a pair of scissors or a small pair of pruning shears in your pocket for the task. Some gardeners prefer to simply pinch away the spent flowers between thumb and forefinger, but sharp scissors make it easier to snip away the dead flower and leaves.
Wear rubber gloves -- some people might be allergic to certain varieties of plants. It also curbs the spread of disease if your naturally oily fingers are protected. Certain floral diseases easily spread when fingers flit from one flower to another.
Look for the flowers that have begun to fade or are drying out.
Reach down to the base of the flower stalk and hold the dead flower gently.
Bend the flower to expose the stem, and then either pinch or snip the dead flower away from the plant.
It's wise to carry a small bag or wear an apron and drop the dead flowers into the bag or apron rather than on the ground. You can dump your deadheaded materials into a recycling pile when you're done with your task.
Because too much water will rot primroses, check them occasionally and clip off any yellow or rotten lower leaves you see around the base of the plant. Removing rotten leaves promotes new growth. Your primrose bed might seem a bit droopy after you deadhead and trim old growth, but you'll be rewarded when new buds start to arrive.
If primroses get too wet, they can develop conditions like crown or root rot and become susceptible to garden bugs, like aphids or spiders.
Once your plants stop blooming, pull the primroses from the ground or your pots, and put them into containers until fall. The best soil is gritty and humus-rich. Keep your containers in a sheltered spot, and keep the plants moist but not wet.

Growing Primroses
You can grow primroses from seed or purchase your plants from a grower. If you choose to grow them from seed, be aware that the seeds are exceptionally small and it is difficult for the novice gardener to be successful starting these plants from seed.
Most primula varieties flower reliably and are easy to grow. Plant them in sun or partial shade, and choose an area or pot that provides good drainage. Primroses don't like to be wet. If you can shelter them, you'll have very happy plants.
Offering your plants liquid fertilizer every two weeks or so will encourage them to produce fresh buds and create a beautifully flowering plant.
Varieties
Most of the 450+ species of the genus primula like cooler weather and will not tolerate midsummer heat. They come in every color of the rainbow and the species names span the alphabet.
The varieties are distinguished by their rosette of leaves that resemble the leaves of a head of lettuce. In the center of the rosette are the flowers. Each flower has five petals joined at the base. Flowers appear on leafless stalks. Common colors include white, red, blue, yellow, purple and cream, but some species also produce bicolored flowers.

Deadheading Primroses
Deadheading simply means grooming the plant. By removing the spent flowers, you prevent your plant from going to seed, and allow it to mature. Cutting back the spent flower stems also encourages new growth, so you'll see fresh flowers. Once your plants have started to thrive, a simple walk around the garden several times a week allows you to see how your primroses are progressing and whether you might need to clean up the flowers that are spent.
Make sure you sterilize your scissors or pruning shears with rubbing alcohol before using them to deadhead your primroses.
Start checking your garden in late spring.
Carry a pair of scissors or a small pair of pruning shears in your pocket for the task. Some gardeners prefer to simply pinch away the spent flowers between thumb and forefinger, but sharp scissors make it easier to snip away the dead flower and leaves.
Wear rubber gloves -- some people might be allergic to certain varieties of plants. It also curbs the spread of disease if your naturally oily fingers are protected. Certain floral diseases easily spread when fingers flit from one flower to another.
Look for the flowers that have begun to fade or are drying out.
Reach down to the base of the flower stalk and hold the dead flower gently.
Bend the flower to expose the stem, and then either pinch or snip the dead flower away from the plant.
It's wise to carry a small bag or wear an apron and drop the dead flowers into the bag or apron rather than on the ground. You can dump your deadheaded materials into a recycling pile when you're done with your task.
Because too much water will rot primroses, check them occasionally and clip off any yellow or rotten lower leaves you see around the base of the plant. Removing rotten leaves promotes new growth. Your primrose bed might seem a bit droopy after you deadhead and trim old growth, but you'll be rewarded when new buds start to arrive.
If primroses get too wet, they can develop conditions like crown or root rot and become susceptible to garden bugs, like aphids or spiders.
Once your plants stop blooming, pull the primroses from the ground or your pots, and put them into containers until fall. The best soil is gritty and humus-rich. Keep your containers in a sheltered spot, and keep the plants moist but not wet.

Growing Primroses
You can grow primroses from seed or purchase your plants from a grower. If you choose to grow them from seed, be aware that the seeds are exceptionally small and it is difficult for the novice gardener to be successful starting these plants from seed.
Most primula varieties flower reliably and are easy to grow. Plant them in sun or partial shade, and choose an area or pot that provides good drainage. Primroses don't like to be wet. If you can shelter them, you'll have very happy plants.
Offering your plants liquid fertilizer every two weeks or so will encourage them to produce fresh buds and create a beautifully flowering plant.
Varieties
Most of the 450+ species of the genus primula like cooler weather and will not tolerate midsummer heat. They come in every color of the rainbow and the species names span the alphabet.
The varieties are distinguished by their rosette of leaves that resemble the leaves of a head of lettuce. In the center of the rosette are the flowers. Each flower has five petals joined at the base. Flowers appear on leafless stalks. Common colors include white, red, blue, yellow, purple and cream, but some species also produce bicolored flowers.
0
1
文章
Erin
2017年08月10日

#兰花 常用分株、播种及组织培养兰花。常见的以分株繁殖为主,兰花分株兰花春秋两季均可进行,兰花一般每隔2—3年分株一次。
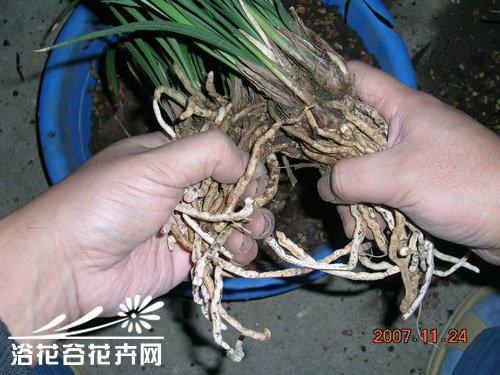
分株后的每丛至少要保存5个连结在一起的假球茎,而这些假球茎上至少有3个叶片生长健壮。分株前要减少灌水,使盆土较干。出盆时,除去根部旧土壤,以清水洗净,晾2—3小时。待根部发白微蔫后,再以利刀在假球茎间切割分株,切口处涂以草木灰或硫磺粉防腐。
栽种兰花适合采用富含腐殖质的砂质壤土。花盆以瓦盆为好,有利植株生长。盆底排水孔应比一般花盆为大,以有3—4个底孔为宜,花盆的大小与深浅依植株大小而定。
上盆时,先以碎瓦片覆在盆底孔上,再铺上粗石子,约占盆深度1/5—1/4,再放粗粒土及少量细土,使盆中部的土隆起后栽植。栽时将根散开,植株应稍倾斜。盆土随填随舒展其根,并摇动花盆数次,同时用手指塞紧压实。
栽植深度以将假球茎刚刚埋人土中为度。栽植后盆面略呈拱形,盆边缘留2厘米沿口,最后用细喷壶喷水2—3次,置阴处10—15天。附生兰需要分株时,先将根修好,适当剪开,然后用泥炭藓、蕨根、残叶等栽培材料包在根系之外,种入漏空花盆中。然后浇水,保持一定湿度。
场地选择:要求四周空旷,通风良好,并靠近水面,空气湿润,无煤烟污染。场地的西南面,可种 蕙兰常绿阔叶树,郁闭度应在0.7左右,这样可减少午后阳光照射,调节湿度与温度。
分株后的每丛至少要保存5个连结在一起的假球茎,而这些假球茎上至少有3个叶片生长健壮。分株前要减少灌水,使盆土较干。出盆时,除去根部旧土壤,以清水洗净,晾2—3小时。待根部发白微蔫后,再以利刀在假球茎间切割分株,切口处涂以草木灰或硫磺粉防腐。

栽种兰花适合采用富含腐殖质的砂质壤土。花盆以瓦盆为好,有利植株生长。盆底排水孔应比一般花盆为大,以有3—4个底孔为宜,花盆的大小与深浅依植株大小而定。
上盆时,先以碎瓦片覆在盆底孔上,再铺上粗石子,约占盆深度1/5—1/4,再放粗粒土及少量细土,使盆中部的土隆起后栽植。栽时将根散开,植株应稍倾斜。盆土随填随舒展其根,并摇动花盆数次,同时用手指塞紧压实。
栽植深度以将假球茎刚刚埋人土中为度。栽植后盆面略呈拱形,盆边缘留2厘米沿口,最后用细喷壶喷水2—3次,置阴处10—15天。附生兰需要分株时,先将根修好,适当剪开,然后用泥炭藓、蕨根、残叶等栽培材料包在根系之外,种入漏空花盆中。然后浇水,保持一定湿度。
场地选择:要求四周空旷,通风良好,并靠近水面,空气湿润,无煤烟污染。场地的西南面,可种 蕙兰常绿阔叶树,郁闭度应在0.7左右,这样可减少午后阳光照射,调节湿度与温度。
3
1
文章
Miss Chen
2017年08月09日

Shade-loving hostas (Hosta spp.) produce their signature foliage in various colors, patterns, sizes and textures. These plants do best in the cooler climates of U.S. Department of Agriculture plant hardiness zones 3 through 8. Slugs are the usual culprits for holes chewed in hosta leaves, although other pests or factors can also cause this damage. Providing the hostas with good care and following excellent sanitation practices around the hostas will help to prevent or minimize the appearance of holes in the hosta leaves.

Step 1
Space plants well at planting or transplant or divide hostas so that there is good air circulation around the hosta foliage. Crowded hostas that are constantly damp are prone to fungal problems like anthracnose. Anthracnose appears as white to tan leaf spots with a dark border that often lose their center before the entire leaf develops a torn or tattered appearance.
Step 2
Keep debris, like excessive mulch, leaf litter, boards, stones and bricks, away from the hostas and thin out any dense ground cover plants near the hostas. Slugs feed on hostas at night and need a damp environment to hide in during the day. Holes caused by slugs are irregular but have a smooth edge. Cutworms chew long, oval holes between hosta leaf veins.
Step 3
Inspect the hosta plants and surrounding area at night with a flashlight, looking for slugs and cutworms. Pick off any pests you find and drown them in a bucket of soapy water.

Step 4
Sprinkle diatomaceous earth over the ground around the hostas. Reapply this material regularly and after each rainfall to ensure it remains effective. Diatomaceous earth will scratch the outer or protective layer of slugs and other pests, causing the pests to dry out and die.
Step 5
Drape a fabric sheet or similar material over the hostas whenever hail or out-of-season frosts are expected. Prop the cloth up with sticks, stakes or boards, so it is not directly in contact with the hosta. Hail damage to hosta leaves appears as holes with jagged edges and an overall torn or tattered appearance.

Step 1
Space plants well at planting or transplant or divide hostas so that there is good air circulation around the hosta foliage. Crowded hostas that are constantly damp are prone to fungal problems like anthracnose. Anthracnose appears as white to tan leaf spots with a dark border that often lose their center before the entire leaf develops a torn or tattered appearance.
Step 2
Keep debris, like excessive mulch, leaf litter, boards, stones and bricks, away from the hostas and thin out any dense ground cover plants near the hostas. Slugs feed on hostas at night and need a damp environment to hide in during the day. Holes caused by slugs are irregular but have a smooth edge. Cutworms chew long, oval holes between hosta leaf veins.
Step 3
Inspect the hosta plants and surrounding area at night with a flashlight, looking for slugs and cutworms. Pick off any pests you find and drown them in a bucket of soapy water.

Step 4
Sprinkle diatomaceous earth over the ground around the hostas. Reapply this material regularly and after each rainfall to ensure it remains effective. Diatomaceous earth will scratch the outer or protective layer of slugs and other pests, causing the pests to dry out and die.
Step 5
Drape a fabric sheet or similar material over the hostas whenever hail or out-of-season frosts are expected. Prop the cloth up with sticks, stakes or boards, so it is not directly in contact with the hosta. Hail damage to hosta leaves appears as holes with jagged edges and an overall torn or tattered appearance.
0
0
文章
Dummer. ゛☀
2017年08月09日

Family - Liliaceae
Stems - To +30cm tall, erect, simple to branching above, glabrous, glaucous, fleshy, herbaceous, from rhizomes and thickened roots.
Leaves - Alternate, perfoliate, rounded at base, acute at apex, entire, glabrous, with 3-5 prominent parallel veins, to +8cm long, 3cm broad.
Inflorescence - Single flower terminating stems. Pedicel to 1.5cm long, glabrous. Flowers pendant.
Flowers - Tepals 6, yellow, spirally curled, linear-oblong, entire, acute, glabrous, to +4cm long, 6mm broad. Stamens 6, erect. Filaments compressed, 5mm long, white, glabrous. Anthers 1.6cm long, yellow. Ovary superior, 3-sided, 5mm long, 4mm broad, 3-valved, 3-locular. Placentation axile. Ovules many. Styles 3, connate in basal 1/2, to 1.3cm long, yellowish-green, glabrous. Stigmas slightly curved at apex.
Flowering - April - May.
Habitat - Rich rocky woods, steep slopes, alluvial valleys.
Origin - Native to U.S.
Other info. - This striking species is common throughout Missouri except in some of the prairie areas. This species is one of the earlier plants to bloom in the spring. Another species, U. sessifolia L. is similar but has sessile leaves, not perfoliate leaves.
The roots and young shoots of U. grandiflora can be eaten. Traditionally, the plant was used to treat sore muscles, backaches, toothaches, and swelling.
This species grows well from seed and should be cultivated more.
Stems - To +30cm tall, erect, simple to branching above, glabrous, glaucous, fleshy, herbaceous, from rhizomes and thickened roots.
Leaves - Alternate, perfoliate, rounded at base, acute at apex, entire, glabrous, with 3-5 prominent parallel veins, to +8cm long, 3cm broad.
Inflorescence - Single flower terminating stems. Pedicel to 1.5cm long, glabrous. Flowers pendant.

Flowers - Tepals 6, yellow, spirally curled, linear-oblong, entire, acute, glabrous, to +4cm long, 6mm broad. Stamens 6, erect. Filaments compressed, 5mm long, white, glabrous. Anthers 1.6cm long, yellow. Ovary superior, 3-sided, 5mm long, 4mm broad, 3-valved, 3-locular. Placentation axile. Ovules many. Styles 3, connate in basal 1/2, to 1.3cm long, yellowish-green, glabrous. Stigmas slightly curved at apex.

Flowering - April - May.
Habitat - Rich rocky woods, steep slopes, alluvial valleys.
Origin - Native to U.S.
Other info. - This striking species is common throughout Missouri except in some of the prairie areas. This species is one of the earlier plants to bloom in the spring. Another species, U. sessifolia L. is similar but has sessile leaves, not perfoliate leaves.

The roots and young shoots of U. grandiflora can be eaten. Traditionally, the plant was used to treat sore muscles, backaches, toothaches, and swelling.
This species grows well from seed and should be cultivated more.
0
0


