文章
绮丽
2017年05月18日


目录
1 芦荟好养吗
▪ 好养
▪ 有什么好处
2 芦荟的养殖方法
▪ 盆土选择
▪ 选苗上盆
▪ 换盆注意事项
▪ 温度要求
▪ 浇水方法
▪ 光照需求
3 芦荟四季养护方法
▪ 春季养护
▪ 夏季养护
▪ 秋季养护
▪ 冬季养护
4 芦荟养殖注意事项
▪ 避免头重脚轻
▪ 加强通风
5 芦荟有问必答
1
2
文章
绮丽
2017年05月18日


空气凤梨的花期
正常的空气凤梨的花期在秋末或早春,但室内的没有具体时间,只要环境适宜就可开花。花基本会维持2~3周,并且一株一生只开一次。


空气凤梨开花后会死吗
会,但不会立马死掉,开花后会生长1~2年。但大家可以趁此机会繁殖后代。
空气凤梨的花开始枯萎,建议剪掉这些枯萎的花梗,这样会产生更多的小苗。当分株想的小苗开始萌动时,植株底部的叶子会开始松动,呈现枯萎状,此时不要将叶子剪掉,因为这些地方是小苗的芽眼的位置。等到小苗长大,可以分株,母株可以休息了。

空气凤梨花后分株
分株通常在空气凤梨母株死后进行。剪掉母株上丛生的枯萎的叶片,然后用手轻轻的掰下分株小苗,基本不费力气。不要立即丢掉母株,渐渐枯萎的空气凤梨也许还会能产生更多的分株小苗。


0
1
文章
绮丽
2017年05月18日


豆瓣绿的土壤选择
豆瓣绿要求土壤腐殖质丰富、疏松、肥沃、排水良好。可以选择叶土7份、河沙3份,加少量基肥配成培养土,或者用泥炭土6份、珍珠岩4份及少量基肥混合配制。种植时一般直接购买盆栽,不需要配土,大家对土壤的成分稍有了解即可。
豆瓣绿的温度要求
豆瓣绿性喜温暖、湿润、半阴的环境,耐高温,生长适温为25℃左右,冬季在10~15℃可以正常生长,10℃以下停止生长,5℃以下受害,低于0℃会受冻死亡。小小一盆豆瓣绿叶不是那么好养的。

豆瓣绿的光照要求
豆瓣绿较耐阴,四季均可放室内有明亮散射光处培养。春秋季可多见些光,冬季放朝南窗沿附近多见阳光,夏季放朝北窗台,适当遮光。光线适宜时叶色艳丽,光线太强或太暗都会使叶色失去娇艳色彩。
豆瓣绿的浇水方法
浇水要盆土干湿相宜,生长过程中,春秋是生长发育旺季,水量多些。夏季天气炎热但植株因温度高其生长反而缓慢,可早晨或傍晚各浇1次,高温多湿茎叶易烂,具体看天气及盆土而定。盆土应略偏干一些,因其茎叶肉质肥厚,过湿易使根部腐烂,特别是冬季因气温低,呈休眠状态,盆土宜带干。

豆瓣绿的施肥方法
豆瓣绿通常2~3年更新1次培养土。生长期间,每隔15~20天追施1次腐熟液肥或氮磷化肥,浓度为饼肥15%~20%,氮磷复合肥0.2%~0.3%。若施肥不知分寸,可减少氮肥,可使叶片上的斑纹更加显著。
豆瓣绿养殖注意事项
别看豆瓣绿小小一盆很可爱,那是人家养的好。若养护三心二意,它也是会徒长的。所以要及时修剪。当豆瓣绿长到10厘米左右,要摘心,促进侧枝萌发,使植株更丰满。
平时管理注意光线适度,肥水合理。阳光不太强烈时,可把盆栽放置室外。但夏季不能受强光直射,尤其不能放在晒太阳的场所,否则会造成枝叶发黄。
1
0
文章
Abigal
2017年05月16日


We all know by now that #composting is important to the #environment . It allows natural waste to return to the earth, while adding a nutrient rich material to our gardens. Here is a break down of the top 3 most common techniques for composting for the home #gardener .

Hot Composting – Open Bins
Hot composting is the most intensive method, but also the fastest way to get finished compost. It involves building compost piles that have a balance of green material (nitrogen), oxygen, water and brown material. The most common method is a three bin open bin method. Made of open slats to allow the piles to breathe, this option is not a great choice for those with limited space, or who will not keep up with turning the pile…. But for those with a little space in the back of the garden, it’s the fastest way to generate a larger amount of compost, and to utilize a larger amount of scraps. Here’s how to make an open bin hot compost pile.
Build or buy three, side by side compost bins. ‘Backyard Feast’ has a complete tutorial on building the ultimate compost bin.

Bin #1 will be for brown materials…kind of a holding area for things you want to compost.
Bin #2 is where all the action happens.
In this bin, layer brown and green materials (green materials include fresh grass, leaves, veggie scraps, etc… browns include dried leaves, twigs, and dead plant material) until you have a ratio of approximately 2 parts brown to 1 part green.
Wet the pile with water until moist, but not soggy.
Turn the pile regularly with a spading fork to allow air to reach the pile and to mix the nitrogen throughout the pile.
Wait for the pile to get hot, and to start composting for you! Basically, the more attentive you are to turning the pile, keeping it moist and not adding any new material until its finished, the faster you will get compost. That gives you a window of 6-12 months. Compost is done when it is warm, not hot, and smells and looks like a sweet soil amendment, and no longer like rotting cantaloupe. :) Move the compost in bin #2 to bin #3 to “settle” and continue to cool until you need to use it. Start another hot pile in bin #2 from all the stuff you have been holding in bin #1!
The benefits to having the three bin system is that you can continue to collect brown materials during the season in bin #1, and that once you move the compost to bin #3 to settle, you can start over again with a new compost pile. Moves things along a lot faster!
You can also create a hot compost pile in just one bin if you have don’t have space, or don’t have much material to compost… it just means you can only work on one pile of compost at a time. ‘This Old House’ shows you complete plans on making a single compost bin.
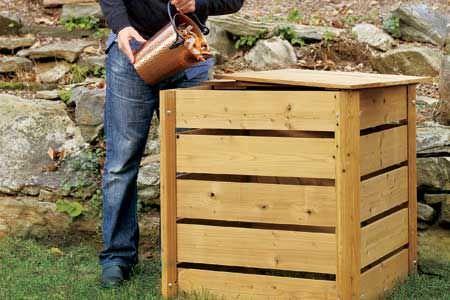
Hot Composting – Closed Bins or Tumblers
This is a one bin system where you use a closed bin or tumbler, add the same “hot” ratio of green to brown and water, then turn the bin itself to mix the ingredients once a week or so. This saves you from having to deal directly with the compost, and saves a little on your back as well! The downside is that you can only make a small amount of compost at a time. If you don’t want to buy a tumbler, ‘Full Measure of Happiness’ shows us how to make a DIY compost bin from a plastic garbage can!

A more intensive project will keep you composting like a pro. ‘Urban Farm Online’ has a tutorial for this DIY compost tumbler you can use year after year.

Cold Composting – Otherwise known as the lazy mans compost pile!
So for all of you groaning out loud because all that sounds like so much work, I have good news. Stuff will compost with or without your help. It’s just a matter of how fast! Cold composting works, but it can take 1-2 years, depending on what kind of materials you have in your pile. Basically, this is the way to do it…
Make a pile 3×3 feet of compostable materials, the smaller the pieces, the better, so shred!
Add some water, or not, and cover if you want to speed the process along… or not. :)
When, and if, you think of it… turn it, water it, and then forget it again.
Wait until it’s done. Voila!
This info graphic by Well Home tells your everything you need to know about hot and cold composting, and also some less well known (and one icky!) composting techniques.

That’s it! Three easy techniques for composting everyone should know! It’s not rocket science, and there is no compost police that is checking to make sure you have turned your pile this week. Just remember, the more attention you give it, the faster it will give you a wonderful, organic soil conditioner for your garden!
3
1


