文章
Miss Chen
2021年07月07日

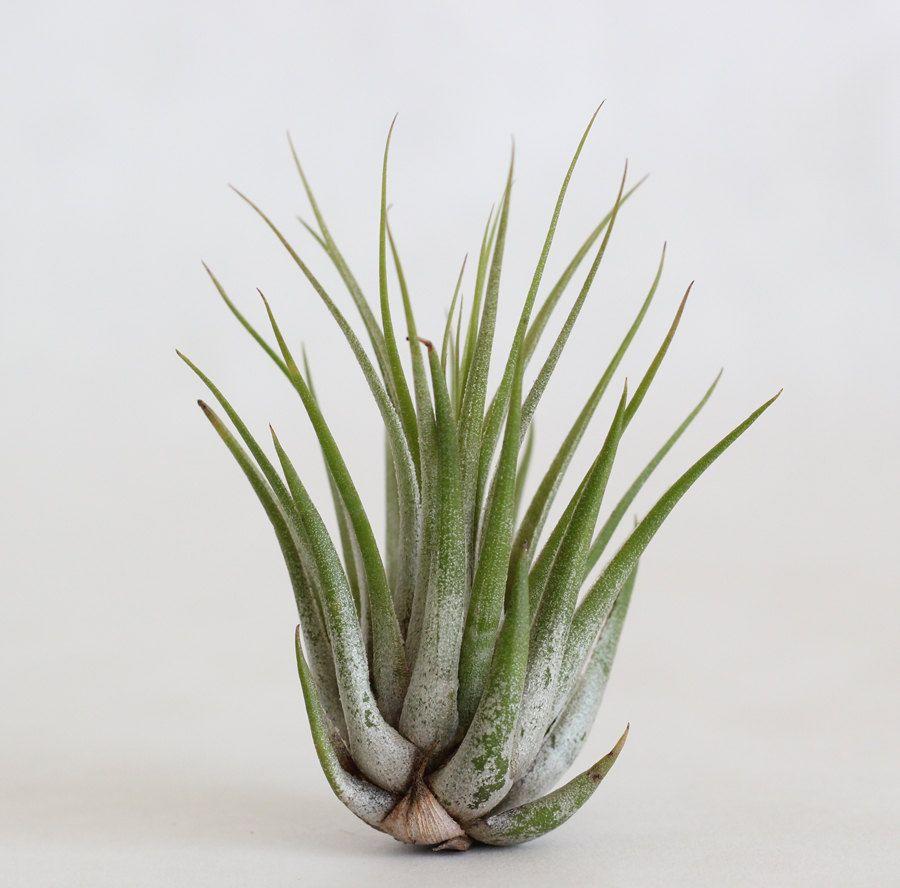
No potting soil? No problem. You don’t need soil to keep your home full of gorgeous houseplants. Meet Tillandsia kolbii, a variety of air plant.
These plants actual absorb nutrients and water through their leaves, not their roots. Because of this, they don’t have big root systems like the usual houseplant. These plants can be set wherever you’d like a little greenery, no pot needed. In fact, you can even hang them.
The Tillandsia kolbii has compact, fuzzy leaves that are a soft green color. With proper care, they may also produce beautiful, unique blooms in red, orange, or purple.

Botanical Name Tillandsia kolbii
Common Name Air plant
Plant Type Houseplant or annual
Mature Size 1 to 3 inches
Sun Exposure Bright, indirect light
Soil Type Not applicable
Soil pH Not applicable
Bloom Time Once, when fully matured
Flower Color Red, orange, or purple
Hardiness Zones 9 to 11, USA
Native Area Mexico and Guatemala
Tillandsia Kolbii Care
Caring for these plants is a breeze. Choose an area with bright, indirect lighting and good airflow to keep your Tillandsia kolbii the happiest. The biggest thing they require is regular watering. How do you water a plant with no soil, you may ask? Regular misting is a wonderful way to keep your plants humid.
With proper attention and care, your Tillandsia kolbii may even bloom. These amazing little plants only bloom once in their lifetime, and the process may take years.
Once they are mature, they will produce pups. These are new little air plants that will pop out of the base of the mother plant. You can either leave these attached so they slowly grow a huge connected colony of air plants, or remove them to create more plants to spread around. Occasionally, mealybugs and scale may pose pest problems.
Light
Tillandsia kolbii, like most air plants, loves bright, indirect lighting. Despite being native to Mexico and Guatemala, too much sunshine can actually harm or burn the plant. Signs of too much sun include burn marks or red-tipped leaves. The red coloring is caused by stress.
Soil
The name “air plants” has become a popular way to describe plants belonging to the Tillandsia family because they don't need to be grown in soil.
Instead, just set your Tillandsia kolbii wherever you’d like to add a little greenery. Whether that be your desk, atop a decorative piece of driftwood, or even in a hanging terrarium. In warm areas, these plants can even be grown outside and make a wonderful addition to your porch décor.
Water
Unlike most houseplants, the Tillandsia kolbii cannot be watered in the usual fashion. To give your air plant the water it needs, soak it in a bowl of water for 10 to 30 minutes every week or two. If your air plant is blooming, be sure to keep the delicate flower above the water during a soak to avoid damaging it.
Once you remove your air plant from the water, tip it upside-down to let the excess water drain from its foliage, and then return it to its display area. Let your air plant dry completely before the next soaking session. This will help avoid problems with rot.
Make sure to use clean water, like spring or filtered water. If you must use tap water, let it sit for at least 24 hours to allow the chlorine to dissipate.
Temperature and Humidity
Tillandsia kolbii loves humidity. Regularly misting it will provide the humidity and moisture that it needs. In drier areas, you may need to mist your air plant daily. In more humid areas, you may only need to mist it every three days or so.
These plants also love warmer temperatures. However, avoid placing them near heating or AC units. Too much heat or cold can damage the plants. Placing them in a well-ventilated area with bright indirect sunlight is ideal.
Fertilizer
Because air plants do not have soil, you will need to fertilize during their monthly soak by adding it to the water. Using a fertilizer designed for air plants is best.
However, fertilizer is not a huge need for these little plants. They will grow wonderfully even without additional feeding. Too much fertilizer can even kill your Tillandsia kolbii.
Propagating Tillandsia kolbii
Propagating an air plant is fun and easy. In fact, your air plant will tell you when. These plants create what are known as “pups” once they are mature. These pups are new air plants. Once your Tillandsia kolbii is mature and producing pups, here is how to remove them.
1. Wait until your pup is at least a third of the size of the mother plant.
2. Locate the base of the pup.
3. Gently pop the pup off the mother plant. Be sure to grip the pup at its base leaves so no tearing occurs on its top leaves. If the pup does not easily pop off, a sharp knife or pair of snips may be needed to trim the pup from the mother.
4. Once the pup is detached, place it in a well ventilated, bright spot of its own.
Before you know it, you’ll have a whole family of air plants. Don’t be discouraged if you do not see pups for some time, though. Air plants can take years to bloom and produce pups. Patience is key.
These plants actual absorb nutrients and water through their leaves, not their roots. Because of this, they don’t have big root systems like the usual houseplant. These plants can be set wherever you’d like a little greenery, no pot needed. In fact, you can even hang them.
The Tillandsia kolbii has compact, fuzzy leaves that are a soft green color. With proper care, they may also produce beautiful, unique blooms in red, orange, or purple.

Botanical Name Tillandsia kolbii
Common Name Air plant
Plant Type Houseplant or annual
Mature Size 1 to 3 inches
Sun Exposure Bright, indirect light
Soil Type Not applicable
Soil pH Not applicable
Bloom Time Once, when fully matured
Flower Color Red, orange, or purple
Hardiness Zones 9 to 11, USA
Native Area Mexico and Guatemala
Tillandsia Kolbii Care
Caring for these plants is a breeze. Choose an area with bright, indirect lighting and good airflow to keep your Tillandsia kolbii the happiest. The biggest thing they require is regular watering. How do you water a plant with no soil, you may ask? Regular misting is a wonderful way to keep your plants humid.
With proper attention and care, your Tillandsia kolbii may even bloom. These amazing little plants only bloom once in their lifetime, and the process may take years.
Once they are mature, they will produce pups. These are new little air plants that will pop out of the base of the mother plant. You can either leave these attached so they slowly grow a huge connected colony of air plants, or remove them to create more plants to spread around. Occasionally, mealybugs and scale may pose pest problems.
Light
Tillandsia kolbii, like most air plants, loves bright, indirect lighting. Despite being native to Mexico and Guatemala, too much sunshine can actually harm or burn the plant. Signs of too much sun include burn marks or red-tipped leaves. The red coloring is caused by stress.
Soil
The name “air plants” has become a popular way to describe plants belonging to the Tillandsia family because they don't need to be grown in soil.
Instead, just set your Tillandsia kolbii wherever you’d like to add a little greenery. Whether that be your desk, atop a decorative piece of driftwood, or even in a hanging terrarium. In warm areas, these plants can even be grown outside and make a wonderful addition to your porch décor.
Water
Unlike most houseplants, the Tillandsia kolbii cannot be watered in the usual fashion. To give your air plant the water it needs, soak it in a bowl of water for 10 to 30 minutes every week or two. If your air plant is blooming, be sure to keep the delicate flower above the water during a soak to avoid damaging it.
Once you remove your air plant from the water, tip it upside-down to let the excess water drain from its foliage, and then return it to its display area. Let your air plant dry completely before the next soaking session. This will help avoid problems with rot.
Make sure to use clean water, like spring or filtered water. If you must use tap water, let it sit for at least 24 hours to allow the chlorine to dissipate.

Temperature and Humidity
Tillandsia kolbii loves humidity. Regularly misting it will provide the humidity and moisture that it needs. In drier areas, you may need to mist your air plant daily. In more humid areas, you may only need to mist it every three days or so.
These plants also love warmer temperatures. However, avoid placing them near heating or AC units. Too much heat or cold can damage the plants. Placing them in a well-ventilated area with bright indirect sunlight is ideal.
Fertilizer
Because air plants do not have soil, you will need to fertilize during their monthly soak by adding it to the water. Using a fertilizer designed for air plants is best.
However, fertilizer is not a huge need for these little plants. They will grow wonderfully even without additional feeding. Too much fertilizer can even kill your Tillandsia kolbii.
Propagating Tillandsia kolbii
Propagating an air plant is fun and easy. In fact, your air plant will tell you when. These plants create what are known as “pups” once they are mature. These pups are new air plants. Once your Tillandsia kolbii is mature and producing pups, here is how to remove them.
1. Wait until your pup is at least a third of the size of the mother plant.
2. Locate the base of the pup.
3. Gently pop the pup off the mother plant. Be sure to grip the pup at its base leaves so no tearing occurs on its top leaves. If the pup does not easily pop off, a sharp knife or pair of snips may be needed to trim the pup from the mother.
4. Once the pup is detached, place it in a well ventilated, bright spot of its own.
Before you know it, you’ll have a whole family of air plants. Don’t be discouraged if you do not see pups for some time, though. Air plants can take years to bloom and produce pups. Patience is key.
0
0
文章
Miss Chen
2021年05月22日

Distribution and habitat: Faucaria tigrina is a subtropical succulent plant native of South Africa in eastern Cape Province thicket and savanna and the Karoo desert. It is found in open, rocky patches, in a dark clay soil with a low pH, in mountain renosterveld.
The Latin name for these succulent house plants is Faucaria meaning jaws and tigrina meaning tiger.
The ‘teeth’ of the Faucaria tigrina however, are actually soft and harmless, and help to trap moist fog and direct it down to the roots. Fog that comes in from the coast provides a precious source of water for plants surviving in the hot, arid thickets.
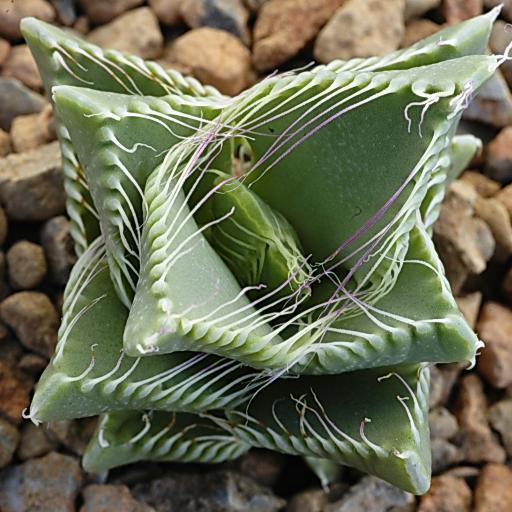
Description: Faucaria tigrina are low growing succulent plants with four or five layers of leaves arranged in criss-cross opposite pairs, forming a thick, star shaped rosette. Each pair of leaves is united at the base and these are virtually no stems. The leaves are fleshy and pointed, 2-5cm (0.8-2 inch) long and 2cm (0.8 inch) broad at the base. The roughly triangular leaves, which are usually edged with soft and bristle-like hooked teeth, have a flat upper surface, but the underside is convex. Leaf colour is greyish green marked with many small white dots. The teeth on the edge of the young leaves interlock, but they later strengthen and separate to give a jaw like appearance.
The plants send out basal offsets that form crowded clumps.
Relatively large, daisy-like flowers, which generally open in the afternoon, are produced from between the leaves in autumn. They are attractive golden yellow, stalk-less and can be up to 5cm (2 inch) wide.
Proper care: The plants in this genus represent some of the more easily cultivated succulent species.
Light: Faucaria tigrina must have at least three hours a day of direct sunlight all year long in order to flower.
Temperature: Faucaria tigrina needs warmer temperatures from spring through fall 21-32°C (70-90°F). It needs average temperatures in winter, 16-24°C (60-75°F).
If the plant is moved outdoors for the summer, be sure to bring it back indoors when nighttime temperatures drop below 16°C (60°F).
This succulent plant requires an average to dry humidity.
Water: Keep Faucaria tigrina soil lightly moist spring through fall. In winter, allow soil to dry out between waterings.
Feeding: During the active growth period only, apply standard liquid fertiliser at half-strength once or twice during growth period. Too frequent feeding will result in soft, uncharacteristic growth.
Potting and repotting: Use a mixture composed of two parts of soil-based mixture to one part of coarse sand or grit. Because Faucaria tigrina have relatively little root, plant them in shallow pans or half-pots. When a clump has covered the surface of the potting mixture, move plants into a container one size larger. Repotting should be necessary, however, only one in two or three years. The best time to pot is early spring.
Gardening: In areas prone to frost, Faucaria tigrina should be overwintered in an intermediate greenhouse or conservatory, in pots of cactus compost. Although the plants will survive mild frost if kept dry – hardy as low as -5°C (23°F) – they should be protected from frost to prevent scarring.
Faucarias become woody and untidy as they age. New plants can be started by cutting a rosette and planting it.
Position: Faucaria tigrina plants need full sun to light shade. Keep them shaded in summer, but provide maximum light the rest of the year. They do not do well in full shade as they tend to etiolate, fall over and rot easily.
Soil: Faucaria tigrina need to be located in an accentuated and drained substratum. The substrate should be gritty-sandy soil. They thrive on a little compost and some fine mulch spread between the plants would also be a good idea.
These succulent plants will grow in a well-drained soil mix, but can tolerate a wide variety of soil types and growing locations as long as there is plenty of sun.
Irrigation: Faucaria tigrina is native to a primarily summer rainfall area but in cultivation the plant can be watered year-round. The plants are well watered during the growing season and allowed to dry thoroughly before watering again and will tolerate some over watering, but the challenge is to help them keep their compact form and prevent elongation of the stem.
Faucaria tigrina plants grow on winter rain and were heading for spring-summer dormancy. Requires little water otherwise their epidermis breaks (resulting in unsightly scars). Water moderately from the middle of summer to the end of winter and keep the compost almost dry when the plants are dormant. Water minimally in spring and summer, only when the plant starts shriveling (but they will generally grow even in summer if given water).
Fertiliser: Faucaria tigrina plants should be fertilised only once during the growing season with a balanced fertilizer diluted to half the recommended strength.
Propagation: Carefully divide overcrowded clumps of Faucaria tigrina in late spring or early summer just after plants have restarted into growth. As individual plants are separated, some will come away with their roots attached. Insert each such rooted Faucaria tigrina directly into an 8cm or 10cm (3-4 inch) container of the recommended potting mixture and treat the new plant as a mature specimen. For the first week or two, however, keep the Faucaria tigrina in medium light, well out of direct sunlight.
An individual plant without roots attached should be left unpotted for a few days to let the base of the plant harden. It may then be inserted in the recommended potting mixture. Surround the base with some additional coarse sand. This will help to prevent rotting and encourage the development of roots. Keep the plant in medium light and water only moderately until new growth indicates that rooting has occurred. Thereafter, treat the young plant as a mature Faucaria tigrina.

Problems:
The spring weather, with a high temperature swing between the day and night hours and pretty frequent rains, can favour the development of fungus diseases (phytophthora) indicated by sudden wilting and pale green discolouration.
Treatement: Remove infected plants and treat remaining plants preemptively with a systemic fungicide, before the gems grow excessively. Avoid fungus infections by improving drainage and over-fertilization.
Waxy fibres and honeydew on leaves and shoots indicate an infestation with mealybugs. Scale insects sit on the undersides of the leaves.
Treatment: At the end of the winter a wide range insecticide is recommended to be applied to prevent the insects attack. It is recommended to do these treatments when there are not flowerings in the garden. Alternatively, control biologically with predatory ladybirds or parasitic wasps can be used in garden.
Note: Continued urban development and over-grazing within its current natural habitat means Faucaria tigrina plant is classed as endangered in the wild.
Uses and display: Faucaria tigrina is used as a border or filler plant in rock gardens, xeriscaping or wild gardens. It will attract bees, butterflies and other insects into the garden. It is a suitable succulent plant for smaller gardens and can be used to stabilise banks and and reduce land erosion. Although it can be grown just as easily indoors as windowsill plant, being well suited to growing in containers and pots.
SUMMARY:
CHARACTERISTICS:
Foliage – green
Features – flowers
Shape – low growing, clustering habit
Height: under 15cm (6 inch)
PROPER CARE:
Watering in rest period – sparingly
Watering in active growth period – plentifully
Light – direct
Temperature in rest period – min 10°C max 13°C (50-55°F)
Temperature in active growth period – min 16°C max 24°C (61-75°F)
Humidity – low
Hardiness zone: 9b-11
The Latin name for these succulent house plants is Faucaria meaning jaws and tigrina meaning tiger.
The ‘teeth’ of the Faucaria tigrina however, are actually soft and harmless, and help to trap moist fog and direct it down to the roots. Fog that comes in from the coast provides a precious source of water for plants surviving in the hot, arid thickets.
Description: Faucaria tigrina are low growing succulent plants with four or five layers of leaves arranged in criss-cross opposite pairs, forming a thick, star shaped rosette. Each pair of leaves is united at the base and these are virtually no stems. The leaves are fleshy and pointed, 2-5cm (0.8-2 inch) long and 2cm (0.8 inch) broad at the base. The roughly triangular leaves, which are usually edged with soft and bristle-like hooked teeth, have a flat upper surface, but the underside is convex. Leaf colour is greyish green marked with many small white dots. The teeth on the edge of the young leaves interlock, but they later strengthen and separate to give a jaw like appearance.
The plants send out basal offsets that form crowded clumps.
Relatively large, daisy-like flowers, which generally open in the afternoon, are produced from between the leaves in autumn. They are attractive golden yellow, stalk-less and can be up to 5cm (2 inch) wide.
Proper care: The plants in this genus represent some of the more easily cultivated succulent species.
Light: Faucaria tigrina must have at least three hours a day of direct sunlight all year long in order to flower.
Temperature: Faucaria tigrina needs warmer temperatures from spring through fall 21-32°C (70-90°F). It needs average temperatures in winter, 16-24°C (60-75°F).
If the plant is moved outdoors for the summer, be sure to bring it back indoors when nighttime temperatures drop below 16°C (60°F).
This succulent plant requires an average to dry humidity.
Water: Keep Faucaria tigrina soil lightly moist spring through fall. In winter, allow soil to dry out between waterings.
Feeding: During the active growth period only, apply standard liquid fertiliser at half-strength once or twice during growth period. Too frequent feeding will result in soft, uncharacteristic growth.
Potting and repotting: Use a mixture composed of two parts of soil-based mixture to one part of coarse sand or grit. Because Faucaria tigrina have relatively little root, plant them in shallow pans or half-pots. When a clump has covered the surface of the potting mixture, move plants into a container one size larger. Repotting should be necessary, however, only one in two or three years. The best time to pot is early spring.
Gardening: In areas prone to frost, Faucaria tigrina should be overwintered in an intermediate greenhouse or conservatory, in pots of cactus compost. Although the plants will survive mild frost if kept dry – hardy as low as -5°C (23°F) – they should be protected from frost to prevent scarring.
Faucarias become woody and untidy as they age. New plants can be started by cutting a rosette and planting it.

Position: Faucaria tigrina plants need full sun to light shade. Keep them shaded in summer, but provide maximum light the rest of the year. They do not do well in full shade as they tend to etiolate, fall over and rot easily.
Soil: Faucaria tigrina need to be located in an accentuated and drained substratum. The substrate should be gritty-sandy soil. They thrive on a little compost and some fine mulch spread between the plants would also be a good idea.
These succulent plants will grow in a well-drained soil mix, but can tolerate a wide variety of soil types and growing locations as long as there is plenty of sun.
Irrigation: Faucaria tigrina is native to a primarily summer rainfall area but in cultivation the plant can be watered year-round. The plants are well watered during the growing season and allowed to dry thoroughly before watering again and will tolerate some over watering, but the challenge is to help them keep their compact form and prevent elongation of the stem.
Faucaria tigrina plants grow on winter rain and were heading for spring-summer dormancy. Requires little water otherwise their epidermis breaks (resulting in unsightly scars). Water moderately from the middle of summer to the end of winter and keep the compost almost dry when the plants are dormant. Water minimally in spring and summer, only when the plant starts shriveling (but they will generally grow even in summer if given water).
Fertiliser: Faucaria tigrina plants should be fertilised only once during the growing season with a balanced fertilizer diluted to half the recommended strength.
Propagation: Carefully divide overcrowded clumps of Faucaria tigrina in late spring or early summer just after plants have restarted into growth. As individual plants are separated, some will come away with their roots attached. Insert each such rooted Faucaria tigrina directly into an 8cm or 10cm (3-4 inch) container of the recommended potting mixture and treat the new plant as a mature specimen. For the first week or two, however, keep the Faucaria tigrina in medium light, well out of direct sunlight.
An individual plant without roots attached should be left unpotted for a few days to let the base of the plant harden. It may then be inserted in the recommended potting mixture. Surround the base with some additional coarse sand. This will help to prevent rotting and encourage the development of roots. Keep the plant in medium light and water only moderately until new growth indicates that rooting has occurred. Thereafter, treat the young plant as a mature Faucaria tigrina.

Problems:
The spring weather, with a high temperature swing between the day and night hours and pretty frequent rains, can favour the development of fungus diseases (phytophthora) indicated by sudden wilting and pale green discolouration.
Treatement: Remove infected plants and treat remaining plants preemptively with a systemic fungicide, before the gems grow excessively. Avoid fungus infections by improving drainage and over-fertilization.
Waxy fibres and honeydew on leaves and shoots indicate an infestation with mealybugs. Scale insects sit on the undersides of the leaves.
Treatment: At the end of the winter a wide range insecticide is recommended to be applied to prevent the insects attack. It is recommended to do these treatments when there are not flowerings in the garden. Alternatively, control biologically with predatory ladybirds or parasitic wasps can be used in garden.
Note: Continued urban development and over-grazing within its current natural habitat means Faucaria tigrina plant is classed as endangered in the wild.
Uses and display: Faucaria tigrina is used as a border or filler plant in rock gardens, xeriscaping or wild gardens. It will attract bees, butterflies and other insects into the garden. It is a suitable succulent plant for smaller gardens and can be used to stabilise banks and and reduce land erosion. Although it can be grown just as easily indoors as windowsill plant, being well suited to growing in containers and pots.
SUMMARY:
CHARACTERISTICS:
Foliage – green
Features – flowers
Shape – low growing, clustering habit
Height: under 15cm (6 inch)
PROPER CARE:
Watering in rest period – sparingly
Watering in active growth period – plentifully
Light – direct
Temperature in rest period – min 10°C max 13°C (50-55°F)
Temperature in active growth period – min 16°C max 24°C (61-75°F)
Humidity – low
Hardiness zone: 9b-11
0
0
文章
莹723
2020年10月19日

There are still plenty of jobs you can get on with in October, including harvesting late crops, planting for next year and improving the soil.
Here are some allotment jobs for October.
1-Harvesting
It’s time to harvest the last of the crops such as runner beans and courgettes, as well as pumpkins and squash. It’s also the time to harvest maincrop potatoes.

2-Sowing and planting
You can sow peas and broad beans now, like sowing ‘Aquadulce’, a particularly hardy broad bean variety. Rhubarb crowns can also be planted now; established clumps can also be divided.

3-Staking
Brussels sprouts can blow over in heavy winds when leaden with crops, so stake them now with a sturdy cane to prevent this.

4-Improve soil
While the plot is relatively empty, it’s a great opportunity to improve the soil. This doesn’t have to be hard work – either sow a green manure, or spread a 5cm layer of well-rotted manure on top of it – worms will work it into the soil over the winter.

Share your seed-sowing tips or ask for advice~

Here are some allotment jobs for October.
1-Harvesting
It’s time to harvest the last of the crops such as runner beans and courgettes, as well as pumpkins and squash. It’s also the time to harvest maincrop potatoes.

2-Sowing and planting
You can sow peas and broad beans now, like sowing ‘Aquadulce’, a particularly hardy broad bean variety. Rhubarb crowns can also be planted now; established clumps can also be divided.

3-Staking
Brussels sprouts can blow over in heavy winds when leaden with crops, so stake them now with a sturdy cane to prevent this.

4-Improve soil
While the plot is relatively empty, it’s a great opportunity to improve the soil. This doesn’t have to be hard work – either sow a green manure, or spread a 5cm layer of well-rotted manure on top of it – worms will work it into the soil over the winter.

Share your seed-sowing tips or ask for advice~

0
0
文章
ritau
2020年08月12日

1. Test the soil every day before you water the plant. Stick your finger 1 inch (2.5 cm) into the soil to feel for moisture. If it feels dry or if you rub your fingers together and see bits of dry soil flaking off, it's time for a good watering.
-If it's damp, wait 12 to 24 hours before checking the soil again.
-Daily watering is especially important during hot summer months.
-Most fuchsias like to be watered every day, but under or over-watering can cause the leaves to wilt so it's wise to check the soil first.
-Hanging baskets dry out faster than standing pots, so you may need to test the soil twice a day (especially on hot or dry days).
2. Pour water onto the soil until it drains from the bottom of the pot. Start by pouring water onto the base of the plant and then water the entire surface of the soil. Keeping pouring until you notice water dribbling out of the bottom of the pot.
-The goal is to keep the soil evenly moist but not sopping wet.
-If you don't see water coming out of the drainage holes, they may be clogged or the soil may not be draining properly (in which case, you should re-pot the plant).
3. Water the plant 2 to 3 times a week in the fall. Once summer is over, start watering your fuchsia plant every other day or just twice a week. Always test the soil with your finger first—if it's bone dry, go ahead and water it. If it's even the slightest bit damp, wait another day and check again.
Withholding water in the fall will prepare the plant for winter dormancy so it can reenergize and grow beautiful blooms in the spring!
4. Limit your waterings to 8 fl oz (240 mL) every 3 to 4 weeks in the winter. Let the soil get relatively dry starting in mid-November to early March (the exact months will vary depending on where you live). A good rule of thumb is to water it with 8 fluid ounces (240 mL) of water every 3 weeks or each month, but you can also feel the soil with your finger to see if it's bone dry. If it is, go ahead and water it and wait another 3 to 4 weeks before watering it again.
The plant will be in its dormant phase during the winter and your job is to make sure the soil doesn't get dusty-dry—a little dry is okay.

5. Fertilize the plant once a week during spring and summer months. Use a fertilizer with equal parts nitrogen, phosphorus, and potassium—a 20-20-20 or 16-16-16 blend is perfect. The amount of fertilizer you need to use depends on the size of the pot, but you should always read the instructions on the package.
-For instance, if you're fertilizing a 12 in (30 cm) pot, you might use 7 drops of liquid fertilizer for each 33 fluid ounces (980 mL) of water or sprinkle 3 to 4 tsp (15 to 20 g) of granular fertilizer on top of the soil.
If your plant is outside, stop fertilizing it 2 weeks before you bring it inside for the colder months.
Bone meal also makes an excellent fertilizer for fuchsia. You can buy it at any garden supply store.
-If it's damp, wait 12 to 24 hours before checking the soil again.
-Daily watering is especially important during hot summer months.
-Most fuchsias like to be watered every day, but under or over-watering can cause the leaves to wilt so it's wise to check the soil first.
-Hanging baskets dry out faster than standing pots, so you may need to test the soil twice a day (especially on hot or dry days).
2. Pour water onto the soil until it drains from the bottom of the pot. Start by pouring water onto the base of the plant and then water the entire surface of the soil. Keeping pouring until you notice water dribbling out of the bottom of the pot.
-The goal is to keep the soil evenly moist but not sopping wet.
-If you don't see water coming out of the drainage holes, they may be clogged or the soil may not be draining properly (in which case, you should re-pot the plant).
3. Water the plant 2 to 3 times a week in the fall. Once summer is over, start watering your fuchsia plant every other day or just twice a week. Always test the soil with your finger first—if it's bone dry, go ahead and water it. If it's even the slightest bit damp, wait another day and check again.
Withholding water in the fall will prepare the plant for winter dormancy so it can reenergize and grow beautiful blooms in the spring!
4. Limit your waterings to 8 fl oz (240 mL) every 3 to 4 weeks in the winter. Let the soil get relatively dry starting in mid-November to early March (the exact months will vary depending on where you live). A good rule of thumb is to water it with 8 fluid ounces (240 mL) of water every 3 weeks or each month, but you can also feel the soil with your finger to see if it's bone dry. If it is, go ahead and water it and wait another 3 to 4 weeks before watering it again.
The plant will be in its dormant phase during the winter and your job is to make sure the soil doesn't get dusty-dry—a little dry is okay.

5. Fertilize the plant once a week during spring and summer months. Use a fertilizer with equal parts nitrogen, phosphorus, and potassium—a 20-20-20 or 16-16-16 blend is perfect. The amount of fertilizer you need to use depends on the size of the pot, but you should always read the instructions on the package.
-For instance, if you're fertilizing a 12 in (30 cm) pot, you might use 7 drops of liquid fertilizer for each 33 fluid ounces (980 mL) of water or sprinkle 3 to 4 tsp (15 to 20 g) of granular fertilizer on top of the soil.
If your plant is outside, stop fertilizing it 2 weeks before you bring it inside for the colder months.
Bone meal also makes an excellent fertilizer for fuchsia. You can buy it at any garden supply store.
0
0
文章
ritau
2020年07月29日

1. Prepare your potting soil in a separate bucket. Pour some soil into a large bucket and add water to it until it is damp. Mix the soil with your hand or a trowel until it is evenly damp. Do not allow the soil to become soggy, or the seeds will rot. You will need a well-draining soil. Lemon trees love water, but they hate to sit in it.
-Try to get a pasteurized soil mix. Pasteurization gets rid of any bacteria that can kill seeds.
-Consider getting a soil that is a blend of peat, perlite, vermiculite, and organic fertilizer. This will give your seedling proper drainage and nutrients.
2. Choose a small pot with drainage holes. The pot should be about 3 to 4 inches (7.62 to 10.16 centimeters) wide, and 5 to 6 inches (12.7 to 15.24 centimeters) deep.This pot will be enough for one seed. Some people like to plant several seeds in one pot at a time. If you want to do this too, choose a larger pot.
Your pot must have drainage holes. If your pot does not have any, you will need to drill some.
3. Fill the pot with soil. Stop when the top of the soil is about 1 inch (2.54 centimeters) from the rim.
4. Make a ½ inch (1.27 centimeter) deep hole in the soil. You can do this using your finger or a pencil.
5. Choose a plump-looking seed from a lemon. It may be necessary to use an organic lemon because seeds from a non-organic lemon may not sprout. Also, avoid taking any seeds that look too tiny (like a grain of rice) or that look shriveled (like a raisin). These seeds either won't sprout or won't grow into healthy seedlings.
Consider planting 5 to 10 lemon seeds at one time, in case some of the seeds don't sprout or don't make it past seedling-hood.
Keep in mind that trees that come from seeds are not identical to the parent tree that they came from. Sometimes, the fruit that the new saplings produce is of a lesser quality. Other times, they do not produce edible fruit at all. This does not prevent the young tree from being visually pleasing. Keep this in mind when growing your tree.

6. Wash the seed to get rid of the slimy coating. You can do this by washing the lemon seed or by sucking on it until the coating is gone. This is important. The gel-like coating contains sugars, which can cause the seed to rot.
Consider leaving the lemon seeds in a cup of warm water overnight. This will help them sprout faster.
7. Drop the seed into the hole and cover it up. Make sure that the pointy tip is pointing downward into the soil, and the rounded part is pointing upward towards you. The roots will come out of the pointy part.
8. Cover the pot with a piece of breathable plastic to trap warmth and moisture. Begin by placing a sheet of clear plastic cling wrap over the pot. Wrap a rubber band around the plastic wrap to secure it to the pot. Poke a few holes into the plastic wrap. You can use a pencil, a toothpick, or even a fork. These holes will allow the plant to breathe.
9. Place the pot in a warm location. You can place the pot in a sunny location too, but sunlight is not vital at this point. In fact, too much sunlight can "cook" the young, delicate seedlings. You should see a sprout emerge in about two weeks.
The ideal temperature is between 68°F and 82.4°F (20°C and 28°C).

10. Water the soil when you see it become dry. The plastic wrap should trap the moisture, and the condensation should rain down onto the soil, making it damp again. In very dry environments, this may not happen. If you see the soil start to become dry, remove the plastic wrap and water the plant. Be sure to re-cover the pot with the plastic wrap when you are done watering.
11. Remove the plastic covering once the sprout appears and transfer the pot to a warm, sunny location. Remember to keep the soil damp, but do not let it become soggy. Click here to learn how to take care of your seedling.
-Try to get a pasteurized soil mix. Pasteurization gets rid of any bacteria that can kill seeds.
-Consider getting a soil that is a blend of peat, perlite, vermiculite, and organic fertilizer. This will give your seedling proper drainage and nutrients.
2. Choose a small pot with drainage holes. The pot should be about 3 to 4 inches (7.62 to 10.16 centimeters) wide, and 5 to 6 inches (12.7 to 15.24 centimeters) deep.This pot will be enough for one seed. Some people like to plant several seeds in one pot at a time. If you want to do this too, choose a larger pot.
Your pot must have drainage holes. If your pot does not have any, you will need to drill some.
3. Fill the pot with soil. Stop when the top of the soil is about 1 inch (2.54 centimeters) from the rim.
4. Make a ½ inch (1.27 centimeter) deep hole in the soil. You can do this using your finger or a pencil.
5. Choose a plump-looking seed from a lemon. It may be necessary to use an organic lemon because seeds from a non-organic lemon may not sprout. Also, avoid taking any seeds that look too tiny (like a grain of rice) or that look shriveled (like a raisin). These seeds either won't sprout or won't grow into healthy seedlings.
Consider planting 5 to 10 lemon seeds at one time, in case some of the seeds don't sprout or don't make it past seedling-hood.
Keep in mind that trees that come from seeds are not identical to the parent tree that they came from. Sometimes, the fruit that the new saplings produce is of a lesser quality. Other times, they do not produce edible fruit at all. This does not prevent the young tree from being visually pleasing. Keep this in mind when growing your tree.

6. Wash the seed to get rid of the slimy coating. You can do this by washing the lemon seed or by sucking on it until the coating is gone. This is important. The gel-like coating contains sugars, which can cause the seed to rot.
Consider leaving the lemon seeds in a cup of warm water overnight. This will help them sprout faster.
7. Drop the seed into the hole and cover it up. Make sure that the pointy tip is pointing downward into the soil, and the rounded part is pointing upward towards you. The roots will come out of the pointy part.
8. Cover the pot with a piece of breathable plastic to trap warmth and moisture. Begin by placing a sheet of clear plastic cling wrap over the pot. Wrap a rubber band around the plastic wrap to secure it to the pot. Poke a few holes into the plastic wrap. You can use a pencil, a toothpick, or even a fork. These holes will allow the plant to breathe.
9. Place the pot in a warm location. You can place the pot in a sunny location too, but sunlight is not vital at this point. In fact, too much sunlight can "cook" the young, delicate seedlings. You should see a sprout emerge in about two weeks.
The ideal temperature is between 68°F and 82.4°F (20°C and 28°C).

10. Water the soil when you see it become dry. The plastic wrap should trap the moisture, and the condensation should rain down onto the soil, making it damp again. In very dry environments, this may not happen. If you see the soil start to become dry, remove the plastic wrap and water the plant. Be sure to re-cover the pot with the plastic wrap when you are done watering.
11. Remove the plastic covering once the sprout appears and transfer the pot to a warm, sunny location. Remember to keep the soil damp, but do not let it become soggy. Click here to learn how to take care of your seedling.
0
0
文章
ritau
2020年02月18日

Hydroponics is a subset of hydroculture, which is a method of growing plants without soil, by instead using mineral nutrient solutions in a water solvent.Terrestrial plants may be grown with only their roots exposed to the nutritious liquid, or the roots may be physically supported by an inert medium such as perlite, gravel.Despite inert media, roots can cause changes of the rhizosphere pH and root exudates can impact the rhizosphere biology.
The nutrients used in hydroponic systems can come from an array of different sources, including (but not limited to) fish excrement, duck manure, purchased chemical fertilisers, or artificial nutrient solutions.
Plants commonly grown hydroponically on inert media include tomatoes, peppers, cucumbers, lettuces, marijuana, and model plants like Arabidopsis thaliana.
Hydroponics offer many advantages, one of them being a decrease in water usage for agriculture. To grow 1 kilogram of tomatoes in Intensive farming requires 400 liters of water, in hydroponics 70 liters of water, and only 20 liters of water for aeroponics.Because of the lack of water needed to grow produce, it would be possible in the future for harsh environments which don’t have much accessible water, to be able to grow their own food.
The earliest published work on growing terrestrial plants without soil was the 1627 book Sylva Sylvarum or 'A Natural History' by Francis Bacon, printed a year after his death. Water culture became a popular research technique after that. In 1699, John Woodward published his water culture experiments with spearmint. He found that plants in less-pure water sources grew better than plants in distilled water. By 1842, a list of nine elements believed to be essential for plant growth had been compiled, and the discoveries of German botanists Julius von Sachs and Wilhelm Knop, in the years 1859-1875, resulted in a development of the technique of soilless cultivation.Growth of terrestrial plants without soil in mineral nutrient solutions was called solution culture. It quickly became a standard research and teaching technique and is still widely used. Solution culture is, now considered, a type of hydroponics where there is an inert medium.

The nutrients used in hydroponic systems can come from an array of different sources, including (but not limited to) fish excrement, duck manure, purchased chemical fertilisers, or artificial nutrient solutions.
Plants commonly grown hydroponically on inert media include tomatoes, peppers, cucumbers, lettuces, marijuana, and model plants like Arabidopsis thaliana.
Hydroponics offer many advantages, one of them being a decrease in water usage for agriculture. To grow 1 kilogram of tomatoes in Intensive farming requires 400 liters of water, in hydroponics 70 liters of water, and only 20 liters of water for aeroponics.Because of the lack of water needed to grow produce, it would be possible in the future for harsh environments which don’t have much accessible water, to be able to grow their own food.

The earliest published work on growing terrestrial plants without soil was the 1627 book Sylva Sylvarum or 'A Natural History' by Francis Bacon, printed a year after his death. Water culture became a popular research technique after that. In 1699, John Woodward published his water culture experiments with spearmint. He found that plants in less-pure water sources grew better than plants in distilled water. By 1842, a list of nine elements believed to be essential for plant growth had been compiled, and the discoveries of German botanists Julius von Sachs and Wilhelm Knop, in the years 1859-1875, resulted in a development of the technique of soilless cultivation.Growth of terrestrial plants without soil in mineral nutrient solutions was called solution culture. It quickly became a standard research and teaching technique and is still widely used. Solution culture is, now considered, a type of hydroponics where there is an inert medium.

0
0
文章
ritau
2020年02月16日

Hello, everybody,today we're going to give you some tips on how to grow cucumbers.

1. Choose a right size flowerpot and fertile soil, and place the soil in the flowerpot.
2. Put the seeds in the pot and water the good seeds to make sure they have enough water.
3. Apply organic fertilizer to the seeds so that the cucumber can get enough nourishment.
4. Place the seeds in a sunny place for enough sunlight.

Cucumbers contain less than 5 percent sugar and are rich in dietary fiber. According to studies, dietary fiber can improve the sensitivity of insulin receptors in human body and improve the utilization of insulin in human body.At the same time, dietary fiber itself is a kind of polysaccharide, and can not be broken down, equivalent to a part of the food space in the human body.This is a good substitute for many diabetic patients who need to reduce their diet. In addition, when fiber enters the body, it will also wrap up part of the sugar in the food, making the speed of sugar absorption slow, which can effectively regulate the postprandial blood glucose balance.


1. Choose a right size flowerpot and fertile soil, and place the soil in the flowerpot.
2. Put the seeds in the pot and water the good seeds to make sure they have enough water.
3. Apply organic fertilizer to the seeds so that the cucumber can get enough nourishment.
4. Place the seeds in a sunny place for enough sunlight.

Cucumbers contain less than 5 percent sugar and are rich in dietary fiber. According to studies, dietary fiber can improve the sensitivity of insulin receptors in human body and improve the utilization of insulin in human body.At the same time, dietary fiber itself is a kind of polysaccharide, and can not be broken down, equivalent to a part of the food space in the human body.This is a good substitute for many diabetic patients who need to reduce their diet. In addition, when fiber enters the body, it will also wrap up part of the sugar in the food, making the speed of sugar absorption slow, which can effectively regulate the postprandial blood glucose balance.

0
0
文章
ritau
2020年02月10日

Hello everyone, today we are going to talk about how to grow succulent plants.

* Soil
Succulents are suitable for use in soils that are permeable to water and air, dry, sterile and insect-free. A mixture of perlite and coconut bran (1:2) is recommended for most succulents.
*Illumination
When raising succulent plant indoors, place it in the window with sufficient sunshine or balcony aptly.If the summer temperature is too high, you can use a shading net with a 70% shading rate, and avoid 12-15 hours of sun exposure.
*Moisture
The principle of succulent plant watering is to water less and thoroughly,and avoid accumulating water. Spring and fall are the growing seasons for succulents, and the best time to water is when the leaves below begin to dry out. Summer is the dormancy season of succulent plants, mainly by spray watering, keep the surface of the basin soil wet.Water less often in winter.

*Temperature
Succulents are native to South Africa, where the optimum growth temperature is between 12 and 28 degrees Celsius. Therefore, the spring and autumn are the most vigorous seasons for succulents.Make sure the room temperature is above 8 degrees Celsius in winter and below 35 degrees Celsius in summer, and pay attention to ventilation and cooling.
Hope those tips may help you! Enjoying your plant!


* Soil
Succulents are suitable for use in soils that are permeable to water and air, dry, sterile and insect-free. A mixture of perlite and coconut bran (1:2) is recommended for most succulents.
*Illumination
When raising succulent plant indoors, place it in the window with sufficient sunshine or balcony aptly.If the summer temperature is too high, you can use a shading net with a 70% shading rate, and avoid 12-15 hours of sun exposure.
*Moisture
The principle of succulent plant watering is to water less and thoroughly,and avoid accumulating water. Spring and fall are the growing seasons for succulents, and the best time to water is when the leaves below begin to dry out. Summer is the dormancy season of succulent plants, mainly by spray watering, keep the surface of the basin soil wet.Water less often in winter.

*Temperature
Succulents are native to South Africa, where the optimum growth temperature is between 12 and 28 degrees Celsius. Therefore, the spring and autumn are the most vigorous seasons for succulents.Make sure the room temperature is above 8 degrees Celsius in winter and below 35 degrees Celsius in summer, and pay attention to ventilation and cooling.
Hope those tips may help you! Enjoying your plant!

0
0
文章
ritau
2020年02月07日

What is Succulent?

In botany, succulent plants, also known as succulents, are plants with parts that are thickened, fleshy and engorged, usually to retain water in arid climates or soil conditions. The word "succulent" comes from the Latin word sucus, meaning juice, or sap.Succulent plants may store water in various structures, such as leaves and stems. Some definitions also include roots, thus geophytes that survive unfavorable periods by dying back to underground storage organs may be regarded as succulents. In horticultural use, the term "succulent" is sometimes used in a way which excludes plants that botanists would regard as succulents, such as cacti. Succulents are often grown as ornamental plants because of their striking and unusual appearance, as well as their ability to thrive with relatively minimal care.

Many plant families have multiple succulents found within them (over 25 plant families).In some families, such as Aizoaceae, Cactaceae, and Crassulaceae, most species are succulents. The habitats of these water preserving plants are often in areas with high temperatures and low rainfall, such as deserts. Succulents have the ability to thrive on limited water sources, such as mist and dew, which makes them equipped to survive in an ecosystem which contains scarce water sources.

In next part, we are going to discuss on how to plant succulent!

In botany, succulent plants, also known as succulents, are plants with parts that are thickened, fleshy and engorged, usually to retain water in arid climates or soil conditions. The word "succulent" comes from the Latin word sucus, meaning juice, or sap.Succulent plants may store water in various structures, such as leaves and stems. Some definitions also include roots, thus geophytes that survive unfavorable periods by dying back to underground storage organs may be regarded as succulents. In horticultural use, the term "succulent" is sometimes used in a way which excludes plants that botanists would regard as succulents, such as cacti. Succulents are often grown as ornamental plants because of their striking and unusual appearance, as well as their ability to thrive with relatively minimal care.

Many plant families have multiple succulents found within them (over 25 plant families).In some families, such as Aizoaceae, Cactaceae, and Crassulaceae, most species are succulents. The habitats of these water preserving plants are often in areas with high temperatures and low rainfall, such as deserts. Succulents have the ability to thrive on limited water sources, such as mist and dew, which makes them equipped to survive in an ecosystem which contains scarce water sources.

In next part, we are going to discuss on how to plant succulent!
0
0
成长记
kensong
2019年06月17日

It's completely root bound. No wonder it stopped growing. Time to repot and give it some fresh soil.

1
0


