文章
Miss Chen
2017年08月08日

Agave plants (Agave spp.) thrive in desert gardens and in sandy soils with little moisture. They grow in U.S. Department of Agriculture plant hardiness zones 9 through 11, depending on the variety. Although agaves die after flowering, they have a long flowering cycle and can live for eight to 60 years. These desert succulents transplant well and tolerate disturbance, so you can move the plants to a new area at any time during the spring and summer growing season.

Safety First
Most agave varieties have sharp spines along the edges of the leaves. The sap is also a common skin irritant and can cause allergic reactions. Before handling the agave, protect your skin and eyes. Heavy leather gloves, long sleeves and long pants provide skin protection. Wear eye protection so sap doesn't get into your eyes. Protecting the plant is also necessary. Disinfect any knives, shears or spade blades you will use to prune and cut through the plant to minimize bacterial soft rot and other disease problems. Wiping them with a cloth soaked in isopropyl alcohol kills any disease pathogens or pests.
Plant Preparation
Small plants, called pups or offsets, often grow up around the base of the main mother plant. Each of these pups grows into a new agave if you separate it from the mother. Cut these off just below the soil surface with a knife or the edge of the spade. Removing the outer leaves of a large agave plant lessens the weight during transplanting and results in a healthier looking plant. Peel the outer ragged leaves off the plant and dispose of them, leaving only the intact, healthy looking rosette of leaves in the center. Tie a string loosely around a remaining leaf on the west side of the agave to mark it, but avoid tying it too tightly and cutting into the leaf.

Digging Right
A shovel lifts the entire plant and keeps you well away from the spiny foliage. Insert the shovel blade into the soil around the outer perimeter of the root zone, working around the plant until the soil is loosened. Slide the shovel under the root system and pry the agave out of the ground. Some roots will break, but this doesn't cause any long-lasting harm. After lifting the agave, dust any exposed wounds with sulfur powder to ward off infection. The wounds on any removed pups also benefit from a sulfur dusting before you replant them.
Transplanting Success
A site with sandy, fast-draining soil that receives all-day sunlight provides the best location for an agave or agave pup. Transplant at the same depth the agave was growing at previously and set it so the string-marked side is facing west. Planting agave so it faces the same direction prevents the side used to shade from sun damage. Spacing requirements vary depending on the agave variety, so leave enough room between plants so they can reach their full size without crowding. If you can't transplant right away, set the agave in a shaded location for two or three days and let any wounds dry over. After planting, cover the agave with a shade cloth to protect it from the direct sunlight as the roots establish in the new site, but remove the cloth as soon as new growth becomes apparent. Watering isn't usually necessary, but you can water just enough so the soil is barely moistened if the soil is completely dry and the plant has resumed growth.

Safety First
Most agave varieties have sharp spines along the edges of the leaves. The sap is also a common skin irritant and can cause allergic reactions. Before handling the agave, protect your skin and eyes. Heavy leather gloves, long sleeves and long pants provide skin protection. Wear eye protection so sap doesn't get into your eyes. Protecting the plant is also necessary. Disinfect any knives, shears or spade blades you will use to prune and cut through the plant to minimize bacterial soft rot and other disease problems. Wiping them with a cloth soaked in isopropyl alcohol kills any disease pathogens or pests.
Plant Preparation
Small plants, called pups or offsets, often grow up around the base of the main mother plant. Each of these pups grows into a new agave if you separate it from the mother. Cut these off just below the soil surface with a knife or the edge of the spade. Removing the outer leaves of a large agave plant lessens the weight during transplanting and results in a healthier looking plant. Peel the outer ragged leaves off the plant and dispose of them, leaving only the intact, healthy looking rosette of leaves in the center. Tie a string loosely around a remaining leaf on the west side of the agave to mark it, but avoid tying it too tightly and cutting into the leaf.

Digging Right
A shovel lifts the entire plant and keeps you well away from the spiny foliage. Insert the shovel blade into the soil around the outer perimeter of the root zone, working around the plant until the soil is loosened. Slide the shovel under the root system and pry the agave out of the ground. Some roots will break, but this doesn't cause any long-lasting harm. After lifting the agave, dust any exposed wounds with sulfur powder to ward off infection. The wounds on any removed pups also benefit from a sulfur dusting before you replant them.
Transplanting Success
A site with sandy, fast-draining soil that receives all-day sunlight provides the best location for an agave or agave pup. Transplant at the same depth the agave was growing at previously and set it so the string-marked side is facing west. Planting agave so it faces the same direction prevents the side used to shade from sun damage. Spacing requirements vary depending on the agave variety, so leave enough room between plants so they can reach their full size without crowding. If you can't transplant right away, set the agave in a shaded location for two or three days and let any wounds dry over. After planting, cover the agave with a shade cloth to protect it from the direct sunlight as the roots establish in the new site, but remove the cloth as soon as new growth becomes apparent. Watering isn't usually necessary, but you can water just enough so the soil is barely moistened if the soil is completely dry and the plant has resumed growth.
0
0
文章
Miss Chen
2017年08月08日


Whether you transplant small 'Black' hens and chicks (Sempervivum 'Black') -- hardy from U.S. Department of Agriculture plant hardiness zones 4 through 9 -- or a larger succulent such as a prickly pear cactus (Opuntia spp.) -- hardy from USDA zones 3b through 11, the keys to success lie in proper soil with good drainage. Therefore, you'll probably spend more time preparing the new growing area than you will transplanting your succulents. Also check each succulent's light requirements before you transplant because a succulent variety may need full sun or shade.
Cactus
credit: fotokate/iStock/Getty Images
Some succulents spread, and their growth habits indicate how much space they need.
Check Drainage
Many types of succulents exist, and what makes a plant a succulent is its ability to draw and store water in its tissues. Succulents also don't tolerate having wet roots, however. So the transplant location you choose for them should have good drainage. Avoid transplanting succulents to low spots.
Check a site's drainage by digging a hole in it when its topsoil is moist. Make the hole 12 inches in diameter and 12 inches deep. Fill the hole with water, and monitor its drainage. If water drains from the hole in fewer than three hours, then the soil has good drainage. If it takes three to 12 hours to drain, then the drainage is OK for most landscaping plants, but you still could improve the drainage. A hole that takes more than 12 hours to drain means the soil has poor drainage that definitely needs to be improved.
Fix Drainage in a Dry Climate
If you live in a dry climate, one way to improve soil drainage is to add a layer of gravel in the bottom of your desired planting area. Dig about 2 feet deep in the entire planting area. Place a 12-inch-thick layer of gravel in the excavated site, and follow it with a few inches of the soil you removed while digging. Over the top of the soil, place 6 to 8 inches of sharp sand. Afterward, the site will offer good drainage for succulents such as prickly pear.
Fix Drainage in a Wet Climate
If you live in a wet climate, create good drainage with an elevated "rock garden." On top of the current soil, set a layer of large, 8- to 12-inch-high rocks. Add coarse sand or pea gravel on the rocks, and then wet the site. Allow it to dry for a few days. Finally, add 3 to 4 inches of scree. A scree suggested by Urban Horticulture Program Assistant John McLaughlin, Ph.D., in an article on the University of Florida IFAS Extension website is a mixture that is 1 part Canadian sphagnum peat, 1 part potting soil, 2 parts course sand and 6 parts bonsai or poultry grit, which is small pebbles of porous granite or other stone. Mix the scree ingredients in a wheelbarrow, and then dump the mixture on top of the sand or pea gravel. Spread the scree evenly across the pile's top. Then cover it with a 1-inch-thick layer of 1/2-inch gravel.

Plant Properly
The temperature at transplanting time should be at least 70 degrees Fahrenheit and not lower than 50 F, especially if you transplant small succulents. Wear a pair of thick, leather work gloves to avoid injuries from succulents' prickly points.
If a succulent you want to transplant is in the ground, then use a trowel or shovel to loosen the soil, sand or gravel several inches from the plant's perimeter, and gently remove the plant from the ground. Lightly brush soil from the roots.
Dig into the new planting site's soil material, making a hole deep and wide enough for the root spread of the succulent you want to put in the hole. Place the root part of the plant in the hole, and allow the fleshy or stem parts of the plant to remain above the soil line. Spread the roots, and cover them with the site's soil material, making the material even with the surrounding ground's surface. Tamp the soil. Allow the plant to dry out and to repair its roots for about one week before watering. Add water once each week thereafter. It's time to water when you stick your finger a few inches into the surrounding soil and find the soil is dry.
1
3
文章
Colour_
2017年08月08日

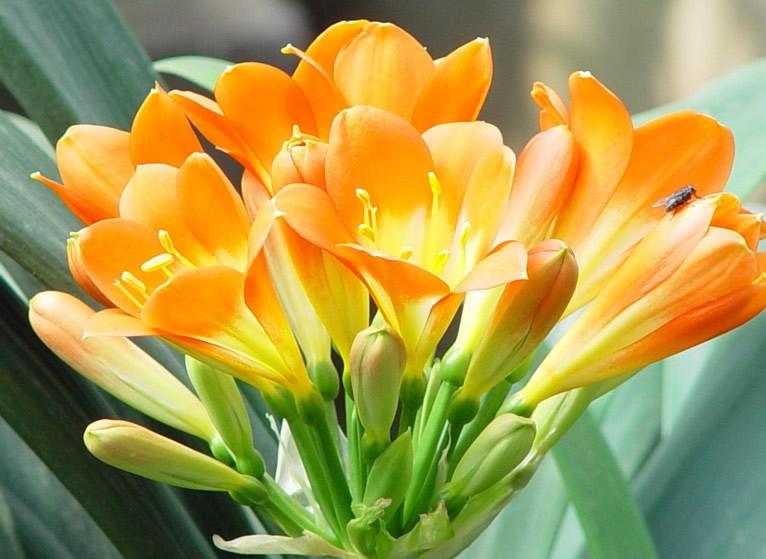
君子兰主要通过种子播种进行繁殖。
#君子兰 的花期是入冬后至次年3-4月份,花后种子成熟也需9-10个月,故君子兰的播种宜在11-12月份。播种前要进行选种,将空瘪发育不良的种子剔除。可用一般花盆播种,下面用粗沙砾或碎石砾铺成2厘米厚的排水层,然后铺一层腐叶土和河沙混合的培养土,厚约4-5厘米,在铺上0.5-1厘米的河沙作播种层。点播时,株距2厘米,然后用沙覆盖。覆土后浸1次水,盖上玻璃盖。播后保持20℃-25℃的气温有利发芽。
从发芽到长出第一片叶需2个月,以后要揭开玻璃盖通风,并逐渐去掉玻璃盖。播后90天便可移栽。移植时,先用竹签或竹筷扎孔,将肉质根插入土中,深度以埋住根茎露出种子为宜,同时注意叶片朝向一致。移后浇1次透水,过数日缓苗后再接受光照。苗期温度控制在15℃-20℃,冬春可见阳光,春、夏季应在散射光下生长,入秋后即可定植栽培。
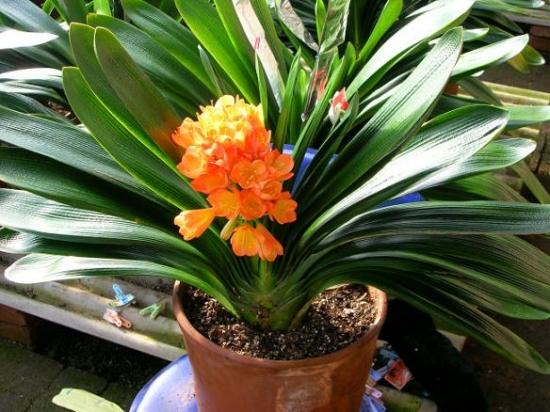
君子兰分株繁殖,需做好以下工作:
①家庭盆栽宜用泥瓦盆,这种盆透气性好,有利于植株生长。
②准备好已消毒过的介质土。如用腐殖土混合细沙的,腐殖土要用高锰酸钾1000-2000倍水溶液喷洒消毒;细河沙也要用开水烫洗消毒,避免幼苗受病菌感染腐烂。
③准备少量木炭粉涂抹伤口,供吸潮防腐之用。
④分株时,将君子兰从盆中磕出来,拍松盆土,理顺根系,找出可以分株的腋芽:如果子株长在母株的外沿,株体较小,可以一手握住鳞茎部分,另一手捏住子株基部,轻轻一掰,就能将子株掰离母株;如果子株粗壮,则用锋利的刀将其切下。然后用于木炭粉涂抹伤口,以吸干流液,防止腐烂。让子株、母株在室内晾干后再种植,种植深度以埋住子株的基部假鳞茎为度,靠植株的部位要使其略高些,并盖上已消毒的沙土。种好后过2天再浇1次透水,2周后待伤口愈合时,再加盖一层培养土。一般需1-2个月才能生出新根,1-2年后便可开花。
0
0
文章
Dummer. ゛☀
2017年08月07日

Description
This slender but tall orchid grows up to 60cm tall. There are 3-8 narrow, pointed leaves arranged along the stem which is flushed deep purple. The inflorescence is lax and carries between 9-22 large dark pink flowers. The erect lateral sepals are bent backwards and are often so close that they touch each other. A hood is formed by the dorsal sepal and the two upper petals. The flower lip is sharply folded length-wise and has a pale (almost white) centre which is usually unmarked or occasionally lightly marked with pink.
Distribution
The range of this species extends from the Algarve region of Portugal (where it is very rare) as far north as Sweden and east to the westerly parts of Asia. It is not recorded in mainland Britain but is found in the Channel Islands where it is referred to as the Jersey Orchid.
Habitat
This orchid prefers damp alkaline habitats and can be found in fens, marshy meadows and beside streams.
Flowering times
In the far south this orchid flowers in April and May, but further north it can be found in full bloom to the end of June
This slender but tall orchid grows up to 60cm tall. There are 3-8 narrow, pointed leaves arranged along the stem which is flushed deep purple. The inflorescence is lax and carries between 9-22 large dark pink flowers. The erect lateral sepals are bent backwards and are often so close that they touch each other. A hood is formed by the dorsal sepal and the two upper petals. The flower lip is sharply folded length-wise and has a pale (almost white) centre which is usually unmarked or occasionally lightly marked with pink.

Distribution
The range of this species extends from the Algarve region of Portugal (where it is very rare) as far north as Sweden and east to the westerly parts of Asia. It is not recorded in mainland Britain but is found in the Channel Islands where it is referred to as the Jersey Orchid.

Habitat
This orchid prefers damp alkaline habitats and can be found in fens, marshy meadows and beside streams.

Flowering times
In the far south this orchid flowers in April and May, but further north it can be found in full bloom to the end of June
0
0
文章
玲儿
2017年08月06日

西洋オダマキの育て方・栽培方法
育て方のポイント
栽培環境・日当たり・置き場
午前中は日なた、午後は明るい日陰になる場所で栽培します。7月から9月上旬の間は30~40%の遮光下に置いて葉焼けや高温障害を防ぎます。冬は北風が当たらないような場所に置きます。庭植えにする場合は、10~20cm盛り土した上に植えます。
水やり
表土が乾いたら十分に与えます。庭植えの場合は、晴天が続いて乾燥していないかぎり必要ありません。
肥料
植え替えの際に、元肥としてリン酸とカリウムが多めの緩効性化成肥料を、4号鉢で三つまみ施します。3月から9月は、週1回、液体肥料を1500~2000倍に薄めて施します。真夏の間は3000倍程度にしたほうが無難です。

病気と害虫
病気:うどんこ病
主に夏前に発生します。葉の表面に白っぽい粉(胞子)をふく前に葉ごとちぎって処分します。被害がひどい場合は、一度葉を切り捨てて再生させます。
害虫:ヨトウムシ、ハダニ、アブラムシ
ヨトウムシは夜間に現れ、葉や若い蕾を暴食します。5月前後と9月前後の春秋2回を中心に発生し、温暖な地域では1年中発生する場合があります。ハダニは暑くなる夏を中心に発生し、葉が白くかすれたようになります。

用土(鉢植え)
水はけのよい土であれば土質を選びません。赤玉土小粒7、腐葉土3の配合土のほか、市販の草花用培養土でもよく育ちます。心配な場合は、鹿沼土、赤玉土、軽石の各小粒を等量配合したもので植えてもよいでしょう。庭植えの場合は10~20cmほど盛り土してから植えると、生育がよくなります。
植えつけ、 植え替え
毎年、または1年おきに行います。適期は芽が出る直前の2月から3月の上旬です。実生苗は成長に合わせて時期を問わず植え替え(鉢増し)を行います。その際、太いゴボウ状の根は傷つけないように注意しましょう。

ふやし方
タネまき:6月から7月に採取したタネを、冷蔵庫で保管して翌年の2月から3月上旬にまきます。発芽率はよいので密まきにならないように注意します。まいたタネは順調であれば2年目に開花します。
株分け:植え替えと同時に行います。古くなった根茎を、自然に分かれている部分で分けます。もしつながっていても、それぞれの芽に十分に根があるのならナイフなどで切り分けてもかまいません。その場合、切り口には癒合剤や殺菌剤を塗って保護しておきます。

主な作業
花がら摘み・花茎切り:タネをとる目的がないなら、大部分の花が咲き終わった段階で花茎を切り取ります。どこで切っても問題ありませんが、根元の葉は残しておきましょう。
タネの採取:6月から7月に熟して先端が開いた果実を取って、タネを集めます。オダマキの仲間はたいへん交雑しやすいので、複数種のオダマキの仲間を栽培している場合は袋かけをして自分で交配するか、タネとり用の親株は隔離しておきましょう。
育て方のポイント
栽培環境・日当たり・置き場
午前中は日なた、午後は明るい日陰になる場所で栽培します。7月から9月上旬の間は30~40%の遮光下に置いて葉焼けや高温障害を防ぎます。冬は北風が当たらないような場所に置きます。庭植えにする場合は、10~20cm盛り土した上に植えます。
水やり
表土が乾いたら十分に与えます。庭植えの場合は、晴天が続いて乾燥していないかぎり必要ありません。
肥料
植え替えの際に、元肥としてリン酸とカリウムが多めの緩効性化成肥料を、4号鉢で三つまみ施します。3月から9月は、週1回、液体肥料を1500~2000倍に薄めて施します。真夏の間は3000倍程度にしたほうが無難です。

病気と害虫
病気:うどんこ病
主に夏前に発生します。葉の表面に白っぽい粉(胞子)をふく前に葉ごとちぎって処分します。被害がひどい場合は、一度葉を切り捨てて再生させます。
害虫:ヨトウムシ、ハダニ、アブラムシ
ヨトウムシは夜間に現れ、葉や若い蕾を暴食します。5月前後と9月前後の春秋2回を中心に発生し、温暖な地域では1年中発生する場合があります。ハダニは暑くなる夏を中心に発生し、葉が白くかすれたようになります。

用土(鉢植え)
水はけのよい土であれば土質を選びません。赤玉土小粒7、腐葉土3の配合土のほか、市販の草花用培養土でもよく育ちます。心配な場合は、鹿沼土、赤玉土、軽石の各小粒を等量配合したもので植えてもよいでしょう。庭植えの場合は10~20cmほど盛り土してから植えると、生育がよくなります。
植えつけ、 植え替え
毎年、または1年おきに行います。適期は芽が出る直前の2月から3月の上旬です。実生苗は成長に合わせて時期を問わず植え替え(鉢増し)を行います。その際、太いゴボウ状の根は傷つけないように注意しましょう。

ふやし方
タネまき:6月から7月に採取したタネを、冷蔵庫で保管して翌年の2月から3月上旬にまきます。発芽率はよいので密まきにならないように注意します。まいたタネは順調であれば2年目に開花します。
株分け:植え替えと同時に行います。古くなった根茎を、自然に分かれている部分で分けます。もしつながっていても、それぞれの芽に十分に根があるのならナイフなどで切り分けてもかまいません。その場合、切り口には癒合剤や殺菌剤を塗って保護しておきます。

主な作業
花がら摘み・花茎切り:タネをとる目的がないなら、大部分の花が咲き終わった段階で花茎を切り取ります。どこで切っても問題ありませんが、根元の葉は残しておきましょう。
タネの採取:6月から7月に熟して先端が開いた果実を取って、タネを集めます。オダマキの仲間はたいへん交雑しやすいので、複数種のオダマキの仲間を栽培している場合は袋かけをして自分で交配するか、タネとり用の親株は隔離しておきましょう。
0
0
文章
Miss Chen
2017年08月06日


Description: This perennial plant is 1½–3½' tall, branching occasionally. The ridged stems are pubescent. The alternate compound leaves are odd pinnate, and 5-9" long, with about 21-31 leaflets. The oblong leaflets are about 1½" long and 3/8" across, with smooth edges. From the upper axils of the compound leaves there occasionally develops a whorled raceme of flowers from a stout stalk. A raceme (including the stalk) is usually about 1-2" longer than the compound leaves subtending it, or about 7-11" long. A typical raceme is crowded with about 75 creamy flowers, which may have yellow or green tints. Each flower is about ¾" long and tubular-shaped, although jutting slightly upward toward the outer tip. It consists of five petals, including a curved upper hood, a lower keel, and close-fitting side petals. The blooming period occurs during the summer and lasts about 2-3 months. There is no noticeable floral scent. The flowers are replaced by stout oval pods with long pointed tips, which are held nearly erect on the stalk. The root system consists of a taproot.
Cultivation: The preference is full or partial sun and mesic conditions. Canada Milkvetch grows well on most kinds of soil, and probably fixes some nitrogen. It's a robust plant, although the foliage sometimes turns prematurely yellow. This plant has a tendency to sprawl, unless it receives support from adjacent vegetation.
Range & Habitat: The native Canada Milkvetch occurs occasionally in the northern half of Illinois, but it is rather uncommon in most areas of southern Illinois (see Distribution Map). Habitats include moist to slightly dry black soil prairies, sand prairies, typical and sandy savannas, thickets and woodland borders, moist meadows near rivers, and abandoned fields.
Faunal Associations: Primarily bumblebees visit the flowers for nectar. Other long-tongued bee visitors include honeybees and Megachile spp. (Large Leaf-Cutting Bees). Insects with shorter mouthparts have trouble reaching the nectar, nor is the pollen easy to access. Unlike many milkvetches of the Western states, the foliage of Canada Milkvetch is non-toxic and palatable to mammalian herbivores, including deer, groundhogs, rabbits, and livestock. This plant may be difficult to establish where these animals occur in abundance. The seeds may be eaten occasionally by the Wild Turkey and other upland gamebirds, as well as small rodents, such as the Thirteen-Lined Ground Squirrel; however, such observations are confined largely to the Western states, where Astragalus spp. are more abundant.
Photographic Location: The wildflower garden of the webmaster in Urbana, Illinois.
Comments: There are very few Astragalus spp. that occur in Illinois. Canada Milkvetch has a distinctive appearance on account of its size (up to 3½' tall) and abundant creamy flowers (about 75 per raceme). Some pale-flowered vetches are superficially similar in appearance, such as Vicia carolina (Carolina Vetch). However, vetches are vine-like plants with tendrils, while Canada Milkvetch is a semi-erect plant without tendrils (although it may clamber over adjacent vegetation, nonetheless). Another difference is the inflorescence: the raceme of Canada Milkvetch is whorled with about 75 flowers, while Vicia spp. have one- or two-sided racemes with fewer flowers.

0
0
文章
Dummer. ゛☀
2017年08月04日

How to Choose Hydrangeas
There are several types of hydrangea plants. Most grow as shrubs, although there is one vine, called climbing hydrangea. Mophead and lacecap types, perhaps the most common hydrangeas in zones 6 through 9, can fill many roles in the landscape. To grow hydrangeas as a hedge, choose panicle, smooth, or oakleaf hydrangea, which also offers good fall leaf color. If you are planning to grow hydrangeas in full shade, choose oakleaf hydrangea or the climbing type. If you’re planting hydrangeas in colder regions, panicle hydrangea (the type that can be grown as a tree) is the one you want, as it is the most winter-hardy.
Where to Plant Hydrangeas
The most important factors when choosing where to plant hydrangeas are light and moisture. In the South, plant them where they will receive morning sunlight and afternoon shade. With these conditions, you can grow the extremely popular French (also called bigleaf) hydrangea or panicle hydrangea. In northern regions, these same types of hydrangeas will grow in all-day sun.
The name hydrangea contains the root word “hydra” (like in hydration), which gives a clue about how much water these plants need. Make sure the spot you select is close to a water source. Know, too, that French hydrangeas tend to need the most water to thrive.

What Kind of Soil to Use for Hydrangeas
To grow hydrangeas in planting beds, focus on improving the native soil. One simple way to do that is to combine equal parts existing soil and Miracle-Gro® Garden Soil for Trees and Shrubs. In warmer regions (zones 7 and warmer), where winter tends to be mild, you can also grow hydrangeas in containers. Create just the right environment for them by filling pots with Miracle-Gro® Moisture Control® Potting Mix.
It is worth noting that mophead and lacecap hydrangeas both change flower color based on soil pH, which is a measure of how alkaline or acidic the soil is. Flowers turn pink to red in alkaline soil, and lavender to blue in acidic soil.
When to Plant Hydrangeas
When you see hydrangea plants for sale at local garden centers, that’s usually the right time for planting. This timing will vary by region. For instance, in areas with winter freezing and snow, hydrangeas should be planted in early spring or early fall (as soon as summer heat breaks). In warmer regions with mild winters, the window for planting hydrangeas is longer, from fall all the way through to early spring.

How to Plant Hydrangeas
How far apart to space plants depends on what type of hydrangea you’re growing. It’s best to check the plant tag. Note that hydrangeas planted in the shade tend to grow a little larger and spread a little more. When planting hydrangeas, dig a hole that is twice as wide as the width of the container the hydrangea came in. Place the plant in the hole so that the root ball is at the same depth as it was in the original pot, then fill in the hole with the 50-50 soil mixture described above. Water well after planting.
How to Plant Hydrangeas in Containers
To plant hydrangeas in containers, again check that plants are at the same depth as they were growing previously. How large a container to use depends on how large your hydrangea will grow. Typically, it’s safe to start with a pot 2 inches larger than the container the plant is currently in.How to Water Hydrangeas
Water deeply after planting, making sure to soak the root ball and surrounding soil. If the hydrangeas are dormant (without leaves), you may not need to water again until growth resumes.
Hydrangeas thrive in consistently moist soil. Check the soil at least once a week. When the top inch of soil is dry, it’s time to water. Once hydrangeas are established, they typically survive on rainfall, except during times of drought.How to Mulch Hydrangeas
After planting hydrangeas, apply a 2- to 3-inch-thick mulch layer around (but not on) the plants. Mulch helps keep soil moist and weeds at bay by blocking the weeds’ growth and access to sunlight. Choose whichever mulch looks best in your landscape: Scotts® bagged mulch, shredded leaves, pine straw, or some other locally available material.
How to Feed Hydrangeas
Fertilize hydrangeas in early spring as new growth appears and again just before summer. Avoid feeding hydrangeas after August, especially in regions with cold winters. A slow-release plant food works well. For best results, try Miracle-Gro® Shake ’n Feed® Flowering Trees & Shrubs Plant Food, which feeds for up to 3 months.
How to Prune Hydrangeas
When to prune hydrangeas hinges on the type of hydrangea you’re growing. Both French and oakleaf hydrangeas flower on old wood (last year’s stems), so you should prune plants right after flowering is finished. Smooth and panicle hydrangeas flower on new growth, which means you can prune stems in late winter to early spring. In general, as long as you give hydrangeas enough elbow room to spread and reach their mature size, you shouldn’t have to do too much pruning beyond cutting out dead or damaged wood.

How to Protect Hydrangeas in Winter
In colder areas, many gardeners erect a burlap screen around oakleaf and French hydrangeas in an effort to help protect flower buds that have already formed for the next year. The most important aspect of winter protection, however, is making sure the hydrangea you’re growing is hardy in your gardening zone.
How to Use Hydrangeas
Hydrangeas can fill multiple roles in the garden. Plant a hydrangea privacy hedge, or use them as a foundation planting around a home. A single hydrangea can be the focal point of a garden, and potted hydrangeas can bring beauty to a deck or entry garden. Hydrangeas also integrate well into mixed borders of shrubs and perennials, and make a natural-looking addition to a woodland setting.
Fresh hydrangea flowers are a favorite for filling vases and adorning wedding bouquets. If you want to dry hydrangea blooms, most experts suggest waiting to let flowers age and dry naturally on the plant. Harvest at the color stage you prefer.
There are several types of hydrangea plants. Most grow as shrubs, although there is one vine, called climbing hydrangea. Mophead and lacecap types, perhaps the most common hydrangeas in zones 6 through 9, can fill many roles in the landscape. To grow hydrangeas as a hedge, choose panicle, smooth, or oakleaf hydrangea, which also offers good fall leaf color. If you are planning to grow hydrangeas in full shade, choose oakleaf hydrangea or the climbing type. If you’re planting hydrangeas in colder regions, panicle hydrangea (the type that can be grown as a tree) is the one you want, as it is the most winter-hardy.
Where to Plant Hydrangeas
The most important factors when choosing where to plant hydrangeas are light and moisture. In the South, plant them where they will receive morning sunlight and afternoon shade. With these conditions, you can grow the extremely popular French (also called bigleaf) hydrangea or panicle hydrangea. In northern regions, these same types of hydrangeas will grow in all-day sun.
The name hydrangea contains the root word “hydra” (like in hydration), which gives a clue about how much water these plants need. Make sure the spot you select is close to a water source. Know, too, that French hydrangeas tend to need the most water to thrive.

What Kind of Soil to Use for Hydrangeas
To grow hydrangeas in planting beds, focus on improving the native soil. One simple way to do that is to combine equal parts existing soil and Miracle-Gro® Garden Soil for Trees and Shrubs. In warmer regions (zones 7 and warmer), where winter tends to be mild, you can also grow hydrangeas in containers. Create just the right environment for them by filling pots with Miracle-Gro® Moisture Control® Potting Mix.
It is worth noting that mophead and lacecap hydrangeas both change flower color based on soil pH, which is a measure of how alkaline or acidic the soil is. Flowers turn pink to red in alkaline soil, and lavender to blue in acidic soil.
When to Plant Hydrangeas
When you see hydrangea plants for sale at local garden centers, that’s usually the right time for planting. This timing will vary by region. For instance, in areas with winter freezing and snow, hydrangeas should be planted in early spring or early fall (as soon as summer heat breaks). In warmer regions with mild winters, the window for planting hydrangeas is longer, from fall all the way through to early spring.

How to Plant Hydrangeas
How far apart to space plants depends on what type of hydrangea you’re growing. It’s best to check the plant tag. Note that hydrangeas planted in the shade tend to grow a little larger and spread a little more. When planting hydrangeas, dig a hole that is twice as wide as the width of the container the hydrangea came in. Place the plant in the hole so that the root ball is at the same depth as it was in the original pot, then fill in the hole with the 50-50 soil mixture described above. Water well after planting.
How to Plant Hydrangeas in Containers
To plant hydrangeas in containers, again check that plants are at the same depth as they were growing previously. How large a container to use depends on how large your hydrangea will grow. Typically, it’s safe to start with a pot 2 inches larger than the container the plant is currently in.How to Water Hydrangeas
Water deeply after planting, making sure to soak the root ball and surrounding soil. If the hydrangeas are dormant (without leaves), you may not need to water again until growth resumes.
Hydrangeas thrive in consistently moist soil. Check the soil at least once a week. When the top inch of soil is dry, it’s time to water. Once hydrangeas are established, they typically survive on rainfall, except during times of drought.How to Mulch Hydrangeas
After planting hydrangeas, apply a 2- to 3-inch-thick mulch layer around (but not on) the plants. Mulch helps keep soil moist and weeds at bay by blocking the weeds’ growth and access to sunlight. Choose whichever mulch looks best in your landscape: Scotts® bagged mulch, shredded leaves, pine straw, or some other locally available material.
How to Feed Hydrangeas
Fertilize hydrangeas in early spring as new growth appears and again just before summer. Avoid feeding hydrangeas after August, especially in regions with cold winters. A slow-release plant food works well. For best results, try Miracle-Gro® Shake ’n Feed® Flowering Trees & Shrubs Plant Food, which feeds for up to 3 months.
How to Prune Hydrangeas
When to prune hydrangeas hinges on the type of hydrangea you’re growing. Both French and oakleaf hydrangeas flower on old wood (last year’s stems), so you should prune plants right after flowering is finished. Smooth and panicle hydrangeas flower on new growth, which means you can prune stems in late winter to early spring. In general, as long as you give hydrangeas enough elbow room to spread and reach their mature size, you shouldn’t have to do too much pruning beyond cutting out dead or damaged wood.

How to Protect Hydrangeas in Winter
In colder areas, many gardeners erect a burlap screen around oakleaf and French hydrangeas in an effort to help protect flower buds that have already formed for the next year. The most important aspect of winter protection, however, is making sure the hydrangea you’re growing is hardy in your gardening zone.
How to Use Hydrangeas
Hydrangeas can fill multiple roles in the garden. Plant a hydrangea privacy hedge, or use them as a foundation planting around a home. A single hydrangea can be the focal point of a garden, and potted hydrangeas can bring beauty to a deck or entry garden. Hydrangeas also integrate well into mixed borders of shrubs and perennials, and make a natural-looking addition to a woodland setting.
Fresh hydrangea flowers are a favorite for filling vases and adorning wedding bouquets. If you want to dry hydrangea blooms, most experts suggest waiting to let flowers age and dry naturally on the plant. Harvest at the color stage you prefer.
1
2
文章
Dummer. ゛☀
2017年07月31日

Family - Berberidaceae
Stems - To -1.5m tall, woody, multiple from base, erect to prostrate, few branched, stoloniferous.
Leaves - Alternate, odd pinnate, evergreen. Leaflets typically 3-9, sessile, lance-ovate, serrate(teeth spinose), glabrous, dark green above, dull green to glaucous below, to +7cm long, +4cm broad, acute.

Inflorescence - Axillary and terminal racemes to 15cm long. Pedicels glabrous, elongating in fruit to +/-1.3cm long, subtended by one small bract to 4mm long.

Flowers - Petals 5-10, in 2-4 whorls, yellow, glabrous, 6-8mm long, 5mm broad, emarginate or obtuse. Stamens 6-10. Filaments to 3.5mm long glabrous. Ovary superior, green, glabrous. Stigma capitate. Style wanting. Sepals to 3mm long, 2mm broad, dense pubescent externally, with scarious margins, yellow.
Fruit - Globose to subglobose berry, blue-black, glaucous, to -1cm in diameter.

Flowering - May - July.
Habitat - Cultivated.
Origin - Native to U.S., cultivated in Missouri.
Other info. - This plant is native to the Northwestern U.S. where it grows in shaded forests. In Missouri the plant begins to bloom around May but in other states in can bloom throughout the year depending on the location. The berries are edible and are eaten by wildlife and humans alike. This is the state flower of Oregon. There are a few varieties in cultivation. Besides being eaten as a fruit,Mahonia has been used medicinally for centuries. The plant contains many alkaloids. Recently the plant has shown great promise in the treatment of psoriasis. Stay tuned.
Stems - To -1.5m tall, woody, multiple from base, erect to prostrate, few branched, stoloniferous.
Leaves - Alternate, odd pinnate, evergreen. Leaflets typically 3-9, sessile, lance-ovate, serrate(teeth spinose), glabrous, dark green above, dull green to glaucous below, to +7cm long, +4cm broad, acute.

Inflorescence - Axillary and terminal racemes to 15cm long. Pedicels glabrous, elongating in fruit to +/-1.3cm long, subtended by one small bract to 4mm long.

Flowers - Petals 5-10, in 2-4 whorls, yellow, glabrous, 6-8mm long, 5mm broad, emarginate or obtuse. Stamens 6-10. Filaments to 3.5mm long glabrous. Ovary superior, green, glabrous. Stigma capitate. Style wanting. Sepals to 3mm long, 2mm broad, dense pubescent externally, with scarious margins, yellow.
Fruit - Globose to subglobose berry, blue-black, glaucous, to -1cm in diameter.

Flowering - May - July.
Habitat - Cultivated.
Origin - Native to U.S., cultivated in Missouri.
Other info. - This plant is native to the Northwestern U.S. where it grows in shaded forests. In Missouri the plant begins to bloom around May but in other states in can bloom throughout the year depending on the location. The berries are edible and are eaten by wildlife and humans alike. This is the state flower of Oregon. There are a few varieties in cultivation. Besides being eaten as a fruit,Mahonia has been used medicinally for centuries. The plant contains many alkaloids. Recently the plant has shown great promise in the treatment of psoriasis. Stay tuned.
0
0


