文章
Miss Chen
2017年08月15日

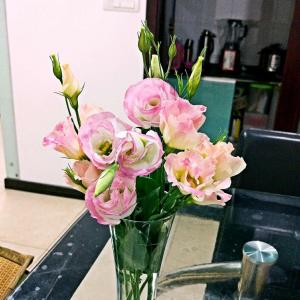
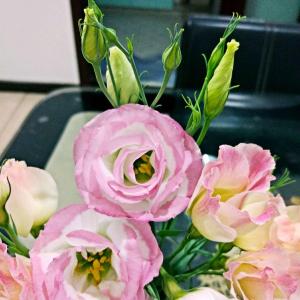
Lobelia, marked by intense colors and masses of small, tubular blooms, provides interest to the garden all summer. Annual lobelia (Lobelia erinus), grown as a perennial in the warm climates of U.S. Department of Agriculture plant hardiness zones 9 through 10, is a bushy, low-growing plant often used in flower beds and hanging baskets. Perennial varieties, which include cardinal flower (Lobelia cardinalis) and lobelia speciosa (Lobelia x speciosa), are tall, upright plants that reach heights of up to 4 feet. They are hardy perennials that grow in USDA zones 3 through 9.
Watering Lobelia

Annual lobelia requires frequent watering during the growing season because the short roots remain near the surface. Water slowly, using a garden hose or drip system, to saturate the soil to a depth of 6 to 8 inches. Allow the top 1 to 2 inches of soil to dry before watering again, as poorly drained, soggy soil may create root rot or other fungal diseases. Perennial varieties benefit from regular watering the first year. Thereafter, the plants are drought-tolerant, and water is necessary only during periods of hot, dry weather.
Fertilize to Promote Healthy Blooms

Annual and perennial lobelia varieties benefit from application of a dry, 5-10-10 or 5-10-5 fertilizer at planting time. Dig the fertilizer into the ground at a rate of about 5 pounds per 100 square feet of planting space. Repeat every spring for perennial varieties. Although a yearly feeding is sufficient for perennials, annual lobelia requires frequent feeding to sustain energy for blooming throughout the season. Use a liquid fertilizer with a ratio such as 12-4-8, mixed at a rate of 1 teaspoon per gallon of water every two to three weeks. Always apply fertilizer to damp soil to prevent damage to the plant; then water thoroughly to distribute the fertilizer evenly around the roots.
Maintaining Healthy Plants

Pinch back the tips of young annual and perennial lobelia plants by 1/2 to 1 inch to create full, bushy plants. Thereafter, shear annual lobelia by about half its height if it becomes tired and leggy in midsummer. To prevent spread of disease organisms, disinfect shears and other cutting tools by wiping the blades with rubbing alcohol before and after each use. You can also sanitize the blades with a mixture of 1 part bleach and 9 parts water. Deadhead perennial varieties to keep the plants looking their best and promote development of flowers throughout the growing season. To deadhead, pinch off wilted blooms along with the stem down to the next branch or leaf. Perennial and annual varieties benefit from 2 to 3 inches of mulch to keep the roots cool and moist during the growing season. Keep a layer of mulch around perennial varieties to protect the roots during the winter. Divide perennial lobelia every two to three years to keep the plant from becoming crowded.
Special Considerations

Lobelia is a pest-resistant plant; however, perennial varieties may be bothered by slugs and snails. If the infestation is light, pick the pests off by hand and drop them in a bucket of soapy water. Otherwise, apply slug bait at a rate of 1 teaspoon per square yard of planting area. Keep the container tightly closed, and store it in a locked place where it is inaccessible to children and pets. Plant lobelia with care because some varieties, including Lobelia cardinalis, are poisonous if eaten in large quantities.
Watering Lobelia

Annual lobelia requires frequent watering during the growing season because the short roots remain near the surface. Water slowly, using a garden hose or drip system, to saturate the soil to a depth of 6 to 8 inches. Allow the top 1 to 2 inches of soil to dry before watering again, as poorly drained, soggy soil may create root rot or other fungal diseases. Perennial varieties benefit from regular watering the first year. Thereafter, the plants are drought-tolerant, and water is necessary only during periods of hot, dry weather.
Fertilize to Promote Healthy Blooms

Annual and perennial lobelia varieties benefit from application of a dry, 5-10-10 or 5-10-5 fertilizer at planting time. Dig the fertilizer into the ground at a rate of about 5 pounds per 100 square feet of planting space. Repeat every spring for perennial varieties. Although a yearly feeding is sufficient for perennials, annual lobelia requires frequent feeding to sustain energy for blooming throughout the season. Use a liquid fertilizer with a ratio such as 12-4-8, mixed at a rate of 1 teaspoon per gallon of water every two to three weeks. Always apply fertilizer to damp soil to prevent damage to the plant; then water thoroughly to distribute the fertilizer evenly around the roots.
Maintaining Healthy Plants

Pinch back the tips of young annual and perennial lobelia plants by 1/2 to 1 inch to create full, bushy plants. Thereafter, shear annual lobelia by about half its height if it becomes tired and leggy in midsummer. To prevent spread of disease organisms, disinfect shears and other cutting tools by wiping the blades with rubbing alcohol before and after each use. You can also sanitize the blades with a mixture of 1 part bleach and 9 parts water. Deadhead perennial varieties to keep the plants looking their best and promote development of flowers throughout the growing season. To deadhead, pinch off wilted blooms along with the stem down to the next branch or leaf. Perennial and annual varieties benefit from 2 to 3 inches of mulch to keep the roots cool and moist during the growing season. Keep a layer of mulch around perennial varieties to protect the roots during the winter. Divide perennial lobelia every two to three years to keep the plant from becoming crowded.
Special Considerations

Lobelia is a pest-resistant plant; however, perennial varieties may be bothered by slugs and snails. If the infestation is light, pick the pests off by hand and drop them in a bucket of soapy water. Otherwise, apply slug bait at a rate of 1 teaspoon per square yard of planting area. Keep the container tightly closed, and store it in a locked place where it is inaccessible to children and pets. Plant lobelia with care because some varieties, including Lobelia cardinalis, are poisonous if eaten in large quantities.
0
0
文章
Dummer. ゛☀
2017年08月10日

An unforgettable sight when exiting the airplane terminal at Cabo San Lucas are the huge brightly colored croton plants that line the edges of the buildings. These popular tropical plants are hardy to United States Department of Agriculture zones 9 to 11. For many of us, that leaves our experience with the plant simply as a houseplant. However, croton in the garden can be enjoyed during the summer and sometimes into the early fall. You just need to learn some rules about how to grow a croton outdoors.
Croton in the Garden
Crotons are thought to be native to Malaysia, India and some of the South Pacific Islands. There are many species and cultivars, but the plants are most known for their easy maintenance and colorful foliage, often with interesting variegation or speckling. Can you grow a croton outdoors? It depends where your zone is located and what your average low temperatures are per year. Croton is very frost tender and will not survive freezing temperatures. Southern gardeners in frost free zones should have no problem growing croton plants outside. Anyone who lives where there are temperatures that near freezing or 32 degrees Fahrenheit (0 Celsius), even temperatures that hover in the 40’s (4 C.) can be damaging. That is why some gardeners choose to grow croton in containers on casters. That way, even the slightest threat of cold temps and the plant can be moved to a sheltered location. Care of outdoor croton may also include covering the plant if it is in the ground. The thing to remember is that these are tropical plants and are not suited for freezing temperatures which can kill the foliage and even the roots. Since croton hardiness is limited to freezing and even slightly above, northern gardeners should not attempt to grow the plant outdoors except in the warmest days of summer. Position the plant so it receives plenty of bright but indirect light to keep the foliage colors bright. Also, place the plant where it will not experience cold northern winds. Use well-draining potting soil and a container large enough to encompass the root ball with a little bit of growing room. Croton does not like to be transplanted, which should only be done every 3 to 5 years or as needed.
Care of Outdoor Croton Plants
Plants grown outdoors in appropriate zones will need slightly more water than those inside. This is because sunlight evaporates moisture and wind has a tendency to dry out soil quickly. Watch for pests and disease and handle immediately. When larger plants in the ground are in danger of a cold snap, cover them with a burlap sack or old blanket. To prevent breaking limbs, push in some stakes around the plant to handle the weight of the covering.
Mulch around plants with at least two inches (5 cm.) of organic material. This will help protect roots from cold, prevent competitive weeds and slowly feed the plant as the material breaks down. Where freezes are early and severe, grow plants in containers and move them in as soon as fall starts to arrive. This should save the plant and you can care for it indoors until the first warm rays of spring when it can go back outside after all danger of frost has passed.

Croton in the Garden
Crotons are thought to be native to Malaysia, India and some of the South Pacific Islands. There are many species and cultivars, but the plants are most known for their easy maintenance and colorful foliage, often with interesting variegation or speckling. Can you grow a croton outdoors? It depends where your zone is located and what your average low temperatures are per year. Croton is very frost tender and will not survive freezing temperatures. Southern gardeners in frost free zones should have no problem growing croton plants outside. Anyone who lives where there are temperatures that near freezing or 32 degrees Fahrenheit (0 Celsius), even temperatures that hover in the 40’s (4 C.) can be damaging. That is why some gardeners choose to grow croton in containers on casters. That way, even the slightest threat of cold temps and the plant can be moved to a sheltered location. Care of outdoor croton may also include covering the plant if it is in the ground. The thing to remember is that these are tropical plants and are not suited for freezing temperatures which can kill the foliage and even the roots. Since croton hardiness is limited to freezing and even slightly above, northern gardeners should not attempt to grow the plant outdoors except in the warmest days of summer. Position the plant so it receives plenty of bright but indirect light to keep the foliage colors bright. Also, place the plant where it will not experience cold northern winds. Use well-draining potting soil and a container large enough to encompass the root ball with a little bit of growing room. Croton does not like to be transplanted, which should only be done every 3 to 5 years or as needed.

Care of Outdoor Croton Plants
Plants grown outdoors in appropriate zones will need slightly more water than those inside. This is because sunlight evaporates moisture and wind has a tendency to dry out soil quickly. Watch for pests and disease and handle immediately. When larger plants in the ground are in danger of a cold snap, cover them with a burlap sack or old blanket. To prevent breaking limbs, push in some stakes around the plant to handle the weight of the covering.

Mulch around plants with at least two inches (5 cm.) of organic material. This will help protect roots from cold, prevent competitive weeds and slowly feed the plant as the material breaks down. Where freezes are early and severe, grow plants in containers and move them in as soon as fall starts to arrive. This should save the plant and you can care for it indoors until the first warm rays of spring when it can go back outside after all danger of frost has passed.
0
1
文章
Dummer. ゛☀
2017年08月10日

The garden croton (Codiaeum variegatum) is a small shrub with big tropical-looking leaves. Crotons can grow outdoors in gardening zones 9 to 11, and some varieties also make great houseplants, though demanding ones. Their striking red, orange and yellow-striped leaves make the extra work worthwhile. Some varieties even have purple or white stripes and patches on the dark green leaves. But sometimes the bright colors on a croton fade, leaving them with ordinary-looking green leaves. It can be disappointing to notice a croton losing color because those vibrant leaves are this plant’s best feature.
Why is My Croton Losing its Color?
Color loss of croton is common in winter and in low light conditions. Croton plants are native to the tropics, growing wild in Indonesia and Malaysia, and they do best in full sun or bright indoor light. Most often, croton plants with faded leaves are simply not receiving enough light. Conversely, some colors may fade if crotons are exposed to excessive direct light. Each variety has its own light preferences, so check whether the variety you have does best in full sun or partial sun.
What to Do When Croton Leaves are Fading
If a croton’s colors fade in low light levels, you need to increase the amount of light it is receiving. Bring the croton outdoors during the warm part of the year to give it more light. Be sure to harden off the plant, bringing it outdoors for a few hours at a time and placing it in a shady spot at first, to allow the plant to adjust to the brighter light, wind, and less stable temperatures of the outdoors. Crotons are not cold hardy and shouldn’t be exposed to temperatures below 30 degrees F. (-1 degree C.). Bring your croton back indoors before the first frost in fall. If a croton develops fading leaves when it is exposed to excessively bright light, try moving it into the shade or farther away from the window. To keep your croton healthy during the winter when it has to be indoors, place it near the sunniest window in the house, within 3 to 5 feet (.91 to 1.52 m.) of the glass, or provide a grow light. Legginess is another sign that the plant is not getting enough light. To ward off other problems that could cause weak coloration in crotons, provide a balanced slow-release fertilizer two to three times a year, but avoid over fertilizing, especially during the winter when growth is slower. Keep soil evenly moist, but avoid waterlogged or poorly drained soil, which may cause leaves to turn yellow. Crotons should be misted to keep them healthy indoors, since they prefer more humidity than most houses provide.

Why is My Croton Losing its Color?
Color loss of croton is common in winter and in low light conditions. Croton plants are native to the tropics, growing wild in Indonesia and Malaysia, and they do best in full sun or bright indoor light. Most often, croton plants with faded leaves are simply not receiving enough light. Conversely, some colors may fade if crotons are exposed to excessive direct light. Each variety has its own light preferences, so check whether the variety you have does best in full sun or partial sun.

What to Do When Croton Leaves are Fading
If a croton’s colors fade in low light levels, you need to increase the amount of light it is receiving. Bring the croton outdoors during the warm part of the year to give it more light. Be sure to harden off the plant, bringing it outdoors for a few hours at a time and placing it in a shady spot at first, to allow the plant to adjust to the brighter light, wind, and less stable temperatures of the outdoors. Crotons are not cold hardy and shouldn’t be exposed to temperatures below 30 degrees F. (-1 degree C.). Bring your croton back indoors before the first frost in fall. If a croton develops fading leaves when it is exposed to excessively bright light, try moving it into the shade or farther away from the window. To keep your croton healthy during the winter when it has to be indoors, place it near the sunniest window in the house, within 3 to 5 feet (.91 to 1.52 m.) of the glass, or provide a grow light. Legginess is another sign that the plant is not getting enough light. To ward off other problems that could cause weak coloration in crotons, provide a balanced slow-release fertilizer two to three times a year, but avoid over fertilizing, especially during the winter when growth is slower. Keep soil evenly moist, but avoid waterlogged or poorly drained soil, which may cause leaves to turn yellow. Crotons should be misted to keep them healthy indoors, since they prefer more humidity than most houses provide.

0
0
文章
Dummer. ゛☀
2017年08月10日

Boston ferns are fabulously popular houseplants. Hardy in USDA zones 9-11, they are kept indoors in pots in most regions. Capable of growing 3 feet (0.9 m) high and 4 feet (1.2 m) wide, Boston ferns can brighten any room with their lush green foliage. That’s why it can be so disheartening to see your vibrant green fern fronds turning black or brown. Keep reading to learn what causes a Boston fern with black fronds, and what to do about it.
Boston Fern Fronds Turning Black Isn’t Always Bad
There is one case in which a Boston fern with black fronds is perfectly natural, and it’s good to be able to spot it. You may see small black spots on the undersides of your fern’s leaves, lined up in regular rows. These spots are spores, and they’re the fern’s way of reproducing. Eventually, the spores will drop to the soil below and grow into reproductive structures. If you see these spots, don’t take any action! It’s a sign that your fern is healthy. Your fern will also experience some natural browning as it ages. As new growth emerges, the oldest leaves at the bottom of the fern will wither and turn brown to black to make way for new growth. This is totally normal. Cut away the discolored leaves to keep the plant looking fresh.
When Boston Fern Fronds Turning Black is Not Good
Boston fern fronds turning brown or black may also signal trouble, however. If your fern’s leaves are suffering from brown or black spots or strips, there may be nematodes in the soil. Add lots of compost to the soil – this will encourage the growth of beneficial fungi that should destroy the nematodes. If the infestation is bad, remove any infected plants. Small, but spreading, soft brown to black spots with an unpleasant odor are most likely a sign of bacterial soft rot. Destroy any infected plants.
Small, but spreading, soft brown to black spots with an unpleasant odor are most likely a sign of bacterial soft rot. Destroy any infected plants. Leaf tip burn manifests as browning and withering tips on fronds and leaves. Destroy any infected plants. Rhizoctonia Blight appears as irregular brownish-black spots that start near the crown of the fern but spread very rapidly. Spray with fungicide.

Boston Fern Fronds Turning Black Isn’t Always Bad
There is one case in which a Boston fern with black fronds is perfectly natural, and it’s good to be able to spot it. You may see small black spots on the undersides of your fern’s leaves, lined up in regular rows. These spots are spores, and they’re the fern’s way of reproducing. Eventually, the spores will drop to the soil below and grow into reproductive structures. If you see these spots, don’t take any action! It’s a sign that your fern is healthy. Your fern will also experience some natural browning as it ages. As new growth emerges, the oldest leaves at the bottom of the fern will wither and turn brown to black to make way for new growth. This is totally normal. Cut away the discolored leaves to keep the plant looking fresh.

When Boston Fern Fronds Turning Black is Not Good
Boston fern fronds turning brown or black may also signal trouble, however. If your fern’s leaves are suffering from brown or black spots or strips, there may be nematodes in the soil. Add lots of compost to the soil – this will encourage the growth of beneficial fungi that should destroy the nematodes. If the infestation is bad, remove any infected plants. Small, but spreading, soft brown to black spots with an unpleasant odor are most likely a sign of bacterial soft rot. Destroy any infected plants.

Small, but spreading, soft brown to black spots with an unpleasant odor are most likely a sign of bacterial soft rot. Destroy any infected plants. Leaf tip burn manifests as browning and withering tips on fronds and leaves. Destroy any infected plants. Rhizoctonia Blight appears as irregular brownish-black spots that start near the crown of the fern but spread very rapidly. Spray with fungicide.
0
0


