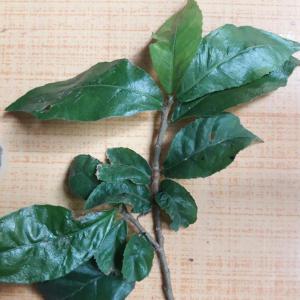
求助
Lucky Coyote
2017年09月05日

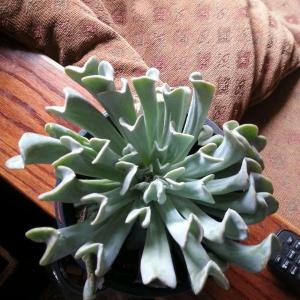
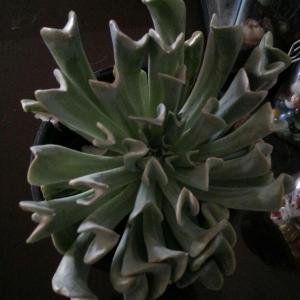
My aunt got this for me yesterday, but I have no idea what it is or what care precautions should be taken. Any help is appreciated


2
0
Ueca:Echeveria runyonii "Topsy Turvy". Give it the regular amount of sun, temperature, and watering for any typical Echeveria.
成长记
Emi Cheshire
2017年09月04日

Krypto seems to be getting slowly better each day, working on getting plant fertilizer to help boost him a little!


0
0
求助
hholman11
2017年09月02日

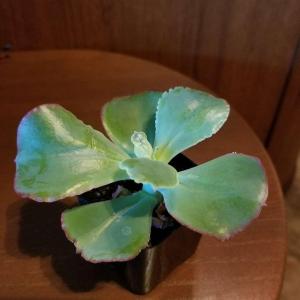
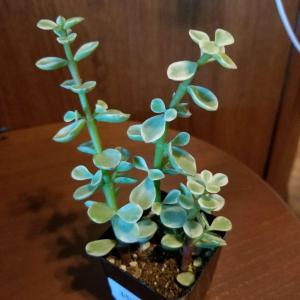
Just bought some new plants and was wondering if anyone knew what they were specifically. They were only labeled as succulent and nothing else. Can anyone help?


1
0
hholman11:I looked it up a bit more and you were right for both of them! Thanks!
meriunkat:The first one also looks like Aeonium Kiwi but I could be wrong, Google the names and see if they look like your plants
meriunkat:The second one looks like Portuluca Afra "Elephant Bush"
文章
Dummer. ゛☀
2017年09月02日

Cutting back a palm tree will not make it grow faster. This myth has caused gardeners to do extensive palm tree pruning that doesn’t help and can hurt the tree. Pruning palm plants, like any plant pruning, must be undertaken carefully. If you want to know how and when to prune a palm tree to make it stronger and healthier, read on.
Trimming a Palm Tree
Some experts recommend avoiding all palm tree pruning, but most suggest you avoid cutting too much or too often. When should you think about pruning palm plants?
Think about cutting back a palm tree if you notice dead or dying fronds. Removing these fronds by pruning palm plants not only prevents breakage damage, it also eliminates nesting places for rats, scorpions and other pests. Another good reason to start trimming a palm tree is when it has become a fire hazard or visual hazard in your yard. If it blocks the views from your driveway or sidewalk, you’ll have to start palm tree pruning.
How and When to Prune a Palm Tree
Experts recommend that you wait until spring to prune your palm tree. Those dead fronds may be somewhat unattractive, but they will help protect the palm from summer’s heat and winter’s cold. Sterilize and sharpen your pruning tools before you begin. Generally, you’ll need pruners, garden knives and pruning saws when you are trimming a palm tree. Wear safety glasses and protective gloves, as well as heavy pants and a shirt with long sleeves. Remove any hanging, dead or unhealthy fronds. All dry, wilted or diseased fronds should be removed. On the other hand, when you are pruning palm plants, don’t think you need to prune green, healthy fronds. There is no biological reason to do so and it can stress the tree. Be sure not to remove green fronds growing horizontally or pointing up.
What to Avoid When Cutting Back a Palm Tree
When cutting back a palm tree, don’t remove most of the fronds. Some gardeners make the mistake of doing this every year, and the tree becomes weak and unhealthy. In fact, leave as many green fronds as you possibly can on the palm. Palms need many green fronds to produce a steady food supply so that the plant can grow. A palm tree cannot stay healthy and build reserves without a considerable number of green fronds.
And resist the urge to start pruning palm plants for cosmetic reasons. Pruning them into pineapple shapes or skinning their trunks weaken the trees.

Trimming a Palm Tree
Some experts recommend avoiding all palm tree pruning, but most suggest you avoid cutting too much or too often. When should you think about pruning palm plants?
Think about cutting back a palm tree if you notice dead or dying fronds. Removing these fronds by pruning palm plants not only prevents breakage damage, it also eliminates nesting places for rats, scorpions and other pests. Another good reason to start trimming a palm tree is when it has become a fire hazard or visual hazard in your yard. If it blocks the views from your driveway or sidewalk, you’ll have to start palm tree pruning.

How and When to Prune a Palm Tree
Experts recommend that you wait until spring to prune your palm tree. Those dead fronds may be somewhat unattractive, but they will help protect the palm from summer’s heat and winter’s cold. Sterilize and sharpen your pruning tools before you begin. Generally, you’ll need pruners, garden knives and pruning saws when you are trimming a palm tree. Wear safety glasses and protective gloves, as well as heavy pants and a shirt with long sleeves. Remove any hanging, dead or unhealthy fronds. All dry, wilted or diseased fronds should be removed. On the other hand, when you are pruning palm plants, don’t think you need to prune green, healthy fronds. There is no biological reason to do so and it can stress the tree. Be sure not to remove green fronds growing horizontally or pointing up.

What to Avoid When Cutting Back a Palm Tree
When cutting back a palm tree, don’t remove most of the fronds. Some gardeners make the mistake of doing this every year, and the tree becomes weak and unhealthy. In fact, leave as many green fronds as you possibly can on the palm. Palms need many green fronds to produce a steady food supply so that the plant can grow. A palm tree cannot stay healthy and build reserves without a considerable number of green fronds.

And resist the urge to start pruning palm plants for cosmetic reasons. Pruning them into pineapple shapes or skinning their trunks weaken the trees.
0
0
文章
Dummer. ゛☀
2017年09月02日

Oak trees (Quercus) are among the most common tree species found in forests, but their number are declining. The main cause of the decline is the value of acorns and young saplings as a food source for wildlife. You can help the tree recover its former glory by starting and planting oak tree seedlings following the instructions in this article.
Propagating Oak Trees
For convenience, the many species of oak are divided into two main groups: red oaks and white oaks. You can tell which group an oak belongs to by taking a close look at the leaves. Red oak leaves have pointed lobes with little bristles at the tips, while the lobes on white oak leaves are rounded. Propagating oak trees is good for the environment and it’s an easy, fun project for kids. All you need is an acorn and a gallon pot filled with soil. Here are the steps for growing oak trees from acorns.
How to Grow an Oak Tree
Don’t gather the first acorns that fall. Wait until the second flush begins to fall, and then collect several handfuls. You might think you are collecting a lot more than you need, but the germination rates for acorns is low, so you need lots of extras. Check the leaves to determine whether you are collecting white oak or red oak acorns, and label the containers if you collect some of each. Visually examine your acorns and throw away any that have small holes where an insect may have bored in, as well as those that are off colored or moldy. The caps of mature acorns come off easily. Go ahead and remove them during your visual inspection.
Soak the acorns in a container of water overnight. Damaged and immature seeds float to the top, and you can scoop them off and discard them. White oak acorns are ready for planting right after soaking, but red oak acorns need a special treatment, called stratification. Place the red oak acorns in a zipper bag with moist sawdust or peat moss. You don’t want the sawdust or peat moss soaking wet, just lightly damp. Leave them for eight weeks, checking every two weeks or so to make sure they aren’t molding. Remove molded acorns and leave the bag open to allow fresh air in if you see signs of mold. Fill pots that are at least 12 inches deep with potting soil. Plant the acorns an inch deep. You can plant several acorns in each pot. Transplant the seedlings to a permanent location when the first leaves unfurl. If you only have one seedling in the pot, you can keep it indoors in a sunny window for up to three months. If you prefer to plant the acorns directly in the ground, take care to protect them from wildlife.
Oak Tree Care
Early on, oak tree saplings are in danger of being consumed by wildlife. Place cages over newly planted saplings and replace them with chicken wire fences as the sapling grows. Keep the tree protected until it is at least 5 feet tall. Keep the area surrounding young oak trees free of weeds and water the soil around the tree in the absence of rain. The tree won’t develop strong roots in dry soil.
Don’t fertilize the tree until its second year after planting. Even then, only use fertilizer if the leaves are pale, or the tree is not growing as it should. Keep in mind that oak trees grow very slowly at first. Feeding the tree to encourage fast growth weakens the wood. This can lead to splits in the trunk and broken branches.

Propagating Oak Trees
For convenience, the many species of oak are divided into two main groups: red oaks and white oaks. You can tell which group an oak belongs to by taking a close look at the leaves. Red oak leaves have pointed lobes with little bristles at the tips, while the lobes on white oak leaves are rounded. Propagating oak trees is good for the environment and it’s an easy, fun project for kids. All you need is an acorn and a gallon pot filled with soil. Here are the steps for growing oak trees from acorns.

How to Grow an Oak Tree
Don’t gather the first acorns that fall. Wait until the second flush begins to fall, and then collect several handfuls. You might think you are collecting a lot more than you need, but the germination rates for acorns is low, so you need lots of extras. Check the leaves to determine whether you are collecting white oak or red oak acorns, and label the containers if you collect some of each. Visually examine your acorns and throw away any that have small holes where an insect may have bored in, as well as those that are off colored or moldy. The caps of mature acorns come off easily. Go ahead and remove them during your visual inspection.

Soak the acorns in a container of water overnight. Damaged and immature seeds float to the top, and you can scoop them off and discard them. White oak acorns are ready for planting right after soaking, but red oak acorns need a special treatment, called stratification. Place the red oak acorns in a zipper bag with moist sawdust or peat moss. You don’t want the sawdust or peat moss soaking wet, just lightly damp. Leave them for eight weeks, checking every two weeks or so to make sure they aren’t molding. Remove molded acorns and leave the bag open to allow fresh air in if you see signs of mold. Fill pots that are at least 12 inches deep with potting soil. Plant the acorns an inch deep. You can plant several acorns in each pot. Transplant the seedlings to a permanent location when the first leaves unfurl. If you only have one seedling in the pot, you can keep it indoors in a sunny window for up to three months. If you prefer to plant the acorns directly in the ground, take care to protect them from wildlife.

Oak Tree Care
Early on, oak tree saplings are in danger of being consumed by wildlife. Place cages over newly planted saplings and replace them with chicken wire fences as the sapling grows. Keep the tree protected until it is at least 5 feet tall. Keep the area surrounding young oak trees free of weeds and water the soil around the tree in the absence of rain. The tree won’t develop strong roots in dry soil.

Don’t fertilize the tree until its second year after planting. Even then, only use fertilizer if the leaves are pale, or the tree is not growing as it should. Keep in mind that oak trees grow very slowly at first. Feeding the tree to encourage fast growth weakens the wood. This can lead to splits in the trunk and broken branches.
0
0
文章
Dummer. ゛☀
2017年09月02日

Mighty and majestic, the bur oak (Quercus macrocarpa) is a survivor. Its massive trunk and rough bark help it exist in a very broad natural range in a variety of habitats – from bottomlands to dry uplands. What is a bur oak? Read on for bur oak information and tips on bur oak care.
What is a Bur Oak?
Bur oaks, also called mossycup oak, are decidedly impressive oak trees native to North America. They grow in the wild in central and eastern sections of the continent. The common names comes from a mossy scale, or bur, on the acorn cup rim.
Bur Oak Information
Bur oak trees are medium to large sized trees. They are deciduous members of the white oak group and grow to heights between 60 and 150 feet tall (18 to 46 m.).
If you are thinking of planting a bur oak, you’ll want to take height into account when selecting a site. Keep in mind that the trees also have broad, rounded crowns. Bur oak trees produce yellow catkin flowers in springtime, but they are not particularly showy. The acorns are oval with fringed cups, and offer a good food source for wildlife, including both birds and mammals. Don’t expect brilliant fall color in bur oak tree leaves. The green leaves turn a dull yellow-brown before they fall.
Planting a Bur Oak
Planting a bur oak is only a good idea for homeowners with very large backyards, given the size of the trees. The massive oak grows best in U.S Department of Agriculture zones 3 through 8. Be sure you site the tree with enough room to grow and in a permanent location. Bur oak information says that these native trees can live up to 300 years. If you do decide to start planting a bur oak, site the tree in full direct sun. Be sure the tree gets at least six hours of unfiltered sunlight every day. For best bur oak care, plant the tree in soil that is well drained and loamy. It will grow in either acidic or alkaline soil, and tolerates sandy, wet and clay soils too.
And speaking of bur oak care, don’t forget to water the tree regularly, especially during its first year in your garden. Bur oak trees have some drought tolerance, but they will grow faster and healthier with moderate moisture. Note that bur oak trees tolerate city smoke and other air pollutants as well as compacted soil. They are often used as shade tree on U.S. city streets.

What is a Bur Oak?
Bur oaks, also called mossycup oak, are decidedly impressive oak trees native to North America. They grow in the wild in central and eastern sections of the continent. The common names comes from a mossy scale, or bur, on the acorn cup rim.

Bur Oak Information
Bur oak trees are medium to large sized trees. They are deciduous members of the white oak group and grow to heights between 60 and 150 feet tall (18 to 46 m.).
If you are thinking of planting a bur oak, you’ll want to take height into account when selecting a site. Keep in mind that the trees also have broad, rounded crowns. Bur oak trees produce yellow catkin flowers in springtime, but they are not particularly showy. The acorns are oval with fringed cups, and offer a good food source for wildlife, including both birds and mammals. Don’t expect brilliant fall color in bur oak tree leaves. The green leaves turn a dull yellow-brown before they fall.

Planting a Bur Oak
Planting a bur oak is only a good idea for homeowners with very large backyards, given the size of the trees. The massive oak grows best in U.S Department of Agriculture zones 3 through 8. Be sure you site the tree with enough room to grow and in a permanent location. Bur oak information says that these native trees can live up to 300 years. If you do decide to start planting a bur oak, site the tree in full direct sun. Be sure the tree gets at least six hours of unfiltered sunlight every day. For best bur oak care, plant the tree in soil that is well drained and loamy. It will grow in either acidic or alkaline soil, and tolerates sandy, wet and clay soils too.

And speaking of bur oak care, don’t forget to water the tree regularly, especially during its first year in your garden. Bur oak trees have some drought tolerance, but they will grow faster and healthier with moderate moisture. Note that bur oak trees tolerate city smoke and other air pollutants as well as compacted soil. They are often used as shade tree on U.S. city streets.
0
0
求助
lensucc
2017年09月01日

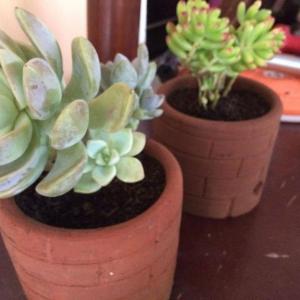
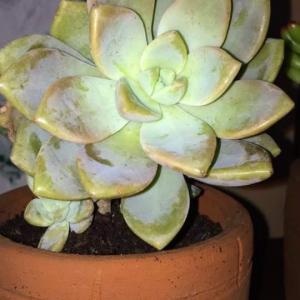
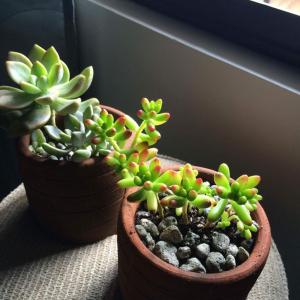
can someone tell me whats the ID of my succulent? my supplier call this Grapto Violet. but I couldnt find the specific succulent that looks like mine. help! My succulent has not been in full sun right now because its rainy season in our place.



3
1
meriunkat:now that I think about it I have a plant that looks exactly like yours, so you might have echeveria California sunset in your hands
Lucky Coyote:I think it may be a Vera Higgins, it looks like what mine did when I got it
meriunkat:@lensucc okey dokey
lensucc:@meriunkat i see. I dont know if that'll turn bronze. but let me see after a few months under the sun and I'll ask again. hahaha, thank you!
meriunkat:Leaf*
显示更多
文章
Dummer. ゛☀
2017年08月31日

The Katura tree is a wonderful ornamental plant for cold to temperate regions. Although this is a low maintenance plant, a little information on how to take care of a Katsura tree will help you keep it healthy and strong as an attractive presence in your landscape.
About Japanese Katsura Trees
The grown up name for Katsura tree, Cercidiphyllum, refers to a genus of trees from Asia, in particular Japan and China. The trees are suited for moist soil in full sun and get no larger than 45 feet tall. In fact, the majority of the trees are almost better classified as big bushes rather than trees.
While there are other varieties, Katsura tree (Cercidiphyllum japonica) is one of the most popular landscape trees. This type hails from Japan and is an economically important deciduous forest tree. The leaves are multi-hued with heavy veins and tones of pink and green. In fall the heart-shaped leaves take on autumnal tones of gold, orange and red before they fall from the tree. Katsura flowers are tiny, white and insignificant, but the foliage has a strong brown sugar smell in fall, which adds to the tree’s appeal. An interesting fact about Katsura trees is that the botanical name translates to ‘red leaf.’
Growing Katsura Trees
Katsura trees will thrive in USDA plant hardiness zones 4b to 8. They need plenty of water at establishment, but once they are mature can handle short periods of drought. Plant the tree in well drained soil that is acid or neutral. The plant is sensitive to frost and does drop its leaves once cold temperatures arrive. Choose either full sun or light shade for growing Katsura trees. The trees are weak limbed, so a sheltered spot is preferable with protection from wind gusts. Pruning is not a necessary part of Katsura tree care, but you can remove any damaged or crossed limbs that prevent the tree from producing a strong scaffold.
How to Take Care of a Katsura
Katsura trees are slow growing and may take up to 50 years to reach their full size. During this time, if the tree was planted in an appropriate soil and site, it will need very little care. Katsuras are not susceptible to many pests and they are basically disease free. Avoid overhead watering to prevent mildew on the ornamental leaves. Spread mulch around the base of the tree out to the root line to minimize competitive weeds and enhance water conservation.
Lightly prune out suckers and dead wood in spring and apply a 10-10-10 balanced granular fertilizer to the root zone of the plant. Water the fertilizer in well. Young Katsura tree care requires tree wraps and slings to protect the thin bark and establish a firm, strong shape. Water the tree daily for the first year to increase health and growth.

About Japanese Katsura Trees
The grown up name for Katsura tree, Cercidiphyllum, refers to a genus of trees from Asia, in particular Japan and China. The trees are suited for moist soil in full sun and get no larger than 45 feet tall. In fact, the majority of the trees are almost better classified as big bushes rather than trees.
While there are other varieties, Katsura tree (Cercidiphyllum japonica) is one of the most popular landscape trees. This type hails from Japan and is an economically important deciduous forest tree. The leaves are multi-hued with heavy veins and tones of pink and green. In fall the heart-shaped leaves take on autumnal tones of gold, orange and red before they fall from the tree. Katsura flowers are tiny, white and insignificant, but the foliage has a strong brown sugar smell in fall, which adds to the tree’s appeal. An interesting fact about Katsura trees is that the botanical name translates to ‘red leaf.’

Growing Katsura Trees
Katsura trees will thrive in USDA plant hardiness zones 4b to 8. They need plenty of water at establishment, but once they are mature can handle short periods of drought. Plant the tree in well drained soil that is acid or neutral. The plant is sensitive to frost and does drop its leaves once cold temperatures arrive. Choose either full sun or light shade for growing Katsura trees. The trees are weak limbed, so a sheltered spot is preferable with protection from wind gusts. Pruning is not a necessary part of Katsura tree care, but you can remove any damaged or crossed limbs that prevent the tree from producing a strong scaffold.

How to Take Care of a Katsura
Katsura trees are slow growing and may take up to 50 years to reach their full size. During this time, if the tree was planted in an appropriate soil and site, it will need very little care. Katsuras are not susceptible to many pests and they are basically disease free. Avoid overhead watering to prevent mildew on the ornamental leaves. Spread mulch around the base of the tree out to the root line to minimize competitive weeds and enhance water conservation.

Lightly prune out suckers and dead wood in spring and apply a 10-10-10 balanced granular fertilizer to the root zone of the plant. Water the fertilizer in well. Young Katsura tree care requires tree wraps and slings to protect the thin bark and establish a firm, strong shape. Water the tree daily for the first year to increase health and growth.
0
0
文章
Dummer. ゛☀
2017年08月30日

Help, my crabapple isn’t flowering! Crabapple trees put on a real show in springtime with dense masses of blossoms in shades ranging from pure white to pink or rosy red. When a flowering crabapple has no flowers, it can be a huge disappointment. There are several possible reasons for a crabapple not blooming, some simple and some more involved. Read on for tips on troubleshooting flowering crabapple problems.
Reasons for No Flowers on Crabapple Trees
Age: When a young crabapple isn’t flowering, it may be because the tree still needs a few more years to grow and mature. On the other hand, an old tree may be past its best blooming years. Feeding: Although crabapple trees don’t need a lot of fertilizer, they benefit from one light feeding every spring during the first four or five years. Sprinkle a time-release fertilizer on the ground under the tree, out to about 18 inches past the dripline. Mature trees require no fertilizer, but a 2- to 4-inch layer of organic mulch will return nutrients to the soil.
Weather: Crabapple trees can be fickle when it comes to the weather. For example, a dry autumn may result in no flowers on crabapple trees the following spring. Similarly, crabapple trees require a chilling period, so an unseasonably warm winter may create flowering crabapple problems. Erratic weather may also be to blame when one tree blooms and a neighboring tree in the same yard doesn’t, or when a tree displays only a few half-hearted flowers. Sunlight: Crabapple trees require full sunlight and a too shady location may be the culprit when a crabapple isn’t flowering. Although crabapples don’t require heavy pruning, proper pruning in spring can ensure sunlight reaches all parts of the tree.
Disease: Apple scab is a common fungal disease that affects leaves when they emerge in spring, particularly when conditions are moist. Replace the tree with a disease-resistant cultivar, or try treating the affected tree with a fungicide at leaf emergence, followed by treatments two and four weeks later.

Reasons for No Flowers on Crabapple Trees
Age: When a young crabapple isn’t flowering, it may be because the tree still needs a few more years to grow and mature. On the other hand, an old tree may be past its best blooming years. Feeding: Although crabapple trees don’t need a lot of fertilizer, they benefit from one light feeding every spring during the first four or five years. Sprinkle a time-release fertilizer on the ground under the tree, out to about 18 inches past the dripline. Mature trees require no fertilizer, but a 2- to 4-inch layer of organic mulch will return nutrients to the soil.

Weather: Crabapple trees can be fickle when it comes to the weather. For example, a dry autumn may result in no flowers on crabapple trees the following spring. Similarly, crabapple trees require a chilling period, so an unseasonably warm winter may create flowering crabapple problems. Erratic weather may also be to blame when one tree blooms and a neighboring tree in the same yard doesn’t, or when a tree displays only a few half-hearted flowers. Sunlight: Crabapple trees require full sunlight and a too shady location may be the culprit when a crabapple isn’t flowering. Although crabapples don’t require heavy pruning, proper pruning in spring can ensure sunlight reaches all parts of the tree.

Disease: Apple scab is a common fungal disease that affects leaves when they emerge in spring, particularly when conditions are moist. Replace the tree with a disease-resistant cultivar, or try treating the affected tree with a fungicide at leaf emergence, followed by treatments two and four weeks later.
0
0
Raghad Osama Al-rifai
2017年08月29日

Can someone help me identify this plant?


0
0
Raghad Osama Al-rifai:@Ueca thank you ❤️
Ueca:Echeveria agavoides. May or may not be a cultivar.
Casey Bradley Quillen
2017年08月27日

I need help finding out what this is, the common name if possible and how to propagate it.


0
0
文章
Dummer. ゛☀
2017年08月25日

If there were an award for “easiest herb to grow,” growing chives (Allium schoenoprasum) would win that award. Learning how to grow chives is so easy that even a child can do it, which makes this plant an excellent herb to help introduce children to herb gardening.
How to Plant Chives from Divisions
Divisions are the most common way how to plant chives. Find an established clump of chives in early spring or mid fall. Gently dig the clump and pull away a smaller clump from the main clump. The smaller clump should have at least five to 10 bulbs. Transplant this small clump to the desired location in your garden where you will be growing chives.
How to Plant Chives from Seeds
While chives are frequently grown from divisions, they are just as easy to start from seeds. Chive can be started indoors or outdoors. Plant chives seeds about 1/4-inch deep in the soil. Water well. If you’re planting chive seeds indoors, place the pot in a dark spot in temperatures 60 to 70 F. (15 to 21 C.) until the seeds sprout, then move them into the light. When the chives reach 6 inches, you can transplant them to the garden. If you’re planting the chive seeds outdoors, wait ’till after the last frost to plant the seeds. The seeds may take a little extra time to sprout until the soil warms up.
Where to Grow Chives
Chives will grow just about anywhere, but prefer strong light and rich soil. Chives also don’t do as well in soil that is too wet or too dry.
Growing Chives Indoors
Growing chives indoors is also easy. Chives do very well indoors and will frequently be the herb that will do the best in your indoor herb garden. The best way how to grow chives indoors is to plant them in a pot that drains well, but is filled with a good potting soil. Place the chives where they will get bright light. Continue harvesting chives as you would if they were outdoors.
Harvesting Chives
Harvesting chives is as easy as growing chives. Once the chives are about a foot tall, simply snip off what you need. When harvesting chives, you can cut the chive plant back to half its size without harming the plant. If your chive plant starts to flower, the flowers are edible as well. Add the chive flowers to your salad or as decorations for soup. Knowing how to grow chives is as easy as knowing how to chew bubble gum. Add these tasty herbs to your garden today.

How to Plant Chives from Divisions
Divisions are the most common way how to plant chives. Find an established clump of chives in early spring or mid fall. Gently dig the clump and pull away a smaller clump from the main clump. The smaller clump should have at least five to 10 bulbs. Transplant this small clump to the desired location in your garden where you will be growing chives.
How to Plant Chives from Seeds
While chives are frequently grown from divisions, they are just as easy to start from seeds. Chive can be started indoors or outdoors. Plant chives seeds about 1/4-inch deep in the soil. Water well. If you’re planting chive seeds indoors, place the pot in a dark spot in temperatures 60 to 70 F. (15 to 21 C.) until the seeds sprout, then move them into the light. When the chives reach 6 inches, you can transplant them to the garden. If you’re planting the chive seeds outdoors, wait ’till after the last frost to plant the seeds. The seeds may take a little extra time to sprout until the soil warms up.

Where to Grow Chives
Chives will grow just about anywhere, but prefer strong light and rich soil. Chives also don’t do as well in soil that is too wet or too dry.
Growing Chives Indoors
Growing chives indoors is also easy. Chives do very well indoors and will frequently be the herb that will do the best in your indoor herb garden. The best way how to grow chives indoors is to plant them in a pot that drains well, but is filled with a good potting soil. Place the chives where they will get bright light. Continue harvesting chives as you would if they were outdoors.

Harvesting Chives
Harvesting chives is as easy as growing chives. Once the chives are about a foot tall, simply snip off what you need. When harvesting chives, you can cut the chive plant back to half its size without harming the plant. If your chive plant starts to flower, the flowers are edible as well. Add the chive flowers to your salad or as decorations for soup. Knowing how to grow chives is as easy as knowing how to chew bubble gum. Add these tasty herbs to your garden today.
0
2
文章
Dummer. ゛☀
2017年08月25日

Catnip plants (Nepeta cataria) can help make your garden a cat-friendly garden. The catnip herb is a perennial member of the mint family that is best known for being attractive to cats, but can also be used in soothing teas. Growing catnip is easy, but there are some things you need to know about how to grow catnip.
Planting Catnip
Catnip can be planted in your garden either from seed or from plants.
If you’re growing catnip from seed, you’ll need to properly prepare the seeds. Catnip seeds are tough and need to be stratified or slightly damaged before they will sprout. This can be done by first placing the seeds in the freezer overnight and then placing the seeds in a bowl of water for 24 hours. This process will damage the seed coat and will make it much easier for the catnip seeds to sprout. After you have stratified the seeds, you can plant them indoors or outdoors. Thin them to one plant per 20 inches after the sprout. You can also plant catnip from plant divisions or started plants. The best time for planting catnip starts or divisions is in either the spring or fall. Catnip plants should be planted 18 to 20 inches apart.
Growing Catnip
Catnip herb grows best in well draining soil in the full sun, but will tolerate part sun and a wide variety of soil types. Once catnip plants are established, they need very little in the way of care. They don’t need to be fertilized, as fertilizer can decrease the potency of their smell and flavor. They only need to be provided with water beyond rainfall if you are growing catnip in pots or if you are having drought conditions.
Catnip can become invasive in some areas so you need to take steps to control it. Catnip plants spread readily by seed so in order to control its spread, you’ll need to remove the flowers before they go to seed. Growing catnip can be rewarding. Now that you know a few facts about how to grow catnip, you (and your cat) can enjoy this wonderful herb.

Planting Catnip
Catnip can be planted in your garden either from seed or from plants.
If you’re growing catnip from seed, you’ll need to properly prepare the seeds. Catnip seeds are tough and need to be stratified or slightly damaged before they will sprout. This can be done by first placing the seeds in the freezer overnight and then placing the seeds in a bowl of water for 24 hours. This process will damage the seed coat and will make it much easier for the catnip seeds to sprout. After you have stratified the seeds, you can plant them indoors or outdoors. Thin them to one plant per 20 inches after the sprout. You can also plant catnip from plant divisions or started plants. The best time for planting catnip starts or divisions is in either the spring or fall. Catnip plants should be planted 18 to 20 inches apart.

Growing Catnip
Catnip herb grows best in well draining soil in the full sun, but will tolerate part sun and a wide variety of soil types. Once catnip plants are established, they need very little in the way of care. They don’t need to be fertilized, as fertilizer can decrease the potency of their smell and flavor. They only need to be provided with water beyond rainfall if you are growing catnip in pots or if you are having drought conditions.

Catnip can become invasive in some areas so you need to take steps to control it. Catnip plants spread readily by seed so in order to control its spread, you’ll need to remove the flowers before they go to seed. Growing catnip can be rewarding. Now that you know a few facts about how to grow catnip, you (and your cat) can enjoy this wonderful herb.
0
0
文章
Dummer. ゛☀
2017年08月24日

Rosemary is a hardy,evergreen herb that is vigorous and fragrant. The needle-like foliage is full of aromatic oils that release in stews, soups and sauces. Drying rosemary can help capture that aroma and the flavor. Harvesting rosemary in summer for drying protects the essence of the plant and brings it conveniently to your spice rack.
Harvesting Rosemary
Tips on how to dry rosemary must include a talk on timing. Most herbs are best just before flowering when the oils are at their peak. Cut the stems in the morning just after the dew dries and before the heat of the day is at its height. Use pruners when harvesting rosemary from mature plants with woody stems. Wash the stems before you begin drying rosemary.
How to Dry Fresh Rosemary
Fresh rosemary is easiest to use because the leaves are soft and pliable. It’s easy to preserve the flavor of the herb but drying rosemary makes the leaves hard and woody. The process of how to dry rosemary can include grinding the dry needles into powder for use without the hard texture.
You can just leave a stem of rosemary on the counter and it will dry, but to ensure safety and quality, a food dehydrator is useful. Dry the stems in a single layer on the dehydrator trays. Pull off the leaves after they are dry and store rosemary whole or ground. Other methods of how to dry rosemary can be done by hanging on a clothes hanger or pulling off the leaves and letting them dry in a single layer on a cookie sheet. A pretty and easy way of drying rosemary is to make tied bouquets. The herb is attractive with numerous leaves and a rich green color. When bundled and tied with a bright ribbon, the bouquet emits a fresh evergreen scent as it dries. Hang the bundles in a warm, dry area until the needles start to fall off, then remove the leaves by rubbing the stem upwards over a bowl or bag.

Harvesting Rosemary
Tips on how to dry rosemary must include a talk on timing. Most herbs are best just before flowering when the oils are at their peak. Cut the stems in the morning just after the dew dries and before the heat of the day is at its height. Use pruners when harvesting rosemary from mature plants with woody stems. Wash the stems before you begin drying rosemary.

How to Dry Fresh Rosemary
Fresh rosemary is easiest to use because the leaves are soft and pliable. It’s easy to preserve the flavor of the herb but drying rosemary makes the leaves hard and woody. The process of how to dry rosemary can include grinding the dry needles into powder for use without the hard texture.
You can just leave a stem of rosemary on the counter and it will dry, but to ensure safety and quality, a food dehydrator is useful. Dry the stems in a single layer on the dehydrator trays. Pull off the leaves after they are dry and store rosemary whole or ground. Other methods of how to dry rosemary can be done by hanging on a clothes hanger or pulling off the leaves and letting them dry in a single layer on a cookie sheet. A pretty and easy way of drying rosemary is to make tied bouquets. The herb is attractive with numerous leaves and a rich green color. When bundled and tied with a bright ribbon, the bouquet emits a fresh evergreen scent as it dries. Hang the bundles in a warm, dry area until the needles start to fall off, then remove the leaves by rubbing the stem upwards over a bowl or bag.

0
0


