成长记
Laura Horak
2017年08月23日

Brand new Eureka Dwarf Lemon Tree (3 yr from Four Winds Growers) was left unwatered for 2 weeks by my plant sitter and I'm DEVASTATED. The top leaves dried up and I pruned it but not sure what else to do... Live in SF with decent sun exposure.
Help! 🙏🏼
#Citrusmitis #Citrusmeyeri #lemon
Pictures:
1. current state: pruned & 1,000 ml water
2. post-plant sitter: minus 2 wks water
3. original condition: prior to leaving
@GFinger
How do I revive it?
How much water should I give it & how often?
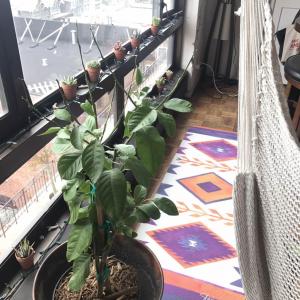
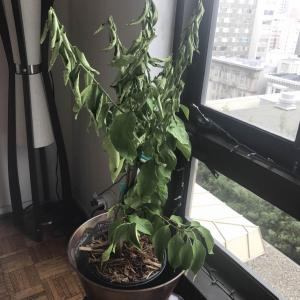
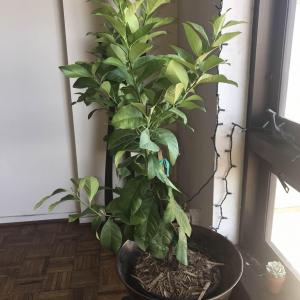
Help! 🙏🏼
#Citrusmitis #Citrusmeyeri #lemon
Pictures:
1. current state: pruned & 1,000 ml water
2. post-plant sitter: minus 2 wks water
3. original condition: prior to leaving
@GFinger
How do I revive it?
How much water should I give it & how often?


0
0
求助
Laura Horak
2017年08月23日

Brand new Eureka Dwarf Lemon Tree (3 yr from Four Winds Growers) was left unwatered for 2 weeks by my plant sitter and I'm DEVASTATED. The top leaves dried up and I pruned it but not sure what else to do... Live in SF with decent sun exposure.
Help! 🙏🏼
#Citrusmitis #Citrusmeyeri #lemon
Pictures:
1. current state: pruned & 1,000 ml water
2. post-plant sitter: minus 2 wks water
3. original condition: prior to leaving
How do I revive it?
How much water should I give it & how often?
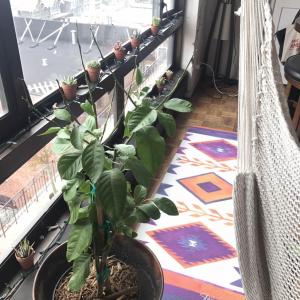
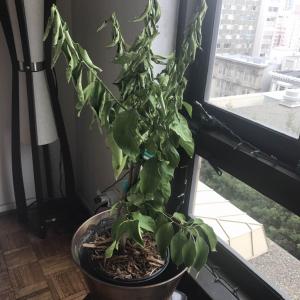
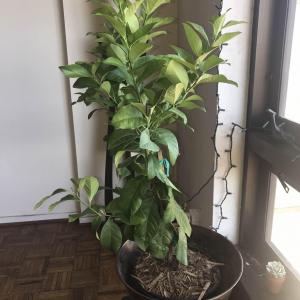
Help! 🙏🏼
#Citrusmitis #Citrusmeyeri #lemon
Pictures:
1. current state: pruned & 1,000 ml water
2. post-plant sitter: minus 2 wks water
3. original condition: prior to leaving
How do I revive it?
How much water should I give it & how often?


0
0
rlehotsky
2017年08月23日

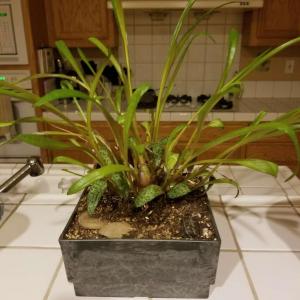
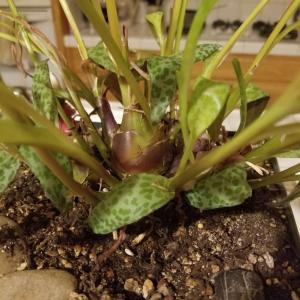
Can someone help me identify this? And can you tell me where to acquire this plant? I love to collect unusual plants from around the world. My husband travels and takes photos of different plants for me.


1
0
文章
Dummer. ゛☀
2017年08月22日

Cilantro is a popular, short-lived herb. If you wish to increase the life span of cilantro, harvesting it regularly will help greatly.
How to Harvest Cilantro
When it comes to cilantro, harvesting is relatively easy. All that is required is cutting cilantro plants about one-third of the way down. The top one-third is what you will use to cook with and the bottom two-thirds will grow new leaves.
How Often Should You Harvest Cilantro?
You should be harvesting cilantro about once a week. If the plant is growing well, you can harvest more often. Either way, you’ll need to harvest the cilantro at least once a week to help stave off bolting. After harvesting the cilantro, if you aren’t able to cook with it immediately, you can freeze the cuttings until you’re ready to cook with them.
How Do You Cut Cilantro?
When cutting the cilantro stem, make sure that you are using sharp, clean shears or scissors. Leave a few leaves on the intact stem so that the plant will still be able to generate food for itself. Now that you know how to harvest cilantro, you know that cilantro harvesting is easy and painless. Harvesting cilantro is an excellent way to have fresh herbs for your Mexican and Asian dishes as well as keeping your cilantro plants usable a little longer.

How to Harvest Cilantro
When it comes to cilantro, harvesting is relatively easy. All that is required is cutting cilantro plants about one-third of the way down. The top one-third is what you will use to cook with and the bottom two-thirds will grow new leaves.
How Often Should You Harvest Cilantro?
You should be harvesting cilantro about once a week. If the plant is growing well, you can harvest more often. Either way, you’ll need to harvest the cilantro at least once a week to help stave off bolting. After harvesting the cilantro, if you aren’t able to cook with it immediately, you can freeze the cuttings until you’re ready to cook with them.

How Do You Cut Cilantro?
When cutting the cilantro stem, make sure that you are using sharp, clean shears or scissors. Leave a few leaves on the intact stem so that the plant will still be able to generate food for itself. Now that you know how to harvest cilantro, you know that cilantro harvesting is easy and painless. Harvesting cilantro is an excellent way to have fresh herbs for your Mexican and Asian dishes as well as keeping your cilantro plants usable a little longer.

0
0
文章
Dummer. ゛☀
2017年08月22日

Cilantro bolting is one of the most frustrating things about this popular herb. Many gardeners ask, “Why does cilantro bolt?” and “How can I keep cilantro from flowering?” With attention to the environment you grow cilantro in, you can help lengthen the amount of time before cilantro will bolt and, therefore, increase the amount of time you can harvest leaves from your cilantro plants.
What to Do When Cilantro Bolts
Many gardeners wonder what to do when cilantro bolts. When they see the white cilantro flowers, they wonder if they can simply cut them off. Unfortunately, once cilantro bolts, the leaves rapidly lose their flavor. Cutting the cilantro flowers off won’t bring the flavor back to the leaves. Instead, go ahead and let the cilantro flowers go to seed. The seeds of the cilantro plant are the spice coriander and can be used in Asian, Indian, Mexican and many other ethnic recipes.
Why Does Cilantro Bolt?
Cilantro grows best in cool, moist conditions and will bolt rapidly in hot weather. This a survival mechanism for the cilantro plant. The plant knows that it will die in hot weather and will try to produce seeds as quickly as possible to ensure that the next generation of cilantro will survive and grow.
How to Keep Cilantro from Bolting
The first thing to understand is that there is no true way to keep cilantro from bolting. Plants are designed to do one thing and that is to reproduce. You are fighting nature. But there are several things you can do to significantly lengthen the time before the cilantro plant produces flowers.
First, if you live in a climate that doesn’t have moist, cool weather, you can buy slow-bolt cilantro. This is cilantro that has been bred to withstand higher temperatures. Second, no matter what kind of cilantro you grow, you should practice succession planting. This is where you plant new seeds every one to two weeks so that as one set of cilantro plantings start to bolt, the next set will be ready to harvest. Third, plant cilantro to grow during cool weather. Early spring, late summer and early fall are the best times to plant cilantro. If you plant in late spring to mid summer, your cilantro will bolt quickly in the heat. Fourth, harvest your cilantro leaves frequently. The more you harvest your cilantro, the more likely you are to nip immature flowering stalks which will delay cilantro flowering. Fifth, mulch cilantro and plant it tightly. It isn’t the heat of the air that causes cilantro to bolt, but rather the heat of the soil. Mulch will help keep the soil cool and retain moisture. Planting cilantro tightly will shade the ground it grows in, which also helps to keep the soil cooler.

What to Do When Cilantro Bolts
Many gardeners wonder what to do when cilantro bolts. When they see the white cilantro flowers, they wonder if they can simply cut them off. Unfortunately, once cilantro bolts, the leaves rapidly lose their flavor. Cutting the cilantro flowers off won’t bring the flavor back to the leaves. Instead, go ahead and let the cilantro flowers go to seed. The seeds of the cilantro plant are the spice coriander and can be used in Asian, Indian, Mexican and many other ethnic recipes.

Why Does Cilantro Bolt?
Cilantro grows best in cool, moist conditions and will bolt rapidly in hot weather. This a survival mechanism for the cilantro plant. The plant knows that it will die in hot weather and will try to produce seeds as quickly as possible to ensure that the next generation of cilantro will survive and grow.
How to Keep Cilantro from Bolting
The first thing to understand is that there is no true way to keep cilantro from bolting. Plants are designed to do one thing and that is to reproduce. You are fighting nature. But there are several things you can do to significantly lengthen the time before the cilantro plant produces flowers.

First, if you live in a climate that doesn’t have moist, cool weather, you can buy slow-bolt cilantro. This is cilantro that has been bred to withstand higher temperatures. Second, no matter what kind of cilantro you grow, you should practice succession planting. This is where you plant new seeds every one to two weeks so that as one set of cilantro plantings start to bolt, the next set will be ready to harvest. Third, plant cilantro to grow during cool weather. Early spring, late summer and early fall are the best times to plant cilantro. If you plant in late spring to mid summer, your cilantro will bolt quickly in the heat. Fourth, harvest your cilantro leaves frequently. The more you harvest your cilantro, the more likely you are to nip immature flowering stalks which will delay cilantro flowering. Fifth, mulch cilantro and plant it tightly. It isn’t the heat of the air that causes cilantro to bolt, but rather the heat of the soil. Mulch will help keep the soil cool and retain moisture. Planting cilantro tightly will shade the ground it grows in, which also helps to keep the soil cooler.
0
0
文章
Dummer. ゛☀
2017年08月22日

Help! My basil leaves are curling and I don’t know what to do! Why do basil leaves curl under? The reason for basil leaves curling up may be environmental, or your plant may be diseased or pestered by pests. Read on to learn more about this frustrating problem.
Reasons for Basil Leaves Curling Up
Generally, growing basil in the garden is easy and stress free. That being said, problems can and do happen. Basil leaf curl treatment is dependent on the specific factor causing it. Here are the most common stressors leading to curling basil leaves.
Sunlight – Basil is definitely a sun-loving plant and exposure to less than six hours of bright light per day may result in distorted foliage or basil leaves small and curled. Relocating the plant to a sunnier location may solve the problem. Water: Too much or too little – Basil requires regular water, but not too much. As a general rule, water the plant deeply whenever the top 1 to 2 inches of soil feels dry to the touch, usually once every four to seven days. However, keep in mind that potted plants may require more frequent irrigation, especially during hot, dry weather.
Whether the plant is in the ground or in a container, be sure the soil (or potting mix) is lightweight and drains well. Water at the base of the plant and keep the leaves as dry as possible. Diseases – Fungal diseases may be the cause of basil leaves curling up, but chances are, you’ll notice other telltale signs. For example, powdery mildew is a fungal disease that causes a grey, powdery substance on the leaves. The disease is caused when conditions become too moist, including too much shade or soggy soil. Fusarium wilt, which is usually deadly, can cause brown or distorted leaves. To prevent moisture related diseases, water basil carefully as directed above. Pests – Basil is a hardy plant, but it can sometimes be bothered by aphids and other small, sap-sucking pests such as spider mites or scale. The pests can be difficult to see, but a close look at the leaves, especially the undersides, will usually tell the tale.
If you determine your plant is infested with bugs, insecticidal soap spray usually keeps the pests in check. Be sure to spray when the foliage is in the shade; otherwise, the spray may scorch the plant. Don’t spray when the temperatures are above 90 degrees F. (32 C.).

Reasons for Basil Leaves Curling Up
Generally, growing basil in the garden is easy and stress free. That being said, problems can and do happen. Basil leaf curl treatment is dependent on the specific factor causing it. Here are the most common stressors leading to curling basil leaves.
Sunlight – Basil is definitely a sun-loving plant and exposure to less than six hours of bright light per day may result in distorted foliage or basil leaves small and curled. Relocating the plant to a sunnier location may solve the problem. Water: Too much or too little – Basil requires regular water, but not too much. As a general rule, water the plant deeply whenever the top 1 to 2 inches of soil feels dry to the touch, usually once every four to seven days. However, keep in mind that potted plants may require more frequent irrigation, especially during hot, dry weather.

Whether the plant is in the ground or in a container, be sure the soil (or potting mix) is lightweight and drains well. Water at the base of the plant and keep the leaves as dry as possible. Diseases – Fungal diseases may be the cause of basil leaves curling up, but chances are, you’ll notice other telltale signs. For example, powdery mildew is a fungal disease that causes a grey, powdery substance on the leaves. The disease is caused when conditions become too moist, including too much shade or soggy soil. Fusarium wilt, which is usually deadly, can cause brown or distorted leaves. To prevent moisture related diseases, water basil carefully as directed above. Pests – Basil is a hardy plant, but it can sometimes be bothered by aphids and other small, sap-sucking pests such as spider mites or scale. The pests can be difficult to see, but a close look at the leaves, especially the undersides, will usually tell the tale.

If you determine your plant is infested with bugs, insecticidal soap spray usually keeps the pests in check. Be sure to spray when the foliage is in the shade; otherwise, the spray may scorch the plant. Don’t spray when the temperatures are above 90 degrees F. (32 C.).
0
0
求助
Lili1919
2017年08月21日

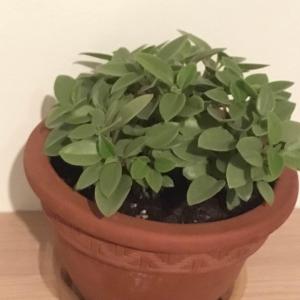
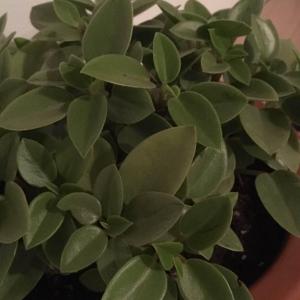
Can someone help me to identify this plant? Thanks !!


3
0
Lili1919:@sunnyzou they're not shiny like the leaves of hoya carnosa. I have one of Those at home too.
sunnyzou:It's leafs really like Hoya carnosa(L.f.)R. B
文章
Dummer. ゛☀
2017年08月21日

Most people are familiar with spider plants as houseplants because they are so tolerant and easy to grow. They tolerate low light, infrequent watering and help clean indoor air, making them very popular. They also propagate easily from the little plantlets (spiders) that grow from their flower stalks. One small spider plant can very quickly lead to many more. You may have wondered at one time or another, “can spider plants be outdoors?” Well, in the right conditions, growing spider plants outdoors is possible. Read more to learn how to grow a spider plant outside.
How to Grow a Spider Plant Outside
The easiest way to grow spider plants outside is just to move your potted spider plant outdoors when weather permits and indoors when it is too cold. Spider plants make excellent plants for hanging baskets, with small white, star-shaped flowers arching down on long flower stalks. After flowering, grass-like new little plantlets form on these flower stalks.
These little spider-like hanging plantlets are why Chlorophytum comosun is commonly called spider plant. The plantlets are like the runners on strawberry plants and will root wherever they touch soil, creating new spider plants. To propagate, simply snip the “spiders” off and stick them in soil. Native to South Africa, spider plants need a warm, tropical climate to survive outside. They can be grown like a perennial in zones 9-11 and as an annual in cooler climates. Spider plants outside cannot tolerate any frost. If planting them as annuals in cooler climates, be sure to wait until there’s no danger of frost. Spider plants prefer filtered sunlight, but can grow in part-shade to shade. They tend to get sunburnt in full sun or afternoon sun. Spider plants outside make excellent spreading groundcovers and border plants around trees. In zones 10-11, it can grow and spread aggressively. Spider plants have thick rhizomes that store water, making them tolerate some drought. Spider plants can also make excellent trailing plants for large container arrangements.
Care of Spider Plants Outdoors
Growing spider plants outdoors can be as easy as growing them inside. Start them early indoors, giving the roots time to develop. Spider plants need well-draining, slightly acidic soil. They prefer dappled shade and cannot handle direct afternoon sun. When young, they need moist soil. Spider plants are sensitive to the fluoride and chlorine in city water, so they perform best with rain water or distilled water. They also don’t like too much fertilizer, use a basic 10-10-10 fertilizer only once a month or bi-monthly.
Spider plants outside are especially susceptible to aphids, scale, whiteflies and spider mites. Use an insecticidal soap, especially if they are being brought inside for the winter. I use a homemade dish soap dip, made from ¼ cup Dawn dish soap, ½ cup mouth wash and a gallon of water. If growing spider plants outdoors as an annual, you can dig them up and over winter them in pots inside. If you have too many, give them away to friends. I have planted them in Halloween cups and handed them out at Halloween parties, telling kids they can grow their own creepy spider plants.

How to Grow a Spider Plant Outside
The easiest way to grow spider plants outside is just to move your potted spider plant outdoors when weather permits and indoors when it is too cold. Spider plants make excellent plants for hanging baskets, with small white, star-shaped flowers arching down on long flower stalks. After flowering, grass-like new little plantlets form on these flower stalks.
These little spider-like hanging plantlets are why Chlorophytum comosun is commonly called spider plant. The plantlets are like the runners on strawberry plants and will root wherever they touch soil, creating new spider plants. To propagate, simply snip the “spiders” off and stick them in soil. Native to South Africa, spider plants need a warm, tropical climate to survive outside. They can be grown like a perennial in zones 9-11 and as an annual in cooler climates. Spider plants outside cannot tolerate any frost. If planting them as annuals in cooler climates, be sure to wait until there’s no danger of frost. Spider plants prefer filtered sunlight, but can grow in part-shade to shade. They tend to get sunburnt in full sun or afternoon sun. Spider plants outside make excellent spreading groundcovers and border plants around trees. In zones 10-11, it can grow and spread aggressively. Spider plants have thick rhizomes that store water, making them tolerate some drought. Spider plants can also make excellent trailing plants for large container arrangements.

Care of Spider Plants Outdoors
Growing spider plants outdoors can be as easy as growing them inside. Start them early indoors, giving the roots time to develop. Spider plants need well-draining, slightly acidic soil. They prefer dappled shade and cannot handle direct afternoon sun. When young, they need moist soil. Spider plants are sensitive to the fluoride and chlorine in city water, so they perform best with rain water or distilled water. They also don’t like too much fertilizer, use a basic 10-10-10 fertilizer only once a month or bi-monthly.

Spider plants outside are especially susceptible to aphids, scale, whiteflies and spider mites. Use an insecticidal soap, especially if they are being brought inside for the winter. I use a homemade dish soap dip, made from ¼ cup Dawn dish soap, ½ cup mouth wash and a gallon of water. If growing spider plants outdoors as an annual, you can dig them up and over winter them in pots inside. If you have too many, give them away to friends. I have planted them in Halloween cups and handed them out at Halloween parties, telling kids they can grow their own creepy spider plants.
0
0
文章
Dummer. ゛☀
2017年08月20日

Oxalis, also known as shamrock or sorrel, is a popular indoor plant around the St. Patrick’s Day holiday. This diminutive little plant is also suitable for growing outdoors with minimal attention, although it may need a little help getting through chilly winters. Read on to learn about growing oxalis outdoors.
How to Grow Oxalis in the Garden
Plant oxalis where the soil is moist and well drained, but never soggy. Slightly acidic soil is best. Additionally, improve soil quality and drainage by digging in a little well-rotted manure or compost before planting. Oxalis needs a few hours of sunlight every day, but plant in afternoon shade if you live in a hot climate. Oxalis leaves may wilt during hot afternoons, but they usually bounce back when the temperature drops in the evening. Keep in mind that species with darker leaves tolerate more sunlight.
Oxalis Outdoor Care
Oxalis plant care in gardens isn’t too demanding nut may include winter protection in cooler climates. Provide enough water to keep the soil evenly moist. Beware of overwatering, however, as the bulbs will rot in soggy, waterlogged soil. On the other hand, be careful the soil doesn’t get completely dry, especially during hot weather. Feed oxalis regularly during the growing season using a liquid fertilizer mixed at half strength. If you live in a warmer climate, don’t be surprised when your oxalis plant turns brown and drops its leaves in late summer. The plant is going into a period of dormancy. Withhold water during this time and resume when new shoots appear in spring.
Take steps to protect your oxalis plant if you live in a chilly climate. Hardiness varies depending on the species, and some, including purple shamrock (Oxalis triangularis), tolerate winters in USDA plant hardiness zone 6. However, most are frost-tender and won’t survive frosty weather. One option when caring for oxalis plants in winter is to pot them up before freezing temperatures arrive in fall, then bring indoors to a sunny location. You can also put the plants in a pot and allow them to go completely dormant, which means no watering. Store in a cool, unheated (but non-freezing) room. Move the oxalis plants to a well-lit location in spring, resume watering, and then move back outdoors when all danger of frost has passed. Alternatively, dig the bulbs and store them until spring. Gently brush off the excess dirt and place the bulbs loosely into a cardboard box. Bring them into the house until the foliage dries up, which takes about a week. Move the bulbs into a container filled with sphagnum moss, peat moss or sawdust, and store them where it’s dark and cool but not freezing.

How to Grow Oxalis in the Garden
Plant oxalis where the soil is moist and well drained, but never soggy. Slightly acidic soil is best. Additionally, improve soil quality and drainage by digging in a little well-rotted manure or compost before planting. Oxalis needs a few hours of sunlight every day, but plant in afternoon shade if you live in a hot climate. Oxalis leaves may wilt during hot afternoons, but they usually bounce back when the temperature drops in the evening. Keep in mind that species with darker leaves tolerate more sunlight.

Oxalis Outdoor Care
Oxalis plant care in gardens isn’t too demanding nut may include winter protection in cooler climates. Provide enough water to keep the soil evenly moist. Beware of overwatering, however, as the bulbs will rot in soggy, waterlogged soil. On the other hand, be careful the soil doesn’t get completely dry, especially during hot weather. Feed oxalis regularly during the growing season using a liquid fertilizer mixed at half strength. If you live in a warmer climate, don’t be surprised when your oxalis plant turns brown and drops its leaves in late summer. The plant is going into a period of dormancy. Withhold water during this time and resume when new shoots appear in spring.

Take steps to protect your oxalis plant if you live in a chilly climate. Hardiness varies depending on the species, and some, including purple shamrock (Oxalis triangularis), tolerate winters in USDA plant hardiness zone 6. However, most are frost-tender and won’t survive frosty weather. One option when caring for oxalis plants in winter is to pot them up before freezing temperatures arrive in fall, then bring indoors to a sunny location. You can also put the plants in a pot and allow them to go completely dormant, which means no watering. Store in a cool, unheated (but non-freezing) room. Move the oxalis plants to a well-lit location in spring, resume watering, and then move back outdoors when all danger of frost has passed. Alternatively, dig the bulbs and store them until spring. Gently brush off the excess dirt and place the bulbs loosely into a cardboard box. Bring them into the house until the foliage dries up, which takes about a week. Move the bulbs into a container filled with sphagnum moss, peat moss or sawdust, and store them where it’s dark and cool but not freezing.
1
0
文章
Dummer. ゛☀
2017年08月19日

Peace lilies are excellent houseplants. They’re easy to care for, they do well in low light, and they’ve been proven by NASA to help purify the air around them. But what do you do when the flowers or even the leaves start to dry up and die? Should peace lilies be pruned? Keep reading to learn more about when and how to prune peace lily plants.
Peace Lily Pruning
Peace lilies are known for their big white bracts, the part we think of as a flower that is actually a modified white leaf surrounding a cluster of tiny flowers on a stalk. After this “flower” has bloomed for a while, it will naturally start to turn green and droop. This is normal, and it just means the flower is spent.
You can clean up the appearance of the plant by deadheading. Peace lilies produce their flowers on stalks that grow up from the base of the plant. Once a stalk has made one flower, it won’t make any more – after the flower fades, the stalk will eventually brown and die as well. Peace lily pruning should be done at the base of the plant. Cut the stalk off as close to the bottom as you can. This will make room for new stalks to emerge.
Pruning a peace lily isn’t limited to the flower stalks. Sometimes leaves yellow and start to shrivel up. This may be due to under watering or too much light, but it can also happen just because of old age. If any of your leaves are turning color or drying out, just cut the offending leaves away at their base. Always disinfect your shears between each cut to prevent the spread of disease. That’s all there is to pruning peace lilies. Nothing too complicated and a very good way to keep your plants looking healthy and happy.

Peace Lily Pruning
Peace lilies are known for their big white bracts, the part we think of as a flower that is actually a modified white leaf surrounding a cluster of tiny flowers on a stalk. After this “flower” has bloomed for a while, it will naturally start to turn green and droop. This is normal, and it just means the flower is spent.

You can clean up the appearance of the plant by deadheading. Peace lilies produce their flowers on stalks that grow up from the base of the plant. Once a stalk has made one flower, it won’t make any more – after the flower fades, the stalk will eventually brown and die as well. Peace lily pruning should be done at the base of the plant. Cut the stalk off as close to the bottom as you can. This will make room for new stalks to emerge.

Pruning a peace lily isn’t limited to the flower stalks. Sometimes leaves yellow and start to shrivel up. This may be due to under watering or too much light, but it can also happen just because of old age. If any of your leaves are turning color or drying out, just cut the offending leaves away at their base. Always disinfect your shears between each cut to prevent the spread of disease. That’s all there is to pruning peace lilies. Nothing too complicated and a very good way to keep your plants looking healthy and happy.
1
1
文章
Dummer. ゛☀
2017年08月17日

Gardeners must be ever vigilant when it comes to diseases on their plants. Often, a speedy diagnosis can help prevent more damage. This is the case with scab of cactus. What is cactus scab? Read on to learn more.

What is Cactus Scab?
Cactus scab is particularly common on prickly pear cactus but can affect many other varieties. It is a form of edema, where something has stimulated an abnormal increase in the size of the cells. This results in strange patches on the skin of the plant. It occurs in many other plants too, such as:
Tomatoes Cucumbers Potatoes Begonia Violets Cabbage Cracks, discoloration, dry scabby lesions? Identifying the issue is quite easy, although the appearance can be mistaken for sunscaldor spider mite attacks. Initial signs of scab of cactus are pale yellow spots on the skin of the plant. These become irregular, corky or rusty. Hence, the name corky scab. The whole effect looks like the cactus has a patch of eczema. Essentially, the cells in the epidermis are breaking and opening up, resulting in almost wound-like lesions. The oldest parts of the plant are usually the first to show signs, with young shoots rarely being affected until they mature. Some plants experience just a few patches, while others can become covered in them.

What Causes Corky Scab on Cactus?
It is believed to be caused by poor cultivation methods and, once noted, can be halted before it damages any more of the plant. Corky scab on cactus is primarily an aesthetic disease, but it can have economic impact in commercial growing. Luckily, the problem is easy to prevent by changing cultural methods. As one of the more common diseases of cactus, corky scab is thought to be the result of overwatering, low temperatures and poor ventilation. It is most common in areas where there is abundant, warm water in soil and cool, moist temperatures. Other situations thought to stimulate the disease are high light, injury to the plant, chemicals and poor drainage. Since most of these conditions can be controlled, cactus scab treatment relies upon changing the cultural situation and methods. Outdoor plants may need to be moved to a location where more control over wind, temperature and ambient humidity are possible.

Cactus Scab Treatment
There are no sprays, drenches or systemic preparations for cactus scab treatment. Avoid irrigating in cool, moist weather and ensure good drainage is occurring. Never let a cactus sit on a saucer in water. If plants are indoors or in a greenhouse, increase ventilation. Increase the temperature of the area in which the plant is being grown. Avoid fertilizing in fall and winter, and do not use a formula with a high nitrogen content. Keep light bright but not above 14,000 foot candles, or lumens. If necessary, repot the plant into fresh cactus mixture. Generally, going back to good cactus cultivation and ensuring good light, watering practices and diminishing humidity will prevent any further corking and see your plant back on the road to optimum health.

What is Cactus Scab?
Cactus scab is particularly common on prickly pear cactus but can affect many other varieties. It is a form of edema, where something has stimulated an abnormal increase in the size of the cells. This results in strange patches on the skin of the plant. It occurs in many other plants too, such as:
Tomatoes Cucumbers Potatoes Begonia Violets Cabbage Cracks, discoloration, dry scabby lesions? Identifying the issue is quite easy, although the appearance can be mistaken for sunscaldor spider mite attacks. Initial signs of scab of cactus are pale yellow spots on the skin of the plant. These become irregular, corky or rusty. Hence, the name corky scab. The whole effect looks like the cactus has a patch of eczema. Essentially, the cells in the epidermis are breaking and opening up, resulting in almost wound-like lesions. The oldest parts of the plant are usually the first to show signs, with young shoots rarely being affected until they mature. Some plants experience just a few patches, while others can become covered in them.

What Causes Corky Scab on Cactus?
It is believed to be caused by poor cultivation methods and, once noted, can be halted before it damages any more of the plant. Corky scab on cactus is primarily an aesthetic disease, but it can have economic impact in commercial growing. Luckily, the problem is easy to prevent by changing cultural methods. As one of the more common diseases of cactus, corky scab is thought to be the result of overwatering, low temperatures and poor ventilation. It is most common in areas where there is abundant, warm water in soil and cool, moist temperatures. Other situations thought to stimulate the disease are high light, injury to the plant, chemicals and poor drainage. Since most of these conditions can be controlled, cactus scab treatment relies upon changing the cultural situation and methods. Outdoor plants may need to be moved to a location where more control over wind, temperature and ambient humidity are possible.

Cactus Scab Treatment
There are no sprays, drenches or systemic preparations for cactus scab treatment. Avoid irrigating in cool, moist weather and ensure good drainage is occurring. Never let a cactus sit on a saucer in water. If plants are indoors or in a greenhouse, increase ventilation. Increase the temperature of the area in which the plant is being grown. Avoid fertilizing in fall and winter, and do not use a formula with a high nitrogen content. Keep light bright but not above 14,000 foot candles, or lumens. If necessary, repot the plant into fresh cactus mixture. Generally, going back to good cactus cultivation and ensuring good light, watering practices and diminishing humidity will prevent any further corking and see your plant back on the road to optimum health.
0
0
文章
Dummer. ゛☀
2017年08月17日

Many people grow Christmas cactus (Schlumbergera bridgessii). This plant makes a great holiday gift for friends and family, so knowing how to propagate and grow Christmas cactus can help make this shopping easier and less hectic. Propagating Christmas Cactus
Propagating Christmas cactus is easy. In fact, when it comes to the Christmas cactus, propagating is a great way to share this wonderful plant with others. Propagating Christmas cactus begins by simply taking a short, Y-shaped cutting from the stem tip. The cutting should consist of at least two or three joined segments. When doing Christmas cactus propagating, always be sure that cuttings are taken from healthy foliage. Allow the cutting to dry a few hours before potting it up for rooting, as to avoid potential stem rot from excessive moisture.

Rooting Christmas Cactus
Rooting Christmas cactus cuttings is simple. Once you’ve taken your cutting, place the segment in a moist peat and sand soil mix. Insert the segment about a quarter of its length below the soil surface. Place the pot in a well-lit area, avoiding direct sunlight. Water the cutting sparingly at first to prevent rotting. After about two or three weeks of rooting Christmas cactus cutting, the cutting should start showing signs of growth at the tips of its leaves, which is usually reddish in color. Once your cutting has rooted, it can be transplanted into a pot with loose potting soil, preferably with a little sand or compost added. The cutting may wilt some in the beginning, but this is normal and will eventually subside once the plant has taken to its new environment. The Christmas cactus may be watered more frequently, fertilized and given additional light at this time. Christmas cactus propagating doesn’t get any easier than this.

Grow Christmas Cactus
While Christmas cactus can adapt to and be grown in low light, the plant will produce more blooms with brighter light conditions. However, stay away from direct sunlight, which may burn the leaves. Don’t allow this plant to dry out completely between watering intervals. Christmas cactus also enjoys average to high humidity with temperatures hovering between 60-70 F. (16-21 C.) Placing the pot on a tray of pebbles and water can add more humidity to drier surroundings. Watering should be done frequently and thoroughly, keeping the soil moist but not saturated. Make sure there is adequate drainage provided to prevent the Christmas cactus from rotting. Apply a mild houseplant fertilizer every other week. Water and fertilize regularly in spring and summer; however, during the winter months, this plant should be kept on the dry side, withholding water for six weeks. Growing and propagating Christmas cactus can be very rewarding, especially when you give them to others during the holidays.
Propagating Christmas cactus is easy. In fact, when it comes to the Christmas cactus, propagating is a great way to share this wonderful plant with others. Propagating Christmas cactus begins by simply taking a short, Y-shaped cutting from the stem tip. The cutting should consist of at least two or three joined segments. When doing Christmas cactus propagating, always be sure that cuttings are taken from healthy foliage. Allow the cutting to dry a few hours before potting it up for rooting, as to avoid potential stem rot from excessive moisture.

Rooting Christmas Cactus
Rooting Christmas cactus cuttings is simple. Once you’ve taken your cutting, place the segment in a moist peat and sand soil mix. Insert the segment about a quarter of its length below the soil surface. Place the pot in a well-lit area, avoiding direct sunlight. Water the cutting sparingly at first to prevent rotting. After about two or three weeks of rooting Christmas cactus cutting, the cutting should start showing signs of growth at the tips of its leaves, which is usually reddish in color. Once your cutting has rooted, it can be transplanted into a pot with loose potting soil, preferably with a little sand or compost added. The cutting may wilt some in the beginning, but this is normal and will eventually subside once the plant has taken to its new environment. The Christmas cactus may be watered more frequently, fertilized and given additional light at this time. Christmas cactus propagating doesn’t get any easier than this.

Grow Christmas Cactus
While Christmas cactus can adapt to and be grown in low light, the plant will produce more blooms with brighter light conditions. However, stay away from direct sunlight, which may burn the leaves. Don’t allow this plant to dry out completely between watering intervals. Christmas cactus also enjoys average to high humidity with temperatures hovering between 60-70 F. (16-21 C.) Placing the pot on a tray of pebbles and water can add more humidity to drier surroundings. Watering should be done frequently and thoroughly, keeping the soil moist but not saturated. Make sure there is adequate drainage provided to prevent the Christmas cactus from rotting. Apply a mild houseplant fertilizer every other week. Water and fertilize regularly in spring and summer; however, during the winter months, this plant should be kept on the dry side, withholding water for six weeks. Growing and propagating Christmas cactus can be very rewarding, especially when you give them to others during the holidays.
0
0
求助
Gilboaman
2017年08月17日

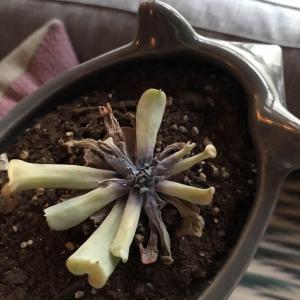
Could anyone please help me with whats goif on with this guy? I haven't watered him much but did i over or under water? Thanks!

0
0
Gilboaman:@cclecombe thanks so much! Unfortunately he didn’t make it :(
cclecombe:You'd be surprised how well they can do in this state! Trim it back as much as you can, get rid of all this old leaves and see what the stem's looking like. If it's not too rotten you might be okay. Did this with a plant we managed to kill and this is it now!
Gilboaman:@sunnyzou thank you very much! It's possible, I'm not sure the plant will make it :(
sunnyzou:maybe you keep some drops of water on its leaf .The pic below is dead in this kind of accident


