Alohariel
2019年05月01日

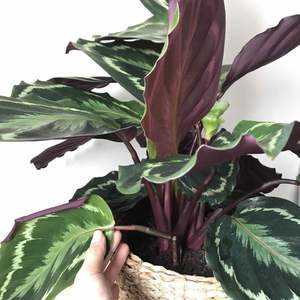
Can I regrow a leaf from this? #Peacock #Plants #Leaf #Indoor #Indoorplants


0
0
文章
Andy
2018年12月26日

Facebook Pinterest Twitter Google+ LinkedIn StumbleUponCreate an Indoor Garden Under Stairs. This can be a unique place to introduce some greenery to your home.
The empty space under the stairs can be useful. You can store things there, this is the most common use. However, there are many other under stair ideas you can opt for, depending upon the type of space you’ve there. A mini library with bookshelves or a reading nook or a home office, if it’s big enough.
A dog house or playhouse for your kids can be an interesting idea too. And, if your kitchen doesn’t offer a lot of cabinet space and it’s near to that under the stair place, make a kitchen pantry. The Kitchn.com has a remarkable post on it, check it out here. You can make a wine cellar as well by taking inspiration from this post.
If the idea of making a wet bar to entertain your guest interest you–must try that. Besides all these under stair ideas, you can make a closet to store your clothes. A small bathroom, a mudroom can also fit well there. There are plenty of projects with tutorials available on the web to teach you how to do this.
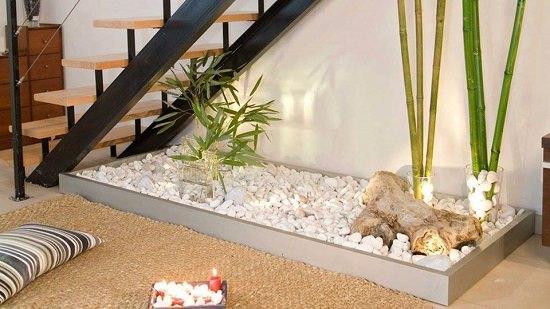
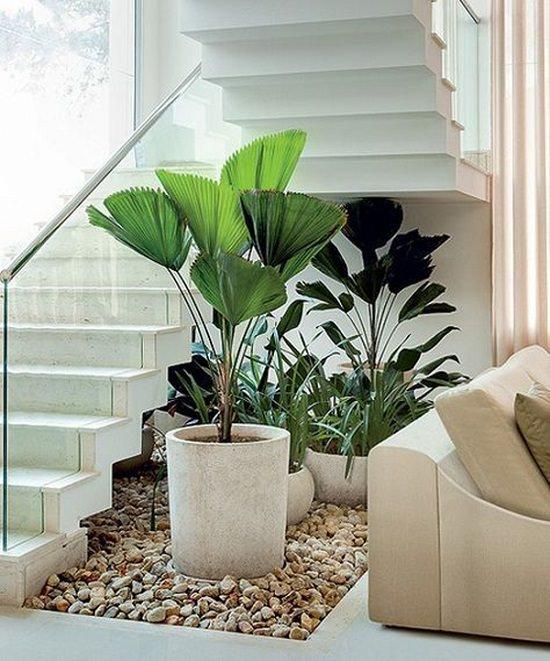
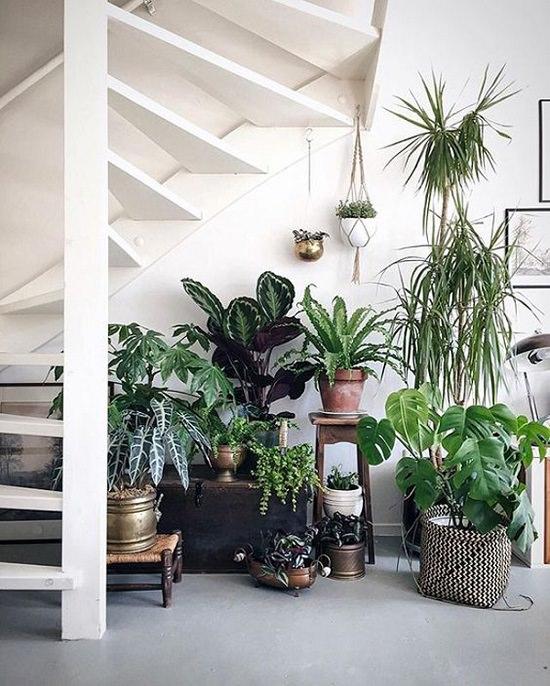
The unique and nowadays popular use is indoor garden under stairs. If your space receives some bright indirect light there, or by using artificial lights you can do this. If both are not possible, you can create greenery by fake plants. Below are the 14 Garden Under the Stairs Ideas you can consider:
1.


2.


3.

4.


5.

6.


Also Read: Most Important Indoor Gardening Tips
7.

8.

9.


10.


11.


12.
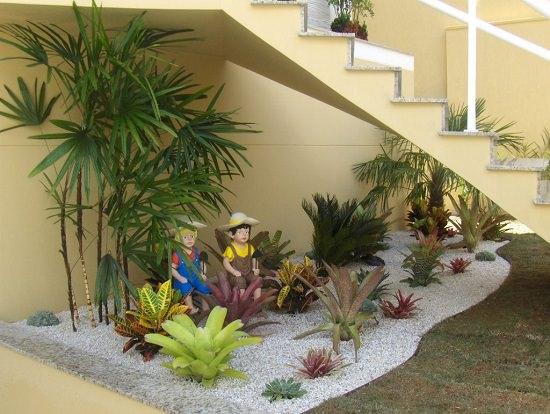

13.
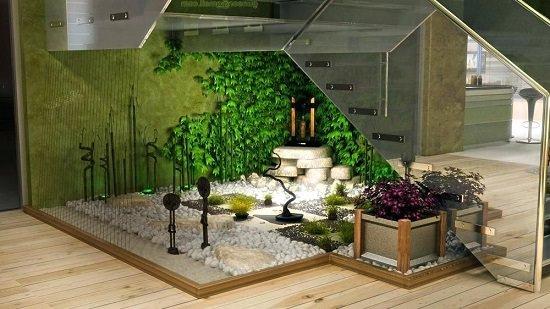

14.


15.


The empty space under the stairs can be useful. You can store things there, this is the most common use. However, there are many other under stair ideas you can opt for, depending upon the type of space you’ve there. A mini library with bookshelves or a reading nook or a home office, if it’s big enough.
A dog house or playhouse for your kids can be an interesting idea too. And, if your kitchen doesn’t offer a lot of cabinet space and it’s near to that under the stair place, make a kitchen pantry. The Kitchn.com has a remarkable post on it, check it out here. You can make a wine cellar as well by taking inspiration from this post.
If the idea of making a wet bar to entertain your guest interest you–must try that. Besides all these under stair ideas, you can make a closet to store your clothes. A small bathroom, a mudroom can also fit well there. There are plenty of projects with tutorials available on the web to teach you how to do this.
The unique and nowadays popular use is indoor garden under stairs. If your space receives some bright indirect light there, or by using artificial lights you can do this. If both are not possible, you can create greenery by fake plants. Below are the 14 Garden Under the Stairs Ideas you can consider:
1.


2.


3.


4.


5.


6.


Also Read: Most Important Indoor Gardening Tips
7.


8.


9.


10.


11.


12.


13.


14.


15.


0
2
成长记
kensong
2018年11月15日

Say hello to my Sansevieria family. They're perfect indoor plants. Forgiving, grow well in indirect or partial shade, can go for weeks without water if you are traveling and purifies your indoor air. What more can you ask of a plant.


0
0
文章
Miss Chen
2018年08月15日

No matter where you live, you can quickly bring a taste of the tropics to your indoor or outdoor garden by growing bird of paradise. Known botanically as Strelitzia reginae, this colorful, eye-catching plant lights up any garden.
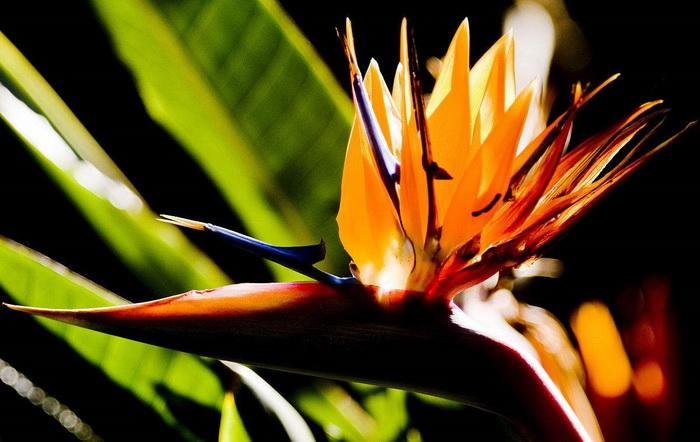
Bird of Paradise Features
Showy bird of paradise flowers consist of orange, blue and white, which form to resemble an exotic bird's beak. There's also a variety that has all white flowers. Each bird of paradise flower can last up to two weeks on or off the plant. The plant's foliage is also dramatic. The large, green, textural leaves make a statement even when the plant isn't blooming.
Bird of Paradise History
Native to South Africa, bird of paradise is widely cultivated throughout South America today. The plant got its botanical name when it was introduced to England in 1773 by Sir Joseph Banks, who ran Kew Gardens at the time. He named the plant Strelitzia after Queen Charlotte, wife of George III. She lived at Kew Gardens for several years.
Where to Grow Bird of Paradise
Bird of paradise makes an excellent accent in the landscape. Use the plant around pools and spas to add a tropical feel or put bird of paradise in a pot and display it as a focal point. When grown in containers, bird of paradise can be displayed on patios, balconies and decks.
Bird of paradise requires full sun outdoors to thrive. The plant is frost sensitive, so it can only be grown outdoors year-round in frost-free climates, such as zones 9 through 12. If you wish to grow bird of paradise outdoors in other zones, do so in the spring and summer when night temperatures are 60 degrees and above. Grow the plant in a container and bring it indoors when nighttime temperatures drop in fall.
Bird of Paradise Grown as a Houseplant
Bird of paradise does well when grown indoors as a houseplant, as such a warm environment is ideal. The plant requires a bright, sunny location, such as in front of an eastern or southern window. Bird of paradise also does well when grown under full-spectrum lighting.
Bird of Paradise Care and Maintenance
With consistent care, bird of paradise can thrive. Though the plant is drought tolerant once established, it grows best when you keep the soil moist but not soggy. This will generally require that you water the plant once a week when grown in the ground. Container-grown plants will require more frequent watering, especially when temperatures are high.

Fertilize bird of paradise once in spring and again in summer with an all-purpose fertilizer designed for flowering plants. Always follow the package directions on the fertilizer, as too much can burn plant roots and damage the plant.
Bird of paradise is a self-cleaning plant that tends to shed its own leaves when necessary. That means it rarely needs pruning. When you do prune, remove dead foliage and spent flower stalks.

Bird of Paradise Features
Showy bird of paradise flowers consist of orange, blue and white, which form to resemble an exotic bird's beak. There's also a variety that has all white flowers. Each bird of paradise flower can last up to two weeks on or off the plant. The plant's foliage is also dramatic. The large, green, textural leaves make a statement even when the plant isn't blooming.
Bird of Paradise History
Native to South Africa, bird of paradise is widely cultivated throughout South America today. The plant got its botanical name when it was introduced to England in 1773 by Sir Joseph Banks, who ran Kew Gardens at the time. He named the plant Strelitzia after Queen Charlotte, wife of George III. She lived at Kew Gardens for several years.
Where to Grow Bird of Paradise
Bird of paradise makes an excellent accent in the landscape. Use the plant around pools and spas to add a tropical feel or put bird of paradise in a pot and display it as a focal point. When grown in containers, bird of paradise can be displayed on patios, balconies and decks.
Bird of paradise requires full sun outdoors to thrive. The plant is frost sensitive, so it can only be grown outdoors year-round in frost-free climates, such as zones 9 through 12. If you wish to grow bird of paradise outdoors in other zones, do so in the spring and summer when night temperatures are 60 degrees and above. Grow the plant in a container and bring it indoors when nighttime temperatures drop in fall.
Bird of Paradise Grown as a Houseplant
Bird of paradise does well when grown indoors as a houseplant, as such a warm environment is ideal. The plant requires a bright, sunny location, such as in front of an eastern or southern window. Bird of paradise also does well when grown under full-spectrum lighting.
Bird of Paradise Care and Maintenance
With consistent care, bird of paradise can thrive. Though the plant is drought tolerant once established, it grows best when you keep the soil moist but not soggy. This will generally require that you water the plant once a week when grown in the ground. Container-grown plants will require more frequent watering, especially when temperatures are high.

Fertilize bird of paradise once in spring and again in summer with an all-purpose fertilizer designed for flowering plants. Always follow the package directions on the fertilizer, as too much can burn plant roots and damage the plant.
Bird of paradise is a self-cleaning plant that tends to shed its own leaves when necessary. That means it rarely needs pruning. When you do prune, remove dead foliage and spent flower stalks.
0
0
文章
Miss Chen
2018年08月11日

Boston fern, known botanically as Nephrolepis exaltata "Bostoniensis" is a tropical fern commonly grown as a patio, porch or indoor plant. According to the University of Rhode Island, "Bostoniensis" is a cultivar that demands high ambient humidity and consistently moist soil. Watering the soil is but one way that you will need to deliver moisture to your plant to keep it healthy. To prevent your fern from suffering browning leaf tips or frond die-back, vigilant care is needed, and the higher you can get the humidity around your Boston fern, the happier it will be.

Step 1
Water the soil of your Boston fern consistently to keep it evenly very moist to the touch but not drowning in stagnant water. Unlike some ferns, Boston fern cannot tolerate its soil to be dry, even on the surface, between waterings. In hot and dry climes, daily watering may be required, while gardeners in cool, rainy climes can offer less frequent irrigation.
Step 2
Boost the ambient humidity passively by setting the fern pot atop a shallow tray filled with stones or marbles and water. Keep the bottom of the pot above the water resting on the stones but refill the tray reservoir frequently to keep the water level high.

Step 3
Mist your Boston fern frequently with a spray bottle filled with distilled water. In low humidity environs or when heating and cooling is being used, daily misting may help keep the fronds green. Refrain from misting with tap water as the treatment chemicals, salts and minerals in the water can damage the leaves.

Step 1
Water the soil of your Boston fern consistently to keep it evenly very moist to the touch but not drowning in stagnant water. Unlike some ferns, Boston fern cannot tolerate its soil to be dry, even on the surface, between waterings. In hot and dry climes, daily watering may be required, while gardeners in cool, rainy climes can offer less frequent irrigation.
Step 2
Boost the ambient humidity passively by setting the fern pot atop a shallow tray filled with stones or marbles and water. Keep the bottom of the pot above the water resting on the stones but refill the tray reservoir frequently to keep the water level high.

Step 3
Mist your Boston fern frequently with a spray bottle filled with distilled water. In low humidity environs or when heating and cooling is being used, daily misting may help keep the fronds green. Refrain from misting with tap water as the treatment chemicals, salts and minerals in the water can damage the leaves.
0
1
文章
Miss Chen
2018年07月29日

If you enjoy growing tropical plants with colorful flowers, the plumeria plant (Plumeris spp.) could be an excellent choice for your garden or as a small indoor tree. Also called the frangipani or temple tree, the plant grows outdoors year-round in U.S. Department of Agriculture plant hardiness zones 9 through 11. You can help keep a plumeria tree in good shape and promote plenty of flowers by pruning it regularly.

The Best Method
A plumeria tree is naturally short and stocky, developing a broad crown and reaching 12 feet or more when it's 6 years old, although this can vary with the variety. Some species, such as West Indian Jasmine (Plumeria alba), which grows in USDA zones 10 through 12, can grow 40 feet tall a if left unpruned. When cutting back a plumeria, use a sharp knife or pruning shears. For a tall plumeria, you might need a pruning saw mounted on a tall pole. Always make cuts at an angle so water won't collect in the cut end of the branch and encourage fungal disease. It's also important to prevent spread of diseases by disinfecting your pruning blades after each cut, wiping them well with rubbing alcohol or dipping them in a container of rubbing alcohol.
Timing
You can prune a plumeria tree at any time, but pruning an actively growing tree can leave unsightly branch stubs until new growth starts. The plant slows its growth in winter, dropping its leaves and looking bare until new ones appear in spring. During this dormant season, it's easy to see the tree's basic form, making pruning decisions easier. To allow the tree to set blossoms for the following season, prune lightly so that enough young growth remains to produce new flowers in spring. To keep the tree within bounds, you can repeat light winter pruning every year or two until the tree reaches a suitable size for its location.
The Overall Plan
If your plumeria is just few years old, you can help control its size in future years by heading it back every year or two, cutting healthy branches back by about one-third. This also encourages lots of new branches that help fill in the tree's shape as it grows and eventually produce flower buds. An older tree that's outgrown its space may respond well to a method called pollarding, which involves removing the upper branches from a mature tree to promote a dense canopy of foliage. This method reduces the tree's size and can keep a mature tree at a predetermined height. Regardless of the tree's age, how often you prune depends somewhat on the tree's response. If there's abundant new growth the following year, you can prune yearly, but if growth appears slowly, it's a good idea to skip a year or two between prunings.

After Pruning
You can help stimulate a newly pruned plumeria to put out healthy growth by fertilizing it regularly during its growing season. Use a granular, 10-30-10 formula, applied at the rate of 1 pound per 1 inch of trunk diameter. Spread the fertilizer under the tree evenly, scratching it into the soil and distributing it to about 2 feet beyond its drip line, which is the outermost area where foliage extends over the ground. Providing adequate water also supports new growth, especially during summer dry spells -- supply enough water to keep the soil moist but not soggy, generally about 1/2 to 1 inch weekly.

The Best Method
A plumeria tree is naturally short and stocky, developing a broad crown and reaching 12 feet or more when it's 6 years old, although this can vary with the variety. Some species, such as West Indian Jasmine (Plumeria alba), which grows in USDA zones 10 through 12, can grow 40 feet tall a if left unpruned. When cutting back a plumeria, use a sharp knife or pruning shears. For a tall plumeria, you might need a pruning saw mounted on a tall pole. Always make cuts at an angle so water won't collect in the cut end of the branch and encourage fungal disease. It's also important to prevent spread of diseases by disinfecting your pruning blades after each cut, wiping them well with rubbing alcohol or dipping them in a container of rubbing alcohol.
Timing
You can prune a plumeria tree at any time, but pruning an actively growing tree can leave unsightly branch stubs until new growth starts. The plant slows its growth in winter, dropping its leaves and looking bare until new ones appear in spring. During this dormant season, it's easy to see the tree's basic form, making pruning decisions easier. To allow the tree to set blossoms for the following season, prune lightly so that enough young growth remains to produce new flowers in spring. To keep the tree within bounds, you can repeat light winter pruning every year or two until the tree reaches a suitable size for its location.
The Overall Plan
If your plumeria is just few years old, you can help control its size in future years by heading it back every year or two, cutting healthy branches back by about one-third. This also encourages lots of new branches that help fill in the tree's shape as it grows and eventually produce flower buds. An older tree that's outgrown its space may respond well to a method called pollarding, which involves removing the upper branches from a mature tree to promote a dense canopy of foliage. This method reduces the tree's size and can keep a mature tree at a predetermined height. Regardless of the tree's age, how often you prune depends somewhat on the tree's response. If there's abundant new growth the following year, you can prune yearly, but if growth appears slowly, it's a good idea to skip a year or two between prunings.

After Pruning
You can help stimulate a newly pruned plumeria to put out healthy growth by fertilizing it regularly during its growing season. Use a granular, 10-30-10 formula, applied at the rate of 1 pound per 1 inch of trunk diameter. Spread the fertilizer under the tree evenly, scratching it into the soil and distributing it to about 2 feet beyond its drip line, which is the outermost area where foliage extends over the ground. Providing adequate water also supports new growth, especially during summer dry spells -- supply enough water to keep the soil moist but not soggy, generally about 1/2 to 1 inch weekly.
0
0
文章
Miss Chen
2018年07月10日

Succulents seem custom-made for indoor gardeners. These hardy plants can thrive for long periods in poor conditions. But given proper care, succulents are some of the most beautiful plants in the world. Learn how to care for succulents plus a few varieties we love.

01How to Grow Healthy Succulents
Succulents are some of the most rewarding plants for indoor gardeners. They're tough, beautiful, and have interesting and varied foliage. Read our best tips for caring for these plants.

02Growing Aloe
Aloe is one of the most popular succulents, grown for both its beauty and health benefits.

03Growing Desert Rose (Adenium obesum)
Desert rose is a striking plant with beautiful flowers. Beware the sap, however, which can be caustic.

04Growing Sedum Morganianum (Burro's Tail)
These beautiful succulents are trailing plants that form long, striking "tails" of tear-drop shaped leaves.

05Growing Echeveria
One of the more popular varieties, Echeveria succulents grow in tight rosettes of overlapping leaves. They are perfect indoor plants: small, beautiful and easy to care for.

01How to Grow Healthy Succulents
Succulents are some of the most rewarding plants for indoor gardeners. They're tough, beautiful, and have interesting and varied foliage. Read our best tips for caring for these plants.

02Growing Aloe
Aloe is one of the most popular succulents, grown for both its beauty and health benefits.

03Growing Desert Rose (Adenium obesum)
Desert rose is a striking plant with beautiful flowers. Beware the sap, however, which can be caustic.

04Growing Sedum Morganianum (Burro's Tail)
These beautiful succulents are trailing plants that form long, striking "tails" of tear-drop shaped leaves.

05Growing Echeveria
One of the more popular varieties, Echeveria succulents grow in tight rosettes of overlapping leaves. They are perfect indoor plants: small, beautiful and easy to care for.
1
2
文章
Miss Chen
2018年03月16日

Lack of garden space shouldn't stop you from growing a crop of Brussels sprouts (Brassica oleracea gemmifera). Simply pot them up in containers on a porch, patio or even an unheated, bright indoor area. Brussels sprouts are annual plants that take between 80 and 110 days to grow before harvest. Dwarf and semi-dwarf varieties, such as "Catskill" or "Long Island," work best for containers. Brussels sprouts grow in U.S. Department of Agriculture plant hardiness zones 2 through 10.

Selecting the Right Pot
Grow Brussels sprouts, one to a pot, in 12-inch-diameter containers or grow multiple plants in large planters, leaving 24 inches between plants. Only use planters with drainage holes in the bottom. Plastic, wood, metal and terra cotta all work well. If you use old, reclaimed wood such as window boxes or troughs as planters, make sure it's not made pressure-treated wood or painted with lead or other toxic paint.
Potting Soil, Compost and Water
Mix 2 parts standard potting soil with 1 part well seasoned compost to grow Brussels sprouts in pots. This compost-potting soil mix provides nutrients for the first part of the growing season.
Water the containers when the top of the soil starts to feel dry, adding enough to thoroughly soak the potting soil all the way through. When excess water starts to leak out the bottom, it indicates the soil is thoroughly damp.
Growing Season and Sun Needs
This cold-weather crop grows best when the air temperature is between 45 and 75 degrees Fahrenheit. Grow container Brussels sprouts outdoors starting in late winter, four weeks before the last frost. Started in late summer, they grow well through the fall and early winter. In mild climates, grow Brussels sprouts outdoors in winter.

Grow Brussels sprouts in pots where they will get at least six hours of sun each day.
Mid-Season Fertilizer
Fertilize mid-season, when the plants stand about 12 inches tall. Select a water-soluble fertilizer for vegetables and herbs with high nitrogen content for strong leaf production. Nitrogen is the first number on the label. A general purpose vegetable fertilizer, for example a 24-8-16 formula, works well. Use 1/2 teaspoon mixed with 1 gallon of water for each plant. Pour the water over the soil, then add more water if needed to soak the soil all the way through.

Selecting the Right Pot
Grow Brussels sprouts, one to a pot, in 12-inch-diameter containers or grow multiple plants in large planters, leaving 24 inches between plants. Only use planters with drainage holes in the bottom. Plastic, wood, metal and terra cotta all work well. If you use old, reclaimed wood such as window boxes or troughs as planters, make sure it's not made pressure-treated wood or painted with lead or other toxic paint.
Potting Soil, Compost and Water
Mix 2 parts standard potting soil with 1 part well seasoned compost to grow Brussels sprouts in pots. This compost-potting soil mix provides nutrients for the first part of the growing season.
Water the containers when the top of the soil starts to feel dry, adding enough to thoroughly soak the potting soil all the way through. When excess water starts to leak out the bottom, it indicates the soil is thoroughly damp.
Growing Season and Sun Needs
This cold-weather crop grows best when the air temperature is between 45 and 75 degrees Fahrenheit. Grow container Brussels sprouts outdoors starting in late winter, four weeks before the last frost. Started in late summer, they grow well through the fall and early winter. In mild climates, grow Brussels sprouts outdoors in winter.

Grow Brussels sprouts in pots where they will get at least six hours of sun each day.
Mid-Season Fertilizer
Fertilize mid-season, when the plants stand about 12 inches tall. Select a water-soluble fertilizer for vegetables and herbs with high nitrogen content for strong leaf production. Nitrogen is the first number on the label. A general purpose vegetable fertilizer, for example a 24-8-16 formula, works well. Use 1/2 teaspoon mixed with 1 gallon of water for each plant. Pour the water over the soil, then add more water if needed to soak the soil all the way through.
1
1
文章
Miss Chen
2018年01月02日

Gladiolus plants send up flowers during the summer. Each flower stem contains several buds that bloom along the length of the stem. The flowers are prized as a colorful garden flower and as a cut flower for indoor display. The plants grow from a tender perennial corm that collects and stores the energy necessary for the following year's growth, making it necessary to properly care for the gladiolus after blooming if you want it to flower again the next year.

Step 1
Cut off the flower stem at its base after all the buds have flowered and completed blooming. Use clean, sharp shears to remove the stems.
Step 2
Water the plants weekly after blooming. Provide enough water at each irrigation to keep the top 6 inches of soil moist. Water more frequently if hot weather causes the soil to dry out or the plants to wilt.
Step 3
Weed between the gladiolus weekly or as necessary to keep weeds from establishing in the bed. Gladiolus plants can't tolerate weed competition, as the weeds rob the soil of the nutrients and water the corms need to store energy.
Step 4
Cut back the foliage to within ½ inch of the ground after the first fall frost causes the foliage to yellow and die back. Dig the corms up after cutting back the foliage.

Step 5
Spread the corms out in a dry, warm location indoors. Dry the corms for three weeks.
Step 6
Break the bottom off the corm along the seam and discard the bottom portion, saving only the new top corm. Store the corms in a paper bag in a dry location where temperatures are 35 to 45 degree Fahrenheit until spring planting.

Step 1
Cut off the flower stem at its base after all the buds have flowered and completed blooming. Use clean, sharp shears to remove the stems.
Step 2
Water the plants weekly after blooming. Provide enough water at each irrigation to keep the top 6 inches of soil moist. Water more frequently if hot weather causes the soil to dry out or the plants to wilt.
Step 3
Weed between the gladiolus weekly or as necessary to keep weeds from establishing in the bed. Gladiolus plants can't tolerate weed competition, as the weeds rob the soil of the nutrients and water the corms need to store energy.
Step 4
Cut back the foliage to within ½ inch of the ground after the first fall frost causes the foliage to yellow and die back. Dig the corms up after cutting back the foliage.

Step 5
Spread the corms out in a dry, warm location indoors. Dry the corms for three weeks.
Step 6
Break the bottom off the corm along the seam and discard the bottom portion, saving only the new top corm. Store the corms in a paper bag in a dry location where temperatures are 35 to 45 degree Fahrenheit until spring planting.
0
0
文章
Miss Chen
2017年12月03日

While commercial mushroom farms raise and package large quantities of mushrooms for consumers, packaged mushroom gardens give individual gardeners the opportunity to raise a small, indoor mushroom crop. These mushroom-growing kits include everything you need to start your own small mushroom garden. Although you can purchase one of these ready-made kits from Internet suppliers and gardening centers, you can also put together the necessary ingredients to make your own mushroom-growing kit. Use this for your own gardening hobby or present this homemade kit as a gift for a friend.

Putting Together Your Kit
Step 1
Obtain a broad, shallow container or recycle a used one for this purpose. A large casserole dish or a plastic storage bin works well for building a mushroom garden.
Step 2
Mix equal amounts of sterile compost, potting soil and peat, filling your container with a 2-to-3-inch layer of this rich medium. Reserve about 1/4 cup of this mixture in a sealed envelope. Smooth the top of your soil mix with a large, wooden spoon, removing any ridges or dips, creating a uniform surface.
Step 3
Gather mushroom spores for your garden kit. Known as spore printing, collecting spores allows you to propagate new mushrooms from harvested species. Purchase only fresh mushrooms from your grocery store to use for this purpose. Cut off the stems and place your mushroom caps, gills down, on a piece of clean, white paper. Wait 12 hours for the mushrooms to release the majority of the miniscule spores. Carefully transfer the spores to a sealable envelope for storage. Keep these cool and dry.

Step 4
Tear off a sheet or two of clear plastic wrap to place over the top of your container. Poke several holes in the plastic wrap to allow adequate airflow. Complete your mushroom garden kit with a plastic spray bottle for misting the soil. Your kit is now ready for planting or giving away as a gift. Include growing instructions with a gift.
Planting and Growing Your Mushrooms
Step 1
Plant your mushroom garden by misting the surface of your soil with a fine spray of water until it glistens. Scatter your tiny spores over the surface of the damp soil. Sprinkle the reserved 1/4 cup of medium over the top of your spores, barely covering them with this fine substance. Spray the surface again to create even dampness and place your plastic wrap over the top of your container.
Step 2
Put your planted mushroom garden in a dimly lit area, such as a closet or storage cabinet. Maintain the temperature in your closet near 75 degrees Fahrenheit. Keep the soil slightly damp to the touch by spraying it every few days.
Step 3
Look for the small mushrooms to appear within one to two weeks. Begin harvesting them as they reach maturity to allow space for new ones to grow. Mushroom gardens often continue supplying fresh produce for six to eight weeks.

Putting Together Your Kit
Step 1
Obtain a broad, shallow container or recycle a used one for this purpose. A large casserole dish or a plastic storage bin works well for building a mushroom garden.
Step 2
Mix equal amounts of sterile compost, potting soil and peat, filling your container with a 2-to-3-inch layer of this rich medium. Reserve about 1/4 cup of this mixture in a sealed envelope. Smooth the top of your soil mix with a large, wooden spoon, removing any ridges or dips, creating a uniform surface.
Step 3
Gather mushroom spores for your garden kit. Known as spore printing, collecting spores allows you to propagate new mushrooms from harvested species. Purchase only fresh mushrooms from your grocery store to use for this purpose. Cut off the stems and place your mushroom caps, gills down, on a piece of clean, white paper. Wait 12 hours for the mushrooms to release the majority of the miniscule spores. Carefully transfer the spores to a sealable envelope for storage. Keep these cool and dry.

Step 4
Tear off a sheet or two of clear plastic wrap to place over the top of your container. Poke several holes in the plastic wrap to allow adequate airflow. Complete your mushroom garden kit with a plastic spray bottle for misting the soil. Your kit is now ready for planting or giving away as a gift. Include growing instructions with a gift.
Planting and Growing Your Mushrooms
Step 1
Plant your mushroom garden by misting the surface of your soil with a fine spray of water until it glistens. Scatter your tiny spores over the surface of the damp soil. Sprinkle the reserved 1/4 cup of medium over the top of your spores, barely covering them with this fine substance. Spray the surface again to create even dampness and place your plastic wrap over the top of your container.
Step 2
Put your planted mushroom garden in a dimly lit area, such as a closet or storage cabinet. Maintain the temperature in your closet near 75 degrees Fahrenheit. Keep the soil slightly damp to the touch by spraying it every few days.
Step 3
Look for the small mushrooms to appear within one to two weeks. Begin harvesting them as they reach maturity to allow space for new ones to grow. Mushroom gardens often continue supplying fresh produce for six to eight weeks.
0
0
Margarett Rafael
2017年11月27日

Help me out to keep this alive please. #indoor begginner


0
0
Margarett Rafael:I poured out the excess before I sleep. I don't know if it has enough sunlight cos its inside the room.
aureus90:@Margarett Rafael yep just remove the excess water on the plant itself. good luck
Margarett Rafael:Yes I watered it. So I'll put some tissue on it?
aureus90:Hi Margarett Did you just water it? I would remove the water sitting on its leaves with a tissue. They can rot easily.
文章
Miss Chen
2017年11月11日

If you have a small yard or live in an apartment, growing grapevines in pots is the perfect solution. According to the Fruit Expert, the best indoor varieties are Black Hamburgh and Thompson’s Seedless. The grapes that the vine produces can be eaten or left as food for birds. Growing grapevines in a container is a basic task, but the pot can become heavy to lift and move as it grows. Place the pot on a board with wheels. This will allow you to move the pot easily wherever and whenever you want.

Step 1
Find a pot that has at least an 18-inch diameter and is at least 1 foot deep. Make sure there are drainage holes at the bottom of the container.
Step 2
Pour 1 inch of gravel in the bottom of the pot.
Step 3
Mix equal amounts of potting soil and perlite. Fill the pot halfway with the amended potting soil.

Step 4
Remove the grapevine from its container. Gently tease them free if the roots are growing around the rootball.
Step 5
Place the grape’s rootball in the center of the container.
Step 6
Fill in with the amended soil around the rootball. Tamp the soil down to remove air bubbles. Leave at least 1 inch between the surface of the soil and the rim of the pot.
Step 7
Place a stake into the pot close to the rootball. Push it in so it rests on the bottom of the pot. Position the stake so the grapevine has something to grow against and provide support. Tie the branches to the stake with twist ties, string or strips of cloth as the vine grows.
Step 8
Water the grapevine to keep the soil moist, watering every two or three days. Cut back on watering during the dormant season. Stick your finger 1 inch into the soil. Water the vine when the soil feels dry.
Step 9
Feed the grapes a balanced fertilizer such as 10-10-10 early in the spring. Read and follow label directions.

Step 1
Find a pot that has at least an 18-inch diameter and is at least 1 foot deep. Make sure there are drainage holes at the bottom of the container.
Step 2
Pour 1 inch of gravel in the bottom of the pot.
Step 3
Mix equal amounts of potting soil and perlite. Fill the pot halfway with the amended potting soil.

Step 4
Remove the grapevine from its container. Gently tease them free if the roots are growing around the rootball.
Step 5
Place the grape’s rootball in the center of the container.
Step 6
Fill in with the amended soil around the rootball. Tamp the soil down to remove air bubbles. Leave at least 1 inch between the surface of the soil and the rim of the pot.
Step 7
Place a stake into the pot close to the rootball. Push it in so it rests on the bottom of the pot. Position the stake so the grapevine has something to grow against and provide support. Tie the branches to the stake with twist ties, string or strips of cloth as the vine grows.
Step 8
Water the grapevine to keep the soil moist, watering every two or three days. Cut back on watering during the dormant season. Stick your finger 1 inch into the soil. Water the vine when the soil feels dry.
Step 9
Feed the grapes a balanced fertilizer such as 10-10-10 early in the spring. Read and follow label directions.
0
0
求助
Adrianne Jorgensen
2017年11月06日

indoor or outdoor?


0
0
meriunkat:it could survive indoors but to avoid etiolation it must be exposed to the sunlight
meriunkat:yes I agree, definitely an outdoor plant
Ueca:Wherever there is sun. Never below 5°C, to be safe.
文章
Dummer. ゛☀
2017年09月28日

Normally thought of as outdoor plants, Primula are actually excellent indoor potted plants for winter or spring blooms. Although the Common Primrose (Primula vulgaris) can be grown as a potted plant inside, the favorite potted Primula tend to be the more delicate species, with clusters of small blooms that rise above the crinkled and attractive leaves.
All delicate Primula should be treated about the same, and in no case should you expect a long-lived houseplant. Rather, think of your pot of spring-time Primula like your blooming fall Phalaenopsis Orchid: it’s a beautiful visitor, but will not survive over the long term inside. Once the plant has finished blooming, you can move it outside to a protected spot of your summer garden and hopefully enjoy a season of additional blooms.
Growing Conditions
Light: They prefer brightly lit windowsills, but the indoor fancy plant should not be exposed to direct sunlight. When planting them outside, put in a shady or dappled corner.
Water: It need adequate, even and regular moisture to thrive. They shouldn’t be soggy, but don’t let the soil dry out either. Look for signs of wilting.
Temperature: Moderate to cool. Intense heat can cause wilting and plant failure.
Soil: A loose, very well-drained, very rich potting mix.
Fertilizer: Fertilize with a weak liquid fertilizer during growth and flowering. Because these are not meant to be long-lived indoor plants, a single application of controlled-release fertilizer may be adequate to get them through the flowering season.
Repotting
It’s unlikely you’ll be repotting your potted Primula. If you do, make sure not to bury them too deep—burying too deep is a prime reason Primula succumb. Bury the plants so the top of the root ball is slightly elevated above the level of the surrounding soil. Never pile soil up around the stem of a flowering plant.
Propagation
They are propagated from seed, which are sown directly in soil or potting media. Most pots of indoors Primula are purchased as flowering plants, destined to be set atop a desk, sill, or table until they’re done flowering. However, if you’re interested in selecting and starting your own Primula pots, sow seeds directly into the pot in fall or early winter and keep the seedlings under fluorescent lights in a warm spot, with regular water. Plants should be blooming by early spring.
Grower’s Tips
Potted indoor Primula are a delightful way to usher out winter or welcome in the spring. They are available in a wide range of striking colors, forming a mass of flowers. Most people prefer the taller, upright delicate Primulas indoors, but even a pot of common Primula is a nice addition. Extend the flowering season by pinching off dying buds. After the plant has done blooming, consider moving it outside. While inside, do not overwater; wilting even though the plant is getting water is a sign of root rot.

All delicate Primula should be treated about the same, and in no case should you expect a long-lived houseplant. Rather, think of your pot of spring-time Primula like your blooming fall Phalaenopsis Orchid: it’s a beautiful visitor, but will not survive over the long term inside. Once the plant has finished blooming, you can move it outside to a protected spot of your summer garden and hopefully enjoy a season of additional blooms.

Growing Conditions
Light: They prefer brightly lit windowsills, but the indoor fancy plant should not be exposed to direct sunlight. When planting them outside, put in a shady or dappled corner.
Water: It need adequate, even and regular moisture to thrive. They shouldn’t be soggy, but don’t let the soil dry out either. Look for signs of wilting.
Temperature: Moderate to cool. Intense heat can cause wilting and plant failure.
Soil: A loose, very well-drained, very rich potting mix.

Fertilizer: Fertilize with a weak liquid fertilizer during growth and flowering. Because these are not meant to be long-lived indoor plants, a single application of controlled-release fertilizer may be adequate to get them through the flowering season.
Repotting
It’s unlikely you’ll be repotting your potted Primula. If you do, make sure not to bury them too deep—burying too deep is a prime reason Primula succumb. Bury the plants so the top of the root ball is slightly elevated above the level of the surrounding soil. Never pile soil up around the stem of a flowering plant.

Propagation
They are propagated from seed, which are sown directly in soil or potting media. Most pots of indoors Primula are purchased as flowering plants, destined to be set atop a desk, sill, or table until they’re done flowering. However, if you’re interested in selecting and starting your own Primula pots, sow seeds directly into the pot in fall or early winter and keep the seedlings under fluorescent lights in a warm spot, with regular water. Plants should be blooming by early spring.

Grower’s Tips
Potted indoor Primula are a delightful way to usher out winter or welcome in the spring. They are available in a wide range of striking colors, forming a mass of flowers. Most people prefer the taller, upright delicate Primulas indoors, but even a pot of common Primula is a nice addition. Extend the flowering season by pinching off dying buds. After the plant has done blooming, consider moving it outside. While inside, do not overwater; wilting even though the plant is getting water is a sign of root rot.
0
0
文章
Dummer. ゛☀
2017年09月28日

Forget-Me-Not (Myosotis sylvatica) make excellent indoor container plants, requiring little care to maintain their gray-green foliage and clusters of tiny, light-blue flowers that appear throughout spring and early summer. The plants perform best in moist but well-drained soil. So a light, standard potting mix works well. Because Forget-Me-Not require plenty of air circulation, grow each plant individually in its own 12-inch/-30 cm-diameter container with bottom drainage holes. The plants are pest-resistant and even grow in nutrient-poor soil. So fertilizing them isn’t necessary. Forget-Me-Not is hardy in U.S. Department of Agriculture plant hardiness zones 3 through 8.
Growing Conditions and General Care
Place Forget-Me-Not in a south or east-facing window, where they receive full or partial sunlight.
Water the soil deeply when its top 3 inches (7.5 cm) feels dry to your touch, watering until the water drips through the bottom of the pots. Don’t allow the plants to stand in water. Reduce watering to about once or twice each month in winter, while the plants are dormant. Resume normal watering in spring.
Remove the plants’ spent, or old, flowers, at their stems, pinching them off with your fingernails. Throw away the removed flowers. Removing spent flowers encourages new blooms to form.
Fertilize the Forget-Me-Not once each month only if their leaves appear wilted or yellow or the plants grow very slowly during spring or summer. Mix 1 teaspoon of 5-10-10, water-soluble fertilizer with 1 gallon of water, and use the mixture to fertilize the plants in place of one watering session, applying only the amount you normally would use to water the plants. Don’t fertilize during winter while the plants are dormant.
Trim off all dead foliage and dead stems throughout the growing season as well as during winter after the plants die back. Use pruning shears or scissors for the task.
Propagation
If starting off Forget-Me-Not and other Myosotis plants indoors then start about 2 months in advance. The seeds of Forget-Me-Not should be sown in vermiculite. It will take from one to four weeks to germinate at 64 to 68 degrees Fahrenheit (18 to 20 degrees Celsius) in the dark. It is necessary to water the Forget-Me-Nots from below to stop them rotting. Once seedlings are ready transplant into the garden and grow about 6 to 8 inches (15 to 20 cm) apart.
Pests and Diseases
Insects and disease are not too common. If problems arise, treat early with insecticides or fungicides as appropriate.

Growing Conditions and General Care
Place Forget-Me-Not in a south or east-facing window, where they receive full or partial sunlight.
Water the soil deeply when its top 3 inches (7.5 cm) feels dry to your touch, watering until the water drips through the bottom of the pots. Don’t allow the plants to stand in water. Reduce watering to about once or twice each month in winter, while the plants are dormant. Resume normal watering in spring.

Remove the plants’ spent, or old, flowers, at their stems, pinching them off with your fingernails. Throw away the removed flowers. Removing spent flowers encourages new blooms to form.
Fertilize the Forget-Me-Not once each month only if their leaves appear wilted or yellow or the plants grow very slowly during spring or summer. Mix 1 teaspoon of 5-10-10, water-soluble fertilizer with 1 gallon of water, and use the mixture to fertilize the plants in place of one watering session, applying only the amount you normally would use to water the plants. Don’t fertilize during winter while the plants are dormant.
Trim off all dead foliage and dead stems throughout the growing season as well as during winter after the plants die back. Use pruning shears or scissors for the task.

Propagation
If starting off Forget-Me-Not and other Myosotis plants indoors then start about 2 months in advance. The seeds of Forget-Me-Not should be sown in vermiculite. It will take from one to four weeks to germinate at 64 to 68 degrees Fahrenheit (18 to 20 degrees Celsius) in the dark. It is necessary to water the Forget-Me-Nots from below to stop them rotting. Once seedlings are ready transplant into the garden and grow about 6 to 8 inches (15 to 20 cm) apart.

Pests and Diseases
Insects and disease are not too common. If problems arise, treat early with insecticides or fungicides as appropriate.
0
0


