文章
Miss Chen
2018年07月29日

The process of deadheading -- or removing the wilted blooms from a flowering plant -- focuses the plant's energy into healthy root and leaf growth instead of seed production. In some plants, it also encourages the plants to bloom again. The various coneflower species respond well to deadheading, but there are also good reasons for not deadheading coneflowers.
Coneflower Blooms
Coneflowers all belong to the plant family, Asteraceae, and the blooms are similar enough they can all be deadheaded the same way, or left on the plant for the same reasons. Not every type of coneflower blooms at the same time, so be on the lookout throughout the summer and fall to deadhead in a timely manner.

The common name "coneflower" applies to several genera, including Echinacea, Rudbeckia and Ratibida. All have a cone-shaped flower center, though plants in the Echinacea genus are the ones most often referred to as "coneflowers."
Purple coneflower (Echinacea purpurea), which grows in U.S. Department of Agriculture plant hardiness zones 3 through 8, has purple-pink petals around an orange center. It grows 2 to 5 feet tall, and blooms all summer
Yellow coneflower (Echinacea paradoxa), which grows in USDA zones 5 through 8, grows 2 to 3 feet tall. It blooms all summer, and has thin yellow petals around a brown center.
Black-eyed Susan (Rudbeckia fulgida), which grows in USDA zones 3 through 9, is a sturdy perennial that grows 2 to 3 feet tall and blooms midsummer through fall. The daisylike yellow flowers have a black center.
Gray-head coneflower (Ratibida pinnata), which grows in USDA zones 3 through 8, grows 3 to 5 feet tall and blooms in the summer. It has thin yellow flower petals that fold back from a 1-inch gray center.
Mexican hat plant (Ratibida columnifera), which grows in USDA zones 4 through 9, is also called long-headed coneflower because the flower center can reach 2 inches high. It grows 1 to 3 feet tall, has yellow flower petals and blooms in the summer and early fall.
Missouri coneflower (Rudbeckia missouriensis), which grows in USDA zones 5 through 8, grows 2 to 3 feet tall and blooms summer through fall. It has orange-yellow flowers with a black center.
Reasons to Deadhead
Deadheading coneflowers can encourage rebloom. Purple coneflower and yellow coneflower will rebloom without deadheading, but black-eyed Susan must be deadheaded if you want reliable repeat blooming all summer and into fall.

Removing spent blooms also prevents self-seeding. If you don't want the plants to spread throughout the garden, make sure you deadhead plants before the seed heads ripen. Removing the flowers as soon as they are finished blooming also keeps the garden looking neat and tidy.
Leaving the Seeds
If you decide not to deadhead coneflowers, the seeds will attract birds to the garden. The seeds that birds don't eat fall to the ground and easily sprout to create more plants. Self-seeding can result in a large number of seedlings in the spring, which will start blooming after about two years.
The flower center of the coneflower is where seeds develop. After the petals fall off, these seed heads often remain upright in the garden throughout all or part of the winter. This provides winter interest in the garden in the form of dark-colored cone-shaped seed heads, and birds that are attracted to the seeds.
Coneflower Blooms
Coneflowers all belong to the plant family, Asteraceae, and the blooms are similar enough they can all be deadheaded the same way, or left on the plant for the same reasons. Not every type of coneflower blooms at the same time, so be on the lookout throughout the summer and fall to deadhead in a timely manner.

The common name "coneflower" applies to several genera, including Echinacea, Rudbeckia and Ratibida. All have a cone-shaped flower center, though plants in the Echinacea genus are the ones most often referred to as "coneflowers."
Purple coneflower (Echinacea purpurea), which grows in U.S. Department of Agriculture plant hardiness zones 3 through 8, has purple-pink petals around an orange center. It grows 2 to 5 feet tall, and blooms all summer
Yellow coneflower (Echinacea paradoxa), which grows in USDA zones 5 through 8, grows 2 to 3 feet tall. It blooms all summer, and has thin yellow petals around a brown center.
Black-eyed Susan (Rudbeckia fulgida), which grows in USDA zones 3 through 9, is a sturdy perennial that grows 2 to 3 feet tall and blooms midsummer through fall. The daisylike yellow flowers have a black center.
Gray-head coneflower (Ratibida pinnata), which grows in USDA zones 3 through 8, grows 3 to 5 feet tall and blooms in the summer. It has thin yellow flower petals that fold back from a 1-inch gray center.
Mexican hat plant (Ratibida columnifera), which grows in USDA zones 4 through 9, is also called long-headed coneflower because the flower center can reach 2 inches high. It grows 1 to 3 feet tall, has yellow flower petals and blooms in the summer and early fall.
Missouri coneflower (Rudbeckia missouriensis), which grows in USDA zones 5 through 8, grows 2 to 3 feet tall and blooms summer through fall. It has orange-yellow flowers with a black center.
Reasons to Deadhead
Deadheading coneflowers can encourage rebloom. Purple coneflower and yellow coneflower will rebloom without deadheading, but black-eyed Susan must be deadheaded if you want reliable repeat blooming all summer and into fall.

Removing spent blooms also prevents self-seeding. If you don't want the plants to spread throughout the garden, make sure you deadhead plants before the seed heads ripen. Removing the flowers as soon as they are finished blooming also keeps the garden looking neat and tidy.
Leaving the Seeds
If you decide not to deadhead coneflowers, the seeds will attract birds to the garden. The seeds that birds don't eat fall to the ground and easily sprout to create more plants. Self-seeding can result in a large number of seedlings in the spring, which will start blooming after about two years.
The flower center of the coneflower is where seeds develop. After the petals fall off, these seed heads often remain upright in the garden throughout all or part of the winter. This provides winter interest in the garden in the form of dark-colored cone-shaped seed heads, and birds that are attracted to the seeds.
0
0
文章
Miss Chen
2018年07月22日

Asparagus (Asparagus officinalis) spears are the new shoots of asparagus plants that grow in spring. Asparagus grows from seed, and plants live 20 to 30 years in good growing conditions. In U.S. Department of Agriculture plant hardiness zones 4 through 8, asparagus is hardy, and plants grow 3 to 5 feet tall. Young asparagus shoots can sometimes cause skin irritation, and the red berries produced by female asparagus plants are poisonous.

Asparagus Roots
Asparagus root systems are called crowns. Asparagus growers start plants from seed and sell asparagus crowns that are one or two years old. Each crown has a central bud, and thick roots spreading out sideways. Shoots grow from the central bud.
Asparagus roots grow horizontally, not vertically. Over time, they form a wide, tuberous mat. When growing asparagus, it's important to select a growing area that can be left undisturbed for years. After planting, asparagus roots should not be moved.
Asparagus Plants
Asparagus plants develop many branched stems, which die down at the end of the growing season. Shoots develop daily on asparagus plants in spring. Newly planted crowns can produce shoots five or six weeks after planting. After a crop of young shoots is harvested, later shoots are allowed to develop so the plants can store energy for next year's crop.
As shoots grow, they produce many stems, which branch off into smaller stems. Rings of thin, hairlike structures appear on the smaller stems, which give mature asparagus plants a feathery appearance. True asparagus leaves are scalelike and tiny, and they can be seen most easily on new shoots. Asparagus stems turn yellow and wither in fall, often after the first frost.
Female and Male Asparagus
Asparagus plants are female or male. Female plants produce more stems than male plants, but the stems are thinner. Female asparagus plants also produce bright red summer berries, which contain the plant's seeds. Seeds from fallen berries can create problems the following year, when the asparagus bed becomes overrun with asparagus seedlings.
Newer varieties of asparagus are mostly male or all male plants. Male plants put all their energy into shoot production and don't waste energy on producing fruit. They also don't create problems with asparagus seedlings.

New Varieties
New asparagus varieties offer disease resistance and a range of colors. Asparagus "Jersey Knight" (Asparagus officinalis "Jersey Knight") is resistant to rust, fusarium wilt, and root and crown rot. Asparagus "Purple Passion" (Asparagus "Purple Passion") features purple spears, though these turn green when cooked. "Jersey Knight" and "Purple Passion" are hardy in USDA zones 3 through 10.
Asparagus "Jersey Giant" (Asparagus officinalis "Jersey Giant"), which is hardy in USDA zones 4 through 7, produces green spears with purple bracts. Bracts are leaflike structures. "Jersey Giant" produces two to three times more spears than some older varieties.

Asparagus Roots
Asparagus root systems are called crowns. Asparagus growers start plants from seed and sell asparagus crowns that are one or two years old. Each crown has a central bud, and thick roots spreading out sideways. Shoots grow from the central bud.
Asparagus roots grow horizontally, not vertically. Over time, they form a wide, tuberous mat. When growing asparagus, it's important to select a growing area that can be left undisturbed for years. After planting, asparagus roots should not be moved.
Asparagus Plants
Asparagus plants develop many branched stems, which die down at the end of the growing season. Shoots develop daily on asparagus plants in spring. Newly planted crowns can produce shoots five or six weeks after planting. After a crop of young shoots is harvested, later shoots are allowed to develop so the plants can store energy for next year's crop.
As shoots grow, they produce many stems, which branch off into smaller stems. Rings of thin, hairlike structures appear on the smaller stems, which give mature asparagus plants a feathery appearance. True asparagus leaves are scalelike and tiny, and they can be seen most easily on new shoots. Asparagus stems turn yellow and wither in fall, often after the first frost.
Female and Male Asparagus
Asparagus plants are female or male. Female plants produce more stems than male plants, but the stems are thinner. Female asparagus plants also produce bright red summer berries, which contain the plant's seeds. Seeds from fallen berries can create problems the following year, when the asparagus bed becomes overrun with asparagus seedlings.
Newer varieties of asparagus are mostly male or all male plants. Male plants put all their energy into shoot production and don't waste energy on producing fruit. They also don't create problems with asparagus seedlings.

New Varieties
New asparagus varieties offer disease resistance and a range of colors. Asparagus "Jersey Knight" (Asparagus officinalis "Jersey Knight") is resistant to rust, fusarium wilt, and root and crown rot. Asparagus "Purple Passion" (Asparagus "Purple Passion") features purple spears, though these turn green when cooked. "Jersey Knight" and "Purple Passion" are hardy in USDA zones 3 through 10.
Asparagus "Jersey Giant" (Asparagus officinalis "Jersey Giant"), which is hardy in USDA zones 4 through 7, produces green spears with purple bracts. Bracts are leaflike structures. "Jersey Giant" produces two to three times more spears than some older varieties.
0
0
文章
Miss Chen
2018年07月22日

Pumpkins take up a large space in the home garden. To grow them successfully, you need to know how to prepare the soil, when to start the seeds, how far apart to space them and when to harvest the pumpkins.

Step 1
Check the back of the seed packet for the number of days until maturity. If you are growing pumpkins for Halloween, add a week or two and then count backwards to arrive at the best planting date. It will most likely be in late spring or early summer. Pumpkin seedlings do not tolerate frost, but the pumpkins will rot before Halloween if you plant them too soon in a warm climate.
Step 2
Prepare the soil for the pumpkin bed in an area that receives sun. Because pumpkins are heavy feeders, dig a hole 2 feet across and 1 foot deep. Fill it with a mix of compost and soil to which you've added a handful of slow-release fertilizer. Form a mound over the hole about 4 inches high in the center.
Step 3
Make additional mounds. Space them 10 feet apart. Pumpkins like to sprawl and require plenty of room.
Step 4
Sow six seeds in a circle in each mound. Push them about one inch deep into the soil and spaced four to six inches apart. After the seeds sprout, remove all but the strongest two seedlings. If you don't, you'll have all foliage and no pumpkins.

Step 5
Weed the bed regularly. Pumpkins can tolerate short periods of hot, dry weather, but if you have extended periods of heat, water them. As the pumpkins grow, slip a shingle or tile under each one to lift it slightly from the soil. This foils some insects and improves the appearance of the pumpkin on that side.
Step 6
Harvest all the pumpkins when they turn orange and before a heavy frost hits. To harvest pumpkins, cut the stem about three inches from the pumpkin. Pumpkins broken from their stems do not keep well.

Step 1
Check the back of the seed packet for the number of days until maturity. If you are growing pumpkins for Halloween, add a week or two and then count backwards to arrive at the best planting date. It will most likely be in late spring or early summer. Pumpkin seedlings do not tolerate frost, but the pumpkins will rot before Halloween if you plant them too soon in a warm climate.
Step 2
Prepare the soil for the pumpkin bed in an area that receives sun. Because pumpkins are heavy feeders, dig a hole 2 feet across and 1 foot deep. Fill it with a mix of compost and soil to which you've added a handful of slow-release fertilizer. Form a mound over the hole about 4 inches high in the center.
Step 3
Make additional mounds. Space them 10 feet apart. Pumpkins like to sprawl and require plenty of room.
Step 4
Sow six seeds in a circle in each mound. Push them about one inch deep into the soil and spaced four to six inches apart. After the seeds sprout, remove all but the strongest two seedlings. If you don't, you'll have all foliage and no pumpkins.

Step 5
Weed the bed regularly. Pumpkins can tolerate short periods of hot, dry weather, but if you have extended periods of heat, water them. As the pumpkins grow, slip a shingle or tile under each one to lift it slightly from the soil. This foils some insects and improves the appearance of the pumpkin on that side.
Step 6
Harvest all the pumpkins when they turn orange and before a heavy frost hits. To harvest pumpkins, cut the stem about three inches from the pumpkin. Pumpkins broken from their stems do not keep well.
1
0
成长记
Pommy Mommy
2018年07月19日

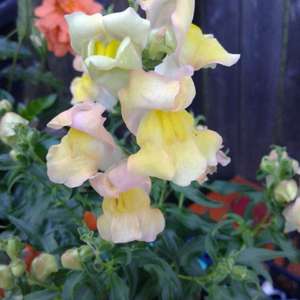
grown from SEED! I don't know if these are the drawer snapdragons or the regular ones all I know is they are awesome

0
0
文章
Miss Chen
2018年07月13日

Cabbages produce seeds from flowers but you don't usually see them do it because it takes more than a year. If you want to get your own seed from your cabbages, choose open-pollinated varieties rather than F1 hybrids, so they'll breed true. Cabbages cross easily, not only with other cabbages but with kale, kohlrabi, cauliflower, broccoli, collards and Brussels sprouts, so you'll need to protect your seed cabbages if other plants of the same species are blooming within 1,000 feet.

Step 1
Plant your cabbage to mature as late in the fall as practical. Choose the best dozen heads to use for seed. If your winters are mild, rarely getting more than a few degrees below freezing, cover the heads with straw or other loose mulch to protect them from freezing. If your winters are severe, pull them up with roots intact and store them in a root cellar or bury them under at least a foot of dirt and mulch, deeper in the coldest climates. You want them to be kept cool but never frozen solid and damp enough so they don't dry out but not so damp that they mold.
Step 2
Dig up or uncover the cabbage heads when the danger of hard freezing is past. Plant or transplant them 1/12 to 2 feet apart, spaced in a square or grid rather than a row if you'll need to protect them from cross-pollination. Plant them deep so the heads are at ground level. Cut an "x" in the top of each head, about an inch deep, to let the flowering stock emerge easily.
Step 3
Set poles upright around the cabbages about 4 feet high and connect the tops with wire or heavy cord. When the seed stalks emerge in early summer but before they bloom, cover the framework with netting that's woven tightly enough that bees can't get through. When the flowers open, raise the cover long enough each morning to allow bees to enter and let them stay inside to pollinate the plants, then raise the cover to release them. Repeat while the plants are blooming, then remove the covering while the seeds mature. If no other plants that cross with cabbages are blooming at the same time within 1,000 feet, you can omit the protection and just let bees come and go to pollinate them naturally.

Step 4
Tie the seed stalks loosely to poles to keep them from bending or breaking in strong wind or rain as the seeds mature. Wait several weeks for the seeds to ripen.
Step 5
Pick the seedpods when they first turn brown, before they burst open and spill their seeds. Some mature before others, so pick them every few days. Lay them on a tray in the sun to finish drying. If you don't mind losing some, you can wait until the majority have turned brown, cut the whole seed stalk and lay it on a tray or sheet to dry. For the most viable seed, let the pods mature as long as possible on the plant.
Step 6
Put the pods in a cloth bag and lightly pound it or crush it to knock the seeds loose, then carefully pour them out. Use a coarse sieve to separate them from larger debris or pour them from one container to another in a light breeze to let the lighter pieces of broken pod blow away. Keep the seeds in a dark, dry place until you want to plant them. They should keep several years.

Step 1
Plant your cabbage to mature as late in the fall as practical. Choose the best dozen heads to use for seed. If your winters are mild, rarely getting more than a few degrees below freezing, cover the heads with straw or other loose mulch to protect them from freezing. If your winters are severe, pull them up with roots intact and store them in a root cellar or bury them under at least a foot of dirt and mulch, deeper in the coldest climates. You want them to be kept cool but never frozen solid and damp enough so they don't dry out but not so damp that they mold.
Step 2
Dig up or uncover the cabbage heads when the danger of hard freezing is past. Plant or transplant them 1/12 to 2 feet apart, spaced in a square or grid rather than a row if you'll need to protect them from cross-pollination. Plant them deep so the heads are at ground level. Cut an "x" in the top of each head, about an inch deep, to let the flowering stock emerge easily.
Step 3
Set poles upright around the cabbages about 4 feet high and connect the tops with wire or heavy cord. When the seed stalks emerge in early summer but before they bloom, cover the framework with netting that's woven tightly enough that bees can't get through. When the flowers open, raise the cover long enough each morning to allow bees to enter and let them stay inside to pollinate the plants, then raise the cover to release them. Repeat while the plants are blooming, then remove the covering while the seeds mature. If no other plants that cross with cabbages are blooming at the same time within 1,000 feet, you can omit the protection and just let bees come and go to pollinate them naturally.

Step 4
Tie the seed stalks loosely to poles to keep them from bending or breaking in strong wind or rain as the seeds mature. Wait several weeks for the seeds to ripen.
Step 5
Pick the seedpods when they first turn brown, before they burst open and spill their seeds. Some mature before others, so pick them every few days. Lay them on a tray in the sun to finish drying. If you don't mind losing some, you can wait until the majority have turned brown, cut the whole seed stalk and lay it on a tray or sheet to dry. For the most viable seed, let the pods mature as long as possible on the plant.
Step 6
Put the pods in a cloth bag and lightly pound it or crush it to knock the seeds loose, then carefully pour them out. Use a coarse sieve to separate them from larger debris or pour them from one container to another in a light breeze to let the lighter pieces of broken pod blow away. Keep the seeds in a dark, dry place until you want to plant them. They should keep several years.
0
0
文章
Miss Chen
2018年07月12日

Potatoes are low-maintenance vegetables that you can grow in your home garden and that produce an abundant harvest. Grow potatoes from seed potatoes, which are small potatoes or pieces of larger ones. Pre-sprouting them before planting, also called chitting, ensures the seed potatoes are ready and able to produce plants. Plant these sprouted potatoes properly; otherwise, they rot in the ground instead of becoming healthy and productive plants.

Step 1
Prepare a full-sun garden bed for planting. Apply a 2-inch layer of compost over the entire bed, and one-half pound of 10-10-10 analysis fertilizer to each 10-foot row. Till the compost and fertilizer into the top 6 inches of the bed.
Step 2
Cut large, sprouted seed potatoes into 1- to 2-inch pieces, leaving at least one sprout - and up to three - on each seed piece. Set the seed pieces on a tray with the cut side up, and leave them overnight so the cut sides scab over, which helps prevent rot. Small seed pieces can be left whole.
Step 3
Sow the seed pieces to a 3-inch depth, and space each piece 8 to 12 inches apart in the row. Space the rows 2 to 3 feet apart. Plant each seed piece so the sprout is on top and the cut side, if applicable, on the bottom.
Step 4
Water the bed after planting until the soil is moist to a 6-inch depth. Water once weekly to maintain this moisture level, or twice weekly during extended dry periods.

Step 5
Cover the bed with a 2-inch layer of straw mulch once the potato plants are 5 inches tall. The mulch preserves moisture, inhibits weeds and also prevents sunburn on potato tubers growing near the soil surface.

Step 1
Prepare a full-sun garden bed for planting. Apply a 2-inch layer of compost over the entire bed, and one-half pound of 10-10-10 analysis fertilizer to each 10-foot row. Till the compost and fertilizer into the top 6 inches of the bed.
Step 2
Cut large, sprouted seed potatoes into 1- to 2-inch pieces, leaving at least one sprout - and up to three - on each seed piece. Set the seed pieces on a tray with the cut side up, and leave them overnight so the cut sides scab over, which helps prevent rot. Small seed pieces can be left whole.
Step 3
Sow the seed pieces to a 3-inch depth, and space each piece 8 to 12 inches apart in the row. Space the rows 2 to 3 feet apart. Plant each seed piece so the sprout is on top and the cut side, if applicable, on the bottom.
Step 4
Water the bed after planting until the soil is moist to a 6-inch depth. Water once weekly to maintain this moisture level, or twice weekly during extended dry periods.

Step 5
Cover the bed with a 2-inch layer of straw mulch once the potato plants are 5 inches tall. The mulch preserves moisture, inhibits weeds and also prevents sunburn on potato tubers growing near the soil surface.
0
0
成长记
Pommy Mommy
2018年07月10日

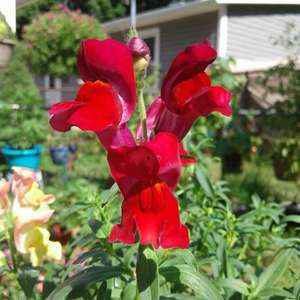
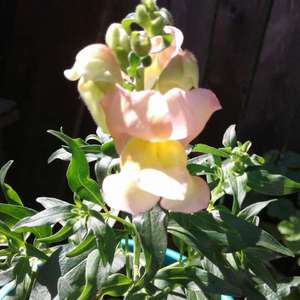
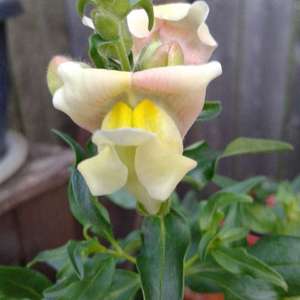
My snapdragons JUST (planted by seed) bloomed but worth the wait! absolutely gorgeous!



0
0
文章
Miss Chen
2018年06月20日

Broccoli (Brassica oleracea var. italica) and cauliflower (Brassica oleracea) grow during the cool season, growing from seed to harvest size in as little as 65 days. Although both plants can survive a freeze, extended periods of cold can slow growth or damage the plants. Waiting to plant until the temperatures are right for the best growth, and providing some protection from extreme cold, keeps the plants healthy and productive.

The Big Freeze
Broccoli and cauliflower can usually survive temperatures as low as 26 degrees Fahrenheit with only minor damage to the leaves. They may survive even lower temperatures if they are acclimated, but usually anything below 26 F will kill the plants if the weather was warmer leading up to the cold snap. Temperatures between 31 and 33 F rarely cause any damage to broccoli or cauliflower, although growth may slow if temperatures remain near or below freezing for an extended period.
A Happy Medium
Cauliflower and broccoli grow best between 65 and 80 F. Broccoli grows well when planted in late winter or early spring for an early summer harvest, or in late summer or fall for a late fall or early winter harvest. Cauliflower is more heat sensitive, so it grows better when planted in mid- to late-summer for a fall harvest. Temperatures above 80 F can cause both broccoli and cauliflower to slow their growth, or they may go to seed prematurely without forming large heads.
Hardening Off
Taking a week to harden off new broccoli or cauliflower transplants in spring makes them better able to survive freezing temperatures. Seedlings started indoors are used to warmer temperatures, so a cold snap in the garden is more likely to damage them if they aren't acclimated. Set the seedlings outside in a protected area, such as on a covered patio, seven days before transplanting. Leave the seedlings outside for only four hours the first day, but gradually increase the time outdoors each day until they stay out all day and night by the final day in the hardening off period. If a hard freeze is expected, bring the seedlings indoors and resume hardening off when the temperatures rise.

Protection Pointers
If your broccoli or cauliflower plants are recently transplanted, or if temperatures below 31 F are expected, you can provide protection to prevent freeze damage or plant death. Planting in a cold frame works, because you can close the glass lid on the frame during freezes and then reopen it when the temperature inside the frame rises above 60 F. For a brief cold snap, place an upturned pot over the plants or mulch around the plants with straw to provide some insulation.

The Big Freeze
Broccoli and cauliflower can usually survive temperatures as low as 26 degrees Fahrenheit with only minor damage to the leaves. They may survive even lower temperatures if they are acclimated, but usually anything below 26 F will kill the plants if the weather was warmer leading up to the cold snap. Temperatures between 31 and 33 F rarely cause any damage to broccoli or cauliflower, although growth may slow if temperatures remain near or below freezing for an extended period.
A Happy Medium
Cauliflower and broccoli grow best between 65 and 80 F. Broccoli grows well when planted in late winter or early spring for an early summer harvest, or in late summer or fall for a late fall or early winter harvest. Cauliflower is more heat sensitive, so it grows better when planted in mid- to late-summer for a fall harvest. Temperatures above 80 F can cause both broccoli and cauliflower to slow their growth, or they may go to seed prematurely without forming large heads.
Hardening Off
Taking a week to harden off new broccoli or cauliflower transplants in spring makes them better able to survive freezing temperatures. Seedlings started indoors are used to warmer temperatures, so a cold snap in the garden is more likely to damage them if they aren't acclimated. Set the seedlings outside in a protected area, such as on a covered patio, seven days before transplanting. Leave the seedlings outside for only four hours the first day, but gradually increase the time outdoors each day until they stay out all day and night by the final day in the hardening off period. If a hard freeze is expected, bring the seedlings indoors and resume hardening off when the temperatures rise.

Protection Pointers
If your broccoli or cauliflower plants are recently transplanted, or if temperatures below 31 F are expected, you can provide protection to prevent freeze damage or plant death. Planting in a cold frame works, because you can close the glass lid on the frame during freezes and then reopen it when the temperature inside the frame rises above 60 F. For a brief cold snap, place an upturned pot over the plants or mulch around the plants with straw to provide some insulation.
0
0
文章
Miss Chen
2018年06月20日

Soybean, lentil and pinto bean seeds grow rapidly, but the time it takes for a bean seed to germinate depends in part on where it sprouts. Germination of a seed in garden soil is measured from the day the seed is planted until just before its first shoot emerges above the soil. Germination outside the soil in a sprouting jar or other container usually is much shorter. Sometimes this is done as part of a science project or to produce edible sprouts.

Soybeans
Soybeans are a good model for a science germination experiment, because they sprout in three to four days in petri dishes, according to the Science Project Lab website. But Michigan State University notes that germination in the soil takes six to 14 days. Cold and excess or inadequate moisture are among the conditions that can slow germination outdoors. Living Gently Quarterly notes that soybean sprouts are becoming more common in cooking. But it warns not to sprout commercial seeds intended for planting, because they are chemically treated.
Lentils
The Sprout People website says it takes two to three days to germinate lentil seeds in sprouters, which are typically lidded containers with holes for air circulation. If growing in the garden, lentil seeds germinate in about 10 days at 68 degrees Fahrenheit, according to the Harvest to Table website. They are hardy annuals and members of the pea family. Sprouting any bean seed involves a process of soaking and regularly rinsing the seeds until they germinate in a sprouter that is kept out of direct sunlight and stored at 70 degrees Fahrenheit. Lentil sprouts can be eaten raw or cooked.

Pinto Beans
In soil, pinto beans germinate in four to eight days, according to the Texas A&M University Extension. But Sprout People says that when germinated in a sprouter, the process only takes 2 to 4 days. Unlike soybean and lentil sprouts, pinto bean sprouts are not edible unless cooked. Sprout People says they add a "delicate sweetness" to soup and that the process of sprouting alleviates some of the gaseousness associated with beans.

Soybeans
Soybeans are a good model for a science germination experiment, because they sprout in three to four days in petri dishes, according to the Science Project Lab website. But Michigan State University notes that germination in the soil takes six to 14 days. Cold and excess or inadequate moisture are among the conditions that can slow germination outdoors. Living Gently Quarterly notes that soybean sprouts are becoming more common in cooking. But it warns not to sprout commercial seeds intended for planting, because they are chemically treated.
Lentils
The Sprout People website says it takes two to three days to germinate lentil seeds in sprouters, which are typically lidded containers with holes for air circulation. If growing in the garden, lentil seeds germinate in about 10 days at 68 degrees Fahrenheit, according to the Harvest to Table website. They are hardy annuals and members of the pea family. Sprouting any bean seed involves a process of soaking and regularly rinsing the seeds until they germinate in a sprouter that is kept out of direct sunlight and stored at 70 degrees Fahrenheit. Lentil sprouts can be eaten raw or cooked.

Pinto Beans
In soil, pinto beans germinate in four to eight days, according to the Texas A&M University Extension. But Sprout People says that when germinated in a sprouter, the process only takes 2 to 4 days. Unlike soybean and lentil sprouts, pinto bean sprouts are not edible unless cooked. Sprout People says they add a "delicate sweetness" to soup and that the process of sprouting alleviates some of the gaseousness associated with beans.
0
0
文章
Miss Chen
2018年06月19日

Ohio has a mild climate, with U.S. hardiness zones of 5a to 6a. Certain micro-climates exist around the state, so growing seasons vary slightly. Plant seed potatoes in Ohio that mature in the time frame for your climate.

Varieties
Early season varieties good for Ohio include superior and norland, which mature in 90 to 100 days and 80 to 90 days respectively. Planting four weeks before your expected frost date allows early harvesting of these potatoes.
Hardiness Zones
The southern part of Ohio warms up a few weeks earlier than the northern areas. You can plant seed potatoes in Ohio as soon as the soil is dry in your area. Select a time when no rainfall is expected. This generally happens in mid-March for southern Ohio and late April for northern Ohio.

Diseases
Potatoes are not without problems and late blight has affected Ohio when spring weather is extremely wet. Control late blight disease by selecting certified seed potatoes, properly drying the potatoes before planting and waiting until the soil is dry. Northern areas of Ohio still yield an abundant harvest even when delaying planting until mid-June.

Varieties
Early season varieties good for Ohio include superior and norland, which mature in 90 to 100 days and 80 to 90 days respectively. Planting four weeks before your expected frost date allows early harvesting of these potatoes.
Hardiness Zones
The southern part of Ohio warms up a few weeks earlier than the northern areas. You can plant seed potatoes in Ohio as soon as the soil is dry in your area. Select a time when no rainfall is expected. This generally happens in mid-March for southern Ohio and late April for northern Ohio.

Diseases
Potatoes are not without problems and late blight has affected Ohio when spring weather is extremely wet. Control late blight disease by selecting certified seed potatoes, properly drying the potatoes before planting and waiting until the soil is dry. Northern areas of Ohio still yield an abundant harvest even when delaying planting until mid-June.
0
0


