文章
Dummer. ゛☀
2017年08月10日

Do Alocasia elephant ears have seeds? They do reproduce through seed but it takes years before you will get the big beautiful leaves. Older plants in good conditions will produce a spathe and spadix that will eventually produce seed pods. Elephant ear flower seeds are only viable a short time, so if you want to plant them, harvest the pods and use them as soon as possible.
Do Alocasia Elephant Ears Have Seeds?
Alocasia odora is also known as elephant ear plant because of its colossally huge leaves and the general shape of the foliage. They are members of the Aroid family, which encompasses plants with some of the most attractive foliage available to gardeners. The glossy, heavily veined leaves are a standout and the main attraction, but occasionally you get lucky and the plant will bloom, producing unique dangling seed pods on elephant ear plant. Elephant ear flower seeds are contained in a hard shelled pod. It takes months for the orange seeds to mature, during which time the pods hang from the plant. They are a rare sight in most gardens, but in warm climates, established plants may develop a spathe and spadix, which house the male and female flowers. Once pollinated, they develop into fruits filled with many little seeds. The seed pods on elephant ear plant must be cracked open to reveal the numerous seeds.
Planting Elephant Ear Flower Seeds
Once the Alocasia elephant ear has seed pods, remove them once the pod has dried and the seeds are mature. Germination is capricious and variable on these plants. Seeds should be removed from the pods and rinsed. Use a humic rich medium with a generous amount of peat. Sow the seeds on the surface of the soil and then lightly dust them with a pinch of medium. Spray the top of the soil with a misting bottle and keep the medium lightly damp but not soggy. Once seedlings appear, which may be as long as 90 days after planting, move the tray to a location with indirect but bright light.
Propagation of Elephant Ear Alocasia rarely produces a flower and subsequent seed pod. Their erratic germination means that even if your elephant ear has seed pods, you are better off starting plants from offsets. The plants send out side shoots at the base of the plant which work well for vegetative production. Simply cut off the side growth and pot them up to establish and grow larger. Once the plant is a year old, transplant to an appropriate area of the garden and enjoy. They can also be grown in containers or indoors. Don’t forget to bring the bulbs or plants indoors in any region where freezing temperatures are expected, as Alocasia plants are not at all winter hardy. Lift in-ground plants and clean off dirt, then store them in a box or paper bag until spring.

Do Alocasia Elephant Ears Have Seeds?
Alocasia odora is also known as elephant ear plant because of its colossally huge leaves and the general shape of the foliage. They are members of the Aroid family, which encompasses plants with some of the most attractive foliage available to gardeners. The glossy, heavily veined leaves are a standout and the main attraction, but occasionally you get lucky and the plant will bloom, producing unique dangling seed pods on elephant ear plant. Elephant ear flower seeds are contained in a hard shelled pod. It takes months for the orange seeds to mature, during which time the pods hang from the plant. They are a rare sight in most gardens, but in warm climates, established plants may develop a spathe and spadix, which house the male and female flowers. Once pollinated, they develop into fruits filled with many little seeds. The seed pods on elephant ear plant must be cracked open to reveal the numerous seeds.

Planting Elephant Ear Flower Seeds
Once the Alocasia elephant ear has seed pods, remove them once the pod has dried and the seeds are mature. Germination is capricious and variable on these plants. Seeds should be removed from the pods and rinsed. Use a humic rich medium with a generous amount of peat. Sow the seeds on the surface of the soil and then lightly dust them with a pinch of medium. Spray the top of the soil with a misting bottle and keep the medium lightly damp but not soggy. Once seedlings appear, which may be as long as 90 days after planting, move the tray to a location with indirect but bright light.

Propagation of Elephant Ear Alocasia rarely produces a flower and subsequent seed pod. Their erratic germination means that even if your elephant ear has seed pods, you are better off starting plants from offsets. The plants send out side shoots at the base of the plant which work well for vegetative production. Simply cut off the side growth and pot them up to establish and grow larger. Once the plant is a year old, transplant to an appropriate area of the garden and enjoy. They can also be grown in containers or indoors. Don’t forget to bring the bulbs or plants indoors in any region where freezing temperatures are expected, as Alocasia plants are not at all winter hardy. Lift in-ground plants and clean off dirt, then store them in a box or paper bag until spring.
0
0
文章
Miss Chen
2017年08月08日


Cacti are angiosperms. Although cacti grow slowly, their life cycles are the same as for any other flowering plant. Cacti reproduce sexually through flower and seed production, or asexually by the fragmentation and rooting of stems.
Germination
Cactus seeds are often distributed by birds, which are attracted to the fruit. Germination occurs in the presence of sufficient water and warm temperatures.
Vegetative Growth
After seed germination it can take several months for the basic barrel shape of the cactus seedling to become visible. It takes five to 10 years for small species to reach flowering size.
Flowering
If there has been sufficient rainfall, flowering occurs in most species during the spring, once temperatures are warm enough.

Pollination
Most cacti are self-sterile, requiring pollen from a different individual plant. Depending on the cactus species, bees, wasps, beetles, butterflies, moths, birds and bats can pollinate cactus flowers.
Fruit Formation
Cactus fruits are seed-filled berries. They form at the base of the flowers and are often brightly colored and sweet to attract birds.
Forced Flowering
In cultivation, cactus plants can sometimes be induced to flower by keeping them in a dark place for up to six weeks and then providing light and water.
0
0
文章
Dummer. ゛☀
2017年08月04日

Sunflowers are such a colorful and whimsical addition to every garden. They’re easy to grow from seed, and make excellent cut flowers.
There are hundreds of different varieties of sunflowers, including perennial varieties that come back every year. Home gardeners most commonly plant annual varieties (which last only one growing season), including both dwarf and tall varieties with multiple branches and dozens of blooms (perfect for cutting). The types of sunflowers grown especially for seed harvesting also fall into the category of annual flowers. You can find sunflowers with flower colors ranging from pale lemon yellow to orange, pink, burgundy, and bright yellow. There are also bi-color and multi-color varieties.
No matter which you choose, let us teach you how to grow sunflowers for weeks of gorgeous flowers.
Where to Plant Sunflowers
Sunflowers grow best in full, bright sun, and in evenly moist, well-drained soil. The amount of space they need depends on which varieties you are growing. Branching types with multiple blooms on one stem need more space horizontally than large single-flowered types. Take care to select a spot to grow taller varieties where they won’t throw too much shade on other shorter, sun-loving plants. The north side of a flower border is almost always a good spot.
When to Plant Sunflowers
Sunflowers are warm-weather plants. You can plant sunflowers outside at the same time you plant peppers, tomatoes, eggplants, zinnias, and other warm-season vegetables and flowers. For a longer sunflower bloom period, plant a row or grouping of sunflowers every two weeks for four to six weeks during the early summer.
How to Prepare the Soil for Planting Sunflowers
Make sure your plants get off to the best start! Prepare new in-ground planting areas with Miracle-Gro® All Purpose Garden Soil, mixing 3 inches of garden soil into the top 6 to 8 inches of native soil. This will feed new plants and help build strong roots, both of which will mean big, beautiful blooms!

How to Plant Sunflowers
While you can start sunflowers from seed indoors, it’s just as easy to grow them from seed outdoors. Plant sunflower seeds directly into the garden when the soil is warm—at least fifty degrees Fahrenheit. Use your thumb to push seeds 1 to 2 inches deep into the soil. Depth and spacing depends on the variety, so read the instructions on the seed package.
How to Water Sunflowers
Water thoroughly at the time of planting and keep the planting area about as moist as a wrung-out sponge (not soggy) while the seeds are sprouting. Most sunflowers are fairly drought-tolerant once established, but will bloom better with regular water. To be on the safe side, water sunflowers well when the top two inches of soil are dry.
How to Feed Sunflowers
While sunflowers are not big feeders, you will get more and better blooms if you make sure they get a steady stream of nutrition. A month after planting, begin feeding sunflowers with Miracle-Gro® Water Soluble All Purpose Plant Food. Make sure to follow the directions on the package.

How to Stake Sunflowers
Whether or not you need to stake your sunflowers depends on how tall they get, the strength of the stems, and the branching pattern. If you’re growing a bunch of sunflowers for cut flowers, you can plant the seeds and then create a latticework of stakes and twine for the plants to grow up through. Create two rows of staggered stakes with 3 feet in between each stake. Run twine around the stakes to create a wide lattice. You can also stake individual plants that are beginning to droop by placing a sturdy stake 3 inches from the plant stem and tying the stem to the stake, loosely, with twine in a couple of places.

How to Avoid Pest Problems with Sunflowers
Squirrels and chipmunks can be a problem when you first plant sunflower seeds, as they love to dig them up and eat them. Shake some ground cayenne pepper on the ground around where you’ve planted the seeds. If that doesn’t deter them, try starting seeds indoors and then planting them outside once they have sprouted. If you’re growing sunflowers for seed, these pests can be a problem near the time of harvest as well. When the outer petals dry up, cover the large flower heads with lightweight cloth tied around the stem.
How to Harvest Sunflower Seeds
Cut the large flower heads off when the back of the large flower disk has turned black and the seed heads are dry. Leave in a cool, dry place for a few days to completely dry out, and then remove the seeds by gently rubbing the flower heads with your thumbs. Keep dried seeds in a breathable paper or cloth bag to prevent mold growth.
How to Grow Sunflowers: Recap
Plant in a sunny location with moist, well-drained soil.
Prepare the existing soil by adding Miracle-Gro® All Purpose Garden Soil.
Sow seeds directly in the garden when the soil warms up in the spring.
Water seeds at the time of planting and regularly throughout the growing season.
Feed sunflowers with Miracle-Gro® Water Soluble All Purpose Plant Food, starting a month after planting.
Stake sunflowers if they have multiple branches or heavy flower heads.
Prevent pests from digging up newly planted seeds and from eating seed heads you hope to harvest.
Harvest flower heads when the back has turned black and the seeds have dried out.
There are hundreds of different varieties of sunflowers, including perennial varieties that come back every year. Home gardeners most commonly plant annual varieties (which last only one growing season), including both dwarf and tall varieties with multiple branches and dozens of blooms (perfect for cutting). The types of sunflowers grown especially for seed harvesting also fall into the category of annual flowers. You can find sunflowers with flower colors ranging from pale lemon yellow to orange, pink, burgundy, and bright yellow. There are also bi-color and multi-color varieties.
No matter which you choose, let us teach you how to grow sunflowers for weeks of gorgeous flowers.

Where to Plant Sunflowers
Sunflowers grow best in full, bright sun, and in evenly moist, well-drained soil. The amount of space they need depends on which varieties you are growing. Branching types with multiple blooms on one stem need more space horizontally than large single-flowered types. Take care to select a spot to grow taller varieties where they won’t throw too much shade on other shorter, sun-loving plants. The north side of a flower border is almost always a good spot.
When to Plant Sunflowers
Sunflowers are warm-weather plants. You can plant sunflowers outside at the same time you plant peppers, tomatoes, eggplants, zinnias, and other warm-season vegetables and flowers. For a longer sunflower bloom period, plant a row or grouping of sunflowers every two weeks for four to six weeks during the early summer.
How to Prepare the Soil for Planting Sunflowers
Make sure your plants get off to the best start! Prepare new in-ground planting areas with Miracle-Gro® All Purpose Garden Soil, mixing 3 inches of garden soil into the top 6 to 8 inches of native soil. This will feed new plants and help build strong roots, both of which will mean big, beautiful blooms!

How to Plant Sunflowers
While you can start sunflowers from seed indoors, it’s just as easy to grow them from seed outdoors. Plant sunflower seeds directly into the garden when the soil is warm—at least fifty degrees Fahrenheit. Use your thumb to push seeds 1 to 2 inches deep into the soil. Depth and spacing depends on the variety, so read the instructions on the seed package.
How to Water Sunflowers
Water thoroughly at the time of planting and keep the planting area about as moist as a wrung-out sponge (not soggy) while the seeds are sprouting. Most sunflowers are fairly drought-tolerant once established, but will bloom better with regular water. To be on the safe side, water sunflowers well when the top two inches of soil are dry.
How to Feed Sunflowers
While sunflowers are not big feeders, you will get more and better blooms if you make sure they get a steady stream of nutrition. A month after planting, begin feeding sunflowers with Miracle-Gro® Water Soluble All Purpose Plant Food. Make sure to follow the directions on the package.

How to Stake Sunflowers
Whether or not you need to stake your sunflowers depends on how tall they get, the strength of the stems, and the branching pattern. If you’re growing a bunch of sunflowers for cut flowers, you can plant the seeds and then create a latticework of stakes and twine for the plants to grow up through. Create two rows of staggered stakes with 3 feet in between each stake. Run twine around the stakes to create a wide lattice. You can also stake individual plants that are beginning to droop by placing a sturdy stake 3 inches from the plant stem and tying the stem to the stake, loosely, with twine in a couple of places.

How to Avoid Pest Problems with Sunflowers
Squirrels and chipmunks can be a problem when you first plant sunflower seeds, as they love to dig them up and eat them. Shake some ground cayenne pepper on the ground around where you’ve planted the seeds. If that doesn’t deter them, try starting seeds indoors and then planting them outside once they have sprouted. If you’re growing sunflowers for seed, these pests can be a problem near the time of harvest as well. When the outer petals dry up, cover the large flower heads with lightweight cloth tied around the stem.
How to Harvest Sunflower Seeds
Cut the large flower heads off when the back of the large flower disk has turned black and the seed heads are dry. Leave in a cool, dry place for a few days to completely dry out, and then remove the seeds by gently rubbing the flower heads with your thumbs. Keep dried seeds in a breathable paper or cloth bag to prevent mold growth.

How to Grow Sunflowers: Recap
Plant in a sunny location with moist, well-drained soil.
Prepare the existing soil by adding Miracle-Gro® All Purpose Garden Soil.
Sow seeds directly in the garden when the soil warms up in the spring.
Water seeds at the time of planting and regularly throughout the growing season.
Feed sunflowers with Miracle-Gro® Water Soluble All Purpose Plant Food, starting a month after planting.
Stake sunflowers if they have multiple branches or heavy flower heads.
Prevent pests from digging up newly planted seeds and from eating seed heads you hope to harvest.
Harvest flower heads when the back has turned black and the seeds have dried out.
2
0
文章
安小宝
2017年05月23日


Square foot gardening is most often used for growing veggies, herbs and greens in a small space. It’s a simple concept that cuts down on gardening chores, saves money, water and seed, and grows healthier plants that are easily harvested when you want. Basically, square foot gardening is the theory that instead of planting in rows, you build a grid of one foot squares, fill with lightweight soil, and manage crop rotation by simply replanting an empty square whenever you harvest. We love this take on square foot gardening (above & below) from ‘Art and Appetite‘.

Benefits of gardening this way?
You can grow a lot more in a much smaller space.
Instead of sowing seeds thickly though out a row, you only need 2-3 seeds per square to grow one plant that doesn’t need the thinning that rows require.
Watering is more direct, therefore you waste less.
Weeds are easy to control, as they are in a controlled space, lightweight soil and easily accessible.
Fertilizing becomes easier, and less is used, again because of the controlled space.
It looks more attractive, and less chaotic than the typical veggie garden.
The plants are healthier due to crop rotation that happens though the natural progression of the squares, and better air circulation.
Having the plants close together allows you to spot and treat pest infestations easily.
You can build and grow a square foot garden right on top of even hard clay soil.
Convinced? Here are the easy steps to share square foot garden success!
Build a bottomless box, 4×4 feet square.
Place the box onto any surface. Since this will be a raised garden technique and the plants grow quickly in a short season, you won’t need more than one foot square of soil per plant. Basically, that means it does not matter what kind of soil is below the box.
Fill the box with a lightweight planting mix. Hardcore square foot gardeners will suggest that a blend of 1/3 compost, 1/3 vermiculite and 1/3 peat is the best mix. However, I have had luck with any good quality planting mix. Do NOT use soil from your yard. It will compact, and not provide a healthy base for your plants
Mark out a one foot square grid system. You can do this with stakes and string, wood slats, or simply decorative stones to mark the “lines”. It is simply a guide for you to know where to plant.

Here is a view of how ‘Our Daily Legacy‘ marked out their grid. Great tips there as well!

Plant 2-3 seeds or one transplant into each grid space for larger plants, up to 6 plants or more each grid space for smaller plants, like leaf lettuce.. Remember to plant the taller plants on the north or east side of the box so they won’t shade all the shorter plants. Here is a chart from ‘Atlantis Hydroponics‘ that shows an idea of how many can fit into each grid space, based on what you are planting.

Water gently, and fertilize as you would any vegetables or herbs, according to their needs.
When plants are ready for harvest, replant into that grid space. However, always replant a different type of plant than what was there before. This creates a natural “Crop rotation” and helps prevent disease. ‘It’s on the Tip of My Tongue‘ created this 4′ x 10’ box with a planting diagram of what they planted where.

Enjoy fresh vegetables and herbs! A couple of things to note…
You can make a larger box than 4×4 feet, but make sure it is in one foot increments, and no deeper than 4 feet to make care of the plants easier. 4×8 and 4×12 are common.
Use a material to build the box that is safe to grow edibles in.
Do not walk in your square foot garden, as this will compact the soil, preventing air and water from freely getting to the roots. This is one of the keys of square foot gardening success!
You can plant pretty things in here too! Especially blooming companion plants, like marigolds. But really, sky is the limit, even cutting flowers can be grown in a square foot garden!
This garden is from ‘Jungle Taming‘, and shows decorative plants mixed with herbs and veggies in a 4×4 box.

That’s all there is to it! Have you grown a square foot garden? Share your experience in comments!
1
1
文章
Hande Salcan
2017年05月23日


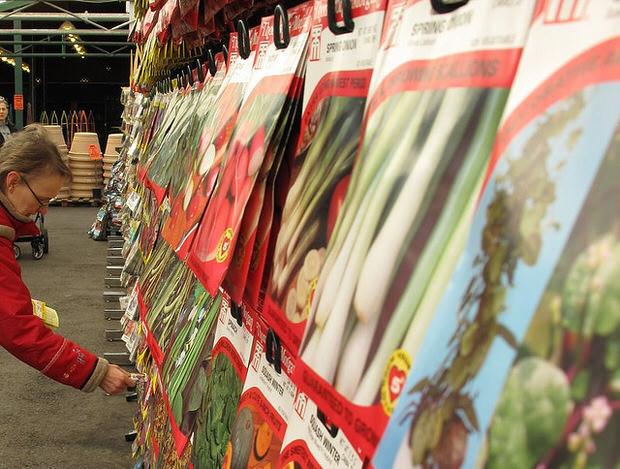
One of the hardest decisions a new gardener must make is where to buy their garden seeds and supplies.
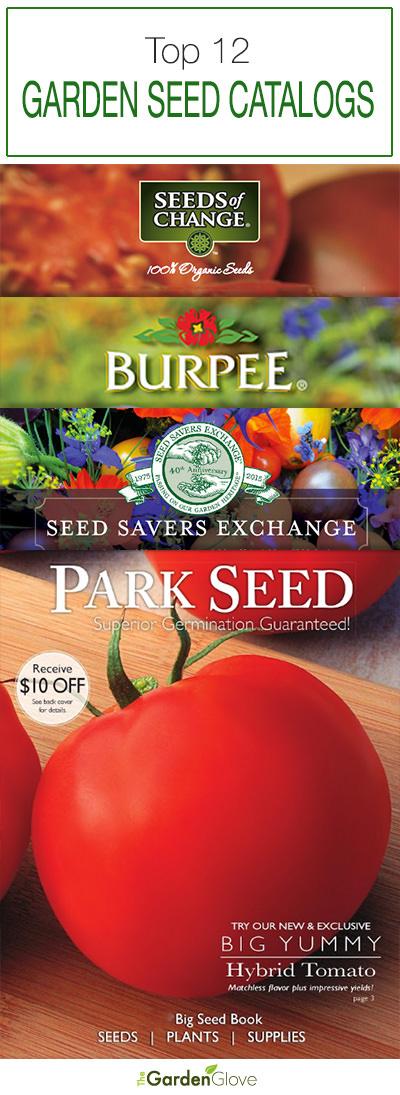
Here at The Garden Glove, we have several favorite seed catalogs and suppliers, and we update this list every January. This list has been updated for 2017. Here is some info on our top picks that we use ourselves, and our experience with them, along with their website information. Log onto their websites and request their catalogs today to have seeds in time for spring planting! Or order online like I do… And check out our favorite choices for buying live plants online at the end!
Update: Some companies, in order to save on waste, no longer print paper catalogs… Their catalogs are online only. While I do love curling up with a cup a tea and a stack of catalogs, consider doing the same with a tablet. I encourage companies to save all the trees they can, and besides… you get faster service with online ordering anyway!
#1
Park Seed
Park Seed always has a great selection of both flower and vegetable seeds, and some great herbs as well. Prices are affordable, and seed packets have plenty of seeds. Seed is always fresh, and we get good to excellent germination rates from them. Shipping is fast, usually just a couple of days from order to in my mailbox! Highly recommended. They also offer some live plants as well.
#2
Burpee Seeds
Burpee has always had one of the most colorful catalogs, and a wide selection of seeds. They are especially good at their vegetable selections, so all you veggie gardeners, take note! Their new varieties are the ones to beat each year!
#3
Thompson and Morgan
Thompson and Morgan is an English seed supplier, but the ultimate in unusual seeds for the serious gardener. If gardening is your passion, you need this catalog.
#4
Johnnys Selected Seeds
As recommended by a reader, this company needs to be added to our list! Not only do they have an extensive seed catalog, they have lots of tips and resources there as well. Johnny has a longstanding reputation as a quality company in the gardening community! Oh, and it’s an employee owned company!
#5
Pinetree Garden Seeds
Pinetree Garden Seeds was one of the first seed companies I ever used. They specialize in smaller packets for the average home gardener, at smaller prices. Most of us will never need the hundreds of seeds in the average seed packet, so why pay for it? They have a good selection, fast shipping and good customer service.
#6
Renee’s Garden Seeds
Renees Garden has grown into one of the most trusted suppliers of seeds for organic and heirloom varieties… So if you crave a little history with your salad, this is the spot for you!
#7
Select Seeds
If you grow flowers and want antique varieties your grandmother grew, this is the place. I love the idea of nostalgia in the garden…so did Thomas Jefferson, one of the most eminent gardeners in our country’s history.
#8
Seed Savers Exchange
Seed savers is a non profit company that is a wonderful source of information on heirloom and open pollinated seed, as well as one of the top sources for such seeds. Not only does the free catalog list all their seeds, their sites educates us on why it is important to save heirloom varieties, and even has an online garden planner that’s got a 30 day free trial. (No, you don’t have to give your credit card!) This is a time honored company and trusted company worth looking into if you wish to preserve our heritage plants!
#9
Seeds of Change
Going organic in the New Year? Seeds of Change is a catalog you need for your veggie garden. Great selection of 100% certified organic seeds.
#10
Cooks Garden
Are you a gourmet cook, or just want to be? Cooks Garden has veggie varieties that are difficult to find on your garden center rack… amazing in flavor and color… Beautiful catalog!
#11
Nichols Garden Nursery
This is a family owned business that has a stellar reputation for quality and customer service. They do not sell any seed that has been genetically modified, and they specialize in fine and rare seeds, herbs and goods for the gardener cook. Love their amazing selection!
#12
Bountiful Gardens
We wanted to include this selection this year because this company is a product of Ecology Action, a not for profit that teaches sustainable agriculture to end world hunger… Their catalog is full of great growing tips, and all their seed is heirloom, non GMO, and certified organic. To quote their website “It doesn’t take much to get started, no gizmos or expensive equipment. If you have some soil, all you need is simple tools, seeds, and the information to use them.”
Order some catalogs today, or visit their online catalogs for faster service, and start dreaming of your spring garden!
Plants
If you want to order top quality, affordable perennials and shrubs, I highly recommend Bluestone Perennials. I have ordered from them again and again, and never been disappointed. Check their internet specials often!
White Flower Farms has top of the line plants for decent prices, and partners with the like of Family Circle and BHG.
If you are looking for the latest varieties or unique plants, Wayside Gardens is the place… can be a little pricey, but thats because they offer varieties and quality seldom found online.
2
2
文章
Hande Salcan
2017年05月23日


When the end of the season nears, serious gardeners should think about saving seeds from their own plants, to prepare for next season’s seed starting. Why save your own seed?
Saving your own seed is a budget friendly way to replant next year, after all, you pay for the seed or plant once, and you can keep saving the seed year after year!
Saving seed protects biodiversity. In other words, we save seed and protect those varieties from being lost to the generations of hybridizing. So many plants our great grandparents grew simply no longer exist… and that’s as tragic a loss as extinct animals.
It allows you to grow plants that do well in your garden, and over time, those seeds adapt to your growing conditions. Basically, you are growing “The Johnsons special corn seed”, and it would be true! After a few years, your seed has adapted to grow better in your garden then anywhere else on earth…and that is an amazing thing.
You are guaranteed not to have seed that’s been treated in any way. After all, you are your own seed company!
You can trade seed with friends, or participate in a seed lending program like some libraries are now sponsoring. Find out more about seed lending from the Washington state seed lending “library”. Many cities have these now. Imagine the possibilities. Search for one in your area.
It’s fun and educational. And it just makes you feel self-sufficient, doesn’t it?
Do remember, hybridized plants seeds’ will revert back to their parent plant. Look for open pollinated plants to grow true from seed. You can find more information on that at Organic Gardening. (Also a good beginners guide!)
Let’s start with the basics. The Farmer’s Almanac has a tutorial on beginning seed saving for vegetables. Start here, and get a feel for how easy it really is!
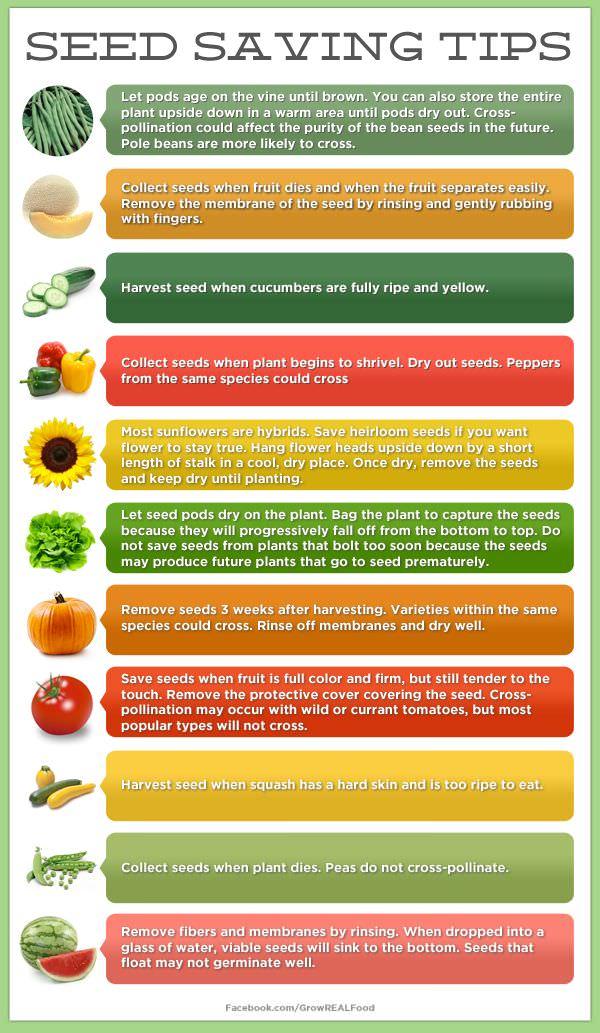
Now that you have the basics down, ‘Grow Real Food’ has a chart of seed saving tips that is really helpful, and gives you specific information plant by plant. This would be great to print out and include in your gardening journal!
‘Tipnut’ has a good tutorial on saving tomato seeds, and includes a tip on getting heirloom varieties from a farmers market… That way, you know how they look and taste, and also that they grow well in your area. Then you can harvest seed directly from your farmers market tomato!
‘Weekend Gardener’ has a primer on saving flower seeds from annuals, for those of you who just can’t let those petunias go!

Now that you have your seeds, you need a way to store them! ‘Erin Vale Designs’ shows us how to make these DIY seed packets from scrapbook paper. I love this because you could choose any color or design to match your personality. These also would make lovely place cards for a garden party! Be sure to scroll to the bottom and click on the download buttons to find the designs for the packet.

If you just want to print out packets, ‘The Prudent Homemaker’ has this free pdf for printing these really nice seed packets… Great for gift giving, and gives space to write information on the variety, date, etc…

Don’t like the idea of packets? Found this idea on Cottage in the Oaks. Paint the tops of old spice jars with chalkboard paint! That way, each year they can be reused for different seeds!

1
2
文章
Hande Salcan
2017年05月23日


It can be easy and inexpensive to start garden seeds indoors for spring planting. Here at The Garden Glove, we use several methods.
Method #1 – Purchase an inexpensive dome style seed starter from your local garden center or discount store. These usually sell for less than $10, and contain everything except the seeds to get you growing, including a humidity dome to keep in heat, and soil or soil less cubes. The only downside to these is that the growing blocks are usually pretty small, so if you are going to plant fast growing annuals such as sunflowers, morning glories or squash, you might want to wait to just two weeks before last frost. Otherwise, you will have to transplant your seedlings into larger containers as they outgrow the seed dome.
This method works very well for growing perennials, since they are slower growing than annuals as a rule.
Make sure the growing medium is moist, place the seeds at the depth recommended by the packet, and place the dome on. You will see moisture condense inside the dome. This is great for starting out, as the heat and moisture is trapped in. However, once seedlings start to appear, you MUST remove the dome to prevent “damping off” a fungal disease that will kill the seedlings. Add water as necessary to keep the soil moist, but not wet.

Method #2 – The second method is the most economical one. This is where we plant seed into reusable or recycled containers. These containers must have drainage, and be able to be moved easily. Tupperware, egg cartons or pots made from recycled newspaper are several popular ideas. Placed on a tray, such as an old cookie sheet- they make great planting flats, if not too terribly attractive. It helps when using this method to enclose the entire tray in a clear plastic bag until seedlings appear. This does the same job as the $10 dome, by keeping in heat and moisture.
Hee is a tutorial from Hobby Room Diaries on making newspaper pots!

Method #3 – This is my preferred method, and one I just started using two years ago. I picked up a portable greenhouse. It has several metal shelves for seedling flats covered by a poly “tent” to keep in heat and moisture. This makes it very easy for me to move the entire set up outdoors for daylight, and the tent keeps the heat in, even when it hovers near freezing outside. I can grow several hundred seedlings in this setup. I caution you against leaving it outdoors during windy conditions, however. Also keep in mind during sunny days it can heat up inside the greenhouse quite quickly, so make sure you tie up one side and occasionally monitor the temps in your greenhouse. When the weather is warm enough, remove the poly tenting entirely.

Once the seedlings are up, they must have very bright, though not direct light. Using a windowsill during bad weather is acceptable, but to grow healthy and strong, seedlings should be placed in either artificial light, or on a protected porch for much of the day. Make sure you bring them in at night, and don’t leave them out on frosty weather.
You can create an artificial light system easily with a cheap shop light from the home improvement store, and a both a warm and cool 40 watt fluorescent tube. It does not have to be one of the more expensive plant growing tubes. Hang the lights from chains off a scrap 2×4 stand. Keep the lights very close to the seedlings, and leave on for at least 12 hours a day.
Starting garden seeds indoors will save you money and allow you to grow plant varieties in your garden that are special and unusual. It’s easy, so try starting your seeds indoors today!
2
0
文章
Andy
2017年05月22日

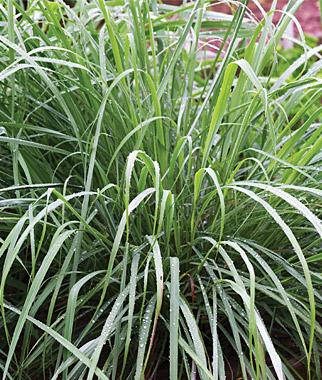
Learn how to grow lemongrass from seed in this short tutorial. Growing lemongrass from seed is easy and requires little to no care, once established.
Lemongrass (Cymbopogon citratus) grows wild in wet grasslands and open forests throughout Southeast Asia, where it is widely used as a culinary herb and medicine. Lemon grass grows up to a height of 1 – 5 meters and have mounding growth habit. Growing lemongrass from seeds is easy and requires little to no care, once established. However, the plants must be kept in warm and humid conditions in the first few weeks after germination.
How to Grow Lemongrass from SeedsFill a seed tray with a moistened mixture of equal parts compost, cocopeat or coconut fiber fine and abrasive. Smooth the surface and compress it 1/2 to 1 centimeter of space that remains between the ground and the top of the tray.Sow lemongrass seeds 1 inches apart and 1/4 inches deep. Squeeze the soil mixture over the tops of the seeds.Mist the lemon grass seeds with water from a spray bottle.
Spray on the soil surface until it feels moderately moist.Stretch plastic wrap over the seed tray, and seal the edges. Set the tray on a windowsill receiving good light.Remove the plastic wrap once a week to water the lemongrass seeds. Mist the surface of soil until the top 1/2 to 1 inch is damp.Look for germination in about 10 – 30 days. Remove the plastic wrap once the lemongrass seeds grow up to 1 inch in height.Tips for Growing Lemongrass from seedsMist lemongrass periodically as it develops to maintain adequate moisture and humidity around the plants.Lemongrass is hardy in USDA Zones 10 to 12 and can be grown anytime. But in cooler season, best time for growing lemongrass from seeds is when temperature start to stay around 70 F.Growing lemongrass from cuttings is easier than growing lemongrass from seeds.
0
0
成长记
Lauren
2017年05月08日

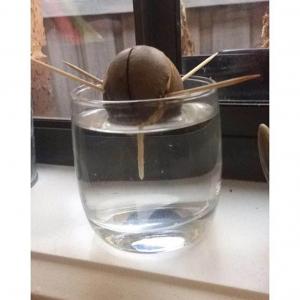
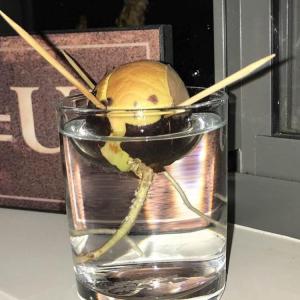
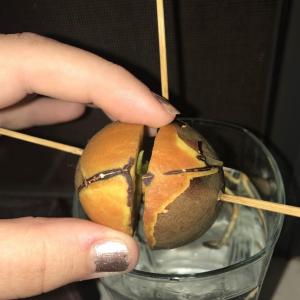
10 weeks of growth on my Avo seed! Its almosy ready to stem!#Avocado


1
0
FieryFlame:@Lauren thanks 😁😁
Lauren:@FieryFlame I literally just leave it alone! It sits in my windowsill where it gets some light and heat, and when I remember I top up the water in the glass to make sure the bottom is always submerged! Make sure you dry the seed out for a few days before putting it in the water and that the top half is out of the water!
FieryFlame:How did you do it? I have never got any success yet, all ended rotten
lrgarden:cool
文章
Andrea
2017年03月27日


Plant potatoes in your home garden and grow one of the most popular vegetables eaten today. Each American eats about 30 pounds of potatoes a year.
To begin growing potatoes, buy certified seed potatoes at nurseries or garden centers. The ones in supermarkets have usually been treated with growth retardants.
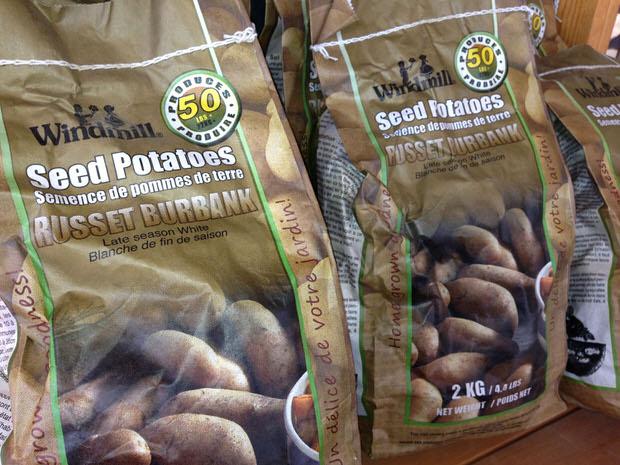

Ten to 14 days before planting, place seed potatoes in a warm area so they begin sprouting. Then, a day or two before planting, use a sharp knife to cut the sprouts, or eyes, into pieces. Each piece should contain 2 or 3 eyes. The bigger the piece, the more food the young potato plant will have to start growing.
About a week or two before the last frost date in your area you can plant the potatoes. Select a site that receives full sun.
Dig up the soil so that it’s loose and drains moisture well. Make rows about two and a half to three feet apart. Plant the potato pieces every 15 inches with the cut side down.
Potatoes are susceptible to frost so if they should be growing when frost conditions are imminent cover then with straw or a blanket or other light covering.
As the plants grow, mound additional soil around the plants every week or two. Continue to add soil or mulch or black plastic around the plants throughout the growing season. The potatoes should not be exposed to sunlight or they will obtain a green coloring which is toxic.
Water well throughout the summer. The most critical time is when the plants are flowering and for a short time afterward as that is the time when they are producing the young potatoes. Water in the morning so that the plants dry before nightfall. Potatoes are very susceptible to fungal diseases.
Fertilize every two to four weeks with a good root crop fertilizer.
Potatoes don’t have many pests but the most common one is the potato beetle which can be controlled with vigilance.
When foliage turns yellow and dies back, discontinue watering. The young potatoes will now mature. Harvest follows in about two weeks. But harvesting can occur at any stage of growth for small baby potatoes.
For winter storage let the potatoes dry either outside or in a dry, cool area for a few days.
1
0
成长记
riverrun
2017年03月23日

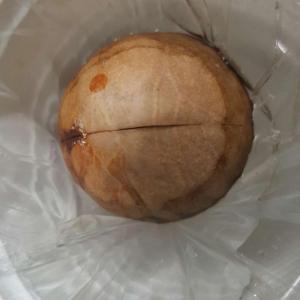
Avocado seed is opening up well but i think it got some mold problem, not sure what's happening 🙁

1
0
fyfywong:Wipe out the mould with some meds, perhaps?


