成长记
Laura Horak
2017年08月23日

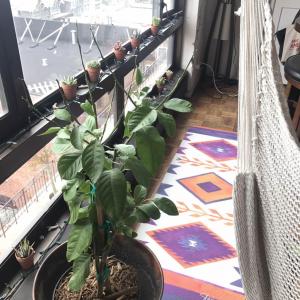
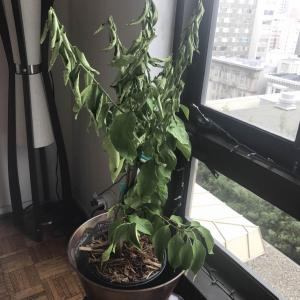
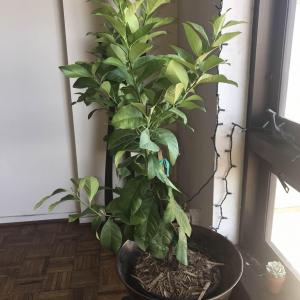
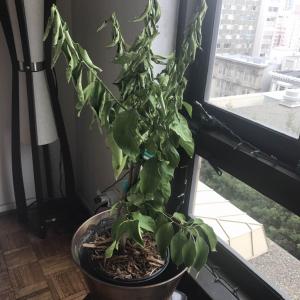
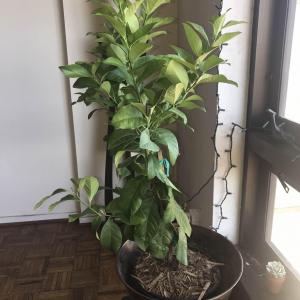
Brand new Eureka Dwarf Lemon Tree (3 yr from Four Winds Growers) was left unwatered for 2 weeks by my plant sitter and I'm DEVASTATED. The top leaves dried up and I pruned it but not sure what else to do... Live in SF with decent sun exposure.
Help! 🙏🏼
#Citrusmitis #Citrusmeyeri #lemon
Pictures:
1. current state: pruned & 1,000 ml water
2. post-plant sitter: minus 2 wks water
3. original condition: prior to leaving
@GFinger
How do I revive it?
How much water should I give it & how often?
Help! 🙏🏼
#Citrusmitis #Citrusmeyeri #lemon
Pictures:
1. current state: pruned & 1,000 ml water
2. post-plant sitter: minus 2 wks water
3. original condition: prior to leaving
@GFinger
How do I revive it?
How much water should I give it & how often?


0
0
求助
Laura Horak
2017年08月23日

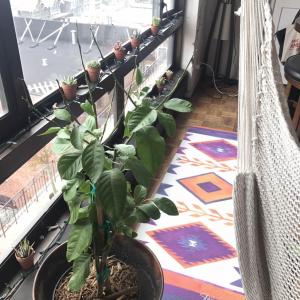
Brand new Eureka Dwarf Lemon Tree (3 yr from Four Winds Growers) was left unwatered for 2 weeks by my plant sitter and I'm DEVASTATED. The top leaves dried up and I pruned it but not sure what else to do... Live in SF with decent sun exposure.
Help! 🙏🏼
#Citrusmitis #Citrusmeyeri #lemon
Pictures:
1. current state: pruned & 1,000 ml water
2. post-plant sitter: minus 2 wks water
3. original condition: prior to leaving
How do I revive it?
How much water should I give it & how often?
Help! 🙏🏼
#Citrusmitis #Citrusmeyeri #lemon
Pictures:
1. current state: pruned & 1,000 ml water
2. post-plant sitter: minus 2 wks water
3. original condition: prior to leaving
How do I revive it?
How much water should I give it & how often?


0
0
成长记
Ueca
2017年08月23日

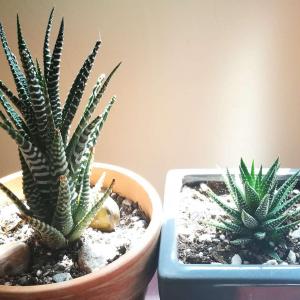
If you look closely at the one in the right, you will see it is sprouting a juvenile plant.

2
0
文章
Dummer. ゛☀
2017年08月23日

The vast array of sizes, textures, colors and shapes of cacti and succulents provides nearly endless diversity for the succulent collector. Moon cactus plants are known as Gymnocalycium mihanovichii or Hibotan cactus. Strangely, the plant is something of a mutant and lacks the ability to produce chlorophyll, which means they must be grafted onto a rootstock with that ability. Instructions for how to grow a moon cactus are similar to most succulents, but they are short lived for the family even with good care.

Moon Cactus Info
Hibotan cacti are native to desert habitats in various parts of South America. There are over 80 species found in Argentina, Paraguay, Brazil and Bolivia. They are a colorful group of succulents that lack the necessary chlorophyll to produce plant sugars through photosynthesis. For this reason, the plants are grafted onto a species that produces plentiful chlorophyll upon which the moon cactus can sustain itself for several years. Moon cactus plants come in vibrant bright colors of hot pink, brilliant orange and even an almost neon yellow. They are commonly sold as gift plants and make lovely window box or southern exposure houseplants. These are small plants, generally only ½ inch across, although there are cultivars that get up to 8 inches in diameter.

Propagation of Moon Cactus
The moon cactus is usually sold already grafted in a process that removes the bottom of the Hibotan and the top of the rootstock cactus. The two halves are set together at the cut ends and soon heal together. The life of the moon cactus can be extended by re-grafting it onto a fresh rootstock. It can also be grown from seed, but this takes at least a year for a recognizable specimen. Sow the seeds over a dry succulent mixture and then cover with a sprinkle of fine grit. Moisten the flat and move it to a warm location for germination. Once the seedlings are large enough to remove, re-plant them in groups for best effect. More commonly, moon cactus propagation is achieved by removing the offsets, which are smaller versions of the parent plant growing from the base of the rootstock. These divide away easily and root readily in a cactus potting soil.

How to Grow a Moon Cactus
Purchased plants will come with moon cactus info that relates to the plants care and cultivation needs. In the event that it doesn’t, care of moon cactus is similar to any succulent or cactus species. Hibotan plants prefer temperatures on the warm side but need a minimum of 48 F. (9 C.) to survive. Wild plants grow in the shelter of taller specimens which shade them from the scorching sun, so indoor plants should be partially shielded from bright sunlight by slatted blinds during the brightest part of the day. Use unglazed shallow pots with numerous drainage holes to prevent standing water at the root zone. Water deeply and then allow the soil to completely dry to the base of the pot before reapplying moisture. Suspend watering in the winter months and repot in spring to reintroduce nutrient dense soil. The moon cactus prefers to have a crowded home, which means you can repot in the same pot for several years. In rare cases, and when care of moon cactus is optimum, you may be rewarded with small red to pink flowers in late spring to early summer.

Moon Cactus Info
Hibotan cacti are native to desert habitats in various parts of South America. There are over 80 species found in Argentina, Paraguay, Brazil and Bolivia. They are a colorful group of succulents that lack the necessary chlorophyll to produce plant sugars through photosynthesis. For this reason, the plants are grafted onto a species that produces plentiful chlorophyll upon which the moon cactus can sustain itself for several years. Moon cactus plants come in vibrant bright colors of hot pink, brilliant orange and even an almost neon yellow. They are commonly sold as gift plants and make lovely window box or southern exposure houseplants. These are small plants, generally only ½ inch across, although there are cultivars that get up to 8 inches in diameter.

Propagation of Moon Cactus
The moon cactus is usually sold already grafted in a process that removes the bottom of the Hibotan and the top of the rootstock cactus. The two halves are set together at the cut ends and soon heal together. The life of the moon cactus can be extended by re-grafting it onto a fresh rootstock. It can also be grown from seed, but this takes at least a year for a recognizable specimen. Sow the seeds over a dry succulent mixture and then cover with a sprinkle of fine grit. Moisten the flat and move it to a warm location for germination. Once the seedlings are large enough to remove, re-plant them in groups for best effect. More commonly, moon cactus propagation is achieved by removing the offsets, which are smaller versions of the parent plant growing from the base of the rootstock. These divide away easily and root readily in a cactus potting soil.

How to Grow a Moon Cactus
Purchased plants will come with moon cactus info that relates to the plants care and cultivation needs. In the event that it doesn’t, care of moon cactus is similar to any succulent or cactus species. Hibotan plants prefer temperatures on the warm side but need a minimum of 48 F. (9 C.) to survive. Wild plants grow in the shelter of taller specimens which shade them from the scorching sun, so indoor plants should be partially shielded from bright sunlight by slatted blinds during the brightest part of the day. Use unglazed shallow pots with numerous drainage holes to prevent standing water at the root zone. Water deeply and then allow the soil to completely dry to the base of the pot before reapplying moisture. Suspend watering in the winter months and repot in spring to reintroduce nutrient dense soil. The moon cactus prefers to have a crowded home, which means you can repot in the same pot for several years. In rare cases, and when care of moon cactus is optimum, you may be rewarded with small red to pink flowers in late spring to early summer.
2
2
文章
Dummer. ゛☀
2017年08月23日

What’s in a name? In the case of brain cactus, a fascinating plant, albeit with a very descriptive name. One of the many species of Mammillaria, Cristata is the form known as brain cactus. It is an easy to grow cactus which often produces lovely little blooms and makes a great houseplant or outdoor specimen in warmer climates. Read on for some Cristata information along with care and growing tips.

What is Brain Cactus?
Mammillaria elongata ‘Cristata’ is also colorfully named the brain cactus due to its convoluted and sinuous growth. One of the more bizarre pieces of Cristata information is how the shape occurs. The form is a result of damage to the plant when it is young. The cells at the injury site go crazy and multiply at a far faster rate than normal. This causes the twisted nature of the pads. Brain cactus is a common houseplant and in cultivation, this “damage” is manually manipulated to create the fan-like growth. The brain cactus is generally a small plant, only achieving 6 inches (15.24 cm.) in height. They are chubby little guys with waistband widths of 12 inches across (31 cm.). In the wild of Central Mexico, they occur in rocky outcroppings and between crevasses. Over time, they develop into a column of stems and small offsets. The spines are in closely gathered areoles and consist of several sizes, with the finest spines almost hair-like. Plants are green but the hairy spines give it a grayish case.

How to Grow a Brain Cactus
These plants make fine indoor plants but can only thrive outside in United States Department of Agriculture zones 10 and 11. Since they are small, try growing a brain cactus in a succulent dish with a mixture of forms and textures. You may expect blooms any time over the course of the summer which will brighten the container and add even more appeal. You may think you know all about succulent care but you don’t know how to grow a brain cactus. Most cactus are sensitive to overwatering and poor drainage, but brain cactus pads will actually trap moisture in the folds and crevasses. This can be bad in cultivation where gnats are attracted, and mold and mildew issues can instill rot and kill the plant. It is best to water from the base of the container to prevent any moisture from collecting on the body of brain cactus. If you wish to propagate the plant, there are some easy methods. Use woody stem cuttings and allow the cut end to callus over for a week. Then insert the cut end into soilless potting medium, such as lightly moistened sand. The other way is to divide the pups away from the parent plant with a clean, sterile knife. Each should also be allowed to callus and then planted into cactus mixture. Growing a brain cactus from pups results in quicker establishment and faster blooms.

Cristata Brain Cactus Care
As a succulent from arid regions, brain cactus are most sensitive to moisture. They need to be kept in a dry place with little humidity. Excess humidity can do as much damage to the plant as too much water. Consider that the region from which they hail is dry most of the year and then characterized by a short drenching rainy season. The plants then do most of their growth and flower after the rain followed by a fairly slow growth rate, almost in hibernation, until the next rainy season. Place the container in a partially sunny location where the brightest noon day rays can’t burn the plant. Allow the surface of the soil to dry to the touch before watering. In winter, water half the amount. In spring, feed with a dilution of cactus food.

What is Brain Cactus?
Mammillaria elongata ‘Cristata’ is also colorfully named the brain cactus due to its convoluted and sinuous growth. One of the more bizarre pieces of Cristata information is how the shape occurs. The form is a result of damage to the plant when it is young. The cells at the injury site go crazy and multiply at a far faster rate than normal. This causes the twisted nature of the pads. Brain cactus is a common houseplant and in cultivation, this “damage” is manually manipulated to create the fan-like growth. The brain cactus is generally a small plant, only achieving 6 inches (15.24 cm.) in height. They are chubby little guys with waistband widths of 12 inches across (31 cm.). In the wild of Central Mexico, they occur in rocky outcroppings and between crevasses. Over time, they develop into a column of stems and small offsets. The spines are in closely gathered areoles and consist of several sizes, with the finest spines almost hair-like. Plants are green but the hairy spines give it a grayish case.

How to Grow a Brain Cactus
These plants make fine indoor plants but can only thrive outside in United States Department of Agriculture zones 10 and 11. Since they are small, try growing a brain cactus in a succulent dish with a mixture of forms and textures. You may expect blooms any time over the course of the summer which will brighten the container and add even more appeal. You may think you know all about succulent care but you don’t know how to grow a brain cactus. Most cactus are sensitive to overwatering and poor drainage, but brain cactus pads will actually trap moisture in the folds and crevasses. This can be bad in cultivation where gnats are attracted, and mold and mildew issues can instill rot and kill the plant. It is best to water from the base of the container to prevent any moisture from collecting on the body of brain cactus. If you wish to propagate the plant, there are some easy methods. Use woody stem cuttings and allow the cut end to callus over for a week. Then insert the cut end into soilless potting medium, such as lightly moistened sand. The other way is to divide the pups away from the parent plant with a clean, sterile knife. Each should also be allowed to callus and then planted into cactus mixture. Growing a brain cactus from pups results in quicker establishment and faster blooms.

Cristata Brain Cactus Care
As a succulent from arid regions, brain cactus are most sensitive to moisture. They need to be kept in a dry place with little humidity. Excess humidity can do as much damage to the plant as too much water. Consider that the region from which they hail is dry most of the year and then characterized by a short drenching rainy season. The plants then do most of their growth and flower after the rain followed by a fairly slow growth rate, almost in hibernation, until the next rainy season. Place the container in a partially sunny location where the brightest noon day rays can’t burn the plant. Allow the surface of the soil to dry to the touch before watering. In winter, water half the amount. In spring, feed with a dilution of cactus food.
0
0
文章
Dummer. ゛☀
2017年08月23日

It is always hard to find durable plants that favor punishing conditions in sandy or rocky soils. Lewisia is a gorgeous little plant perfect for such areas. What is Lewisia? It is a member of the Portulaca family, known for the attractive fleshy green leaves and ease of care common to members of this group. Lewisia bitterroot plants (Lewisia rediviva) are a favorite in my garden. With all the other garden chores required for a healthy garden, you can rest with Lewisia care. The succulents fend for themselves and bring astonishingly lovely flowers in late spring through early summer.

What is Lewisia?
Lewisia is hardy in USDA zones 3 to 8. There are several species available and this native of North America performs well in alpine gardens, rockeries, planters or even in along a gravel path. Lewisia bitterroot plants are herbs with medicinal uses and a name straight from history after Meriwether Lewis, the famed explorer. An interesting bit of Lewisia plant info includes its status as the Montana state flower. Its taproot was also used as a food by the Flathead Indians. They are found in nature in pine forests, rocky mesas and gravel hillsides.

Lewisia Plant Info
This low profiled plant has a moderate growth rate and perennial status in all but the coldest and hottest zones. Some forms are deciduous and prefer bright sunlight while the evergreen varieties can thrive in partial sun. The foliage forms a rosette that rarely gets taller than 3 inches with a bloom balanced on a slender stalk that grows up to 12 inches high. The thick leaves have a waxy coating that helps the plant conserve moisture. Flowers are comprised of up to nine petals, some of which have an almost feathered appearance. Blooms come in a range of hues, from yellow, white and magenta to salmon and brilliant pink.

How to Grow Lewisia
Lewisia bitterroot plants produce offsets, which are the easiest way to propagate this interesting little succulent. Simply divide them from the parent plant and pot them up to grow a good taproot and fleshy feeder roots. You can also learn how to grow Lewisia from seed. The tiny plants take a couple of seasons to form a rosette but establish easily when sown in a sandy potting mixture. Once the plants are placed in a garden situation, provide them with moderate water, excellent drainage and a minimum of nutrients. It couldn’t be simpler to grow Lewisia bitterroot plants. The primary thing to remember is to avoid excessively fertile soil and compacted or clay situations.

Lewisia Care
I like to take off the spent flowers at the rosette so the lovely foliar arrangement can be enjoyed after bloom time. Watch for slug and snail damage and avoid overwatering as this can promote rot. The plant is not susceptible to many insect or disease problems. Provided you don’t give it too much water and it doesn’t freeze too deeply in winter, this garden gem will be with you for a long time. Enjoy the dried flowers with their nut brown little capsules of seeds at the end of the season.

What is Lewisia?
Lewisia is hardy in USDA zones 3 to 8. There are several species available and this native of North America performs well in alpine gardens, rockeries, planters or even in along a gravel path. Lewisia bitterroot plants are herbs with medicinal uses and a name straight from history after Meriwether Lewis, the famed explorer. An interesting bit of Lewisia plant info includes its status as the Montana state flower. Its taproot was also used as a food by the Flathead Indians. They are found in nature in pine forests, rocky mesas and gravel hillsides.

Lewisia Plant Info
This low profiled plant has a moderate growth rate and perennial status in all but the coldest and hottest zones. Some forms are deciduous and prefer bright sunlight while the evergreen varieties can thrive in partial sun. The foliage forms a rosette that rarely gets taller than 3 inches with a bloom balanced on a slender stalk that grows up to 12 inches high. The thick leaves have a waxy coating that helps the plant conserve moisture. Flowers are comprised of up to nine petals, some of which have an almost feathered appearance. Blooms come in a range of hues, from yellow, white and magenta to salmon and brilliant pink.

How to Grow Lewisia
Lewisia bitterroot plants produce offsets, which are the easiest way to propagate this interesting little succulent. Simply divide them from the parent plant and pot them up to grow a good taproot and fleshy feeder roots. You can also learn how to grow Lewisia from seed. The tiny plants take a couple of seasons to form a rosette but establish easily when sown in a sandy potting mixture. Once the plants are placed in a garden situation, provide them with moderate water, excellent drainage and a minimum of nutrients. It couldn’t be simpler to grow Lewisia bitterroot plants. The primary thing to remember is to avoid excessively fertile soil and compacted or clay situations.

Lewisia Care
I like to take off the spent flowers at the rosette so the lovely foliar arrangement can be enjoyed after bloom time. Watch for slug and snail damage and avoid overwatering as this can promote rot. The plant is not susceptible to many insect or disease problems. Provided you don’t give it too much water and it doesn’t freeze too deeply in winter, this garden gem will be with you for a long time. Enjoy the dried flowers with their nut brown little capsules of seeds at the end of the season.
0
0
文章
Dummer. ゛☀
2017年08月23日

What is a key lime pie plant? These South African natives have plump, fan-shaped leaves edged with crinkles that take on a reddish tint in bright light. Key lime pie plant (Adromischus cristatus) displays rusty reddish-brown aerial roots and clusters of green, tube-shaped flowers bloom atop 8-inch stems in spring and early summer. You may know key lime pie plants as crinkle leaf succulent plants. Whatever you choose to call these tough little plants, key lime pie plant propagation is about as easy as it gets. Read on to learn about propagation of Adromischus succulents.

How to Propagate Key Lime Pie Succulents
Hold a lower leaf and wiggle it gently until it comes loose from the parent plant. Be sure the leaf is intact and doesn’t tear. Set the leaf aside for a few days until the end dries out and forms a callus. Without a callus, the leaf absorbs too much moisture and is likely to rot and die. Fill a small pot with potting soil formulated for cacti and succulents. Lay the callused leaf on top of the potting soil. (Don’t worry if the ends don’t touch the soil, the leaves will still root.) Place the pot in bright, indirect light. Avoid intense sunlight. Mist the potting soil very lightly with a spray bottle whenever the soil is dry.

Key Lime Pie Plant Care
Like most succulents, established key lime pie plants require little attention. Plant them in full sunlight and well-drained soil. However, a little afternoon shade is helpful in very hot climates. Water the plant regularly during the growing season – whenever the soil is dry and the leaves begin to look slightly shrunken. Don’t overwater, as all succulents are prone to rot in soggy conditions. Water sparingly during the winter months. Key lime pie plant is hardy to 25 F. (-4 C.). In cooler climates, the plant does well indoors.

How to Propagate Key Lime Pie Succulents
Hold a lower leaf and wiggle it gently until it comes loose from the parent plant. Be sure the leaf is intact and doesn’t tear. Set the leaf aside for a few days until the end dries out and forms a callus. Without a callus, the leaf absorbs too much moisture and is likely to rot and die. Fill a small pot with potting soil formulated for cacti and succulents. Lay the callused leaf on top of the potting soil. (Don’t worry if the ends don’t touch the soil, the leaves will still root.) Place the pot in bright, indirect light. Avoid intense sunlight. Mist the potting soil very lightly with a spray bottle whenever the soil is dry.

Key Lime Pie Plant Care
Like most succulents, established key lime pie plants require little attention. Plant them in full sunlight and well-drained soil. However, a little afternoon shade is helpful in very hot climates. Water the plant regularly during the growing season – whenever the soil is dry and the leaves begin to look slightly shrunken. Don’t overwater, as all succulents are prone to rot in soggy conditions. Water sparingly during the winter months. Key lime pie plant is hardy to 25 F. (-4 C.). In cooler climates, the plant does well indoors.
0
0
文章
Dummer. ゛☀
2017年08月23日

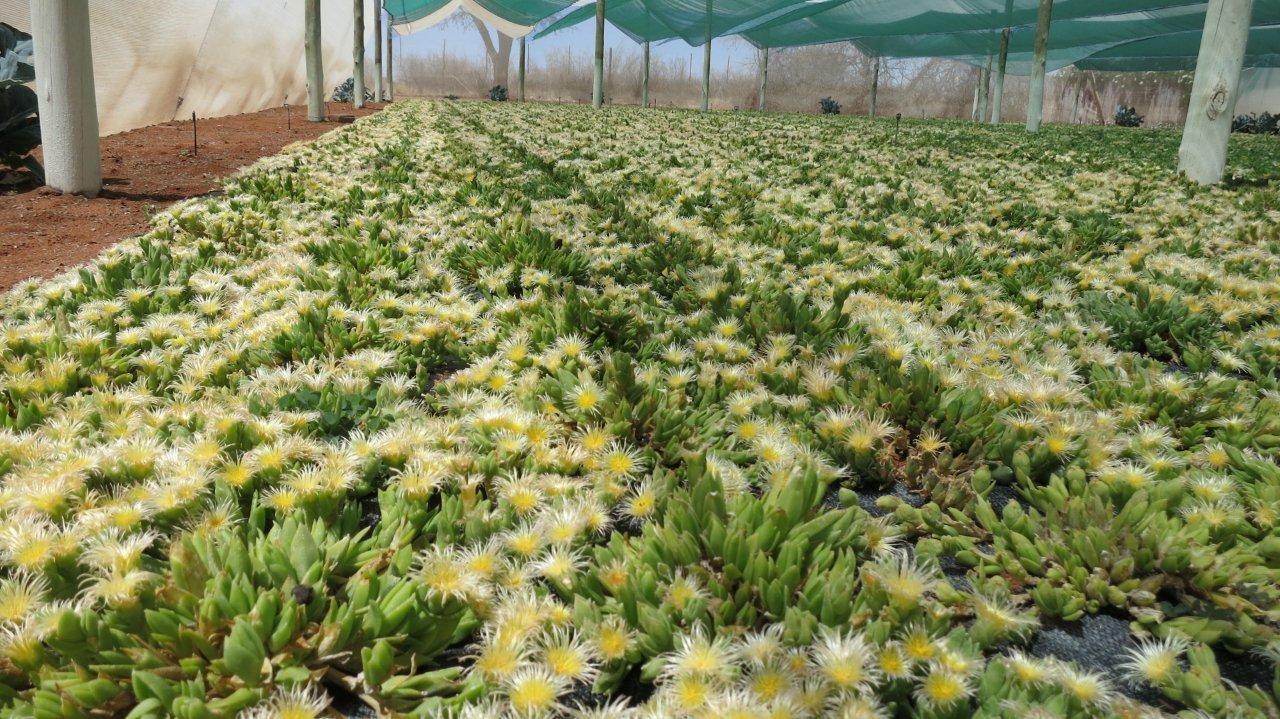
The Sceletium tortuosum plant, commonly called kanna, is a succulent blooming ground cover used for mass coverage in areas where other plants often fail. Growing kanna plants hold the moisture necessary to live through the driest of summers. However, an Internet search indicates the plant is not used primarily as an ornamental.
Information about Kanna Plants
According to some info, kanna is used medicinally in its native Cape Provinces of South Africa as a mood elevator and anti-depressant. South Africans chew the plant, which is also said to aid in weight loss and to quell the addictions of smoking and alcoholism. Some have called it the “happy plant.” This plant is also used in teas and tinctures and is sometimes even smoked along with other herbs. Unfortunately, kanna plant is not often grown in cultivation and information about kanna plants says it is dying out in the wild. One source encourages growers to attempt growing kanna plants so they can be saved from extinction. Kanna plant care is exacting when plants are young, though becomes minimal as the plants mature. Information about kanna plants indicates it is a low growing shrub related to the ice plant. Attractive flowers vary in color from white to yellow and occasionally pale orange or pink. Blooms of the Sceletium tortuosum plant are spiky and appear similar to blooms of the spider mum.
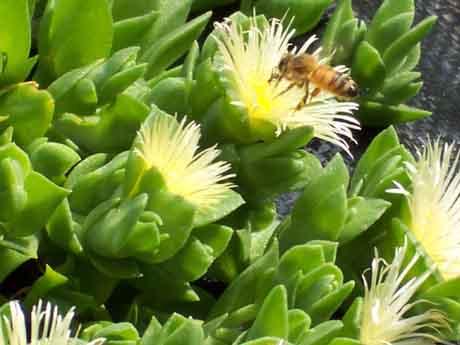
Growing Kanna Plants
Seeds for this plant are readily available online. If you are able to acquire already sprouted seedlings, the growth process will move along more quickly. Seeds may take several weeks to a few months to germinate. Be patient. Plant seeds into a sandy cactus type mix. Press seeds into moistened sand, cover and place in a warm, brightly lit spot. Keep the soil moist.

How to Care for Kanna Plant Seedlings
Once seeds have sprouted and have two sets of true leaves, scoop up the clump, along with a good amount of surrounding soil, and plant out into a small container. New growth of the young Sceletium tortuosum plant often attracts aphids. Go ahead and treat for aphids before the pests become a problem. A homemade, soapy spray is an effective means of kanna plant care pest control. Seedlings need less water and soil should be allowed to dry out slightly between waterings. Though this plant is not a cactus, when learning how to care for kanna plant, you’ll find that it benefits from similar care. Seedlings benefit from bright light, but avoid direct sun until the plants are moved outside. The kanna plant can be planted into a bigger container or into similar soil outdoors when all danger of frost is past. When growing kanna in areas with winter freezes, lift rhizomes and store for the winter. Container grown plants can be moved into a greenhouse or garage where temperatures remain above freezing.

Information about Kanna Plants
According to some info, kanna is used medicinally in its native Cape Provinces of South Africa as a mood elevator and anti-depressant. South Africans chew the plant, which is also said to aid in weight loss and to quell the addictions of smoking and alcoholism. Some have called it the “happy plant.” This plant is also used in teas and tinctures and is sometimes even smoked along with other herbs. Unfortunately, kanna plant is not often grown in cultivation and information about kanna plants says it is dying out in the wild. One source encourages growers to attempt growing kanna plants so they can be saved from extinction. Kanna plant care is exacting when plants are young, though becomes minimal as the plants mature. Information about kanna plants indicates it is a low growing shrub related to the ice plant. Attractive flowers vary in color from white to yellow and occasionally pale orange or pink. Blooms of the Sceletium tortuosum plant are spiky and appear similar to blooms of the spider mum.

Growing Kanna Plants
Seeds for this plant are readily available online. If you are able to acquire already sprouted seedlings, the growth process will move along more quickly. Seeds may take several weeks to a few months to germinate. Be patient. Plant seeds into a sandy cactus type mix. Press seeds into moistened sand, cover and place in a warm, brightly lit spot. Keep the soil moist.

How to Care for Kanna Plant Seedlings
Once seeds have sprouted and have two sets of true leaves, scoop up the clump, along with a good amount of surrounding soil, and plant out into a small container. New growth of the young Sceletium tortuosum plant often attracts aphids. Go ahead and treat for aphids before the pests become a problem. A homemade, soapy spray is an effective means of kanna plant care pest control. Seedlings need less water and soil should be allowed to dry out slightly between waterings. Though this plant is not a cactus, when learning how to care for kanna plant, you’ll find that it benefits from similar care. Seedlings benefit from bright light, but avoid direct sun until the plants are moved outside. The kanna plant can be planted into a bigger container or into similar soil outdoors when all danger of frost is past. When growing kanna in areas with winter freezes, lift rhizomes and store for the winter. Container grown plants can be moved into a greenhouse or garage where temperatures remain above freezing.
0
0
文章
Dummer. ゛☀
2017年08月23日

The structural craziness of Crassula marnieriana makes it a standout plant for any grower’s collection. The succulent is known by many names, among them: Worm plant Chinese jade Jade necklace vine Baby necklace Lucky for us colder clime growers, this plant is hardy and can even withstand a light freeze. The genus Crassula may exceed 200 species. Crassula marnieriana is one of the most unique with vertical stacked thick leaves adorned on the edges with blushed pink. Here are a few tips on how to grow a jade necklace and experience the architectural beauty and Dr. Seuss form of the worm plant.

Jade Necklace Vine Info
Succulent lovers are probably familiar with the family of Crassula plants. Many of them are notable for their strange shapes and unusual stacked leaves. Crassula worm plants exemplify the fantastical structure of a living necklace, with stacked leaves placed perfectly one on top of the other. Words almost fail when trying to describe Crassula worm plants. Smaller specimens have erect, slender branches decorated with tiles of succulent leaves growing right on top of each other. Stems will rarely get longer than 8 inches, but the longer sections tend to droop and hang or even simply trail along the ground. Jade necklace vine is native to South Africa, Lesotho and Swaziland. Leaves are green with pink to rose edges, plump and tightly stacked on the stem much like beads on a string. If you are lucky, the plant produces tiny starry clusters of pinkish blooms.

How to Grow a Jade Necklace
The jade necklace worm plant is also a very easy plant to grow, provided you have enough sun and satisfy a few other conditions. Jade necklace worm plant is one of the easiest succulents to propagate and well worth the effort to create more of these eye-catching plants. As with most succulents, you can start new plants simply by cuttings. Seeds are available but adult forms of the plant take many years to grow. Cuttings should be allowed to callus for a few days to prevent rot. Then, simply insert the cutting into sand or other soilless media and keep moderately moist in a brightly lit area that is protected from scorching sun. Roots should form in just a few weeks. Once the plant is sufficiently established, it may be moved to a well-drained pot in good cactus or succulent soil. The next step is to follow good worm plant care so your new baby will thrive and delight you with a show of flowers and festively adorned stems.

Jade Necklace Worm Plant Care
Crassulas prefer sunny locations but they can tend to burn if in scorching sun’s rays. Jade necklace is resistant to drought and all but the coldest weather, so it makes a perfect patio plant for most regions. If freezes threaten, bring your plant indoors. The best soil is a well-drained mixture of sand or grit with peat and vermiculite or perlite. Choose a pot that evaporates excess moisture since wet roots and stems can spell a death sentence for Crassula. In summer, water the plant deeply every week and in winter water only once every 3 weeks. During the growing season, use a fertilizer formulated for succulents to promote health. Transplant the plant only when it outgrows its pot. Crassula are very tolerant of crowded conditions and can be very happy in their container for many years. Watch for mealybugs or scale and treat the plant with a good horticultural soap. Crassula plants need good air circulation to prevent mildew issues, but other than that these are some of the hardiest and easiest plants to grow. Add one to your collection for easy care beauty and interest.

Jade Necklace Vine Info
Succulent lovers are probably familiar with the family of Crassula plants. Many of them are notable for their strange shapes and unusual stacked leaves. Crassula worm plants exemplify the fantastical structure of a living necklace, with stacked leaves placed perfectly one on top of the other. Words almost fail when trying to describe Crassula worm plants. Smaller specimens have erect, slender branches decorated with tiles of succulent leaves growing right on top of each other. Stems will rarely get longer than 8 inches, but the longer sections tend to droop and hang or even simply trail along the ground. Jade necklace vine is native to South Africa, Lesotho and Swaziland. Leaves are green with pink to rose edges, plump and tightly stacked on the stem much like beads on a string. If you are lucky, the plant produces tiny starry clusters of pinkish blooms.

How to Grow a Jade Necklace
The jade necklace worm plant is also a very easy plant to grow, provided you have enough sun and satisfy a few other conditions. Jade necklace worm plant is one of the easiest succulents to propagate and well worth the effort to create more of these eye-catching plants. As with most succulents, you can start new plants simply by cuttings. Seeds are available but adult forms of the plant take many years to grow. Cuttings should be allowed to callus for a few days to prevent rot. Then, simply insert the cutting into sand or other soilless media and keep moderately moist in a brightly lit area that is protected from scorching sun. Roots should form in just a few weeks. Once the plant is sufficiently established, it may be moved to a well-drained pot in good cactus or succulent soil. The next step is to follow good worm plant care so your new baby will thrive and delight you with a show of flowers and festively adorned stems.

Jade Necklace Worm Plant Care
Crassulas prefer sunny locations but they can tend to burn if in scorching sun’s rays. Jade necklace is resistant to drought and all but the coldest weather, so it makes a perfect patio plant for most regions. If freezes threaten, bring your plant indoors. The best soil is a well-drained mixture of sand or grit with peat and vermiculite or perlite. Choose a pot that evaporates excess moisture since wet roots and stems can spell a death sentence for Crassula. In summer, water the plant deeply every week and in winter water only once every 3 weeks. During the growing season, use a fertilizer formulated for succulents to promote health. Transplant the plant only when it outgrows its pot. Crassula are very tolerant of crowded conditions and can be very happy in their container for many years. Watch for mealybugs or scale and treat the plant with a good horticultural soap. Crassula plants need good air circulation to prevent mildew issues, but other than that these are some of the hardiest and easiest plants to grow. Add one to your collection for easy care beauty and interest.
1
0
文章
Dummer. ゛☀
2017年08月23日

Plant enthusiasts are always on the look-out for an unusual and amazing specimen. Huernia zebrina, or Lifesaver plant, is one of the best in this category. Lifesaver cactus plants are easy to grow in small dish gardens or even bonsai containers. The biggest challenges with Huernia cactus care are overwatering, incorrect lighting and mealybugs. Let’s go through some guidelines on how to grow a Lifesaver cactus and, hopefully, get some of the blooms for which it is named.

Lifesaver Cactus Plants
Lifesaver plants can produce amazing 5-pointed, star-like blooms with zebra stripes and a thickened center that resembles a root beer flavored Lifesaver. If this isn’t enough to intrigue you, they have fascinating 4-sided stems with soft teeth along the edges. In lower light situations, these are deeply green, but they attain a reddish tinge in full sun. These are not frost hardy but you can try growing Huernia cactus on the patio in summer with some protection from midday sun. Succulents, like cactus, are some of the easiest plants to care for and provide a range of texture and form for any gardener’s taste. Growing Huernia cactus as houseplants is preferred for most regions of the country, as they are not tolerant of cold weather.

How to Grow a Lifesaver Cactus
Choose a well-draining container, preferably one that is unglazed and will allow evaporation of excess moisture. Use a good cactus mix or make your own blend of 1 part potting soil and 4 parts gritty material. Lighting is of special concern with Huernia cactus care. They grow under plants in their native range and can exhibit stress if grown in searing heat and light. Try an eastern or western window that is bright most of the day but doesn’t experience the hottest rays of the day. A sensible watering schedule is key to caring for Huernia. As with most succulents, the plant is prone to rot if it is too wet, but it does need supplemental water during its growing season. In winter, the plant hardly needs water at all, just once per month on average, as it is mostly dormant and not actively producing growth. In spring through summer, water the plant when the soil is dry to the touch. Make sure any saucer you have is emptied of water to prevent root rot. Another important part of Huernia cactus care is temperature. If you are growing the plant outside, it should be moved indoors if temperatures drop to 50 degrees Fahrenheit (10 C.). Pests are rarely a problem, but occasionally mealybugs can become a concern. Repot any purchased plants and spray with a 1:10 dilution of rubbing alcohol and water. Additional Info on Caring for Huernia Cactus You will rarely need to repot your Lifesaver plant. They prefer a slightly crowded environment and this will also keep a tight, compact plant. Change the soil every two years, but you can usually keep the same pot. Cactus plants, in general, benefit from supplemental feeding during their growing season. Gradually increase the amount of water you give the plant in April or May. At this time, feed the plant with a 15-15-15 liquid plant food once per month diluted by half. Stop fertilizing in late August to prevent new growth from forming while the plant goes into dormancy. Huernia zebrina doesn’t really need pruning unless you want a smaller plant. You can save the cuttings, let them callus for a few days and then pot them up to create new plants. This is a really easy and fun little plant to grow and enjoy, season after season.

Lifesaver Cactus Plants
Lifesaver plants can produce amazing 5-pointed, star-like blooms with zebra stripes and a thickened center that resembles a root beer flavored Lifesaver. If this isn’t enough to intrigue you, they have fascinating 4-sided stems with soft teeth along the edges. In lower light situations, these are deeply green, but they attain a reddish tinge in full sun. These are not frost hardy but you can try growing Huernia cactus on the patio in summer with some protection from midday sun. Succulents, like cactus, are some of the easiest plants to care for and provide a range of texture and form for any gardener’s taste. Growing Huernia cactus as houseplants is preferred for most regions of the country, as they are not tolerant of cold weather.

How to Grow a Lifesaver Cactus
Choose a well-draining container, preferably one that is unglazed and will allow evaporation of excess moisture. Use a good cactus mix or make your own blend of 1 part potting soil and 4 parts gritty material. Lighting is of special concern with Huernia cactus care. They grow under plants in their native range and can exhibit stress if grown in searing heat and light. Try an eastern or western window that is bright most of the day but doesn’t experience the hottest rays of the day. A sensible watering schedule is key to caring for Huernia. As with most succulents, the plant is prone to rot if it is too wet, but it does need supplemental water during its growing season. In winter, the plant hardly needs water at all, just once per month on average, as it is mostly dormant and not actively producing growth. In spring through summer, water the plant when the soil is dry to the touch. Make sure any saucer you have is emptied of water to prevent root rot. Another important part of Huernia cactus care is temperature. If you are growing the plant outside, it should be moved indoors if temperatures drop to 50 degrees Fahrenheit (10 C.). Pests are rarely a problem, but occasionally mealybugs can become a concern. Repot any purchased plants and spray with a 1:10 dilution of rubbing alcohol and water. Additional Info on Caring for Huernia Cactus You will rarely need to repot your Lifesaver plant. They prefer a slightly crowded environment and this will also keep a tight, compact plant. Change the soil every two years, but you can usually keep the same pot. Cactus plants, in general, benefit from supplemental feeding during their growing season. Gradually increase the amount of water you give the plant in April or May. At this time, feed the plant with a 15-15-15 liquid plant food once per month diluted by half. Stop fertilizing in late August to prevent new growth from forming while the plant goes into dormancy. Huernia zebrina doesn’t really need pruning unless you want a smaller plant. You can save the cuttings, let them callus for a few days and then pot them up to create new plants. This is a really easy and fun little plant to grow and enjoy, season after season.
0
0
文章
Dummer. ゛☀
2017年08月23日

Succulents are a diverse form of plants that includes cacti and other moisture-storing specimens. Graptopetalum ghost plant develops a rosette shape on stems which may trail or hang. As with most plants in this group, water needs are little and exposure is important. Ghost flower plant care hinges on providing a natural environment that mimics the succulent’s native habitat. Tips on how to grow a Graptopetalum will ensure your ghost plant is healthy and enjoyable for many years.

Graptopetalum Ghost Plant Information
Thick, fleshy leaves and stems characterize most succulent plants. Ghost plants (Graptopetalum paraguayense) have thick leaves that hold excess moisture so the plant can withstand periods without rain. The silvery gray to bluish green foliage has a pinkish tinge to the edges of the leaves when they are young. Layers of leaves form the rosette, which range in size from less than an inch across to several inches wide. The plant is related to and resembles Echeveria, which is a common and fairly hardy succulent plant often used in container gardens.
These plants have color changing abilities. Full sun is the best location for them, but growing succulent ghost plants in partial shade produces the bluish-gray tones. Full sun plants tend to be yellowish-pink, pearlescent and slightly translucent. Those in punishing heat turn gray with pink overtones. Full ghost plant information must include the detail that the plant grows from the center of the rosette. This gives mature succulents a rangy appearance, which is easy fix by pinching back. The plant flowers occasionally in spring to summer with airy little yellow blooms.

How to Grow a Graptopetalum
The stems on this plant are fairly brittle and detach easily. This is because in its habitat, Graptopetalum ghost plant reproduces vegetatively. Any rosette that breaks off has the potential to root and start a new plant. Even a leaf that drops off will root below the parent plant and produce a new rosette quickly. The new plant feeds off the leaf until it shrivels up and falls off. By then the new little ghost plant has rooted and sprouted new leaves. Growing succulent ghost plants is ridiculously easy and a great confidence booster for the novice gardener. USDA zones 7b and up are suitable for growing succulent ghost plants. The rules for ghost flower plant care are similar to those for most succulents. Container-bound plants thrive in a mixture of peat, sand or other grit, topsoil and a little bit of compost. Full sun is the best situation but they will also grow in partial sun with slightly rangy results. Because the stems are so fragile, it is best to pick the best location for ghost plant and then don’t move it. Ghost plants need excellent drainage and moderate water. You can tell when to water by sticking your finger in the soil. If it is dry several inches down or the fleshy leaves are looking shriveled, you should water. Overwatering is a cause of root rots and the plant can get several pest infestations. Fertilize it in early spring and provide water only monthly in winter.

Graptopetalum Ghost Plant Information
Thick, fleshy leaves and stems characterize most succulent plants. Ghost plants (Graptopetalum paraguayense) have thick leaves that hold excess moisture so the plant can withstand periods without rain. The silvery gray to bluish green foliage has a pinkish tinge to the edges of the leaves when they are young. Layers of leaves form the rosette, which range in size from less than an inch across to several inches wide. The plant is related to and resembles Echeveria, which is a common and fairly hardy succulent plant often used in container gardens.
These plants have color changing abilities. Full sun is the best location for them, but growing succulent ghost plants in partial shade produces the bluish-gray tones. Full sun plants tend to be yellowish-pink, pearlescent and slightly translucent. Those in punishing heat turn gray with pink overtones. Full ghost plant information must include the detail that the plant grows from the center of the rosette. This gives mature succulents a rangy appearance, which is easy fix by pinching back. The plant flowers occasionally in spring to summer with airy little yellow blooms.

How to Grow a Graptopetalum
The stems on this plant are fairly brittle and detach easily. This is because in its habitat, Graptopetalum ghost plant reproduces vegetatively. Any rosette that breaks off has the potential to root and start a new plant. Even a leaf that drops off will root below the parent plant and produce a new rosette quickly. The new plant feeds off the leaf until it shrivels up and falls off. By then the new little ghost plant has rooted and sprouted new leaves. Growing succulent ghost plants is ridiculously easy and a great confidence booster for the novice gardener. USDA zones 7b and up are suitable for growing succulent ghost plants. The rules for ghost flower plant care are similar to those for most succulents. Container-bound plants thrive in a mixture of peat, sand or other grit, topsoil and a little bit of compost. Full sun is the best situation but they will also grow in partial sun with slightly rangy results. Because the stems are so fragile, it is best to pick the best location for ghost plant and then don’t move it. Ghost plants need excellent drainage and moderate water. You can tell when to water by sticking your finger in the soil. If it is dry several inches down or the fleshy leaves are looking shriveled, you should water. Overwatering is a cause of root rots and the plant can get several pest infestations. Fertilize it in early spring and provide water only monthly in winter.
2
4
rlehotsky
2017年08月23日

Can someone help me identify this? And can you tell me where to acquire this plant? I love to collect unusual plants from around the world. My husband travels and takes photos of different plants for me.


1
0
求助
Ueca
2017年08月22日

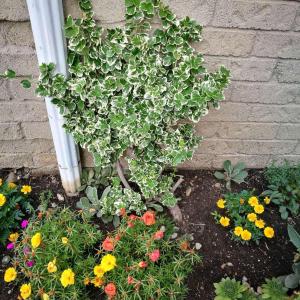
What is the species of this climbing plant?

0
0
Cristel:Euonymus, possibly “Winter Creeper”
Ueca:Found it. It is the merit-winning Euonymus fortunei.
Ueca:Currently it is about 60cm tall, but it was up to 3m up the wall in the past.
文章
Dummer. ゛☀
2017年08月22日

Hyssop (Hysoppus officinalis) is an attractive flowering herb commonly grown for its flavorful leaves. Growing a hyssop plant is easy and makes a lovely addition to the garden. The spikes of blue, pink, or red flowers are great for attracting important pollinators to the landscape as well.
Growing Hyssop as a Garden Plant
Although most hyssop plants are grown in herb gardens, they also have their place in flower gardens as border plants. Hyssop makes a great edging plant when grown in masses as well, but did you know that hyssop plants can also be grown in containers? When you grow hyssop in containers, make sure the pot is large enough to accommodate the large root systems. Hyssop plants prefer to be grown in areas with full sun or partial shade. They need well-drained soil, a bit on the dry side, amended with organic matter.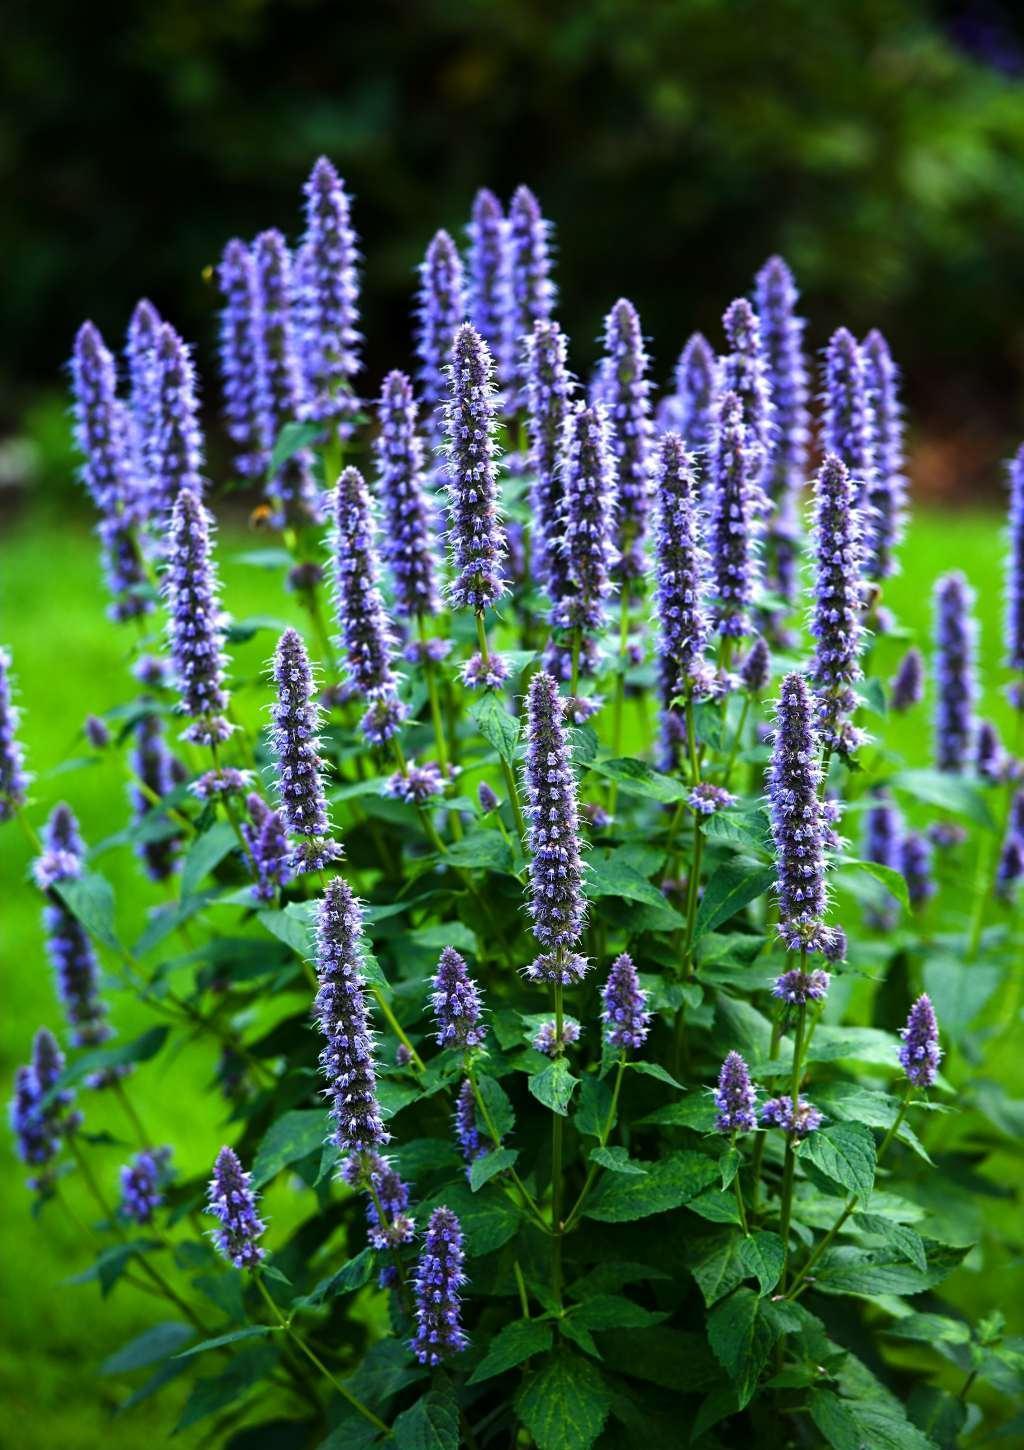
How to Plant Hyssop Seed
The most common way to plant hyssop is by sowing seeds. Sow hyssop seeds indoors or directly in the garden about eight to 10 weeks before the last frost. Plant hyssop just beneath the soil’s surface or about a quarter inch deep. Hyssop seeds usually take between 14 and 21 days to germinate and can be transplanted (if sown indoors) in the garden after the threat of frost has ended in spring. Space hyssop plants about 6 to 12 inches apart. Once blooming has ceased and seed capsules have completely dried, they can be collected and stored for growing hyssop the next season. In some areas, however, hyssop plants will self-seed readily. In addition, the plants can be divided in fall.
Harvesting & Pruning Hyssop Plants
If growing hyssop for use in the kitchen, it is best used fresh. However, it can be dried or frozen and stored for later use. When harvesting a hyssop plant, cut it in the morning hours once any dew has dried. Hang the plants upside down in small bunches to dry in a dark, well-ventilated area. Alternatively, you can place the leaves in a plastic bag after removing them from the stems and place in the freezer until ready to use. When you grow hyssop as a garden plant, trim back established hyssop plants heavily in early spring and again after flowering to prevent them from becoming too spindly. Cutting back the foliage also encourages bushier plants. Growing hyssop as a garden plant is not only easy but can also attract wildlife like butterflies and hummingbirds to the garden. In addition, hyssop leaves can be harvested for use in salads, soups and other dishes.

Growing Hyssop as a Garden Plant
Although most hyssop plants are grown in herb gardens, they also have their place in flower gardens as border plants. Hyssop makes a great edging plant when grown in masses as well, but did you know that hyssop plants can also be grown in containers? When you grow hyssop in containers, make sure the pot is large enough to accommodate the large root systems. Hyssop plants prefer to be grown in areas with full sun or partial shade. They need well-drained soil, a bit on the dry side, amended with organic matter.

How to Plant Hyssop Seed
The most common way to plant hyssop is by sowing seeds. Sow hyssop seeds indoors or directly in the garden about eight to 10 weeks before the last frost. Plant hyssop just beneath the soil’s surface or about a quarter inch deep. Hyssop seeds usually take between 14 and 21 days to germinate and can be transplanted (if sown indoors) in the garden after the threat of frost has ended in spring. Space hyssop plants about 6 to 12 inches apart. Once blooming has ceased and seed capsules have completely dried, they can be collected and stored for growing hyssop the next season. In some areas, however, hyssop plants will self-seed readily. In addition, the plants can be divided in fall.

Harvesting & Pruning Hyssop Plants
If growing hyssop for use in the kitchen, it is best used fresh. However, it can be dried or frozen and stored for later use. When harvesting a hyssop plant, cut it in the morning hours once any dew has dried. Hang the plants upside down in small bunches to dry in a dark, well-ventilated area. Alternatively, you can place the leaves in a plastic bag after removing them from the stems and place in the freezer until ready to use. When you grow hyssop as a garden plant, trim back established hyssop plants heavily in early spring and again after flowering to prevent them from becoming too spindly. Cutting back the foliage also encourages bushier plants. Growing hyssop as a garden plant is not only easy but can also attract wildlife like butterflies and hummingbirds to the garden. In addition, hyssop leaves can be harvested for use in salads, soups and other dishes.
0
0
文章
Dummer. ゛☀
2017年08月22日

Agastache is a perennial plant with lovely flower spires that bloom all season long. The Agastache flower is commonly found in purple to lavender but may also bloom in pink, rose, blue, white and orange. Growing Agastache as a drought-loving perennial actually produces the best plants. Agastache plant is tolerant of low water and poor nutrient conditions but provides you with a color display and enduring greenery for months. Learning how to grow Agastache requires no special skills or care.
What is Agastache Plant?
Agastache is in the Hyssop family of herbs and makes a flavorful tea. It is a striking plant that has many varieties, some of which are hardy and others that are frost tender and grown as annuals in most cooler climates. Growing Agastache requires sun and well drained soil. The leaves resemble catmint and are a dull green with heavy veining. The plants can grow 2 to 6 feet tall and produce the showy Agastache flowers until the first frost. Agastache flowers come in a variety of colors and rise up off of stiff triangular stems. The blooms have the appearance of being coated with fuzz because they are comprised of many tiny florets. The entire flower may be 3 to 4 inches long and begin to bloom from the top down. This means that the florets at the crown of the flower die out first, leaving tips that look slightly burnt. This just adds more interest to the Agastache plant.
How to Grow Agastache
Growing Agastache can be done indoors as starts or you may direct seed into the garden in spring. Flowers will be produce quickly on plants that are started indoors in May and transplanted in early summer. Agastache plant is hardy in USDA plant hardiness zones 4 to 10. Most plants can survive temperatures down to 10 F. (-12 C.) if heavily mulched. Provide plenty of water when plants are establishing but they can mostly fend for themselves thereafter.
Agastache Varieties
There are many types of Agastache. The genus represents 30 different plants, each with different flower color, height, foliage, aroma and hardiness. Giant hyssop is a perennial garden favorite that tops 6 feet in height. Anise hyssop or Anise Agastache (Agastache foeniculum) is a licorice flavored and scented plant that makes an excellent tea. There is even a bubble gum scented cultivar. ‘Golden Jubilee’ bears golden yellow foliage with blue flowers. There are new cultivars of Agastache flowers bred every year. It is easy to find Agastache varieties for every garden.
Agastache Uses
Agastache are usually tall plants and their lengthy stalks show best at the back of a perennial border or lining a fence. They can be used in container gardens or in cut flower gardens, as the Agastache flowers are long lasting. Growing Agastache in the butterfly garden not only attracts those beautiful insects but pollinators and hummingbirds. Deer and rabbits do not seem to enjoy Agastache, which makes it ideal for the woodland garden.

What is Agastache Plant?
Agastache is in the Hyssop family of herbs and makes a flavorful tea. It is a striking plant that has many varieties, some of which are hardy and others that are frost tender and grown as annuals in most cooler climates. Growing Agastache requires sun and well drained soil. The leaves resemble catmint and are a dull green with heavy veining. The plants can grow 2 to 6 feet tall and produce the showy Agastache flowers until the first frost. Agastache flowers come in a variety of colors and rise up off of stiff triangular stems. The blooms have the appearance of being coated with fuzz because they are comprised of many tiny florets. The entire flower may be 3 to 4 inches long and begin to bloom from the top down. This means that the florets at the crown of the flower die out first, leaving tips that look slightly burnt. This just adds more interest to the Agastache plant.

How to Grow Agastache
Growing Agastache can be done indoors as starts or you may direct seed into the garden in spring. Flowers will be produce quickly on plants that are started indoors in May and transplanted in early summer. Agastache plant is hardy in USDA plant hardiness zones 4 to 10. Most plants can survive temperatures down to 10 F. (-12 C.) if heavily mulched. Provide plenty of water when plants are establishing but they can mostly fend for themselves thereafter.

Agastache Varieties
There are many types of Agastache. The genus represents 30 different plants, each with different flower color, height, foliage, aroma and hardiness. Giant hyssop is a perennial garden favorite that tops 6 feet in height. Anise hyssop or Anise Agastache (Agastache foeniculum) is a licorice flavored and scented plant that makes an excellent tea. There is even a bubble gum scented cultivar. ‘Golden Jubilee’ bears golden yellow foliage with blue flowers. There are new cultivars of Agastache flowers bred every year. It is easy to find Agastache varieties for every garden.
Agastache Uses
Agastache are usually tall plants and their lengthy stalks show best at the back of a perennial border or lining a fence. They can be used in container gardens or in cut flower gardens, as the Agastache flowers are long lasting. Growing Agastache in the butterfly garden not only attracts those beautiful insects but pollinators and hummingbirds. Deer and rabbits do not seem to enjoy Agastache, which makes it ideal for the woodland garden.
0
0


