成长记
Plantlin
2018年09月12日

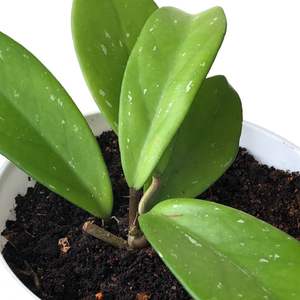
It is growing a bit wild... Thinking about making a new plant from cuttings:)


1
0
文章
Miss Chen
2018年09月10日

Named for their large, broad leaves, elephant ears (Colocasia spp.) are moisture loving plants that can grow in up to 6 inches of standing water. Colocasia esculenta, which is hardy in U.S. Department of Agriculture plant hardiness zones 8 through 10, is a commonly grown variety of elephant ears. Also called taro, this elephant ears variety usually grows 3 to 6 feet tall and wide, and features boldly veined leaves up to 2 feet long. Uncooked elephant ears are poisonous, and the plants are invasive in some areas of the United States.

Transplanting Time
The best time for transplanting elephant ears is when new growth appears in spring. Elephant ears sprout from tubers in spring and quickly grow into large, spreading clumps. In frost-free areas elephant ears can be transplanted any time of year, but transplanting when the plants are small is easiest.
In areas of the United States that experience frosts, elephant ears must be transplanted after the final local average frost date. If late frosts threaten after the plants have been transplanted, cover elephant ears with old sheets or several layers of newspaper overnight.
Growing Spot
A sheltered, partially shaded spot with organically rich, medium moisture or wet soil provides the best growing conditions for transplanted elephant ears. These plants also need protection from strong winds. In a wet site, such as the edge of a pond, elephant ears tolerate up to eight hours of direct sunlight, but the plants grow best in filtered sun or shade during the hottest part of the day.
Improve the soil for elephant ears by mixing in organic matter before transplanting. Spread a 4-inch layer of garden compost or aged manure over the growing spot and mix it 12 inches deep into the soil with a garden fork.
Planting Hole
Elephant ears can establish quickly in wide planting holes. These vigorous plants can grow up to 8 feet tall in one growing season in ideal conditions and produce tubers that weigh 1 to 2 pounds.
Dig a hole as deep as an elephant ear's root ball and twice as wide. Remove the plant from its container and place it in the center of the hole. The plant should sit at its original growing depth. Holding the elephant ears plant upright with one hand, scoop the dug soil into the hole with the other hand until you fill the hole. Gently press the soil around the plant with the flats of your hands to firm the plant in the hole.

Watering Elephant Ears
Regular watering is essential for newly transplanted elephant ears. Spray water over the growing spot using a garden hose fitted with a soft spray attachment. When the water puddles, stop watering and wait an hour. Test the soil moisture level by pushing your fingers into it. If the soil is moist but not wet, water the plants again.
Don't allow the soil around elephant ears to dry out. Water elephant ears when the soil surface begins to dry or more frequently.

Transplanting Time
The best time for transplanting elephant ears is when new growth appears in spring. Elephant ears sprout from tubers in spring and quickly grow into large, spreading clumps. In frost-free areas elephant ears can be transplanted any time of year, but transplanting when the plants are small is easiest.
In areas of the United States that experience frosts, elephant ears must be transplanted after the final local average frost date. If late frosts threaten after the plants have been transplanted, cover elephant ears with old sheets or several layers of newspaper overnight.
Growing Spot
A sheltered, partially shaded spot with organically rich, medium moisture or wet soil provides the best growing conditions for transplanted elephant ears. These plants also need protection from strong winds. In a wet site, such as the edge of a pond, elephant ears tolerate up to eight hours of direct sunlight, but the plants grow best in filtered sun or shade during the hottest part of the day.
Improve the soil for elephant ears by mixing in organic matter before transplanting. Spread a 4-inch layer of garden compost or aged manure over the growing spot and mix it 12 inches deep into the soil with a garden fork.
Planting Hole
Elephant ears can establish quickly in wide planting holes. These vigorous plants can grow up to 8 feet tall in one growing season in ideal conditions and produce tubers that weigh 1 to 2 pounds.
Dig a hole as deep as an elephant ear's root ball and twice as wide. Remove the plant from its container and place it in the center of the hole. The plant should sit at its original growing depth. Holding the elephant ears plant upright with one hand, scoop the dug soil into the hole with the other hand until you fill the hole. Gently press the soil around the plant with the flats of your hands to firm the plant in the hole.

Watering Elephant Ears
Regular watering is essential for newly transplanted elephant ears. Spray water over the growing spot using a garden hose fitted with a soft spray attachment. When the water puddles, stop watering and wait an hour. Test the soil moisture level by pushing your fingers into it. If the soil is moist but not wet, water the plants again.
Don't allow the soil around elephant ears to dry out. Water elephant ears when the soil surface begins to dry or more frequently.
1
1
求助
libbybuie912@yahoo.com
2018年09月09日

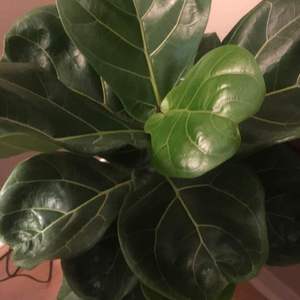
What kind of care does this beautiful plant need

0
0
suculea:Ficus lyrata. It does not need lots of direct sunlight, the bright place works the best. It likes damp compost soil, but still does not like to sit in water
马耳东风:it likes water and sunshine.
成长记
DaniH
2018年09月09日
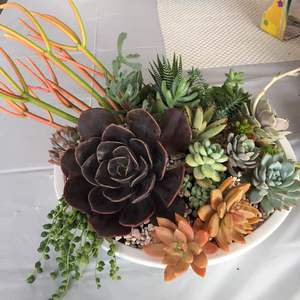
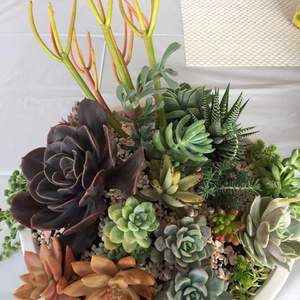
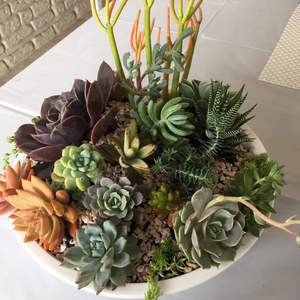
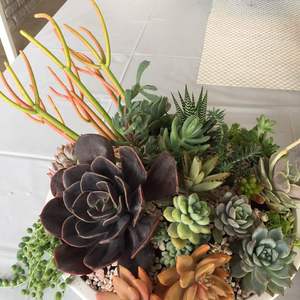
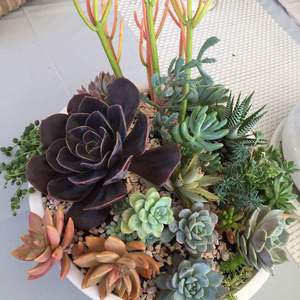
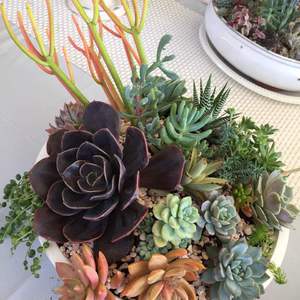
Ech Blue MEtal, Blue Bird, Lola, Pat’s Pink, Subcorymbrosa Lau, Sedum Clavatum, Haworthia Attentuata, Sedum Blue Feather, Sedum Pachyphyllum (blue jelly beans), Sedeveria Maialen, Kalanchoe Tomentosa Panda Plant, Oscularia Deltoids, Crassula Lanugin Pachystemon and Fire Sticks



2
0
文章
Miss Chen
2018年09月08日

Peonies (Paeonia spp.) can grow well in containers. Common garden peonies (Paeonia lactiflora), which are hardy in U.S. Department of Agriculture plant hardiness zones 3 through 8, are herbaceous perennials that die down in fall. Tree peonies (Paeonia suffruticosa, USDA zones 4 through 8) are woody shrubs. Select containers that complement your garden's style, such as metal containers for contemporary gardens, faded terracotta for Mediterranean gardens, or decorative clay pots for cottage gardens.

Containers for Growing Peonies
Peonies need large containers with drainage holes. Peony root balls are large, and their containers should fit the root balls without crushing them, plus another inch or two of space around root balls' sides and bases. A 5-gallon container is usually large enough for one peony.
Most frost-proof containers are suitable, including clay, wood and plastic. Common garden peonies don't tolerate transplanting well, and tree peonies are slow-growing, so both plants should stay in their containers for three or four years. Heavy containers such as clay help prevent tree peonies from blowing over in strong winds, but dry out quickly compared to wood and plastic containers. Wood containers made of cypress or cedar are rot-resistant.
Sites and Potting Soils
Full-sun or partially shaded sites are best for growing peonies, and the plants need organically-rich, well-draining potting soil. These large plants are heavy and difficult to move, so choose your growing site well, or place the pots on boards with wheels.
A mixture of soilless potting soil and well-rotted manure or rich garden compost is suitable for growing peonies. You can buy commercial soilless potting soil or you can mix your own using 1 part sphagnum peat moss and 1 part perlite or vermiculite. Mix 2 shovels of potting soil with 1 shovel of manure or compost, and fill the containers with this mixture. Every spring, when new growth appears on the peonies, scrape the loose potting soil mixture from the surface of the containers and replace it with fresh mixture.
Water and Fertilizer
Peonies in containers need more water and fertilizer than plants in the ground. Water the peonies when the soil surface is dry. Slowly pour water over the potting soil until it appears through the drainage holes in the base of the container. In hot weather, peonies may need watering once or more per day.

Fertilize peonies in pots once every month while the plants are in leaf. Dilute 1/2 teaspoon of a liquid 15-30-15 fertilizer in 1 gallon of water, and apply the solution to the potting soil. You can replace water with fertilizer solution if the peonies need watering. Manufacturer's instructions vary between products, so read and follow the instructions on the label.
Frost Protection
An advantage of growing peonies in containers is that you can move them indoors to protect them from frosts. Freezing temperatures can damage peonies and affect flowering in the following season.
When common garden peonies have died down and tree peonies have lost all their leaves, move the containers to an unheated indoor area, such as a garage. Water the containers when the soil surface is dry to a depth of 1 inch. The peonies aren't growing and using water at this time. It's important not to water so much that the potting soil becomes soggy, which can cause rotting. Move the containers outdoors again when new growth appears in spring.

Containers for Growing Peonies
Peonies need large containers with drainage holes. Peony root balls are large, and their containers should fit the root balls without crushing them, plus another inch or two of space around root balls' sides and bases. A 5-gallon container is usually large enough for one peony.
Most frost-proof containers are suitable, including clay, wood and plastic. Common garden peonies don't tolerate transplanting well, and tree peonies are slow-growing, so both plants should stay in their containers for three or four years. Heavy containers such as clay help prevent tree peonies from blowing over in strong winds, but dry out quickly compared to wood and plastic containers. Wood containers made of cypress or cedar are rot-resistant.
Sites and Potting Soils
Full-sun or partially shaded sites are best for growing peonies, and the plants need organically-rich, well-draining potting soil. These large plants are heavy and difficult to move, so choose your growing site well, or place the pots on boards with wheels.
A mixture of soilless potting soil and well-rotted manure or rich garden compost is suitable for growing peonies. You can buy commercial soilless potting soil or you can mix your own using 1 part sphagnum peat moss and 1 part perlite or vermiculite. Mix 2 shovels of potting soil with 1 shovel of manure or compost, and fill the containers with this mixture. Every spring, when new growth appears on the peonies, scrape the loose potting soil mixture from the surface of the containers and replace it with fresh mixture.
Water and Fertilizer
Peonies in containers need more water and fertilizer than plants in the ground. Water the peonies when the soil surface is dry. Slowly pour water over the potting soil until it appears through the drainage holes in the base of the container. In hot weather, peonies may need watering once or more per day.

Fertilize peonies in pots once every month while the plants are in leaf. Dilute 1/2 teaspoon of a liquid 15-30-15 fertilizer in 1 gallon of water, and apply the solution to the potting soil. You can replace water with fertilizer solution if the peonies need watering. Manufacturer's instructions vary between products, so read and follow the instructions on the label.
Frost Protection
An advantage of growing peonies in containers is that you can move them indoors to protect them from frosts. Freezing temperatures can damage peonies and affect flowering in the following season.
When common garden peonies have died down and tree peonies have lost all their leaves, move the containers to an unheated indoor area, such as a garage. Water the containers when the soil surface is dry to a depth of 1 inch. The peonies aren't growing and using water at this time. It's important not to water so much that the potting soil becomes soggy, which can cause rotting. Move the containers outdoors again when new growth appears in spring.
0
0
文章
Miss Chen
2018年09月08日

For a colorful, showy display of flowers, few plants out-perform the peony (Paeonia spp.), a perennial that grows in U.S. Department of Agriculture plant hardiness zones 3 through 8, with some variation among the different varieties. Although most peonies are attractive even when not in bloom, it can be discouraging when a plant fails to bloom or produces only a few flowers. Giving a peony some extra care or making a few adjustments can help prevent or correct this problem.

Plant Maturity and Depth
A peony might not bloom simply because it's too immature; in that case, all you need to do is wait a while to see flowers. If you've recently planted a new, nursery-grown peony, it may take several years to reach a size and maturity that can support flowering. It could take even longer to see flowers -- up to four or five years -- if you've grown the plant from seed. If you're dividing a larger plant to make new plants, the number of dormant buds, or "eyes," on each new division can also influence the length of time before flowers appear. To speed flowering by these new plants, make large divisions with at least three to five eyes each. Planting peonies too deeply can also inhibit flowering, so position new plants or divisions so buds are no more than 1 or 2 inches below the soil surface.
Correct Fertilizer
Although peonies benefit from rich soil that contains a good supply of nutrients, it's important to feed the plants properly and not use too much nitrogen, which can promote growth of stems and leaves at the expense of flowers. For best results, select a granular, low-nitrogen fertilizer such as 5-10-10, applying it at a rate of 2 to 3 pounds per 100 square feet of planted area. Apply the fertilizer once per season in the spring, when the plant's stems are about 3 inches tall, working it carefully into the ground. Keep fertilizer away from the plant's stems to prevent burning, and don't disturb tender new shoots; water the fertilizer in well.
Sun and Other Issues
Peonies need abundant light to set flower buds, so pick a planting site that gets at least six or more hours of full sun daily; a spot that gets too much shade can result in few or no flowers. If you have a peony that's recently stopped blooming, this could be because other nearby plants have become large and block the peony's access to light. Prune back surrounding plants as needed to give the peony more light, or consider relocating the peony to a brighter spot. Removing leaves and stems as you tidy the garden during the summer can also contribute to poor flowering because this weakens the plant and interferes with its ability to store energy for the next year. Delay cleanup until fall, when the plant's growth has slowed and foliage is wilted and partly dry.

Disease Control
Sometimes you might see flower buds develop on a peony plant that don't enlarge, and they eventually dry up and drop off the plant. This can indicate the presence of a fungal disorder such as blight or leaf blotch that stops the bud from producing a flower. These diseases might also cause black spots on leaves and stems. They are best prevented by keeping foliage as dry as possible, so water only at the plant's base on sunny days, and cut peonies back to the ground in late fall, removing all plant debris that can harbor fungal microorganisms. Wear gloves and clean pruning blades in rubbing alcohol between each cut to prevent spreading disease.

Plant Maturity and Depth
A peony might not bloom simply because it's too immature; in that case, all you need to do is wait a while to see flowers. If you've recently planted a new, nursery-grown peony, it may take several years to reach a size and maturity that can support flowering. It could take even longer to see flowers -- up to four or five years -- if you've grown the plant from seed. If you're dividing a larger plant to make new plants, the number of dormant buds, or "eyes," on each new division can also influence the length of time before flowers appear. To speed flowering by these new plants, make large divisions with at least three to five eyes each. Planting peonies too deeply can also inhibit flowering, so position new plants or divisions so buds are no more than 1 or 2 inches below the soil surface.
Correct Fertilizer
Although peonies benefit from rich soil that contains a good supply of nutrients, it's important to feed the plants properly and not use too much nitrogen, which can promote growth of stems and leaves at the expense of flowers. For best results, select a granular, low-nitrogen fertilizer such as 5-10-10, applying it at a rate of 2 to 3 pounds per 100 square feet of planted area. Apply the fertilizer once per season in the spring, when the plant's stems are about 3 inches tall, working it carefully into the ground. Keep fertilizer away from the plant's stems to prevent burning, and don't disturb tender new shoots; water the fertilizer in well.
Sun and Other Issues
Peonies need abundant light to set flower buds, so pick a planting site that gets at least six or more hours of full sun daily; a spot that gets too much shade can result in few or no flowers. If you have a peony that's recently stopped blooming, this could be because other nearby plants have become large and block the peony's access to light. Prune back surrounding plants as needed to give the peony more light, or consider relocating the peony to a brighter spot. Removing leaves and stems as you tidy the garden during the summer can also contribute to poor flowering because this weakens the plant and interferes with its ability to store energy for the next year. Delay cleanup until fall, when the plant's growth has slowed and foliage is wilted and partly dry.

Disease Control
Sometimes you might see flower buds develop on a peony plant that don't enlarge, and they eventually dry up and drop off the plant. This can indicate the presence of a fungal disorder such as blight or leaf blotch that stops the bud from producing a flower. These diseases might also cause black spots on leaves and stems. They are best prevented by keeping foliage as dry as possible, so water only at the plant's base on sunny days, and cut peonies back to the ground in late fall, removing all plant debris that can harbor fungal microorganisms. Wear gloves and clean pruning blades in rubbing alcohol between each cut to prevent spreading disease.
0
1
文章
Miss Chen
2018年09月08日

The plant commonly called vinca (Catharanthus roseus) grows as a short, upright bush, covered in small pink or magenta flowers. It grows as a perennial in U.S. Department of Agriculture plant hardiness zones 10 through 11 but can be treated as a summer annual elsewhere. Vinca's close cousins, greater periwinkle (Vinca major), which grows in USDA zones 7 through 9, and common periwinkle (Vinca minor), which grows in USDA zones 4 through 9, can become invasive, but vinca doesn't usually spread beyond its garden bed.
Care Basics

Vinca flowers best in full sun. Although it can tolerate partial shade, too much shade inhibits flowering and results in sparse foliage. Trailing varieties can spread more than 18 inches wide, creating a sprawling ground cover, but most have a bushy form. Vinca can readily self-seed, even in areas where it usually grows as an annual, so plant it in beds where you plan to continue growing it or remove the seedlings when you see them.
Watering Needs

Drought-tolerant vinca survives even with infrequent watering. Water the soil only during extended dry periods if the plants begin to wilt even at night, otherwise rainfall and water from nearby areas of the yard will provide enough water. Vinca leaves may curl and appear wilted during the day when it's hot and dry, but they don't need additional water if they still unfurl during the cooler nights. Applying a 2-inch layer of mulch over the bare soil surrounding the plants conserves soil moisture and further minimizes the need for watering. Pull mulch back so it doesn't rest against the base of the vinca plants.
Regular Maintenance

Once established, vinca doesn't require much care. If the plant looks sparse, cut back stems to encourage branching and new growth. Wipe the shears with a rubbing alcohol-soaked cloth before making a cut to disinfect them. Vinca also doesn't require deadheading, dropping its blooms naturally after the flower wilts. Light fertilization once a month during the spring and summer growing season helps keep the plants healthy. Water with an all-purpose soluble fertilizer. For example, 1 tablespoon of a 24-8-16 blend mixed with 1 gallon of water provides enough to feed 10 square feet of vinca plants.
Common Problems

Most vinca problems come from too much moisture or improper watering. Stem and root rot, fungal leaf spots and botrytis blight are most common in wet, overwatered beds or from wet foliage. Avoid overhead watering and keep water from splashing onto the leaves to prevent most diseases. Aphids may sometimes feed on the plant, but you can rinse them off with a blast of water from the garden hose. When rinsing off aphids, do so in the morning so the leaves dry before nightfall.
Care Basics

Vinca flowers best in full sun. Although it can tolerate partial shade, too much shade inhibits flowering and results in sparse foliage. Trailing varieties can spread more than 18 inches wide, creating a sprawling ground cover, but most have a bushy form. Vinca can readily self-seed, even in areas where it usually grows as an annual, so plant it in beds where you plan to continue growing it or remove the seedlings when you see them.
Watering Needs

Drought-tolerant vinca survives even with infrequent watering. Water the soil only during extended dry periods if the plants begin to wilt even at night, otherwise rainfall and water from nearby areas of the yard will provide enough water. Vinca leaves may curl and appear wilted during the day when it's hot and dry, but they don't need additional water if they still unfurl during the cooler nights. Applying a 2-inch layer of mulch over the bare soil surrounding the plants conserves soil moisture and further minimizes the need for watering. Pull mulch back so it doesn't rest against the base of the vinca plants.
Regular Maintenance

Once established, vinca doesn't require much care. If the plant looks sparse, cut back stems to encourage branching and new growth. Wipe the shears with a rubbing alcohol-soaked cloth before making a cut to disinfect them. Vinca also doesn't require deadheading, dropping its blooms naturally after the flower wilts. Light fertilization once a month during the spring and summer growing season helps keep the plants healthy. Water with an all-purpose soluble fertilizer. For example, 1 tablespoon of a 24-8-16 blend mixed with 1 gallon of water provides enough to feed 10 square feet of vinca plants.
Common Problems

Most vinca problems come from too much moisture or improper watering. Stem and root rot, fungal leaf spots and botrytis blight are most common in wet, overwatered beds or from wet foliage. Avoid overhead watering and keep water from splashing onto the leaves to prevent most diseases. Aphids may sometimes feed on the plant, but you can rinse them off with a blast of water from the garden hose. When rinsing off aphids, do so in the morning so the leaves dry before nightfall.
0
1
文章
Miss Chen
2018年09月08日

Large flowers in bright, bold colors make gerbera daisy (Gerbera jamesonii) a show-stopper in garden displays. Also called Barberton daisy, African daisy and Transvaal daisy, gerbera daisy is perennial outdoors in U.S. Department of Agriculture plant hardiness zones 9 through 11 but is often grown as an annual. It also grows well indoors. A gerbera daisy plant performs best in well-drained soil that is rich in organic matter and in a full-sun site, but it needs afternoon shade in a hot climate.
Feeding and Watering an Outdoor Plant

An outdoor gerbera daisy needs regular feeding to flower well, but it should be watered infrequently to avoid crown rot. Feed your gerbera daisy with a water-soluble, 24-8-16 fertilizer diluted at a rate of 1 tablespoon per 1 gallon of water, which feeds 10 square feet of plants. Apply the solution every two weeks while the gerbera daisy flowers, or dilute and apply the fertilizer according to the instructions on its label. In wet conditions, gerbera daisy suffers from crown rot, which affects its base. Help your plant avoid that disease by watering your gerbera daisy when its soil is dry to a depth of 1 inch. If you water and feed the plant at the same time, then apply the fertilizer first. Don't apply only fertilizer if the ground is dry. Feed and water the gerbera at the plant's base, and never from above, to help avoid leaf diseases.
Deadheading and Dividing

Deadheading encourages a gerbera daisy plant to produce more flowers, and dividing an outdoor plant helps keep it healthy. Deadheading, which is removing flowers as they fade, improves the plant's appearance and encourages a long blooming period. Wipe pruning shear blades with rubbing alcohol, and use the tool to prune fading flowers at their stem bases. Sterilizing the pruning shears again is necessary after you finish pruning. If you grow your outdoor gerbera daisy as a perennial, lift and divide it in the spring of the plant's third year. Do so by pushing a garden fork into the soil about 4 inches from the plant's base, and gently lever the plant out of its soil. Pull the plant's base into three or four equal sections, and plant the sections 1 foot apart and about 1/2 inch higher than the original growing depth.
Controlling Pests and Diseases

Aphids, mites, thrips and whiteflies attack gerbera daisy, and the plant also suffers from leaf spots, rots and viruses. Aphids are small insects that cluster at shoot tips and on the undersides of leaves. Mites look like tiny moving dots, and thrips are tiny, very slim insects. Whiteflies are small, white, flying insects. Favorable growing conditions and good-quality care are the gerbera daisy's best defenses against pests and diseases, and you also can control minor problems by pinching off affected shoots. On a cloudy day, spray an outdoor gerbera daisy heavily infested with pests with a ready-to-use insecticidal soap containing 1 percent potassium salts of fatty acids. This spray also can be used on an indoor gerbera daisy. Spray the plant once each week as needed, covering all its foliage but avoiding its flowers. Dig up an outdoor gerbera daisy heavily infested with leaf spots, rots or viruses, and put it in the trash.
Tending an Indoor Plant

Gerbera daisy can grow well as an indoor plant for two to three years. Grow your gerbera daisy in a peat moss-based potting compost in a container with bottom drainage holes and a drip tray. Place the container in a bright spot that receives no more than one to two hours of direct sunlight each day, and water the plant when its potting compost is dry to a depth of 1 1/2 inches. Allow that material to drain thoroughly before returning the container to its drip tray. Keep the plant's location at 40 to 70 degrees Fahrenheit while the plant is in flower, and feed the gerbera daisy every two weeks with a liquid 24-8-16 fertilizer diluted at a rate of 1/2 teaspoon per 1 gallon of water. You can replace water with the fertilizer solution if the plant needs watering. Pour the solution slowly onto the potting compost surface until it runs out of the plant container's drainage holes, and allow the plant to drain thoroughly before putting the container back on its drip tray.
Feeding and Watering an Outdoor Plant

An outdoor gerbera daisy needs regular feeding to flower well, but it should be watered infrequently to avoid crown rot. Feed your gerbera daisy with a water-soluble, 24-8-16 fertilizer diluted at a rate of 1 tablespoon per 1 gallon of water, which feeds 10 square feet of plants. Apply the solution every two weeks while the gerbera daisy flowers, or dilute and apply the fertilizer according to the instructions on its label. In wet conditions, gerbera daisy suffers from crown rot, which affects its base. Help your plant avoid that disease by watering your gerbera daisy when its soil is dry to a depth of 1 inch. If you water and feed the plant at the same time, then apply the fertilizer first. Don't apply only fertilizer if the ground is dry. Feed and water the gerbera at the plant's base, and never from above, to help avoid leaf diseases.
Deadheading and Dividing

Deadheading encourages a gerbera daisy plant to produce more flowers, and dividing an outdoor plant helps keep it healthy. Deadheading, which is removing flowers as they fade, improves the plant's appearance and encourages a long blooming period. Wipe pruning shear blades with rubbing alcohol, and use the tool to prune fading flowers at their stem bases. Sterilizing the pruning shears again is necessary after you finish pruning. If you grow your outdoor gerbera daisy as a perennial, lift and divide it in the spring of the plant's third year. Do so by pushing a garden fork into the soil about 4 inches from the plant's base, and gently lever the plant out of its soil. Pull the plant's base into three or four equal sections, and plant the sections 1 foot apart and about 1/2 inch higher than the original growing depth.
Controlling Pests and Diseases

Aphids, mites, thrips and whiteflies attack gerbera daisy, and the plant also suffers from leaf spots, rots and viruses. Aphids are small insects that cluster at shoot tips and on the undersides of leaves. Mites look like tiny moving dots, and thrips are tiny, very slim insects. Whiteflies are small, white, flying insects. Favorable growing conditions and good-quality care are the gerbera daisy's best defenses against pests and diseases, and you also can control minor problems by pinching off affected shoots. On a cloudy day, spray an outdoor gerbera daisy heavily infested with pests with a ready-to-use insecticidal soap containing 1 percent potassium salts of fatty acids. This spray also can be used on an indoor gerbera daisy. Spray the plant once each week as needed, covering all its foliage but avoiding its flowers. Dig up an outdoor gerbera daisy heavily infested with leaf spots, rots or viruses, and put it in the trash.
Tending an Indoor Plant

Gerbera daisy can grow well as an indoor plant for two to three years. Grow your gerbera daisy in a peat moss-based potting compost in a container with bottom drainage holes and a drip tray. Place the container in a bright spot that receives no more than one to two hours of direct sunlight each day, and water the plant when its potting compost is dry to a depth of 1 1/2 inches. Allow that material to drain thoroughly before returning the container to its drip tray. Keep the plant's location at 40 to 70 degrees Fahrenheit while the plant is in flower, and feed the gerbera daisy every two weeks with a liquid 24-8-16 fertilizer diluted at a rate of 1/2 teaspoon per 1 gallon of water. You can replace water with the fertilizer solution if the plant needs watering. Pour the solution slowly onto the potting compost surface until it runs out of the plant container's drainage holes, and allow the plant to drain thoroughly before putting the container back on its drip tray.
2
1
文章
Miss Chen
2018年09月07日

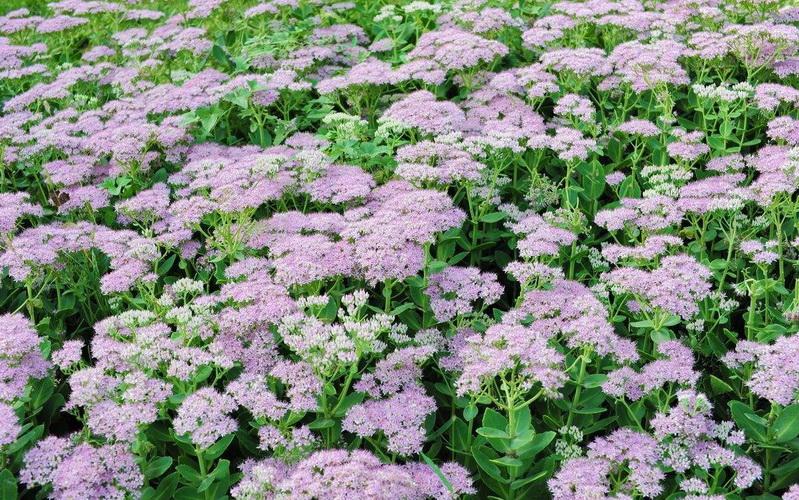
Considered one of the top perennials for fall color, "Autumn Joy" sedum (Sedum x "Autumn Joy") grows in U.S. Department of Agriculture plant hardiness zones 5 through 9. Once you have one sedum, it's easy to make more by taking stem and leaf cuttings or dividing the plant. Because "Autumn Joy" is a hybrid, seeds will not produce exact copies of the parent plant.
Cut Stems or Leaves
"Autumn Joy" sedum roots easily from stem or leaf cuttings. You can do this any time the plants are actively growing. Cuttings taken from new growth root more easily than cuttings from older stems.
Take cuttings in the early morning or late afternoon, and water the plants one hour before you take the cuttings. Make stem cuttings 2 to 6 inches long, with at least three sets of leaves. Cut the stem just below the node where a leaf joins the stem.
For leaf cuttings, remove the leaf along with the stalk that attaches the leaf to the stem. To keep them from drying out before planting, place stem and leaf cuttings in water or in a plastic bag with a damp paper towel.
Use sharp scissors or pruners to take the cuttings. Disinfect cutting tools by soaking them in a solution of 1 part bleach to 3 parts water for 5 minutes. Rinse them in clean water, and let them air-dry before use.
Plant Cuttings
Cuttings root best in a sterile, soilless potting mix. You can use a purchased seed-starting mix, or make your own for rooting cuttings by mixing equal parts river sand, perlite, and either vermiculite or peat moss. Use this mix to fill pots or planting trays with drainage holes. Water the potting mix so it is damp, and smooth the surface.
To avoid spreading disease, plant in new pots and planting trays or sterilize used pots before filling them with soil. Clean used pots and trays by scrubbing away any loose dirt, then soaking them in a solution of 1 part bleach to 9 parts water for 30 minutes. Wipe them dry before use. Always use pots and containers that have drainage holes.

For stem cuttings, use sterilized scissors or pruners to clip off the lowest set of leaves. If there are any flower buds on the cutting, remove those as well. Use a pencil to poke a hole in the potting mix, then place the cutting in the hole, firming the potting mix around the cutting so the place where you cut the leaves off is covered. For leaf cuttings, cover about 1/4 inch of the stem-end of the leaf with potting mix. There is no need to use a rooting hormone on "Autumn Joy" sedum cuttings.
Keep Them Moist
Cover the cuttings with clear plastic bags to help keep them from drying out. Some planting trays come with clear plastic domes which makes it easy to keep humidity levels high. The cuttings still need air circulation, though, so make sure there is space between the plastic and the pot or tray. Don't let the plastic touch the plant leaves.
Mist the cuttings as needed to keep the soil from drying out. You want the soil to stay moist, but not waterlogged. After two weeks, check if the stem cuttings are rooting by gently lifting the stem. If it comes free of the soil easily, replant it and check again in another week. Keep checking until the cuttings stay rooted in the soil when you gently tug at the stem.
You can tell leaf cuttings have rooted when new leaves start to emerge from the base of the leaf. Once the new stem or leaf cuttings have roots, gradually decrease the humidity by leaving the plastic off for several hours each day.
Move the Sedums Outside
The best time to plant new "Autumn Joy" sedum is in the spring after danger of frost has passed, but this plant is not picky about planting time. If you take cuttings in spring, the resulting plants can still be planted outdoors in the summer or fall. Mature plants reach 12 to 24 inches tall, and they should be spaced 12 to 18 inches apart.
A spot in full-sun is best, and "Autumn Joy" sedum will grow in any soil type as long as it drains well. Sedum is highly drought-tolerant, but water once a week for the first year if there is no rain. This encourages deep rooting.
Divide Established Plants
Once "Autumn Joy" sedum is established, divide the clumps every three to five years. This is an easy way to get new plants and to keep the sedum from becoming crowded. Divide the sedum in the spring, as soon as new growth starts to emerge from the soil. Choose an overcast day, preferably with light rain in the forecast. Water the plants the day before you plan to divide the plant.
Use a sharp spade to dig around the entire sedum clump, about 4 to 6 inches away from the base of the plant. Lift the entire clump, and shake off loose soil so you can see the root system better. Sedums form clumps, and you many need to use a sharp, large knife to divide the clump and cut through the roots. Sterilize this knife before use the same way you sterilized the pruning tools.
Replant the divisions as soon as possible. If you must delay planting, place the sedum in the shade and keep the soil moist. When you plant the new divisions, place them at the same depth they were previously growing. Firm the soil around the plants, and water thoroughly.

Cut Stems or Leaves
"Autumn Joy" sedum roots easily from stem or leaf cuttings. You can do this any time the plants are actively growing. Cuttings taken from new growth root more easily than cuttings from older stems.
Take cuttings in the early morning or late afternoon, and water the plants one hour before you take the cuttings. Make stem cuttings 2 to 6 inches long, with at least three sets of leaves. Cut the stem just below the node where a leaf joins the stem.
For leaf cuttings, remove the leaf along with the stalk that attaches the leaf to the stem. To keep them from drying out before planting, place stem and leaf cuttings in water or in a plastic bag with a damp paper towel.
Use sharp scissors or pruners to take the cuttings. Disinfect cutting tools by soaking them in a solution of 1 part bleach to 3 parts water for 5 minutes. Rinse them in clean water, and let them air-dry before use.
Plant Cuttings
Cuttings root best in a sterile, soilless potting mix. You can use a purchased seed-starting mix, or make your own for rooting cuttings by mixing equal parts river sand, perlite, and either vermiculite or peat moss. Use this mix to fill pots or planting trays with drainage holes. Water the potting mix so it is damp, and smooth the surface.
To avoid spreading disease, plant in new pots and planting trays or sterilize used pots before filling them with soil. Clean used pots and trays by scrubbing away any loose dirt, then soaking them in a solution of 1 part bleach to 9 parts water for 30 minutes. Wipe them dry before use. Always use pots and containers that have drainage holes.

For stem cuttings, use sterilized scissors or pruners to clip off the lowest set of leaves. If there are any flower buds on the cutting, remove those as well. Use a pencil to poke a hole in the potting mix, then place the cutting in the hole, firming the potting mix around the cutting so the place where you cut the leaves off is covered. For leaf cuttings, cover about 1/4 inch of the stem-end of the leaf with potting mix. There is no need to use a rooting hormone on "Autumn Joy" sedum cuttings.
Keep Them Moist
Cover the cuttings with clear plastic bags to help keep them from drying out. Some planting trays come with clear plastic domes which makes it easy to keep humidity levels high. The cuttings still need air circulation, though, so make sure there is space between the plastic and the pot or tray. Don't let the plastic touch the plant leaves.
Mist the cuttings as needed to keep the soil from drying out. You want the soil to stay moist, but not waterlogged. After two weeks, check if the stem cuttings are rooting by gently lifting the stem. If it comes free of the soil easily, replant it and check again in another week. Keep checking until the cuttings stay rooted in the soil when you gently tug at the stem.
You can tell leaf cuttings have rooted when new leaves start to emerge from the base of the leaf. Once the new stem or leaf cuttings have roots, gradually decrease the humidity by leaving the plastic off for several hours each day.
Move the Sedums Outside
The best time to plant new "Autumn Joy" sedum is in the spring after danger of frost has passed, but this plant is not picky about planting time. If you take cuttings in spring, the resulting plants can still be planted outdoors in the summer or fall. Mature plants reach 12 to 24 inches tall, and they should be spaced 12 to 18 inches apart.
A spot in full-sun is best, and "Autumn Joy" sedum will grow in any soil type as long as it drains well. Sedum is highly drought-tolerant, but water once a week for the first year if there is no rain. This encourages deep rooting.
Divide Established Plants
Once "Autumn Joy" sedum is established, divide the clumps every three to five years. This is an easy way to get new plants and to keep the sedum from becoming crowded. Divide the sedum in the spring, as soon as new growth starts to emerge from the soil. Choose an overcast day, preferably with light rain in the forecast. Water the plants the day before you plan to divide the plant.
Use a sharp spade to dig around the entire sedum clump, about 4 to 6 inches away from the base of the plant. Lift the entire clump, and shake off loose soil so you can see the root system better. Sedums form clumps, and you many need to use a sharp, large knife to divide the clump and cut through the roots. Sterilize this knife before use the same way you sterilized the pruning tools.
Replant the divisions as soon as possible. If you must delay planting, place the sedum in the shade and keep the soil moist. When you plant the new divisions, place them at the same depth they were previously growing. Firm the soil around the plants, and water thoroughly.
0
0


