文章
Miss Chen
2018年08月29日

Purslane, scientific name Portulaca oleracea, is an annual, edible succulent plant. It is also called Pusley, Verdolaga, Pigweed, and Hogweed.

Description
Purslane has a thick reddish stem and succulent, rounded leaves that grow in clusters. Its flowers are small and yellow, with five petals, and they bloom according to rainfall or moisture. It grows low to the ground and tends to spread.
Origin
Purslane originated in North Africa, the Middle East, and India. It probably spread to North America and elsewhere prior to the mid-1400s.
Cultivation
Purslane is an easy plant to grow, even in an arid climate. As a succulent, it is heat- and drought-tolerant, and a very hardy plant. In fact, it is often considered a weed in North America. It tends to sprawl across the ground, and will need to be cut back to be maintained.
Check with regulations in your area before planting purslane; in some regions it is considered an invasive weed.
Culinary Uses
All parts of Purslane are edible: leaves, flowers, and stem. It has a slightly sweet and sour flavor and a chewy texture. It is commonly eaten fresh, cooked, or in soups and stews.
Interesting Facts
Purslane is sometimes known as the Dolly Parton flower because of when it blooms--from 9 a.m. to 5 p.m.

Purslane is a good source of Omega-3 fatty acids and Vitamins A and C.
It is considered a edible plant in Mexican, Russian, and Mediterranean cultures, among others.

Description
Purslane has a thick reddish stem and succulent, rounded leaves that grow in clusters. Its flowers are small and yellow, with five petals, and they bloom according to rainfall or moisture. It grows low to the ground and tends to spread.
Origin
Purslane originated in North Africa, the Middle East, and India. It probably spread to North America and elsewhere prior to the mid-1400s.
Cultivation
Purslane is an easy plant to grow, even in an arid climate. As a succulent, it is heat- and drought-tolerant, and a very hardy plant. In fact, it is often considered a weed in North America. It tends to sprawl across the ground, and will need to be cut back to be maintained.
Check with regulations in your area before planting purslane; in some regions it is considered an invasive weed.
Culinary Uses
All parts of Purslane are edible: leaves, flowers, and stem. It has a slightly sweet and sour flavor and a chewy texture. It is commonly eaten fresh, cooked, or in soups and stews.
Interesting Facts
Purslane is sometimes known as the Dolly Parton flower because of when it blooms--from 9 a.m. to 5 p.m.

Purslane is a good source of Omega-3 fatty acids and Vitamins A and C.
It is considered a edible plant in Mexican, Russian, and Mediterranean cultures, among others.
0
0
文章
Miss Chen
2018年08月29日

The Hawaiian ti, or Cordyline fruticosa, is a lovely plant, distinctive with dark maroon leaves that emerge from the top of tall canes. It grows naturally not only in the Pacific Islands, but in tropical areas of Asia and Australia, and has become a popular houseplant. Ti plant is a fast grower, and before you know it, it can reach heights of more than 3 feet. Occasional pruning will keep the ti plant healthy, neat, shapely, and within its boundaries.

Step 1
Begin with a pair of sharp garden pruners, which won't be likely to tear the tender tissues of the plant. Clean the pruners with a mixture of one part water to nine parts household bleach. Working with clean shears will prevent bacteria or disease from spreading from plant to plant.
Step 2
Remove brown, yellow, shriveled or distorted leaves as they appear, as the ti plant will attempt to repair the damaged leaves at the expense of the rest of the plant. Dead and diseased leaves can also invite insects and mildew. Groom the ti plant as the need arises to prevent the need for more drastic pruning.

Step 3
Trim the ti plant to control the size if it grows too large, or to maintain the ti's pleasant shape. It's safe to cut the ti plant it back as much as 6 inches from the top of the soil. Hold the stalk steady in one hand and prune the stalk the desired height with sharp garden shears. Although cutting down to 6 inches may seem drastic, healthy new shoots will grow from the remaining shoot.

Step 1
Begin with a pair of sharp garden pruners, which won't be likely to tear the tender tissues of the plant. Clean the pruners with a mixture of one part water to nine parts household bleach. Working with clean shears will prevent bacteria or disease from spreading from plant to plant.
Step 2
Remove brown, yellow, shriveled or distorted leaves as they appear, as the ti plant will attempt to repair the damaged leaves at the expense of the rest of the plant. Dead and diseased leaves can also invite insects and mildew. Groom the ti plant as the need arises to prevent the need for more drastic pruning.

Step 3
Trim the ti plant to control the size if it grows too large, or to maintain the ti's pleasant shape. It's safe to cut the ti plant it back as much as 6 inches from the top of the soil. Hold the stalk steady in one hand and prune the stalk the desired height with sharp garden shears. Although cutting down to 6 inches may seem drastic, healthy new shoots will grow from the remaining shoot.
0
0
文章
Miss Chen
2018年08月29日

Fragrant lavender (Lavandula angustifolia) supplies year-round garden interest, with aromatic flowers in summer and gray-green evergreen foliage. The small shrubs grow in U.S. Department of Agriculture plant hardiness zones 5 through 9, where they thrive with very little maintenance beyond pruning. The right time and method for pruning depends on the age of the plant and the type of trim it needs.
Spring Pruning
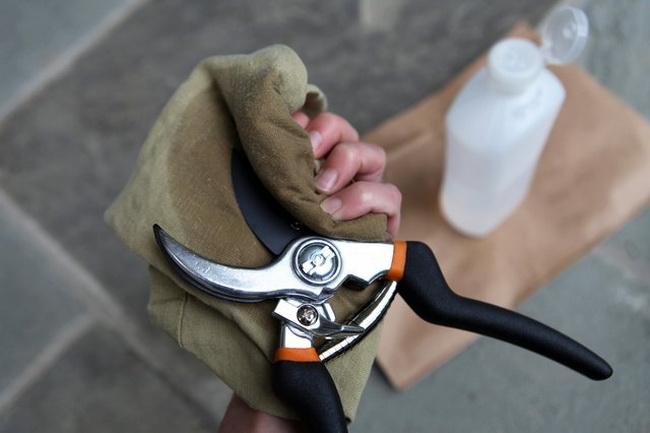
New plants need to be pruned in spring when new green growth has appeared. Spring pruning prevents flowering but encourages branching, allowing the new lavender to develop strong roots and a full framework of branches. Before pruning, wipe the shears with a cloth soaked in isopropyl alcohol to disinfect them, and then disinfect the shears each time you begin pruning a new plant. Cut back the stem tips by 2 to 3 inches, lightly shaping to maintain an even, rounded shape.
Deadheading and Harvest

Lavender may flower a second time if you prune off the old flowers after the first flush of summer blooms. Prune off the flowers a second time in late summer if the plant flowers again. Deadhead after the flowers open and begin to wilt if you want lavender blooms in the garden. For harvesting and drying, cut off the flowers when only two or three buds on the flower spikes have opened. Trim out the spikes with disinfected shears, cutting the stem so the cut end is inside the main bush and not visible. For harvesting, tie the harvested spikes together in bundles and hang them in a dark, dry area until the buds are completely dry.
Summer Shaping
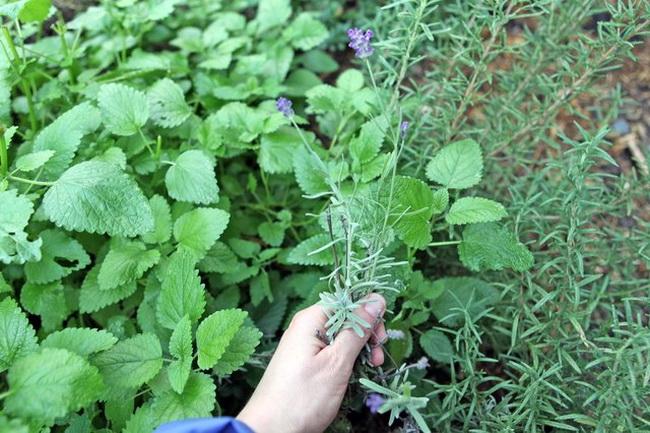
Main pruning occurs in summer, after the flower harvest. Cut back up to one-third of the leafy section of the stems, shaping the lavender into an evenly rounded mound as you prune. Avoid cutting into the woody stem bases. Lavender will not regrow from the lower stem sections, so cutting into wood will leave bare spots in the bush and weaken the lavender. Although summer, after the plant flowers, is the best time to prune, you can prune into late summer or early fall. However, avoid pruning in late fall because frost can damage the new growth encouraged by pruning.
Rejuvenating Woody Plants
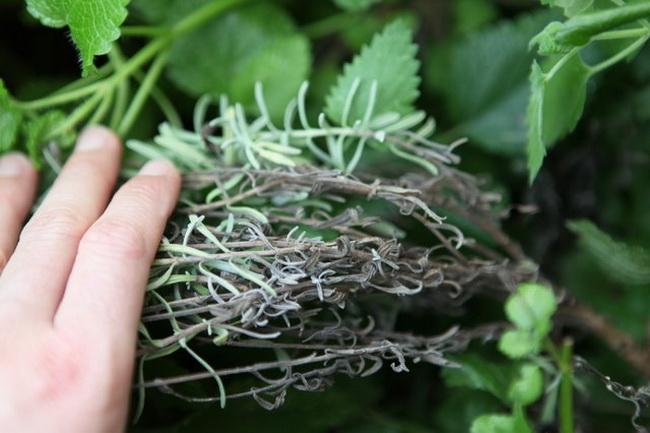
Woody, overgrown lavender plants develop sparse foliage and may fall open, or split. In most cases replacement is the best option, but you may be able to rejuvenate the lavender with careful pruning. Prune for rejuvenation in spring when new growth begins showing on the stems. Cut back all the green stems to within 1 inch of the woody portion at the base, but don't remove the green completely. The lavender may produce fuller growth in response.
Spring Pruning

New plants need to be pruned in spring when new green growth has appeared. Spring pruning prevents flowering but encourages branching, allowing the new lavender to develop strong roots and a full framework of branches. Before pruning, wipe the shears with a cloth soaked in isopropyl alcohol to disinfect them, and then disinfect the shears each time you begin pruning a new plant. Cut back the stem tips by 2 to 3 inches, lightly shaping to maintain an even, rounded shape.
Deadheading and Harvest

Lavender may flower a second time if you prune off the old flowers after the first flush of summer blooms. Prune off the flowers a second time in late summer if the plant flowers again. Deadhead after the flowers open and begin to wilt if you want lavender blooms in the garden. For harvesting and drying, cut off the flowers when only two or three buds on the flower spikes have opened. Trim out the spikes with disinfected shears, cutting the stem so the cut end is inside the main bush and not visible. For harvesting, tie the harvested spikes together in bundles and hang them in a dark, dry area until the buds are completely dry.
Summer Shaping

Main pruning occurs in summer, after the flower harvest. Cut back up to one-third of the leafy section of the stems, shaping the lavender into an evenly rounded mound as you prune. Avoid cutting into the woody stem bases. Lavender will not regrow from the lower stem sections, so cutting into wood will leave bare spots in the bush and weaken the lavender. Although summer, after the plant flowers, is the best time to prune, you can prune into late summer or early fall. However, avoid pruning in late fall because frost can damage the new growth encouraged by pruning.
Rejuvenating Woody Plants

Woody, overgrown lavender plants develop sparse foliage and may fall open, or split. In most cases replacement is the best option, but you may be able to rejuvenate the lavender with careful pruning. Prune for rejuvenation in spring when new growth begins showing on the stems. Cut back all the green stems to within 1 inch of the woody portion at the base, but don't remove the green completely. The lavender may produce fuller growth in response.
0
0
文章
Miss Chen
2018年08月29日

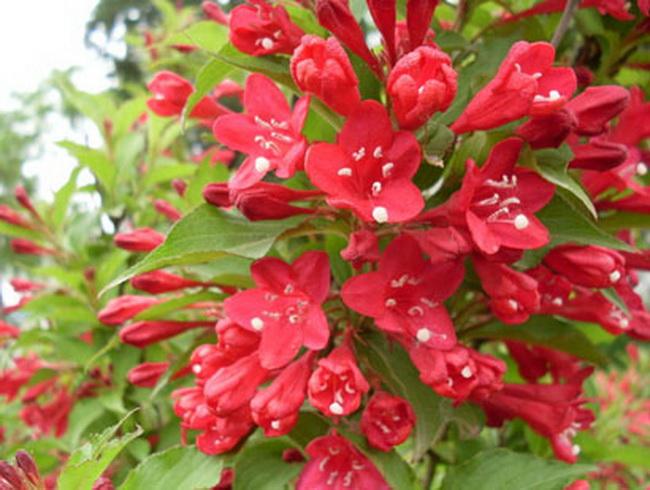
If you're growing a weigela (Weigela spp.) or you're thinking of planting one, you probably know that it's an especially easy-to-grow shrub. A tough plant that has masses of colorful flowers in late spring or early summer, a weigela is cold-tolerant and grows in U.S. Department of Agriculture plant hardiness zones 4 through 9, depending on the variety. Whatever type of weigela you grow, it's a good idea to give it a bit of extra care as winter approaches and at winters end to help keep it flourishing.
Fall Preparation
Although a weigela is a deciduous plant that drops its leaves in fall, its roots continue functioning for a while and don't become dormant as quickly as the top growth. Because of this, it's important to support good root growth during fall, especially if your weigela is newly planted. Continue watering the shrub during fall, giving it extra water whenever the top 1 to 2 inches of its soil feel dry to the touch. Moist soil also tends to stay warm longer than dry soil, so watering through fall helps keep the roots warm.
Adding a 6- or 8-inch layer of organic mulch, such as straw or shredded bark, in fall helps conserve soil moisture and keeps roots growing as long as possible. In cold-winter areas, mulch also protects the plant from freeze-thaw cycles that cause the ground to expand and contract. These cycles can heave roots out of the ground and damage them.
Winter Sun Damage
Because a weigela has no leaves in winter, its stems are susceptible to a problem called sun scald, which happens when sun heats up the bark on bright but cold days, stimulating activity in the stem that can be followed by tissue damage when the sun goes down and the stem is chilled. This is especially likely in a young or recently transplanted shrub, or in one planted where its south-facing side is unprotected. If sun scald develops, you'll see dried or cracked bark, or areas on a stem that are sunken or shriveled.
You can help prevent sun scald by wrapping the larger stems on a weigela with a commercial tree wrap or a light-colored plastic tree guard. If your weigela is bushy and has only thin stems that aren't easily wrapped, provide some shade on the south-facing side by stapling a sheet of burlap to two or three stakes driven into the ground near the south-facing side of the shrub.
At Winter's End
Although weigela is a hardy plant, it's prone to winter dieback, especially in areas with harsh winters. Because of this, it's a good idea to examine the plant at the end of winter and prune off any dead stems.

Double-check stems that look dead by scratching the bark with a fingernail. If tissue under the bark is greenish white, the stem is healthy, but dry tissue indicates the stem has died back.
Remove dead stems by cutting into healthy tissue behind the damaged part, using sharp shears or a pruning knife that you wipe with rubbing alcohol between each cut to prevent spreading disease.
You can also remove any broken or damaged branches at the end of winter, but a weigela has its heaviest flowering in spring on the previous season's growth, so it's best you don't prune heavily in winter to preserve flower buds. If your shrub is older and overgrown, you can stimulate its growth by pruning off a few large branches at the end of winter. Cut these off near the shrub's base to let light into its interior so new shoots can form.

Fall Preparation
Although a weigela is a deciduous plant that drops its leaves in fall, its roots continue functioning for a while and don't become dormant as quickly as the top growth. Because of this, it's important to support good root growth during fall, especially if your weigela is newly planted. Continue watering the shrub during fall, giving it extra water whenever the top 1 to 2 inches of its soil feel dry to the touch. Moist soil also tends to stay warm longer than dry soil, so watering through fall helps keep the roots warm.
Adding a 6- or 8-inch layer of organic mulch, such as straw or shredded bark, in fall helps conserve soil moisture and keeps roots growing as long as possible. In cold-winter areas, mulch also protects the plant from freeze-thaw cycles that cause the ground to expand and contract. These cycles can heave roots out of the ground and damage them.
Winter Sun Damage
Because a weigela has no leaves in winter, its stems are susceptible to a problem called sun scald, which happens when sun heats up the bark on bright but cold days, stimulating activity in the stem that can be followed by tissue damage when the sun goes down and the stem is chilled. This is especially likely in a young or recently transplanted shrub, or in one planted where its south-facing side is unprotected. If sun scald develops, you'll see dried or cracked bark, or areas on a stem that are sunken or shriveled.
You can help prevent sun scald by wrapping the larger stems on a weigela with a commercial tree wrap or a light-colored plastic tree guard. If your weigela is bushy and has only thin stems that aren't easily wrapped, provide some shade on the south-facing side by stapling a sheet of burlap to two or three stakes driven into the ground near the south-facing side of the shrub.
At Winter's End
Although weigela is a hardy plant, it's prone to winter dieback, especially in areas with harsh winters. Because of this, it's a good idea to examine the plant at the end of winter and prune off any dead stems.

Double-check stems that look dead by scratching the bark with a fingernail. If tissue under the bark is greenish white, the stem is healthy, but dry tissue indicates the stem has died back.
Remove dead stems by cutting into healthy tissue behind the damaged part, using sharp shears or a pruning knife that you wipe with rubbing alcohol between each cut to prevent spreading disease.
You can also remove any broken or damaged branches at the end of winter, but a weigela has its heaviest flowering in spring on the previous season's growth, so it's best you don't prune heavily in winter to preserve flower buds. If your shrub is older and overgrown, you can stimulate its growth by pruning off a few large branches at the end of winter. Cut these off near the shrub's base to let light into its interior so new shoots can form.
0
0
文章
Miss Chen
2018年08月27日

Poinsettias produce deep red blooms in winter, adding color to holiday tables. A tropical perennial plant, poinsettias can survive and bloom for many years with proper care. Poinsettias do not require high levels of light, one of the reasons they are favored as a potted plant. The flowers of the poinsettia are actually modified leaf structures called bracts. Once these have wilted and begun to die off, the poinsettia requires a thorough pruning. Poinsettias may also require some trimming throughout the growing season in order to remain full and healthy.

Step 1
Trim off the leaves on each poinsettia stem once the plant finishes blooming in March, leaving just three to four leaves on each stem. Cut the stems back to half their former height with shears.
Step 2
Trim off the top of each stem when they are 4 to 6 inches long in summer. Cut off the top 1/2 inch of each tip, as this helps the poinsettia grow full and bushy.
Step 3
Trim off the growing tips on each stem a second time in August if the stems have put on at least an additional 5 inches of growth since the last pruning.

Step 4
Cut out any damaged or dead leaves throughout the growing period. Remove these where they emerge from the stems.

Step 1
Trim off the leaves on each poinsettia stem once the plant finishes blooming in March, leaving just three to four leaves on each stem. Cut the stems back to half their former height with shears.
Step 2
Trim off the top of each stem when they are 4 to 6 inches long in summer. Cut off the top 1/2 inch of each tip, as this helps the poinsettia grow full and bushy.
Step 3
Trim off the growing tips on each stem a second time in August if the stems have put on at least an additional 5 inches of growth since the last pruning.

Step 4
Cut out any damaged or dead leaves throughout the growing period. Remove these where they emerge from the stems.
0
1
文章
Miss Chen
2018年08月27日

Fill patio planters and pots with hydrangeas (Hydrangea spp.) in spring for a summer full of flowers. Hydrangeas grow in U.S. Department of Agriculture plant hardiness zones 3 through 9 depending on the species, and they range in size from 3 to 9 feet tall. Two varieties that grow well in containers are big leaf hydrangea (Hydrangea macrophylla), hardy in USDA zones 5 through 9, and mountain hydrangea (Hydrangea serrata), hardy in USDA zones 6 through 9. While spring is the best time to plant, you can pot up hydrangeas anytime through summer.

The Right Planter
When selecting a planter for hydrangeas, consider both aesthetics and functionality. You can choose the material of the planter based on aesthetics, such as wood, colored plastic, terracotta or glazed ceramic, but it must have drainage holes. Terracotta and wood dry out more rapidly, so if watering is an issue in your area, consider plastic or glazed ceramic. Some new pots come with a plug in the bottom covering the drainage hole. Make sure to pop it out before planting hydrangeas.
Look for a planter or pot 2 to 4 inches bigger in diameter than the nursery pot or planter the hydrangea is in.
Disinfecting Pots and Planters
Clean and disinfect both new and old planters before planting.
Dump out old dirt and give the pot a scrub with detergent and water to remove any soil particles.
Fill a bucket or trough -- make sure its large enough to submerge the planter -- with a 9-to-1 water-to-bleach solution.
Soak the old planters for 10 to 15 minutes.
Remove the planter and wash it with soapy water, then rinse.
Allow the pot to air-dry before potting up your new hydrangeas.
Large planters are difficult to soak because it's not always easy to find something large enough for full submersion. An alternative method is to seal the drain holes temporarily -- try duct tape -- then fill the container up to the top with the bleach solution. Allow it to sit in the pot for 10 minutes, then drain, remove the tape, wash, rinse and allow to dry.
Acidic Potting Blend
Hydrangeas like acidic potting soil. Use peat moss to increase the acidity of regular potting soil. Use equal parts of each, and blend them thoroughly before planting. If the peat moss is dry, soak it in a bucket of water overnight, then drain out the excess water before mixing it with potting soil.

Scoop two to three handfuls of potting medium into the bottom of the container to form a base for the root ball.
Potting Up
Gently wiggle the hydrangea out of the nursery pot, handling it by the roots, and set it on top of the peat moss and potting soil blend. Add or take out material from the bottom of the pot until the top of the root ball is 3 inches below the edge of the pot. Fill in around the roots with additional damp peat moss, bringing the level up to the base of the stalks.
Place potted hydrangeas in full morning sun with light afternoon shade. For an indoor plant, set it in a room with bright morning light but no direct afternoon sun.
Water and Fertilizer
Water potted hydrangeas immediately after planting, then each time the potting mix starts to dry out 1 inch deep. Soak the potting mix until a little extra leaks out the drainage hole in the bottom. That way you know the water penetrated through to the bottom.
Fertilize right after planting, then every two weeks, with a complete water-soluble fertilizer. Dilute 3/4 tablespoon in 1 1/2 gallons of water and use it, along with additional water if necessary, to water the potting soil of outdoor plants.
Repot in Spring
Repot hydrangeas in early spring before new growth starts using a blend of equal parts peat moss and potting soil. Gently tease the root ball out of the container and brush of excess dirt to expose the outer roots. Check for rot or mushy spots and pull apart roots that circle the root ball. Repot in the same planter, or go up a pot size if the root ball is crowded in the old planter.

The Right Planter
When selecting a planter for hydrangeas, consider both aesthetics and functionality. You can choose the material of the planter based on aesthetics, such as wood, colored plastic, terracotta or glazed ceramic, but it must have drainage holes. Terracotta and wood dry out more rapidly, so if watering is an issue in your area, consider plastic or glazed ceramic. Some new pots come with a plug in the bottom covering the drainage hole. Make sure to pop it out before planting hydrangeas.
Look for a planter or pot 2 to 4 inches bigger in diameter than the nursery pot or planter the hydrangea is in.
Disinfecting Pots and Planters
Clean and disinfect both new and old planters before planting.
Dump out old dirt and give the pot a scrub with detergent and water to remove any soil particles.
Fill a bucket or trough -- make sure its large enough to submerge the planter -- with a 9-to-1 water-to-bleach solution.
Soak the old planters for 10 to 15 minutes.
Remove the planter and wash it with soapy water, then rinse.
Allow the pot to air-dry before potting up your new hydrangeas.
Large planters are difficult to soak because it's not always easy to find something large enough for full submersion. An alternative method is to seal the drain holes temporarily -- try duct tape -- then fill the container up to the top with the bleach solution. Allow it to sit in the pot for 10 minutes, then drain, remove the tape, wash, rinse and allow to dry.
Acidic Potting Blend
Hydrangeas like acidic potting soil. Use peat moss to increase the acidity of regular potting soil. Use equal parts of each, and blend them thoroughly before planting. If the peat moss is dry, soak it in a bucket of water overnight, then drain out the excess water before mixing it with potting soil.

Scoop two to three handfuls of potting medium into the bottom of the container to form a base for the root ball.
Potting Up
Gently wiggle the hydrangea out of the nursery pot, handling it by the roots, and set it on top of the peat moss and potting soil blend. Add or take out material from the bottom of the pot until the top of the root ball is 3 inches below the edge of the pot. Fill in around the roots with additional damp peat moss, bringing the level up to the base of the stalks.
Place potted hydrangeas in full morning sun with light afternoon shade. For an indoor plant, set it in a room with bright morning light but no direct afternoon sun.
Water and Fertilizer
Water potted hydrangeas immediately after planting, then each time the potting mix starts to dry out 1 inch deep. Soak the potting mix until a little extra leaks out the drainage hole in the bottom. That way you know the water penetrated through to the bottom.
Fertilize right after planting, then every two weeks, with a complete water-soluble fertilizer. Dilute 3/4 tablespoon in 1 1/2 gallons of water and use it, along with additional water if necessary, to water the potting soil of outdoor plants.
Repot in Spring
Repot hydrangeas in early spring before new growth starts using a blend of equal parts peat moss and potting soil. Gently tease the root ball out of the container and brush of excess dirt to expose the outer roots. Check for rot or mushy spots and pull apart roots that circle the root ball. Repot in the same planter, or go up a pot size if the root ball is crowded in the old planter.
0
0
文章
Miss Chen
2018年08月27日

Hostas (Hosta spp.) are usually prized for their foliage, but yellow and brown leaves are not the most desirable of rewards. Growing in U.S. Department of Agriculture plant hardiness zones 3 through 8, they thrive in rich, moist soil and can tolerate full shade. Healthy hostas glow in shades of blue, green, gold and cream. Unfortunately, that fabulous foliage will fade if hostas are cared for improperly or are damaged by pests or diseases.

The Root of the Problem
Anything that damages the roots of hostas can cause yellow and brown leaves. The damaged roots are unable to absorb nutrients and water, and as a result, the plant suffers or even dies, depending on the extent of the damage. Although hostas prefer moist, cool soils, heavy and wet soil in spring and winter can lead to root rot -- a fungal disease that rots away the roots. Well-drained soil is a must for these plants, and pots containing hostas should have a hole in the bottom to allow for good drainage. Burrowing animals, such as voles, can also damage the roots of the plants. Voles prefer to create their tunnels under lawns, mulch and areas with loose soil, so try planting your hostas among tree roots or near other underground barriers that will naturally block tunneling animals.
Let There Be Light
Many home gardeners use hostas to brighten up shady corners of their gardens, but hostas are brighter when they receive some sunlight. They key here is knowing how much is too much. Some hostas are much more tolerant of direct sunlight than others. Too much hot, direct sunlight can scorch the leaves of some varieties, causing them to turn yellow and brown. Choose varieties that can withstand the sun, such as "Sun Power" hybrids. In general, home gardeners in USDA zones 6 and above should avoid planting hostas in direct sunlight, according to the Missouri Botanical Gardens website. Making sure your hostas get enough water during hot, dry periods can also help.
Vexing Viruses
Hostas can sometimes suffer from something called "Virus X," which causes the leaves to develop dark spots, rings, browning or twisting of the leaves. Unfortunately, there is no cure for this disease. In addition, these symptoms often mimic those of spontaneous mutations, or sports, which some home gardeners find desirable. In general, however, it's best to remove plants that suffer from these symptoms, especially if they appear all over the plant. If they appear in just one section of the plant or on only a few leaves, you can just remove those leaves.

Frustrating Fungi
Fungi don't just affect the roots of hosta plants. They can also damage the stems and leaf petioles. In fact, petiole rot is a common and serious affliction of hostas. When this happens, the leaves are cut off from the main stem and are unable to receive nutrients. They turn yellow and brown, and pull away easily from the plant. Southern blight, which rots the stem, and anthracnose, which usually attacks the leaves themselves, are also fungal diseases that can cause hosta foliage to turn yellow and brown. Avoid these problems as best you can by watering at the ground level, rather than from overhead, and by watering early in the morning so that the sun can dry off the leaves. Overcrowded conditions can also contribute to fungal diseases, so make sure air can circulate around your hosta plants.

The Root of the Problem
Anything that damages the roots of hostas can cause yellow and brown leaves. The damaged roots are unable to absorb nutrients and water, and as a result, the plant suffers or even dies, depending on the extent of the damage. Although hostas prefer moist, cool soils, heavy and wet soil in spring and winter can lead to root rot -- a fungal disease that rots away the roots. Well-drained soil is a must for these plants, and pots containing hostas should have a hole in the bottom to allow for good drainage. Burrowing animals, such as voles, can also damage the roots of the plants. Voles prefer to create their tunnels under lawns, mulch and areas with loose soil, so try planting your hostas among tree roots or near other underground barriers that will naturally block tunneling animals.
Let There Be Light
Many home gardeners use hostas to brighten up shady corners of their gardens, but hostas are brighter when they receive some sunlight. They key here is knowing how much is too much. Some hostas are much more tolerant of direct sunlight than others. Too much hot, direct sunlight can scorch the leaves of some varieties, causing them to turn yellow and brown. Choose varieties that can withstand the sun, such as "Sun Power" hybrids. In general, home gardeners in USDA zones 6 and above should avoid planting hostas in direct sunlight, according to the Missouri Botanical Gardens website. Making sure your hostas get enough water during hot, dry periods can also help.
Vexing Viruses
Hostas can sometimes suffer from something called "Virus X," which causes the leaves to develop dark spots, rings, browning or twisting of the leaves. Unfortunately, there is no cure for this disease. In addition, these symptoms often mimic those of spontaneous mutations, or sports, which some home gardeners find desirable. In general, however, it's best to remove plants that suffer from these symptoms, especially if they appear all over the plant. If they appear in just one section of the plant or on only a few leaves, you can just remove those leaves.

Frustrating Fungi
Fungi don't just affect the roots of hosta plants. They can also damage the stems and leaf petioles. In fact, petiole rot is a common and serious affliction of hostas. When this happens, the leaves are cut off from the main stem and are unable to receive nutrients. They turn yellow and brown, and pull away easily from the plant. Southern blight, which rots the stem, and anthracnose, which usually attacks the leaves themselves, are also fungal diseases that can cause hosta foliage to turn yellow and brown. Avoid these problems as best you can by watering at the ground level, rather than from overhead, and by watering early in the morning so that the sun can dry off the leaves. Overcrowded conditions can also contribute to fungal diseases, so make sure air can circulate around your hosta plants.
0
0
文章
Miss Chen
2018年08月26日

With more than 400 species, Aloe is one of the largest groups of succulents. The most widely planted aloe, Aloe vera, is a favorite house plant and has naturalized in North Africa, India, the Caribbean, South America, and other frost-free areas, according to the Cactus and Succulent Society of America. Originating largely in Africa and the Arabian Peninsula, aloe is grown primarily for its spiky leaves, but many aloes also produce flowers.

Aloe vera
The aloe vera plant is the most familar and widely cultivated aloe. Gel from inside aloe vera leaves is used as a first aid treatment for burns, herbal remedies, food supplements, and in cosmetics. Succulent grayish green leaves up to 20 inches long grow from a dense rosette at the plant's base. Aloe vera produces offset pups, which are propagated and grow to adult size in individual containers.
Tree aloes
The largest African tree aloe is Aloe barberae, reaching almost 50 feet high with a stem diameter of approximately 3 feet. Unlike aloe vera, propagation is usually from seeds or stem cuttings. Another tree aloe is Aloe dichotoma (quiver tree). The quiver tree can grow to 30 feet. Native to South Africa and Namibia, tree roots are used in traditional medicine to treat asthma and tuberculosis.
Mountain aloes
Aloe marlothii is known as the mountain aloe. Described by Kew Gardens as "one of the most iconic of the hundreds of aloes occurring in Africa," this species fills South African hillsides with hundreds of plants. This is a tall aloe, 6 to 12 feet tall and rosette crown. Leaves are dull green with numerous short spikes on leaf edges and flat surfaces. Some ethnomedical uses of Aloe marlothii leaf gel include treating internal parasites in humans and livestock.

Miniature aloes
Miniature aloes include Aloe descoingsii, labeled the world's smallest aloe. A native of Madagascar, individual heads are approximately 1 1/2 inches across. Triangular leaves with whitish specks sit below small orange flowers. A little bigger is Aloe jucunda, with heads slightly larger than 2 inches. Another miniature aloe is Aloe haworthioides, with 2-inch heads, dark green leaves and hairy bristles.

Aloe vera
The aloe vera plant is the most familar and widely cultivated aloe. Gel from inside aloe vera leaves is used as a first aid treatment for burns, herbal remedies, food supplements, and in cosmetics. Succulent grayish green leaves up to 20 inches long grow from a dense rosette at the plant's base. Aloe vera produces offset pups, which are propagated and grow to adult size in individual containers.
Tree aloes
The largest African tree aloe is Aloe barberae, reaching almost 50 feet high with a stem diameter of approximately 3 feet. Unlike aloe vera, propagation is usually from seeds or stem cuttings. Another tree aloe is Aloe dichotoma (quiver tree). The quiver tree can grow to 30 feet. Native to South Africa and Namibia, tree roots are used in traditional medicine to treat asthma and tuberculosis.
Mountain aloes
Aloe marlothii is known as the mountain aloe. Described by Kew Gardens as "one of the most iconic of the hundreds of aloes occurring in Africa," this species fills South African hillsides with hundreds of plants. This is a tall aloe, 6 to 12 feet tall and rosette crown. Leaves are dull green with numerous short spikes on leaf edges and flat surfaces. Some ethnomedical uses of Aloe marlothii leaf gel include treating internal parasites in humans and livestock.

Miniature aloes
Miniature aloes include Aloe descoingsii, labeled the world's smallest aloe. A native of Madagascar, individual heads are approximately 1 1/2 inches across. Triangular leaves with whitish specks sit below small orange flowers. A little bigger is Aloe jucunda, with heads slightly larger than 2 inches. Another miniature aloe is Aloe haworthioides, with 2-inch heads, dark green leaves and hairy bristles.
1
0


