文章
Micky
2017年05月23日


Come Fourth of July, most of us spend that day outdoors. It’s a great time to show your patriotic pride by making some outdoor 4th of July decor for your yard and garden. We’ve found some cool projects for you that are fun, easy and great for the kids to help on as well. So fly your flag and get out the red, white and blue! It’s Fourth of July!
Our featured project, above – ‘A Diamond in the Stuff’ has a project that just might be the best use for a wood pallet I’ve seen yet. Try her wood flag wreath… This could be a great porch decoration all year round!
From ‘Sunshine Girl Crafts’, this outdoor “fireworks” display is made from simple 4×4 wood scraps, some paint and a little dollar store froo froo!

‘For the Love Of’ has a simple tutorial to create these DIY patriotic luminaries with tissue paper…great craft with the kids!

‘Pink and Green Mama’ made these DIY 4th of July lawn stars with her kids…flour and water, and a homemade stencil… this is festive and fun!

This easy to make patriotic bunting from ‘Create and Babble’ will have your front porch just oozing the red, white and blue!

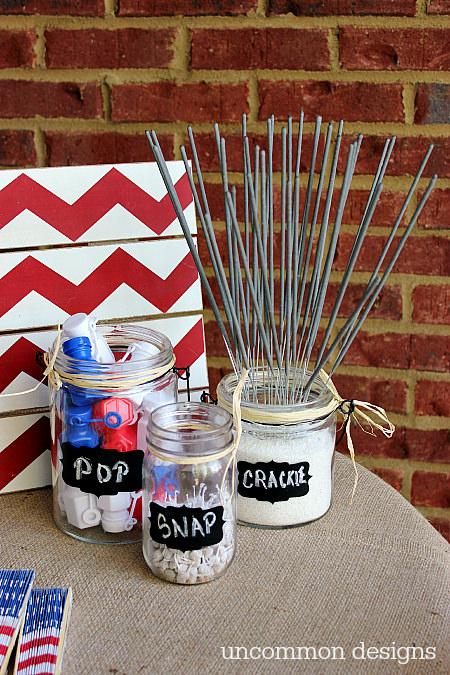
Set up this cool fun and games station by ‘Uncommon Designs’, and make sure all the kids make those wonderful summer memories at your 4th celebration.
Ehow has this cute cupcake liner wreath tutorial… you might even find all these supplies at your dollar store. Fun!

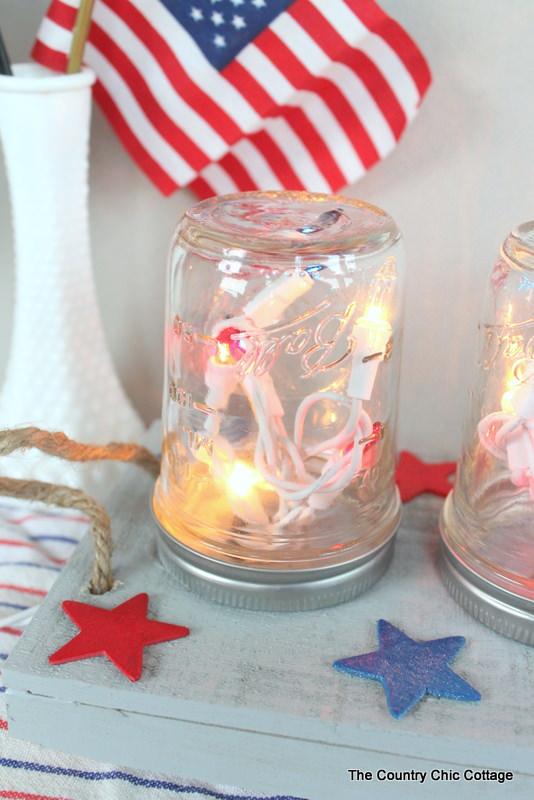
Love, love, love this DIY mason jar centerpiece by ‘Country Chic Cottage’… Lighted and amazing, you could use this year after year!
Our final project is by ‘Addicted 2 DIY’, these DIY patriotic jar lanterns are easy, and I love the glow they put off when lit at night.


What are your fav outdoor Fourth of July decorations? Share!
0
0
文章
小马奥
2017年05月23日

If you’re looking for some OFFBEAT ideas for growing plants indoors or outdoors, these DIY hanging planter ideas are worth looking at!To give your garden a playful look, you need to be creative and what’s better than some offbeat planters made from unused home items hanging in line and beautiful plants trailing from them.1. DIY Hanging Terrarium

The DIY hanging terrarium planter is perfect for keeping indoors, and it looks awesome. With a few supplies and plants, you can do this without any difficulty following the steps. Visit this website and this ONE too, to learn everything.
2. DIY Birdcage Planter

Add a little whim to your garden by adding a birdcage planter. You can also hang it on your balcony. The step by step article is available here!
3. Hanging Purse Garden

Repurpose old and damaged purses into a beautiful hanging garden. Keep the plants in their pots so you can easily slip them out to drain excess moisture. You can also line the purse with plastic to keep the purse from getting wet.
4. Hanging Seashell Planter

You’ll need some big conch shells, threads to tie, soil, trailing succulents or you can also use air plants. See more INCREDIBLE SEASHELL planter ideas here!
5. DIY Mason Jar Hanging Planter

The Mason jars are so versatile; we also added a few ideas here! This DIY mason jar planter is not hanging but actually clamped, a wonderful idea. We found it on Allison Patrick’s blog. Here’s an another link to a different DIY post!
6. Hanging Hat Planter

If you have a few old hats, use them for this bizarre idea. Hang your planters from a wall, cut a hole into the top of the hat of the size of plant stems. Now slide the stems out through the hole so that it’ll look like plants are growing in hats, your planter is ready. Allow a few days for plants to grow around the hat to see the natural display.
7. Hanging Plastic Bottle Planter

Simple idea for upcycling old plastic bottles and turn them into beautiful hanging plant pots. Check out the tutorial here.
8. Creative Hanging Planter

We found this DIY tutorial on Bloglovin and loved it. Although the tutorial is not available in English, you can translate it using Google translate.
9. DIY Hanging Air Plant Holder

Impressive DIY for indoors. This unique plant holder is cool to display air plants. The step by step tutorial is available on Squirrelly Minds.
10. Tin Can Hanging Planter

If you have tin cans in your homes that you’re about to throw, make use of them to grow annuals, succulents or herbs and hang them. So many DIY tutorials available if you search the web. One of its kind is here!
11. Hanging Gloves Planters

If you love to surprise your visitors, this idea is for you. Just plant the plants in small pots and place them in gloves. Hang the gloves on a wall, on a tree or a rope.
12. DIY Hanging Planters Out of Metal Bowls

These hanging planters are so unique and made of metal bowls. It’s a sexy idea, to learn step by step– Visit A Beautiful Mess
13. Ice Cream Cone DIY Hanging Planter

A fun DIY hanging planter idea for Ice cream lovers. You can make a planter like this for under 10$. The complete tutorial is available on Brit.co.
14. Hanging Tire Planter

Old Tire Uses in the garden are popular, and one of the best ways to use an old tire in the garden is to make it a hanging tire planter. See the DIY tutorial here!
15. DIY Plastic Bottle Hanging Planter

If you love recycling projects, take a look at this DIY at PopSugar! You can also look at 13 Plastic Bottle Recycling Ideas here.
16. Hanging Tray Planter

Make this easy hanging succulent planter with a tray or shallow pot, succulents, threads, and candles. To make it, just plant the succulents in a tray that has holes on sides to hang (or drill a few holes). Hang the tray with the help of threads. You can also put some candles, burn those candles in the night to create an astonishing effect. Ensure you do not hang this in a windy spot.

The DIY hanging terrarium planter is perfect for keeping indoors, and it looks awesome. With a few supplies and plants, you can do this without any difficulty following the steps. Visit this website and this ONE too, to learn everything.
2. DIY Birdcage Planter

Add a little whim to your garden by adding a birdcage planter. You can also hang it on your balcony. The step by step article is available here!
3. Hanging Purse Garden

Repurpose old and damaged purses into a beautiful hanging garden. Keep the plants in their pots so you can easily slip them out to drain excess moisture. You can also line the purse with plastic to keep the purse from getting wet.
4. Hanging Seashell Planter

You’ll need some big conch shells, threads to tie, soil, trailing succulents or you can also use air plants. See more INCREDIBLE SEASHELL planter ideas here!
5. DIY Mason Jar Hanging Planter

The Mason jars are so versatile; we also added a few ideas here! This DIY mason jar planter is not hanging but actually clamped, a wonderful idea. We found it on Allison Patrick’s blog. Here’s an another link to a different DIY post!
6. Hanging Hat Planter

If you have a few old hats, use them for this bizarre idea. Hang your planters from a wall, cut a hole into the top of the hat of the size of plant stems. Now slide the stems out through the hole so that it’ll look like plants are growing in hats, your planter is ready. Allow a few days for plants to grow around the hat to see the natural display.
7. Hanging Plastic Bottle Planter

Simple idea for upcycling old plastic bottles and turn them into beautiful hanging plant pots. Check out the tutorial here.
8. Creative Hanging Planter

We found this DIY tutorial on Bloglovin and loved it. Although the tutorial is not available in English, you can translate it using Google translate.
9. DIY Hanging Air Plant Holder

Impressive DIY for indoors. This unique plant holder is cool to display air plants. The step by step tutorial is available on Squirrelly Minds.
10. Tin Can Hanging Planter

If you have tin cans in your homes that you’re about to throw, make use of them to grow annuals, succulents or herbs and hang them. So many DIY tutorials available if you search the web. One of its kind is here!
11. Hanging Gloves Planters

If you love to surprise your visitors, this idea is for you. Just plant the plants in small pots and place them in gloves. Hang the gloves on a wall, on a tree or a rope.
12. DIY Hanging Planters Out of Metal Bowls

These hanging planters are so unique and made of metal bowls. It’s a sexy idea, to learn step by step– Visit A Beautiful Mess
13. Ice Cream Cone DIY Hanging Planter

A fun DIY hanging planter idea for Ice cream lovers. You can make a planter like this for under 10$. The complete tutorial is available on Brit.co.
14. Hanging Tire Planter

Old Tire Uses in the garden are popular, and one of the best ways to use an old tire in the garden is to make it a hanging tire planter. See the DIY tutorial here!
15. DIY Plastic Bottle Hanging Planter

If you love recycling projects, take a look at this DIY at PopSugar! You can also look at 13 Plastic Bottle Recycling Ideas here.
16. Hanging Tray Planter

Make this easy hanging succulent planter with a tray or shallow pot, succulents, threads, and candles. To make it, just plant the succulents in a tray that has holes on sides to hang (or drill a few holes). Hang the tray with the help of threads. You can also put some candles, burn those candles in the night to create an astonishing effect. Ensure you do not hang this in a windy spot.
1
1
文章
Juze
2017年05月22日

Learn how to grow dragon fruit, it’s one of the most strange looking subtropical fruit you’d like to grow in your garden. Growing dragon fruit is fairly easy both outdoors or in the pot.

USDA Zones— 9 to 11
Propagation Method — Seeds, vegetative propagation
Difficulty — Moderate
Soil pH — 6 to 7
Other names — Indonesia buah naga, Khmer sror kaa neak, Thai kaeo mangkon, nanettika fruit, Kaktus madu, Long guo, Cereus triangularis, Thanh long, Strawberry Pear, Cactus fruit, Night blooming Cereus, Belle of the Night, Jesus in the Cradle.
Dragon fruit, also known as pitahaya or pitaya, belongs to the cactus family. Its flowers are unique and one among the largest in the world. It has a diameter of 25 cm and is about 30 cm long. One more feature of its bloom is: it only opens for one night and exudes inviting fruity fragrance.
Growing Regions
Dragon fruit is native to Central America and grown throughout the subtropical and tropical part of China, Israel, Vietnam, Malaysia, Thailand and
Nicaragua.
How to Plant and Grow Dragon Fruit
Dragon fruit plant is actually a climbing cactus and needs support to climb on, usually as the plant becomes mature it forms aerial roots from the branches and find something to climb. So, it’s best if you’re growing dragonfruit, find something to support your plant.
Dragon fruit is a sub tropical plant, it loves heat and sun but it’s better to plant it in a spot that remains dry and receives only partial sun.
If you’re living in more temperate climate or if you’re an urban gardener and don’t have much space, grow dragon fruit in pot, it’s fairly easy to grow and adapts itself well in containers. In pot you can move and overwinter it to save from frost as pitaya plant can survive only short period of freezing temperature (below 28 F is detrimental) and frost.
PropagationGrowing Dragon Fruit from Seed
With a knife, divide dragon fruit in half and scoop out the black seeds from the pulp. Wash the pulp off the seeds. Put these seeds on a moist paper towel and leave them overnight.
Fill the germinating tray or small pot with well draining but poor starting mix. You can make it yourself by mixing one part peat and one part perlite. Sprinkle the seed on soil surface and cover that with a thin layer of growing medium that barely covers the seeds.
Thoroughly moisten the soil using sprayer and cover the pot with plastic wrap. Keep the soil moist until seeds germinate, which will take around 15 to 30 days.
After the seeds germinate, uncover the plastic and transplant them to bigger pots when necessary.
Growing Dragon Fruit from Cuttings
To learn how to propagate dragon fruit from cuttings, read this.
Soil
For growing dragonfruit, well draining soil that is sandy is better. A mixture of sand in garden soil would be appropriate. It is forgiving to poor soil.
Water
Since the dragon fruit is a cactus, water it moderately with care like you do with other succulents. Water only when soil dries out completely.
Fertilizer for Growing Dragonfruit
Fertilize dragon fruit with balanced fertilizer every month when the plant is active in its growing season. Stop fertilizing in winter if growing in colder climate. Application of aged manure or compost can also be done time to time.
Dragon Fruit Pollination
Many dragon fruit varieties are self pollinating but there are some that requires cross pollination. If your dragon fruit is unable to do self pollination, you’ll need to grow two or more dragon fruit plants closely for cross pollination. As dragon fruit flowers are nocturnal, its pollination depends on moths and bats. For assurance, you can also do self pollination at night.
Harvest
Harvest dragon fruit when its skin color changes from bright green to red or pink. Its fruit is oval to ovate in shape and 10 to 15 cm long and forms 30 to 50 days after flowering.
Pericarp of dragon fruit is rough and scaly and is usually pink in color. However, there are also red, or yellow dragon fruits depending on the variety. The flesh is located in the interior is white and contains black seeds.
Pests and Diseases

USDA Zones— 9 to 11
Propagation Method — Seeds, vegetative propagation
Difficulty — Moderate
Soil pH — 6 to 7
Other names — Indonesia buah naga, Khmer sror kaa neak, Thai kaeo mangkon, nanettika fruit, Kaktus madu, Long guo, Cereus triangularis, Thanh long, Strawberry Pear, Cactus fruit, Night blooming Cereus, Belle of the Night, Jesus in the Cradle.
Dragon fruit, also known as pitahaya or pitaya, belongs to the cactus family. Its flowers are unique and one among the largest in the world. It has a diameter of 25 cm and is about 30 cm long. One more feature of its bloom is: it only opens for one night and exudes inviting fruity fragrance.
Growing Regions
Dragon fruit is native to Central America and grown throughout the subtropical and tropical part of China, Israel, Vietnam, Malaysia, Thailand and
Nicaragua.
How to Plant and Grow Dragon Fruit
Dragon fruit plant is actually a climbing cactus and needs support to climb on, usually as the plant becomes mature it forms aerial roots from the branches and find something to climb. So, it’s best if you’re growing dragonfruit, find something to support your plant.
Dragon fruit is a sub tropical plant, it loves heat and sun but it’s better to plant it in a spot that remains dry and receives only partial sun.
If you’re living in more temperate climate or if you’re an urban gardener and don’t have much space, grow dragon fruit in pot, it’s fairly easy to grow and adapts itself well in containers. In pot you can move and overwinter it to save from frost as pitaya plant can survive only short period of freezing temperature (below 28 F is detrimental) and frost.
PropagationGrowing Dragon Fruit from Seed
With a knife, divide dragon fruit in half and scoop out the black seeds from the pulp. Wash the pulp off the seeds. Put these seeds on a moist paper towel and leave them overnight.
Fill the germinating tray or small pot with well draining but poor starting mix. You can make it yourself by mixing one part peat and one part perlite. Sprinkle the seed on soil surface and cover that with a thin layer of growing medium that barely covers the seeds.
Thoroughly moisten the soil using sprayer and cover the pot with plastic wrap. Keep the soil moist until seeds germinate, which will take around 15 to 30 days.
After the seeds germinate, uncover the plastic and transplant them to bigger pots when necessary.
Growing Dragon Fruit from Cuttings
To learn how to propagate dragon fruit from cuttings, read this.
Soil

For growing dragonfruit, well draining soil that is sandy is better. A mixture of sand in garden soil would be appropriate. It is forgiving to poor soil.
Water
Since the dragon fruit is a cactus, water it moderately with care like you do with other succulents. Water only when soil dries out completely.
Fertilizer for Growing Dragonfruit
Fertilize dragon fruit with balanced fertilizer every month when the plant is active in its growing season. Stop fertilizing in winter if growing in colder climate. Application of aged manure or compost can also be done time to time.
Dragon Fruit Pollination
Many dragon fruit varieties are self pollinating but there are some that requires cross pollination. If your dragon fruit is unable to do self pollination, you’ll need to grow two or more dragon fruit plants closely for cross pollination. As dragon fruit flowers are nocturnal, its pollination depends on moths and bats. For assurance, you can also do self pollination at night.
Harvest
Harvest dragon fruit when its skin color changes from bright green to red or pink. Its fruit is oval to ovate in shape and 10 to 15 cm long and forms 30 to 50 days after flowering.
Pericarp of dragon fruit is rough and scaly and is usually pink in color. However, there are also red, or yellow dragon fruits depending on the variety. The flesh is located in the interior is white and contains black seeds.
Pests and Diseases
0
0
文章
Abigal
2017年05月22日

The great outdoors and food just kinda go together, don’t they? Think camping, picnics, and of course, BBQ’s! So instead of schlepping all your food, dishes and cooking prep through the house over and over, how about making yourself an amazing outdoor kitchen or grilling station? The cook in your life will be out where the people are, and those who are helping with the prep won’t be stuck indoors. Ok, there is also that cool feeling of cooking outside. Don’t know what it is, it’s kind of a primal, survival deal. It just tastes better and feels oh so satisfying! So let’s do it! Tackle one of these DIY projects this weekend, and wait for the jealous ooo’s and ahhh’s from your guests!

Our feature project above, is a DIY outdoor serving center from ‘Build Something’. The tutorial has complete plans and cutting instructions. We love that this is made of cedar, and also the sliding top that can still be used as a counter when it’s open. And it’s a pretty piece of furniture too!
Wanna have everything you need to grill at your fingertips? AND have room to set things while you are at the BBQ? This DIY rolling outdoor island has complete building plans and instructions, from Elisha at ‘Pneumatic Addict’. This one has it all, and it rolls out of the way when not in use too!

This DIY grill station from Angela at ‘Unexpected Elegance’ is ah-mazing! Why? She not only made it practical, it’s pretty! She used stone veneer over a sheet metal frame that she created herself. A lot of value for a weekend project! Easy instructions with photos.

This patio cooler stand from ‘Eddie and Steph‘ is a great idea, with a short little tutorial. A DIY’er with some projects under their belt could take this idea and make it amazing! There is nothing worse than having to go inside every 5 minutes for more drinks!

Here is another idea straight from a Pinterest user… Using a dorm fridge to make an outdoor refrigerator in a really pretty box! (See similar project with plans at the end!)

These DIY outdoor concrete countertops are kind of a two parter… The actual concrete counter how-to is from ‘Kara Paslay’, but you will find a general tutorial on making a countertop for outdoors at ‘HomeDit‘. This is a more permanent outdoor kitchen design that can add value to your home.

From ‘Old World Garden Farms’ via ‘Hometalk’, this rustic outdoor summer kitchen is the perfect look for a farm style home. (Or one where you just want to add some rustic charm!) Photos and instructions. We are loving’ on that corrugated metal!

Our last two are from one of our favorite woodworker sites, ‘Ana White’. This BBQ built in was uploaded by one of her readers, and unfortunately they did not share which of Ana’s free plans they used! (You can search on the site though!)

This last one is a wooden cooler stand from ‘Ana White‘ done by ‘Birds and Soap, and this time, we found the tutorial to make this outdoor cooler project. Be sure to scroll down to find the drawings and plans. Which version would you make?


Our feature project above, is a DIY outdoor serving center from ‘Build Something’. The tutorial has complete plans and cutting instructions. We love that this is made of cedar, and also the sliding top that can still be used as a counter when it’s open. And it’s a pretty piece of furniture too!
Wanna have everything you need to grill at your fingertips? AND have room to set things while you are at the BBQ? This DIY rolling outdoor island has complete building plans and instructions, from Elisha at ‘Pneumatic Addict’. This one has it all, and it rolls out of the way when not in use too!

This DIY grill station from Angela at ‘Unexpected Elegance’ is ah-mazing! Why? She not only made it practical, it’s pretty! She used stone veneer over a sheet metal frame that she created herself. A lot of value for a weekend project! Easy instructions with photos.

This patio cooler stand from ‘Eddie and Steph‘ is a great idea, with a short little tutorial. A DIY’er with some projects under their belt could take this idea and make it amazing! There is nothing worse than having to go inside every 5 minutes for more drinks!

Here is another idea straight from a Pinterest user… Using a dorm fridge to make an outdoor refrigerator in a really pretty box! (See similar project with plans at the end!)

These DIY outdoor concrete countertops are kind of a two parter… The actual concrete counter how-to is from ‘Kara Paslay’, but you will find a general tutorial on making a countertop for outdoors at ‘HomeDit‘. This is a more permanent outdoor kitchen design that can add value to your home.

From ‘Old World Garden Farms’ via ‘Hometalk’, this rustic outdoor summer kitchen is the perfect look for a farm style home. (Or one where you just want to add some rustic charm!) Photos and instructions. We are loving’ on that corrugated metal!

Our last two are from one of our favorite woodworker sites, ‘Ana White’. This BBQ built in was uploaded by one of her readers, and unfortunately they did not share which of Ana’s free plans they used! (You can search on the site though!)

This last one is a wooden cooler stand from ‘Ana White‘ done by ‘Birds and Soap, and this time, we found the tutorial to make this outdoor cooler project. Be sure to scroll down to find the drawings and plans. Which version would you make?

0
0
文章
Abigal
2017年05月22日

Nothing is better than soft, natural lighting while spending time outdoors in the evening hours. I don’t know about you, but I prefer my garden lighting to have some character! Lighting in the garden is really important if you spend any time outdoors after the sun goes down, and it should definitely be more than switching on a porch light. We found these DIY projects that show us how to make these unique garden lanterns perfect for that spring night or that winter holiday glow, or any night in between!
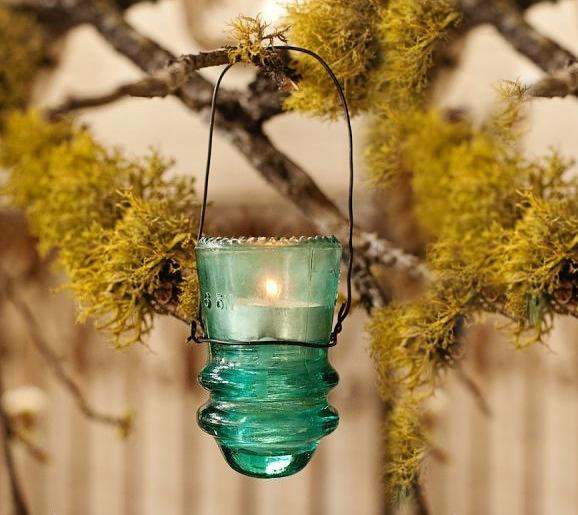
Recently we came across this great idea for using old insulators to create one of a kind garden lanterns at ‘Vintage Ambience‘, a vintage rental company in the Seattle area. We love these because of the soft color, the gentle glow, the re-purposing of the insulators and the easy and quick nature of the project itself! These old style insulators can be found at antique shops or architectural salvage. There are a few that have become collectable and are quite expensive, but you can still find plenty in the ten dollar range or less. Here’s how to make a unique garden lantern!
Step one: Using floral wire, encircle the middle of the insulator with a “girdle” of wire, twist to secure and then bend back the excess wire onto itself.
Step two: Create a large loop with the wire for the “handle” of the lantern. Attach to the wire on each side to the “girdle” , twist to secure, bend back if necessary.
Step three: Fill the opening with a little sand, then drop a votive candle into the top of the insulator. Hang and light! Easy, unique way to add wonderful garden lighting for any time of year. We love this project!
Ananda at ‘Piece of Rainbow’ has a complete tutorial for her DIY faux metal star lanterns. These lanterns are made from card stock! She has a complete downloadable pattern for this project for you too. Obviously, these can’t be left out in the weather, but can you imagine them for a party or BBQ? Love these!

These Pottery Barn inspired Hyannis lanterns from Lo at ‘A Lo and Behold Life’ have a really cool coastal vibe, but I think they would fit into a lot of garden spaces. The rope gives it an organic feel, and the project is easy enough with good directions and photos! Check out her home tour while you are there… Pretty!

So any of you who have been around for awhile know that we love a good glass of wine out in the garden. Preferably red, from right up the road here here in Washington state, but hey, that’s another subject! So when we saw this hanging wine bottle lantern from ‘First Step Designs‘ on Etsy, we were quite ready to have some shipped right out. (And still may, BTW! Great price for these!) If you want to try your hand at DIY’ing this, try this tutorial on ‘Instructables‘.

These DIY candle lanterns from Allison at ‘It’s Toile Good’ are an inexpensive project. Do you recognize those dollar store vases? Finally, something cool to do with them! Good instructions and photos.

Finally, we love these Pottery Barn knock off sea glass hanging votives from Johnnie at ‘Saved by Love Creations’. She made these for $3! Since PB’s version costs $60, I think this is a tutorial well worth popping over to, don’t you?

1
0
文章
Abigal
2017年05月21日


We love living outdoors as much as possible, but in order to live outdoors, you need to have a spot to do that living! That pretty much requires furniture, which can be pricey, cheap looking, or just plain not work for your needs. These brilliant DIY outdoor furniture projects will make sure you always have a place to sit, cook, serve, and even just set down your glass of wine or lemonade! Give one (or all of them) a try to make your outside spaces more comfortable for your family and friends to wile away those warm afternoons and evenings. Our feature project above, is from ‘DIY Candy’. This Williams Sonoma inspired DIY outdoor bench is just what you need for extra seating on the deck, or to tuck in a little garden nook for an afternoon breather. Such a nice, clean look to this project! Great tutorial! Oh, and did we mention? They did this for $35!
We found this tutorial for this really awesome DIY pallet rustic table from ‘Inspire Me Heather’ via ‘The 36Th Avenue’… What a great way to repurpose, and make something really useable and full of charm. I can see this with more modern chairs, or paired with poufs on a simple patio!

From ‘Design Confidential’ this Chesapeake double lounger is exactly what Steve and I need… This is an amazing DIY project, because it looks very high end. Could you touch this in a place like “Room and Board” for less than $700? Find the link for the free plans in the first paragraph!

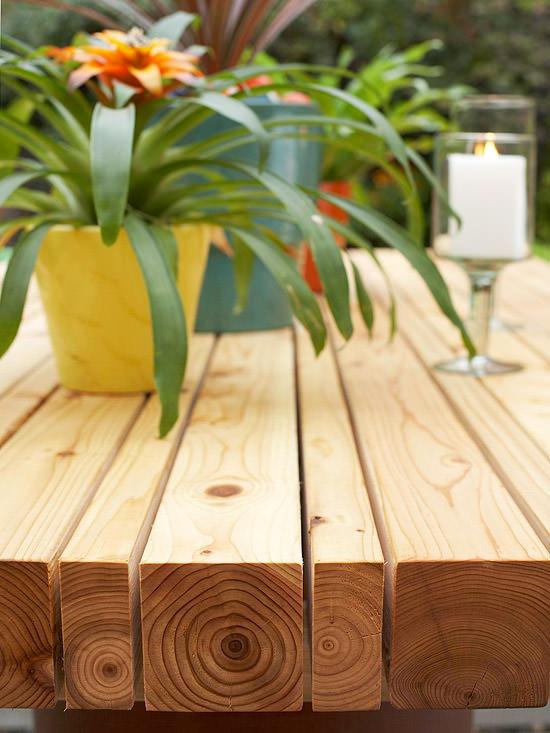
This DIY picnic table from ‘BHG’ is one of my fav outdoor table designs… Not only do I LOVE the base, but using wood of different sizes makes the piece look simple, yet really interesting all at the same time. Pretty simple table top!
From “Home Dzine”, this pine garden love seat is a great project for using out in the garden, or better yet, in a spot with a view of the garden! Complete supply list along with these plans.

Remember when I mentioned having a place to set that glass of wine? This DIY concrete side table totally fits the bill for me. Yes, please! Love this look. From ‘Store Front Life’, lot’s of step by step photos and instructions.

So if you have been reading us for awhile, you know we are HUGE fans of Ana White. She is one amazing woodworker, DIY’er, and all around brilliant artist with building furniture. And the best part for you guys? She’s gives out free plans, instructions, and even shares her readers versions of her projects! So we are featuring several of her projects next…Why? ‘Cause she is that good.
This grill table with stainless top was made by one of her readers, Krochelle… We believe it was modified from her sturdy work bench plans. Be sure to read both, because Krochelle does offer a lot of tips on how she did this version in the comments. Also, there are other versions of this done by other readers on her site… lot’s of opportunities to personalize your project here!

Build this Adirondack stool or end table from Ana White’s free plans! Be sure to scroll down to find the drawings and instructions. I love the bright colors she used on these!

This cedar ladder garden planter is our last project for today from Ana, and it is the perfect way to bring a touch of the garden up to eye level for these outdoor living spaces. As always, GREAT instructions for this project!

0
0
文章
Abigal
2017年05月21日


It’s pretty tough to enjoy summer activities in a backyard that bakes in the afternoon heat. We all need a way to get out of the sun, but still be able to spend time outdoors. We found these 9 clever DIY ways to a shady backyard oasis for you to help turn your space into a retreat! We didn’t want to just share the same ol’ wood pergolas (though if thats what you are looking for, check out our post on DIY pergolas!) so we hope these unique and creative shade structure ideas hit the shady spot!
Our feature project above, is a DIY drop cloth fabric shade cover made by ‘Anything Pretty’. Check out her tutorial, it took them just a couple of hours to get this up, and made over their old pergola! LOVE the globe lights woven through the shades.
Here is another tutorial for a fabric shade by ‘Koiphen’. Good close up photos here to help you understand the wire system for holding the shades.

From ‘J and B Marvin’, this DIY fabric pergola has a quick tutorial, and a lot of good tips. Same type of system as the project above. This is fully retractable too!
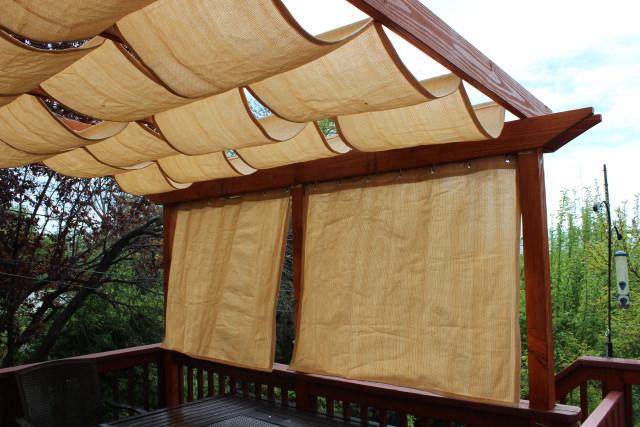
Ok, so you need Google Translate for this one, unless you read Dutch. At least, I think it’s Dutch! But I love this one, because it’s a freestanding DIY fabric pergola that can be put up even where there is no existing structure. From ‘VT Wonen’.

Hope you were paying attention to those tutorials, ’cause these next few ideas don’t have instructions, but they follow the same principles of the ones you’ve seen so far! This space from ‘InDecora‘ has a simple wire mounted fabric shade, with grommets to string the cable through. Grommet kits can be bought at craft and sewing stores, and this could be made out of sturdy canvas drop cloths from the hardware store.


Same idea as some of the projects above with this slide wire canopy from ‘Superior Awning’.

From Jamie Durie of ‘HGTV‘, these sliding canvas panels are mounted and slide the same way as the fabric ones above. There are eye hooks mounted on the frame of the panels, and the wire cable slides through the hooks, over the top of the panel. These can be moved to cover different areas of the space as the sun moves.

Also from ‘HGTV‘, covering sections of your existing pergola with canvas cloth makes a more permanent shade structure. Clever!

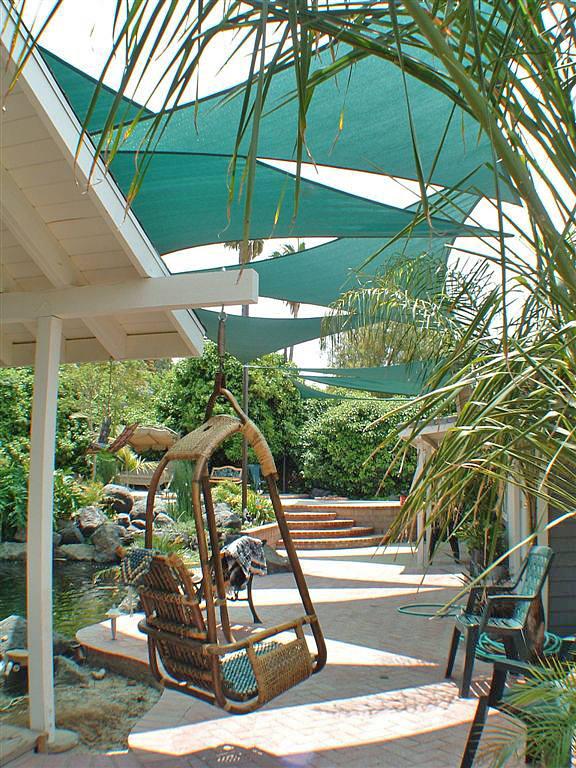
Finally, if you want a cool look for over your patio, or even your pool, think about using shade sails. They come in triangular and rectangular shapes of different sizes, and are attached to posts, trees or buildings with hooks and cables. Check out our post on how to hang shade sails for more info on this project!
0
0
文章
Abigal
2017年03月15日

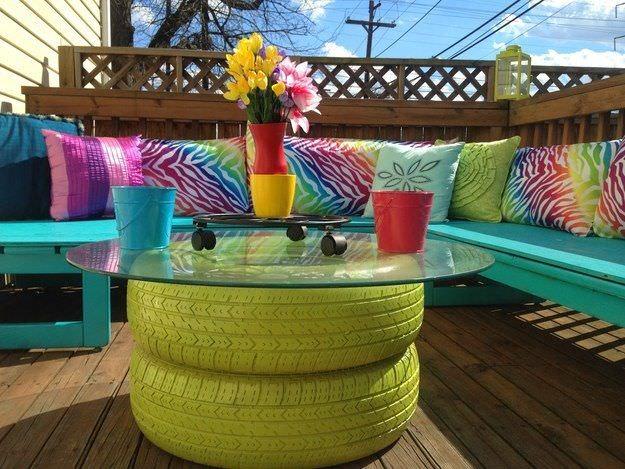
Backyard furniture can be just as important as the furniture in your living room these days… after all, we have finally embraced the outdoors as another room on it’s own! Make sure your backyard space has furniture with a personality that tells a story about you and your family… Are you creative, adventurous, ingenious, or perhaps a little ‘uptown girl’? We have a great selection of super cool backyard furniture projects that you can DIY for your garden! Our featured project is shown above. This tire coffee table from ‘Madcap Frenzy’ may or may not be your cup o’ tea, but you have to admire the creativity! Love the bright colors!
‘Homemade Modern’ made this log lounger for $30 and in 6 hours… scroll down the page to see all the step by step photos, and they even have a how to video!

‘Apartment Therapy’ shows us how to make a flower pot table out of two pots and a pizza pan! (Oh, and a little bit of spray paint!)

This daybed lounger from ‘vtwonen’ looks like a very expensive piece of furniture. The whole tutorial is there, problem is, it’s in Dutch! Luckily, you can go to Google Translate and be able to read the instructions.

If you are like me, you might be getting a little tired of the “DIY pallet” phenomenon… but you have to admit, its clever, cheap and upcycling! Once in while a project catches our eye that makes it worth including, and this DIY pallet furniture by ‘Bridgman’ is! Ok, the view might have swayed us a little…

This fence bench by ‘The Brick House’ is my favorite piece of the post! It’s made from old fence boards, and I love the modern mid century legs to add an upscale and trendy feel. Click through to see it used indoors as well.

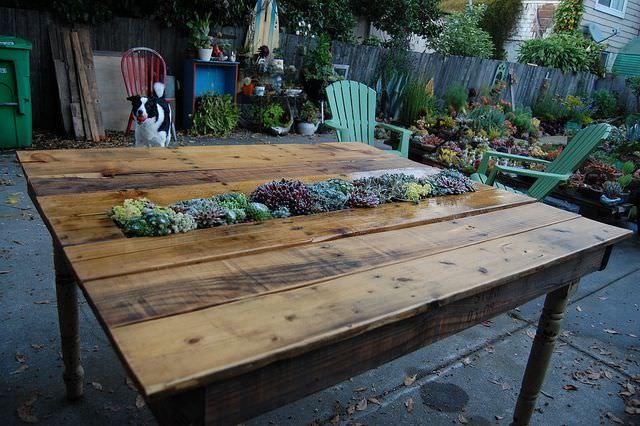
Another pallet project that made the grade, this pallet succulent table by ‘Far Out Flora’ was made for the Sunset test gardens!
This crate storage table by Beckie at ‘Infarrantly Creative’ (we love her!) is not only a vintage looking piece you would love to have, it stores as well! Tuck a reading blanket in there for cool and sunny fall afternoons…

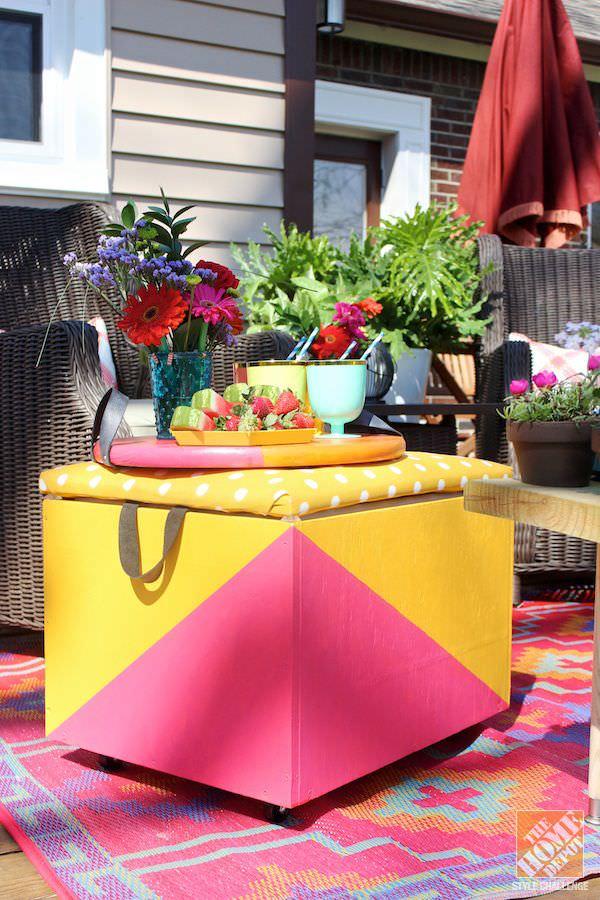
From Home Depot, this rolling cooler ottoman is both those things, and a shot of bright color for a tired fall garden!
Our last two projects we are including for inspiration… they are both DIY’able but they don’t have complete tutorials… this is where that wonderful loved one who is good with their hands will be really appreciated!
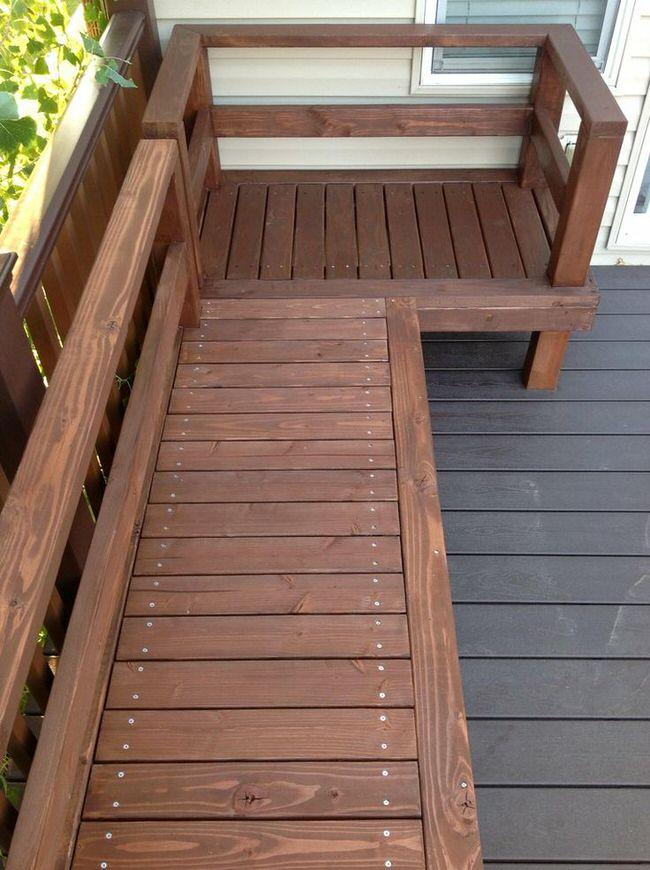
This deck bench has a very short explanation of how it was made, but all out of 2×4’s…
Watch a video of the DIY magnetic pallet chair… could you DIY this? So clever! You can purchase this chair at Uncommon Goods.

0
1
文章
Abigal
2017年03月14日


I think I started my love affair with the outdoors, and the garden, when I was a kid playing outdoors until the street lights came on and my bare feet were tired. Kids need to be outdoors from a young age, but they also need to be able to play with the security of a watchful eye, and that usually means at home. If you want the outdoors to compete with the computer, the video games and the cell phones, you might want to consider making at least one of these incredible DIY kids outdoor play-sets. Yes, these are all DIY and have complete tutorials with them, and most are less expensive than buying the boring pre-made versions from Home Depot. So let’s get right to it, because we have a bunch of them for you! swing sets, play houses, sand boxes, and more fun ideas… Your kids and grandkids are gonna LOVE us!
Our featured project, above, is a modern a-frame swing set from HGTV Gardens. They have step by step photos, a complete materials list… This is a simple project with a cool look. SO much better than a rusty old swing set!
Want to hear your kids squeal like crazy when you surprise them with this DIY handmade hideaway from The Handmade Home? All the instructions! I want this! :)

This is a larger DIY wooden kids playset that has free plans and materials list. It’s a little more expensive, we priced it out at around $500 in our area, but it’s large, and will last!

Make this deluxe DIY sandbox with this complete tutorial from Small + Friendly! And it’s covered!

Try this Pottery Barn inspired sandbox by Life in the Dub Lane… All the instructions you need! Oh, did I mention they did it for $65?

This DIY backyard swing set by Our Everyday Art is amazing with it’s details… steering wheel, telescope… even climbing rocks! Find out exactly how to make it!

Make this swing set tire ladder from the plans at Exploring Domesticity.

Get all the details on how to make an outdoor chalkboard from Bringing Home Ezra… Look how happy that sweet little boy is!

Learn to make a willow den from Raising Sparks. This looks like something I would have loved as a kid…I’m still looking for ways to have my “Secret Garden”.

Most kids I know would love this sprinkler water toy made from pvc pipe… All the instructions are here for you.

Great alternative to a slip and slide… this giant squishy play mat from Mommies Made Me Do It! They give good instructions and it’s inexpensive to make.

Ok, last one, even though I could do this all day! Little boys and girls will love to have fun in the sun with their own outdoor play track. Find out how at Shelve It!
0
0
文章
Abigal
2017年02月22日

In the late summer and fall, as the sun sets earlier but the gorgeous weather still keeps us #outdoors , the need for cool #garden lighting arises. No one wants to run out and install a lighting system just because sunset comes a little sooner! We have five great #DIY garden lighting ideas that are easy enough for any beginner, and can be done in time for your weekend BBQ! Check out these lighting projects anyone can do!

Paint Cans
Luminaries are an easy DIY lighting project, and can be done with everything form recycled kitchen aluminum cans, to empty paint cans you can pick up at the home improvement store. There are two methods…
Trace a design on the outside of the can with pencil, or a use a stencil. You can use a drill to drill holes into the can following the pattern. This is best for larger cans.
For smaller cans, fill with water and freeze. Now while still frozen, use a hammer and nail to punch the pattern into the can. Allow cans to melt, (in a sink or outdoors!) empty and dry.
Paint with spray paint of your choice, pop in a candle, and there you go!

Pot Rack Chandelier
This one is a pretty easy one if you have an overhead structure or tree. Simply hang an old pot rack (Or an old iron grate, sled, or even a small pallet) from chains and sturdy hooks. Place a variety of potted plants and candles onto the rack. Light the candles. Enjoy a wonderful, or even romantic evening!

Recycled Torches
Love these garden torches by In My Own Style! They have a great tutorial but short version is that this is a budget friendly lighting project that is way cool, and recycles too! Think about painting them in brights or metallics…


Globe String Lights
Have you noticed those fancy string lights in the stores (even Target) can run $25 for one string? Pick up raffia balls at the dollar store, then string through white holiday lights. Done, for less than a couple bucks!


Glowing Orbs
Finally, from The Art of Doing Stuff is this tutorial on glowing orbs, made for less than $3! Simply find old glass globes from the thrift store (We have a project coming up at TGG that utilizes these, so stock up!) and holiday lights! Love this!


Summer isn’t over ’til it’s over folks! Create a space for your family to spill over into the outdoors well into fall with these easy garden DIY projects.

Paint Cans
Luminaries are an easy DIY lighting project, and can be done with everything form recycled kitchen aluminum cans, to empty paint cans you can pick up at the home improvement store. There are two methods…
Trace a design on the outside of the can with pencil, or a use a stencil. You can use a drill to drill holes into the can following the pattern. This is best for larger cans.
For smaller cans, fill with water and freeze. Now while still frozen, use a hammer and nail to punch the pattern into the can. Allow cans to melt, (in a sink or outdoors!) empty and dry.
Paint with spray paint of your choice, pop in a candle, and there you go!

Pot Rack Chandelier
This one is a pretty easy one if you have an overhead structure or tree. Simply hang an old pot rack (Or an old iron grate, sled, or even a small pallet) from chains and sturdy hooks. Place a variety of potted plants and candles onto the rack. Light the candles. Enjoy a wonderful, or even romantic evening!

Recycled Torches
Love these garden torches by In My Own Style! They have a great tutorial but short version is that this is a budget friendly lighting project that is way cool, and recycles too! Think about painting them in brights or metallics…


Globe String Lights
Have you noticed those fancy string lights in the stores (even Target) can run $25 for one string? Pick up raffia balls at the dollar store, then string through white holiday lights. Done, for less than a couple bucks!


Glowing Orbs
Finally, from The Art of Doing Stuff is this tutorial on glowing orbs, made for less than $3! Simply find old glass globes from the thrift store (We have a project coming up at TGG that utilizes these, so stock up!) and holiday lights! Love this!


Summer isn’t over ’til it’s over folks! Create a space for your family to spill over into the outdoors well into fall with these easy garden DIY projects.
0
0
GFinger
2016年07月19日

TIPS📝
We take an interest in gardening for a variety of reasons—higher quality produce, exercise in the great outdoors etc.
When you're just getting started, gardening can be intimidating.GFinger will help you learn the basics, starting with these steps.
Step 1: Gather Your Gear
Proper tools provide us more comfort and efficiency, which means less work for us!
Here's what you'll need to get started.
1 Trowel - Used for weeding and digging small holes.
2 Gardening gloves - As much as we like getting our hands dirty, we don’t like getting them that dirty. A good pair of gloves can also protect your hands from bugs and prickly plants and weeds.
3 Sun hat - For UV protection, make sure this is wide-brimmed and cinches.
4 Watering can or hose – What you need will vary depending on your garden’s water needs and proximity to your water source.
5 Wheelbarrow - For larger gardens, you'll need one to transport mulch, dirt, and compost.
6 Roundhead shovel - For digging larger holes.
7 Rake - Ideal for spreading mulch, and gathering or transporting debris that has collected around your garden and between plants.
8 Shears - Use to prune away browning leaves or snipping herbs.
9 Pitchfork - This is an essential tool if you are creating a compost heap or pile.
Continued…


6
0


